Western Blot Protein Transfer: A Complete Guide from Principles to Troubleshooting
This comprehensive guide details the critical process of transferring proteins from gel to membrane in western blotting, a foundational technique for researchers and drug development professionals.
Western Blot Protein Transfer: A Complete Guide from Principles to Troubleshooting
Abstract
This comprehensive guide details the critical process of transferring proteins from gel to membrane in western blotting, a foundational technique for researchers and drug development professionals. It covers core principles of electroblotting, compares wet, semi-dry, and dry transfer methodologies, and provides advanced optimization strategies for challenging proteins. The article includes systematic troubleshooting for common transfer failures and validation techniques to ensure reproducible, high-quality data for biomedical research and clinical applications.
Protein Transfer Fundamentals: Understanding the Core Principles of Western Blotting
Electroblotting, or electrophoretic transfer, is a pivotal step in western blotting that enables the detection and analysis of proteins separated by gel electrophoresis. This process uses an electric field to drive the migration of proteins from within the polyacrylamide gel onto a solid-support membrane, where they become accessible for probing with specific antibodies [1]. The fundamental principle relies on the fact that proteins, having been denatured and imparting a uniform negative charge from sodium dodecyl sulfate (SDS), will migrate towards the positively charged anode when an electric current is applied [1] [2]. The successful execution of this transfer is paramount, as it directly influences the sensitivity, specificity, and overall quality of the final immunoblot data [3].
The significance of electroblotting lies in its ability to render proteins accessible for immunodetection. While polyacrylamide gels are ideal for separating complex protein mixtures based on molecular weight, their matrix is fragile and not conducive to the efficient binding and washing steps required for antibody-based detection. Transferring the separated proteins to a robust membrane, such as nitrocellulose or polyvinylidene difluoride (PVDF), creates a stable, two-dimensional replica of the gel's protein pattern, facilitating subsequent analytical steps [1]. The efficiency of this transfer is influenced by numerous factors, including the properties of the proteins of interest, the composition of the gel and transfer buffer, the type of membrane, and the specific transfer methodology employed [1] [3].
The following diagram illustrates the assembly of a standard wet electroblotting transfer apparatus and the direction of protein migration.
Electroblotting Methodologies: A Comparative Analysis
The two most prevalent electroblotting techniques are wet (tank) transfer and semi-dry transfer, with dry transfer emerging as a more recent innovation. The choice of method involves a trade-off between transfer efficiency, convenience, and suitability for different protein types [3] [4].
Wet Transfer is often considered the gold standard for its reliability and high efficiency across a broad molecular weight range [3]. In this method, the gel-membrane sandwich is fully submerged in a tank filled with transfer buffer and positioned between parallel electrodes. This setup efficiently dissipates heat, allowing for high-intensity transfers over longer periods, which is particularly beneficial for the complete elution of high molecular weight (HMW) proteins (>150 kDa) from the gel matrix [3] [4]. However, this method requires larger volumes of buffer and is more time-consuming.
Semi-Dry Transfer offers a faster and more convenient alternative. The gel-membrane stack is sandwiched between two plate electrodes that have been moistened with a small volume of transfer buffer [3]. This system is quicker and uses less reagent but can generate more heat and has historically been less efficient for transferring HMW proteins, though modern systems and improved consumables have mitigated this issue [3] [4].
Dry Transfer is a buffer-free system that uses pre-stacked consumables for rapid protein transfer. Systems like the iBlot 2 Gel Transfer Device can complete transfers in as little as 7-10 minutes. While highly convenient, this method offers less flexibility in consumables compared to traditional systems [3] [4].
Table 1: Comparison of Electroblotting Methodologies
| Feature | Wet (Tank) Transfer | Semi-Dry Transfer | Dry Transfer |
|---|---|---|---|
| Principle | Gel/membrane submerged in buffer tank [3] | Gel/membrane between wet filter papers & plate electrodes [3] | Gel/membrane in integrated, buffer-free stack [3] |
| Typical Duration | 60 minutes - overnight [3] [5] | 10-30 minutes [3] [4] | 7-10 minutes [4] |
| Buffer Consumption | High [3] | Low [3] | None [3] |
| Heat Management | Excellent (buffer dissipates heat) [3] | Moderate (can generate more heat) [3] | Varies by system |
| Best For | High molecular weight proteins, robust optimization [3] [4] | Routine transfers of low-mid MW proteins, speed [3] | Speed and convenience [3] |
| Key Consideration | High efficiency, flexible but slower [3] | Fast, but may struggle with HMW proteins [4] | Fast and convenient, limited consumable flexibility [3] |
Critical Parameters for Optimization
Achieving uniform and efficient transfer for all proteins, particularly challenging targets like high molecular weight (HMW) proteins, requires careful optimization of several interlinked parameters.
Protein Characteristics and Gel Selection
The size of the target protein is a primary determinant for protocol design. High Molecular Weight (HMW) Proteins (>150 kDa) migrate slowly through the dense gel matrix. Using gels with a lower percentage of acrylamide, such as 3–8% Tris-acetate gels, creates a more open pore structure that facilitates better separation and subsequent elution of large proteins [4] [2]. In contrast, Low Molecular Weight (LMW) Proteins (<30 kDa) can be effectively separated and transferred using higher percentage gels, such as 4–12% Bis-Tris gels with MES buffer, which provide better resolution for smaller proteins [2].
Transfer Buffer Composition
The transfer buffer is critical for maintaining protein stability and conductivity during electroblotting. A standard Tris-glycine buffer with methanol is widely used [5]. Methanol plays a dual role: it helps remove SDS from the SDS-protein complexes, enhancing their adsorption to the membrane, and it prevents gel swelling during transfer. However, methanol can reduce the elution efficiency of HMW proteins. For semi-dry systems, specialized, high-ionic strength "1-Step" buffers are available that can improve transfer efficiency [4].
Membrane Selection
The two most common membrane types are nitrocellulose and PVDF. Nitrocellulose is a traditional choice with strong protein-binding affinity, while PVDF offers higher mechanical strength and a greater binding capacity, making it ideal for applications requiring membrane stripping and reprobing [3]. A key operational difference is that PVDF membranes are hydrophobic and require pre-wetting in methanol (or ethanol) before use, whereas nitrocellulose does not [3].
Electrical Settings
Voltage and transfer time must be balanced. High voltage for a short duration can cause uneven transfer and excessive heat, particularly problematic for HMW proteins. Lower voltage over a longer period often ensures more uniform transfer across a broad molecular weight range [3]. For HMW proteins, increasing the transfer time is frequently necessary to allow slow-migrating proteins to exit the gel completely [4].
Table 2: Optimization Guide for Key Electroblotting Parameters
| Parameter | Recommendation for HMW Proteins (>150 kDa) | Recommendation for LMW Proteins (<30 kDa) | Rationale |
|---|---|---|---|
| Gel Chemistry | 3–8% Tris-acetate gel [4] [2] | 4–12% Bis-Tris gel (MES buffer) [2] | More open pore structure for HMW; better resolution for LMW [4] [2] |
| Transfer Time | Increase time (e.g., 8-12 mins for dry; 60+ mins for wet) [4] [3] | Standard time (e.g., 7 mins for dry; 60 mins for wet) | HMW proteins migrate slower and require more time to elute [4] |
| Membrane Type | PVDF or Nitrocellulose | PVDF or Nitrocellulose | PVDF offers higher binding capacity; choice depends on application [3] |
| Buffer Additives | Consider ethanol pre-equilibration (for non-Tris-acetate gels) [4] | Standard Tris-glycine buffer with methanol [5] | Ethanol helps shrink gel, improving HMW protein transfer efficiency [4] |
Detailed Experimental Protocol for Wet Electroblotting
This protocol provides a step-by-step guide for transferring proteins from a polyacrylamide gel to a nitrocellulose or PVDF membrane using a standard wet tank transfer system.
Materials and Reagents
- Transfer Buffer (1X): 25 mM Tris, 192 mM glycine, 20% methanol [5]. For PVDF membranes, some protocols recommend adding 0.1% SDS to enhance elution of HMW proteins, though this may reduce binding efficiency.
- Membrane: Nitrocellulose or PVDF membrane.
- Filter Paper and Porous Pads: Cut to the size of the gel.
- Transfer Apparatus: Tank transfer unit with cassette and power supply.
Step-by-Step Procedure
- Gel Electrophoresis: Complete SDS-PAGE separation of proteins according to standard protocols [2].
- Membrane Preparation:
- Prepare the Transfer Sandwich: On the bottom half of the transfer cassette, submerged in a tray of transfer buffer, assemble the following layers in order:
- Assembly and Transfer:
- Place the cassette into the transfer tank, ensuring the membrane is oriented toward the anode (+) and the gel toward the cathode (-) [1].
- Fill the tank with pre-chilled 1X transfer buffer.
- Apply a constant voltage of 35V for 60-75 minutes, or 100V for 30-60 minutes. For HMW proteins, consider a lower voltage (e.g., 30V) overnight at 4°C to ensure complete transfer [3] [4] [5].
- Post-Transfer Analysis:
- Disassemble the cassette and carefully separate the membrane.
- To confirm efficient transfer, stain the membrane with a reversible protein stain like Ponceau S or a superior fluorescent total protein stain [1].
- Proceed with blocking and immunodetection.
The Scientist's Toolkit: Essential Research Reagent Solutions
Successful electroblotting relies on a suite of specialized reagents and materials, each fulfilling a critical function in the transfer process.
Table 3: Essential Reagents and Materials for Electroblotting
| Item | Function | Key Considerations |
|---|---|---|
| Nitrocellulose Membrane | Binds proteins via hydrophobic interactions [3] | Traditional choice; good for most applications; does not require pre-wetting [3]. |
| PVDF Membrane | Binds proteins via hydrophobic and dipole interactions [3] | Higher binding capacity and mechanical strength; must be pre-wet in methanol before use [3]. |
| Tris-Glycine Transfer Buffer | Conducts current and maintains protein stability during transfer [5] | Standard buffer often supplemented with 20% methanol to promote protein binding to membrane [3] [5]. |
| Methanol | Additive to transfer buffer that promotes protein binding to the membrane and prevents gel swelling [3] | Can reduce the transfer efficiency of high molecular weight proteins; concentration typically 10-20% [3]. |
| Filter Paper & Porous Pads | Facilitates even current and pressure across the gel-membrane sandwich [1] | Must be saturated with transfer buffer before assembly to ensure proper conductivity and prevent overheating. |
| Molecular Weight Marker | Provides reference for protein size and transfer efficiency [2] | Pre-stained markers allow visual monitoring of transfer progress in real-time [2]. |
Troubleshooting Common Electroblotting Issues
Even with a standardized protocol, challenges can arise. The following flowchart outlines a systematic approach to diagnosing and resolving common electroblotting problems.
Poor Transfer Efficiency: If a post-transfer gel stain confirms proteins remain in the gel, the transfer was inefficient. Remedies include increasing transfer time or voltage, particularly for HMW proteins [4]. For HMW targets not using a Tris-acetate gel, a pre-transfer equilibration in 20% ethanol for 5-10 minutes can help shrink the gel and improve elution [4]. Always verify that the transfer stack was assembled correctly, with no air bubbles between the gel and membrane [3].
High Background Noise: A high background on the developed blot can often be traced to inadequate blocking or insufficient washing. Ensure the membrane is incubated with a sufficient concentration of a suitable blocking agent (e.g., BSA or non-fat dry milk) for at least one hour [3] [5]. Increasing the number and duration of wash steps after antibody incubations can also help reduce background [3].
Non-specific Bands: The appearance of unexpected bands can result from antibody cross-reactivity or non-specific binding. To troubleshoot, try using a higher antibody dilution or a different blocking agent. Ensuring the membrane is clean and the transfer buffer is fresh can also mitigate this issue [3].
The selection of an appropriate transfer membrane is a critical, yet often overlooked, factor in the success of western blotting experiments. This guide provides a detailed comparison of nitrocellulose and polyvinylidene fluoride (PVDF) membranes, the two most prevalent types used in protein immunoblotting. The choice between them directly impacts key outcomes such as sensitivity, background noise, and the reliability of data, especially when targeting proteins of specific sizes or using advanced detection methods [6] [7]. Framed within the broader context of optimizing protein transfer from gel to membrane, this document provides researchers and drug development professionals with the definitive resource for selecting and handling the ideal membrane for their specific application. The following decision workflow offers a strategic starting point for this selection process.
In-Depth Property Comparison
The fundamental differences between nitrocellulose and PVDF membranes stem from their distinct chemical compositions. Understanding these properties is essential for making an informed choice that aligns with your experimental goals.
Chemical and Physical Properties
Nitrocellulose is produced by nitrating cellulose, which creates a matrix that binds proteins through a combination of hydrophobic interactions, hydrogen bonding, and electrostatic forces [7] [8]. This diversity in binding mechanisms contributes to its broad suitability for various proteins. However, nitrocellulose is inherently more fragile and brittle when dry, making it susceptible to tearing during handling [6] [8]. It also has poor resistance to organic solvents and is subject to stricter shipping and storage regulations in some regions due to its flammability [7] [9].
PVDF, in contrast, is a fluoropolymer that is highly hydrophobic and binds proteins primarily through strong hydrophobic interactions [7] [10]. This structure gives PVDF superior mechanical and chemical strength, making it more durable and resistant to tearing, as well as compatible with a wider range of solvents and harsh stripping conditions [6] [10]. A critical handling difference is that PVDF membranes must be pre-activated in 100% methanol before use to wet the hydrophobic surface and allow aqueous buffers to penetrate; failure to do so will result in failed protein transfer [7] [9].
Performance and Application Metrics
The table below summarizes the key performance characteristics that directly influence experimental outcomes.
Table 1: Comprehensive Comparison of Nitrocellulose and PVDF Membrane Properties
| Property | Nitrocellulose (NC) | PVDF | Experimental Implication |
|---|---|---|---|
| Protein Binding Capacity | 80–100 µg/cm² [6] [8] | 150–200 µg/cm² [6] [10] | PVDF is superior for detecting low-abundance proteins. |
| Durability | Fragile, brittle when dry [6] [9] | High mechanical strength [10] [8] | PVDF is better for stripping/reprobing and archival. |
| Methanol Requirement | In transfer buffer (not for membrane activation) [6] [11] | Pre-wetting in 100% methanol required [7] [9] | PVDF adds a mandatory pre-activation step. |
| Autofluorescence | Low [6] [12] | High (standard); Low (specialized LF-PVDF) [7] [12] | NC is better for standard fluorescence; use LF-PVDF for sensitive fluorescence. |
| Suitability for Stripping/Reprobing | Possible but with significant signal loss [6] [8] | Better suited, retains sensitivity [6] [9] | PVDF is the clear choice for multiple probings. |
| Optimal Protein Size Range | Mid-to-low molecular weight [6] [8] | All sizes, particularly effective for high MW proteins [6] [12] | PVDF is more reliable for proteins >100 kDa. |
| Primary Binding Mechanism | Mixed: Hydrophobic, H-bond, electrostatic [7] [8] | Predominantly hydrophobic [7] [10] | Binding affinity can vary by protein characteristics. |
Strategic Selection Guidelines
Choosing the correct membrane is a strategic decision. The following guidelines, aligned with common experimental scenarios, will help you navigate this choice effectively.
Selection by Experimental Goal
- For High-Sensitivity and Low-Abundance Proteins: PVDF is the preferred choice due to its higher protein binding capacity (approximately twice that of nitrocellulose), which ensures maximal retention of scarce targets [6] [10].
- For High Molecular Weight (HMW) Proteins (>100 kDa): PVDF is strongly recommended. The transfer of HMW proteins can be hindered by gel trapping, and the higher binding capacity and robustness of PVDF make it more effective for their efficient capture and retention [6] [12].
- For Fluorescent Detection: Low-fluorescence PVDF membranes are specifically engineered for this application, offering the lowest background and enabling the use of a wider range of fluorescent channels for multiplexing [7] [11]. While standard nitrocellulose has low autofluorescence, its lower binding capacity can be a limitation for sensitive fluorescent detection of low-abundance targets [7] [12].
- For Experiments Requiring Stripping and Reprobing: The superior durability of PVDF allows it to withstand the harsh chemical treatments (e.g., low pH, strong detergents) often used in stripping protocols without significant damage or loss of protein, making it ideal for sequential detection of multiple proteins from a single blot [6] [9].
- For Routine Analysis of Abundant, Low/Medium MW Proteins: Nitrocellulose is an excellent and cost-effective option. Its ready-to-use nature simplifies the workflow, and it provides excellent results with minimal background for many common applications [6] [12].
Pore Size Selection
Pore size is a critical parameter that works in tandem with membrane type. The general guidelines are consistent across both nitrocellulose and PVDF membranes [9] [8]:
- 0.45 µm: This is the standard pore size for most routine applications, ideal for proteins above 20 kDa.
- 0.2 µm: Use this smaller pore size for low molecular weight proteins (<20 kDa) to prevent "blow-through" where small proteins pass through the larger pores, and for applications requiring high sensitivity for small or low-abundance targets, as the increased surface area enhances binding [6] [9].
Detailed Experimental Protocols
Membrane Handling and Transfer Protocol
The following workflow details the critical steps for preparing and using nitrocellulose and PVDF membranes in a standard wet tank transfer, highlighting the key differences.
Procedure:
- Gel Equilibration: Following SDS-PAGE, carefully equilibrate the gel in transfer buffer for 5-15 minutes. This step removes excess SDS and salts, which can interfere with efficient transfer.
- Membrane Preparation:
- For Nitrocellulose: Simply wet the membrane by floating it on the surface of transfer buffer, then submerging it until it is uniformly wetted. No methanol pre-treatment is needed [7] [8].
- For PVDF: Pre-activate the membrane by immersing it in 100% methanol for 15-30 seconds. The membrane will change from opaque to semi-transparent. Then, briefly rinse it in deionized water and equilibrate in transfer buffer for at least 5 minutes [7] [9]. Note: Never let a dry PVDF membrane contact aqueous buffers directly, as this will prevent proper wetting and protein binding.
- Assemble Transfer Sandwich: On the cassette, assemble the transfer stack in the following order (from cathode [-] to anode [+]):
- Fiber pad / filter paper
- Gel
- Membrane
- Filter paper / fiber pad Ensure that the gel and membrane are in direct, bubble-free contact by gently rolling a tube or pipette over the stack after the membrane is placed [9].
- Electrophoretic Transfer:
- Place the cassette in the tank filled with pre-chilled transfer buffer. For wet tank systems, transfer is typically performed at constant voltage (100V) for 1 hour or constant current (350 mA) for 60-90 minutes, with cooling to dissipate heat [13]. Adjust time and conditions based on protein size; larger proteins require longer transfer times.
- Post-Transfer Analysis:
- After transfer, stain the membrane with Ponceau S to visually confirm uniform protein transfer and assess loading consistency before proceeding to immunodetection [6].
Protocol for Stripping and Reprobing PVDF Membranes
This protocol is optimized for the durability of PVDF membranes and should be performed at room temperature with gentle agitation.
- Wash Membrane: Briefly rinse the membrane with 1X TBST after detection.
- Strip Antibodies: Incubate the membrane in a commercial stripping buffer or a mild stripping solution (e.g., 15 glycine, 1% SDS, pH 2.2) for 10-15 minutes. Harsh methods using strong detergents and high heat are also possible with PVDF but carry a higher risk of protein loss [9].
- Wash Thoroughly: Wash the membrane multiple times (e.g., 3 x 5-10 minutes) with 1X TBST to completely remove the stripping buffer.
- Re-block and Reprobe: Re-block the membrane for 1 hour and then proceed with incubation using a new primary antibody [9].
The Scientist's Toolkit: Essential Research Reagent Solutions
Table 2: Key Reagents for Western Blot Membrane Protocols
| Item | Function / Application | Key Considerations |
|---|---|---|
| PVDF Membrane | High-binding, durable matrix for protein immobilization. | Essential for low-abundance targets, reprobing, and HMW proteins. Must be pre-wet in methanol [7] [10]. |
| Nitrocellulose Membrane | Standard matrix for routine protein blotting. | Ideal for abundant proteins, simpler workflows, and is ready-to-use after wetting in buffer [6] [8]. |
| Low-Fluorescence PVDF Membrane | Specialized PVDF for fluorescent detection. | Critical for minimizing background autofluorescence in fluorescent and multiplex western blots [7] [11]. |
| Transfer Buffer (e.g., Towbin Buffer) | Conducts current and facilitates protein elution from gel. | Typically contains Tris, Glycine, and Methanol (10-20%). Methanol prevents gel swelling but can precipitate HMW proteins [6] [13]. |
| Methanol (100%) | Activation agent for PVDF and component of transfer buffer. | Required to wet the hydrophobic PVDF surface prior to equilibration in transfer buffer [7] [9]. |
| Ponceau S Stain | Reversible stain for total protein on membrane. | Used for quick visual assessment of transfer efficiency and protein loading uniformity after blotting [6]. |
| Stripping Buffer | Removes bound antibodies from the membrane. | Allows for sequential detection of multiple proteins from the same blot. PVDF is more resilient to these harsh chemicals [9]. |
Troubleshooting Common Membrane-Related Issues
- High Background Signal: This is often caused by insufficient blocking or non-specific antibody binding. Solution: Optimize blocking conditions by increasing blocking time or trying a different blocking agent (e.g., switch from non-fat dry milk to BSA, or use a commercial synthetic blocker) [9] [10]. For fluorescence, ensure you are using a low-fluorescence PVDF membrane [7].
- Poor Transfer Efficiency: Incomplete or uneven transfer can result from improper membrane preparation (especially for PVDF), bubbles in the transfer sandwich, or suboptimal transfer conditions. Solution: For PVDF, confirm the membrane was properly activated in methanol. Ensure bubble-free assembly of the gel-membrane stack. For high molecular weight proteins, consider increasing transfer time, adding SDS to the transfer buffer, or reducing methanol concentration to facilitate protein elution from the gel [6] [9].
- Protein Loss or "Blow-Through": This occurs when proteins, particularly small ones, pass completely through the membrane. Solution: For proteins <20 kDa, switch to a membrane with a smaller pore size (0.2 µm) to enhance retention [6] [9].
- Brittle or Torn Membrane: This is characteristic of dry nitrocellulose. Solution: Handle nitrocellulose membranes with care, always using gloves or forceps. Keep the membrane hydrated throughout the process. For applications requiring physical robustness, PVDF is the superior alternative [6] [8].
Protein transfer is a pivotal step in western blotting, where electrophoretically separated proteins are moved from a polyacrylamide gel onto a solid support membrane for subsequent antibody probing [13]. This process immobilizes proteins, creating a replica of the gel's protein pattern on a more durable matrix that facilitates efficient immunodetection [14]. The efficiency of this transfer is paramount to the success of the entire western blot experiment, as incomplete or inefficient transfer can lead to false negative results or inaccurate quantification [3].
The fundamental principle underlying protein transfer involves applying an electric field to drive negatively charged proteins, complexed with sodium dodecyl sulfate (SDS), out of the gel matrix and onto the membrane [15]. The composition of the transfer buffer significantly influences this process, with key components like methanol and SDS playing critical roles in determining transfer efficiency, especially across varying protein molecular weights [16] [17]. Optimizing these components is therefore essential for researchers, scientists, and drug development professionals seeking reliable and reproducible protein data.
The Composition and Function of Transfer Buffers
Core Components and Their Roles
Transfer buffers create the conductive medium that facilitates protein movement during electroblotting. The standard Towbin buffer system (25 mM Tris, 192 mM glycine, pH 8.3) provides the foundational ionic components that maintain a pH above the isoelectric point of most proteins, ensuring they retain a negative charge and migrate toward the anode [16] [15]. The specific additives to this base, particularly methanol and SDS, require careful optimization based on experimental conditions.
Table 1: Core Components of Standard Western Blot Transfer Buffers
| Component | Standard Concentration | Primary Function |
|---|---|---|
| Tris-Glycine | 25 mM Tris, 192 mM Glycine | Provides conductivity and maintains pH (~8.3) above protein pI for negative charge [16] [15]. |
| Methanol | 0-20% (v/v) | Prevents gel swelling, removes SDS from proteins, promotes membrane binding [18] [14]. |
| SDS | 0-0.1% (w/v) | Increases protein solubility, prevents precipitation, improves transfer of large proteins [17]. |
The Critical Role of Methanol
Methanol serves multiple crucial functions in transfer buffer. It prevents gel swelling during the transfer process, maintains gel structure, and improves protein binding to the membrane by stripping SDS from the protein-SDS complexes [18] [14]. This SDS removal is particularly important for promoting hydrophobic interactions between proteins and PVDF membranes [15].
However, methanol also has potentially detrimental effects. It can reduce gel pore size, potentially hindering the migration of larger proteins, and may cause protein precipitation by stripping away the charged SDS layer that keeps proteins soluble [16] [17]. The optimal methanol concentration represents a balance between these competing effects, typically adjusted based on the molecular weight of the target protein and the membrane type used.
The Dual-Natured Effects of SDS
SDS plays a contrasting role to methanol in transfer buffer. While methanol removes SDS, adding SDS to the transfer buffer can be beneficial in specific scenarios. SDS increases protein solubility by maintaining a negative charge and preventing aggregation or precipitation, which is particularly valuable for large, hydrophobic proteins that tend to precipitate during transfer [17].
The decision to include SDS involves trade-offs. While it aids protein solubility, excess SDS can interfere with protein binding to membranes, particularly nitrocellulose, as proteins may retain too much charge and solubility to adsorb effectively to the membrane surface [15]. Therefore, SDS is typically used at low concentrations (0.02-0.1%) and often in conjunction with reduced methanol levels [17].
Optimization Strategies for Different Experimental Conditions
Protein Size-Based Buffer Optimization
The molecular weight of the target protein is the primary determinant for optimizing transfer buffer composition. The conflicting requirements for different protein sizes necessitate strategic adjustments to methanol and SDS concentrations.
Table 2: Buffer Optimization Based on Protein Molecular Weight
| Protein Size | Methanol | SDS | Additional Considerations |
|---|---|---|---|
| Small Proteins & Peptides (<20 kDa) | 20% standard concentration [19] [17]. | Omit or use minimal SDS to prevent blow-through [19]. | Use 0.2 µm pore membrane to prevent loss [19]. |
| Medium Proteins (20-100 kDa) | 10-20% standard concentration [19]. | Typically not required [17]. | Standard transfer conditions apply [19]. |
| Large Proteins (>100 kDa) | Reduce to 10% or less [16] [17]. | Add 0.05-0.1% to prevent precipitation [16] [17]. | Use low-percentage gels (e.g., 8%), extend transfer time [17]. |
Membrane-Specific Considerations
The choice of blotting membrane significantly influences buffer composition strategy. PVDF membranes, being hydrophobic, require pre-wetting in methanol before use to facilitate buffer penetration and protein binding [20] [15]. For the actual transfer, methanol can sometimes be omitted from the buffer when using PVDF, though this may increase heat generation [18]. Nitrocellulose membranes do not require methanol for activation, but methanol is often included in the transfer buffer to improve protein binding efficiency [18].
Alternative Alcohols and Methanol-Free Protocols
Due to methanol's toxicity, researchers sometimes explore alternatives. Ethanol (10-20%) is a safer, effective replacement for methanol in both semi-dry and wet transfer systems, performing a similar function in preventing gel swelling and promoting protein binding [18]. Isopropanol is another potential substitute, though it is less characterized in published protocols and may reduce transfer efficiency due to its lower polarity compared to methanol or ethanol [18].
Modern gel systems, particularly Bis-Tris-based gels designed for low swelling, allow for complete omission of alcohol from the transfer buffer when using nitrocellulose membranes [18]. In such cases, transfers must be conducted in the cold to manage increased heat generation [18].
Integrated Protocols and Workflow
Standard Wet Transfer Protocol with Buffer Optimization
The following protocol outlines a standardized wet transfer method with embedded optimization points for buffer composition:
- Gel Equilibration: Following SDS-PAGE, incubate the gel in transfer buffer for 15 minutes to remove electrophoresis contaminants and allow the gel to adjust to the transfer buffer composition [16].
- Membrane Preparation:
- Sandwich Assembly: On the cathode side of the cassette, sequentially stack: fiber pad/sponge, filter paper, equilibrated gel, prepared membrane, filter paper, and fiber pad/sponge. Carefully roll out air bubbles with a 15 mL tube after each layer to ensure complete contact [19].
- Transfer Execution: Place the sealed cassette in the tank filled with transfer buffer, ensuring correct orientation (gel facing cathode, membrane facing anode). Apply appropriate electrical conditions based on protein size (see Table 3) [19]. For high-voltage transfers, use a cooling unit or surround the tank with ice to dissipate heat [19].
Table 3: Wet Transfer Conditions Based on Protein Size
| Protein Size | Voltage | Current | Time | Temperature Control |
|---|---|---|---|---|
| < 15 kDa | 30 V | 100-150 mA | 3-4 hours or Overnight | Cold room or ice bath [19] |
| 15-50 kDa | 70-100 V | 200-300 mA | 1-2 hours | Room temperature [19] |
| 50-100 kDa | 100 V | 250-350 mA | 1.5-2 hours | Room temperature [19] |
| > 100 kDa | 25-30 V | 100-200 mA | Overnight (12-16 hours) | Cold room or ice bath [19] |
Decision Framework for Buffer Optimization
The diagram below outlines a systematic workflow for optimizing transfer buffer composition based on key experimental parameters.
Transfer Efficiency Verification
Confirming successful protein transfer is crucial before proceeding to immunodetection. Several verification methods exist:
- Pre-stained Ladder Visualization: A pre-stained protein ladder run on the gel allows direct visualization of transfer efficiency as colored bands appear on the membrane [21]. Different colored bands can help monitor transfer efficiency for different protein sizes simultaneously.
- Post-Transfer Gel Staining: Staining the polyacrylamide gel with Coomassie Blue after transfer reveals any proteins that failed to transfer. A mostly clear gel indicates successful transfer, while prominent blue bands suggest incomplete transfer requiring protocol optimization [21].
- Dual-Membrane Test: Placing two membranes in the transfer stack helps identify over-transfer. Protein detection on the second membrane indicates that small proteins have passed completely through the first membrane, signaling excessive transfer time or suboptimal membrane pore size [21].
- Ponceau S Staining: Temporary staining of the membrane with Ponceau S solution (0.1% w/v in 5% acetic acid) allows total protein visualization to confirm uniform transfer and identify potential bubbles or artifacts before proceeding with blocking and antibody incubation [15].
The Scientist's Toolkit: Essential Reagents and Materials
Table 4: Essential Reagents for Western Blot Transfer Optimization
| Category | Item | Specification & Function |
|---|---|---|
| Buffer Components | Tris-Glycine Base | 25 mM Tris, 192 mM Glycine, pH 8.3; conductive base for Towbin buffer [16] [14]. |
| Methanol (MeOH) | Analytical grade; prevents gel swelling, promotes protein-membrane binding [16] [15]. | |
| SDS Solution | 10-20% stock; enhances solubility of large/hydrophobic proteins [17]. | |
| Membranes | Nitrocellulose | 0.2 µm for small proteins, 0.45 µm standard; binds proteins via hydrophobic/electrostatic interactions [19] [15]. |
| PVDF | 0.2 µm for small proteins, 0.45 µm standard; high binding capacity, mechanical strength, requires methanol activation [19] [15]. | |
| Transfer Systems | Wet/Tank Apparatus | High efficiency for diverse protein sizes, especially >100 kDa; requires large buffer volumes [13] [19]. |
| Semi-Dry Apparatus | Faster transfer (15-60 min), uses less buffer; may struggle with very large proteins [13] [19]. | |
| Dry Transfer System | Fastest (as few as 3-7 min), no buffer preparation; requires proprietary stacks, less flexible optimization [13] [19]. | |
| Verification Tools | Pre-stained Protein Ladder | Visual monitor of transfer efficiency in real-time [21]. |
| Ponceau S Stain | Reversible membrane stain for visualizing total transferred protein [15]. | |
| Coomassie Blue | Gel stain for post-transfer analysis of residual proteins [21]. |
The strategic optimization of transfer buffer components—particularly the balanced interplay between methanol and SDS—is foundational to successful western blotting. Methanol enhances membrane binding but can hinder large protein transfer, while SDS counteracts precipitation but may impair binding if used excessively. There is no universal formula; the optimal buffer system must be determined empirically based on the target protein's size, the membrane type, and the transfer methodology. By applying the structured protocols and decision frameworks outlined in these application notes, researchers can systematically overcome transfer challenges, ensuring high-quality, reproducible results critical for rigorous protein analysis in research and drug development.
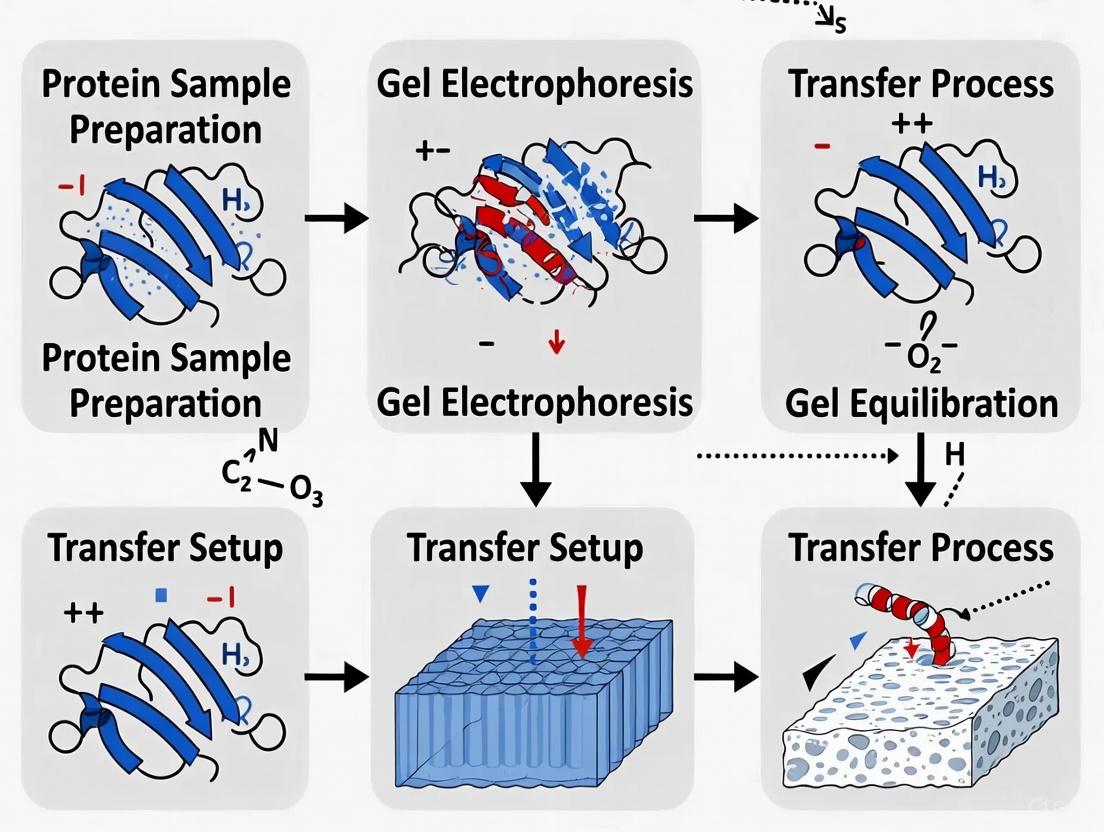
In western blotting, the electrophoretic transfer of proteins from a polyacrylamide gel to a solid-support membrane is a pivotal step that enables subsequent antibody probing and detection. The core of this process is the precise construction of the "transfer sandwich," a layered structure that facilitates protein movement under an electric field. Proper assembly of this sandwich—comprising sponges, filter papers, the gel, and the membrane—is fundamental to achieving high transfer efficiency, uniform protein binding, and minimal background artifacts. The configuration must ensure intimate contact between all layers to prevent air bubbles that can distort protein patterns and create transfer failures. This application note provides detailed methodologies and optimization strategies for the proper assembly of the transfer sandwich within the broader context of reliable protein transfer for western blotting research, addressing the critical needs of researchers, scientists, and drug development professionals.
Understanding Transfer Sandwich Components and Configurations
Core Components of the Transfer Sandwich
The transfer sandwich is a multi-layered structure where each component serves a specific function. From cathode to anode, the standard assembly sequence is: cathode electrode, sponge, filter paper, gel, membrane, filter paper, sponge, and anode electrode [22] [19]. The sponges (sometimes called pads) provide cushioning and even pressure distribution across the entire gel surface, ensuring uniform contact between layers. The filter papers (typically thick Whatman paper) serve as reservoirs for transfer buffer, maintaining hydration and facilitating ion flow during electrotransfer. The gel contains the separated proteins, while the membrane (nitrocellulose or PVDF) serves as the final solid support for immobilized proteins [13] [19].
The configuration must maintain correct electrical orientation, with the gel facing the cathode (-) and the membrane facing the anode (+), since negatively charged SDS-coated proteins migrate toward the positive electrode [13]. This directional migration is fundamental to successful protein transfer from gel to membrane.
Comparison of Western Blot Transfer Methods
The assembly principles remain consistent across transfer methods, though specific configurations may vary. The table below compares the three primary electroblotting techniques.
Table 1: Comparison of Western Blot Transfer Methods
| Parameter | Wet/Tank Transfer | Semi-Dry Transfer | Dry Transfer |
|---|---|---|---|
| Transfer Time | 30 min to overnight [13] [19] | 7-60 minutes [13] [19] | As few as 3-10 minutes [13] [19] |
| Buffer Volume | High (~1000 mL) [13] | Low (~200 mL) [13] | None required [13] |
| Throughput | Multiple gels possible [13] | Typically single gel [13] | Single gel [13] |
| Transfer Efficiency | High for broad molecular weight range [13] | Good for low to mid molecular weights [13] | High, comparable to wet transfer [13] |
| Ease of Use | Moderate (extensive setup and cleanup) [13] | High (simpler setup) [13] | High (minimal setup) [13] |
| Cooling Requirement | Often required [19] | Not typically required [19] | Not required [13] |
| Best Applications | Quantitative data, very large (>300 kDa) or very small proteins [19] | Rapid protocols, routine targets [13] | Fast processing, convenience [13] |
Detailed Experimental Protocols
Standard Wet Transfer Protocol
Materials and Reagents:
- Transfer buffer (e.g., Towbin buffer: 25 mM Tris, 192 mM glycine, 20% methanol, pH 8.3) [19]
- Methanol (for PVDF membrane activation)
- Sponges
- Filter paper (Whatman)
- Nitrocellulose or PVDF membrane
- Transfer cassette
Procedure:
- Gel Equilibration: Following SDS-PAGE, carefully open the gel cassette and immerse the gel in transfer buffer for 15-30 minutes. This step removes electrophoresis buffers salts and prepares proteins for transfer [19].
- Membrane Preparation:
- For nitrocellulose membranes: Pre-wet in transfer buffer for 5-10 minutes [19].
- For PVDF membranes: Activate by immersing in 100% methanol for 15-30 seconds, then transfer to deionized water briefly, and finally equilibrate in transfer buffer for 5 minutes [19]. PVDF is hydrophobic and requires methanol to wet the surface and facilitate buffer entry into the membrane matrix.
- Sandwich Assembly (conducted in a tray with transfer buffer):
- Open the transfer cassette with the black side (cathode) facing down.
- Place a pre-wetted sponge on the cassette.
- Add a sheet of buffer-saturated filter paper.
- Carefully place the equilibrated gel on the filter paper.
- Position the pre-treated membrane directly on top of the gel.
- Roll a 15 mL tube gently over the membrane to remove air bubbles without damaging the gel [22] [19].
- Place another pre-wetted filter paper on the membrane.
- Top with the second pre-wetted sponge.
- Close the cassette firmly, ensuring no movement of internal components [19].
- Transfer Setup:
- Insert the cassette into the transfer tank with the gel side facing the cathode (black) and membrane facing the anode (red/white).
- Fill the tank with transfer buffer, ensuring complete immersion of the cassette.
- Connect the lid with correct electrode orientation and activate the power supply [19].
- Transfer Conditions:
- Apply appropriate electrical settings based on protein size (see Table 2).
- For extended transfers (>1 hour) or high power settings, use a cooling system or perform in a cold room to dissipate heat [19].
Table 2: Recommended Wet Transfer Conditions Based on Protein Size
| Protein Size (kDa) | Voltage (V) | Current (mA/gel) | Transfer Time | Special Considerations |
|---|---|---|---|---|
| < 15 (Small) | 30V | 100-150 mA | 3-4 hours or Overnight | Use 0.2 µm pore membrane; reduce methanol to 10% or omit [19] |
| 15-50 (Medium) | 70-100V | 200-300 mA | 1-2 hours | Standard conditions with 0.45 µm membrane [19] |
| 50-100 (Large) | 100V | 250-350 mA | 1.5-2 hours | May require extended transfer time [19] |
| > 100 (Very Large) | 25-30V | 100-200 mA | Overnight (12-16 hours) | Add 0.1% SDS to transfer buffer; reduce methanol to 10-15% [4] [19] |
Semi-Dry Transfer Protocol
Materials and Reagents:
- Transfer buffer (often methanol-free for semi-dry systems)
- Filter paper cut precisely to gel size
- Semi-dry transfer apparatus
Procedure:
- Gel Preparation: Equilibrate the gel in transfer buffer for 10-15 minutes [19].
- Membrane Preparation:
- For nitrocellulose: Pre-wet in transfer buffer.
- For PVDF: Activate in methanol, then equilibrate in transfer buffer [19].
- Filter Paper Preparation: Cut six sheets of filter paper to the exact size of the gel. Saturate all sheets thoroughly with transfer buffer [19].
- Sandwich Assembly (on the anode plate):
- Stack three layers of saturated filter paper on the anode.
- Place the pre-treated membrane on the filter paper stack.
- Position the gel carefully on the membrane.
- Top with the remaining three sheets of saturated filter paper.
- Roll a tube over the stack to eliminate air bubbles after each layer is added [19].
- Carefully lower the cathode plate to complete the assembly.
- Transfer Conditions:
Figure 1: Transfer Sandwich Assembly. The diagram illustrates the sequential arrangement of components in the transfer sandwich, showing the direction of protein migration from gel to membrane.
Optimization Strategies for Transfer Sandwich Assembly
Protein Size-Specific Considerations
High Molecular Weight Proteins (>150 kDa):
- Use low-percentage gels (e.g., 3-8% Tris-acetate) for better separation and transfer [4].
- Extend transfer times: 8-10 minutes for dry systems; 10-12 minutes for semi-dry systems; overnight for wet tank systems [4] [19].
- Add SDS (0.1%) to the transfer buffer to maintain protein solubility and mobility [19].
- Reduce methanol concentration (10-15%) to prevent protein precipitation [19].
- Implement a pre-transfer gel equilibration in 20% ethanol for 5-10 minutes to shrink the gel and remove salts, particularly when not using Tris-acetate gels [4].
Low Molecular Weight Proteins (<15 kDa):
- Use smaller pore membranes (0.2 µm instead of 0.45 µm) to prevent blow-through [19].
- Reduce or omit methanol from transfer buffer to minimize gel shrinkage and protein retention [19].
- Shorten transfer times to prevent over-transfer through the membrane [13].
Membrane Selection Guidelines
Membrane choice significantly impacts protein binding capacity and background signals. The table below compares the two primary membrane types.
Table 3: Comparison of Western Blot Membrane Properties
| Parameter | Nitrocellulose | PVDF |
|---|---|---|
| Binding Mechanism | Hydrophobic interactions & van der Waals forces [22] | Hydrophobic interactions [22] |
| Binding Capacity | ~80-100 µg/cm² [22] | Higher than nitrocellulose: ~100-200 µg/cm² [22] |
| Background | Generally lower [22] | Potentially higher [22] |
| Mechanical Strength | Fragile when dry [3] | Durable, suitable for stripping/reprobing [3] |
| Pre-treatment | Hydrate in transfer buffer [19] | Activate in methanol, then transfer buffer [19] |
| Pore Sizes | 0.2 µm, 0.45 µm [19] | 0.2 µm, 0.45 µm [19] |
| Best Applications | Routine applications; low-abundance targets [22] | High-abundance targets; stripping/reprobing [3] |
Transfer Efficiency Monitoring and Troubleshooting
Efficiency Assessment Methods:
- Pre-stained molecular weight standards: Visual confirmation of protein transfer from gel to membrane [22].
- Post-transfer gel staining: Stain the gel with Coomassie Blue after transfer to detect residual proteins [22].
- Dual membrane technique: Place two membranes in sequence; protein detection on the second membrane indicates over-transfer [22].
Troubleshooting Common Issues:
- Air bubbles: Cause clear circular areas with no transfer. Prevent by rolling each layer thoroughly with a tube or glass rod [19].
- High background: May result from improper membrane handling, insufficient blocking, or contaminated buffers.
- Inefficient transfer of high molecular weight proteins: Optimize by increasing transfer time, reducing gel concentration, adding SDS to buffer, or using specialized gel chemistries [4].
- Over-transfer of small proteins: Use smaller pore membranes, reduce transfer time, or add methanol to enhance protein retention [13].
Figure 2: Western Blot Transfer Optimization Workflow. This flowchart outlines the key decision points for optimizing protein transfer based on experimental requirements.
The Scientist's Toolkit: Essential Research Reagent Solutions
Table 4: Essential Materials for Western Blot Transfer Sandwich Assembly
| Item | Function/Purpose | Examples/Specifications |
|---|---|---|
| Transfer Membranes | Solid support for immobilized proteins; enables antibody probing [13] | Nitrocellulose (0.2 µm, 0.45 µm); PVDF (0.2 µm, 0.45 µm) [19] |
| Filter Paper | Buffer reservoir; ensures even buffer distribution and electrical contact [22] | Whatman paper; extra-thick (approx. 3 mm) for semi-dry transfer [13] |
| Sponges/Pads | Cushioning; applies even pressure across gel surface [22] | Transfer sponges specific to apparatus manufacturer |
| Transfer Buffer | Conducting medium; maintains protein charge and mobility [19] | Towbin buffer (Tris-glycine-methanol); Bis-Tris transfer buffer (methanol-free) [19] |
| Methanol | Promotes protein binding to PVDF; removes SDS from proteins [19] | 100% methanol for PVDF activation; 10-20% in transfer buffers [19] |
| Pre-stained Marker | Visual transfer monitor; tracks efficiency for different protein sizes [22] | Color-coded molecular weight standards [22] |
| Gel Equilibration Buffer | Removes electrophoresis salts; prepares gel for transfer [4] | Transfer buffer; 20% ethanol for high molecular weight proteins [4] |
The proper assembly of the transfer sandwich represents a critical technical foundation for successful western blotting. Meticulous attention to component selection, orientation, and assembly technique directly influences protein transfer efficiency and data quality. By understanding the principles underlying each transfer method, optimizing conditions for specific protein characteristics, and implementing rigorous quality control measures, researchers can achieve reproducible and reliable protein transfer. These standardized approaches to transfer sandwich assembly support robust protein analysis across diverse research applications, from basic biological investigation to drug development processes requiring high reproducibility and accuracy.
Electroblotting, or protein transfer, is a critical step in western blotting where proteins separated by sodium dodecyl sulfate-polyacrylamide gel electrophoresis (SDS-PAGE) are moved onto a solid-phase membrane for immunodetection [15]. The efficiency of this process is not uniform; it is profoundly influenced by the intrinsic properties of the proteins themselves, primarily their molecular weight and isoelectric point (pI) [23] [24]. Molecular weight dictates the physical mobility of a protein through the gel and membrane matrices, while the pH of the transfer buffer relative to a protein's pI determines its net charge and, consequently, its electrophoretic mobility [15]. Failure to optimize transfer conditions for these characteristics is a primary cause of experimental failure, leading to weak signals, incomplete transfer, or complete loss of target proteins. This application note provides a detailed examination of these relationships and offers optimized protocols to ensure reliable and reproducible protein detection for researchers and drug development professionals.
Theoretical Principles of Protein Transfer
The Interplay of Protein Properties and Transfer Efficiency
The western blot transfer process relies on an electric field to drive negatively charged proteins from the polyacrylamide gel onto a membrane. Two fundamental protein characteristics—size and charge—govern this migration. Molecular weight directly impacts a protein's mobility due to steric hindrance; high molecular weight (HMW) proteins navigate the porous gel and membrane matrices more slowly than their low molecular weight (LMW) counterparts [4] [25]. Protein charge during transfer is determined by the pH of the transfer buffer. To maintain a consistent negative charge that ensures migration toward the anode, the buffer pH must be kept above the pI of most proteins [15]. A buffer pH below a protein's pI will confer a net positive charge, potentially driving the protein in the wrong direction and resulting in a failed transfer.
The following diagram illustrates the core principles of how molecular weight and buffer pH collectively influence the final transfer outcome.
Membrane Chemistry and Protein Binding
The membrane serves as the final destination for transferred proteins, and its chemical nature dictates the binding mechanism. The two most common membranes are Nitrocellulose (NC) and Polyvinylidene Fluoride (PVDF).
Nitrocellulose binds proteins primarily through non-covalent hydrophobic and electrostatic interactions [23] [15]. It is easily hydrated and typically yields a low background signal. A key disadvantage is that it becomes brittle upon drying, making it poorly suited for experiments requiring membrane stripping and reprobing [23] [15].
In contrast, PVDF is a hydrophobic polymer that requires pre-wetting in methanol before use. It interacts with proteins via strong hydrophobic and dipole interactions, resulting in a higher protein binding capacity (~150 µg/cm² for PVDF vs. ~80 µg/cm² for NC in one study) [26] [15]. This greater binding strength makes PVDF more robust for repeated stripping and reprobing [15]. However, the increased affinity can also lead to higher background signals if blocking is not optimized [15]. Systematic comparisons have shown that the optimal membrane can also depend on protein size, with some studies indicating PVDF may offer superior detection sensitivity for a broader range of molecular weights [26].
Optimizing Transfer for Molecular Weight
Challenges and Strategies for Different Protein Sizes
The molecular weight of a target protein is the primary determinant for selecting gel composition, transfer method, and buffer conditions.
High Molecular Weight (HMW) Proteins (>150 kDa): HMW proteins migrate slowly and are prone to precipitation within the gel matrix, which can halt transfer completely [4] [25]. They often require specialized low-percentage gels (e.g., 3-8% Tris-acetate) with a more open matrix to facilitate movement [4]. Transfer must be aided by the inclusion of SDS (0.1%) in the transfer buffer to keep proteins soluble, while the methanol concentration should be reduced (to 10% or less) or omitted to prevent gel shrinkage and protein precipitation [24] [25]. Extended transfer times are crucial [4].
Low Molecular Weight (LMW) Proteins (<15-20 kDa): The main challenge with LMW proteins is their potential to pass completely through the membrane without binding, a phenomenon known as "blow-through" [19]. This is mitigated by using membranes with smaller pore sizes (e.g., 0.2 µm instead of 0.45 µm) to increase the binding surface area [19] [15]. Methanol in the buffer is beneficial as it promotes protein adherence to the membrane, but SDS should generally be omitted as it can hinder the binding of small proteins [24].
Table 1: Optimization Strategy Based on Protein Molecular Weight
| Protein Size | Recommended Gel Type | Key Buffer Modifications | Pore Size | Primary Risk |
|---|---|---|---|---|
| < 15 kDa (Small) | Standard Bis-Tris or Tris-Glycine [24] | 20% Methanol; No SDS [24] | 0.2 µm [19] | Blow-through [19] |
| 15 - 100 kDa (Medium) | Standard Bis-Tris or Tris-Glycine [24] | Standard conditions (e.g., 20% MeOH) [24] | 0.45 µm [15] | Standard transfer |
| 100 - 150 kDa (Large) | Low-percentage Bis-Tris (e.g., 8%) [24] | Reduce MeOH (≤10%); Add 0.1% SDS [24] | 0.45 µm [15] | Precipitate in gel [25] |
| > 150 kDa (HMW) | 3-8% Tris-Acetate gels [4] | Low/No MeOH; Add 0.1% SDS [4] [25] | 0.45 µm [15] | Incomplete transfer [4] |
Protocol for High Molecular Weight Proteins (>150 kDa)
The following protocol is specifically designed for the efficient transfer and detection of proteins between 150 and 300 kDa [25].
Solutions & Reagents
- Transfer Buffer: 25 mM Tris, 192 mM Glycine, 0.1% SDS, pH ~8.3. Prepare without methanol for PVDF membranes; for nitrocellulose, methanol can be added to 10% [25].
- Pre-cast Gels: 3-8% Tris-acetate gels are ideal [4]. Alternatively, low-percentage (e.g., 8%) Bis-Tris gels can be used.
- Membrane: PVDF membrane.
Method
- Electrophoresis: Load at least 20 µg of total protein per lane onto the chosen gel. Perform electrophoresis at 150 V for approximately 1.5 hours using a pre-chilled running buffer. Surround the tank with ice packs if extended run times are needed to prevent overheating [25].
- Gel Equilibration: After electrophoresis, immerse the gel in 1X transfer buffer for 40 minutes. This step removes electrophoresis salts and allows the gel to adjust to the transfer buffer conditions [25].
- Membrane Activation: Cut the PVDF membrane to the gel's size and activate it by soaking in 100% methanol for 15 seconds. Subsequently, immerse the membrane, along with filter papers and sponges, in the transfer buffer for 30 minutes [25].
- Sandwich Assembly: Assemble the wet transfer sandwich in the following order (from cathode to anode): sponge, filter paper, gel, PVDF membrane, filter paper, sponge. Roll out each layer carefully with a tube or roller to remove all air bubbles [24] [25].
- Electroblotting: Place the cassette in a transfer tank filled with pre-chilled transfer buffer. Perform a wet transfer at a constant current of 500 mA for 1 hour at 4°C. Alternatively, for standard wet transfer systems, 25-30 V overnight at 4°C is also highly effective [19] [25].
- Post-transfer: Once complete, wash the membrane twice for 10 minutes in deionized water before proceeding to blocking and immunodetection [25].
The Critical Role of pH and Transfer Buffer Composition
Buffer Components and Their Functions
The transfer buffer is not merely a conductive medium; its specific composition is critical for maintaining proteins in a soluble, negatively charged state to facilitate their migration and binding.
- Tris/Glycine: This combination provides the conductive ions and buffering capacity. The standard Towbin buffer (192 mM glycine, 25 mM Tris) has a pH of approximately 8.3, which is above the pI of most proteins, ensuring they carry a net negative charge and migrate toward the anode [15].
- Methanol: Methanol serves multiple purposes. It promotes the displacement of SDS from protein-SDS complexes, which is essential for the protein to bind to the hydrophobic membrane [3] [15]. It also prevents gel swelling during transfer. However, a significant drawback is that it causes the gel to shrink, which can trap HMW proteins. Therefore, its concentration must be tuned based on the target protein size [24] [15].
- SDS (Sodium Dodecyl Sulfate): The inclusion of SDS at 0.1% concentration helps keep HMW proteins soluble and prevents their precipitation within the gel matrix, thereby improving transfer efficiency [24] [25]. However, because SDS inhibits protein binding to the membrane, it should be omitted from the transfer buffer when working with LMW proteins [24].
Table 2: Transfer Buffer Composition Guidelines
| Component | Standard Concentration | Function | Effect of Modification |
|---|---|---|---|
| Tris/Glycine | 25 mM / 192 mM [24] | Provides conductivity and buffering at pH ~8.3 [15] | High ion levels increase heat; pH must be >pI of target proteins. |
| Methanol | 20% [24] | Removes SDS, aids membrane binding, prevents gel swelling [3] [15] | Reduce (to 10%) or omit for HMW proteins to minimize gel trapping. Keep at 20% for LMW proteins to aid adhesion. [24] |
| SDS | 0% (Standard) or 0.1% [24] | Increases protein solubility [24] | Add 0.1% for HMW proteins to prevent precipitation. Omit for LMW proteins to facilitate membrane binding. [24] |
The Scientist's Toolkit: Essential Reagents and Materials
Successful optimization of protein transfer requires the use of specific, high-quality reagents. The following table lists essential items for a western blotting workflow optimized for diverse protein characteristics.
Table 3: Essential Research Reagent Solutions for Western Blotting
| Item | Function / Application | Specific Examples & Notes |
|---|---|---|
| Tris-Acetate Gels (3-8%) | Optimal separation and transfer of HMW proteins (>150 kDa) due to larger pore matrix [4]. | NuPAGE Tris-Acetate Gels [4] |
| PVDF Membrane | High protein-binding capacity membrane; ideal for stripping/reprobing and HMW proteins; requires methanol activation [25] [26]. | Immobilon-P (0.45 µm for standard proteins; 0.2 µm for LMW proteins) [23] [15] |
| Nitrocellulose Membrane | Traditional membrane with low background; can become brittle; various pore sizes available [23] [15]. | 0.45 µm for standard proteins; 0.2 µm to prevent blow-through of LMW proteins [15] |
| Transfer Buffer Additives | Fine-tune transfer conditions. Methanol aids binding but can trap HMW proteins. SDS helps solubilize HMW proteins [24]. | Prepare fresh for each use. Adjust methanol and SDS levels based on target protein size [24]. |
| Pre-stained Protein Ladder | Visual marker to monitor transfer efficiency in real-time by confirming migration of proteins from gel to membrane [22]. | Colored markers help track different molecular weight proteins simultaneously [22]. |
| Ponceau S Stain | Reversible stain for quick visualization of total protein on the membrane after transfer to assess uniformity and efficiency [24] [15]. | 0.1% (w/v) Ponceau S in 5% acetic acid; can be washed off with water before blocking [15]. |
Troubleshooting and Verification of Transfer Efficiency
Common Problems and Solutions
Even with optimized protocols, issues can arise. The following workflow chart outlines a logical approach to diagnosing and resolving the most common transfer-related problems in western blotting.
Quantitative Data and Validation
Validation of transfer efficiency is a critical but often overlooked step. Quantitative data supports the optimization strategies discussed:
- Transfer Time for HMW Proteins: Systematic analysis shows that for a ~190 kDa protein (EGFR), increasing transfer time from the standard 7 minutes to 8-10 minutes on a dry transfer system resulted in significantly improved detection sensitivity [4].
- Gel Chemistry Impact: Compared to a standard 4-20% Tris-glycine gel, using a 3-8% Tris-acetate gel improved the detection limit for a ~190 kDa protein from 750 ng down to 9 ng under identical transfer conditions, highlighting the profound effect of gel choice on HMW protein transfer [4].
- Methanol Pre-treatment: For gels other than Tris-acetate, a 5-10 minute pre-equilibration in 20% ethanol can enhance the transfer of HMW proteins by removing salts and adjusting gel size, as demonstrated with a ~360-400 kDa protein (KLH) [4].
The efficient transfer of proteins from gel to membrane is a foundational step in western blotting that cannot be approached with a one-size-fits-all method. This application note has detailed how the molecular weight of the target protein and the pH-dependent charge dictate the selection of every major parameter, from gel type and membrane composition to buffer additives and transfer duration. By understanding the principles of steric hindrance and electrochemistry that govern protein mobility, researchers can systematically optimize their protocols. Adhering to the tailored strategies and troubleshooting guides provided here will empower scientists and drug developers to achieve highly sensitive, reliable, and reproducible detection of proteins across the entire molecular weight spectrum, thereby strengthening the validity of their scientific conclusions.
Hands-On Transfer Protocols: Wet, Semi-Dry, and Dry Blotting Techniques
Protein transfer is a vital step in western blot analysis which involves the electrophoretic transfer of proteins separated by SDS-PAGE to a solid support matrix, typically a nitrocellulose or PVDF membrane [13]. This process immobilizes the protein to a solid support matrix, which facilitates the subsequent detection of specific proteins using antibodies directed against the protein(s) of interest [13]. The wet transfer method, also known as tank transfer, is a widely used technique that ensures efficient transfer and detection of proteins across a broad molecular weight range by submerging the gel-membrane sandwich in a tank filled with transfer buffer where an electric field is applied to move proteins from the gel onto the membrane [19]. This method is particularly valued for its high transfer efficiency, versatility, and suitability for quantitative western blotting, as it allows extensive customization of time, temperature, voltage, and buffer composition to suit specific experimental requirements [27] [13].
The fundamental principle underlying wet transfer is electroblotting, which relies on the electrophoretic mobility of proteins to move them out of the gel matrix [13]. When an electric field is applied, negatively charged protein-SDS complexes migrate toward the positively charged anode, moving out of the gel and onto the surface of the membrane where they become tightly attached [13]. The resulting membrane contains a replica of the protein separation pattern originally present in the polyacrylamide gel, creating a stable platform for subsequent antibody probing and detection steps [13]. This transfer process is essential not only for better handling capability offered by the membrane compared to a fragile gel but also for improved target protein accessibility by macromolecules like antibodies [13].
Figure 1: Western Blot Wet Transfer Workflow - This diagram illustrates the sequential steps involved in performing a standard wet transfer protocol for western blotting.
Principles and Historical Context
The western blot technique, first introduced by Towbin et al. in 1979, has since become a routine and fundamental technique for protein analysis [13]. The method was developed following the invention of the eponymously named "Southern blot" for DNA detection by Edwin Southern in 1975, which was quickly followed by the "northern blot" for detecting specific RNA molecules using radio-labeled DNA probes [28]. Inspired by the northern blot, W. Neal Burnette developed a method for visualizing proteins separated by SDS-PAGE using monoclonal antibodies, subsequently terming this method the "western blot" in a nod to its predecessors [28]. Despite initial criticism from reviewers who considered the method's name "flippant and frivolous whimsy," the technique became widely circulated and published in 1981, eventually becoming an essential and ubiquitous technique in biology and medical laboratories worldwide [28].
The wet transfer method represents the traditional approach to protein electroblotting and continues to be widely used due to its reliability and effectiveness across diverse protein types and molecular weights [13]. The method involves placing the gel-membrane sandwich in a vertical orientation between stainless steel or platinum wire electrodes in a tank completely filled with transfer buffer [13]. The configuration allows for efficient heat dissipation and extended transfer times, making it particularly suitable for transferring high molecular weight proteins that require longer migration times to exit the gel matrix completely [19]. Transfer efficiencies of 80–100% are achievable for proteins between 14–116 kDa, with efficiency generally better for lower molecular weight proteins than higher molecular weight proteins [13].
Materials and Reagents
Research Reagent Solutions
Table 1: Essential Materials and Reagents for Wet Transfer Protocol
| Item | Function/Purpose | Additional Notes |
|---|---|---|
| Transfer Buffer | Provides conducting medium for protein migration; typically Tris-glycine buffer with methanol [13] | Methanol helps remove SDS from proteins and enhances binding to membrane [3]; SDS (0.1%) may be added for large proteins [19] |
| Nitrocellulose or PVDF Membrane | Solid support matrix that binds transferred proteins [13] | Nitrocellulose: 0.45 µm for standard proteins, 0.2 µm for small proteins (<15 kDa); PVDF: higher binding capacity but may yield higher background [22] [19] |
| Filter Paper | Creates even pressure and buffer distribution in transfer stack [19] | Should be cut to exact gel size without overhangs for optimal transfer [13] |
| Sponges/Pads | Cushions to ensure even pressure and contact between gel and membrane [19] | Pre-wet with transfer buffer before assembly |
| Transfer Cassette | Housing unit that holds the assembled transfer stack [19] | Must be correctly oriented in tank (membrane toward anode) [19] |
| Cooling System | Prevents heat buildup during transfer [27] | Ice packs, cooling unit, or performing transfer in cold room [27] |
| Protease Inhibitors | Prevents protein degradation during sample preparation [28] | Include in lysis buffer (e.g., PMSF, aprotinin, leupeptin) [28] |
| Phosphatase Inhibitors | Prevents dephosphorylation during sample preparation [28] | Include when studying phosphorylated proteins (e.g., sodium orthovanadate, sodium fluoride) [28] |
Transfer Buffer Composition
The standard transfer buffer for wet transfer is typically a Tris-glycine buffer containing methanol [13]. A common formulation includes:
- 25 mM Tris base
- 192 mM glycine
- 10-20% methanol [13]
- Optional: 0.1% SDS for large proteins (>100 kDa) to improve transfer efficiency [19]
Methanol plays a crucial role in the transfer process by promoting the dissociation of SDS from protein-SDS complexes, which enhances the binding of proteins to the membrane [3]. However, higher methanol concentrations can reduce the efficiency of transferring large proteins out of the gel, so the methanol concentration may be reduced to 10-15% for proteins >100 kDa [19]. For some applications, particularly when transferring very large proteins, SDS may be added to the transfer buffer to enhance protein mobility and transfer efficiency [19].
Step-by-Step Wet Transfer Protocol
Pre-Transfer Steps
Gel Electrophoresis: Following SDS-PAGE, carefully remove the gel from the electrophoresis unit. If using hand-cast gels, gently separate the glass plates to avoid damaging the gel [19].
Gel Equilibration: Place the gel in a container with transfer buffer and incubate for 10-15 minutes. This step ensures the gel is properly equilibrated with the transfer buffer, which promotes efficient protein transfer [19] [13].
Membrane Preparation:
- Nitrocellulose membranes: Pre-wet in transfer buffer for 5-10 minutes [19].
- PVDF membranes: First activate in 100% methanol for 15-30 seconds, then transfer to distilled water for 2 minutes, and finally equilibrate in transfer buffer for at least 5 minutes [19] [3]. PVDF membranes are hydrophobic and require methanol activation to become hydrophilic and permeable to transfer buffer.
Preparation of Other Components: Soak sponges, filter papers, and fiber pads in transfer buffer until fully saturated. Ensure all components are cut to the exact size of the gel without overhangs, as this can cause current to bypass the gel and reduce transfer efficiency [13].
Transfer Stack Assembly
Open Transfer Cassette: Place the cassette on a clean, flat surface with the black (negative/cathode) side facing down [19].
Build the Transfer Stack in the following order from cathode (black side) to anode (clear side):
Remove Air Bubbles: After placing each component, carefully roll a 15 mL tube or similar cylindrical object over the surface to remove any trapped air bubbles between layers [19]. Air bubbles create barriers that prevent protein transfer in affected areas, resulting in blank spots on the final blot.
Close the Cassette: Secure the cassette according to the manufacturer's instructions, ensuring the stack does not shift during closure. The completed sandwich should be firm but not overly compressed [19].
Tank Setup and Transfer Execution
Insert Cassette into Tank: Place the assembled cassette into the transfer tank with the black side (cathode) facing the black (negative) electrode and the clear side (anode) facing the red (positive) electrode [19]. This orientation ensures proteins, which are negatively charged due to SDS binding, migrate toward the positive anode and onto the membrane.
Fill Tank with Transfer Buffer: Completely fill the tank with transfer buffer, ensuring the cassette is fully submerged. If transferring multiple gels, cassettes can be placed facing the same direction or according to the manufacturer's guidelines [13].
Cooling System Setup: For transfers longer than 1 hour or when using high power settings, include a cooling unit, ice packs, or perform the transfer in a cold room (4°C) to prevent overheating [27] [19]. Excessive heat can cause gel distortion, protein degradation, and inconsistent transfers.
Set Transfer Parameters and Run: Close the tank lid, connect to the power supply, and set the appropriate voltage and time based on the protein size (refer to Table 2 for specific conditions). Begin the transfer, monitoring for excessive heat generation or bubbling [19].
Post-Transfer Procedures
Disassemble Cassette: After the transfer is complete, turn off the power supply, remove the cassette from the tank, and carefully open it to retrieve the membrane. The membrane should contain the transferred protein pattern.
Verify Transfer Efficiency: Optional verification steps include:
- Membrane staining: Use reversible stains like Ponceau S to visualize total protein transfer [22].
- Gel staining: Stain the post-transfer gel with Coomassie Blue to check for residual proteins that failed to transfer [22].
- Pre-stained ladder: Use a pre-stained molecular weight marker to confirm successful transfer of standard proteins [22].
Blocking and Detection: Proceed with standard western blotting protocols including membrane blocking, antibody incubations, and detection according to experimental requirements [19] [3].
Table 2: Optimized Wet Transfer Conditions Based on Protein Size [19]
| Protein Size (kDa) | Voltage (V) | Current (mA per gel) | Transfer Time | Additional Optimization Tips |
|---|---|---|---|---|
| < 15 (Small proteins) | 30V | 100-150 mA | 3-4 hours or Overnight (Low voltage) | Use 0.2 µm membrane to prevent loss; reduce methanol in transfer buffer |
| 15-50 (Medium proteins) | 70-100V | 200-300 mA | 1-2 hours | Standard transfer conditions; 0.45 µm membranes recommended |
| 50-100 (Large proteins) | 100V | 250-350 mA | 1.5-2 hours | May require extended transfer time to ensure complete transfer |
| > 100 (Very large proteins) | 25-30V | 100-200 mA | Overnight (12-16 hours) | Use SDS (0.1%) in transfer buffer; reduce methanol concentration (10-15%) |
Troubleshooting and Optimization Strategies
Monitoring Transfer Efficiency
Several methods can be employed to monitor and optimize transfer efficiency:
Pre-stained Molecular Weight Markers: These colored protein standards allow visual tracking of transfer progress. The brightly colored bands should completely disappear from the gel and appear on the membrane after successful transfer [22]. Using a ladder with different colored bands for various molecular weights is particularly beneficial as it enables tracking of transfer efficiency for differently-sized proteins simultaneously [22].
Post-Transfer Gel Staining: After transfer, stain the polyacrylamide gel with Coomassie Blue to visualize any proteins that failed to transfer. If the gel shows significant protein retention, especially in the regions corresponding to the protein of interest, transfer conditions may need optimization [22]. A successfully transferred gel should appear mostly blank with minimal residual protein staining.
Dual Membrane Transfer: To test for over-transfer (particularly of low molecular weight proteins), place two membranes in the transfer stack behind one another [22]. After transfer, blot both membranes. If significant protein is detected on the second membrane, transfer time may be too long, causing proteins to pass completely through the primary membrane [22]. This is particularly relevant for small proteins that may migrate quickly through the membrane matrix.
Common Issues and Solutions
Incomplete Transfer: For large proteins (>100 kDa), extend transfer time, reduce methanol concentration, or add SDS to the transfer buffer to enhance mobility [19].
Over-Transfer of Small Proteins: For proteins <15 kDa, use membranes with smaller pore size (0.2 µm instead of 0.45 µm), reduce transfer time, or lower current/voltage [19] [13].
Uneven or Blotchy Transfer: Ensure proper removal of air bubbles during sandwich assembly and use freshly prepared transfer buffer. Check that the transfer stack is evenly compressed without shifting components [19].
Gel Melting or Distortion: Implement adequate cooling during transfer by using ice packs, a cooling unit, or performing the transfer in a cold room, especially for extended transfers [27] [19].
High Background on Blot: Optimize blocking conditions after transfer and ensure proper membrane preparation. For PVDF membranes, confirm complete activation with methanol before use [3].
Figure 2: Western Blot Transfer Troubleshooting Guide - This flowchart outlines common wet transfer problems and their corresponding solutions to optimize protein transfer efficiency.
Comparison with Alternative Transfer Methods
While wet transfer is highly effective for many applications, understanding its relative advantages and limitations compared to other transfer methods is essential for selecting the optimal approach for specific experimental needs. The three primary electroblotting methods—wet, semi-dry, and dry transfer—each offer distinct benefits and drawbacks [27] [19] [13].
Table 3: Comparison of Western Blot Transfer Methods [27] [19] [13]
| Parameter | Wet Transfer | Semi-Dry Transfer | Dry Transfer |
|---|---|---|---|
| Transfer Time | 30 min to overnight (typically 1-2 hours) | 15-60 minutes | As few as 3-10 minutes |
| Buffer Requirements | Large volume (∼1000 mL) typically containing methanol [13] | Small volume (∼200 mL); often methanol-free [13] | No buffer required [13] |
| Throughput | +++ (Multiple gels per run) | +++ | +++ |
| Transfer Efficiency | +++ (Best for broad molecular weight range) | ++ (May struggle with extremes of protein size) | +++ |
| Ease of Use | ++ (Moderate setup and cleanup) | +++ (Simpler setup) | +++ (Minimal setup) |
| Quantitative Capability | Yes, highly suitable for quantitative westerns [27] | Not recommended for quantitative work [27] | Limited quantitative applications |
| Optimization Flexibility | High (time, temperature, voltage, buffer can be customized) [27] | Moderate (some buffer options available) | Low (limited by pre-made stacks) |
| Cooling Requirements | Often required, especially for longer transfers [27] | Typically performed at room temperature | Typically performed at room temperature |
| Best Applications | Quantitative work; broad molecular weight range; difficult proteins requiring customization [27] [19] | Routine transfers of mid-size proteins; when time and reagent conservation are priorities [27] | Rapid results; minimal setup time; routine applications [27] |
Wet transfer remains the gold standard for quantitative western blotting and for transferring proteins across a broad molecular weight spectrum, particularly very large proteins (>100 kDa) that require extended transfer times [27] [19]. The method's principal advantages include high transfer efficiency, customization flexibility, and compatibility with a wide range of protein sizes [27] [13]. However, wet transfer requires larger volumes of reagents, generates more hazardous waste (particularly when using methanol-containing buffers), and typically requires longer transfer times compared to semi-dry or dry methods [13]. Additionally, the heat generated during transfer often necessitates cooling systems to maintain optimal conditions [27].
Semi-dry transfer offers a faster alternative with reduced reagent consumption, making it suitable for routine applications and when processing multiple gels efficiently [27] [13]. However, this method may struggle with quantitative transfer of proteins at extreme molecular weights, particularly very large proteins (>300 kDa) that require extended transfer times or very small proteins that may transfer completely through the membrane [19] [13]. The limited buffer capacity of semi-dry systems also restricts extended transfer times, as the system can dry out and exhaust the buffer capacity [27].
Dry transfer represents the most rapid and convenient approach, eliminating buffer preparation entirely and completing transfers in as little as 3-10 minutes [13]. This method uses pre-assembled transfer stacks containing proprietary buffer matrices, significantly reducing setup and cleanup time [27] [13]. However, the requirement for specialized, often costly consumables and limited optimization options make dry transfer less suitable for challenging proteins or quantitative applications requiring extensive protocol customization [27].
Within the broader context of Western blotting methodology, the transfer of proteins from a polyacrylamide gel to a solid-support membrane is a critical step that significantly influences the sensitivity and accuracy of protein detection [13] [29]. Rapid semi-dry transfer is an electroblotting technique that leverages a horizontal apparatus where the gel-membrane sandwich is pressed between two plate electrodes, with transfer buffer confined to soaked filter papers rather than a large tank [13] [19]. This method is designed for speed and efficiency, enabling complete transfer in as little as 7 to 10 minutes for many protein targets, while also minimizing the consumption of transfer buffers and associated hazardous waste [27] [30]. This application note provides detailed protocols and optimization strategies to ensure successful implementation of rapid semi-dry transfer for researchers and drug development professionals.
Principles of Semi-Dry Transfer
In semi-dry transfer, an electric field is applied to move negatively charged proteins from the gel onto the membrane [13]. The setup creates a short, direct path for the proteins, which contributes to the speed of the transfer. The "semi-dry" terminology arises because the gel and membrane are not submerged in a large buffer volume; instead, the necessary ionic conductivity is maintained by buffer-saturated filter papers [13] [29]. The close proximity of the electrodes and the confined buffer system maximize the current passing through the gel itself, rather than around it, leading to faster transfer times compared to traditional wet tank systems [13].
Diagram Title: Semi-Dry Transfer Setup and Protein Movement
Materials and Reagent Solutions
Research Reagent Solutions
The following table details essential materials and reagents required for successful rapid semi-dry transfer.
Table 1: Essential Materials and Reagents for Rapid Semi-Dry Transfer
| Item | Description & Function |
|---|---|
| Semi-Dry Apparatus | Horizontal blotter with two plate electrodes. Provides even current distribution and pressure [31]. |
| Filter Paper | Thick, buffer-saturated paper (approx. 3 mm). Serves as a buffer reservoir and ensures even contact; must be cut precisely to gel size [13] [31]. |
| Transfer Membrane | Nitrocellulose or PVDF. Binds transferred proteins. PVDF requires pre-wetting in methanol [22] [19]. |
| Transfer Buffer | Typically a Tris-Glycine-based solution. Conducts current. Methanol (10-20%) promotes protein binding but can be substituted with ethanol [19] [30]. |
| Pre-stained Standard | Colored protein ladder. Allows visual monitoring of transfer efficiency and progress [22]. |
Step-by-Step Protocol
Detailed Experimental Methodology
- Gel Equilibration: Following SDS-PAGE, carefully immerse the gel in transfer buffer for 5–10 minutes. This step removes contaminating electrophoresis salts and prevents excessive heat generation during transfer [4] [19].
- Membrane Preparation:
- Filter Paper Preparation: Soak the filter papers (cut to the exact size of the gel) in transfer buffer for at least 5 minutes to ensure complete hydration [31].
- Sandwich Assembly: On the bottom electrode (anode), assemble the transfer stack in the following order, carefully rolling out any air bubbles with a test tube or roller after each layer [19] [29]:
- Buffer-saturated filter paper
- Pre-wetted membrane
- Equilibrated gel
- Buffer-saturated filter paper
- Transfer Execution: Close the top electrode (cathode) and run the transfer at a constant current or voltage. Standard parameters are 10-25 V for 15-60 minutes, depending on protein size [19]. For true "rapid" protocols, specialized systems can complete the transfer in 7-10 minutes [13] [27].
- Post-Transfer Processing: After the run, disassemble the stack. The membrane can be stained with Ponceau S to verify successful protein transfer before proceeding to blocking and immunodetection [22] [32].
Optimization Strategies
Key Parameters for Enhanced Performance
Optimization is critical for challenging targets, such as very high or low molecular weight proteins.
Table 2: Optimization Guide for Transfer Conditions
| Parameter | Standard Condition | Optimization for HMW Proteins (>150 kDa) | Optimization for LMW Proteins (<30 kDa) |
|---|---|---|---|
| Transfer Time | 15-30 min [19] | Increase to 10-12 min (rapid) or 45-60 min (standard) [4] [19] | Reduce time to prevent "blow-through" [27] |
| Methanol Content | 20% in standard Towbin buffer [32] | Reduce to 10-15% or omit to enlarge gel pores [19] [32] | Maintain 20% to enhance protein binding to membrane [32] |
| SDS Additive | 0% | Add 0.01-0.1% SDS to improve elution of large proteins [19] [32] | Avoid, as it can reduce binding efficiency [32] |
| Membrane Pore Size | 0.45 µm | 0.45 µm can be used | Use 0.2 µm membrane to trap small proteins [32] |
Additional Optimization Techniques
- Gel Chemistry: For HMW proteins (>150 kDa), use low-percentage Bis-Tris or Tris-glycine gels, or specialized 3–8% Tris-acetate gels, which have a more open matrix that facilitates better migration and transfer [4].
- Ethanol Equilibration: If not using a Tris-acetate gel, equilibrating the gel in 20% ethanol for 5-10 minutes before transfer can shrink the gel and enhance the transfer efficiency of HMW proteins [4].
- Discontinuous Buffer Systems: Using different anode and cathode buffers can improve transfer across a broader molecular weight range. For example, an anode buffer with SDS can help elute large proteins, while a cathode buffer without SDS can aid in the binding of smaller proteins [27] [32].
Diagram Title: Optimization and Troubleshooting Pathway
Troubleshooting Common Problems
Even with an optimized protocol, issues can arise. The table below outlines common problems, their causes, and solutions.
Table 3: Troubleshooting Common Semi-Dry Transfer Issues
| Problem | Possible Cause | Solution |
|---|---|---|
| Patchy or Incomplete Transfer | Uneven pressure or air bubbles in stack; insufficient buffer in filter papers [31]. | Reassemble stack, roll out bubbles thoroughly; ensure filter papers are fully saturated [31] [19]. |
| High Background Streaking | pH shifts in buffer; contaminated electrodes; insufficient blocking [31]. | Replace transfer buffer regularly; clean electrodes with deionized water/ethanol; optimize blocking conditions [31]. |
| Poor Transfer of HMW Proteins | Transfer time too short; gel pore size too small; excessive methanol [4]. | Increase transfer time; use a low-% or Tris-acetate gel; reduce methanol to 10% or add SDS [4] [19]. |
| Loss of Low MW Proteins | Transfer time too long; membrane pore size too large [27]. | Reduce transfer time; use a membrane with 0.2 µm pore size [32]. |
| Overheating | Excessive current/voltage; prolonged run time [31]. | Do not exceed recommended settings (e.g., 1.5 mA/cm²); limit runs to ≤45 min [31]. |
Rapid semi-dry transfer is a powerful and efficient method for immobilizing proteins onto a membrane for Western blot analysis. Its advantages of speed, minimal reagent use, and convenience make it highly suitable for high-throughput workflows and diagnostic applications. Successful implementation, however, relies on a clear understanding of the underlying principles, meticulous attention to protocol details—particularly in the assembly of the transfer stack—and a systematic approach to optimization based on the specific characteristics of the target protein. By applying the protocols and best practices outlined in this document, researchers can reliably achieve high-quality transfers, forming a solid foundation for robust and reproducible protein detection.
Dry transfer systems represent a significant advancement in western blotting technology, eliminating the need for traditional liquid transfer buffers through pre-cast buffer-infused gel stacks. This application note details the implementation, optimization, and troubleshooting of dry transfer systems for protein immunoblotting. We provide comprehensive experimental protocols and performance data demonstrating efficient transfer of proteins across various molecular weights, with particular emphasis on methodologies for high molecular weight targets (>150 kDa). This streamlined approach enables rapid, reproducible protein transfer in as little as 3-10 minutes while reducing hazardous waste and handling time, making it particularly valuable for research and drug development applications requiring high-throughput protein analysis.
Protein transfer from polyacrylamide gels to solid support membranes is a critical step in western blotting that directly impacts detection sensitivity and assay reproducibility. Dry electroblotting technology represents a paradigm shift from conventional buffer-based transfer methods by incorporating the transfer buffer directly into a pre-assembled gel matrix system [13]. This innovation eliminates the time-consuming buffer preparation and optimization steps required for wet and semi-dry transfer methods while significantly accelerating the transfer process.
The fundamental principle underlying dry transfer systems involves the use of disposable transfer stacks containing pre-hydrated fiber matrices that serve as both buffer reservoirs and ion conductors [4] [13]. When an electric field is applied, proteins migrate from the separation gel through the optimized matrix onto the blotting membrane. The technology utilizes copper electrodes that do not generate oxygen gas during transfer, thereby reducing blot distortion commonly encountered with traditional electrodes [30]. This technical note establishes standardized protocols for implementing dry transfer systems across various experimental contexts in biomedical research and drug development.
System Components and Mechanism
Dry transfer systems employ integrated consumable stacks composed of multiple specialized layers that collectively replace traditional buffer-based transfer setups. The typical configuration includes bottom and top gel matrices with proprietary buffer compositions optimized for efficient protein migration and binding [13] [30]. Unlike conventional methods that require external transfer buffers, these pre-assembled stacks contain all necessary chemical components for electrophoretic transfer, significantly simplifying workflow and reducing potential variability.
The transfer mechanism relies on creating a high ionic density environment within the gel matrix that enables rapid protein mobility when voltage is applied [13]. The shortened distance between electrodes in dry transfer systems allows for higher field strength and current, accelerating transfer times to as little as 3-10 minutes compared to 30-120 minutes for wet transfer methods [27] [13]. The copper anode used in dry transfer systems prevents oxygen gas formation through water electrolysis, a significant advantage over inert electrodes used in wet and semi-dry systems that can cause blot distortion [30].
Comparative Method Analysis
The following table summarizes key performance characteristics across the three primary electroblotting methodologies:
Table 1: Comparative Analysis of Western Blot Transfer Methods
| Parameter | Wet Transfer | Semi-Dry Transfer | Dry Transfer |
|---|---|---|---|
| Transfer Time | 30-120 minutes [13] | 7-60 minutes [27] [13] | 3-10 minutes [4] [13] |
| Buffer Requirements | High volume (∼1000 mL) with methanol [13] | Reduced volume (∼200 mL) [13] | No buffer preparation required [13] |
| Transfer Efficiency | Excellent for broad molecular weight range [13] [15] | Good for mid-range proteins [13] | Comparable to wet transfer [13] |
| Ease of Use | Moderate (extensive setup) [27] | High (simplified setup) [27] | Very high (minimal setup) [27] |
| Cooling Requirements | Required [19] [16] | Not required [19] | Not required [30] |
| Optimization Flexibility | High [27] | Moderate [27] | Low [27] |
| Hazardous Waste Generation | High [19] | Reduced [27] | Minimal [30] |
Diagram 1: Workflow comparison highlighting efficiency advantages of dry transfer systems over traditional methods.
Experimental Protocols
Standard Dry Transfer Protocol for Routine Applications
This protocol outlines the standard procedure for transferring proteins from SDS-PAGE gels to membranes using dry transfer systems, with optimization guidelines for different protein molecular weights.
Materials and Reagents
Table 2: Essential Research Reagent Solutions for Dry Transfer Systems
| Component | Function | Specification |
|---|---|---|
| Dry Transfer Stacks | Integrated buffer matrix and membrane | Pre-assembled nitrocellulose or PVDF stacks [4] |
| SDS-PAGE Gels | Protein separation matrix | Tris-glycine, Bis-Tris, or Tris-acetate gels [4] |
| Methanol | Membrane activation (PVDF only) | 100% analytical grade [19] |
| Filter Paper | Interface between gel and stack (if required) | Cut to gel dimensions [30] |
| Protein Molecular Weight Standards | Transfer efficiency monitoring | Pre-stained or unstained markers [30] |
Procedure
Gel Preparation: Following SDS-PAGE separation, carefully open the cassette and excise the polyacrylamide gel. Remove any unused gel lanes to ensure proper alignment with the transfer stack.
Membrane Preparation:
Transfer Stack Assembly:
- Place the bottom stack (anode side) with the protective film facing down.
- Carefully position the equilibrated gel onto the bottom stack.
- Place the membrane on top of the gel, ensuring complete coverage.
- Add the top stack (cathode side) with the protective film facing up.
- Roll a 15 mL tube gently over the stack to remove air bubbles and ensure uniform contact [19].
Transfer Execution:
- Insert the assembled stack into the transfer unit, ensuring proper alignment with electrical contacts.
- Program the transfer parameters according to protein molecular weight (see Table 3).
- Initiate transfer and monitor for proper current flow.
Post-Transfer Processing:
- Following transfer, disassemble the stack and retrieve the membrane.
- Verify transfer efficiency using Ponceau S staining or pre-stained molecular weight markers [15].
- Proceed to blocking and immunodetection steps.
Enhanced Protocol for High Molecular Weight Proteins (>150 kDa)
Transfer of high molecular weight (HMW) proteins presents unique challenges due to their slower migration through gel matrices. The following protocol modifications optimize detection of HMW targets:
Gel Chemistry Selection: Use 3-8% Tris-acetate gels instead of Bis-Tris or Tris-glycine gels for improved HMW protein separation and transfer [4]. The more open matrix structure of Tris-acetate gels facilitates better migration of large proteins.
Extended Transfer Time: Increase transfer duration to 8-10 minutes at 20-25V instead of the standard 7 minutes [4]. The extended time allows complete emigration of HMW proteins from the gel matrix.
Gel Pretreatment (Alternative Method): When using non-ideal gel chemistries, pre-equilibrate the gel in 20% ethanol for 5-10 minutes prior to transfer. This step removes contaminating salts and adjusts gel size, significantly improving HMW protein transfer efficiency [4].
Validation: Include positive controls for HMW proteins such as EGFR (~190 kDa) or KLH (~360-400 kDa) to verify transfer efficiency [4].
Table 3: Optimized Transfer Parameters for Different Protein Size Ranges
| Protein Size Range | Voltage | Time | Recommended Gel Type | Special Considerations |
|---|---|---|---|---|
| <50 kDa | 20V | 7 minutes | Bis-Tris, Tris-glycine | Standard protocol sufficient |
| 50-150 kDa | 20-25V | 7-8 minutes | Bis-Tris, Tris-glycine | May require slight time increase |
| >150 kDa | 20-25V | 8-10 minutes | Tris-acetate | Extended time critical [4] |
| >300 kDa | 25V | 10+ minutes | Tris-acetate | Ethanol equilibration beneficial [4] |
Results and Discussion
Transfer Efficiency Analysis
Dry transfer systems demonstrate comparable or superior transfer efficiency to traditional methods across a broad molecular weight spectrum when optimized appropriately. Experimental data using the iBlot 2 Transfer System shows complete transfer of EGFR (~190 kDa) from 3-8% Tris-acetate gels within 10 minutes at 25V, with detection sensitivity reaching 9 ng compared to 750 ng required with traditional Tris-glycine gels [4]. This represents an 80-fold improvement in detection sensitivity for HMW targets when combining optimized gel chemistry with dry transfer technology.
For very HMW proteins such as keyhole limpet hemocyanin (KLH, ~360-400 kDa), transfer efficiency improvements up to 5-fold have been documented when implementing a 20% ethanol equilibration step prior to dry transfer [4]. This pretreatment compensates for suboptimal gel chemistries by removing conductive salts that generate heat during transfer and allowing gel shrinkage to its final size before the transfer process.
Method Validation and Quality Control
Rigorous validation of dry transfer performance should include both qualitative and quantitative assessment methods:
Ponceau S Staining: Temporary staining with 0.1% Ponceau S in 5% acetic acid provides rapid visualization of total transferred protein, allowing assessment of transfer uniformity and identification of bubbles or artifacts that may interfere with protein migration [15].
Dual Membrane Capture: Placement of a secondary membrane behind the primary capture membrane detects potential blow-through of low molecular weight proteins, indicating over-transfer [15]. This is particularly relevant when transferring complex samples with wide molecular weight distributions.
Post-Transfer Gel Staining: Coomassie Blue staining of the gel following transfer confirms complete removal of proteins, validating transfer efficiency especially for HMW targets that may retain in the gel matrix [3].
Loading Control Monitoring: Consistent detection of housekeeping proteins across samples verifies uniform transfer efficiency between experimental replicates [30].
Diagram 2: Quality control workflow for validating protein transfer efficiency in dry transfer systems.
Applications in Drug Development and Biomedical Research
The streamlined nature of dry transfer systems makes them particularly valuable in drug development pipelines where high-throughput screening of protein targets is essential. The significantly reduced transfer time (3-10 minutes versus 30-120 minutes) enables rapid iteration of experimental conditions during target validation and mechanism of action studies [33]. The consistency achieved through pre-manufactured transfer stacks reduces inter-assay variability, a critical factor in preclinical drug development.
In biomedical research applications, the minimal reagent requirements and elimination of methanol-based buffers align with growing initiatives for laboratory sustainability [30]. The small instrument footprint conserves valuable bench space, while the simplified protocol reduces technical training requirements for research personnel. These advantages collectively enhance workflow efficiency in diverse research environments from academic core facilities to industrial drug discovery laboratories.
Troubleshooting Guide
Table 4: Troubleshooting Common Dry Transfer Issues
| Problem | Potential Causes | Solutions |
|---|---|---|
| Incomplete Transfer | Insufficient transfer time | Increase duration to 8-10 minutes for HMW proteins [4] |
| Improper stack assembly | Ensure firm contact between layers; remove all air bubbles [19] | |
| Incorrect voltage | Verify and adjust voltage according to manufacturer specifications | |
| High Background | Membrane handling contamination | Use clean gloves and forceps during membrane manipulation |
| Non-optimal blocking | Extend blocking time or try alternative blocking agents [3] | |
| Patchy or Uneven Transfer | Air bubbles between layers | Roll stack more thoroughly with 15 mL tube before transfer [19] |
| Irregular gel surface | Ensure uniform gel thickness during casting | |
| Low Signal for HMW Proteins | Suboptimal gel chemistry | Switch to Tris-acetate gels with more open matrix [4] |
| Insufficient transfer time | Extend transfer time to 10+ minutes at 25V [4] | |
| Gel porosity issues | Implement 20% ethanol equilibration step before transfer [4] |
Dry transfer systems provide a robust, efficient platform for protein immunoblotting that significantly streamlines the western workflow. The elimination of buffer preparation, reduced transfer times, and minimal waste generation offer substantial advantages over traditional transfer methods while maintaining high transfer efficiency across a broad molecular weight range. The implementation of optimized protocols for high molecular weight targets, coupled with appropriate quality control measures, ensures reliable performance for both research and diagnostic applications. As western blotting continues to evolve as a fundamental protein analysis technique, dry transfer technology represents a significant step toward standardized, reproducible protein detection methodologies.
Specialized Protocols for High Molecular Weight Proteins (>150 kDa)
The western blot is a cornerstone technique in molecular biology and proteomics for detecting specific proteins and their post-translational modifications [34]. However, the efficient electrophoretic transfer of high molecular weight (HMW) proteins, typically defined as those larger than 150 kDa, from a gel to a membrane remains a significant and common challenge in many laboratories [4]. The successful analysis of large proteins is critical in fields such as structural biology, neurobiology, cancer research, and signaling pathway analysis, where targets like membrane receptors, structural components, and multi-domain enzymes play pivotal roles [25] [35].
The fundamental challenge with HMW proteins lies in their size, which hinders their migration through the dense matrix of a polyacrylamide gel and subsequent transfer onto a membrane [25]. Standard western blot protocols often result in the compaction of HMW proteins at the top of the resolving gel, leading to poor resolution, inefficient transfer, and ultimately, weak or undetectable signals [4]. This application note addresses these challenges by providing detailed, optimized protocols for the reliable transfer and detection of HMW proteins, framed within the broader context of protein transfer methodologies for western blotting research.
Key Factors Influencing HMW Protein Transfer Efficiency
The successful transfer of HMW proteins depends on a carefully optimized workflow where each step—from gel selection to transfer conditions—is critical. The diagram below illustrates the key decision points and parameters in this process.
The successful execution of the workflow depends on several interconnected technical considerations:
- Gel Chemistry and Pore Size: The open matrix structure of low-percentage Bis-Tris (e.g., 4–6%) or Tris-acetate (e.g., 3–8%) gels allows HMW proteins to migrate further, reducing compaction and improving transfer efficiency. In contrast, the tighter matrix of popular 4–20% Tris-glycine gels severely limits HMW protein movement [4] [35].
- Transfer Buffer Composition: The inclusion of SDS (0.1%) can improve the elution of large proteins from the gel, while reducing the methanol concentration to 10-15% helps prevent protein precipitation and improves mobility [19] [36].
- Membrane Choice: PVDF membranes are often preferred for HMW proteins due to their higher protein binding capacity and superior physical strength, which is beneficial for the extended manipulation often required [36].
Optimized Experimental Protocols
This section provides two detailed, validated protocols for transferring HMW proteins. The first is a robust wet transfer method, and the second is a rapid dry transfer protocol.
Protocol 1: Extended Wet Transfer for HMW Proteins
This protocol is highly customizable and is the gold standard for ensuring complete transfer of HMW proteins, though it is more time-consuming [25] [35] [19].
- Sample Denaturation: Mix protein samples (20–100 µg total protein per lane) with Laemmli buffer. For most proteins, heat at 70–100°C for 10 minutes. Critical note: For multi-pass transmembrane proteins, avoid boiling to prevent aggregation; instead, incubate at room temperature for 15-20 minutes or at 70°C for 10-20 minutes [37].
- Gel Electrophoresis: Load and run samples on a Tris-acetate (3–8%) or low-percentage Tris-glycine (4–6%) gel according to the manufacturer's instructions. Use pre-chilled running buffer [4] [25] [35].
- Gel Equilibration: After electrophoresis, equilibrate the gel in 1X transfer buffer for 40 minutes at room temperature with gentle agitation [25].
- Membrane Activation:
- Transfer Sandwich Assembly: Assemble the transfer stack in the following order (cathode to anode): sponge, filter paper, gel, membrane, filter paper, sponge. Carefully roll out any air bubbles with a roller or glass tube [19].
- Electroblotting: Place the cassette in a tank filled with pre-chilled 1X transfer buffer. Perform the transfer at 25–30 V, 100–200 mA per gel, for 12–16 hours (overnight) at 4°C [35] [19].
- Post-Transfer Processing: After transfer, wash the membrane twice in deionized water for 10 minutes each before proceeding to blocking and immunodetection [25].
Protocol 2: Rapid Dry Transfer for HMW Proteins
This method is ideal for speed and convenience, utilizing specialized instruments like the iBlot 2 Gel Transfer Device, but offers less customization [4] [19].
- Steps 1-3 (Sample Denaturation, Gel Electrophoresis, and Gel Equilibration): Identical to Protocol 1.
- Instrument Setup: Use a pre-programmed dry transfer system. Select the appropriate transfer stack (nitrocellulose or PVDF).
- Electroblotting: For proteins >150 kDa, increase the transfer time beyond the standard protocol. Run at 20–25 V for 8–10 minutes using the preprogrammed P0 or P3 method [4].
- Gel Pre-Treatment (if not using Tris-acetate gels): If using a Bis-Tris gel, submerge it in 20% ethanol (in deionized water) for 5–10 minutes on a shaker before transfer. This step removes salts and adjusts the gel size, significantly improving HMW protein transfer efficiency [4].
Quantitative Data and Buffer Formulations
Optimized buffer recipes and a clear comparison of transfer parameters are essential for reproducibility.
Table 1: Recommended Transfer Parameters for HMW Proteins (>150 kDa)
| Transfer Method | Voltage | Current | Duration | Temperature | Key Buffer Additives |
|---|---|---|---|---|---|
| Wet Transfer [25] [35] [19] | 25–30 V | 100–200 mA/gel | 12–16 hours (Overnight) | 4°C | 0.1% SDS, 10-15% Methanol |
| Rapid Semi-Dry Transfer [4] | 10–25 V | As per system | 10–12 minutes | Room Temperature | 1-Step Transfer Buffer |
| Rapid Dry Transfer [4] | 20–25 V | As per system | 8–10 minutes | Room Temperature | Proprietary buffer matrices |
Table 2: Essential Buffer Recipes for HMW Protein Western Blotting
| Buffer | Composition | Role in HMW Protein Transfer |
|---|---|---|
| 1X Transfer Buffer (Wet) [25] [36] | 25 mM Tris base, 192 mM glycine, 10-15% methanol, pH 8.3. SDS (0.1%) optional. | Lower methanol % prevents precipitation of HMW proteins; SDS aids elution from gel. |
| 2X Laemmli Sample Buffer [35] [38] | 25% 0.5 M Tris-HCl (pH 6.8), 4% SDS, 20% glycerol, 0.01% 2-Mercaptoethanol, 16% Bromophenol Blue. | Denatures and linearly coats proteins with negative charge for separation by size. |
| Tris-Tricine or Tris-Acetate Running Buffer [4] [38] | Compatible with respective gel chemistries (e.g., NuPAGE Tris-Acetate Running Buffer). | Provides optimal pH and ion conditions for separation of large proteins in specialized gels. |
| Blocking Buffer [35] [38] | PBS or TBS with 3-5% BSA or specialty blocking agents. | Blocks non-specific binding sites on the membrane without interfering with antigenicity. |
The Scientist's Toolkit: Essential Research Reagent Solutions
The following reagents and tools are critical for successfully implementing the protocols described above.
Table 3: Essential Reagents and Kits for HMW Protein Analysis
| Item | Function/Application | Example Products/Catalog Numbers |
|---|---|---|
| Tris-Acetate Gels | Optimal gel chemistry for separation of HMW proteins due to large pore size and open matrix structure. | NuPAGE 3–8% Tris-Acetate Gels (Cat. No. EA03752BOX) [4] |
| Transfer Stacks | Pre-assembled stacks for dry transfer systems; contain integrated buffer matrices. | iBlot 2 Transfer Stacks (Nitrocellulose or PVDF) [4] |
| PVDF Membrane | High-protein-binding-capacity membrane ideal for retaining HMW proteins and for its physical strength. | Thermo Scientific PVDF Membranes (Cat. No. 88518) [36] [38] |
| Specialized Transfer Buffers | Pre-mixed buffers formulated for maximum protein transfer and retention. | NuPAGE Transfer Buffer (Cat. No. NP0006) [38] |
| Enhanced Chemiluminescent (ECL) Substrate | High-sensitivity substrate for detecting low-abundance HMW proteins after successful transfer. | SuperSignal West Femto (Cat. No. 34095) [38] |
| Fluorescent Blocking Buffer | Reduces background fluorescence for fluorescent detection methods. | Blocker FL Fluorescent Blocking Buffer (Cat. No. 37565) [4] [38] |
The reliable transfer of high molecular weight proteins is achievable through a deliberate and optimized approach that addresses the unique physical challenges these targets present. The key to success lies in selecting an appropriate gel matrix with a large pore size, such as Tris-acetate, and employing a transfer method—whether extended wet transfer or an optimized rapid protocol—that provides sufficient time and optimal conditions for the large proteins to elute from the gel and bind to the membrane. By adhering to the detailed protocols and recommendations outlined in this application note, researchers can overcome the historical challenges associated with HMW proteins and obtain robust, reproducible, and high-quality data essential for advancing research in proteomics and drug development.
Optimized Transfer Conditions for Small Proteins (<15 kDa) to Prevent Blow-Through
Within the broader context of optimizing protein transfer from gel to membrane for western blotting, the efficient immobilization of low molecular weight (MW) proteins presents a unique challenge. Standard western blot protocols often lead to the complete loss of proteins smaller than 15 kDa, a phenomenon known as "blow-through," where proteins pass entirely through the membrane matrix [39] [40]. This application note details targeted strategies to prevent this issue, ensuring the reliable detection and analysis of small proteins and peptides, which is critical for researchers in fields such as epigenetics, proteomics, and signal transduction [39].
The Core Challenge: Why Small Proteins Are Lost
The propensity for low MW proteins to be lost during transfer is due to several interconnected factors. Their small size allows for rapid electrophoretic migration, facilitating an easy exit from the gel matrix and subsequent passage through the pores of standard blotting membranes [39] [41]. Furthermore, the presence of SDS coats these proteins with a strong negative charge, accelerating their movement and reducing their affinity for the membrane surface, thereby preventing effective binding [41]. The graph below illustrates the logical relationship between protein size, transfer conditions, and the risk of blow-through, highlighting the critical need for optimized protocols.
Optimized Transfer Parameters
Preventing the loss of low MW proteins requires a multi-faceted approach, meticulously optimizing each component of the transfer system to retain these small targets effectively.
Membrane Selection and Preparation
The choice of membrane is the most critical factor in retaining small proteins.
- Membrane Type and Pore Size: A PVDF membrane with a 0.2 µm pore size is highly recommended over standard 0.45 µm membranes or nitrocellulose [39] [19] [42]. The smaller pore size physically obstructs the passage of small proteins, while PVDF's hydrophobic nature provides a high binding capacity for low MW targets [43] [42].
- Membrane Activation: PVDF membranes require pre-activation in 100% methanol for 15-30 seconds prior to equilibration in transfer buffer. This step is essential for rendering the membrane hydrophilic and enabling it to wet properly, which facilitates protein binding [39] [13].
Transfer Buffer Composition
The composition of the transfer buffer can be fine-tuned to modulate protein mobility and binding.
- Methanol Content: Methanol promotes protein binding to PVDF but also shrinks the gel pores, which can trap larger proteins. For proteins <15 kDa, a moderate methanol concentration of 15-20% is typically used in the Towbin buffer system. This provides a balance between promoting binding and allowing efficient migration out of the gel [39] [32] [41].
- SDS Additive: Adding SDS (up to 0.1%) to the transfer buffer increases the negative charge on proteins, which can help transfer efficiency. However, it also reduces binding to the membrane. Therefore, if SDS is added, it is crucial to maintain at least 10-20% methanol in the buffer to ensure proteins adhere to the membrane upon arrival [32].
Electrophoretic Conditions
Controlling the electrical parameters and temperature is key to a controlled, efficient transfer.
- Method Selection: While semi-dry transfer is faster, the wet (tank) transfer method is generally preferred for its superior control and consistency, especially for challenging targets [19] [40]. It allows for efficient transfer of a broad range of protein sizes and is more easily optimized with cooling.
- Power and Time: To prevent blow-through, use lower voltage and shorter transfer times compared to standard protocols. A typical optimized condition for wet transfer is 30-100 mA per gel for 45-60 minutes at 4°C [39] [19]. Extended overnight transfers at very low currents (e.g., 30V for 12-16 hours) can also be effective but require rigorous temperature control [19].
- Temperature: The transfer should be performed at 4°C using a pre-chilled buffer and a cooling unit. This minimizes protein degradation and gel swelling, ensuring sharp bands [39] [19].
The table below summarizes the key optimized conditions for the transfer of small proteins.
Table 1: Summary of Optimized Transfer Conditions for Proteins <15 kDa
| Parameter | Standard Conditions | Optimized for <15 kDa | Rationale |
|---|---|---|---|
| Membrane Pore Size | 0.45 µm | 0.2 µm PVDF | Prevents physical passage of small proteins [19] [43] |
| Methanol Concentration | 20% | 15-20% | Promotes protein binding to PVDF membrane [39] [32] |
| Transfer Time | 60-90 min (wet) | 45-60 min (wet) [39] | Reduces opportunity for proteins to pass through membrane [42] |
| Current/Voltage | 200-250 mA / 70-100V | 30-100V / 100-150 mA [19] | Slower, more controlled migration [19] |
| Temperature | Room Temperature | 4°C | Stabilizes proteins and gel matrix [39] [19] |
Complementary Gel Electrophoresis: Tricine-SDS-PAGE
For optimal separation and resolution of proteins below 30 kDa, the Tris-glycine buffer system used in standard SDS-PAGE is often insufficient. Tricine-SDS-PAGE is a superior method for this weight range [39] [43]. Tricine, as the trailing ion, has a lower mobility and pK value than glycine, which improves the stacking of low MW proteins and results in sharper, better-resolved bands [39]. This is particularly crucial for distinguishing between small proteins or for detecting short peptides. A common setup for proteins <10 kDa involves using a resolving gel with 15–16.5% acrylamide [39].
Detailed Experimental Protocol
Materials and Reagents
Table 2: Research Reagent Solutions for Small Protein Transfer
| Item | Function | Example / Specifics |
|---|---|---|
| PVDF Membrane (0.2 µm) | Solid support for protein immobilization | Millipore Immobilon-PSQ [43] |
| Transfer Buffer | Conducts current & modulates transfer | 25 mM Tris, 192 mM glycine, 15-20% methanol [39] [41] |
| Methanol (100%) | Activates PVDF membrane | Pre-wet membrane for 15-30 sec [39] |
| Pre-chilled Buffer & Chamber | Maintains low temperature during transfer | Critical to run at 4°C to prevent overheating [39] [19] |
| Filter Paper & Sponges | Forms a uniform transfer sandwich | Soaked in transfer buffer before assembly [39] |
Step-by-Step Wet Transfer Protocol
- Gel Equilibration: Following electrophoresis (preferably using a Tricine gel system), carefully remove the gel from the cassette and equilibrate it in transfer buffer for 10-15 minutes with gentle agitation. This removes excess SDS and salts, preventing transfer artifacts [41].
- Membrane Activation: Cut the PVDF membrane to the size of the gel. Activate the membrane by submerging it in 100% methanol for 15-30 seconds. Then, transfer it to the transfer buffer for equilibration for at least 5 minutes [39].
- Sandwich Assembly: In a tray of transfer buffer, assemble the transfer sandwich in the following order (from cathode (-) to anode (+)):
- Cathode Assembly: Cassette base → Sponge → Filter paper → Gel
- Membrane Placement: Carefully place the activated PVDF membrane on top of the gel.
- Anode Assembly: Filter paper → Sponge → Cassette top Use a glass tube or roller to gently roll over the stack after placing each layer to remove any trapped air bubbles, which can cause uneven transfer [19] [41].
- Electrotransfer:
- Place the assembled cassette into the transfer tank filled with pre-chilled transfer buffer.
- Ensure the correct orientation (gel facing the cathode, membrane facing the anode).
- Run the transfer at a constant 30-100V (or 100-150 mA) for 45-60 minutes at 4°C [39] [19]. For multiple gels or different apparatus, follow manufacturer guidelines and optimize accordingly.
- Post-Transfer Processing:
- After transfer, disassemble the sandwich. The membrane can be briefly rinsed in deionized water or TBS.
- Immediately stain the membrane with a reversible stain like Ponceau S to confirm successful protein transfer and check for even loading [40].
- Proceed with standard blocking and immunodetection protocols.
Troubleshooting and Validation
Despite optimization, issues can arise. The table below outlines common problems and their solutions.
Table 3: Troubleshooting Guide for Small Protein Transfer
| Problem | Possible Cause | Solution |
|---|---|---|
| Faint or No Signal | Blow-through (over-transfer) | Use 0.2 µm PVDF; shorten transfer time; reduce voltage [42] [40] |
| Insufficient transfer | Ensure membrane activation; check buffer composition; verify power supply [39] | |
| High Background | Inefficient blocking | Extend blocking time to 1 hour at room temperature or overnight at 4°C [39] [40] |
| Non-optimal antibody dilution | Titrate antibody concentrations; use recommended blocking buffers [44] | |
| Smeared Bands | Inefficient separation | Use Tricine-SDS-PAGE for better resolution of small proteins [39] [43] |
| Overheating during transfer | Ensure transfer is performed at 4°C with pre-chilled buffers [19] |
A critical validation step is the double membrane assay. Place a second 0.2 µm PVDF membrane directly behind the first one during sandwich assembly. After transfer, develop both membranes. If the target protein is detected on the second membrane, it confirms that blow-through is occurring, indicating a need for further optimization of transfer time or conditions [40].
Within the framework of western blotting research, the transfer of proteins from a separation gel to a solid-support membrane is a critical step for subsequent immunodetection. While electrophoretic transfer methods (wet, semi-dry, and dry) are most prevalent, alternative techniques are invaluable for specific experimental scenarios. Capillary and vacuum blotting are two such methods that provide unique advantages, particularly when dealing with delicate proteins, when specialized detection is required, or when traditional electrophoresis equipment is unavailable [13] [19] [45]. This application note details the principles, protocols, and specific applications of these alternative transfer methods, providing researchers with a comprehensive toolkit for challenging protein analysis.
Method Principles and Comparison
Capillary Blotting (Diffusion Blotting)
Capillary blotting, also known as diffusion blotting, relies on the passive thermal motion of molecules. Proteins diffuse from an area of high concentration (the gel) to an area of low concentration (the membrane), where they are absorbed and immobilized. This absorption helps maintain the concentration gradient, continuously driving the process [13] [19]. Originally developed for transferring proteins from isoelectric focusing (IEF) gels, this method is also applicable to other macromolecules like nucleic acids [13].
Vacuum Blotting (Vacuum Capillary Blotting)
Vacuum blotting is a variant of capillary blotting that uses mild vacuum pressure to accelerate the transfer process. A vacuum source draws buffer from a reservoir through the gel and blotting membrane into dry absorbent material below, thereby pulling polypeptides from the gel onto the membrane [13] [19]. This method requires a slab gel dryer system or similar equipment capable of applying a controlled vacuum.
Method Selection Guide
The table below provides a direct comparison of these alternative methods with common electrophoretic transfers to guide appropriate selection.
Table 1: Comparative Analysis of Western Blot Transfer Methods
| Method | Principle | Typical Protein Recovery | Optimal Protein Size | Best For | Key Limitations |
|---|---|---|---|---|---|
| Capillary Blotting | Passive diffusion via thermal motion [19] | 25–50% [13] [19] | Smaller proteins; challenging for large proteins in SDS-PAGE gels [13] [19] | Preparing multiple blots from a single gel; mass spectrometry analysis; zymography [13] [19] | Low and non-quantitative transfer; slow process [13] [19] |
| Vacuum Blotting | Capillary action accelerated by vacuum [13] | 30–65% (efficiency higher for low MW proteins) [19] | Low molecular weight (e.g., 14.3 kDa); less efficient for high MW (e.g., 200 kDa) [19] | Faster transfer times compared to passive capillary blotting [13] | Risk of gel drying; requires optimization of vacuum pressure [13] [19] |
| Wet (Tank) Transfer | Electrophoretic elution in buffer tank [1] [13] | 80–100% (for 14-116 kDa) [13] [19] | Versatile for a wide range, but best for 14-116 kDa [19] | High transfer efficiency; quantitative data; standard and high-MW proteins [13] [19] | Time-consuming; high buffer volumes; heat generation [1] [19] |
| Semi-Dry Transfer | Electrophoretic elution between plate electrodes [1] [13] | 60–80% [19] | Low-, mid-, and high-MW proteins; can struggle with >300 kDa [13] [19] | Rapid transfer; reduced buffer consumption [1] [19] | May require more optimization; lower efficiency for very large proteins [13] [19] |
The following workflow diagram illustrates the decision-making process for selecting a transfer method based on key experimental goals.
Detailed Experimental Protocols
Protocol for Capillary Blotting
Capillary blotting is ideal for generating multiple copies of a blot from a single gel for screening different antibodies or for downstream applications like mass spectrometry [13] [19].
Materials Required:
- Separation Gel: SDS-PAGE or IEF gel.
- Membrane: Nitrocellulose or PVDF.
- Blotting Paper: Thick filter paper (Whatman 3MM or equivalent).
- Weight: A 0.5–1 kg flat weight.
- Transfer Buffer: Standard Towbin or Tris-glycine buffer.
Step-by-Step Procedure:
Post-Electrophoresis Preparation: Following electrophoresis, carefully open the gel cassette. Do not equilibrate the gel in transfer buffer.
Membrane Preparation: Cut the membrane and filter papers to the exact size of the gel. Pre-wet the membrane according to its type:
- Nitrocellulose: Saturate in transfer buffer.
- PVDF: Activate in methanol for 30 seconds, then rinse in distilled water and equilibrate in transfer buffer [46].
Sandwich Assembly: On a clean glass or plastic plate, assemble the transfer stack in the following order from bottom to top:
- Several sheets of dry, thick blotting paper.
- The pre-wet membrane.
- The gel (carefully placed on the membrane).
- Several sheets of dry, thick blotting paper.
Transfer: Carefully place a flat, heavy weight (0.5–1 kg) on top of the assembled stack to ensure intimate contact between all layers. Allow the transfer to proceed for 24–48 hours at room temperature. The buffer from the gel will be drawn into the dry filter paper, facilitating protein transfer via capillary action.
Completion: After transfer, carefully disassemble the stack. The membrane can now be processed for immunodetection (blocking, antibody incubation, etc.). The gel can be stained with Coomassie Blue to confirm protein transfer efficiency [22].
Protocol for Vacuum Blotting
Vacuum blotting accelerates capillary action and is suitable for faster transfers while avoiding the heat and potential protein deformation of electroblotting [13].
Materials Required:
- Vacuum Blotting Unit: A slab gel dryer system or dedicated vacuum blotter.
- Separation Gel: SDS-PAGE gel.
- Membrane: Nitrocellulose.
- Blotting Paper: Filter paper.
- Transfer Buffer: Standard Towbin or Tris-glycine buffer.
Step-by-Step Procedure:
Apparatus Setup: Set up the vacuum blotting unit according to the manufacturer's instructions. Ensure the vacuum seal is clean and intact.
Gel and Membrane Preparation: Cut the membrane and filter paper to the size of the gel. Pre-wet the nitrocellulose membrane in transfer buffer. Do not use methanol if using nitrocellulose, as it will dissolve. [46]. After electrophoresis, equilibrate the gel in transfer buffer for 5–10 minutes.
Sandwich Assembly: On the vacuum blotter's porous screen, assemble the stack in this order:
- Pre-wetted filter paper.
- The equilibrated gel.
- The pre-wetted membrane.
- Another sheet of pre-wetted filter paper.
- Ensure no air bubbles are trapped between layers by gently rolling a 15 mL tube over the stack [19].
Transfer: Apply a moderate and consistent vacuum. A strong pump should not be used, as a high vacuum can damage the gel or membrane [13]. The transfer buffer will be drawn through the stack. Monitor the buffer level to ensure the gel does not dry out; most systems require a buffer reserve. Transfer is typically complete within 45-60 minutes.
Post-Transfer Handling: Release the vacuum, disassemble the stack, and proceed with standard immunoblotting steps.
The Scientist's Toolkit: Essential Research Reagents
Successful implementation of capillary and vacuum blotting requires specific reagents and materials. The following table lists key solutions and their functions.
Table 2: Key Research Reagent Solutions for Alternative Transfer Methods
| Reagent/Material | Function | Application Notes |
|---|---|---|
| Nitrocellulose Membrane | Binds proteins via hydrophobic interactions [1] [22]. | Standard for most applications; compatible with both capillary and vacuum blotting. Pore size (0.2 µm or 0.45 µm) should be selected based on protein size [22]. |
| PVDF Membrane | Binds proteins with high affinity and capacity [1] [22]. | Requires activation in methanol before use [46]. Ideal for low-abundance proteins but may yield higher background [22]. |
| Towbin Transfer Buffer | Standard buffer for protein transfer [13]. | Contains Tris, glycine, and often methanol (10-20%). Methanol promotes protein binding to membranes but can reduce elution efficiency for large proteins [1] [19]. |
| Ponceau S Stain | Reversible stain for visualizing protein bands on membrane [1] [46]. | Used post-transfer to confirm successful protein transfer and check uniformity before proceeding to immunodetection [46]. |
| Thick Blotting Filter Paper | Acts as a buffer reservoir in capillary blotting and ensures good contact in vacuum blotting [13] [19]. | High absorbency and thickness (e.g., ~3 mm) are critical for holding sufficient buffer for prolonged capillary transfer [13]. |
Capillary and vacuum blotting, while not as universally applicable as electrophoretic methods, are crucial techniques in the western blotting arsenal. Their value is evident in specialized applications such as creating multiple blot replicas, performing zymography, preparing samples for mass spectrometry, and transferring proteins from delicate gel matrices like IEF gels [13] [19]. By understanding the principles, advantages, and limitations of these methods—and by following the detailed protocols provided—researchers and drug development professionals can effectively expand their experimental capabilities to address complex protein analysis challenges.
Troubleshooting Transfer Failures: Solving Common Problems and Optimization Strategies
In Western blotting, the electrophoretic transfer of proteins from a polyacrylamide gel to a solid support membrane is a foundational step that enables subsequent immunodetection. This process of protein transfer is vital for two primary reasons: it provides more robust handling capability compared to a fragile gel, and it greatly improves target protein accessibility for macromolecular probes like antibodies [13]. A failed or inefficient transfer—characterized by weak or absent signal—compromises the entire experiment, wasting precious samples, reagents, and time. Effective protein transfer is heavily reliant on multiple factors, including the gel acrylamide percentage, the molecular weight of the separated proteins, and the type of blotting membrane employed [47]. This application note systematically addresses the common causes of transfer failure, provides targeted troubleshooting methodologies, and outlines optimized protocols to ensure reliable protein transfer for high-quality Western blot data.
Troubleshooting Transfer Problems: A Systematic Approach
Diagnosing transfer issues requires a methodical examination of the entire process. The table below outlines common symptoms, their potential causes, and recommended solutions.
Table 1: Troubleshooting Weak or No Signal in Western Blots
| Observed Problem | Potential Causes | Recommended Solutions |
|---|---|---|
| Weak or No Signal for Specific Protein | Poor transfer efficiency | Optimize transfer time and voltage; Add SDS to transfer buffer for large proteins (>100 kDa); Reduce methanol concentration for large proteins [48] [24]. |
| Protein size-specific issues | For large proteins (>100 kDa): Use low-% gels (e.g., 6-8%), add 0.1% SDS to transfer buffer, reduce methanol to ≤10%, use wet transfer [48] [24]. For small proteins (<30 kDa): Use 0.2 µm pore size membrane, ensure 20% methanol, omit SDS from transfer buffer to enhance membrane binding [48] [49]. | |
| Overall Faint or No Bands (All Lanes) | Incorrect transfer assembly | Verify sandwich orientation (gel facing cathode, membrane facing anode); Ensure no air bubbles between gel and membrane [48] [50]. |
| Power supply issues | Check for broken/corroded electrodes; Confirm power supply is functioning; Verify buffer concentration and composition (e.g., use Tris base, not Tris-HCl) [48]. | |
| Bands Appear Swirled or Distorted | Poor gel-membrane contact | Roll sandwich thoroughly with glass pipette during assembly; Assemble in buffer to prevent bubbles; Check that pads/filters are saturated and not over-compressed [48]. |
| Poor Transfer Efficiency Verified by Post-Staining | Incomplete transfer | Increase transfer time or voltage; Pre-equilibrate gel in transfer buffer; For large proteins, pre-incubate gel in buffer with 0.02-0.04% SDS [48]. |
| "Blow-Through" (Small Proteins Lost) | Over-transfer or wrong membrane | Shorten transfer time; For proteins <10-30 kDa, use 0.2 µm pore size membrane instead of 0.45 µm [48] [49]. |
The following decision tree provides a logical workflow for diagnosing the root cause of a failed transfer, moving from simple checks to more complex interventions.
Diagram 1: Diagnostic workflow for transfer problems.
Optimized Protocols for Reliable Protein Transfer
Standard Wet (Tank) Transfer Protocol
Wet transfer is highly reliable, especially for proteins over 100 kDa, and is less prone to failure from membrane drying [13] [24]. The following protocol is adapted for high efficiency and can be completed in 1 to 2 hours for most proteins, though overnight transfers at lower voltages may be used for maximum efficiency.
Materials Required:
- Transfer apparatus (tank)
- Transfer buffer (see formulation below)
- Nitrocellulose or PVDF membrane
- Filter paper and sponge pads
- Cooling unit or ice bath (if running at high power)
Protocol Steps:
Prepare the Transfer Buffer: A standard 1X wet transfer buffer contains 25 mM Tris base, 192 mM glycine, and 20% methanol. Adjust the pH to 8.3 [49]. For proteins >100 kDa, adding SDS to a final concentration of 0.1% is recommended to improve elution from the gel [24].
Prepare the Membrane:
Equilibrate the Gel: After electrophoresis, carefully open the cassette and soak the gel in transfer buffer for 10-15 minutes [49].
Assemble the Transfer Sandwich: On the cassette, assemble in the following order (from cathode [-] to anode [+]):
Run the Transfer:
Verify Transfer: After transfer, visualize the membrane with Ponceau S stain to check for efficient and even protein transfer before proceeding to blocking [51].
Fast Semi-Dry Transfer Protocol
Semi-dry transfer is faster and uses less buffer but may be less efficient for very high molecular weight proteins [13]. It is ideal for proteins between 30-100 kDa.
Materials Required:
- Semi-dry transfer apparatus
- Semi-dry transfer buffer (see formulation below)
- Nitrocellulose or PVDF membrane
- Extra-thick filter paper
Protocol Steps:
Prepare the Transfer Buffer: A common semi-dry buffer contains 48 mM Tris base, 39 mM glycine, 0.04% SDS, and 20% methanol. Do not adjust the pH [49] [24].
Prepare the Gel and Membrane: Follow the same steps as for wet transfer to prepare the membrane and equilibrate the gel [49].
Assemble the Transfer Sandwich:
Run the Transfer:
The Scientist's Toolkit: Essential Reagents for Successful Transfer
The following table lists key reagents and materials critical for an efficient Western blot transfer, along with their specific functions and optimization tips.
Table 2: Key Research Reagent Solutions for Protein Transfer
| Reagent/Material | Function & Importance | Optimization Notes |
|---|---|---|
| PVDF Membrane | Hydrophobic membrane that binds proteins via hydrophobic interactions; offers high binding capacity and mechanical strength [49] [47]. | Must be activated in 100% methanol before use [49] [24]. Ideal for low-abundance proteins and sequential blotting [49]. |
| Nitrocellulose Membrane | Binds proteins via hydrophobic and electrostatic interactions; generally lower background with some antibodies [47] [24]. | Do not use methanol. Soak directly in buffer. Preferred for low molecular weight proteins [49]. |
| Transfer Buffer (Wet) | Conducts current and provides appropriate pH for protein migration. Standard: 25 mM Tris, 192 mM Glycine, 20% Methanol [49] [24]. | Methanol promotes protein binding to membrane but can shrink gel pores. SDS (0.1%) helps elute large proteins but inhibits binding of small proteins [48] [24]. |
| Ponceau S Stain | Reversible stain used to visualize protein bands on the membrane post-transfer to confirm efficiency and even loading [51]. | A quick and inexpensive quality control step. Can be washed off with TBST or water before blocking [51]. |
| Filter Paper/Sponges | Create a uniform conductive path and ensure tight contact between gel and membrane within the transfer sandwich [13]. | Must be fully saturated with transfer buffer. Over-compression can distort bands, while under-compression can cause poor contact [48]. |
Advanced Considerations: Normalization and Data Integrity
Beyond successful transfer, obtaining quantitative data that meets modern publication standards requires careful normalization. While housekeeping proteins (HKPs) like GAPDH and β-actin have been widely used, they are falling out of favor because their expression can vary with experimental conditions, cell type, and pathology [52].
Total Protein Normalization (TPN) is now considered the gold standard for quantitative Western blotting. TPN normalizes the target protein signal to the total amount of protein in each lane, which corrects for variations in sample loading and transfer efficiency more accurately than a single HKP [52]. TPN can be achieved using fluorescent total protein stains or labeling reagents applied directly to the membrane after transfer. This method provides a larger dynamic range and is increasingly required by top scientific journals [52].
Mastering the protein transfer step is non-negotiable for generating robust and publishable Western blot data. Success hinges on selecting the appropriate transfer method and meticulously optimizing conditions for the specific proteins under investigation—paying particular attention to molecular weight. By systematically diagnosing failure modes, implementing the optimized protocols provided, and adopting total protein normalization, researchers can overcome the common challenge of weak or absent signals. This ensures that their data is not only detectable but also quantitatively reliable, paving the way for meaningful scientific conclusions.
Eliminating High Background and Non-Specific Binding
In protein research, the accuracy of data derived from western blotting is paramount. High background and non-specific binding represent two of the most pervasive and detrimental challenges, often compromising the interpretation of results and leading to irreproducible data. These phenomena occur when antibodies bind to sites other than the specific target protein, creating a generalized signal that obscures true detection. In the context of transferring proteins from gel to membrane—a cornerstone of western blotting—understanding and mitigating these artifacts is essential for any researcher, scientist, or drug development professional aiming to generate reliable, publication-quality data. The transfer step itself, while necessary for facilitating antibody access, introduces multiple surfaces and interfaces where non-specific interactions can occur. This application note details the primary sources of this interference and provides validated, detailed protocols for its elimination, framed within the critical stage of protein transfer.
The fundamental causes of non-specific binding are often traceable to the reagents and conditions used during the transfer and immunoblotting processes. Excess antibody concentration can lead to lower-affinity interactions, while the presence of Fc receptors on certain cell types can bind the constant region of antibodies non-specifically [53]. Furthermore, a lack of sufficient protein in washing and staining solutions can cause antibodies to stick to the membrane or other surfaces, and interactions mediated by plasma complement proteins can also create artifactual signals [53]. During the transfer from gel to membrane, inefficient protein retention or inappropriate membrane choice can exacerbate these issues. As evidenced in a 2025 study, failure to adequately address these factors can lead to significant background that interferes with the accurate interpretation of results, particularly in complex samples [54].
Key Strategies for Reduction of Background
Optimization of the Transfer Process
The method chosen to transfer proteins from the polyacrylamide gel to a solid membrane directly influences the efficiency of protein immobilization, which in turn affects background signal during immunodetection. Efficient transfer ensures that proteins are securely and uniformly bound to the membrane, reducing the potential for later antibody detachment or non-specific adsorption.
The following table compares the three primary electroblotting transfer methods, highlighting their specific advantages and disadvantages concerning background and efficiency [13] [55] [56]:
| Transfer Method | Typical Transfer Time | Impact on Background & Efficiency | Best Use Cases |
|---|---|---|---|
| Wet (Tank) Transfer | 30 minutes to overnight [13] | Pros: High transfer efficiency, particularly for proteins of a wide molecular weight range; consistent performance. Cons: Longer setup and cleanup; requires large volumes of buffer (often containing methanol); can generate heat requiring cooling [13] [56]. | High molecular weight (>100 kDa) proteins; low abundance proteins; when consistency is prioritized over speed [55] [56]. |
| Semi-Dry Transfer | 7 to 60 minutes [13] | Pros: Faster and less buffer required than wet transfer; lighter cleanup.Cons: Can be less efficient for high molecular weight proteins (>300 kDa); may require optimization of buffer systems [13] [56]. | Routine applications with mid-to-low molecular weight proteins; when speed and convenience are important [13]. |
| Dry (Dry Blotting) Transfer | As few as 3 to 7 minutes [13] | Pros: Fastest method; no liquid buffer required, minimizing preparation and cleanup.Cons: Requires specialized, often expensive, equipment and pre-assembled transfer stacks [13] [56]. | Fast, high-quality transfers for a broad range of protein sizes; labs performing high volumes of western blots [13]. |
Critical Transfer Parameters:
- Membrane Selection: The choice of membrane is critical. PVDF membranes generally offer higher protein binding capacity and better protein retention, which is ideal for low-abundance proteins. However, they require a brief activation in methanol before use. Nitrocellulose membranes are ideal for lower molecular weight proteins but have lower protein retention and can be more brittle. For proteins smaller than 30 kDa, a pore size of 0.2 µm is recommended over 0.45 µm to prevent "blow-through" where proteins pass completely through the membrane [55] [56].
- Buffer and Assembly: The transfer buffer typically contains methanol, which helps proteins bind to the membrane. However, for semi-dry transfers, methanol-free buffers can be used [13]. It is imperative to remove all air bubbles from the gel-membrane sandwich during assembly, as bubbles create areas where transfer cannot occur, leading to uneven signal and potential background issues [55].
Immunoblotting and Blocking Protocols
Once transfer is complete, the subsequent steps are geared towards ensuring that antibodies bind only to the protein of interest. The cornerstone of this phase is effective blocking.
Detailed Blocking and Antibody Incubation Protocol [2] [56]:
- Post-Transfer Wash: Following transfer, wash the membrane twice briefly with distilled water or 1x TBST (Tris-Buffered Saline with Tween-20).
- Blocking: Incubate the membrane with a blocking solution with constant rocking for 1 hour at room temperature (or overnight at 4°C for enhanced blocking).
- Standard Blocking Solution: 1x TBST containing 2-5% non-fat dry milk.
- For Phospho-Epitopes: Use 1-5% Bovine Serum Albumin (BSA) in 1x TBST, as milk contains phosphoproteins that can cause high background [56].
- Primary Antibody Incubation: Dilute the primary antibody in the chosen blocking solution. A common starting dilution is 1:1000, but the optimal concentration must be determined experimentally via a dilution series to maximize signal-to-noise ratio [56]. Incubate the membrane with the primary antibody for 1 hour at room temperature (or overnight at 4°C for increased sensitivity) on a rocker.
- Washing: Wash the membrane three times with 1x TBST for 10 minutes each to remove unbound primary antibody.
- Secondary Antibody Incubation: Incubate the membrane with a species-appropriate secondary antibody conjugated to a reporter enzyme (e.g., HRP) or fluorophore. The antibody should be diluted as per the manufacturer's instructions in blocking solution. Incubate for 1 hour at room temperature with constant rocking. If using fluorescent secondaries, keep the membrane in the dark from this point onward.
- Final Washing: Wash the membrane three times with 1x TBST for 10 minutes each to rigorously remove any non-specifically bound secondary antibody.
Advanced and Novel Techniques
Emerging methodologies offer powerful new ways to discriminate specific signal from background. A landmark 2022 study published in Nature Communications introduced the Single-Molecule Colocalization Assay (SiMCA). This technique uses capture and detection antibodies labeled with distinct fluorophores. By using total internal reflection fluorescence (TIRF) microscopy to count only the detection antibody molecules that are colocalized with a capture antibody, the method can virtually eliminate background from non-specific detection antibody binding. The study reported that this approach achieved a three-fold lower limit of detection compared to conventional assays, demonstrating consistent performance even in complex matrices like serum and blood [57].
Furthermore, a 2025 study focusing on immunoglobulin G (IgG) staining for blood-brain barrier research demonstrated that heating at 75°C was sufficient to eliminate non-specific binding in brain sections. The study also found that while hydrogen peroxide pretreatment alone was ineffective, a mixture of hydrogen peroxide and the catalase inhibitor 3-amino-1,2,4-triazole (3-AT) reduced background staining by 35.4% ± 5.7% in untreated mouse brains and by 36.9% ± 1.8% in disease model mice when using the polymer method for detection [54].
The Scientist's Toolkit: Research Reagent Solutions
The following table details essential materials and their specific functions in mitigating background during western blotting.
| Research Reagent | Function in Reducing Background |
|---|---|
| Non-Fat Dry Milk | A common and economical blocking agent that coats the membrane with a layer of protein, preventing non-specific antibody binding [56]. |
| Bovine Serum Albumin (BSA) | A more defined blocking agent than milk; essential for detecting post-translational modifications like phosphorylation, as it lacks phosphoproteins that can cause background [56]. |
| Fc Receptor Blocking Reagent | Contains recombinant proteins that bind to Fc receptors on cell lysates, preventing non-specific binding of the Fc region of antibodies [53]. |
| Catalase Inhibitor (3-AT) | When used with hydrogen peroxide, can significantly reduce non-specific background in HRP-based detection systems by inhibiting endogenous catalase activity [54]. |
| PVDF Membrane (0.2 µm pore) | Provides superior protein retention, especially for low molecular weight proteins (<30 kDa), preventing loss of target and subsequent nonspecific signal [55] [56]. |
| Methanol in Transfer Buffer | Facilitates the adsorption of proteins onto the PVDF membrane, ensuring tight binding that is less likely to leach and cause background later [55] [56]. |
Experimental Workflow and Visualization
The following diagram illustrates the integrated western blot workflow, highlighting key decision points and steps critical for minimizing background and non-specific binding.
The table below consolidates key quantitative findings from recent studies on reducing background and non-specific binding, providing a reference for expected outcomes.
| Method / Reagent | Quantitative Effect | Experimental Context |
|---|---|---|
| Catalase Inhibitor (3-AT) + H₂O₂ | Reduced background by 35.4% ± 5.7% and 36.9% ± 1.8% [54] | IgG staining in mouse brain sections using the HRP-polymer method [54]. |
| Heat Treatment (75°C) | Effectively eliminated non-specific binding [54] | PFA-fixed brain vibratome sections from untreated and MCAO mice [54]. |
| Single-Molecule Colocalization (SiMCA) | Achieved a 3-fold lower Limit of Detection (LOD) vs conventional assay (7.6 ± 1.9 pM vs 26 ± 5.8 pM) [57] | Detection of TNF-α in serum using a two-color TIRF microscopy immunoassay [57]. |
| Antibody Titration | Optimizes signal-to-background staining; critical when antibody concentration is too high [53] | General best practice in antibody-based techniques like flow cytometry and western blotting [53]. |
The persistent challenge of high background and non-specific binding in western blotting demands a systematic and knowledgeable approach. As detailed in these application notes, success hinges on optimizing each stage of the process, with particular attention to the protein transfer and immunoblotting phases. By carefully selecting the appropriate transfer method and membrane, employing rigorous blocking and washing protocols, titrating antibodies, and considering advanced techniques like SiMCA or specific chemical inhibitors such as 3-AT, researchers can significantly enhance the specificity, sensitivity, and reliability of their data. Adhering to these detailed protocols will empower scientists in both academic and drug development settings to produce robust, quantifiable, and publication-ready western blot results.
In western blotting, the electrophoretic transfer of proteins from a polyacrylamide gel to a solid support membrane is a critical step that directly impacts detection sensitivity and accuracy. Incomplete transfer represents a common challenge, manifesting as two distinct problems: the inefficient transfer of high molecular weight (HMW) proteins (>150 kDa) that remain trapped in the gel matrix, and the over-transfer of low molecular weight (LMW) proteins (<20 kDa) that pass completely through the membrane. This application note details optimized strategies and protocols to address both issues, ensuring comprehensive transfer efficiency across a broad molecular weight spectrum for reliable protein detection.
The Protein Transfer Challenge: Molecular Weight Divergence
The differential migration behavior of proteins during electroblotting stems from their physical properties. HMW proteins navigate through gel and membrane matrices with difficulty due to their substantial hydrodynamic radius, often requiring extended transfer times and specialized conditions [4]. Conversely, LMW proteins migrate rapidly and can completely pass through standard membranes, leading to signal loss [40]. This fundamental divergence necessitates customized approaches based on target protein size, as a one-size-fits-all transfer protocol inevitably compromises detection of proteins at either end of the molecular weight spectrum.
The following diagram illustrates the core challenges and strategic solutions for transferring proteins of different sizes:
Figure 1: Core challenges and strategic directions for transferring proteins of different sizes. HMW proteins require facilitation through the gel matrix, while LMW proteins need restricted movement to prevent over-transfer.
Strategic Optimization of Transfer Conditions
Gel and Membrane Selection
The initial setup for protein transfer begins with appropriate gel and membrane selection, which varies significantly based on target protein size. For HMW proteins, Tris-acetate gels with their neutral pH (∼7.0) and larger pore sizes provide superior separation and transfer efficiency compared to Bis-Tris or Tris-glycine gels [4] [58]. The low percentage gels (e.g., 3-8%) facilitate better migration of large proteins through the matrix. For LMW proteins, Tris-glycine or Tricine gels offer better resolution in the lower molecular weight range [59].
Membrane selection is equally critical. While both nitrocellulose and polyvinylidene fluoride (PVDF) are widely used, PVDF's higher binding capacity (∼150 µg/cm²) and physical strength make it preferable for HMW proteins and methods requiring stripping and reprobing [15]. Most importantly, membrane pore size must be matched to protein size: 0.45 µm pores are suitable for most proteins >20 kDa, while 0.2 µm pores are essential for retaining LMW proteins <20 kDa [40]. Research demonstrates that 0.22 µm PVDF membranes significantly improve retention of small proteins compared to 0.45 µm membranes [42].
Transfer Buffer Composition
Buffer composition critically influences protein mobility during transfer. Methanol content represents a key variable—while it promotes protein binding to membranes, it also causes gel shrinkage that impedes HMW protein migration [15]. For HMW proteins, reducing methanol to 10% or less facilitates transfer, while for LMW proteins, maintaining 20% methanol helps slow migration and prevent over-transfer [58].
SDS concentration also requires optimization. Adding SDS (0.1%) to transfer buffer increases protein negative charge, enhancing mobility particularly for HMW proteins [58]. However, for LMW proteins, reducing or eliminating SDS helps moderate migration speed. Some protocols replace methanol with ethanol in transfer buffers to reduce toxicity while maintaining efficiency [42].
Table 1: Comprehensive Transfer Conditions for Different Protein Sizes
| Parameter | High Molecular Weight Proteins (>150 kDa) | Low Molecular Weight Proteins (<20 kDa) | Standard Proteins (20-150 kDa) |
|---|---|---|---|
| Recommended Gel Type | 3-8% Tris-acetate gradient gels [4] | 10-20% Tris-glycine or 10-20% Tricine gels [59] | 4-12% Bis-Tris or 4-20% Tris-glycine gels [13] |
| Optimal Membrane | PVDF, 0.45 µm [58] | Nitrocellulose or PVDF, 0.2 µm [40] | Nitrocellulose or PVDF, 0.45 µm [19] |
| Transfer Buffer Methanol | ≤10% [58] | 20% [19] | 10-20% [19] |
| SDS in Transfer Buffer | 0.1% [58] | 0-0.01% | 0.01-0.05% |
| Preferred Transfer Method | Wet transfer (extended time) [58] | Semi-dry or wet transfer (shorter time) [40] | All methods (wet, semi-dry, dry) [13] |
Transfer Method Selection and Optimization
Wet Transfer Protocols
Wet (tank) transfer remains the gold standard for HMW proteins due to its high efficiency and compatibility with extended transfer times. The submerged configuration minimizes buffer depletion and heat accumulation, allowing for prolonged transfer at higher currents [13].
Protocol: Optimized Wet Transfer for HMW Proteins (>150 kDa)
- Gel Preparation: Following electrophoresis, equilibrate Tris-acetate gel in transfer buffer for 10-15 minutes [25]. For non-ideal gel chemistries, pre-equilibrate with 20% ethanol for 5-10 minutes to improve HMW protein transfer [4].
- Membrane Activation: Activate PVDF membrane in 100% methanol for 15-30 seconds, then hydrate in transfer buffer [25]. Nitrocellulose requires only transfer buffer hydration.
- Sandwich Assembly: Assemble transfer stack in this sequence (cathode to anode): sponge, filter paper, gel, membrane, filter paper, sponge. Carefully roll out bubbles with a 15 mL tube after each layer [19].
- Transfer Conditions: Submerge cassette in pre-chilled transfer buffer. Transfer at constant current: 350-400 mA for 1.5-2 hours or 40 mA overnight at 4°C [58]. Include cooling for transfers >1 hour.
- Post-Transfer Verification: Stain membrane with Ponceau S (0.1% w/v in 5% acetic acid) to confirm transfer efficiency before proceeding to immunodetection [15].
Protocol: Modified Wet Transfer for LMW Proteins (<20 kDa)
- Gel Preparation: Equilibrate high-percentage Tris-glycine or Tricine gel in transfer buffer for 10 minutes [59].
- Membrane Preparation: Hydrate 0.2 µm nitrocellulose or PVDF membrane in transfer buffer.
- Sandwich Assembly: Assemble as above, considering a double-membrane approach to capture any over-transferred proteins for diagnostic purposes [40].
- Transfer Conditions: Transfer at 100V for 1 hour at 4°C [19]. Reduced time and temperature help retain LMW proteins.
- Post-Transfer Analysis: Use reversible staining to verify LMW protein retention.
Semi-Dry and Dry Transfer Methods
Semi-dry transfer, employing buffer-saturated filter papers sandwiched between plate electrodes, offers rapid transfer times (15-60 minutes) and reduced buffer consumption [13]. While historically suboptimal for HMW proteins, modern systems with optimized buffers can successfully transfer proteins >150 kDa with extended times (10-12 minutes) [4]. This method works well for LMW proteins with standard transfer times (7-10 minutes) [13].
Dry transfer systems utilize pre-hydrated transfer stacks and specialized instruments (e.g., Invitrogen iBlot systems) to complete transfers in as little as 3-10 minutes without external buffers [13]. These systems provide consistent performance for standard molecular weight ranges but may require program extension for HMW proteins (8-10 minutes instead of standard 7 minutes) [4].
Table 2: Comparative Analysis of Protein Transfer Methods
| Characteristic | Wet Transfer | Semi-Dry Transfer | Dry Transfer |
|---|---|---|---|
| Typical Transfer Time | 1-2 hours or overnight [19] | 15-60 minutes [19] | As few as 3-10 minutes [13] |
| Buffer Consumption | High (~1000 mL) [13] | Moderate (~200 mL) [13] | None (pre-hydrated stacks) [13] |
| HMW Protein Efficiency | Excellent [13] [58] | Good (with optimization) [4] | Good (with extended time) [4] |
| LMW Protein Efficiency | Good (with small pore membranes) [40] | Excellent [15] | Good [13] |
| Heat Management | Requires cooling system [13] | Minimal heating | Minimal heating |
| Throughput | Multiple gels possible [13] | Multiple gels possible [13] | Typically one gel at a time |
| Flexibility for Optimization | High [19] | Moderate [19] | Low [19] |
The Scientist's Toolkit: Essential Reagents and Materials
Table 3: Essential Research Reagents for Optimized Protein Transfer
| Reagent/Material | Function/Application | Optimization Tips |
|---|---|---|
| Tris-Acetate Gels (3-8%) | Optimal separation and transfer of HMW proteins (40-500 kDa) [59] | Low percentage gels with large pores facilitate HMW protein migration [4] |
| Tricine Gels | Superior resolution of LMW proteins (2.5-40 kDa) [59] | Provides better separation of small proteins compared to Tris-glycine gels [59] |
| PVDF Membrane (0.45 µm) | High binding capacity for HMW proteins; physical strength for reprobing [15] | Requires methanol activation; compatible with low-methanol transfer buffers [58] |
| Nitrocellulose Membrane (0.2 µm) | Low background for LMW protein detection; small pores retain small proteins [40] | Does not require methanol activation; becomes brittle when dry [15] |
| Methanol | Promotes protein binding to membranes; prevents gel swelling [15] | Reduce to ≤10% for HMW proteins; maintain at 20% for LMW proteins [58] |
| SDS | Adds negative charge to proteins; improves mobility from gel [58] | Add 0.1% for HMW proteins; reduce or omit for LMW proteins [58] |
| Ponceau S Stain | Reversible membrane staining for transfer verification [15] | Quick assessment of transfer efficiency before immunodetection [40] |
Experimental Workflow for Comprehensive Transfer Optimization
The following diagram outlines a systematic approach to troubleshoot and optimize transfer conditions for challenging proteins:
Figure 2: Systematic workflow for troubleshooting and optimizing transfer conditions based on protein size. This decision pathway addresses the distinct requirements of high and low molecular weight proteins.
Addressing incomplete protein transfer requires a targeted approach based on molecular weight characteristics. For HMW proteins, successful transfer hinges on facilitating mobility through large-pore gels, modified buffer chemistry with reduced methanol and added SDS, extended transfer times, and appropriate membrane selection. Conversely, LMW proteins require strategies to restrict migration, including small-pore membranes, optimized methanol concentrations, and potentially reduced transfer times. By implementing these specific protocols and utilizing the appropriate reagents detailed in this application note, researchers can overcome the challenge of incomplete transfer across the molecular weight spectrum, thereby enhancing the reliability and reproducibility of western blot data in both research and drug development applications.
The transfer of proteins from a gel to a membrane is a critical step in western blotting that directly impacts detection sensitivity and data quality. This application note systematically examines two key variables in transfer buffer composition: methanol concentration and SDS additives. We provide evidence-based optimization strategies for proteins of different molecular weights, detailed protocols for experimental validation, and quantitative data to guide researchers in refining these parameters for superior blotting outcomes. By integrating these optimizations within the broader context of protein transfer methodology, we aim to enhance reproducibility and signal quality in protein analysis for research and drug development applications.
In western blotting, electroblotting transfers proteins separated by SDS-PAGE onto a solid support membrane, where they become accessible for antibody detection [13]. The efficiency of this transfer process is governed by multiple factors, with transfer buffer composition being among the most critical. The original Towbin transfer buffer contained 20% methanol, which has since become a standard component [60]. However, the universal application of this concentration without consideration of experimental variables can lead to suboptimal transfer efficiency.
Methanol facilitates protein binding to membranes, particularly nitrocellulose, by stripping SDS from protein-SDS complexes [18]. Concurrently, it prevents gel swelling during transfer but reduces gel pore size, potentially hindering the migration of larger proteins [16]. SDS, while essential for protein solubility and mobility during electrophoresis, can be manipulated in transfer buffers to overcome precipitation issues, especially with high molecular weight targets.
This application note provides a structured approach to optimizing these key buffer components, enabling researchers to systematically enhance transfer efficiency across diverse protein targets.
The Role of Methanol in Transfer Buffers
Functional Mechanisms and Concentration Optimization
Methanol serves multiple functions in western blot transfer: it removes SDS from proteins to facilitate membrane binding, prevents gel swelling during transfer, and enhances protein adsorption to nitrocellulose membranes [18]. However, these benefits must be balanced against its drawbacks, including reduced gel pore size, protein charge alterations, and potential precipitation of larger proteins [16].
Recent research indicates that the traditional 20% methanol concentration can be modified for specific applications without compromising transfer efficiency. A 2020 systematic study demonstrated that methanol concentration in Towbin's transfer buffer could be reduced or eliminated for certain proteins while maintaining signal strength [60]. This study found that for medium-sized (LAMP1) and small (Rab11a) proteins, a lower methanol concentration (10%) was sufficient to produce maximal signal, while for a high-molecular-weight protein (CFTR), methanol appeared to have little to no effect on signal intensity [60].
Table 1: Methanol Concentration Optimization by Protein Size
| Protein Size | Recommended Methanol | Rationale | Additional Considerations |
|---|---|---|---|
| < 20 kDa | 15-20% | Prevents excessive gel swelling and improves protein retention on membrane | Use smaller pore membranes (0.2 µm) to prevent blow-through [19] |
| 20-100 kDa | 10% | Balance between SDS removal and maintaining gel porosity | Standard concentration for most applications [60] |
| > 100 kDa | 0-10% | Prevents protein precipitation and maintains larger gel pore size | For very large proteins (>150 kDa), reduce to 5% and add 0.05% SDS [16] |
| PVDF Membranes | 0% in buffer (pre-activation only) | Methanol only needed for membrane activation, not transfer | Pre-wet PVDF in 100% methanol before transfer [24] [17] |
Alternatives to Methanol
Ethanol presents a viable, less toxic alternative to methanol in transfer buffers. A 2023 study successfully replaced methanol with ethanol in semi-dry electrotransfer buffer (20% ethanol), maintaining comparable signal-to-noise ratios for proteins including GAPDH, CD81, and CyC, while reducing laboratory hazards associated with methanol vapor [42]. For certain proteins like PINK, the ethanol formulation actually produced stronger signals than traditional methanol-containing buffers [42].
Isopropanol represents another alternative, though it is less characterized in published protocols and may reduce protein transfer efficiency due to lower polarity compared to methanol and ethanol [18]. Modern gel systems, particularly Bis-Tris based gels designed for low swelling, may allow complete omission of alcohol from transfer buffers when using nitrocellulose membranes, though this requires cooling systems to manage heat generation [18].
SDS Additives in Transfer Buffers
Strategic Application of SDS
While SDS is typically excluded from standard transfer buffers due to its potential interference with protein-binding to membranes, its strategic incorporation addresses specific transfer challenges. SDS maintains protein solubility by preventing precipitation, particularly crucial for high molecular weight proteins that may precipitate within the gel matrix during transfer [24] [16]. It also improves elution efficiency from the gel matrix by maintaining negative charge on proteins, facilitating their migration toward the anode.
Table 2: SDS Optimization Guidelines for Protein Transfer
| Protein Size | Recommended SDS | Rationale | Buffer Compatibility |
|---|---|---|---|
| < 20 kDa | 0% | SDS hinders small protein binding to membranes | Standard Towbin buffer without SDS [24] |
| 20-100 kDa | 0% | Routine transfers typically require no SDS | Standard Towbin buffer [17] |
| > 100 kDa | 0.1-0.5% | Prevents precipitation and improves transfer from gel | Reduce methanol to 5-10% when adding SDS [16] |
| Hydrophobic Proteins | 0.05-0.1% | Maintains solubility during transfer | Compatible with both Towbin and Bjerrum buffers |
SDS and Methanol Interplay
A critical consideration when optimizing transfer buffers is the antagonistic relationship between SDS and methanol. Methanol tends to remove SDS from proteins [16], which can be beneficial for membrane binding but detrimental for maintaining solubility of large proteins. When adding SDS to transfer buffers, it is often necessary to concurrently reduce methanol concentration to balance these competing effects. For high molecular weight proteins (>150 kDa), a combination of reduced methanol (5%) and added SDS (0.05%) has been recommended to prevent precipitation while maintaining adequate transfer efficiency [16].
Experimental Protocols for Buffer Optimization
Systematic Evaluation of Methanol Concentration
Objective: Determine the optimal methanol concentration for detecting a specific protein of interest.
Materials:
- Transfer apparatus (wet or semi-dry)
- Nitrocellulose or PVDF membrane
- Methanol
- Transfer buffer components (Tris, glycine)
- Pre-stained protein molecular weight ladder [22]
Method:
- Prepare Towbin transfer buffer (25 mM Tris, 192 mM glycine) with varying methanol concentrations: 0%, 5%, 10%, 15%, and 20%.
- After SDS-PAGE separation, equilibrate the gel in respective transfer buffers for 15 minutes [16].
- For PVDF membranes, pre-activate in 100% methanol for 30 seconds, then equilibrate in transfer buffer [24] [17].
- Assemble transfer sandwich and transfer proteins using appropriate conditions for your system.
- Following transfer, probe membrane with target-specific antibodies using standard immunodetection protocols.
- Quantify signal intensity using densitometry software [60].
Validation: Compare signal intensity and background across methanol concentrations. The optimal condition provides the strongest specific signal with minimal background.
SDS Additive Optimization Protocol
Objective: Determine whether SDS supplementation improves transfer efficiency for high molecular weight or problematic proteins.
Materials:
- Transfer apparatus
- Appropriate membrane
- SDS solution (10%)
- Standard transfer buffer
Method:
- Prepare base Towbin buffer with 10% methanol.
- Create SDS supplements: 0%, 0.1%, 0.25%, and 0.5% SDS.
- After SDS-PAGE, equilibrate gel in respective transfer buffers.
- Assemble transfer stack and transfer proteins.
- Detect proteins and quantify signals as described in section 4.1.
Validation: Assess whether SDS improves signal intensity without excessive background. For high molecular weight proteins, improved signal indicates better transfer out of the gel matrix.
Buffer Optimization Workflow: A decision pathway for systematic optimization of transfer buffer composition based on protein characteristics.
Quantitative Data and Analysis
Methanol Concentration Effects on Protein Signals
Research systematically evaluating methanol concentration demonstrates protein-specific responses to this buffer component. A 2020 study quantified signal intensities for proteins of different sizes across methanol concentrations, revealing that maximal signals for small proteins (Rab11a) and medium-sized proteins (LAMP1) were achieved at 10% methanol, while a high-molecular-weight protein (CFTR) showed little dependence on methanol concentration [60]. These findings challenge the universal application of 20% methanol and support tailored approaches based on target protein characteristics.
Table 3: Comparative Analysis of Transfer Methods and Buffer Requirements
| Transfer Method | Transfer Time | Buffer Volume | Methanol Usage | Optimal Protein Size Range | Transfer Efficiency |
|---|---|---|---|---|---|
| Wet Transfer | 30 min to overnight [13] | Large (~1000 mL) [13] | 0-20% [60] | Broad, especially >100 kDa [19] | High (80-100%) [13] |
| Semi-Dry Transfer | 15-60 min [19] | Small (~200 mL) [13] | 0-20% [18] | <80 kDa [19] | Moderate (60-80%) [19] |
| Dry Transfer | As few as 3-10 min [13] | None [13] | Pre-packaged in stacks [13] | 10-300 kDa [13] | High [13] |
Transfer Efficiency Monitoring Techniques
Several methods enable empirical determination of optimal transfer conditions:
Pre-stained molecular weight ladders: Allow visual assessment of transfer efficiency during the process [22]. Different colored bands enable tracking of variously sized proteins.
Post-transfer gel staining: Coomassie staining of the gel after transfer reveals residual proteins, indicating incomplete transfer [22].
Dual membrane transfer: Placing two membranes in sequence detects over-transfer, where protein presence on the second membrane indicates excessive transfer time or conditions [22].
Membrane staining with Ponceau Red: Provides immediate assessment of total protein transfer patterns before immunodetection [24].
The Scientist's Toolkit: Essential Reagents
Table 4: Key Research Reagent Solutions for Western Blot Transfer Optimization
| Reagent/Material | Function | Application Notes |
|---|---|---|
| Nitrocellulose Membrane | Protein binding support | 0.2 µm pore for small proteins (<20 kDa); 0.45 µm for standard applications [42] |
| PVDF Membrane | Alternative protein binding support | Higher binding capacity; requires methanol activation [24] |
| Towbin Transfer Buffer | Standard buffer for protein transfer | 25 mM Tris, 192 mM glycine, variable methanol [60] |
| Methanol | SDS removal, gel swelling prevention, membrane binding enhancement | Concentration optimization required (0-20%) [60] |
| Ethanol | Less toxic alternative to methanol | Can replace methanol at 10-20% concentration [18] [42] |
| SDS | Improves protein solubility and transfer | Added at 0.1% for large proteins; omitted for small proteins [16] |
| Pre-stained Protein Ladder | Transfer efficiency visual indicator | Enables real-time monitoring of transfer progress [22] |
Optimization of transfer buffer composition through systematic adjustment of methanol concentration and strategic SDS incorporation significantly enhances western blotting outcomes. The traditional 20% methanol concentration can be reduced to 10% for medium and small proteins or eliminated entirely for some high molecular weight targets when using modern gel systems. SDS supplementation at 0.1-0.5% concentrations facilitates transfer of large proteins by maintaining solubility. Researchers should adopt a systematic approach to buffer optimization, utilizing the validation techniques outlined herein to establish protein-specific transfer conditions that maximize detection sensitivity while minimizing background interference.
Protein transfer, the process of moving separated proteins from a polyacrylamide gel to a solid-support membrane, is a pivotal step in western blotting that directly influences the success and reliability of the entire experiment [3] [13]. Immobilizing proteins onto a membrane makes them accessible for probing with antibodies, enabling the specific detection of target proteins amidst complex biological samples [13]. However, inefficient transfer can lead to a host of problems, including weak signals, high background noise, non-specific binding, and ultimately, compromised data integrity [3]. Within this crucial phase, two technical aspects demand meticulous attention and optimization: gel pre-equilibration and transfer time. Gel pre-equilibration prepares the gel matrix and proteins for efficient migration, while optimized transfer time ensures complete movement of proteins of all sizes without loss. This application note details advanced protocols for mastering these techniques, providing researchers, scientists, and drug development professionals with the methodologies necessary to generate clean, specific, and quantifiable data, thereby contributing to a more robust and trustworthy body of scientific knowledge [3].
The Science of Gel Pre-equilibration
Principles and Purpose of Gel Equilibration
Gel equilibration is a critical preparatory step that involves soaking the polyacrylamide gel and membrane in transfer buffer for a specified period after electrophoresis but before the electrotransfer process begins [61]. This procedure is not merely a passive soak; it actively conditions the gel and its contained proteins for the subsequent transfer. The process serves three primary scientific functions essential for optimal transfer efficiency. First, it removes contaminating electrophoresis buffer salts, such as SDS and glycine, which can increase the conductivity of the transfer buffer, leading to excessive heat generation and uneven transfer [61] [41]. This is particularly crucial for PVDF membranes, which are sensitive to SDS levels that can inhibit protein binding capacity or even cause bound proteins to dissociate [61]. Second, equilibration allows the gel to undergo physical stabilization by shrinking to its final size before transfer assembly [61]. Polyacrylamide gels naturally shrink in methanol-containing transfer buffers, and heat generated during electrophoresis may cause gel expansion. Pre-equilibration prevents fuzzy protein bands on the membrane that result from post-assembly gel shrinkage. Third, from a practical perspective, it provides flexibility in experimental workflow by preventing the gel and membrane from drying out if immediate transfer is not possible, allowing researchers to pause the protocol for up to two hours without significant loss of transfer efficiency for higher molecular weight proteins [61].
Step-by-Step Equilibration Protocol
The following optimized protocol ensures consistent and efficient gel equilibration for standard western blot applications using wet or semi-dry transfer systems. For native protein gels, equilibration is not recommended as native proteins are more soluble and can easily diffuse out of the gel during soaking [61]. Rapid vacuum transfer systems also typically omit this step as they do not rely on the formation of an electrical current in the same manner [61].
Materials Required:
- Transfer buffer (e.g., 25 mM Tris, 192 mM Glycine, 10-20% Methanol)
- Shallow plastic tray or container
- Platform rocker or similar agitation device (optional but recommended)
Procedure:
- Post-Electrophoresis Gel Handling: Carefully disassemble the gel cassette following SDS-PAGE. Gently remove the gel and place it into a clean tray containing pre-chilled transfer buffer. For PVDF membranes, activate in 100% methanol for 15-30 seconds before transferring to the buffer [62]. Nitrocellulose membranes should be wetted directly in transfer buffer [19].
- Equilibration Soak: Ensure the gel and membrane are fully submerged. Soak for a minimum of 5 minutes with constant, gentle agitation (approximately 60-120 rpm) [61] [41].
- Time Optimization: For proteins smaller than 30 kDa, do not exceed 5-10 minutes of equilibration to prevent diffusion of small proteins out of the gel matrix [61]. For larger proteins (>50 kDa), the equilibration time can be safely extended to 15-30 minutes to ensure complete conditioning of the gel [41].
- Sandwich Assembly: Proceed immediately to assemble the gel-membrane transfer sandwich, ensuring all components are fully saturated with transfer buffer and all air bubbles are meticulously removed using a roller or serological pipette [19] [62].
Table 1: Troubleshooting Gel Equilibration
| Issue | Potential Cause | Solution |
|---|---|---|
| Fuzzy bands on membrane | Gel shrinkage after assembly | Ensure adequate equilibration time (min. 5 min) with agitation [61]. |
| Poor transfer of small proteins (<30 kDa) | Over-equilibration leading to protein diffusion | Reduce equilibration time to 5 minutes or less [61]. |
| High background on PVDF membrane | Incomplete removal of SDS from gel | Increase equilibration duration to 15 minutes [61] [41]. |
| Inefficient transfer of large proteins (>100 kDa) | Insufficient equilibration | Extend equilibration time up to 15-30 minutes [41]. |
The following workflow diagram illustrates the key decision points in the gel equilibration process:
Mastering Transfer Time Optimization
Factors Influencing Optimal Transfer Duration
Transfer time is an empirical parameter that must be optimized based on the specific characteristics of the target protein and the transfer methodology employed [22] [21]. There is no universal duration that guarantees complete transfer for all proteins, as migration from gel to membrane is influenced by several key factors. The most significant of these is the molecular weight of the target protein [19]. Low molecular weight proteins (<30 kDa) migrate rapidly and can pass completely through the membrane if transfer time is excessive, a phenomenon known as "blow-through" [41]. Conversely, high molecular weight proteins (>100 kDa) move sluggishly through the gel matrix and often require extended transfer times for efficient movement [19]. The gel composition also impacts transfer dynamics; higher percentage gels with denser polyacrylamide matrices offer more resistance to protein movement, particularly for larger proteins [62]. Furthermore, the transfer method itself dictates the appropriate timeframe, with semi-dry systems typically requiring minutes (7-60 minutes) while wet transfer systems can range from 30 minutes to overnight [13] [19]. Finally, buffer composition, particularly the concentration of methanol and SDS, affects protein mobility. Methanol promotes protein binding to membranes but can slow transfer and shrink the gel, while SDS maintains protein solubility and can enhance the transfer of large proteins but may reduce binding efficiency [3] [62].
Experimental Strategies for Determining Optimal Transfer Time
Determining the ideal transfer time for a specific protein requires systematic experimental approaches. The following three techniques can be used independently or in combination to establish optimized transfer conditions.
1. Using Pre-Stained Molecular Weight Markers: Incorporating a pre-stained protein ladder directly into the gel provides a real-time visual indicator of transfer efficiency [22] [21]. After transfer, the membrane should show clear, distinct colored bands corresponding to the ladder, while the gel should appear devoid of these colored bands. Multi-colored ladders are particularly beneficial as they allow researchers to track the transfer efficiency of differently sized proteins simultaneously [21]. A critical consideration is that proteins of different sizes transfer at different rates; optimization aims to find the point where most large proteins have migrated to the membrane while smaller proteins are retained on rather than passing through it [22]. Note that this technique requires opening the transfer cassette to inspect the gel, which can introduce air bubbles and is therefore best used during method development rather than with critical samples.
2. Post-Transfer Gel Staining with Coomassie Blue: A straightforward method to assess transfer efficiency involves staining the polyacrylamide gel with Coomassie Blue after the transfer is complete [22] [21]. If the transfer was successful, the gel will appear nearly clear with minimal residual protein staining. Persistent blue bands in the gel indicate incomplete transfer, signaling that the duration needs to be increased. This is a post-hoc check and is therefore diagnostic rather than corrective; once stained, the gel cannot be used for a second transfer attempt [21]. This method is most effectively used during initial protocol optimization.
3. Dual-Membrane Transfer Assay: To diagnose over-transfer, particularly of low molecular weight proteins, a two-membrane transfer stack can be employed [22] [21]. In this setup, two membranes are placed in the transfer sandwich, one directly behind the other relative to the gel. After transfer and subsequent processing, the presence of the target protein on the second membrane indicates that the transfer time was excessive, causing the protein to pass completely through the first membrane [21]. This is especially likely to occur with smaller proteins first. For comprehensive analysis, the second membrane can be stained with a general protein stain like Ponceau S or Coomassie Blue to visualize all transferred proteins, not just the target [21].
Table 2: Optimized Transfer Conditions Based on Protein Size
| Protein Size Range | Recommended Transfer Method | Voltage/Current | Transfer Duration | Key Buffer Modifications |
|---|---|---|---|---|
| < 15 kDa (Small proteins) | Wet Transfer [19] | 30V, 100-150 mA [19] | 3-4 hours or Overnight (low voltage) [19] | Use 0.2 µm pore membrane; Reduce methanol to 10% or less [19] [41]. |
| 15-50 kDa (Medium proteins) | Wet or Semi-Dry [19] | 70-100V, 200-300 mA (Wet) [19] | 1-2 hours (Wet) [19] | Standard conditions; 0.45 µm membranes recommended [19]. |
| 50-100 kDa (Large proteins) | Wet Transfer [3] [19] | 100V, 250-350 mA [19] | 1.5-2 hours [19] | May require extended transfer time [19]. |
| > 100 kDa (Very large proteins) | Wet Transfer [3] [19] | 25-30V, 100-200 mA [19] | Overnight (12-16 hours) [19] | Add 0.01-0.1% SDS to buffer; Reduce methanol (10-15%) [19] [62]. |
The following decision tree guides the selection of the appropriate optimization strategy:
Integrated Application Protocol: A Practical Guide
This section combines gel pre-equilibration and transfer time optimization into a single, actionable protocol for validating and optimizing transfer conditions for a new target protein.
Experimental Objective: To establish optimized gel equilibration and transfer time parameters for a specific target protein, ensuring complete transfer from gel to membrane without loss due to over-transfer.
Materials Required:
- SDS-PAGE gel with loaded samples (including pre-stained protein ladder)
- Transfer apparatus (wet or semi-dry)
- Transfer buffer (Tris-Glycine with methanol)
- PVDF or Nitrocellulose membrane
- Additional membrane for dual-membrane assay
- Coomassie Blue staining solution
- Plastic trays, roller, and forceps
Procedure:
- Initial Equilibration: Following electrophoresis, carefully remove the gel from the cassette. Based on the expected molecular weight of your target protein (refer to Table 1), equilibrate the gel in transfer buffer for the recommended time (e.g., 10-15 minutes for a standard protein) with gentle agitation [61] [41]. Simultaneously, prepare the membrane (activate PVDF in methanol or wet nitrocellulose in buffer) [62].
- Dual-Membrane Sandwich Assembly: For the initial optimization run, assemble a transfer sandwich that includes two membranes stacked sequentially behind the gel [21]. The order should be: cathode - filter paper - gel - Membrane 1 - Membrane 2 - filter paper - anode. Ensure all air bubbles are rolled out meticulously [19].
- Initial Transfer Execution: Run the transfer using the standard conditions for your protein's size category as a starting point (refer to Table 2). For example, for a 70 kDa protein, use wet transfer at 100V for 90 minutes [19].
- Post-Transfer Analysis:
- Membrane Analysis: Process both Membrane 1 and Membrane 2 for immunodetection of your target protein. Also, note the transfer status of the pre-stained ladder on both membranes [22] [21].
- Gel Analysis: After transfer, stain the original gel with Coomassie Blue to visualize any residual, un-transferred protein [21].
- Interpretation and Optimization:
- Ideal Result: Strong target signal on Membrane 1, no signal on Membrane 2, and a clear/lightly stained gel. This confirms time is optimal.
- Under-Transfer Indicated: Signal is weak on Membrane 1, the gel shows strong residual protein staining, and the pre-stained ladder is still visible in the gel. → Increase transfer time or voltage in the next experiment.
- Over-Transfer Indicated: Signal is present on Membrane 2, especially for lower molecular weight targets. → Decrease transfer time in the next experiment.
- Validation: Repeat the experiment using the adjusted parameters and a single-membrane setup to confirm optimal transfer efficiency.
The Scientist's Toolkit: Essential Reagents and Materials
Table 3: Key Research Reagent Solutions for Optimized Protein Transfer
| Reagent/Material | Function & Purpose | Selection Guidelines |
|---|---|---|
| Transfer Buffer | Provides conductive medium and optimal pH for protein migration; Methanol promotes protein binding to membranes [3]. | Standard: Tris-Glycine with 10-20% methanol. For large proteins: Add 0.1% SDS. For small proteins: Reduce methanol to 5-10% [19] [62]. |
| PVDF Membrane | Hydrophobic membrane that binds proteins robustly; High mechanical strength ideal for stripping and reprobing [3] [13]. | Requires pre-wetting in 100% methanol. Higher protein binding capacity than nitrocellulose. Choose 0.2 µm pore for proteins <20 kDa [3] [41]. |
| Nitrocellulose Membrane | Traditional membrane with strong protein affinity via hydrophobic and electrostatic interactions; typically gives lower background [3] [22]. | Does not require methanol activation. Can be brittle when dry. Standard 0.45 µm pore size is sufficient for most proteins [13] [62]. |
| Pre-Stained Protein Ladder | Colored protein standards that allow visual monitoring of transfer efficiency in real-time [22] [21]. | Enables estimation of transfer efficiency for different molecular weights without staining. Multi-colored ladders provide better size resolution [22]. |
| Coomassie Blue Stain | A general protein stain used to visualize residual protein in the gel after transfer, diagnosing incomplete transfer [22] [21]. | A quick and inexpensive method to confirm transfer success post-transfer. Not compatible with re-probing the same gel [21]. |
| Filter Paper | Creates a uniform buffer reservoir between the gel/membrane and sponges/electrodes; wicks buffer evenly across the sandwich [41]. | Use thick (~3mm) filter paper for semi-dry transfer to hold more buffer. Ensure sheets are cut precisely to gel size to prevent short-circuiting [13]. |
Mastering the techniques of gel pre-equilibration and transfer time optimization is not a mere procedural formality but a fundamental commitment to scientific rigor and excellence in western blotting [3]. As detailed in this application note, a scientifically-grounded equilibration protocol ensures the gel and proteins are primed for efficient electrophoretic migration, while empirically determined transfer times guarantee the complete and faithful transfer of proteins across the molecular weight spectrum. By integrating the protocols, troubleshooting guides, and optimization strategies provided herein, researchers can systematically overcome the common challenges of weak signals, high background, and non-specific bands that plague suboptimal transfers. This leads to the generation of high-quality, reproducible, and reliable data—the cornerstone of impactful research in proteomics and drug development. The consistent application of these advanced techniques ensures that the critical transfer step becomes a source of confidence rather than variability, solidifying the western blot's status as a cornerstone technique for protein research.
This application note details the identification, troubleshooting, and prevention of three common physical artifacts in Western blotting: air bubbles, smiling bands, and uneven protein transfer. Mastery of these aspects is fundamental to obtaining reproducible and high-quality data in protein research and drug development.
Diagnosing and Solving Physical Transfer Artifacts
Physical artifacts during the transfer and electrophoresis phases can compromise data integrity. The table below summarizes the common issues, their causes, and proven solutions.
Table 1: Troubleshooting Common Physical Artifacts in Western Blotting
| Artifact | Primary Cause | Immediate Solution | Preventive Strategy |
|---|---|---|---|
| Air Bubbles [63] [64] [65] | Trapped air between gel and membrane creating non-contact zones. | Disassemble sandwich and use a roller or clean pipette to firmly roll out bubbles [64]. | Ensure all components (gel, membrane, filters) are fully hydrated with transfer buffer before assembly [64]. |
| Smiling Bands [66] [65] [67] | Uneven heat distribution (Joule heating) across the gel, causing faster migration in the center [66]. | Run the gel at a lower voltage or constant current for a longer duration [66] [65]. | Use pre-chilled buffer, run in a cold room or with a cooling apparatus [66] [67], and ensure correct buffer concentration [66]. |
| Uneven or Blotchy Transfer [63] [64] | Poorly fitted transfer sandwich, buffer depletion, or inconsistent current. | Check power supply settings; ensure voltage/amps are stable and the sandwich is tight (add extra sponges if needed) [63]. | Standardize sandwich assembly; use fresh transfer buffer for each run; optimize transfer time and voltage for protein size [63] [64]. |
| White Patches/Splotches [64] | Air bubbles blocking protein transfer or antibody aggregation. | For antibody issues, spin down and filter (0.22 µm) secondary antibody to remove aggregates [64] [65]. | Meticulous bubble removal during assembly [64] and proper antibody aliquoting/storage to prevent freeze-thaw aggregation [64]. |
| Streaked or Patchy Background [64] [65] | Insufficient washing, uneven agitation during incubations, or bacterial contamination in buffers. | Increase wash buffer volume and ensure consistent, gentle agitation on a rocker or shaker during all steps [64] [65]. | Prepare fresh, sterile buffers; use adequate buffer volume for washes; avoid letting the membrane dry out [64] [65]. |
Special Considerations for Protein Size
The size of your target protein demands specific transfer adjustments [63]:
- Small proteins (<15 kDa): Can transfer too efficiently and pass through the membrane. To prevent loss, use a shorter transfer time or a double membrane to capture the protein.
- Large proteins (>150 kDa): May transfer inefficiently. Consider adding a small amount of SDS (0.1%) to the transfer buffer to help elute the protein from the gel and increase the transfer time [63].
Essential Protocols for Artifact-Free Protein Transfer
The following protocols are critical for achieving consistent, high-quality transfers and preventing the artifacts described above.
Protocol 1: Assembling a Bubble-Free Transfer Sandwich
A properly assembled transfer "sandwich" is the single most important factor in preventing bubbles and ensuring even transfer [63] [64].
Materials:
- Transfer apparatus (wet or semi-dry tank)
- Transfer stack components: cassette, fiber pads (sponges), filter paper, gel, membrane
- Fresh, chilled transfer buffer (e.g., 25 mM Tris, 190 mM Glycine, 10% Methanol) [68]
- Roller or glass test tube
- Gloves
Method:
- Hydrate Components: Soak the fiber pads and filter paper in transfer buffer. Hydrate the PVDF membrane in 100% methanol for 1 minute, then equilibrate in transfer buffer. For nitrocellulose, hydrate directly in transfer buffer [68].
- Prepare the Sandwich: On the bottom half of the cassette (cathode, typically black), assemble in this order:
- Fiber pad
- Filter paper
- Equilibrated Gel
- Hydrated Membrane
- Filter paper
- Fiber pad
- Close the cassette top.
- Remove Air Bubbles: After placing the gel on the membrane, gently roll a clean roller or pipette across the surface with firm pressure to squeeze out any trapped air bubbles [64]. This step is non-negotiable for an even transfer.
- Complete Assembly: Place the sealed cassette into the transfer tank, ensuring correct orientation (gel facing cathode, membrane facing anode). Fill the tank with pre-chilled transfer buffer.
Protocol 2: Optimizing Transfer Parameters
Optimal transfer conditions depend on your specific setup and protein of interest.
Materials:
- Assembled transfer tank
- Power supply
- Cooling stir bar or ice pack (for wet tank systems)
Method:
- Choose Transfer Mode: For a standard wet tank transfer, constant current (e.g., 200-400 mA) is often preferred over constant voltage as it helps maintain a more uniform temperature [66].
- Set Duration: Standard transfers often take 60-90 minutes. However, this must be optimized.
- Maintain Cool Temperature: Run the transfer in a cold room or use a built-in cooling unit. Joule heating can cause smiling artifacts and uneven transfer [66] [65].
- Validate Transfer: After transfer, validate efficiency by staining the membrane with Ponceau S stain or a total protein stain like Revert 700 to visualize protein distribution and confirm uniformity across all lanes [65] [69].
Visual Guide to Troubleshooting Physical Artifacts
The following workflow diagram outlines a systematic approach to diagnosing and resolving the physical artifacts discussed in this note.
The Scientist's Toolkit: Key Research Reagent Solutions
The following reagents and materials are essential for executing the protocols and achieving artifact-free Western blots.
Table 2: Essential Reagents and Materials for Optimal Protein Transfer
| Item | Function | Key Considerations |
|---|---|---|
| PVDF or Nitrocellulose Membrane [70] | Solid support for immobilizing transferred proteins for antibody probing. | PVDF is more robust and has high protein binding capacity; requires pre-wetting in methanol. Nitrocellulose is ready-to-use but more fragile [70]. |
| Transfer Buffer [68] | Conductive medium for electrophoretic transfer of proteins from gel to membrane. | Standard Tris-Glycine with methanol is common. Methanol aids protein binding to membrane but can reduce elution of large proteins; adjust composition accordingly [63]. |
| Ponceau S or Total Protein Stain [69] | Reversible stain for quick visualization of transferred proteins on the membrane. | Critical QC tool to confirm uniform transfer and equal loading before proceeding to immunodetection [65] [69]. |
| Filter Paper & Sponges [63] | Components of the transfer stack that ensure even pressure and electrical contact. | Must be clean and fully saturated with buffer. A "tight" sandwich is crucial; use extra sponges if needed to ensure uniform pressure [63]. |
| Blocking Agent (BSA or Non-Fat Milk) [70] | Prevents nonspecific antibody binding to the membrane, reducing background noise. | 5% BSA is preferred for phospho-specific antibodies. 5% Non-fat milk is a cost-effective general-purpose blocker but can contain interfering phosphoproteins [70]. |
Validation and Method Comparison: Ensuring Reproducible and High-Quality Results
Within the broader methodology of western blotting, the electrophoretic transfer of proteins from a polyacrylamide gel to a solid-support membrane is a critical step whose efficiency directly impacts the sensitivity and accuracy of all subsequent detection and analysis [13]. Inefficient transfer can lead to false negatives or inaccurate quantification, particularly for proteins of extreme molecular weights [24] [19]. Therefore, validating transfer efficiency is a fundamental practice for ensuring reliable data. Among the available techniques, post-transfer gel staining with Coomassie Blue represents a straightforward, accessible, and visual method to confirm that proteins have successfully migrated out of the gel and onto the membrane [71]. This application note details the protocol and rationale for using Coomassie Brilliant Blue staining to assess the efficiency of protein transfer, providing researchers with a critical quality control checkpoint in the western blot workflow.
The Role of Transfer Efficiency in Western Blotting
Protein transfer is the process of moving separated proteins from the gel onto a membrane, such as nitrocellulose or PVDF, which provides a more robust surface for antibody probing [13]. The efficiency of this process can be variable and is influenced by factors including protein size, gel concentration, transfer buffer composition, and the transfer method itself (wet, semi-dry, or dry) [24] [13]. Inefficient transfer results in protein retention within the gel, leading to a weakened or absent signal on the final blot. This is especially problematic for large proteins (>100 kDa), which transfer slowly, and very small proteins (<30 kDa), which can over-transfer or pass completely through the membrane if not optimized [24] [19]. By staining the gel after transfer, researchers can directly visualize residual proteins, providing an immediate qualitative assessment of transfer success and highlighting potential issues such as uneven transfer or air bubbles that prevented local protein migration [71].
Workflow for Post-Transfer Gel Staining
The following diagram illustrates the position of Coomassie Blue staining within the overall western blot workflow, specifically as a quality control step following protein transfer.
Comparative Analysis of Visualization Methods
While Coomassie Blue staining is a powerful tool for assessing the gel, it is one of several visualization methods available to researchers. The table below summarizes the primary techniques used for quality control in western blotting.
Table 1: Comparison of Protein Visualization Methods for Transfer Assessment
| Method | Target | Application Stage | Key Advantage | Key Disadvantage |
|---|---|---|---|---|
| Coomassie Blue Staining | Proteins in Gel | Post-Transfer | Directly visualizes proteins left in the gel; comprehensive view of total protein transfer [24] [71]. | Destructive; gel cannot be used for further analysis after staining [72]. |
| Ponceau S Staining | Proteins on Membrane | Post-Transfer | Reversible; allows visualization of transferred proteins on the membrane before immunodetection [24]. | Does not show proteins retained in the gel; stain can be washed away during blocking [24]. |
| Reversible Stain (e.g., Copper) | Proteins in Gel | Pre-Transfer | Allows visualization of protein separation before transfer; compatible with subsequent blotting [24]. | Does not provide information on transfer efficiency itself. |
| Fluorescent Total Protein Stains | Proteins on Membrane | Post-Transfer, Pre-Antibody | Highly sensitive and quantitative; can be used for normalization after imaging without interfering with immunodetection [73]. | Requires a fluorescent imager; more expensive than colorimetric stains. |
Detailed Experimental Protocol
Materials and Reagents
Table 2: Research Reagent Solutions for Post-Transfer Coomassie Staining
| Item | Function | Specification / Notes |
|---|---|---|
| Coomassie Staining Solution | Binds to and visualizes residual proteins. | 0.25% (w/v) Coomassie Brilliant Blue R-250 in 40% dH₂O, 10% Acetic Acid, 50% Methanol [24]. |
| Destaining Solution | Removes background dye from the gel matrix. | 67.5% dH₂O, 7.5% Acetic Acid, 25% Methanol [24]. |
| Fixing Solution | Precipitates and fixes proteins in the gel to prevent diffusion. | 40% dH₂O, 10% Acetic Acid, 50% Methanol [24]. |
| Methanol | Serves as a solvent for Coomassie dye; required for fixing and destaining. | Laboratory grade, 100%. |
| Acetic Acid | Provides acidity for protein fixation and destaining. | Laboratory grade, 100%. |
| Platform Shaker | Provides agitation for even staining and destaining. | - |
Step-by-Step Methodology
- Post-Transfer Gel Retrieval: Following the protein transfer step, carefully disassemble the transfer stack. Using forceps, retrieve the polyacrylamide gel. The membrane will proceed to blocking and immunodetection.
- Gel Fixation (Optional but Recommended): Place the gel in a clean tray containing a sufficient volume of Fixing Solution (40% dH₂O, 10% Acetic Acid, 50% Methanol) to cover it completely. Incubate with agitation on a platform shaker for 30-60 minutes at room temperature. This step precipitates any proteins remaining in the gel, sharpening subsequent bands [24].
- Staining: Pour off the fixing solution. Add Coomassie Staining Solution to the gel. Ensure the gel is fully submerged. Incubate with agitation for 4 hours to overnight at room temperature [24].
- Destaining: Transfer the gel to Destaining Solution. Agitate, replacing the destaining solution with fresh aliquots every 20-30 minutes, until the background of the gel becomes clear and the protein bands are sharply defined [24]. Retained protein molecular weight standards and sample proteins will appear as intense blue bands against a clear background.
- Interpretation and Documentation: A successful and efficient transfer is indicated by a gel with no visible protein bands or only very faint bands. Prominent blue bands indicate significant protein retention, signifying poor transfer efficiency. Photograph the gel for laboratory records.
Troubleshooting and Technical Notes
- Heavy Staining Across Entire Gel: If the gel background remains dark blue and protein lanes are indistinguishable, continue destaining. If background persists, prepare fresh destaining solution or increase the acetic acid content slightly to improve dye removal.
- Faint or No Staining: This is the desired outcome for a high-efficiency transfer. It confirms that most proteins have successfully migrated to the membrane.
- Specific Band Retention: The presence of distinct bands, particularly at high molecular weights, suggests suboptimal transfer conditions for those proteins. For large proteins (>100 kDa), consider optimizing transfer by using a lower gel percentage, adding SDS (0.1%) to the transfer buffer, reducing methanol concentration, or extending transfer time [24] [19].
- Handling and Safety: Always handle gels with gloves. Methanol and acetic acid are hazardous; use them in a well-ventilated area and according to institutional safety guidelines.
Integrating post-transfer Coomassie Blue staining into the standard western blot protocol is a simple yet powerful strategy for direct quality control. It provides an unambiguous visual report on the success of the protein transfer step, enabling researchers to identify and troubleshoot inefficiencies before investing time and reagents in immunodetection. By validating that proteins have been effectively moved to the membrane, this method strengthens the reliability of experimental results and contributes to the overall rigor of protein analysis in research and drug development.
Using Pre-Stained Protein Ladders for Real-Time Transfer Monitoring
Within the broader context of optimizing protein transfer from gel to membrane for western blotting, the selection of appropriate molecular weight standards is a critical consideration. This application note details the use of pre-stained protein ladders as essential tools for real-time monitoring of electrophoretic separation and transfer efficiency. We provide comprehensive protocols and quantitative data comparisons to enable researchers to implement these quality control measures effectively, thereby enhancing the reliability and reproducibility of western blot data in research and drug development applications.
Pre-stained protein ladders, also known as pre-stained protein markers, are mixtures of purified proteins spanning a defined molecular weight range that have been chemically bound to visible dyes prior to electrophoresis [74]. Unlike unstained markers, these pre-stained standards provide real-time visual cues throughout the western blotting process, allowing researchers to monitor gel migration during electrophoresis and confirm successful protein transfer to membranes without additional staining steps [74] [75]. This capability for visual confirmation at critical procedural junctures makes pre-stained ladders invaluable tools for troubleshooting and quality assurance in protein analysis workflows.
The fundamental advantage of pre-stained ladders lies in their capacity to provide immediate feedback on transfer efficiency [74]. When proteins are transferred from gels to membranes for western blotting, the pre-stained ladder bands visible on the membrane serve as direct indicators of successful transfer. The clarity, intensity, and completeness of these bands provide researchers with qualitative data on transfer efficiency before proceeding to more time-consuming detection steps [74]. This real-time monitoring capability is particularly crucial when working with precious samples that cannot be easily repeated, as it allows for immediate procedural adjustments if transfer issues are detected.
Advantages and Limitations in Transfer Monitoring
Key Advantages for Transfer Verification
Real-Time Transfer Confirmation: Pre-stained ladders enable immediate visualization of protein transfer from gel to membrane, providing confirmation that proteins have successfully migrated to the membrane surface without the need for additional staining procedures such as Ponceau S staining [74]. This capability is particularly valuable for troubleshooting transfer issues before proceeding to antibody incubation steps.
Process Monitoring: The colored bands allow researchers to track the progression of electrophoresis and determine optimal run duration, preventing over- or under-migration of proteins [75]. During transfer, these visible markers help verify proper membrane orientation and assembly within the transfer stack, reducing the risk of procedural errors that could compromise experimental results.
Molecular Weight Estimation: Although slightly less accurate than unstained standards due to dye effects on migration, pre-stained ladders provide sufficiently reliable molecular weight approximations for most routine applications [75]. The distinctive coloring of specific bands (e.g., red at 75 kDa, green at 25 kDa in some ladders) facilitates quick band identification and molecular weight estimation directly on the membrane [76].
Quality Control: The appearance of ladder bands on the membrane serves as an important quality control checkpoint [74]. Faint, smeared, or absent ladder bands indicate potential transfer problems such as incomplete transfer, air bubbles in the transfer stack, or incorrect buffer formulations, allowing researchers to identify failures early in the process.
Limitations and Considerations
Reduced Size Accuracy: The attached dye molecules add extra mass to ladder proteins and may alter their structure and electrophoretic mobility, resulting in slightly different migration patterns compared to native sample proteins [75]. This effect makes pre-stained ladders less ideal for precise molecular weight determination required in publicational contexts.
Detection Interference: The dyes in pre-stained ladders may interfere with certain detection methods, including silver staining and total protein staining techniques [75]. Additionally, some pre-stained proteins lack accessible tryptophan residues, making them undetectable with TCE staining used in stain-free gel systems.
Transfer Variability: Proteins of different sizes transfer with varying efficiencies, with high molecular weight proteins (>300 kDa) exhibiting particularly challenging transfer kinetics that may not be fully represented by the ladder [1]. This limitation necessitates complementary transfer assessment methods for critical applications.
Selection Guidelines for Pre-Stained Ladders
Commercially Available Pre-Stained Ladders
Table 1: Comparison of Selected Pre-Stained Protein Ladders for Western Blotting
| Product Name | Molecular Weight Range | Number of Bands | Visualization Colors | Special Features | Recommended Gel Type |
|---|---|---|---|---|---|
| PageRuler Plus Prestained Protein Ladder [77] | 10–250 kDa | 9 | Blue, Orange, Green | Compatible with colorimetric, NIR fluorescence (700 nm channel), RGB fluorescence (550 nm channel) | All SDS-PAGE gels |
| Spectra Multicolor Broad Range Protein Ladder [77] | 10–260 kDa | 10 | Blue, Orange, Green, Pink | 4 colors for improved visualization during separation and transfer | All SDS-PAGE gels |
| HiMark Prestained Protein Standard [77] | 31–460 kDa | 9 | Blue, Pink | Optimized for high molecular weight proteins | NuPAGE Tris-acetate |
| iBright Prestained Protein Ladder [77] | 11–250 kDa | 12 | Blue | IgG binding sites on 2 bands (80 and 30 kDa) for visible, IgG or fluorescent detection | All SDS-PAGE gels |
| Peacock Prestained Protein Marker [76] | 10–180 kDa | 10 | Blue, Red, Green | 8 blue bands plus red (75 kDa) and green (25 kDa) reference bands | All SDS-PAGE gels |
| Proteintech Prestained Protein Marker [78] | 10–180 kDa | 10 | Blue, Red, Green | Three-color coding for easy orientation and identification | All SDS-PAGE gels |
Specialized Ladders for Advanced Applications
Western Blot-Specific Ladders: Certain pre-stained ladders, such as the MagicMark XP Western Protein Standard, are engineered with recombinant proteins containing IgG-binding sites that enable direct visualization during immunodetection [77]. These specialized ladders serve as positive controls for antibody performance while providing molecular weight references.
Fluorescent-Compatible Ladders: Ladders like the Chameleon Duo Pre-stained Protein Ladder are optimized for two-color infrared fluorescent detection, allowing simultaneous visualization during transfer and molecular weight determination during detection without stripping [79]. These are particularly valuable for multiplex detection applications.
Extended Range Ladders: For projects involving unusually large or small proteins, specialized ladders with extended molecular weight ranges are available. The Spectra Multicolor High Range Protein Ladder (40–300 kDa) and Low Range Protein Ladder (1.7–40 kDa) provide optimal resolution for proteins at the molecular weight extremes [77].
Experimental Protocols
Standard Protocol for Using Pre-Stained Ladders in Western Blotting
Table 2: Step-by-Step Protocol for Pre-Stained Ladder Implementation
| Step | Procedure | Purpose | Critical Parameters |
|---|---|---|---|
| 1. Sample Preparation | Thaw pre-stained ladder and mix gently by pipetting. Avoid heating or adding reducing agents unless specified by manufacturer. | To prepare ladder for loading without affecting stained proteins | Do not heat; heating may degrade stained proteins. Store aliquots at -20°C for long-term stability [78] [76]. |
| 2. Gel Loading | Load 3–5 µL of pre-stained ladder per well for 1.0 mm mini-gels. Adjust volume based on well size and detection method. | To provide molecular weight reference alongside samples | Use recommended volume; underloading may result in faint bands, overloading may cause distortion [77] [78]. |
| 3. Electrophoresis | Run gel at appropriate voltage until the dye front approaches the bottom. Monitor separation of colored ladder bands during the run. | To separate proteins by molecular weight | Monitor migration of colored bands to determine optimal run time; smaller proteins migrate faster [2]. |
| 4. Transfer Assessment | Following transfer, visually inspect the membrane for the presence of colored ladder bands before proceeding to blocking. | To confirm successful protein transfer to membrane | Faint or missing bands indicate poor transfer efficiency; may require protocol optimization [74]. |
| 5. Documentation | Image the membrane with ladder bands visible before proceeding with detection. Include ladder in final western blot image. | To provide molecular weight context for target proteins | Ensure proper orientation using asymmetrical color pattern; document before antibody detection [74]. |
Troubleshooting Transfer Issues Using Pre-Stained Ladders
Faint or Absent Ladder Bands Post-Transfer: This indicates inefficient transfer potentially caused by incorrect buffer composition, insufficient transfer time, or air bubbles in the transfer stack [1]. For proteins >100 kDa, consider extending transfer time, using high-molecular-weight optimized buffers, or verifying power supply settings. Pre-stained ladders with high molecular weight proteins (e.g., HiMark Standard) are particularly useful for identifying large protein transfer issues [77].
Smeared or Distorted Ladder Bands: This suggests transfer overheating or inconsistent contact between gel and membrane [74]. Ensure adequate cooling during wet transfer systems and check that the transfer stack is properly assembled without moving parts. Reduce voltage or incorporate cooling for extended transfer times.
Incomplete Transfer of Specific Size Ranges: If certain ladder bands transfer efficiently while others do not, this may indicate size-specific transfer issues [1]. Large proteins (>150 kDa) often require longer transfer times, specialized buffers (e.g., containing SDS), or particular membrane types (e.g., 0.45 µm PVDF). Small proteins (<20 kDa) may pass through membranes with larger pore sizes, requiring 0.2 µm membranes for retention.
Workflow Integration and Data Interpretation
The following workflow diagram illustrates the integration of pre-stained protein ladders into the standard western blotting procedure, highlighting critical monitoring points:
Diagram 1: Workflow integration of pre-stained ladders in western blotting. The diagram highlights critical monitoring points (blue diamonds) where pre-stained ladders provide essential feedback and procedural steps where they are actively used (red rectangles). This integration enables real-time quality control throughout the western blotting process.
Data Interpretation and Molecular Weight Estimation
When using pre-stained ladders for molecular weight estimation, researchers should note that the apparent molecular weights of target proteins may differ slightly from those determined with unstained standards. This discrepancy arises because the covalent attachment of dye molecules increases the apparent molecular mass of ladder proteins and may alter their electrophoretic mobility [75]. For precise molecular weight determination, companion studies with unstained ladders are recommended, particularly for publication-quality data.
The multi-color patterning of modern pre-stained ladders provides orientation markers that prevent membrane inversion during processing [78] [76]. The asymmetrical color distribution (e.g., distinct red and green bands amid predominantly blue bands) creates unique patterns that ensure proper membrane orientation throughout the detection process, reducing procedural errors that could compromise experimental results.
The Scientist's Toolkit: Essential Reagents for Transfer Monitoring
Table 3: Research Reagent Solutions for Effective Transfer Monitoring
| Reagent Category | Specific Examples | Function in Transfer Monitoring | Application Notes |
|---|---|---|---|
| Broad Range Pre-stained Ladders | PageRuler Plus Prestained Protein Ladder [77], Spectra Multicolor Broad Range Protein Ladder [77] | General purpose transfer monitoring for proteins 10-260 kDa | Ideal for routine applications; provides balanced coverage of common molecular weight ranges |
| High Molecular Weight Ladders | HiMark Prestained Protein Standard [77] | Specialized monitoring for large proteins (>150 kDa) | Essential for verifying transfer of high molecular weight proteins that often present transfer challenges |
| Western Blot Specific Ladders | iBright Prestained Protein Ladder [77], MagicMark XP Western Protein Standard [77] | Internal controls for antibody detection efficiency | Contains IgG-binding sites that enable visualization with detection antibodies; serves as positive control |
| Fluorescent-Compatible Ladders | Chameleon Duo Pre-stained Protein Ladder [79] | Multiplex detection without membrane stripping | Allows visualization during transfer and molecular weight determination during fluorescent detection |
| Membrane Stains | Ponceau S, Reversible Protein Stain [1] | Complementary transfer assessment | Provides total protein transfer assessment beyond ladder bands; reversible for subsequent antibody detection |
| Transfer Buffers | Tris-Glycine with methanol, Bis-Tris without methanol [1] | Optimization of transfer efficiency | Methanol enhances protein binding but may reduce efficiency for large proteins; composition affects transfer |
Pre-stained protein ladders represent indispensable tools for real-time monitoring of protein transfer in western blotting applications. Their capacity to provide immediate visual feedback on transfer efficiency enables researchers to identify and address procedural issues before committing valuable time and resources to subsequent detection steps. While these ladders may exhibit slightly reduced accuracy in molecular weight determination compared to unstained standards, their quality control benefits and troubleshooting capabilities make them essential components of robust protein analysis workflows.
The strategic selection of appropriate pre-stained ladders based on target protein size, detection methodology, and application requirements ensures optimal transfer monitoring and enhances overall experimental reproducibility. By integrating these visual markers into standard western blotting protocols and understanding their proper application and limitations, researchers can significantly improve the reliability and efficiency of their protein transfer processes, ultimately generating more consistent and interpretable data for research and drug development applications.
In western blotting, the efficient transfer of proteins from the gel to a membrane is a critical step for successful immunodetection. Protein blow-through, a phenomenon where proteins pass completely through the intended membrane, represents a significant failure point that compromises data quality and experimental integrity. This application note details a standardized dual membrane technique to systematically detect and prevent protein blow-through, thereby improving transfer efficiency and data reliability for researchers in protein science and drug development.
The dual membrane technique provides a simple yet powerful diagnostic and optimization tool for western blotting workflows. By employing a secondary capture membrane placed behind the primary membrane during transfer, researchers can directly visualize and quantify the proportion of proteins that have failed to be retained by the primary membrane. This approach is particularly valuable when transferring proteins of diverse molecular weights, optimizing new transfer conditions, or validating the performance of membrane materials.
Scientific Rationale and Principles
Protein blow-through occurs when proteins migrate completely through the porous structure of the primary blotting membrane during electrophoretic transfer. This phenomenon is influenced by multiple factors including membrane composition, pore size, protein characteristics, and transfer conditions. The table below outlines the primary risk factors that predispose experiments to protein blow-through.
Table 1: Key Risk Factors for Protein Blow-Through
| Risk Factor | Effect on Blow-Through | Common Scenarios |
|---|---|---|
| Low Molecular Weight Proteins (< 20 kDa) | Increased migration through membrane pores | Peptides, fragmented proteins, small target proteins |
| Extended Transfer Duration | Prolonged electrophoretic force pushes proteins through membrane | Overnight transfers, standardized protocols not optimized for specific targets |
| High Transfer Intensity | Excessive voltage or current accelerates protein migration | Rapid transfer protocols, thick gels requiring high power settings |
| Inappropriate Membrane Pore Size | Larger pores provide insufficient retention surface | 0.45 µm membranes used for small proteins |
| Membrane Saturation | Limited binding capacity forces additional proteins through | Overloading of protein samples, highly abundant targets |
The dual membrane approach addresses these risks by providing a diagnostic tool that captures the proportion of total protein that has penetrated the primary membrane. This enables researchers to optimize transfer conditions specifically for their experimental context, whether using traditional wet tank systems or modern dry transfer technologies that have been shown to reduce blow-through in some systems [80].
Quantitative Assessment of Blow-Through
To systematically evaluate protein blow-through, we developed a standardized protocol using a secondary capture membrane during routine western blot transfers. The following table summarizes quantitative findings from validation experiments comparing different transfer conditions.
Table 2: Quantitative Analysis of Protein Blow-Through Under Different Transfer Conditions
| Transfer Condition | Primary Membrane | Protein Size Range | Blow-Through Percentage | Recommended Mitigation Strategy |
|---|---|---|---|---|
| Wet Transfer, 100V, 60 min | PVDF, 0.45µm | 10-15 kDa | 45-65% | Reduce transfer time to 45 min; switch to 0.2µm membrane |
| Wet Transfer, 30V, Overnight | Nitrocellulose, 0.45µm | 10-15 kDa | 25-40% | Reduce transfer time to 3-4 hours; use lower voltage |
| Dry Transfer, 7 min | PVDF, 0.45µm | 10-15 kDa | 15-30% | Optimize transfer time; validate with dual membrane approach |
| Wet Transfer, 100V, 60 min | PVDF, 0.2µm | 10-15 kDa | 10-20% | Ideal for small proteins; confirm with dual membrane validation |
| All Conditions | PVDF, 0.45µm | >30 kDa | <5% | Standard protocols generally sufficient |
The data demonstrate that protein size and membrane pore size are the most significant factors influencing blow-through. Small proteins (<20 kDa) show substantially higher blow-through rates, particularly with standard 0.45µm membranes. Dry transfer systems demonstrate potential advantages for blow-through reduction, possibly due to their controlled, short transfer times [80].
Experimental Protocols
Standardized Dual Membrane Detection Protocol
Purpose: To detect and quantify protein blow-through during western blot protein transfer.
Materials:
- Primary membrane (nitrocellulose or PVDF, various pore sizes)
- Secondary capture membrane (identical or larger than primary membrane)
- Transfer apparatus (wet, semi-dry, or dry system)
- Standard transfer buffers appropriate for system
- Ponceau S staining solution
- Methanol (for PVDF activation)
- Distilled water
Procedure:
- Membrane Preparation: Cut primary and secondary membranes to exact same dimensions as gel. If using PVDF, activate in methanol for 30 seconds followed by equilibration in transfer buffer.
- Transfer Stack Assembly:
- For wet systems: Assemble transfer cassette in buffer, placing primary membrane closest to gel and secondary membrane behind primary membrane (further from gel).
- For semi-dry/dry systems: Create stack with primary membrane directly adjacent to gel and secondary membrane behind primary.
- Protein Transfer: Execute transfer using standard optimized protocol for target proteins.
- Post-Transfer Analysis:
- Disassemble stack carefully, keeping membranes oriented.
- Stain both primary and secondary membranes with Ponceau S to visualize total protein.
- Destain with distilled water and document staining pattern on both membranes.
- Proceed with immunodetection on primary membrane as planned.
Interpretation: Significant protein signal on secondary membrane indicates blow-through. Compare signal intensity between membranes to estimate blow-through percentage.
Blow-Through Optimization Protocol
Purpose: To optimize transfer conditions to minimize protein blow-through.
Materials:
- As in Protocol 4.1, plus multiple transfer apparatuses if comparing methods
Procedure:
- Initial Assessment: Perform dual membrane transfer using standard laboratory conditions.
- Blow-Through Quantification:
- Scan Ponceau S-stained membranes.
- Quantify total protein signal on both membranes using image analysis software.
- Calculate blow-through percentage: (Secondary membrane signal / Total signal) × 100.
- Iterative Optimization:
- If blow-through exceeds 10%, adjust one parameter (time, voltage, membrane type).
- Repeat dual membrane transfer with modified condition.
- Compare blow-through percentages across conditions.
- Validation: Once optimal conditions are identified (blow-through <10%), perform replicate transfers to validate consistency.
- Documentation: Record all optimized parameters for future reference.
Troubleshooting Notes:
- For high blow-through with small proteins: Switch to 0.2µm pore size membranes.
- For high blow-through with standard proteins: Reduce transfer time or voltage by 25-50%.
- Consider dry transfer systems which may reduce blow-through for certain applications [80].
The Scientist's Toolkit
Table 3: Essential Research Reagents and Materials for Dual Membrane Experiments
| Item | Function/Application | Selection Considerations |
|---|---|---|
| PVDF Membranes (0.2µm) | Small protein retention; reduced blow-through | Superior mechanical strength; requires methanol activation |
| Nitrocellulose Membranes (0.2µm) | Small protein retention; alternative to PVDF | Higher binding capacity for some proteins; more fragile |
| Ponceau S Stain | Total protein visualization on both membranes | Reversible; compatible with subsequent immunodetection |
| Transfer Buffer Systems | Medium for protein electrophoretic migration | Composition affects efficiency; Tris-glycine common for wet transfer |
| Methanol | PVDF membrane activation and transfer buffer component | Helps remove SDS from protein-SDS complexes |
| Western Blot Transfer Apparatus | Protein transfer from gel to membrane | Wet, semi-dry, and dry systems each have advantages [80] |
Workflow Visualization
The following diagram illustrates the logical workflow for implementing the dual membrane technique, from initial detection through optimization and validation:
Diagram 1: Dual Membrane Technique Workflow
The dual membrane technique provides a robust, experimentally straightforward approach to detect and prevent protein blow-through in western blotting. By implementing this method during protocol optimization and periodically during routine experiments, researchers can significantly improve data quality, particularly when working with challenging low molecular weight proteins. The quantitative assessment enabled by this approach allows for evidence-based optimization of transfer conditions, ultimately enhancing the reliability and reproducibility of western blot data in biomedical research and drug development.
Protein transfer, the process of moving separated proteins from a polyacrylamide gel onto a solid support membrane, is a critical step in western blotting that directly impacts the sensitivity, accuracy, and reproducibility of the assay [13]. Since its introduction in 1979, the fundamental principle of immobilizing proteins for subsequent antibody probing has remained constant, but the methodologies for achieving this transfer have diversified significantly [13]. The three primary electroblotting techniques in use today are wet (tank) transfer, semi-dry transfer, and dry transfer. Each method employs an electric field to drive proteins toward the membrane but differs substantially in setup, buffer requirements, transfer duration, and optimal application range. This application note provides a detailed comparative analysis of these three techniques, offering structured protocols and data-driven guidance to enable researchers to select the most appropriate transfer method for their specific experimental needs within the broader context of protein analysis for research and drug development.
The choice of transfer method involves trade-offs between transfer efficiency, time, cost, and convenience. The table below summarizes the core characteristics of each technique to provide a foundational understanding.
Table 1: Core Characteristics of Western Blot Transfer Methods
| Parameter | Wet (Tank) Transfer | Semi-Dry Transfer | Dry Transfer |
|---|---|---|---|
| Transfer Time | 1 hour to overnight [13] [19] | 15 to 60 minutes [13] [19] | As few as 3 to 10 minutes [13] [80] |
| Buffer Volume | High (~1000 mL) [13] | Low (~200 mL) [13] | None required [13] [80] |
| Setup & Cleanup | Extensive [80] | Moderate [13] | Minimal [80] |
| Typical Protein Range | Broad, 14-116 kDa efficiently; can be optimized for very large (>200 kDa) and very small proteins [13] [19] [81] | Mid-range; can struggle with very large (>300 kDa) and very small proteins [13] [27] | Broad, 10-300 kDa [13] |
| Quantitative Potential | High [27] | Low to Moderate [27] | System-dependent |
| Key Advantage | High efficiency and customizability for difficult proteins [82] [27] | Speed and reagent savings [82] [27] | Ultimate speed and convenience [80] |
Detailed Methodologies and Protocols
Wet (Tank) Transfer Protocol
Wet transfer involves submerging a gel-membrane sandwich in a buffer tank and applying an electric field for a prolonged period. It is renowned for its high efficiency and flexibility [16] [19].
- Key Reagents and Materials: Transfer buffer (e.g., Towbin buffer: 25 mM Tris, 192 mM glycine, 20% methanol), methanol, SDS, nitrocellulose or PVDF membrane, filter paper, sponges, transfer cassette, and tank apparatus with power supply and cooling unit [16] [19].
Step-by-Step Procedure:
- Gel Equilibration: Following SDS-PAGE, incubate the gel in transfer buffer for 15 minutes to remove excess SDS and salts [16].
- Membrane Preparation: Pre-wet a nitrocellulose membrane in transfer buffer. For PVDF membranes, first immerse in 100% methanol for 15 seconds, then equilibrate in transfer buffer [19].
- Sandwich Assembly: On the bottom half of the transfer cassette, assemble the following stack in the order listed, ensuring each layer is thoroughly wetted with buffer:
- Sponge
- Filter paper
- SDS-PAGE gel
- Pre-wetted membrane
- Filter paper
- Sponge [19]
- Bubble Removal: Carefully roll a 15 mL tube over the stack to remove all trapped air bubbles, which can disrupt transfer [19].
- Cassette Closure: Close the cassette and place it into the transfer tank, ensuring the membrane faces the anode (+) and the gel faces the cathode (-) [30] [19].
- Buffer and Cooling: Fill the tank with chilled transfer buffer. Use a cooling unit or ice pack to prevent overheating [27] [19].
- Power Application: Apply power according to the protein size. Standard conditions are 100V for 1-2 hours, or 30V overnight for large proteins [19].
Optimization Tips:
- For large proteins (>100 kDa): Add 0.1% SDS to the transfer buffer and reduce the methanol concentration to 5-10% to facilitate protein movement out of the gel matrix [16] [19].
- For small proteins (<15 kDa): Use a membrane with a smaller pore size (0.2 µm) and reduce methanol to 10% or omit it to prevent excessive protein retention in the gel and potential blow-through [19].
Semi-Dry Transfer Protocol
Semi-dry transfer confines a small volume of buffer within the transfer stack, which is placed directly between two plate electrodes, resulting in a faster transfer [13] [16].
- Key Reagents and Materials: Transfer buffer (often Towbin or Bjerrum buffer), nitrocellulose or PVDF membrane, thick filter paper, and a semi-dry blotter [13] [16].
Step-by-Step Procedure:
- Gel and Membrane Prep: Equilibrate the gel and pre-wet the membrane (and filter papers) in transfer buffer as described in the wet transfer protocol [16].
- Sandwich Assembly: Directly on the anode plate of the semi-dry apparatus, assemble the stack in this order:
- Pre-wetted filter paper
- Pre-wetted membrane
- Equilibrated SDS-PAGE gel
- Pre-wetted filter paper [82]
- Bubble Removal: Meticulously roll out any air bubbles between layers [19].
- Lid Closure: Close the apparatus, bringing the cathode plate into contact with the top of the stack.
- Power Application: Run at a constant current of ~0.4 A or voltage of 10-25 V for 15-60 minutes, depending on protein size [13] [19].
Optimization Tips:
- Use a discontinuous buffer system to improve transfer of a wider protein size range. For instance, use an anode buffer (e.g., Tris-CAPS with methanol) and a cathode buffer (e.g., Tris-CAPS with SDS) [27] [16].
- Ensure all filter papers and the membrane are trimmed to the exact size of the gel to prevent current short-circuiting and uneven transfer [13].
Dry Transfer Protocol
Dry transfer is a proprietary system that uses pre-made stacks containing integrated buffer matrices, eliminating the need for liquid transfer buffers [13] [80].
- Key Reagents and Materials: Pre-assembled dry transfer stacks (e.g., iBlot stacks) and a compatible dry transfer instrument [13] [80].
Step-by-Step Procedure:
- Stack Preparation: Place the bottom stack (anode) into the transfer unit.
- Gel Placement: Place the SDS-PAGE gel directly onto the bottom stack. No pre-equilibration is required.
- Membrane Placement: Place the membrane on top of the gel.
- Stack Completion: Place the top stack (cathode) over the membrane.
- Transfer Initiation: Close the instrument, select a pre-programmed method (typically 3-8 minutes), and start the transfer [13] [80].
Optimization Tips:
- Newer models offer cooling settings that can improve blot-to-blot consistency [80].
- As the system is less customizable, optimization relies on selecting the appropriate pre-programmed method for your protein's molecular weight.
Performance Analysis and Application Scenarios
Transfer Efficiency Across Molecular Weights
The molecular weight of the target protein is a primary determinant in selecting the optimal transfer method. The following table outlines performance data.
Table 2: Transfer Efficiency and Conditions by Protein Size
| Protein Size | Recommended Method | Typical Conditions | Efficiency & Notes |
|---|---|---|---|
| < 30 kDa | Wet Transfer [13] | 30V, 100-150 mA, 3-4 hours or overnight; 0.2 µm membrane; low methanol [19] | High risk of "blow-through" with semi-dry and dry methods. Wet transfer allows for controlled, shorter times to retain small proteins [13] [27]. |
| 30 - 120 kDa | All Methods | Wet: 70-100V, 1-2 hr [19]Semi-dry: 15-60 min [19]Dry: 3-10 min [13] | This is the optimal range for all methods. Semi-dry achieves 60-80% efficiency, while wet and dry can achieve 80-100% [13] [19]. |
| > 150 kDa | Wet Transfer [82] [81] | 25-30V, 100-200 mA, overnight; 0.1% SDS; 5-10% methanol [16] [19] | Semi-dry transfer is less efficient for large proteins due to shorter transfer times and limited buffer capacity. Wet transfer is the gold standard [27] [81]. Examples: mTOR (289 kDa), Ki-67 (~358 kDa), ApoB100 (~500 kDa) [80] [81]. |
Decision Workflow for Method Selection
The following diagram synthesizes the key decision points for selecting the most appropriate transfer method based on experimental priorities.
The Scientist's Toolkit: Essential Materials and Reagents
Successful protein transfer relies on a set of core components. The following table details these essential items and their functions.
Table 3: Essential Research Reagent Solutions for Protein Transfer
| Item | Function | Key Considerations |
|---|---|---|
| Nitrocellulose Membrane | Solid support that binds proteins via hydrophobic and electrostatic interactions [82]. | Pore size (0.2 µm for small proteins, 0.45 µm for most proteins); highly flammable when dry [30] [22]. |
| PVDF Membrane | Solid support that binds proteins via strong hydrophobic interactions [82]. | Higher protein binding capacity than nitrocellulose; must be activated in methanol before use; can yield higher background [82] [30] [22]. |
| Towbin Transfer Buffer | Standard conductive medium for wet and semi-dry transfer (25 mM Tris, 192 mM Glycine, 20% Methanol) [16]. | Methanol promotes protein binding to membrane but can precipitate large proteins and shrink gel pores. Concentration can be adjusted (0-20%) [16] [19]. |
| Methanol / Ethanol | Additive in transfer buffer. Dissociates SDS from proteins, improving membrane binding and preventing gel swelling [30]. | Ethanol can often substitute for methanol, reducing hazardous waste [30]. For large proteins, reducing or omitting alcohol can improve transfer [16]. |
| SDS (Sodium Dodecyl Sulfate) | Anionic detergent added to transfer buffer. | Helps elute large proteins from the gel matrix. Typically used at 0.1% for proteins >100 kDa [16] [19]. |
| Pre-stained Protein Ladder | Colored molecular weight markers. | Allows visual monitoring of transfer efficiency as bands move from gel to membrane [22]. |
| Dry Transfer Stacks | Integrated consumables containing buffer matrices and electrodes for dry transfer. | System-specific (e.g., iBlot stacks); enable buffer-free, rapid transfers but are a recurring cost [13] [80]. |
Troubleshooting and Optimization Techniques
Even with a chosen method, several factors can affect transfer efficiency. Implementing the following controls can help diagnose and resolve common issues.
Monitor Transfer Efficiency:
- Post-Transfer Gel Staining: Stain the gel with Coomassie Blue after transfer. A clear gel indicates successful transfer, while residual stained bands suggest incomplete transfer [22].
- Dual-Membrane Technique: Place a second membrane behind the first during transfer. Detection of the target protein on the second membrane indicates the primary transfer time was too long, leading to "blow-through" of proteins, particularly for low molecular weight targets [30] [22].
Address Inefficient Transfer of Large Proteins: For proteins >150 kDa, the gel matrix can pose a significant barrier. Remedies include:
Minimize Variability:
- Clean Electrodes: Corroded electrodes in wet tank systems can cause inconsistent current and band distortions [80].
- Temperature Control: Excessive heat can melt gels or distort bands. Use a cold room, ice packs, or a recirculating chiller for wet transfers [27] [19]. For dry transfers, utilize instrument cooling settings [80].
- Remove Bubbles: Trapped air between gel and membrane creates non-transfer zones. Meticulously roll out the sandwich during assembly [19].
The wet, semi-dry, and dry western blot transfer methods each offer a distinct profile of advantages tailored to different experimental demands. Wet transfer remains the most flexible and robust method, particularly for quantitative applications and proteins at the extreme ends of the molecular weight spectrum. Semi-dry transfer provides an excellent balance of speed and efficiency for routine analysis of mid-range proteins. Dry transfer offers unparalleled speed and convenience for high-throughput workflows. The optimal choice is not universal but is dictated by the specific target protein, the need for quantitative rigor, and available laboratory resources. By applying the comparative data, detailed protocols, and optimization strategies outlined in this application note, researchers can make an informed decision that ensures efficient and reliable protein transfer, forming a solid foundation for their western blotting research and drug development projects.
Western blotting is a cornerstone technique in biomedical research, yet it traditionally consumes large volumes of costly antibodies. The conventional (CV) method requires substantial reagent pools—typically 10 mL or more of antibody solution—to fully submerge the membrane during incubation [83]. This practice leads to significant waste, as the antibody-antigen binding reaction occurs primarily at the membrane-solution interface, leaving most antibodies in the bulk solution unreacted [83]. For laboratories utilizing rare or expensive antibody stocks, this inefficiency poses considerable financial and practical challenges. Recent innovations address this issue through a elegantly simple approach: the Sheet Protector (SP) Strategy. This method leverages common stationery materials to create a minimal-volume incubation system, dramatically reducing antibody consumption while maintaining detection sensitivity and specificity [83]. Framed within the critical context of protein transfer methodologies—a foundational step determining western blot success—this application note details the implementation and validation of the SP strategy for antibody conservation.
The Sheet Protector Strategy: Concept and Advantages
The Sheet Protector Strategy revolutionizes antibody incubation by fundamentally changing the delivery system. Instead of submerging the membrane in a large container of antibody solution, the technique utilizes a standard office sheet protector to distribute a minimal volume of antibody (20-150 µL for a mini-gel) as a thin layer over the nitrocellulose (NC) membrane [83]. The plastic sheet protector creates a uniform, sealed environment where surface tension maintains even antibody distribution across the membrane surface, enabling efficient antigen-antibody binding with dramatically reduced reagent requirements.
Quantified Advantages Over Conventional Method
The table below summarizes the operational and economic benefits demonstrated through direct comparison studies:
Table 1: Performance Comparison Between Conventional and Sheet Protector Methods
| Parameter | Conventional (CV) Method | Sheet Protector (SP) Strategy |
|---|---|---|
| Antibody Volume | 10 mL (typical for mini-gel) [83] | 20-150 µL (adjusted for membrane size) [83] |
| Incubation Time | Overnight (18 hours typical) [83] | As little as 15 minutes to a few hours [83] |
| Incubation Temperature | 4°C (with agitation) [83] | Room temperature (without agitation) [83] |
| Agitation Requirement | Required (orbital shaker) [83] | Not required [83] |
| Sensitivity & Specificity | Standard | Comparable to conventional method [83] |
Comprehensive Experimental Protocol
Materials and Reagents
Table 2: Essential Research Reagent Solutions and Materials
| Item | Specification/Function |
|---|---|
| Sheet Protector | Standard office stationery (e.g., polyethylene). Creates a sealed, uniform incubation chamber. |
| Nitrocellulose (NC) Membrane | 0.2 µm pore size. Solid support for transferred proteins. |
| Primary Antibody | Diluted in 5% skim milk/TBST to working concentration. |
| Secondary Antibody | HRP-conjugated, diluted in 5% skim milk/TBST. |
| Blocking Solution | 5% skim milk in TBST. Reduces non-specific antibody binding. |
| TBST Buffer | Tris-buffered saline with 0.1% Tween-20. Used for washing and buffer preparation. |
| Chemiluminescent Substrate | HRP-sensitive substrate (e.g., WesternBright Quantum). For signal detection. |
Step-by-Step Workflow
The following diagram illustrates the core procedural workflow of the Sheet Protector Strategy:
Detailed Procedural Steps
Protein Separation and Transfer: Perform standard SDS-PAGE and electrotransfer of proteins to a nitrocellulose membrane using your established protocol [19] [13]. Confirm transfer efficiency with Ponceau S staining or a reversible protein stain if necessary [21].
Blocking: Block the membrane in 5% skim milk solution in TBST with gentle agitation for 1 hour at room temperature [83] [29].
Membrane Preparation for SP: Briefly rinse the blocked membrane in TBST to remove excess milk. Thoroughly blot the membrane on a clean paper towel to absorb residual moisture, achieving a semi-dry state. This step is crucial for ensuring even antibody distribution [83].
Antibody Application:
- Lay the prepared membrane flat on one leaf of a cropped sheet protector.
- Pipette the calculated volume of primary antibody working solution directly onto the membrane surface. The required volume (V) can be estimated using the formula:
V (in µL) ≈ 5.5 × L (membrane length in cm) × N (number of lanes)[83]. - Gently lower the upper leaf of the sheet protector onto the membrane, allowing the antibody solution to naturally spread and form a thin, even layer across the entire surface by surface tension. Avoid creating bubbles.
Incubation:
- For incubations ≤ 2 hours: The assembled "SP unit" (sheet protector + membrane + antibody) can be placed directly on the bench at room temperature.
- For longer incubations (> 2 hours): Place the SP unit on a moist paper towel and seal it inside a zipper bag to prevent evaporation [83].
Post-Incubation Processing: After incubation, carefully open the sheet protector and proceed with standard TBST washes (3 × 5 minutes each with agitation). Continue with standard secondary antibody incubation and chemiluminescent detection protocols [83] [84].
Validation and Optimization Data
Antibody Concentration and Incubation Time
The SP strategy's efficiency allows for significantly shortened incubation times. Researchers have successfully detected apoptosis markers using a 15-minute SP incubation at room temperature, demonstrating the method's utility for rapid results [83]. To achieve signal intensity comparable to the conventional method, a slight increase in antibody concentration may be required during optimization.
Table 3: Optimization Guidelines for Key Experimental Parameters
| Factor | Consideration & Optimization Tip |
|---|---|
| Antibody Concentration | Start with the same concentration as the CV method. If signal is weak, a 1.5 to 2-fold increase may be needed to match CV signal intensity [83]. |
| Incubation Time | Can be radically reduced from hours to minutes. Test a series from 15 minutes upwards for your target [83]. |
| Membrane Moisture | The membrane must be semi-dry. Excessive moisture will dilute the antibody; a completely dry membrane may exhibit high background. |
| Evaporation Prevention | For extended incubations, use a humidity chamber (e.g., a sealed bag with a wet towel) to prevent solution evaporation and membrane drying [83]. |
Integration with Protein Transfer Methods
The success of the SP strategy, like any immunodetection method, is predicated on efficient and complete protein transfer from the gel to the membrane. The diagram below contextualizes the Sheet Protector Strategy within the broader western blot workflow, highlighting its role post-transfer.
Critical Transfer Considerations for SP Success
- Transfer Efficiency Check: Always verify transfer completeness before antibody incubation. Stain the post-transfer gel with Coomassie Blue to ensure proteins have left the gel, or use a reversible membrane stain like Ponceau S [21].
- Membrane Selection: The SP strategy has been validated on nitrocellulose (NC) membranes [83]. Note that membranes with different pore sizes (e.g., 0.2 µm vs. 0.45 µm) can affect the retention of proteins, especially low molecular weight targets, which influences the final signal [42].
- Troubleshooting Transfer Issues: If you encounter weak or no signal after SP incubation, do not overlook transfer efficiency as a potential cause. Staining the gel after transfer or using a prestained protein ladder are effective ways to monitor transfer efficiency [85] [21].
The Sheet Protector Strategy represents a significant advancement in western blot methodology, aligning with the growing need for sustainable, cost-effective, and efficient laboratory practices. By reducing antibody consumption by up to 99%, eliminating the need for overnight incubations and specialized agitation equipment, this technique offers a universally accessible solution that does not compromise data quality. Its simplicity and low cost lower the barrier to adoption, making it an indispensable tool for any research group aiming to optimize resource utilization and accelerate the pace of discovery in protein analysis.
Establishing Proper Controls for Reliable Protein Detection and Quantification
Within the critical context of transferring proteins from a gel to a membrane for western blotting, the establishment of rigorous controls is not merely a supplementary step but a foundational requirement for obtaining reliable and interpretable data. The process of electrotransfer, whether wet, semi-dry, or dry, introduces inherent variabilities in efficiency, particularly for proteins of different sizes [1]. Without appropriate controls, these technical inconsistencies can be mistaken for genuine biological changes, leading to erroneous conclusions in research and drug development. This application note provides detailed methodologies and frameworks for implementing a comprehensive control system, ensuring that your protein detection and quantification are robust, reproducible, and publication-ready.
The Critical Role of Normalization Controls
Quantitative western blotting aims to measure relative changes in protein expression or post-translational modifications. However, variability can arise from inconsistent sample loading, unequal protein concentrations, and irregularities during the transfer process [52]. Normalization controls are essential to account for these technical variances, thereby distinguishing them from true biological effects.
Total Protein Normalization (TPN): The Gold Standard
Total Protein Normalization (TPN) is increasingly required by leading scientific journals and is considered the superior method for accurate quantitation [52]. This technique normalizes the signal of the target protein to the total amount of protein present in each lane of the gel, rather than to a single loading control protein.
- Advantages: TPN is not affected by experimental manipulations that might alter the expression of a single housekeeping protein. It provides a larger dynamic range for detection and offers valuable information about the quality and uniformity of your electrophoresis and blotting procedures [52].
- Implementation: TPN can be achieved using total protein stains or, more effectively, with fluorogenic labeling technologies. For instance, fluorescent labeling reagents allow for rapid, sensitive visualization of total protein with low background and no destaining steps, and can be imaged on compatible systems like the iBright Imaging System [52]. This method is performed after the transfer step, directly assessing the success and uniformity of the protein blot onto the membrane.
Housekeeping Proteins (HKP): Limitations and Considerations
For decades, housekeeping proteins (HKPs) such as GAPDH, β-actin, and β-tubulin have been widely used as internal loading controls. However, this method is falling out of favor with top journals due to several significant drawbacks [52].
- Variable Expression: The fundamental assumption of consistent HKP expression across all experiments and conditions is often false. HKP expression can change with cell type, developmental stage, tissue pathology, and experimental treatments [52].
- Signal Saturation: HKPs are typically highly abundant, meaning their band intensities can saturate easily, leading to non-linear signal response and misinterpretation of data [52].
- Additional Labor: HKP normalization requires meticulous optimization of controls and a linear dynamic range for both the target protein and the HKP itself, which can be prohibitively narrow.
If HKPs must be used, it is crucial to validate their stable expression under your specific experimental conditions and to ensure they are run on the same blot as the target protein [86].
Table 1: Comparison of Normalization Strategies
| Feature | Total Protein Normalization (TPN) | Housekeeping Protein (HKP) |
|---|---|---|
| Principle | Normalizes target to total protein in lane | Normalizes target to a single ubiquitously expressed protein |
| Sensitivity to Biological Variability | Low | High (HKP expression can change) |
| Dynamic Range | Large | Narrow (due to signal saturation) |
| Validation Required | No | Yes (for each experimental condition) |
| Journal Preference | Preferred/Gold Standard [52] | Falling out of favor [52] |
A Framework of Essential Controls
A robust western blot experiment incorporates multiple types of controls to ensure every step of the process—from gel separation to immunodetection—is functioning correctly.
Loading and Electrophoresis Controls
- Molecular Weight Marker: A molecular weight ladder (e.g., ab116028 [2]) run alongside samples is indispensable for confirming the expected size of the target protein and verifying the efficacy of the electrophoretic separation.
- Total Protein Assessment: After transfer, reversible protein stains like Ponceau S or more sensitive alternatives can be used to visualize the total protein pattern on the membrane. This confirms successful and even transfer across all lanes and can serve as the basis for TPN [1].
Antibody-Specific Controls
The specificity of the antibody-antigen interaction is the cornerstone of western blotting. The following controls are non-negotiable for validating your detection results.
- Positive Control: A lysate or purified sample known to contain the target protein confirms that the antibody and detection system are working correctly.
- Negative Control: A sample known not to express the target protein (e.g., a knockout cell line, siRNA-treated lysate, or an irrelevant cell type) is essential for demonstrating the specificity of the primary antibody and identifying any non-specific bands.
- No-Primary Antibody Control: Incubating the membrane with only the secondary antibody solution identifies any background signal resulting from non-specific binding of the secondary antibody.
Detailed Experimental Protocols
Protocol: Total Protein Normalization with Fluorescent Labeling
This protocol is adapted for use with fluorescent total protein stains and imaging systems.
Materials:
- Transferred membrane (PVDF or Nitrocellulose)
- Fluorescent total protein label (e.g., No-Stain Protein Labeling Reagent)
- Wash Buffer (e.g., TBST or PBST)
- Fluorescent-compatible blocking buffer (e.g., Blocker FL Fluorescent Blocking Buffer)
- Primary and fluorescently-labeled secondary antibodies
- Fluorescence imaging system
Method:
- Post-Transfer: Following protein transfer to the membrane and a brief wash in deionized water, proceed to total protein labeling.
- Total Protein Labeling: Incubate the membrane with the fluorescent total protein labeling reagent according to the manufacturer's instructions. This typically involves a 5-10 minute incubation with gentle agitation.
- Image for Total Protein: Image the membrane using the appropriate channel on your fluorescence imager. This image serves as your normalization reference.
- Blocking: Incubate the membrane with a sufficient volume of fluorescent blocking buffer for 30-60 minutes at room temperature with agitation. Do not add detergent unless specified, as it may increase background [38].
- Antibody Incubation: Proceed with standard primary and secondary antibody incubations. Dilute secondary antibodies to 0.4 - 0.1 µg/mL in wash buffer or blocking buffer. Protect the membrane from light during and after incubation to prevent photobleaching [38].
- Final Imaging: After thorough washing, image the membrane using the channels specific to your secondary antibodies. The target protein signals can then be quantified and normalized to the total protein signal in each corresponding lane.
Protocol: Verification of Antibody Specificity
Materials:
- Test lysates (experimental samples)
- Positive control lysate
- Negative control lysate (e.g., knockout)
- Primary antibody against target protein
- Secondary antibody
- Standard western blot reagents
Method:
- Prepare Samples: Aliquot equal amounts of protein (e.g., 10-40 µg for lysates [2]) from your test, positive, and negative control samples into loading buffer. Denature by heating at 100°C for 10 minutes.
- Gel Electrophoresis: Load samples and a molecular weight marker onto an appropriate SDS-PAGE gel. The gel percentage should be selected based on your target protein's size (e.g., 4-12% Bis-Tris for 31-150 kDa proteins [2]).
- Protein Transfer: Transfer proteins to a membrane using a wet, semi-dry, or dry system optimized for your protein's size. For large proteins (>150 kDa), use lower acrylamide gels (3-8%) and extended transfer times [2] [1].
- Blocking and Incubation: Block the membrane with a suitable blocking buffer (e.g., 5% non-fat milk or a commercial blocker). Incubate the membrane with the primary antibody diluted in blocking buffer, followed by the appropriate HRP- or fluorescent-conjugated secondary antibody.
- Detection and Analysis: Develop the blot using chemiluminescent or fluorescent detection. A specific result is confirmed when:
- A band of the correct size appears in the positive control and test samples.
- No band is present at the same molecular weight in the negative control lane.
- No bands are present in the no-primary-antibody control.
Data Presentation and Image Integrity
Adherence to journal guidelines for data presentation is critical for publication. Leading journals like Nature, Science, and the Journal of Biological Chemistry have strict policies to prevent misinterpretation [52] [86].
- Unprocessed Data: Nature Portfolio journals require unprocessed images of all gels and blots to be submitted as Supplementary Information [86].
- Image Processing: Minimal processing is acceptable. Adjustments to brightness or contrast must be applied equally across the entire image and equally to controls. The use of touch-up tools (e.g., cloning, healing) is unacceptable [86].
- Gel and Blot Presentation:
- Quantitative comparisons between samples on different gels are strongly discouraged.
- Re-arranged lanes must be clearly indicated with dividing lines and described in the figure legend.
- Cropped gels must retain all important bands.
- Loading controls must be run on the same blot as the target protein.
- High-contrast images are discouraged as overexposure may mask additional bands [86].
The Scientist's Toolkit: Research Reagent Solutions
Table 2: Essential Materials for Controlled Western Blotting
| Item | Function | Examples & Considerations |
|---|---|---|
| Lysis Buffer | Extracts protein from cells/tissue while maintaining integrity. | RIPA (general), non-denaturing (for native structures). Always add protease/phosphatase inhibitors [2]. |
| Protein Assay | Quantifies protein concentration pre-loading to ensure equal loading. | Bradford or BCA assay kits (e.g., ab102536) [2]. |
| SDS-PAGE Gel | Separates proteins by molecular weight. | Choose % acrylamide based on protein size: 4-12% gradient for 31-150 kDa; 3-8% for >150 kDa [2]. |
| Membrane | Immobilizes proteins for antibody probing. | Nitrocellulose: General use. PVDF: Higher mechanical strength, requires pre-wetting in methanol [38] [1]. |
| Blocking Buffer | Prevents non-specific antibody binding to reduce background. | 5% non-fat milk (economical), commercial fluorescent blockers (low background), BSA. Requires optimization [87] [1]. |
| Primary Antibody | Binds specifically to the target protein. | Must be validated for western blot. Check host species for multiplexing [87]. |
| Secondary Antibody | Conjugated to reporter (HRP/fluorophore), binds to primary antibody for detection. | Must match host species of primary antibody. Use cross-adsorbed antibodies for multiplexing to avoid cross-reactivity [87] [38]. |
| Detection Reagent | Generates measurable signal (light/fluorescence). | Chemiluminescent substrates (e.g., SuperSignal series) for HRP; specific laser/excitation for fluorescent dyes [38]. |
Workflow Diagram
The following diagram illustrates the integrated workflow for establishing proper controls, from experimental design to data analysis, ensuring reliable protein detection and quantification.
Control Integration Workflow
The reliability of protein detection and quantification in western blotting is entirely dependent on the implementation of a comprehensive system of controls. By prioritizing total protein normalization, rigorously validating antibody specificity, and adhering to stringent data presentation standards, researchers can generate data that is not only scientifically sound but also worthy of publication in high-impact journals. This disciplined approach is fundamental to advancing our understanding in basic research and ensuring the integrity of data in the drug development pipeline.
Conclusion
Mastering protein transfer is fundamental to successful western blotting, requiring careful selection of methodology based on protein characteristics and research objectives. Wet transfer remains the gold standard for versatility, particularly with high molecular weight proteins, while semi-dry and dry methods offer speed and convenience for routine applications. Systematic troubleshooting and rigorous validation through techniques like post-transfer staining and dual membrane assessment are crucial for generating reproducible, publication-quality data. As western blotting evolves, innovations in buffer-free systems and minimal-antibody approaches promise to enhance efficiency and sustainability in biomedical research, ultimately supporting more reliable drug development and clinical diagnostic applications.
References
- 1. Western Blotting: Products, Protocols, & Applications [https://www.thermofisher.com/us/en/home/life-science/protein-biology/protein-biology-learning-center/protein-biology-resource-library/pierce-protein-methods/overview-western-blotting.html]
- 2. Western blot protocol [https://www.abcam.com/en-us/technical-resources/protocols/western-blot]
- 3. Optimizing Protein Transfer and Detection in Western Blotting [https://www.labx.com/resources/optimizing-protein-transfer-and-detection-in-western-blotting/5568]
- 4. Successful Transfer High Molecular Weight Proteins during ... [https://www.thermofisher.com/us/en/home/life-science/protein-biology/protein-biology-learning-center/protein-biology-resource-library/protein-biology-application-notes/successful-transfer-high-mw-proteins-western-blotting.html]
- 5. Standard Western Blot Protocol [https://www.fortislife.com/protocols/western-blot-protocols/standard-western-blot-protocol]
- 6. Nitrocellulose vs PVDF: Choosing the Best Membrane for ... [https://hoeferinc.com/pages/nitrocellulose-vs-pvdf?srsltid=AfmBOorNXXkzyZ002IbXM1DL3IjPXBSKdmhk3cGZxWbJROgSycM5Z4Ai]
- 7. PVDF vs Nitrocellulose? How to Choose a Blot Membrane [https://www.thermofisher.com/blog/life-in-the-lab/pvdf-vs-nitrocellulose-how-to-choose-a-blot-membrane/]
- 8. Nitrocellulose Membrane for Western Blot | Boster Bio [https://www.bosterbio.com/blog/post/nitrocellulose-membrane-for-western-blot?srsltid=AfmBOop81CtX8Hkx-r0luYmDSWIY8ZaK1701l8l3eWkOF-aTS7TBNM8r]
- 9. Western blot membrane: Selection and preparation guide [https://www.abcam.com/en-us/knowledge-center/western-blot/western-blot-membranes]
- 10. Why PVDF Transfer Membranes Are Ideal for Western ... [https://cobetter.com/technical/why-pvdf-transfer-membranes-are-ideal-for-western-blotting.html]
- 11. How to Select the Best Western Blot Membrane [https://www.licorbio.com/blog/how-to-select-the-best-Western-blot-membrane]
- 12. When to use nitrocellulose vs PVDF membranes [https://azurebiosystems.com/blog/nitrocellulose-vs-pvdf-membranes/]
- 13. Western Blot Transfer Methods [https://www.thermofisher.com/us/en/home/life-science/protein-biology/protein-biology-learning-center/protein-biology-resource-library/pierce-protein-methods/western-blot-transfer-methods.html]
- 14. Western Blot - StatPearls - NCBI Bookshelf - NIH [https://www.ncbi.nlm.nih.gov/books/NBK542290/]
- 15. Western blotting guide: Part 3, Electroblotting – Protein ... [https://www.jacksonimmuno.com/secondary-antibody-resource/technical-tips/western-blotting-guide-part-3/]
- 16. Choosing the Right Western Blot Transfer Method [https://www.licorbio.com/blog/choosing-the-right-western-blot-transfer-method]
- 17. Protein Transfer Methods for Western Blot [https://www.sinobiological.com/category/wb-protein-transfer]
- 18. Can methanol in transfer buffer be replaced by less toxic ... [https://www.agrisera.com/en/blogg/technical-blog/2025/05/12/can-methanol-in-transfer-buffer-be-replaced-by-less-toxic-alternative-.html]
- 19. Western blot transfer techniques [https://www.abcam.com/en-us/knowledge-center/western-blot/western-blot-transfer-methods]
- 20. Western Blot Protocol [https://www.ptglab.com/support/western-blot-protocol/western-blot-protocol/?srsltid=AfmBOoobnrjVn1GRmLrX60oiIbxyvETtsGPLGDnmQBMZU1ZPtvNErglB]
- 21. How to Optimize Your Western Blot Transfers [https://bitesizebio.com/8276/how-to-optimize-your-western-blot-transfers/]
- 22. 3 Hot Tips to Optimize Your Western Blot Transfers [https://bitesizebio.com/7356/optimize-your-western-blot/]
- 23. Western Blotting: An Introduction - PMC [https://pmc.ncbi.nlm.nih.gov/articles/PMC7304528/]
- 24. Protein transfer and visualization in western blot [https://www.abcam.com/en-us/technical-resources/guides/western-blot-guide/protein-transfer-and-visualization-in-western-blot]
- 25. Western blot protocol for high molecular weight proteins [https://www.abcam.com/en-us/technical-resources/protocols/western-blot-for-high-molecular-weights]
- 26. Comparison of the sensitivity of Western blotting between ... [https://www.nature.com/articles/s41598-021-91521-8]
- 27. When to use Wet, Semi-Dry and Dry Transfers for Western ... [https://azurebiosystems.com/blog/western-blot-transfer-methods/]
- 28. Western Blot: The Complete Guide [https://www.antibodies.com/applications/western-blotting]
- 29. Western Blot: Technique, Theory, and Trouble Shooting [https://pmc.ncbi.nlm.nih.gov/articles/PMC3456489/]
- 30. The Pros and Cons of Wet, Semi-dry and Dry Transfer ... [https://www.labconscious.com/green-lab-tips/the-pros-and-cons-of-wet-semi-dry-and-dry-transfer-for-western-blots]
- 31. Troubleshooting Blotting Common Problems and Solutions ... [https://hoeferinc.com/pages/troubleshooting-blotting-common-problems-and-solutions-semi-dry-transfer?srsltid=AfmBOor03eZa_1_cFrnmAcsfjib2_axmYc434oYUAq-VCaqe0JNgwVKP]
- 32. Six Tips for Efficient Transfer of Your Proteins [https://www.bioradiations.com/six-tips-for-efficient-transfer-of-your-proteins/]
- 33. Protein Transfer System Market Expansion: Growth Outlook ... [https://www.datainsightsmarket.com/reports/protein-transfer-system-204929]
- 34. Protein purification and analysis: next generation Western ... [https://pmc.ncbi.nlm.nih.gov/articles/PMC6810642/]
- 35. Western Blot (WB) Protocol for High Molecular Weight ... [https://www.alomone.com/info/western-blot-protocol-for-high-molecular-weight-hmw-proteins?srsltid=AfmBOort8n2H1GahJXDF5PIAQ82NoM9C3bzK3XGenOah_j1fT1NlmFYT]
- 36. Protein Transfer from Gel to Membrane in Western Blot [https://www.novusbio.com/support/support-by-application/protein-transfer-gel?srsltid=AfmBOopU73RfpsO_Tt1Q81XBF0YrUFv2NrZ01L0dmJLQjBE13zQSHXqg]
- 37. Sample preparation of membrane-bound and nuclear ... [https://www.abcam.com/en-us/technical-resources/protocols/sample-preparation-of-membrane-bound-and-nuclear-proteins-for-western-blot]
- 38. Western Blot Protocols and Recipes [https://www.thermofisher.com/us/en/home/life-science/protein-biology/protein-biology-learning-center/protein-gel-electrophoresis-information/western-blot-protocols.html]
- 39. Western blot protocol for low molecular weight proteins [https://www.abcam.com/en-us/technical-resources/protocols/western-blot-protocol-for-low-molecular-weight-proteins]
- 40. Troubleshooting and Optimizing a Western Blot [https://blog.addgene.org/troubleshooting-and-optimizing-a-western-blot]
- 41. Western blot transfer condition protocols [https://www.cytoskeleton.com/western-blot-transfer]
- 42. Comprehensive Optimization of Western Blotting - PMC [https://pmc.ncbi.nlm.nih.gov/articles/PMC10453944/]
- 43. How To Optimize Your Results With Low MW Proteins [https://www.ptglab.com/support/western-blot-protocol/how-to-optimize-your-results-with-low-mw-proteins/?srsltid=AfmBOooMxjqbAJwlSKMKSU8ot0L5kRDpY2bc8VsoYZL7wL570m-wwC_j]
- 44. Western Blotting Troubleshooting Guide [https://www.cellsignal.com/learn-and-support/troubleshooting/western-blot-troubleshooting-guide?srsltid=AfmBOoqLlc4dgB2wH0EOe2nT5DEcYfivW7wGeiYRweO_hrAUuiAnMtXS]
- 45. Western Blotting (Immunoblotting): History, Theory, Uses ... [https://pmc.ncbi.nlm.nih.gov/articles/PMC12303220/]
- 46. General Western Blot Protocol Overview [https://www.novusbio.com/support/support-by-application/western-blot/protocol.html?srsltid=AfmBOop_p2bK1_YKXKcTxuxQmC5qfRoDfrZ6BwWwZ2rxXS-77oHC2_uz]
- 47. Western Blot: Protein Transfer Overview - PMC [https://pmc.ncbi.nlm.nih.gov/articles/PMC3978941/]
- 48. Western Blotting Support—Troubleshooting [https://www.thermofisher.com/us/en/home/technical-resources/technical-reference-library/protein-electrophoresis-western-blotting-support-center/western-blotting-support/western-blotting-support-troubleshooting.html]
- 49. Protein Transfer from Gel to Membrane in Western Blot [https://www.novusbio.com/support/support-by-application/protein-transfer-gel?srsltid=AfmBOoqqFSZMXgWlk3BObd7BzzzB8em3upJ00lmzfT2u_Saf4oMcJu6m]
- 50. SDS-PAGE and Western Blot Protocol [https://www.bostonbioproducts.com/resources/western-blotting-protocol/]
- 51. Western Blot Protocol [https://www.ptglab.com/support/western-blot-protocol/western-blot-protocol/?srsltid=AfmBOoqNPEr5IUPCyJWchTJ5RPX_whpvcf2mhi7Tp_-qRohs5fylOhin]
- 52. 2024 Guide to Quantitative Western Blot Publication [https://www.thermofisher.com/blog/life-in-the-lab/2023-guide-to-quantitative-western-blot-publication/]
- 53. What causes non-specific antibody binding and how can it ... [https://www.cytometry.org/web/q_view.php?id=153&filter=Analysis%20Techniques]
- 54. Non-specific background in immunoglobulin G staining can ... [https://www.sciencedirect.com/science/article/abs/pii/S0065128125000418]
- 55. Protein Transfer from Gel to Membrane in Western Blot [https://www.bio-techne.com/applications/western-blotting/protein-transfer-gel]
- 56. Western Blot Protocol [https://www.ptglab.com/support/western-blot-protocol/western-blot-protocol/?srsltid=AfmBOooY6al-wx1bkA-YChVmePsPO0uQ6fN9ead9Mx4xv_TQLa8M0yq2]
- 57. Improved immunoassay sensitivity and specificity using ... [https://www.nature.com/articles/s41467-022-32796-x]
- 58. Five Fast Tips for Blotting Large Proteins [https://bitesizebio.com/24228/five-fast-tips-for-blotting-large-proteins/]
- 59. Detecting Low Abundance Proteins in Western Blotting [https://www.thermofisher.com/us/en/home/life-science/protein-biology/protein-biology-learning-center/protein-biology-resource-library/pierce-protein-methods/detecting-low-abundance-proteins-in-western-blotting.html]
- 60. Optimization of western blotting for the detection of proteins ... [https://pmc.ncbi.nlm.nih.gov/articles/PMC7333534/]
- 61. Equilibrating your way to a perfect Western blot [https://bitesizebio.com/20098/equilibrating-your-way-to-a-perfect-western-blot/]
- 62. Western Blot Protocol: Step-by-Step Guide to Sample Prep ... [https://www.astorscientific.us/blogs/news/western-blot-protocol?srsltid=AfmBOooOGOvE1oADoVPJujPaSMBlspfTfkVHWbQuUMxGpUDwTUTeSQsC]
- 63. The Top 10 Western Blotting Mistakes (and Solutions!) [https://bitesizebio.com/19799/the-top-10-western-blotting-mistakes-and-solutions/]
- 64. Blotchy Western Blot: Causes, Troubleshooting & [https://www.astorscientific.us/blogs/news/blotchy-western-blot?srsltid=AfmBOoqRCap2T4WFQ5hmxMfocS7uEZPb5NPobl3-Neaac1mmAuU5mQuF]
- 65. Western Blot Troubleshooting [https://stjohnslabs.com/western-blot-troubleshooting/?srsltid=AfmBOooiUzAyG5xi6LeK-3QQ_Kxnh5lfUAUFKmhrl4vwR5x57m6K87sr]
- 66. Troubleshooting Common Electrophoresis Problems and ... [https://www.labx.com/resources/troubleshooting-common-electrophoresis-problems-and-artifacts/5539]
- 67. Western Blot Troubleshooting Wrong Band Size & ... [https://www.sinobiological.com/category/wb-troubleshooting-other-problems]
- 68. Western Blotting Protocol | Antibodies Inc [https://www.antibodiesinc.com/pages/western-protocol?srsltid=AfmBOoqWtNGlqJVgh3JR4SBxVXr-U0EdQ2D8G3HVhm8HzYwnf7OUYOdC]
- 69. Good Normalizations Gone Bad [https://www.licorbio.com/support/contents/applications/western-blots/good-normalization-gone-bad.html?Highlight=normalization]
- 70. Western Blot Detection [https://azurebiosystems.com/western-blotting-applications/western-blotting/]
- 71. How to Western Blot a Coomassie-stained gel [https://bitesizebio.com/9960/second-chance-saloon-how-to-western-blot-a-coomassie-stained-gel/]
- 72. Western Blot Protocol: Step-by-Step Guide [https://www.bosterbio.com/protocol-and-troubleshooting/western-blot-protocol?srsltid=AfmBOorg3sm6VJ8icggmSQvX2pXdg-PoNuEYPpt3l_cBdJ1pHPFA-y9Y]
- 73. Troubleshooting Quantitative Western Blots Hints and Tips [https://www.licorbio.com/applications/quantitative-western-blots/troubleshooting]
- 74. What Are Pre-Stained Protein Ladders and Why Are They ... [https://nusep.us/blogs/protein-ladder-knowledge-hub/what-are-pre-stained-protein-ladders-and-why-are-they-essential-for-western-blotting-1?srsltid=AfmBOorpmfBAKqo9dUK7xmwSZ-uVTz6h4gpoVg8BLvBNI78QtVo3Vq0H]
- 75. Protein Ladders: Prestained Versus Unstained [https://www.goldbio.com/blogs/articles/protein-ladders-prestained-versus-unstained?srsltid=AfmBOoql3NTO0r_CH2aTFeSQpU4SBHS8Q_vShj9EsBvnVQ4gkvRXTKzk]
- 76. Peacock™ Prestained Protein Marker [https://biotium.com/product/peacock-prestained-protein-marker/]
- 77. Protein Standards & Ladders [https://www.thermofisher.com/us/en/home/life-science/protein-biology/protein-gel-electrophoresis/protein-standards-ladders.html]
- 78. Prestained Protein Marker (10-180 kDa) PL00001 [https://www.ptglab.com/products/Prestained-protein-marker-PL00001.htm?srsltid=AfmBOopuH4AKWAcJx7BYioWcA620EPoyV4MNBPjXfl2IR9co83JddsDL]
- 79. Pre-stained Protein Ladders for Visible and Near-Infrared ... [https://www.licorbio.com/blog/pre-stained-protein-ladders-for-visible-and-near-infrared-detection]
- 80. 4 Reasons to Switch Your Western Blot Transfer Method ... [https://www.thermofisher.com/blog/life-in-the-lab/wet-vs-dry-blotting/]
- 81. Dry/Semi-Dry vs Wet Transfer Western Blot [https://www.bio-techne.com/resources/blogs/wet-or-dry-protein-transfer-which-one-to-choose-for-your-western-blotting]
- 82. Wet vs Semi-dry Transfer for Western Blotting - CST Blog [https://blog.cellsignal.com/wet-versus-semi-dry-transfer]
- 83. Sheet Protector Strategy for Western Blot to Reduce ... [https://pmc.ncbi.nlm.nih.gov/articles/PMC12462392/]
- 84. Western Blotting Protocol | Antibodies Inc [https://www.antibodiesinc.com/pages/western-protocol?srsltid=AfmBOooGEpy_R0CiiDAoF9FT2Zlw4UtJPWMfyeJhCR-a_P8dUHOITSlA]
- 85. Western Blot Troubleshooting [https://www.thermofisher.com/us/en/home/life-science/protein-biology/protein-biology-learning-center/protein-gel-electrophoresis-information/western-blot-troubleshooting.html]
- 86. Image integrity and standards | Nature Portfolio [https://www.nature.com/nature-portfolio/editorial-policies/image-integrity]
- 87. Developing a 3-Color Western Blot [https://www.licorbio.com/support/contents/applications/western-blots/developing-a-3-color-western.html]