Stacking Gel vs. Resolving Gel: A Complete Guide to SDS-PAGE Separation
This article provides a comprehensive guide to the distinct roles of stacking and resolving gels in SDS-PAGE, a cornerstone technique for protein analysis.
Stacking Gel vs. Resolving Gel: A Complete Guide to SDS-PAGE Separation
Abstract
This article provides a comprehensive guide to the distinct roles of stacking and resolving gels in SDS-PAGE, a cornerstone technique for protein analysis. Tailored for researchers and drug development professionals, it covers the foundational science behind the discontinuous buffer system, offers step-by-step methodological protocols, and delivers advanced troubleshooting for common issues. It further explores validation techniques and compares traditional methods with modern innovations, serving as a complete resource for optimizing protein separation in biomedical research.
The Core Science: How Stacking and Resolving Gels Work Together
Sodium dodecyl sulfate–polyacrylamide gel electrophoresis (SDS-PAGE) represents a foundational methodology in biochemical research and biopharmaceutical development. The discontinuous (or "two-gel") system, pioneered by Ulrick K. Laemmli, provides significantly enhanced resolution over continuous systems by incorporating stacking and resolving gels with different physicochemical properties [1] [2]. This technical guide examines the core principles, molecular mechanisms, and practical applications of discontinuous SDS-PAGE, with particular emphasis on the distinct functions of its constituent gel layers. Within the context of protein separation science, understanding this system provides researchers with a powerful framework for analyzing complex protein mixtures with exceptional precision.
The Core Principle of Discontinuous SDS-PAGE
The fundamental objective of SDS-PAGE is to separate proteins primarily by their molecular weight [2]. This is achieved by negating two inherent protein characteristics—tertiary structure and intrinsic charge—that would otherwise influence electrophoretic mobility. The discontinuous system accomplishes this through a two-stage process: initial protein concentration into a sharp zone within the stacking gel, followed by size-based separation in the resolving gel [3] [4].
The key innovation of the discontinuous system lies in its use of different buffer compositions and pH levels in the stacking gel, resolving gel, and electrode chambers [4]. This discontinuity creates a transient, self-forming gradient that concentrates proteins from the relatively large sample volume (wells are typically ~1 cm deep) into an extremely narrow band before they enter the resolving matrix [5] [4]. Without this stacking mechanism, proteins would enter the resolving gel at different times, resulting in diffuse, smeared bands and poor resolution [4].
Molecular Mechanisms of the Two-Gel System
The Role of SDS in Protein Denaturation and Charge Masking
Sodium dodecyl sulfate (SDS), an anionic detergent, serves two critical functions in sample preparation. First, it disrupts non-covalent bonds within protein molecules, causing them to unfold and assume a linear, rod-like conformation [3] [4]. Second, SDS binds to the denatured polypeptides with high affinity at a relatively constant ratio of approximately 1.4 g SDS per 1 g of protein [2] [4]. This SDS coating confers a uniform negative charge density along the polypeptide backbone, effectively masking the proteins' intrinsic charges [3]. Consequently, all SDS-coated proteins exhibit similar charge-to-mass ratios, ensuring that molecular size becomes the primary determinant of electrophoretic mobility [4].
The Polyacrylamide Gel Matrix as a Molecular Sieve
The polyacrylamide gel matrix forms through the co-polymerization of acrylamide and bisacrylamide, creating a cross-linked porous network [2] [5]. The pore size within this network is determined by the concentration of acrylamide and the ratio of bisacrylamide to acrylamide [2]. Table 1 illustrates how different acrylamide concentrations optimize the separation of various molecular weight ranges.
Table 1: Acrylamide Concentration and Optimal Protein Separation Range
| Acrylamide Percentage (%) | Optimal Molecular Weight Range (kDa) |
|---|---|
| 7 | 50 - 500 |
| 10 | 20 - 300 |
| 12 | 10 - 200 |
| 15 | 3 - 100 |
Lower percentage gels feature larger pores, facilitating the separation of higher molecular weight proteins, while higher percentage gels with smaller pores provide better resolution for lower molecular weight proteins [3] [2]. Gradient gels, which increase in acrylamide concentration from top to bottom, can separate a broader range of protein sizes within a single gel [2].
The Discontinuous Buffer System and the Stacking Mechanism
The stacking gel, typically buffered at pH 6.8 with a low acrylamide concentration (e.g., 4-5%), functions not to separate proteins but to concentrate them into a sharp zone [3] [5] [4]. The mechanism hinges on the controlled manipulation of glycine's charge state within the Tris-glycine buffer system.
In the electrode buffer (pH ~8.3), glycine exists primarily as glycinate anions, which are highly mobile in an electric field [3] [4]. Upon entering the stacking gel at pH 6.8, the local environment causes most glycine molecules to enter a zwitterionic state (carrying both positive and negative charges), becoming electrophoretically slow [3]. Chloride ions (Cl⁻) from the Tris-HCl in the gel, however, remain highly mobile [4].
This creates an ion mobility disparity: a fast-moving front of chloride ions followed by a slow-moving front of glycine zwitterions [4]. The proteins, with electrophoretic mobilities intermediate between these two fronts, become compressed into a extremely narrow zone between them—a process known as isotachophoresis [3]. The following diagram illustrates this mechanism and the subsequent separation.
SDS-PAGE Two-Gel Separation Mechanism
When this tightly focused protein band reaches the resolving gel (typically buffered at pH 8.8), the local pH increase causes glycine to regain its negative charge, allowing it to migrate rapidly past the proteins [3] [4]. The proteins, now entering a gel with a higher acrylamide concentration and without the stacking effect, begin to separate based on their molecular weights as they navigate the smaller pores of the resolving matrix [3].
Experimental Protocol for Discontinuous SDS-PAGE
Gel Preparation
Discontinuous SDS-PAGE requires the preparation of two distinct gel layers. The following protocol, adapted from standard laboratory practices, provides specific formulations for a mini-gel system [6].
Table 2: Example Formulations for a Two-Gel System
| Reagent | 12% Resolving Gel (35 mL) | 5.1% Stacking Gel (12 mL) |
|---|---|---|
| 30% Acrylamide Stock (mL) | 14.0 | 2.0 |
| Separating Gel Buffer (pH 8.8) | 8.75 (Tris-HCl) | - |
| Stacking Gel Buffer (pH 6.8) | - | 3.0 (Tris-HCl) |
| Double Distilled Water (mL) | 12.25 | 6.9 |
| 10% Ammonium Persulfate (µL) | 175 | 100 |
| TEMED (µL) | 15 | 10 |
Procedure:
- Prepare Resolving Gel: Combine all reagents for the resolving gel in the order listed, adding TEMED last to initiate polymerization. Immediately pipette the mixture into assembled gel cassettes, leaving space for the stacking gel. Gently layer water or isopropanol on top to create a flat interface and exclude oxygen. Allow complete polymerization (typically 15-30 minutes) [6] [2].
- Prepare Stacking Gel: After removing the overlay liquid and drying the top of the resolving gel, combine stacking gel reagents. Add TEMED last, then pipette the mixture onto the polymerized resolving gel. Immediately insert a clean comb, avoiding air bubbles. Allow complete polymerization [6].
Sample Preparation and Electrophoresis
- Sample Denaturation: Mix protein samples with Laemmli sample buffer (containing SDS, Tris-HCl, glycerol, bromophenol blue, and a reducing agent like β-mercaptoethanol or DTT) [3] [5]. Heat the samples at 95-100°C for 5 minutes to ensure complete denaturation and reduction of disulfide bonds [6] [5].
- Gel Electrophoresis: Mount the polymerized gel in the electrophoresis chamber filled with running buffer (Tris, glycine, SDS, pH ~8.3) [3] [6]. Load denatured samples and molecular weight standards into the wells. Apply a constant voltage: 80-100V through the stacking gel, then 120-200V through the resolving gel until the dye front reaches the bottom [6] [5].
- Post-Electrophoresis Analysis: Following separation, proteins are typically fixed and visualized using stains like Coomassie Brilliant Blue, or transferred to a membrane for western blotting [6] [2].
The Scientist's Toolkit: Essential Reagents and Materials
Table 3: Key Research Reagents for Discontinuous SDS-PAGE
| Reagent/Material | Function in the Experiment |
|---|---|
| SDS (Sodium Dodecyl Sulfate) | Denatures proteins and confers a uniform negative charge, masking intrinsic charge and enabling separation primarily by size [3] [4]. |
| Acrylamide/Bisacrylamide | Monomers that copolymerize to form the porous polyacrylamide gel matrix, which acts as a molecular sieve [2] [5]. |
| Tris-HCl Buffers | Maintains the distinct pH environments of the stacking gel (pH ~6.8) and resolving gel (pH ~8.8), which is critical for the discontinuous buffer system [3] [4]. |
| Glycine | A key component of the running buffer; its pH-dependent charge transition (anion to zwitterion) is essential for the protein stacking mechanism [3] [4]. |
| Ammonium Persulfate (APS) & TEMED | Catalytic system that generates free radicals to initiate and accelerate the polymerization of acrylamide into a gel [6] [2]. |
| Laemmli Sample Buffer | Contains SDS for denaturation, glycerol for sample density, a reducing agent, and a tracking dye to monitor electrophoresis progress [3]. |
| Molecular Weight Markers | A mixture of pre-stained or unstained proteins of known molecular weights, run alongside samples to estimate the molecular mass of unknown proteins [2]. |
Advanced Applications and Protocol Modifications
The fundamental discontinuous SDS-PAGE system can be modified to address specific research questions. Key adaptations include:
- Native SDS-PAGE (NSDS-PAGE): By omitting reducing agents, lowering SDS concentrations, and eliminating heating steps, this modification allows for the separation of protein complexes under semi-native conditions. This enables the analysis of protein-protein interactions, enzymatic activity, and the retention of bound metal cofactors post-electrophoresis [7].
- Non-Reducing SDS-PAGE: Omitting reducing agents (e.g., DTT or β-mercaptoethanol) preserves disulfide bonds, allowing researchers to study disulfide-linked protein complexes and oligomers, as applied in the analysis of proinsulin folding and misfolding [8].
- Two-Dimensional (2D) PAGE: This high-resolution technique combines isoelectric focusing (IEF) in the first dimension with SDS-PAGE in the second dimension, resolving thousands of proteins based on both their isoelectric point and molecular weight [9] [2].
The following workflow diagram integrates the core protocol with these common advanced applications.
SDS-PAGE Core and Advanced Workflows
The discontinuous SDS-PAGE system remains a cornerstone technique in modern molecular biology and biotechnology. Its elegant design, leveraging differential pH, buffer ions, and gel porosity to first concentrate and then separate proteins, provides unparalleled resolution for routine protein analysis. A deep understanding of the distinct yet complementary functions of the stacking and resolving gels is not merely academic; it empowers researchers to troubleshoot experimental anomalies, optimize separation conditions for specific protein targets, and adapt the fundamental protocol for advanced applications like native complex analysis or disulfide bond characterization. As protein science continues to drive discoveries in both basic research and drug development, mastery of the two-gel system remains an indispensable skill for the scientific professional.
The stacking gel is a fundamental component of the discontinuous buffer system in SDS-PAGE, designed to concentrate protein samples into sharp bands before they enter the resolving gel. This initial concentration is critical for achieving high-resolution separation. The efficacy of this process is governed by two key chemical parameters: a low polyacrylamide concentration that creates a large-pore sieve for unrestricted protein movement, and an acidic pH that manipulates the charge state of glycine ions in the running buffer to create a stacking effect. This technical guide details the chemistry behind these parameters, provides optimized protocols, and explores recent methodological advancements, framing this knowledge within the broader context of protein function research.
Sodium Dodecyl Sulfate-Polyacrylamide Gel Electrophoresis (SDS-PAGE) is a cornerstone technique for separating proteins by molecular weight [10] [11]. The method most commonly used today is based on the discontinuous buffer system described by Laemmli, which employs two distinct gel layers stacked vertically: a resolving gel (or separating gel) and a stacking gel [12] [13].
The primary function of the stacking gel is to concentrate heterogeneous protein samples into a sharp, unified band before they reach the resolving gel [14]. When a protein sample is loaded into the well, it is distributed throughout the height of the well (often around a centimeter deep). If this diffuse sample were to enter the resolving gel directly, the resulting separation would be a smeared, indistinct band. The stacking gel ensures that all proteins, regardless of size, enter the resolving gel at the same time and in the same extremely narrow zone, which is a prerequisite for the high-resolution separation that occurs in the resolving gel based solely on molecular weight [14]. This process is enabled by a sophisticated interplay of gel concentration and pH.
Core Chemical Principles: Concentration and pH
The stacking gel's function is made possible by creating discontinuities in both gel pore size and pH between the different parts of the electrophoresis system. Table 1 summarizes the standard conditions for a traditional Tris-Glycine SDS-PAGE system.
Table 1: Standard Composition and Conditions for Stacking and Resolving Gels
| Parameter | Stacking Gel | Resolving Gel |
|---|---|---|
| Function | Concentrates proteins into a sharp band | Separates proteins by molecular weight |
| Typical Acrylamide Concentration | 4 - 5% [11] | 8 - 20% (depending on target protein size) [11] |
| Typical pH | 6.8 [13] [14] | 8.8 [13] [14] |
| Pore Size | Large | Small (sieving effect) |
| Leading Ion | Chloride (Cl⁻) [14] | Chloride (Cl⁻) [14] |
| Trailing Ion | Glycine zwitterion [14] | Glycinate anion [14] |
The Science of Low Concentration and Large Pores
The low percentage of acrylamide in the stacking gel (typically 4-5%) polymerizes into a loose matrix with large pores [11]. This structure creates a molecular sieve with minimal sieving effect, allowing all SDS-coated proteins to move through it freely and rapidly, regardless of their molecular weight [14]. The low concentration ensures that the migration speed of proteins in the stacking gel is not yet determined by their size, but is instead controlled by the surrounding ionic environment.
The Critical Role of Acidic pH and Glycine Zwitterions
The acidic pH of the stacking gel (approximately 6.8) is the key to the "stacking" phenomenon and is intricately linked to the chemistry of the glycine amino acid in the running buffer [13] [14]. At the pH of the running buffer (8.3), glycine exists predominantly as a glycinate anion (NH₂-CH₂-COO⁻), which is highly mobile in an electric field. However, when this anion enters the acidic environment of the stacking gel (pH 6.8), its amino group becomes protonated. This shifts its predominant form to a zwitterion (NH₃⁺-CH₂-COO⁻), which has a net charge of zero and thus migrates very slowly through the gel under the influence of the electric field [14].
This sets up a critical ion frontier: the highly mobile chloride ions (Cl⁻) from the Tris-HCl in the gel become the "leading ions," while the slow-moving glycine zwitterions form the "trailing ions." The protein-SDS complexes, which are negatively charged, possess an electrophoretic mobility that is intermediate between these two fronts. They are therefore compressed or "stacked" into a very sharp band in the narrow zone between the leading chloride and trailing glycine fronts as they are herded through the stacking gel [13] [14].
Upon reaching the resolving gel at pH 8.8, the glycine zwitterions are deprotonated and rapidly regain their negative charge, transforming back into fast-moving glycinate anions. These anions quickly overtake the protein stack, depositing all proteins in a tight line at the top of the resolving gel. The proteins then begin their separation by size as they migrate through the higher-concentration acrylamide matrix [14].
The following diagram illustrates this ionic dynamics and protein stacking process.
Advanced Experimental Protocols
Standard Protocol for Discontinuous Gel Preparation
The following is a detailed methodology for preparing a standard Laemmli discontinuous gel, adapted from common laboratory practices [11] [15].
Materials:
- Acrylamide/Bis-acrylamide solution (typically 30-40%)
- Tris-HCl (1.5 M, pH 8.8 for resolving gel; 0.5 M, pH 6.8 for stacking gel)
- 10% Sodium Dodecyl Sulfate (SDS)
- 10% Ammonium Persulfate (APS) - Note: Use fresh aliquots for complete polymerization [16].
- N,N,N',N'-Tetramethylethylenediamine (TEMED)
- Water (deionized)
- Gel cassette and casting apparatus
Resolving Gel Preparation:
- In a small beaker or flask, combine the following components in order for a 10% resolving gel: 4.0 mL of 40% acrylamide solution, 3.9 mL of 1% bisacrylamide solution, 7.5 mL of 1.5 M Tris-HCl (pH 8.8), and water to a final volume of 30 mL [11].
- Add 0.3 mL of 10% SDS and 0.3 mL of 10% APS. Mix gently.
- Add 0.03 mL of TEMED, mix gently but thoroughly, and immediately pipette the solution into the assembled gel cassette, leaving space for the stacking gel.
- Carefully overlay the gel solution with isopropanol or water-saturated butanol to create a flat, even interface.
- Allow the gel to polymerize completely (approximately 20-30 minutes).
Stacking Gel Preparation:
- Once the resolving gel has polymerized, pour off the overlay liquid and rinse the top of the gel with deionized water.
- In a separate tube, combine components for a 5% stacking gel: 1.25 mL of 40% acrylamide, 2.5 mL of 0.5 M Tris-HCl (pH 6.8), and 6.1 mL water.
- Add 0.1 mL of 10% SDS and 0.05 mL of 10% APS. Mix.
- Add 0.01 mL of TEMED, mix, and pipette the solution directly onto the top of the polymerized resolving gel.
- Immediately insert a clean comb into the stacking gel solution, avoiding air bubbles.
- Allow the stacking gel to polymerize for 20-30 minutes at room temperature. The gel is now ready for electrophoresis.
Innovation: One-Step Casting with a Colored Stacking Gel
A recent innovation addressing the challenge of visualizing the often-ill-defined boundary in one-step gel casting methods is the Mako OT method (Makoto one-step-time-saving gel) [12]. This method allows for the simultaneous preparation of both resolving and stacking gels but includes a dye in the stacking gel solution.
Key Advancement:
- Method: A dye (e.g., Brilliant Blue FCF) is added directly to the stacking gel solution during the one-step casting process [12].
- Benefit: This creates a clearly visible, colored stacking gel layer, allowing researchers to confirm successful gel preparation and a defined interface before running the electrophoresis. This method halves the preparation time compared to the traditional Laemmli method while providing comparable performance for both SDS-PAGE and western blotting [12].
The Scientist's Toolkit: Essential Reagents
Successful SDS-PAGE relies on a specific set of reagents, each with a defined role in the process, particularly in sample preparation and the stacking mechanism.
Table 2: Key Research Reagents for SDS-PAGE
| Reagent | Function | Technical Note |
|---|---|---|
| SDS (Sodium Dodecyl Sulfate) | Denatures proteins and confers a uniform negative charge, masking intrinsic charge and shape [13] [14]. | Ensures separation is primarily by molecular weight. |
| Acrylamide/Bis-acrylamide | Forms the cross-linked polyacrylamide gel matrix that acts as a molecular sieve [11]. | The Bis-acrylamide is the cross-linker. Concentration determines pore size. |
| APS & TEMED | Catalysts for the polymerization of acrylamide [11]. | APS generates free radicals; TEMED accelerates the reaction. |
| Tris-HCl Buffers | Provides the buffering capacity at different pHs (6.8 for stacking, 8.8 for resolving) [13]. | Creates the pH discontinuity essential for the stacking effect. |
| Glycine | The "trailing ion" in the discontinuous buffer system [14]. | Its charge-state change with pH is the engine of protein stacking. |
| Beta-Mercaptoethanol | A reducing agent that breaks disulfide bonds in proteins [13]. | Ensures proteins are fully denatured into their monomeric subunits. |
| Bromophenol Blue | A anionic dye front that migrates ahead of the smallest proteins [13]. | Visualizes the progress of electrophoresis. |
The stacking gel is a masterclass in applied biochemistry, where precise control over chemical environment—specifically, a low acrylamide concentration (4-5%) and an acidic pH (6.8)—orchestrates the precise alignment of protein samples. This foundational step is non-negotiable for achieving the high-resolution separations that underpin protein analysis in research and diagnostics. Understanding this chemistry is crucial for troubleshooting and for appreciating the value of new innovations, such as time-saving colored stacking gels, which enhance the efficiency and reliability of this decades-old yet indispensable technique. A firm grasp of these principles ensures that researchers can optimally leverage SDS-PAGE within a broader strategy for understanding protein function.
In the intricate architecture of discontinuous polyacrylamide gel electrophoresis (PAGE), the resolving gel serves as the critical stage where high-resolution separation of proteins by molecular weight is achieved. This capability stems from its well-defined polyacrylamide matrix, which acts as a molecular sieve [2]. The "molecular sieve" effect, a phenomenon deeply studied since the technique's inception, describes how the cross-linked polymer network regulates the migration of proteins based on their size and shape [17] [18].
Within the context of a broader thesis on gel electrophoresis, understanding the resolving gel is paramount. While the stacking gel efficiently concentrates sample proteins into a sharp starting band, it is the precisely controlled pore size of the resolving gel that performs the core analytical task of separation [2] [19]. The properties of this gel matrix can be finely tuned to separate a vast range of protein sizes, making it an indispensable tool for researchers, scientists, and drug development professionals engaged in protein characterization, quality control, and proteomic discovery [2] [20].
The Science of Molecular Sieving in Polyacrylamide Gels
Fundamental Principles of Molecular Sieving
The resolving gel operates on the principle that the migration velocity of a protein through the polyacrylamide matrix depends not only on its charge but also, to a very large extent, on its molecular size [18]. The cross-linked polyacrylamide forms a three-dimensional mesh with defined pores through which proteins must travel under the influence of an electric field [21]. Smaller proteins navigate this mesh with relative ease, while larger proteins are progressively hindered, a effect that is so pronounced that the migration order of proteins can be reversed simply by altering the gel concentration [18].
In standard SDS-PAGE, the use of sodium dodecyl sulfate (SDS) ensures that proteins are denatured and linearized, and coated with a uniform negative charge. This effectively negates the influence of a protein's native charge and shape, meaning that separation occurs primarily based on polypeptide size [2] [22]. The frictional force imposed by the gel matrix is the key factor dictating the final separation [2].
Quantitative Relationship Between Pore Size and Gel Concentration
The pore size of a polyacrylamide gel is not fixed; it is inversely related to the polyacrylamide percentage [2]. Early foundational studies estimated that the "average pore size" is approximately 20 Å, 50 Å, and 150 Å at polyacrylamide concentrations of 20%, 7.5%, and 3%, respectively [17]. The total pore volume and the average pore diameter are determined by the total monomer concentration (%T) and the proportion of cross-linker (%C) [23].
Table 1: Estimated Polyacrylamide Gel Pore Sizes at Various Concentrations
| Polyacrylamide Gel Concentration (%) | Estimated Average Pore Size (Å) |
|---|---|
| 3% | ~150 |
| 7.5% | ~50 |
| 20% | ~20 |
The mobility (μ) of a protein molecule in the gel is mathematically related to the gel concentration. It can be described by the general function:
μ ∝ 1 / (1 + K · Cgel)
where Cgel is the gel concentration and K is a constant related to the size of the protein and the properties of the gel [23]. This relationship confirms the observation that as the gel concentration increases, protein migration slows down due to the smaller pore size.
Optimizing the Resolving Gel for Separation
Gel Concentration and Protein Size Range
The choice of polyacrylamide percentage for the resolving gel is critical and depends directly on the molecular weight of the target proteins. Using a gel with a pore size too large will fail to resolve small proteins, while a pore size too small will not allow larger proteins to enter the matrix effectively [2] [24].
Table 2: Recommended Resolving Gel Concentrations for Optimal Protein Separation
| Target Protein Size Range | Recommended Resolving Gel Percentage |
|---|---|
| >200 kDa | 4-6% |
| 50-200 kDa | 8% |
| 15-100 kDa | 10% |
| 10-70 kDa | 12.5% |
| 12-45 kDa | 15% |
| 4-40 kDa | Up to 20% |
The Power of Gradient Gels
To overcome the limitation of a fixed-concentration gel and resolve a broader range of protein sizes on a single gel, gradient gels are employed. These gels are formulated with a continuous gradient of polyacrylamide, typically from a low percentage at the top to a high percentage at the bottom [24].
Gradient gels offer several key advantages:
- Broad-Range Separation: A single gradient gel (e.g., 4-20%) can effectively separate proteins from very small to very large molecular weights, which would otherwise require multiple single-percentage gels [24].
- Sharper Bands: As a protein migrates, its leading edge encounters progressively smaller pores and slows down, while the lagging edge continues moving relatively faster. This phenomenon causes the protein band to "stack" on itself, resulting in sharper, tighter bands [24].
- Enhanced Resolution of Similar-Sized Proteins: The sharpening effect and the extended path length through a high-percentage gel can better separate proteins with very similar molecular weights [24].
Table 3: Example Gradient Gel Formulations for Specific Needs
| Range of Protein Sizes | Low/High Acrylamide Percentages | Application |
|---|---|---|
| 4 – 250 kDa | 4% / 20% | Discovery work; analyzing complex samples |
| 10 – 100 kDa | 8% / 15% | Targeted analysis of a broader size range |
| 50 – 75 kDa | 10% / 12.5% | High-resolution separation of similarly sized proteins |
Advanced Methodologies and Detection
A Standard Experimental Protocol for SDS-PAGE Resolving Gel
The following is a detailed methodology for preparing and running a standard Tris-Glycine SDS-PAGE resolving gel, adapted from common laboratory practice [2] [22].
Research Reagent Solutions for Resolving Gel Preparation
| Reagent | Function |
|---|---|
| Acrylamide/Bis-acrylamide (30-40% stock) | Forms the cross-linked polymer network that creates the sieving matrix. |
| Tris-HCl (pH 8.8) | Provides the appropriate alkaline pH for the resolving gel and buffers the system. |
| Sodium Dodecyl Sulfate (SDS) | Denatures proteins and provides a uniform negative charge, ensuring separation by size. |
| Ammonium Persulfate (APS) | Initiator of the free-radical polymerization reaction. |
| Tetramethylethylenediamine (TEMED) | Catalyst that accelerates the polymerization reaction by stabilizing free radicals. |
| Deionized Water | Solvent for the gel solution. |
Protocol Steps:
- Gel Solution Preparation: In a beaker or flask, mix the components for a 10% resolving gel. A typical recipe for a mini-gel might include: 3.3 mL of 30% acrylamide/bis-acrylamide mix, 2.5 mL of 1.5 M Tris-HCl (pH 8.8), 0.1 mL of 10% SDS, and 4.0 mL of water. Swirl to mix [2].
- Polymerization Initiation: Immediately before casting, add 50 μL of 10% ammonium persulfate (APS) and 10 μL of TEMED to the solution. Swirl gently to mix. Note: The addition of TEMED will start the polymerization process rapidly, so work quickly from this point.
- Casting: Using a pipette, transfer the resolving gel solution into the gap between two assembled glass plates. Leave space for the stacking gel.
- Overlaying: Carefully overlay the gel solution with isopropanol or water-saturated butanol. This creates a flat, even interface at the top of the resolving gel and excludes oxygen, which inhibits polymerization.
- Polymerization: Allow the gel to polymerize completely for 20-30 minutes. A distinct schlieren line will appear between the gel and the overlay.
- Stacking Gel Addition: Pour off the overlay, rinse the top of the gel with water, and then cast the stacking gel on top, inserting a comb to create sample wells.
- Electrophoresis: Once the stacking gel has set, assemble the gel cassette in the electrophoresis tank filled with running buffer (e.g., Tris-Glycine-SDS, pH 8.3). Load protein samples mixed with Laemmli buffer into the wells and apply a constant current (e.g., 30 mA per mini-gel) until the dye front reaches the bottom of the gel.
Innovative Detection: Real-Time Fluorescence Imaging
Traditional detection of proteins in resolving gels relies on post-electrophoresis staining with dyes like Coomassie Brilliant Blue, a process that is time-consuming and can cause band broadening [25]. A recent technological advance is the development of online intrinsic fluorescence imaging (IFI).
This method takes advantage of the intrinsic fluorescence of aromatic amino acids (tryptophan and tyrosine) in proteins. Researchers have designed a semi-open gel apparatus and a deep-UV LED light source to irradiate the standard slab gel during electrophoresis [25]. This allows for:
- Real-time monitoring of protein migration.
- Immediate imaging after the run, avoiding band broadening caused by post-staining diffusion.
- Quantitative detection with a limit of detection (LOD) for BSA of 20 ng, which is reported to be 5-fold lower than staining methods, and a wide linear dynamic range of 0.03–10 μg [25].
This PAGE-IFI method exemplifies the ongoing innovation in the field, providing a faster, more sensitive, and quantitative alternative to conventional detection for the resolving gel.
SDS-PAGE Protein Separation Workflow
The resolving gel is the cornerstone of polyacrylamide gel electrophoresis, whose function is defined by its tunable pore size and resultant molecular sieving capability. Through the precise control of acrylamide concentration, scientists can design gels to separate target proteins with high resolution. The development of gradient gels and advanced detection techniques like intrinsic fluorescence imaging further enhances the power and utility of this foundational methodology. As the global market for PAGE gels continues to grow, driven by demand in scientific research and pharmaceutical development, the principles governing the resolving gel's role remain as relevant as ever [20]. A deep understanding of these principles is essential for any researcher aiming to harness the full potential of electrophoresis in the analysis of proteins.
Within the framework of investigating stacking and resolving gel functions, this technical guide elucidates the fundamental mechanism by which glycine operates as a trailing ion to establish a critical voltage gradient in SDS-PAGE. The discontinuous buffer system, pioneered by Laemmli, relies on precise pH control to modulate glycine's charge state, creating a moving boundary that concentrates protein samples into sharp bands before they enter the resolving gel. This process is indispensable for achieving high-resolution separation of proteins based on molecular weight. This paper details the underlying principles, provides verified experimental methodologies, and presents quantitative data to guide researchers in optimizing this critical technique for proteomic analysis and biopharmaceutical development.
Sodium Dodecyl Sulfate-Polyacrylamide Gel Electrophoresis (SDS-PAGE) is the cornerstone of modern protein analysis. The most common implementation uses a discontinuous buffer system based on the method described by Laemmli in 1970 [12] [26]. The term "discontinuous" refers to the deliberate use of different pH values and ionic compositions in the stacking gel, resolving gel, and electrode buffers [4]. This intentional discontinuity is the fundamental basis for the stacking phenomenon, which allows proteins to be concentrated into an extremely narrow zone before separation begins. Without this stacking process, proteins would enter the resolving gel as a diffuse band up to a centimeter deep, resulting in poor resolution and significant smearing [4].
The stacking process enables researchers to load samples in a relatively large volume while still achieving sharp, well-defined bands. For the pharmaceutical industry, this precision is crucial for analyzing protein drug purity, identifying post-translational modifications, and ensuring batch-to-batch consistency during biologic drug development [10]. The entire mechanism hinges on the clever manipulation of a single amino acid—glycine—whose charge state is dynamically controlled by the local pH environment to create a voltage gradient that orchestrates the protein stacking.
The Fundamental Mechanism: Glycine's Charge Dynamics
The Chemistry of Glycine's Zwitterionic Nature
Glycine is the simplest amino acid, with the chemical formula NH₂-CH₂-COOH. Its charge state is exquisitely sensitive to the pH of its surrounding environment, allowing it to exist in three distinct forms [4]:
- Positively Charged: In acidic environments (low pH), the amino group is protonated (-NH₃⁺), while the carboxyl group remains protonated (-COOH), resulting in a net positive charge.
- Zwitterion: At neutral pH (approximately pH 7), glycine carries both a positive charge (-NH₃⁺) and a negative charge (-COO⁻), resulting in a net neutral charge.
- Negatively Charged: In basic environments (high pH, ~8.3 and above), the amino group is neutral (-NH₂), while the carboxyl group is deprotonated (-COO⁻), resulting in a net negative charge (glycinate anion) [27] [4].
The strategic placement of gels at different pH levels exploits these transitions. The stacking gel is buffered at pH 6.8, pushing glycine toward its zwitterionic form, while the resolving gel is at pH 8.8, and the electrode buffer is at pH 8.3, both favoring the negatively charged glycinate anion [27] [4] [26].
Establishment of the Voltage Gradient
When an electric current is applied, the glycinate anions in the pH 8.3 electrode buffer enter the pH 6.8 stacking gel. At this lower pH, most glycine molecules transition to the zwitterionic form, losing their net negative charge and consequently moving very slowly in the electric field [4] [28].
In contrast, the chloride ions (Cl⁻) from the Tris-HCl in the gel itself are highly mobile and move rapidly toward the positive anode. This creates a spatial separation between the fast-moving Cl⁻ front (the "leading ions") and the slow-moving glycine zwitterion front (the "trailing ions") [27] [28].
This ion separation generates a narrow zone with a steep voltage gradient between the two fronts. The proteins in the sample, which are coated with SDS and have a uniform negative charge, possess an electrophoretic mobility that is intermediate between the Cl⁻ ions and the glycine zwitterions. Consequently, the proteins become compressed into this narrow, high-voltage gradient zone and are "herded" through the stacking gel as a tight band [27] [4] [29]. The following diagram illustrates this ion migration and protein stacking process.
Diagram: Ion Migration and Protein Stacking Process. The visualization shows how glycine's charge transition between gel layers creates the voltage gradient necessary for protein stacking.
Protein Entry into the Resolving Gel
The stacked protein band and the ion fronts proceed until they reach the interface with the resolving gel, which is buffered at pH 8.8. At this higher pH, glycine zwitterions rapidly gain negative charges, converting to the fast-moving glycinate anions [27] [29]. These anions then accelerate past the protein stack, which is deposited as an extremely narrow band at the top of the resolving gel [4].
Once in the resolving gel, the proteins encounter a higher percentage of acrylamide, creating a smaller pore size that slows their migration. Freed from the compression of the voltage gradient, the proteins now separate based solely on their molecular weight as they travel through the polyacrylamide matrix [27] [26]. Smaller proteins navigate the pores more easily and migrate faster, while larger proteins are retarded, resulting in distinct bands corresponding to different molecular weights.
Experimental Protocols and Methodologies
Standard Laemmli Discontinuous SDS-PAGE Protocol
The following protocol details the established two-step gel casting and electrophoresis procedure based on the Laemmli method.
Gel Composition and Buffer Recipes:
Table 1: Standard Gel Compositions for Laemmli SDS-PAGE
| Component | Stacking Gel | Resolving Gel (12%) | Function |
|---|---|---|---|
| Acrylamide | 4-5% | 12% | Forms porous matrix for separation [4] |
| Tris-HCl Buffer | pH 6.8, 0.125 M | pH 8.8, 0.375 M | Maintains pH for charge states [27] |
| SDS | 0.1% | 0.1% | Denatures proteins, maintains negative charge [27] |
| Ammonium Persulfate (APS) | 0.1% | 0.1% | Polymerization catalyst [27] |
| TEMED | 0.1% | 0.1% | Polymerization catalyst [27] [26] |
| Other | - | - | - |
Electrode (Running) Buffer:
- Composition: 25 mM Tris, 192 mM glycine, 0.1% SDS, pH ~8.3 [27] [4].
- Function: Provides ions for current conduction; glycine is the key trailing ion in its anionic form at this pH.
Sample Preparation:
- Laemmli Buffer (2X): 62.5 mM Tris-HCl pH 6.8, 2% SDS, 25% glycerol, 0.01% Bromophenol Blue, with 5% beta-mercaptoethanol (BME) or DTT added fresh [27].
- Procedure: Mix protein sample with equal volume 2X Laemmli buffer. Heat at 95-100°C for 5-10 minutes to denature proteins. Centrifuge briefly before loading.
Electrophoresis Conditions:
- Apply constant voltage (e.g., 80-120 V) through the stacking phase until dye front enters resolving gel, then increase to 120-200 V for separation.
- Stop when the Bromophenol Blue dye front reaches the bottom of the gel.
Advanced Method: One-Step Gel Casting with Colored Stacking Gel
A recent methodological advancement addresses the challenge of visualizing the stacking-resolving gel boundary in one-step casting procedures.
Background: Traditional Laemmli method requires sequential polymerization of resolving and stacking gels, taking 60-120 minutes [12] [30]. While one-step methods save time, a poorly defined boundary makes it difficult to confirm successful gel preparation before running the experiment [12].
Protocol: Mako OT Method [12] [30]:
- Gel Casting: Prepare resolving gel solution as normal. For the stacking gel solution, add a visible dye such as Brilliant Blue FCF before layering on top of the unpolymerized resolving solution.
- Polymerization: Allow the entire gel cassette to polymerize in one step. The dye migrates to form a colored stacking layer above the clear resolving gel, creating a clearly visible boundary.
- Validation: The colored stacking gel allows immediate visual confirmation of proper gel formation and horizontal solidification.
Performance: This method halves preparation time and performs comparably to conventional Laemmli gels in both SDS-PAGE and western blotting [12].
Technical Specifications and Optimization
Buffer System Variations and Applications
While the Tris-glycine system is most common, alternative trailing ions can optimize separation for specific molecular weight ranges.
Table 2: Buffer Systems for Discontinuous SDS-PAGE
| Buffer System | Trailing Ion | Optimal Separation Range | Notes and Applications |
|---|---|---|---|
| Laemmli (Standard) | Glycine | 15-200 kDa [31] | Universal standard for most protein separations |
| Tris-Tricine | Tricine | 1-100 kDa [31] | Superior for low molecular weight peptides and proteins |
| Tris-Taurine | Taurine | 3-300 kDa [31] | Broad range; compatible with various staining methods |
The Scientist's Toolkit: Essential Reagents
Table 3: Key Research Reagent Solutions for SDS-PAGE
| Reagent | Composition | Primary Function |
|---|---|---|
| SDS (Sodium Dodecyl Sulfate) | Anionic detergent | Denatures proteins; confers uniform negative charge [27] [26] |
| Acrylamide/Bis-acrylamide | Monomer and cross-linker | Forms porous gel matrix; pore size controls separation [27] [26] |
| TEMED/Ammonium Persulfate | Polymerization catalysts | Generates free radicals to initiate acrylamide polymerization [27] [26] |
| Tris-HCl Buffers | Tris(hydroxymethyl)aminomethane hydrochloride | Maintains distinct pH in stacking (6.8) and resolving (8.8) gels [27] [4] |
| Glycine | Amino acid | Key trailing ion; charge transition enables stacking [27] [4] |
| Beta-Mercaptoethanol (BME) or DTT | Reducing agents | Breaks protein disulfide bonds for complete denaturation [27] |
| Glycerol | - | Adds density to sample for easy well loading [27] |
| Bromophenol Blue | Tracking dye | Visualizes sample migration during electrophoresis [27] |
Glycine's role as a pH-dependent trailing ion is not merely a component of the SDS-PAGE protocol but is the fundamental engine driving the stacking process. By strategically manipulating glycine's charge state across a discontinuous pH system, a steep voltage gradient is established between leading chloride ions and trailing glycine zwitterions. This gradient concentrates disparate protein molecules into a razor-thin band, enabling the high-resolution separation that follows in the resolving gel. This mechanistic understanding empowers researchers to troubleshoot electrophoretic anomalies, optimize protocols for specific protein ranges, and innovate new methodologies like the colored stacking gel system. As protein analysis continues to be pivotal in basic research and biopharmaceutical development, mastering these foundational principles remains essential for achieving reproducible, publication-quality results.
In the realm of protein biochemistry, few techniques are as fundamental as sodium dodecyl sulfate-polyacrylamide gel electrophoresis (SDS-PAGE). Established by Laemmli in 1970, this method provides researchers with a powerful tool for separating complex protein mixtures based on molecular weight [12]. The journey from a crude protein sample to sharp, separated bands represents a sophisticated interplay of biochemistry and physics, enabled by a discontinuous gel system that orchestrates protein migration with remarkable precision. For researchers, scientists, and drug development professionals, mastering this journey is not merely routine laboratory practice but a critical competency for analyzing protein purity, verifying expression, diagnosing diseases, and ensuring therapeutic protein integrity [10].
This technical guide examines the core mechanisms of SDS-PAGE, focusing specifically on the distinct yet complementary functions of stacking and resolving gels. Within the context of broader thesis research on electrophoretic methodologies, understanding these functions provides foundational knowledge for innovating protein separation techniques, troubleshooting experimental anomalies, and interpreting complex biomolecular data. The following sections will dissect the biochemical principles, provide detailed methodologies, and explore advanced applications that demonstrate the enduring significance of this decades-old technique in modern biological research.
Fundamental Principles of SDS-PAGE
The Role of SDS in Protein Denaturation and Charge Uniformity
SDS-PAGE separates proteins primarily by molecular weight through a strategic process of protein denaturation and charge normalization [2]. The ionic detergent sodium dodecyl sulfate (SDS) plays the pivotal role in this process. When protein samples are heated to 70-100°C in the presence of excess SDS and a reducing agent (typically β-mercaptoethanol or dithiothreitol), several transformative events occur:
- Disulfide bond cleavage: Reducing agents break disulfide bonds, fully dissociating proteins into their constituent subunits
- Polypeptide unfolding: The native three-dimensional structure of proteins is eliminated
- SDS binding: SDS molecules bind to the polypeptide backbone in a constant weight ratio of approximately 1.4 g SDS per 1 g of protein [2]
This uniform SDS coating provides all proteins with a net negative charge that is proportional to their molecular mass. Consequently, the intrinsic charge differences between various proteins become insignificant compared to the overwhelming negative charge conferred by SDS. The resulting SDS-polypeptide complexes assume a similar rod-like shape, ensuring that separation occurs primarily according to polypeptide chain length rather than native charge or conformation [2]. This fundamental principle enables accurate molecular weight estimation when samples are compared to appropriate protein standards.
Polyacrylamide Gel Matrix as a Molecular Sieve
The polyacrylamide gel forms the physical medium through which proteins migrate under electrical current. Created by polymerizing acrylamide and bisacrylamide (N,N'-methylenediacrylamide) in the presence of a catalyst (ammonium persulfate) and accelerator (TEMED), this matrix creates a porous network whose properties determine separation characteristics [2]. The pore size of this network is inversely related to the polyacrylamide percentage—a 7% gel has larger pores than a 12% gel, making it more suitable for separating high-molecular-weight proteins [2].
Table 1: Polyacrylamide Gel Concentrations for Optimal Protein Separation
| Protein Size Range | Recommended Gel Percentage | Primary Application |
|---|---|---|
| 4-40 kDa | Up to 20% | Small proteins/peptides |
| 10-70 kDa | 12.5% | Medium-sized proteins |
| 15-100 kDa | 10% | Broad protein range |
| 50-200 kDa | 8% | Large proteins |
| >200 kDa | 4-6% | Very large proteins |
For complex samples containing proteins of diverse sizes, gradient gels provide superior resolution. These gels contain a continuous gradient of polyacrylamide, typically from low to high concentration, which progressively sieves proteins across a broad molecular weight range [24]. The leading edge of a protein band encounters higher percentage gel with smaller pores, slowing its migration relative to the lagging edge. This "traffic jam" effect produces sharper, better-resolved bands than fixed-concentration gels [24].
The Electrophoretic Journey: A Stage-by-Stage Analysis
Sample Preparation and Loading
The electrophoretic journey begins with proper sample preparation. Protein samples are diluted in a buffer containing SDS, reducing agents, glycerol for density, and a tracking dye (typically bromophenol blue). The glycerol ensures samples sink to the bottom of the loading wells, while the tracking dye provides visual monitoring of electrophoresis progress [2]. Samples are heated to 95°C for 5-10 minutes to ensure complete denaturation and SDS binding. Insufficient heating can result in incomplete unfolding and abnormal migration, a common troubleshooting point in SDS-PAGE analysis.
The Stacking Gel: Concentration and Alignment
The initial stage of electrophoresis occurs in the stacking gel, which has a lower acrylamide concentration (typically 4-5%), larger pores, and different pH (6.8) and ionic content compared to the resolving gel below [2]. This carefully engineered environment creates discontinuous buffer conditions that effectively concentrate dispersed protein samples into sharp, thin bands before they enter the resolving gel.
The fundamental mechanism driving this stacking effect involves differences in electrophoretic mobility between leading and trailing ions in the discontinuous buffer system. Glycine ions present in the running buffer exist in multiple charge states depending on local pH. In the stacking gel's mildly acidic environment (pH 6.8), glycine exists primarily as zwitterions with minimal net charge, causing them to migrate slowly. Chloride ions from the Tris-HCl gel buffer serve as highly mobile leading ions, while the protein-SDS complexes migrate with intermediate mobility, sandwiched between the fast chloride ions and slow glycine ions [2].
Diagram 1: Protein migration from stacking to resolving gel (Max Width: 760px)
This ionic arrangement creates a steep voltage gradient that compresses the protein-SDS complexes into an extremely thin zone (10-20 μm thick) as they migrate toward the resolving gel. The colored stacking gel developed in the Mako OT method—which adds dye to the stacking portion—makes this concentrating process visible, allowing researchers to confirm proper gel formation before electrophoresis begins [12]. When the stacked proteins reach the interface between the stacking and resolving gels, they encounter a sharp increase in polyacrylamide concentration and pH, triggering the next phase of separation.
The Resolving Gel: Molecular Weight-Based Separation
The resolving (or separating) gel contains higher acrylamide concentration (typically 8-15%, depending on target protein sizes) and has a higher pH (8.8) [2]. As proteins cross the boundary into this region, they encounter two significant changes:
- Increased pore resistance: The higher acrylamide concentration creates a tighter molecular sieve that differentially retards proteins based on size
- Altered glycine mobility: In the alkaline environment (pH 8.8), glycine ions shed protons and become predominantly negatively charged, allowing them to migrate rapidly and overtake the protein-SDS complexes
Freed from the stacking interface, proteins now migrate at velocities inversely proportional to their molecular weights. Smaller proteins navigate the gel matrix pores more easily and migrate farther, while larger proteins encounter greater frictional resistance and migrate more slowly [2]. This molecular sieving effect continues throughout electrophoresis, progressively separating polypeptides by size.
The distinct boundary between stacking and resolving gels is critical for this process. Traditional Laemmli gels create this boundary through a two-step pouring process, requiring 60-120 minutes for preparation [12]. Recent innovations like the Mako OT method enable one-step gel preparation with a colored stacking gel that maintains this essential discontinuity while reducing preparation time by approximately 50% [12].
Diagram 2: Molecular sieving in the resolving gel (Max Width: 760px)
Advanced Methodologies and Applications
Experimental Protocols for SDS-PAGE Analysis
Standard SDS-PAGE Protocol (Adapted from Thermo Fisher Scientific) [2]
Gel Formulation: 10% Tris-Glycine Mini Gel for SDS-PAGE
| Component | Volume | Final Concentration | Function |
|---|---|---|---|
| 40% acrylamide solution | 7.5 mL | 10% | Gel matrix formation |
| 1% bisacrylamide solution | 3.9 mL | ~0.13% | Cross-linker for pore formation |
| 1.5 M Tris-HCl, pH 8.7 | 7.5 mL | 375 mM | Buffering at resolving gel pH |
| 10% SDS | 0.3 mL | 0.1% | Denaturant in gel |
| 10% ammonium persulfate (APS) | 0.3 mL | 0.1% | Polymerization initiator |
| TEMED | 0.03 mL | ~0.05% | Polymerization catalyst |
| Water | To 30 mL | - | Solvent |
Procedure:
- Resolving gel preparation: Combine all components except TEMED in a flask. Add TEMED last, mix gently without introducing bubbles, and immediately pour between glass plates, leaving space for stacking gel. Carefully overlay with isopropanol or water to create a flat interface.
- Polymerization: Allow resolving gel to polymerize completely (approximately 30-45 minutes).
- Stacking gel preparation: Prepare stacking gel solution (typically 4-5% acrylamide in Tris-HCl, pH 6.8). Pour off overlay, add stacking gel mixture, and immediately insert well comb.
- Sample preparation: Dilute protein samples in Laemmli buffer containing SDS and reducing agent. Heat at 95°C for 5-10 minutes.
- Electrophoresis: Place gel in running chamber filled with Tris-glycine-SDS running buffer. Load samples and molecular weight markers. Run at constant voltage (100-150V for mini-gels) until dye front reaches bottom.
One-Step Gel Preparation (Mako OT Method) [12]
The Mako OT method simplifies traditional gel preparation by enabling simultaneous casting of both stacking and resolving gels. This approach:
- Reduces total preparation time by approximately 50% compared to conventional methods
- Incorporates dye in the stacking gel for clear visualization of the interface
- Maintains performance comparable to conventional gels for both SDS-PAGE and western blotting
- Allows confirmation of proper gel formation before electrophoresis begins
The Scientist's Toolkit: Essential Research Reagents
Table 2: Key Reagents for SDS-PAGE Analysis
| Reagent/Category | Specific Examples | Function in SDS-PAGE |
|---|---|---|
| Denaturing Agents | SDS, DTT, β-mercaptoethanol | Denature proteins, reduce disulfide bonds, impart uniform charge |
| Gel Matrix Components | Acrylamide, bisacrylamide | Form porous polyacrylamide gel matrix for molecular sieving |
| Polymerization Initiators | Ammonium persulfate (APS), TEMED | Catalyze and accelerate acrylamide polymerization |
| Buffer Systems | Tris-HCl, glycine | Create discontinuous pH conditions for stacking and separation |
| Visualization Markers | Bromophenol blue, prestained protein markers | Track electrophoresis progress, estimate molecular weights |
| Detection Reagents | Coomassie Blue, SYBR Safe, SYPRO Ruby | Stain separated proteins for visualization and quantification |
| Specialized Additives | Glycerol (in one-step gels) [12], cyclodextrin (for in-gel refolding) [32] | Enable specific methodological enhancements |
Advanced Applications and Detection Methods
Following electrophoresis, separated proteins can be analyzed using various detection methods. Coomassie Brilliant Blue staining provides a general protein stain, while more sensitive fluorescent dyes can detect lower protein amounts [12]. For specific protein detection, western blotting transfers proteins from the gel to a membrane for subsequent antibody-based identification [12].
Innovative detection methods continue to expand SDS-PAGE applications. For example, cyclodextrin-mediated removal of SDS in the presence of 20% methanol enables in-gel refolding of fully denatured green fluorescent proteins (GFPs), allowing fluorescence detection without antibody-based methods [32]. This technique maintains compatibility with subsequent total protein staining and western blotting, providing a simple, cost-effective alternative for detecting GFP-fused proteins.
Native PAGE represents another important electrophoretic variant that preserves protein structure and function. Unlike SDS-PAGE, native electrophoresis separates proteins according to their net charge, size, and shape without denaturation [2]. This technique retains enzymatic activity and quaternary structure, enabling functional analysis post-separation. High-resolution clear native PAGE (hrCN-PAGE), coupled with in-gel activity assays, allows researchers to distinguish active tetramers from other protein forms—critical for understanding how pathogenic variants affect structure and function in diseases like medium-chain acyl-CoA dehydrogenase deficiency [33].
The journey from sample well to sharp, separated bands represents a sophisticated interplay of biochemical principles carefully engineered into a practical laboratory technique. Understanding the distinct functions of stacking and resolving gels provides researchers with deeper insights for troubleshooting experiments, interpreting results, and developing methodological innovations. The stacking gel's role in concentrating diverse protein samples into unified sharp bands, followed by the resolving gel's molecular weight-based separation, remains foundational to protein analysis across diverse fields.
For thesis research focused on electrophoretic methodologies, several emerging trends warrant attention: the development of time-saving one-step gel preparation methods [12], innovations in in-gel refolding and detection [32], adaptation of in-gel activity assays for structural-functional studies [33], and integration with downstream analytical techniques. These advances continue to refine the century-old electrophoresis principle, ensuring its continued relevance in contemporary biological research and drug development.
As electrophoretic techniques evolve alongside complementary technologies like capillary electrophoresis and mass spectrometry, the fundamental understanding of stacking and resolution mechanisms will continue to inform experimental design in basic research, clinical diagnostics, and biopharmaceutical development. The complete journey of proteins through polyacrylamide gels remains not just a routine laboratory procedure, but a continuing story of scientific innovation with profound implications for understanding biological systems.
Practical Protocols: Casting Gels and Selecting Parameters for Your Protein
Step-by-Step Guide to Pouring a Two-Layer Polyacrylamide Gel
In the realm of protein biochemistry, SDS-Polyacrylamide Gel Electrophoresis (SDS-PAGE) stands as a fundamental technique for separating protein mixtures based on their molecular weights. The pioneering work of Laemmli established the discontinuous buffer system that utilizes a two-layer gel, a design that remains the gold standard in laboratories worldwide [12] [34]. This system is pivotal for applications ranging from basic protein analysis to western blotting in drug development and clinical diagnostics [10]. The core principle of this technique lies in its two distinct gel layers: a resolving gel (or separating gel) that performs the size-based separation, and a stacking gel that concentrates the protein samples into sharp bands before they enter the resolving gel, thereby dramatically enhancing resolution [35] [34]. This guide provides an in-depth, step-by-step protocol for casting a two-layer polyacrylamide gel, framed within the context of understanding the distinct functions of its components.
Principles of the Discontinuous Gel System
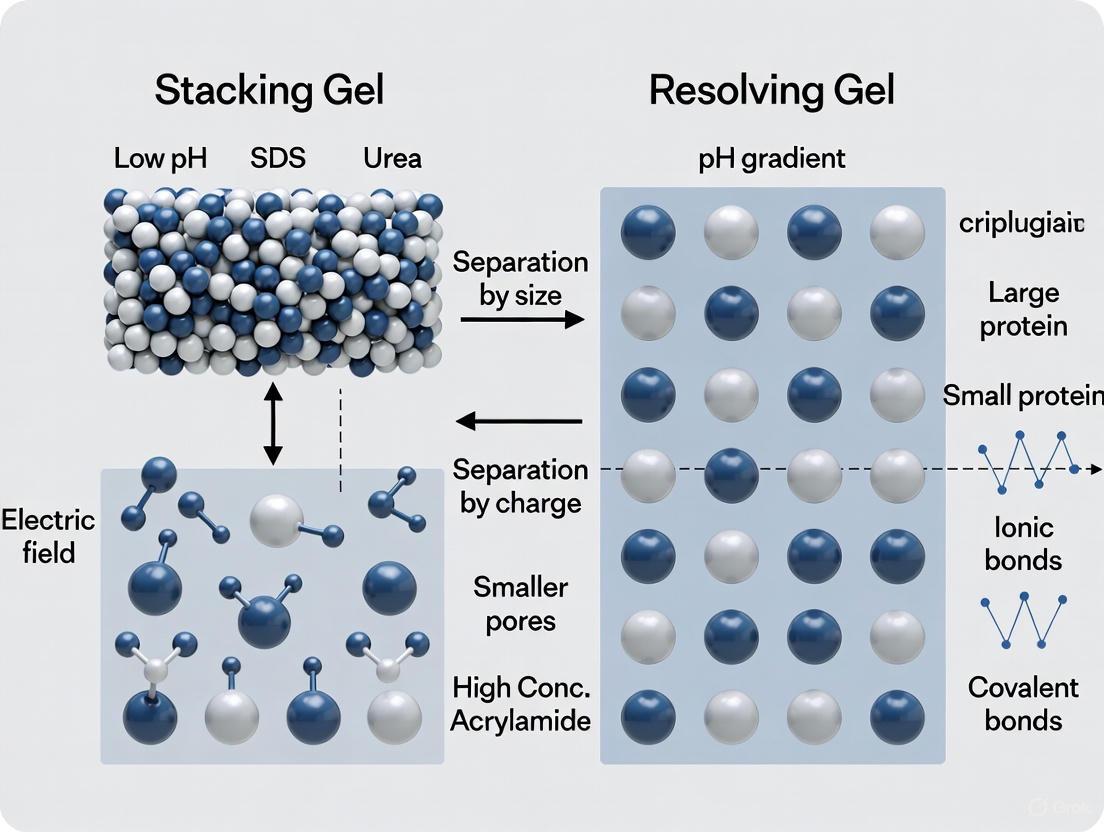
The Science Behind the Two-Layer Structure
The high resolution achieved by SDS-PAGE is a direct result of its discontinuous nature, which incorporates differences in gel pore size, pH, and ionic composition [35] [34]. The entire process is designed to ensure that proteins enter the resolving gel simultaneously and in a highly concentrated fashion.
The Stacking Gel (pH 6.8): This upper layer has a low acrylamide concentration (typically 4-5%), creating a large-pore matrix that offers little resistance to protein movement [36] [37]. Its lower pH (6.8) is critical for the "stacking" effect. In the running buffer (pH 8.3), glycine exists primarily as glycinate anions. Upon entering the stacking gel's lower pH environment, a significant fraction of glycine molecules become neutral zwitterions, drastically reducing their electrophoretic mobility [35] [34]. This creates a zone of high voltage gradient between the fast-moving chloride ions (from the Tris-HCl in the gel) and the slow-moving glycine zwitterions. Proteins, with their intermediate mobility, are compressed into a extremely narrow band within this zone [34].
The Resolving Gel (pH 8.8): This lower layer has a higher acrylamide concentration (typically 8-20%), creating a smaller-pore matrix that acts as a molecular sieve [36] [37]. When the protein stack reaches the interface of the resolving gel, the higher pH (8.8) causes glycine to regain its negative charge. As glycinate ions, they now migrate rapidly, overtaking the proteins and eliminating the stacking effect. The proteins, now deposited as a sharp line at the top of the resolving gel, begin to separate based solely on their molecular weight as they migrate through the restrictive pores [35] [34].
The following diagram illustrates this workflow and the underlying mechanisms:
The Scientist's Toolkit: Essential Reagents and Materials
Key Reagent Solutions
Before beginning, ensure all core solutions are prepared and stored properly [38] [39] [36].
| Reagent Solution | Composition / Specification | Function in the Protocol |
|---|---|---|
| Acrylamide/Bis-Acrylamide | 30% (w/v), typically 29:1 or 37.5:1 ratio | Forms the gel matrix; pore size determines resolving power [40] [39]. |
| Resolving Gel Buffer | 1.5 M Tris-HCl, pH 8.8 | Creates the high-pH environment for protein separation [38] [41]. |
| Stacking Gel Buffer | 0.5 M Tris-HCl, pH 6.8 | Creates the low-pH environment essential for the stacking effect [38] [41]. |
| SDS Solution | 10% (w/v) Sodium Dodecyl Sulfate | Denatures proteins and confers uniform negative charge [40] [36]. |
| Ammonium Persulfate (APS) | 10% (w/v) in water | Initiator of the polymerization reaction (radical source) [39] [36]. |
| TEMED | N,N,N',N'-Tetramethylethylenediamine | Catalyst that accelerates the polymerization reaction [39] [36]. |
| Running Buffer | 25 mM Tris, 192 mM Glycine, 0.1% SDS, pH ~8.3 | Conducts current and provides ions for the discontinuous system [35] [36]. |
| Isopropanol or Water-Saturated Butanol | >99% or saturated solution | Overlaid on resolving gel to exclude oxygen and ensure a flat meniscus [40] [37]. |
Safety Considerations
- Acrylamide Toxicity: Acrylamide monomer is a potent neurotoxin and a suspected carcinogen. Always wear appropriate gloves, safety glasses, and work in a fume hood when handling the powder or liquid solutions [39] [41] [37].
- General Practice: Use lint-free wipes for cleaning glass plates to avoid fibers that can disrupt the gel matrix [40].
Step-by-Step Gel Casting Protocol
Preparation and Glass Plate Assembly
- Clean and Assemble Glass Plates: Thoroughly clean the short and tall glass plates, as well as spacers, with deionized water and ethanol. Assemble the gel cassette according to your specific gel system manufacturer's instructions (e.g., BioRad Mini-PROTEAN) [40] [41].
- Check for Leaks: Clamp the assembled cassette into the casting stand. Pipette a small amount of deionized water between the plates to verify a watertight seal. If it leaks, reassemble. Pour out the water and wick away residual moisture with a lint-free tissue [41].
Preparing and Casting the Resolving Gel
- Choose Gel Percentage: Select the appropriate acrylamide percentage for your resolving gel based on the molecular weight of your target proteins (see Table 2) [40] [37].
- Mix Resolving Gel Solution: In a small beaker or conical tube, combine all components for the resolving gel except APS and TEMED (see Table 1 for recipes). Mix gently without introducing air bubbles. Oxygen can inhibit polymerization [41].
- Initiate Polymerization and Pour: Add the 10% APS and TEMED to the mixture. Swirl gently to mix. Work quickly from this point. Using a pipette, immediately transfer the solution into the gap between the glass plates until the height is about 2.5 cm below the top of the shorter plate [40] [41].
- Overlay with Isopropanol: Gently overlay the resolving gel solution with isopropanol or water-saturated butanol. This layer excludes oxygen, which inhibits polymerization, and ensures a flat, level surface at the top of the gel [40] [37].
- Polymerize: Allow the gel to polymerize completely at room temperature. This typically takes 20-45 minutes. Polymerization is complete when a distinct, sharp interface is visible between the polymerized gel and the overlay liquid. A useful tip is to prepare a small excess of gel mix in a tube to monitor the polymerization progress separately [40] [37].
Preparing and Casting the Stacking Gel
- Remove Overlay and Prepare Stacking Gel Solution: Once the resolving gel has set, pour off the isopropanol overlay. Rinse the top of the gel with deionized water to remove any residual alcohol, and carefully wick away all liquid with a lint-free tissue [40]. In a new tube, combine all components for the stacking gel except APS and TEMED (see Table 1).
- Initiate Polymerization and Pour: Add 10% APS and TEMED to the stacking gel solution and mix gently. Pour the stacking gel solution directly onto the surface of the polymerized resolving gel, filling the cassette completely to the top.
- Insert Comb: Carefully insert a clean, dry comb into the liquid stacking gel solution at a slight angle to avoid trapping air bubbles. Ensure the comb is fully seated. The comb will displace some solution, which can be wiped away.
- Polymerize: Allow the stacking gel to polymerize for 20-30 minutes. Do not disturb the gel during this time [40] [37].
- Remove Comb and Finalize: Once polymerized, gently remove the comb in a straight, vertical motion to prevent damage to the wells. Rinse the wells immediately with deionized water or running buffer to remove any unpolymerized acrylamide and debris [40]. The gel is now ready for electrophoresis or can be wrapped in moist tissue paper, sealed in plastic wrap, and stored at 4°C for up to a week [40] [36].
Gel Recipe Tables
The following tables provide standard recipes for casting mini-gels. The total volume (15 mL for resolving, 5 mL for stacking) is suitable for casting two gels using a common mini-gel system. Adjust volumes proportionally if casting a different number of gels [40] [37].
Table 1: Standard Resolving Gel Recipes (for ~15 mL, two mini-gels)
| Component | 8% Gel | 10% Gel | 12% Gel | 15% Gel |
|---|---|---|---|---|
| Deionized Water | 4.6 mL | 3.8 mL | 3.2 mL | 2.2 mL |
| 30% Acrylamide/Bis Mix | 2.6 mL | 3.4 mL | 4.0 mL | 5.0 mL |
| 1.5 M Tris-HCl (pH 8.8) | 2.5 mL | 2.5 mL | 2.5 mL | 2.5 mL |
| 10% SDS | 100 µL | 100 µL | 100 µL | 100 µL |
| 10% APS | 50-100 µL | 50-100 µL | 50-100 µL | 50-100 µL |
| TEMED | 5-10 µL | 5-10 µL | 5-10 µL | 5-10 µL |
Add APS and TEMED last, immediately before pouring. Polymerization time is highly dependent on the amount and freshness of APS/TEMED [39] [36] [37].
Table 2: Standard Stacking Gel Recipe (for ~5 mL, two mini-gels)
| Component | Volume |
|---|---|
| Deionized Water | 3.05 - 3.4 mL |
| 30% Acrylamide/Bis Mix | 0.65 - 0.83 mL |
| 0.5 M Tris-HCl (pH 6.8) | 0.63 - 1.25 mL |
| 10% SDS | 50 µL |
| 10% APS | 25-50 µL |
| TEMED | 5-10 µL |
Add APS and TEMED last, immediately before pouring [36] [37].
Table 3: Guide for Choosing Resolving Gel Percentage
| Target Protein Size (kDa) | Recommended Gel Percentage (%) |
|---|---|
| 4 - 40 | 20 |
| 12 - 45 | 15 |
| 10 - 70 | 12.5 |
| 15 - 100 | 10 |
| 25 - 200 | 8 |
For mixtures of proteins with a very broad molecular weight range, a gradient gel (e.g., 4-20%) is recommended [40] [37].
Troubleshooting Common Casting Issues
Even with a careful protocol, issues can arise. The following table addresses common problems and their solutions.
| Issue | Possible Cause | Solution |
|---|---|---|
| Leaking Gel Cassette | Plates or spacers not assembled correctly or dirty. | Disassemble, clean all components, and reassemble carefully. Check for cracks in glass or spacers [40] [41]. |
| Gel Does Not Polymerize | Old or degraded APS/TEMED; oxygen inhibition. | Use fresh aliquots of APS (store at 4°C) and TEMED. Ensure the gel solution is mixed without excessive introduction of air [36]. |
| Swirling or Irregular Gel Surface | Insufficient or uneven mixing; polymerization too fast. | Mix components thoroughly but gently. If polymerization is excessively rapid, slightly reduce the amount of APS/TEMED. |
| Wavy or Distorted Wells | Air bubbles trapped during comb insertion; comb removed unevenly. | Insert the comb slowly and evenly. Remove the comb slowly and straight up. Rinse wells immediately after removal [40]. |
| Poor Resolution During Electrophoresis | Incorrect gel percentage; improperly formed gel layers. | Ensure the correct gel percentage is used for the target protein size. Verify that the stacking/resolving gel interface is well-formed and level [12] [36]. |
Mastering the art of pouring a two-layer polyacrylamide gel is a fundamental skill that underpins the reliability and quality of SDS-PAGE analysis. The discontinuous system, with its clever use of differing pH and porosity, is engineered to generate sharp, high-resolution protein bands. While pre-cast gels offer convenience, the ability to cast custom gels in-house provides researchers with unparalleled flexibility, cost-effectiveness, and the capacity to tailor experiments precisely to their needs, from verifying recombinant protein expression in drug development to diagnosing diseases through serum protein analysis [10]. A deep understanding of the principles and procedures outlined in this guide empowers scientists to consistently produce high-quality gels, ensuring robust and reproducible results in their research.
This technical guide provides a foundational framework for researchers and drug development professionals to optimize protein separation in SDS-PAGE by selecting appropriate acrylamide percentages based on target protein molecular weight. Proper selection is critical for achieving high-resolution separation, accurate molecular weight determination, and reliable downstream analysis in western blotting. This review integrates core principles of stacking and resolving gel functions with practical selection criteria and advanced methodological considerations to enhance experimental reproducibility and data quality in proteomics research.
Sodium dodecyl sulfate-polyacrylamide gel electrophoresis (SDS-PAGE) separates proteins primarily by molecular weight through a two-step process involving stacking and resolving gels [42]. The technique employs a discontinuous buffer system that first concentrates proteins into sharp bands before separating them based on size [2]. The polyacrylamide gel matrix acts as a molecular sieve, with its pore size determined by the concentration of acrylamide and bisacrylamide crosslinker [43]. The key principle is that higher acrylamide percentages create smaller pores, better resolving smaller proteins, while lower percentages with larger pores are more suitable for separating larger proteins [44] [24].
The fundamental mechanism relies on SDS, an anionic detergent that binds to proteins at a consistent ratio of approximately 1.4g SDS per 1g of protein, masking intrinsic charge differences and conferring a uniform negative charge [43]. When an electric field is applied, all SDS-bound proteins migrate toward the anode at rates inversely proportional to their molecular weight, with smaller proteins moving more rapidly through the gel matrix than larger ones [2]. This charge uniformity allows separation based primarily on molecular size rather than native charge or structure [42].
The Discontinuous Buffer System: Stacking versus Resolving Gels
The Laemmli discontinuous buffer system utilizes two distinct gel regions with different pore sizes and pH values to achieve high-resolution separation [42]. The stacking gel features a large-pore polyacrylamide matrix (typically 4-5%) with an acidic pH (~6.8) that concentrates diverse protein samples into narrow, sharp bands before they enter the resolving gel [2]. This concentration occurs through isotachophoresis, where the trailing glycinate ions and leading chloride ions create a voltage gradient that compresses proteins into a thin zone [42].
The resolving gel (or separating gel) contains a higher acrylamide percentage with a basic pH (~8.8) where actual molecular weight-based separation occurs [43]. As proteins transition from the stacking to resolving gel, the increased pH causes glycinate ions to become more negatively charged and migrate past the protein-SDS complexes [42]. Proteins then encounter the smaller pores of the resolving gel and separate based on their molecular size, with smaller proteins migrating faster than larger ones [2]. This two-stage process ensures proteins enter the resolving gel simultaneously as sharp bands, significantly improving resolution compared to a continuous gel system [42].
Acrylamide Percentage Selection by Protein Size
Selecting the appropriate acrylamide percentage is paramount for achieving optimal protein separation. The following table provides evidence-based recommendations for gel percentage selection based on target protein molecular weight, synthesized from multiple technical resources [44] [45].
Table 1: Acrylamide Gel Percentage Recommendations Based on Protein Molecular Weight
| Protein Size (kDa) | Recommended Gel Percentage (%) | Separation Characteristics |
|---|---|---|
| 4 - 40 | 15-20 | Ideal for resolving small proteins and peptides |
| 12 - 45 | 15 | Optimal for lower molecular weight proteins |
| 10 - 70 | 12.5 | Standard range for many cellular proteins |
| 15 - 100 | 10 | Versatile for moderate-sized proteins |
| 25 - 200 | 8 | Broad range with larger pore size |
| 50 - 200 | 8 | Suitable for high molecular weight proteins |
| >200 | 4-6 | Essential for very large protein complexes |
These percentages represent standard bis-acrylamide crosslinked gels run in traditional Tris-glycine buffer systems [44]. Note that alternative buffer systems such as Bis-Tris or Tris-acetate may slightly alter protein migration characteristics and require optimization [46].
Polyacrylamide Gradient Gels for Enhanced Separation
For complex samples or proteins with unknown molecular weights, gradient gels provide superior resolution across a broader size range compared to fixed-percentage gels [24]. Gradient gels contain a continuous increase in acrylamide concentration from top to bottom (e.g., 4-20%), creating a corresponding pore size decrease that sharpens protein bands during electrophoresis [24]. As proteins migrate, the leading edge encounters higher acrylamide concentrations and smaller pores, slowing its progress relative to the trailing edge, which creates a focusing effect that produces sharper bands [24].
Table 2: Gradient Gel Selection Guidelines for Various Applications
| Protein Size Range (kDa) | Gradient Range (%) | Application Context |
|---|---|---|
| 4 - 250 | 4 - 20 | Discovery work with unknown targets |
| 10 - 100 | 8 - 15 | Targeted analysis avoiding multiple gels |
| 50 - 75 | 10 - 12.5 | Resolving similarly sized proteins |
Gradient gels are particularly valuable when analyzing samples containing proteins with widely varying molecular weights or when investigating proteins with unknown sizes [24]. They also eliminate the need for multiple fixed-percentage gels in exploratory research, conserving precious samples [24].
Experimental Protocols and Methodologies
Standard SDS-PAGE Protocol
The following protocol outlines the fundamental steps for SDS-PAGE protein separation, adaptable based on specific protein size requirements [44] [46]:
Sample Preparation:
- Prepare protein lysates using appropriate lysis buffers (e.g., RIPA buffer) with protease and phosphatase inhibitors [42].
- Determine protein concentration using a Bradford, BCA, or other colorimetric assay [42].
- Dilute protein samples in Laemmli buffer (60 mM Tris-HCl pH 6.8, 2% SDS, 20% glycerol, 4% β-mercaptoethanol, 0.01% bromophenol blue) [42].
- Denature samples by heating at 70-100°C for 5-10 minutes [46].
Gel Preparation and Electrophoresis:
- Select appropriate acrylamide percentage based on target protein molecular weight (refer to Table 1) [44].
- Cast or obtain pre-cast gels with stacking (4-5%) and resolving portions at selected percentage [2].
- Load equal protein amounts (10-50 µg for cell lysates, 10-100 ng for purified proteins) alongside molecular weight markers [44].
- Assemble electrophoresis apparatus filled with running buffer (25 mM Tris base, 192 mM glycine, 0.1% SDS, pH 8.3) [44].
- Run gel at constant voltage (100-150V) until dye front reaches bottom (typically 1-2 hours) [44] [47].
Post-Electrophoresis Analysis:
- Proceed to western blotting, protein staining, or other downstream applications [2].
Alternative Buffer System: NuPAGE Electrophoresis
The NuPAGE system represents an advanced alternative to Laemmli-based SDS-PAGE, operating at neutral pH to enhance protein stability and band resolution [46]. This system offers several advantages over traditional methods:
- Extended Gel Stability: Neutral pH formulation provides 8-12 month shelf life compared to 4-6 weeks for Laemmli gels [46].
- Improved Protein Integrity: Neutral pH environment minimizes protein modifications such as deamination and Asp-Pro bond cleavage [46].
- Flexible Separation Ranges: Bis-Tris gels with MES or MOPS running buffer resolve proteins from 1-200 kDa; Tris-Acetate gels separate large proteins from 36-400 kDa [46].
Table 3: NuPAGE Gel System Selection Guide
| Gel Type | Optimal Separation Range | Running Buffer | Applications |
|---|---|---|---|
| Bis-Tris 10% | Broad range: 1-200 kDa | MES or MOPS | Most routine applications |
| Tris-Acetate 3-8% | Large proteins: 36-400 kDa | Tris-Acetate | Membrane proteins, complexes |
Research Reagent Solutions
The following essential materials are required for successful SDS-PAGE experimentation:
Table 4: Essential Reagents for SDS-PAGE Experiments
| Reagent Category | Specific Examples | Function and Importance |
|---|---|---|
| Detergents | Sodium dodecyl sulfate (SDS) | Denatures proteins and confers uniform negative charge [43] |
| Reducing Agents | β-mercaptoethanol, DTT | Breaks disulfide bonds for complete linearization [42] |
| Gel Components | Acrylamide, bis-acrylamide | Forms porous polyacrylamide matrix for molecular sieving [2] |
| Polymerization Initiators | Ammonium persulfate (APS), TEMED | Catalyzes acrylamide polymerization reaction [2] |
| Buffer Systems | Tris-glycine, Bis-Tris, Tris-acetate | Maintains pH and conducts current during electrophoresis [46] |
| Molecular Weight Markers | Prestained or unstained protein ladders | Provides size references for unknown proteins [45] |
| Tracking Dye | Bromophenol blue | Visualizes migration progress during electrophoresis [42] |
Visualization of SDS-PAGE Principles
The following diagram illustrates the fundamental separation process in SDS-PAGE, highlighting the roles of both stacking and resolving gels:
SDS-PAGE Separation Mechanism
Troubleshooting and Optimization Strategies
Common SDS-PAGE Issues and Solutions
- Smeared Bands: Often caused by excessive voltage; reduce to 10-15 V/cm and ensure adequate cooling [47].
- Smiling Bands (Curved Migration): Results from excessive heat; run gel in cold room or with ice packs, or reduce voltage for extended time [47].
- Poor Resolution: May indicate insufficient run time, improper buffer preparation, or incorrect acrylamide percentage; extend electrophoresis until dye front reaches bottom, remake running buffer, or adjust gel percentage [47].
- Edge Effect: Distorted peripheral lanes caused by empty wells; load protein ladder or control samples in edge wells rather than leaving empty [47].
- Sample Diffusion: Proteins migrating out of wells before electrophoresis begins; minimize time between sample loading and current application [47].
Advanced Optimization Techniques
For challenging separations, consider these advanced approaches:
- Alternative Buffer chemistries: MOPS-based buffers increase protein migration speed and resolution between bands, while MES-based buffers visualize a broader protein size range [24].
- Specialized Gel Formulations: Pre-cast gels with extended shelf lives and enhanced resolution are available commercially, such as the NuPAGE system operating at neutral pH [46].
- High-Throughput Formats: Novel 96-well polyacrylamide gels enable simultaneous analysis of multiple samples with standard western blotting compatibility, though with reduced molecular weight resolution [48].
Selecting the appropriate acrylamide percentage based on target protein molecular weight is fundamental to successful SDS-PAGE separation. This guide provides evidence-based recommendations for gel percentage selection, along with core principles of stacking and resolving gel functions. For most applications, fixed-percentage gels between 8-15% acrylamide will provide optimal resolution, while gradient gels offer superior performance for complex samples or unknown targets. Proper implementation of these guidelines, combined with appropriate troubleshooting and optimization strategies, will significantly enhance experimental reproducibility and data quality in protein analysis workflows.
Sodium Dodecyl Sulfate-Polyacrylamide Gel Electrophoresis (SDS-PAGE) stands as a cornerstone technique in biochemistry, molecular biology, and clinical diagnostics, providing researchers with a reliable method for separating proteins based on their molecular weight [10]. This process plays a crucial role in analyzing protein purity, identifying protein modifications, and assisting in drug development [10]. The technique's effectiveness hinges on a discontinuous buffer system utilizing two distinct gel layers—stacking and resolving—each with specific chemical compositions and pH environments that work in concert to concentrate and separate protein samples into sharp, well-defined bands. This technical guide delves into the precise recipes and functional contexts of these critical buffer components, providing researchers with the foundational knowledge required for protocol optimization and robust, reproducible results.
The Chemical Anatomy of Gel Buffers
The separation magic of SDS-PAGE occurs within a polyacrylamide matrix formed through the polymerization of acrylamide and bisacrylamide. This matrix is cast in two distinct sections with different properties and functions, both created from specific buffer formulations.
Core Chemical Components and Their Functions
- SDS (Sodium Dodecyl Sulfate): This anionic detergent unfolds proteins by disrupting non-covalent bonds and binds to the polypeptide backbone, conferring a uniform negative charge and creating a similar charge-to-mass ratio for all proteins. This ensures separation is based primarily on molecular size rather than inherent charge [49].
- Tris-HCl (Tris(Hydroxymethyl)Aminomethane Hydrochloride): This buffer maintains the required pH for the electrophoresis process. Its pKa of 8.1 makes it ideal for buffering in the biological pH range [49]. Different concentrations and pH levels are used in the stacking and resolving gels to create the necessary environment for the discontinuous system.
- Glycine: An amino acid that plays a dynamic role due to its charge state being highly dependent on pH. Its changing mobility is the engine behind the stacking phenomenon [49].
- Acrylamide/Bis-Acrylamide: The monomer and cross-linker that form the porous polyacrylamide gel matrix when polymerized. The pore size, determined by the total percentage of acrylamide, dictates the resolution range for proteins [49].
- Ammonium Persulfate (APS) and TEMED: These reagents catalyze the polymerization reaction of acrylamide and bisacrylamide. APS provides the free radicals, while TEMED acts as a catalyst to accelerate the reaction [49].
Table 1: Core Reagent Functions in SDS-PAGE Buffers
| Reagent | Primary Function | Key Characteristic |
|---|---|---|
| SDS (Sodium Dodecyl Sulfate) | Denatures proteins; confers uniform negative charge | Creates consistent charge-to-mass ratio [49] |
| Tris-HCl | Buffering agent | pKa of 8.1 ideal for biological pH range [49] |
| Glycine | Leading ion in running buffer; charge-state dependent mobility | Key to discontinuous buffer system; zwitterion at stacking gel pH [49] |
| Acrylamide/Bis | Forms porous gel matrix | Pore size determines protein separation resolution [49] |
| APS & TEMED | Polymerization catalysts | Initiates and accelerates acrylamide gel formation [49] |
Standard Buffer Recipes and Compositions
The following table provides standard, ready-to-use formulations for preparing stacking and resolving gel buffers. These compositions are foundational for most SDS-PAGE applications.
Table 2: Standard Compositions for Stacking and Resolving Gel Buffers
| Component | Stacking Gel Buffer | Resolving Gel Buffer |
|---|---|---|
| Tris-HCl Concentration | 0.5 M [50] | 1.5 M [50] |
| pH | 6.8 [49] [51] | 8.8 [49] |
| SDS Concentration | 0.1% [49] | 0.1% [49] |
| Typical Acrylamide Concentration | Lower (e.g., 4%) [49] | Higher (e.g., 8-18%) [49] |
Commercial stacking buffer solutions, such as the 4X concentrate offered by Boston BioProducts (BP-95), are also available. This specific product contains 500 mM Tris-base/Tris-HCl and 0.4% SDS at a pH of 6.8, designed to be diluted to a 1X working concentration for gel preparation [51].
The Functional Context: A Discontinuous System in Action
The distinct buffer compositions are not arbitrary; they create a discontinuous system in both pH and pore size that is critical for the initial concentration of samples into sharp bands before separation.
The Stacking Mechanism
The stacking gel, with its lower pH (6.8) and lower percentage of acrylamide, functions to line up all protein samples so they enter the resolving gel simultaneously [49]. The key to this process is the behavior of glycine in the running buffer. At the running buffer pH of 8.3, glycine exists primarily as a glycinate anion, carrying a negative charge. When the electric field is applied and these anions enter the low-pH environment of the stacking gel, they become predominantly zwitterions, losing their net negative charge and slowing down dramatically [49].
In contrast, the chloride ions (Cl⁻) from the Tris-HCl in the gel move at a much faster rate. This creates a steep voltage gradient between the fast-moving Cl⁻ (leading ions) and the slow-moving glycine zwitterions (trailing ions). The SDS-coated proteins, with a mobility intermediate to these two fronts, are compressed into a very narrow zone as they are herded through the stacking gel [49]. This process ensures that the proteins enter the resolving layer as a tight, concentrated band.
The Resolving Mechanism
When the ion fronts and the compressed protein band hit the resolving gel, the environment changes drastically. The higher pH of 8.8 causes the glycine zwitterions to regain their negative charge, converting back into fast-moving glycinate anions that speed past the proteins [49]. The proteins, now deposited at the top of the resolving gel without the concentrating voltage gradient, encounter a much denser web of polyacrylamide with smaller pores. Their migration is now determined solely by their size, as they sieve through the matrix—smaller proteins move faster, while larger ones are more hindered, resulting in separation by molecular weight [49].
The Scientist's Toolkit: Essential Research Reagent Solutions
Successful execution of SDS-PAGE relies on a suite of specific reagents and materials beyond the core gel buffers. The following table details these essential components.
Table 3: Essential Reagents and Materials for SDS-PAGE
| Item | Function/Description | Example Composition/Notes |
|---|---|---|
| 30% Acrylamide/Bis Solution | Forms the sieving matrix of the gel. | Standard ratio is 29.2:0.8 (acrylamide:bis) [50]. |
| 10% Ammonium Persulfate (APS) | Initiator for acrylamide polymerization. | Freshly prepared in water is recommended [50]. |
| TEMED | Catalyst that accelerates polymerization. | Used with APS to solidify the gel [50]. |
| SDS-PAGE Running Buffer | Conducts current and maintains pH during run. | 0.025 M Tris, 0.192 M glycine, 0.1% SDS, pH ~8.3 [49] [50]. |
| SDS Lysis Buffer (Laemmli Buffer) | Denatures and prepares protein samples for loading. | Contains Tris-HCl, SDS, glycerol, β-mercaptoethanol, and bromophenol blue [49]. |
| Nitrocellulose/PVDF Membrane | Solid support for protein transfer in Western blotting. | Used for immunodetection after SDS-PAGE [50]. |
| Western Blot Transfer Buffer | Mediates electrophoretic protein transfer from gel to membrane. | Typically 0.025 M Tris, 0.192 M glycine, 20% methanol [50]. |
Detailed Experimental Protocol: Casting and Running a Discontinuous Gel
This section provides a detailed methodology for preparing and running an SDS-PAGE gel, as derived from standard laboratory protocols [50].
Preparing the Resolving Gel
- Assemble the gel cassette according to the manufacturer's instructions for the electrophoresis system.
- In a conical flask, combine the following reagents for a 10% resolving gel:
- Resolving Gel Buffer (1.5 M Tris-HCl, pH 8.8): 2.5 mL
- 30% Acrylamide/Bis Solution: 3.33 mL
- Water: 4 mL
- Degas the mixture for about 10 minutes to remove dissolved oxygen, which can inhibit polymerization.
- Add catalysts to initiate polymerization:
- 10% SDS: 100 µL
- 10% Ammonium Persulfate (APS): 80 µL
- TEMED: 10 µL
- Note: After adding TEMED, work quickly as the gel will begin to polymerize.
- Cast the gel by pipetting the solution into the assembled cassette. Leave space for the stacking gel (approximately the height of the comb's teeth plus 1 cm).
- Gently overlay the gel solution with isobutanol or water to create a flat, even interface.
- Allow the gel to polymerize completely (typically 20-30 minutes).
Preparing and Loading the Stacking Gel
- Once the resolving gel has set, pour off the isobutanol overlay and rinse the top with water.
- In a clean conical flask, combine for the stacking gel:
- Stacking Gel Buffer (0.5 M Tris-HCl, pH 6.8): 1.25 mL
- 30% Acrylamide/Bis Solution: 0.67 mL
- Water: 3 mL
- Degas the stacking gel mixture.
- Add catalysts:
- 10% SDS: 100 µL
- 10% APS: 40 µL
- TEMED: 5 µL
- Cast the stacking gel onto the top of the polymerized resolving gel. Immediately insert a clean gel comb without introducing air bubbles.
- Allow the stacking gel to polymerize (about 15-20 minutes).
- Prepare protein samples by mixing them with SDS lysis buffer (e.g., Laemmli buffer). Heat the samples at 95°C for 5 minutes to ensure complete denaturation [50].
- Once the gel is set, place it in the electrophoresis chamber and fill the buffer chambers with running buffer.
- Carefully load the denatured samples and an appropriate molecular weight standard into the wells.
Electrophoresis and Post-Run Analysis
- Connect the power supply and run the gel. A common protocol is to run at a constant current of 15 mA until the dye front has entered the resolving gel, then increase to 25 mA until the bromophenol blue dye front reaches the bottom of the gel [50].
- Post-separation analysis: After electrophoresis, the gel can be processed for various downstream applications. The most common is Western blotting, where proteins are transferred electrophoretically to a nitrocellulose or PVDF membrane for immunodetection [50]. Alternative transfer methods, such as passive diffusion at 37°C, can also be employed to generate multiple immunoblots from a single gel [50].
Advanced Techniques and Future Outlook
Understanding core buffer composition enables the adaptation of SDS-PAGE for specialized applications. For instance, fluorescence detection of fully denatured Green Fluorescent Proteins (GFPs) after SDS-PAGE is typically impossible. However, an advanced protocol involving in-gel refolding, achieved by cyclodextrin-mediated SDS removal in the presence of 20% methanol, can restore fluorescence, providing a cost-effective alternative to immunodetection [32].
Looking forward, the fundamental principles of SDS-PAGE buffer composition remain timeless, but the technique continues to evolve. By 2025, trends point toward increased automation, miniaturization, and integration with data analytics and AI-driven interpretation to enhance accuracy and reproducibility [10]. While emerging techniques like capillary electrophoresis may complement SDS-PAGE in specific high-throughput applications, the simplicity, reliability, and cost-effectiveness of the discontinuous gel buffer system ensure its enduring place in the life science laboratory [10].
In the context of a broader thesis on understanding stacking and resolving gel functions, proper sample preparation emerges as the critical first step that dictates the success of all subsequent separation and analysis. The discontinuous buffer system pioneered by Laemmli relies fundamentally on sample pretreatment to create the ideal conditions for protein stacking and resolution [52] [13]. This preparatory stage transforms complex three-dimensional protein structures into uniform linear molecules that can be separated solely based on molecular weight as they migrate through the stacking and resolving gel layers [53]. Without proper sample denaturation and reduction, proteins would migrate according to their inherent charge, shape, and size, fundamentally undermining the molecular weight-based separation principle of SDS-PAGE and compromising the entire analytical process [54] [13].
The essential triumvirate of SDS, reducing agents, and loading dye works synergistically to precondition protein samples for the sophisticated electrophoretic environment they will encounter. Each component addresses specific structural challenges: SDS dismantles higher-order structures and imparts uniform charge, reducing agents break covalent disulfide bonds, and loading dye components manage sample density and visualization while providing appropriate buffering conditions [53] [55]. This comprehensive approach to sample preparation ensures that when proteins enter the stacking gel, they are properly configured to form the tight zones necessary for simultaneous entry into the resolving gel, where true molecular weight-based separation occurs [52] [13].
The Core Components: Functions and Mechanisms
Sodium Dodecyl Sulfate (SDS): The Great Linearizer
SDS serves as the cornerstone of protein denaturation in SDS-PAGE sample preparation. This anionic detergent performs two crucial functions that are fundamental to the electrophoresis process. First, SDS disrupts non-covalent bonds—including hydrogen bonds, hydrophobic interactions, and van der Waals forces—that maintain protein secondary and tertiary structures [52] [53]. This action causes proteins to unfold into linear polypeptide chains, eliminating the influence of molecular shape on electrophoretic mobility [56].
Second, SDS binds to protein backbones with high affinity and in relatively constant proportions—approximately 1.4 grams of SDS per gram of protein [55] [56]. This binding creates a uniform negative charge density along the entire length of the denatured polypeptides, effectively masking the proteins' intrinsic electrical charges [13]. The result is a population of protein molecules whose migration through the polyacrylamide gel matrix depends almost exclusively on molecular size rather than charge or conformation [10]. This charge masking is essential for accurate molecular weight determination, as it ensures all proteins migrate toward the anode with mobility inversely proportional to the logarithm of their molecular mass [56] [13].
Reducing Agents: Breaking Disulfide Bonds
Reducing agents target the covalent disulfide bonds that SDS alone cannot disrupt, completing the denaturation process started by the detergent. These bonds, which form between cysteine residues, often stabilize tertiary and quaternary protein structures [53]. Common reducing agents include β-mercaptoethanol (BME) and dithiothreitol (DTT), both of which work by reducing disulfide bridges (-S-S-) to sulfhydryl groups (-SH) [55] [13].
The choice between reducing agents involves considerations beyond effectiveness. While both successfully break disulfide bonds, DTT is often preferred over BME because it has a less pungent odor and may provide more complete denaturation under certain conditions [53]. The reducing environment these agents create ensures that multi-subunit proteins held together by disulfide bridges dissociate into their monomeric constituents, allowing for accurate molecular weight determination rather than migration as anomalously high-molecular-weight complexes [13]. For proteins without disulfide bonds, reducing agents may be omitted, but their inclusion represents standard practice for comprehensive sample denaturation [55].
Loading Dye: The Multifunctional Facilitator
The loading dye solution serves multiple practical functions that are essential for successful electrophoresis. This typically blue-colored mixture contains several key components, each with specific roles in sample handling and separation [53] [57]:
Tracking Dye: Bromophenol blue is the most common tracking dye, providing a visible migration front during electrophoresis that allows researchers to monitor progress and prevent sample loss from running off the gel [53] [13]. Being small and negatively charged, it migrates ahead of the proteins, serving as a useful although not exact indicator of protein migration.
Glycerol: This dense sugar alcohol increases sample density, ensuring samples sink properly to the bottom of gel wells during loading rather than diffusing into the running buffer [53] [55]. This function is crucial for precise and consistent sample application across all wells.
Buffer Components: Tris-HCl at pH 6.8 provides the appropriate ionic environment and pH that complements the discontinuous buffer system, particularly in the stacking gel where the slightly acidic environment influences glycine charge states [53] [13].
Table 1: Core Components of Sample Loading Buffer and Their Functions
| Component | Typical Concentration | Primary Function | Mechanism of Action |
|---|---|---|---|
| SDS | 2-4% | Protein denaturation and charge masking | Binds protein backbone, disrupts non-covalent bonds, imparts uniform negative charge [55] [13] |
| Reducing Agent (DTT/BME) | 100-500 mM | Reduction of disulfide bonds | Breaks covalent disulfide bridges, completes protein denaturation [53] [55] |
| Glycerol | 10-20% | Increases sample density | Allows sample to sink into wells, prevents diffusion [53] [57] |
| Bromophenol Blue | 0.01-0.1% | Tracking dye | Provides visible migration front during electrophoresis [53] [13] |
| Tris-HCl Buffer | 60-125 mM, pH 6.8 | Maintains pH | Creates optimal pH for stacking in discontinuous buffer system [53] [13] |
Composition and Formulation: Quantitative Aspects
Standard Buffer Formulations and Recipes
The precise formulation of sample buffer significantly impacts denaturation efficiency and subsequent electrophoretic separation. While commercial preparations are available, many laboratories prepare sample buffers in-house according to established protocols. A typical 2X Laemmli buffer formulation includes: 4% SDS, 20% glycerol, 125 mM Tris-HCl (pH 6.8), 0.02% bromophenol blue, and 10% β-mercaptoethanol or 200 mM DTT [55] [57]. This concentrated formulation allows for 1:1 dilution with protein samples while maintaining final effective concentrations.
For the standard 2X Laemmli buffer, the following recipe yields reliable results:
- 2.0 mL of 1M Tris-HCl, pH 6.8
- 4.0 mL of 20% SDS (or 0.8 g SDS)
- 2.0 mL glycerol
- 1.0 mL β-mercaptoethanol or 0.62 g DTT
- 2.5 mg bromophenol blue
- Bring to 10 mL with deionized water [55] [57]
The pH of the Tris buffer is critical, as the stacking process in discontinuous electrophoresis requires a specific pH environment—approximately pH 6.8 in the stacking gel—to establish the proper conditions for protein concentration between the leading chloride ions and trailing glycine ions [52] [13]. The inclusion of EDTA (1-2 mM) in some formulations chelates divalent cations, reducing the activity of metalloproteases that might otherwise degrade samples [53].
Concentration and Storage Considerations
Sample buffer is typically prepared as a concentrated stock solution (2X, 4X, or 6X) to minimize dilution of protein samples [55]. Aliquoting and storage at -20°C preserves reducing agent activity and prevents microbial growth. Repeated freeze-thaw cycles should be minimized, particularly for buffers containing DTT, which can oxidize over time. For extended storage, some protocols recommend adding reducing agents fresh immediately before use, though this adds complexity to the workflow [53].
The final concentration of SDS in the prepared sample should be approximately 1%, ensuring sufficient detergent is available to bind all proteins at the optimal ratio [53]. Insufficient SDS can lead to incomplete denaturation and aberrant migration, while excess SDS generally does not interfere with separation but may affect downstream applications like Western blotting if samples are not heated properly [55].
Table 2: Troubleshooting Common Sample Preparation Issues
| Problem | Potential Causes | Solutions | Preventive Measures |
|---|---|---|---|
| Protein Aggregation | Insufficient reducing agent; overheating; incomplete SDS binding | Adjust heating temperature (70-95°C); increase DTT/BME concentration; add more SDS [53] [55] | Use fresh reducing agents; optimize heating conditions; ensure adequate SDS:protein ratio |
| Incomplete Denaturation | Inadequate heating; old or contaminated reagents; insufficient SDS | Increase heating time/temperature; prepare fresh reagents; vortex during heating [53] [57] | Follow standardized protocols; aliquot and store reagents properly; verify reagent quality |
| Streaking or Smearing | Protein degradation; incomplete reduction; overloaded wells | Add protease inhibitors; increase reducing agent concentration; decrease protein load [53] [57] | Use fresh protease inhibitors; optimize protein concentration; avoid overloading gels |
| Inconsistent Migration | Improper buffer pH; uneven heating; variations in sample viscosity | Check buffer pH; ensure consistent heating across samples; mix thoroughly before loading [53] [13] | Standardize heating method; verify buffer pH; centrifuge samples before loading |
Experimental Protocols: Standard Operating Procedures
Sample Preparation Workflow
The process of preparing protein samples for SDS-PAGE follows a systematic workflow to ensure reproducibility and reliability. Begin by lysine cells or tissues in an appropriate lysis buffer containing protease inhibitors to prevent degradation [58] [55]. Determine protein concentration using a compatible assay (Bradford, BCA, or Lowry), with the BCA assay offering advantages for samples containing detergents [58] [57]. Normalize all samples to the same protein concentration using lysis buffer to ensure equal loading across gels [13].
Mix the normalized protein sample with an equal volume of 2X sample buffer (or appropriate volume for other concentrations) to achieve final working concentrations [53] [13]. For a standard 10 μL reduced sample preparation: combine x μL protein sample, 2.5 μL 4X SDS/LDS sample buffer, 1 μL 10X reducing agent, and deionized water to 10 μL total volume [58]. Vortex the mixture thoroughly to ensure complete mixing.
Heat the samples at 70-100°C for 5-10 minutes to facilitate denaturation [58] [55]. The optimal temperature and time balance complete denaturation with avoiding excessive protein aggregation; 95°C for 5 minutes is standard, but 70°C for 10 minutes may be preferable for membrane proteins prone to aggregation [55]. After heating, briefly centrifuge samples to collect condensation and ensure the entire sample is at the tube bottom [55] [57]. Samples can be loaded immediately onto gels or stored at -20°C to -80°C for future use [53].
Specialized Methodological Considerations
Certain protein types require modifications to standard preparation protocols. Membrane proteins, with their hydrophobic domains, often benefit from slightly lower heating temperatures (70°C instead of 95-100°C) to prevent aggregation that can hinder gel entry [55]. Additionally, more vigorous vortexing during or after heating may improve solubility.
For samples destined for non-reducing SDS-PAGE, simply omit the reducing agent from the standard protocol [58] [55]. This approach preserves disulfide bonds, potentially maintaining antibody recognition epitopes or protein complexes, though molecular weight interpretation requires caution as proteins may not be fully denatured.
When preparing native PAGE samples, both SDS and reducing agents are excluded, and samples are not heated [58] [55]. This maintains protein folding and native interactions, though separation occurs by both size and charge rather than size alone. The loading buffer for native electrophoresis typically contains Coomassie Blue G-250 rather than bromophenol blue to minimize charge effects [55].
Diagram 1: Protein Denaturation and Preparation Workflow. This flowchart illustrates the sequential process of protein denaturation from native structure to prepared sample ready for SDS-PAGE.
The Researcher's Toolkit: Essential Reagents and Materials
Successful sample preparation requires more than just the core components discussed; several additional reagents and materials contribute to robust and reproducible results. The following toolkit represents essential items that should be available in any laboratory performing SDS-PAGE:
Table 3: Essential Research Reagent Solutions for Sample Preparation
| Tool/Reagent | Specific Function | Application Notes |
|---|---|---|
| Lysis Buffers (RIPA, NP-40, T-PER) | Extracts proteins from cells/tissues while maintaining stability | Choice depends on protein localization; RIPA for membrane/nuclear proteins, mild detergents for cytoplasmic proteins [58] [55] |
| Protease Inhibitor Cocktails | Prevents protein degradation during and after extraction | Essential for maintaining protein integrity; should be added fresh to lysis buffers [58] [55] |
| Protein Assay Kits (BCA, Bradford) | Quantifies protein concentration for equal loading | BCA more compatible with detergents; Bradford faster but detergent-sensitive [58] [57] |
| Thermal Heater/Block | Provides consistent heating for denaturation | Enables standardized denaturation conditions across samples [53] [56] |
| Microcentrifuge | Collects samples after heating; removes debris | Ensures full sample recovery; prevents well contamination [55] [57] |
| Precision Pipettes and Tips | Accurate measurement and loading | Critical for reproducibility and equal loading across wells [57] |
Integration with Gel Electrophoresis: Connecting Sample Preparation to Separation Success
The ultimate test of proper sample preparation manifests in the electrophoresis process itself, particularly in how prepared samples interact with the stacking and resolving gel systems. The discontinuous buffer system—a hallmark of Laemmli-style SDS-PAGE—depends critically on samples being in the appropriate denatured and reduced state [52] [13]. When samples are properly prepared, several key interactions occur as electrophoresis commences.
In the stacking gel (pH ~6.8), the slightly acidic environment causes glycine molecules from the running buffer to exist primarily as zwitterions with limited mobility [52] [13]. Meanwhile, chloride ions from the Tris-HCl in the gel move rapidly toward the anode. This creates a steep voltage gradient between the fast-moving chloride front (leading ions) and the slow-moving glycine zwitterions (trailing ions). Properly prepared SDS-coated proteins, with their uniform negative charges, concentrate into a narrow zone between these fronts, effectively "stacking" before entering the resolving gel [52]. This stacking phenomenon would be impossible without the uniform charge conferred by SDS during sample preparation.
As the stacked proteins reach the resolving gel (pH ~8.8), the sharp pH increase causes glycine to shed protons and become highly mobile glycinate anions that race past the protein front [52] [13]. The proteins then encounter a higher-density polyacrylamide matrix that retards their movement according to size [56]. The reducing agents in the sample buffer prove their worth here, ensuring that proteins migrate as individual polypeptides rather than disulfide-linked complexes that would produce aberrant banding patterns and inaccurate molecular weight estimations [53] [13].
Diagram 2: Sample Migration Through Gel System. This diagram illustrates the journey of properly prepared samples through the discontinuous buffer system, highlighting key interactions at each stage.
The consequences of inadequate sample preparation become apparent during electrophoresis. Incomplete reduction results in persistent higher-order structures that migrate anomalously, while insufficient SDS allows proteins to separate by charge and shape rather than molecular weight alone [53] [13]. Improper heating can cause either incomplete denaturation or protein aggregation, both yielding poor resolution and potential loss of signal [53] [55]. Each of these failures disrupts the delicate interplay between sample and gel matrix, compromising the entire separation process that follows.
The essential components of sample preparation—SDS, reducing agents, and loading dye—function as indispensable partners in the electrophoretic process, transforming heterogeneous protein populations into uniform analytes ready for size-based separation. Their coordinated action ensures that proteins enter the electrophoresis system in an appropriate state for the stacking and resolution processes that follow. Through denaturation, charge masking, disulfide reduction, and practical handling enhancements, these components establish the foundation upon which reliable protein separation and analysis depends. When implemented with careful attention to formulation, concentration, and procedural details, proper sample preparation remains the non-negotiable first step toward accurate and reproducible SDS-PAGE results that advance our understanding of protein function in health and disease.
Western blotting, also known as immunoblotting, stands as a cornerstone technique in protein analysis, bridging the gap between proteomic research and clinical diagnostics. This method provides researchers with the unique capability to detect specific proteins within a complex biological sample, offering both qualitative identification and quantitative assessment of protein expression levels. The technique's specificity and reliability have cemented its status as a gold standard in protein research, particularly valuable for confirming gene expression results, analyzing protein-protein interactions, and validating potential disease biomarkers identified through large-scale omics studies [59] [60].
The global market valuation and growth trajectory of Western blotting underscore its indispensable role. The market for Western blot analysis services was valued at USD 548 million in 2024 and is projected to reach USD 746 million by 2031, exhibiting a compound annual growth rate (CAGR) of 4.5% [59]. When considering the entire Western blotting ecosystem—including instruments, consumables, and services—the market size is even more substantial, calculated at USD 2.01 billion in 2024 and projected to reach USD 3.6 billion by 2034 [61]. This growth is propelled by increasing demand in biomedical research, pharmaceutical R&D, and the rising prevalence of chronic infectious diseases requiring precise diagnostic confirmation.
Fundamental Principles and Workflow
Core Mechanism of Western Blotting
The western blot technique leverages the powerful combination of electrophoretic separation and specific antibody-based detection. The process begins with the separation of proteins denatured by sodium dodecyl sulfate (SDS) according to their molecular weight via polyacrylamide gel electrophoresis (PAGE) [62] [63]. SDS, an anionic detergent, plays a critical role by binding to proteins and conferring a uniform negative charge, effectively negating the influence of inherent protein charge and ensuring separation is based primarily on size [63]. Following separation, proteins are transferred from the gel onto a solid-phase membrane, typically nitrocellulose or PVDF, creating an exact replica of the gel's protein pattern. The membrane is then probed with a primary antibody specific to the protein of interest, followed by a labeled secondary antibody that enables detection, often through chemiluminescent or fluorescent methods [62] [64].
The Critical Discontinuous Gel System
A sophisticated yet fundamental aspect of traditional Western blotting is the use of a discontinuous gel system, comprising two distinct layers: the stacking gel and the resolving gel. Each layer possesses unique chemical and physical properties engineered to optimize protein separation [63].
Stacking Gel Function: The stacking gel, with a lower percentage of acrylamide and pH of 6.8, serves as a protein-focusing mechanism. Its primary function is to concentrate all protein samples into a sharp, unified band before they enter the resolving gel. This is achieved through a discontinuous buffer system involving chloride ions (from Tris-HCl in the gel) and glycine ions (from the running buffer). At the stacking gel's pH, glycine exists predominantly as a zwitterion with minimal mobility. This creates a steep voltage gradient that herds the protein samples into a thin, concentrated line, ensuring they enter the resolving layer simultaneously [63].
Resolving Gel Function: The resolving gel, with a higher percentage of acrylamide and pH of 8.8, is where actual size-based separation occurs. When the protein stack reaches this layer, the increased pH causes glycine to gain negative charge and migrate rapidly ahead of the proteins. The higher acrylamide concentration creates a porous matrix that acts as a molecular sieve, retarding the migration of larger proteins while allowing smaller proteins to move more freely, thus separating them by molecular weight [63].
Table 1: Composition and Function of Gel Components in Discontinuous SDS-PAGE
| Gel Component | Polyacrylamide % | pH | Primary Function | Key Chemical Mediators |
|---|---|---|---|---|
| Stacking Gel | 4-5% | 6.8 | Concentrate proteins into a sharp band | Tris-HCl, Glycine (zwitterion form) |
| Resolving Gel | 8-15% (variable) | 8.8 | Separate proteins by molecular weight | Tris-HCl, Glycine (anion form), Polyacrylamide matrix |
This discontinuous system is visually summarized in the following workflow, which outlines the key stages of the Western blot process from sample preparation to detection:
Figure 1: Western Blotting Workflow from Sample to Detection
Experimental Protocols and Methodologies
Standard Chemiluminescent Western Blot Protocol
The following step-by-step protocol outlines the standard procedure for chemiluminescent detection, which remains one of the most widely used applications of Western blotting in research and diagnostic laboratories [64]:
Protein Transfer Preparation:
- Prepare transfer buffer appropriate for your gel chemistry (e.g., Tris-Glycine buffer for standard SDS-PAGE).
- Prepare transfer membrane: for PVDF, pre-wet in 100% methanol for 30 seconds, rinse in deionized water, and equilibrate in transfer buffer for 5 minutes; for nitrocellulose, equilibrate directly in transfer buffer.
Protein Transfer:
- Assemble transfer stack according to manufacturer's instructions for wet, semi-dry, or dry transfer systems.
- Transfer proteins using appropriate conditions (constant current or voltage) for 1-2 hours depending on protein size and transfer method.
Post-Transfer Membrane Processing:
- After transfer, wash membrane in deionized water 4 times for 5 minutes each with agitation to remove all transfer buffer.
- Incubate membrane with sufficient volume of blocking buffer (e.g., 5% non-fat milk or commercial blocking agents) for 30-60 minutes at room temperature with agitation.
Primary Antibody Incubation:
- Dilute primary antibody per supplier recommendations in blocking buffer (typical dilutions range from 1:1,000 to 1:5,000 for most applications).
- Incubate membrane protein-side up in primary antibody solution with agitation, for 1 hour at room temperature or overnight at 2-8°C.
Membrane Washing:
- Wash membrane 3 times with agitation for 10 minutes each in wash buffer (TBS or PBS with 0.05% Tween 20).
Secondary Antibody Incubation:
- Prepare dilution of HRP-conjugated secondary antibody in wash buffer or blocking buffer (typical dilutions range from 1:1,000 to 1:250,000 depending on signal strength needed).
- Incubate membrane protein-side up in secondary antibody solution for 1 hour with agitation at room temperature.
Final Washing and Detection:
- Wash membrane 6 times with agitation for 5 minutes each in wash buffer to thoroughly remove unbound secondary antibodies.
- Prepare working solution of chemiluminescent substrate according to manufacturer instructions.
- Incubate blot with working solution for 1 minute (standard ECL) or 5 minutes (high-performance substrates).
- Drain excess reagent and image blot using film or appropriate digital imaging system [64].
Fluorescent Western Blotting Protocol
For quantitative applications, fluorescent Western blotting offers several advantages, including a wider linear dynamic range and the capacity for multiplexing [60] [64]. The protocol differs mainly in the detection stage:
Steps 1-5: Follow the same procedure as chemiluminescent Western through the primary antibody incubation and washing steps.
Fluorescent Secondary Antibody Incubation:
- Prepare dilutions of fluorescently conjugated secondary antibodies to 0.4-0.1 µg/mL in wash buffer or blocking buffer (typically 1:5,000 to 1:20,000 dilution from a 2 mg/mL stock).
- Incubate membrane protein-side up in secondary antibody solution for 1 hour with agitation at room temperature, protecting the membrane from light to prevent photobleaching.
Final Washing and Imaging:
- Wash membrane 6 times with agitation for 5 minutes each in wash buffer.
- Image blot while still wet or after drying using an appropriate imaging system with fluorescence detection capabilities.
- For dried blots, place between two sheets of western blot filter paper and store in the dark to prevent photobleaching [64].
Essential Reagents and Research Solutions
Successful Western blotting depends on a comprehensive suite of specialized reagents and materials, each serving a specific function in the experimental workflow. The following table details these essential components:
Table 2: Essential Western Blotting Reagents and Their Functions
| Reagent/Material | Function | Key Considerations |
|---|---|---|
| Lysis Buffers (RIPA, NP-40, Tris-HCl) | Solubilize proteins from cells or tissues | Choice depends on protein localization and application; RIPA for whole cell extracts, NP-40 for cytoplasmic proteins [62] |
| Protease/Phosphatase Inhibitors (PMSF, Aprotinin, Sodium Orthovanadate) | Prevent protein degradation and post-translational modification loss | Add fresh to lysis buffers; specific inhibitors target different protease classes [62] |
| SDS-PAGE Gels (Stacking and Resolving) | Separate proteins by molecular weight | Acrylamide percentage determines resolution range; 8% for large, 15% for small proteins [63] |
| Transfer Membranes (Nitrocellulose, PVDF) | Immobilize separated proteins for antibody probing | PVDF requires methanol activation; nitrocellulose has higher protein binding capacity [64] |
| Blocking Agents (Non-fat milk, BSA, commercial blockers) | Reduce non-specific antibody binding | Choice depends on application; milk may contain phosphoproteins interfering with phospho-specific antibodies [64] |
| Primary Antibodies | Specifically bind to target protein | Must be validated for Western blotting; optimal dilution determined empirically [62] [64] |
| Secondary Antibodies (HRP or fluorescent-conjugated) | Detect primary antibody binding | HRP for chemiluminescence; fluorescent dyes for multiplexing and quantification [60] [64] |
| Detection Substrates (Chemiluminescent, Fluorescent) | Generate measurable signal | Chemiluminescent offers high sensitivity; fluorescent provides better quantification [60] [64] |
The critical mechanism of the discontinuous gel system, particularly the pH-dependent change in glycine charge states that enables protein stacking, is illustrated below:
Figure 2: Discontinuous Buffer System Mechanism
Quantitative vs. Qualitative Analysis in Research and Diagnostics
Western blotting serves two distinct analytical purposes in proteomics and diagnostics, each with different methodological requirements and interpretation criteria [60].
Qualitative Western Blot Analysis
Qualitative analysis answers fundamental presence-or-absence questions about protein expression. This approach is foundational for applications such as verifying recombinant protein expression, confirming gene knockdown or knockout, and initial protein characterization. In diagnostic settings, qualitative Western blotting serves as a confirmatory test for infectious diseases like HIV, Lyme disease, and Hepatitis B and C, where the detection of specific pathogen-associated proteins confirms infection [65] [60]. The key advantage in these applications is the technique's high specificity compared to other immunoassays, providing definitive confirmation of protein presence.
Quantitative Western Blot Analysis
Quantitative Western blotting represents a more rigorous application aimed at measuring relative protein abundance across different samples. This approach is essential for investigating changes in protein expression in response to experimental treatments, comparing protein levels between normal and diseased tissues, or assessing post-translational modifications. The transition from qualitative to quantitative analysis introduces several critical requirements [60]:
- Normalization: The use of loading controls (e.g., GAPDH, β-actin, tubulin) to correct for technical variations in protein loading and transfer efficiency.
- Linear Dynamic Range: Ensuring both the detection method and protein abundance fall within the linear range of the system where signal intensity directly correlates with protein amount.
- Advanced Detection Methods: Fluorescent detection systems are often preferred for quantitative applications due to their wider linear range compared to chemiluminescence.
- Validated Antibodies: Antibodies must be specifically validated for quantitative applications to ensure specific, reproducible detection.
Table 3: Comparison of Qualitative and Quantitative Western Blot Applications
| Feature | Qualitative Western Blotting | Quantitative Western Blotting |
|---|---|---|
| Primary Objective | Determine presence/absence of specific protein | Measure relative abundance of protein across samples |
| Key Applications | Confirmatory diagnostics, expression verification | Disease mechanism studies, drug efficacy, biomarker validation |
| Data Output | Binary (positive/negative) | Numerical (band intensity ratios) |
| Normalization | Not required | Essential (loading controls) |
| Detection System | Chemiluminescence typically sufficient | Fluorescence preferred for linear dynamic range |
| Common Challenges | Non-specific bands, false positives | Signal saturation, loading accuracy, linear range validation |
Applications in Disease Research and Diagnostic Markets
Diagnostic Applications in Infectious Diseases
Western blotting plays a critical role in confirmatory diagnostics for several infectious diseases, providing a highly specific method for detecting pathogen-specific antibodies or antigens. In HIV diagnosis, Western blotting serves as the traditional gold standard confirmatory test, detecting antibodies against specific viral proteins such as gp120, gp41, and p24 [65] [61]. The technique is similarly valuable in diagnosing Lyme disease (detecting antibodies against Borrelia burgdorferi antigens), Hepatitis C, and Herpes infections. The rising global prevalence of infectious diseases contributes significantly to market growth; with approximately 39.9 million people living with HIV globally in 2023, the demand for reliable confirmatory testing remains substantial [61].
Biomarker Discovery and Validation
In proteomics research, Western blotting serves as an essential bridge between initial biomarker discovery and clinical validation. While high-throughput techniques like mass spectrometry often identify potential biomarker candidates in discovery phases, Western blotting provides orthogonal validation through its specific detection capabilities. The technique allows researchers to confirm the identity, size, and relative abundance of putative biomarkers across larger sample cohorts, verifying their potential clinical utility. This application is particularly valuable in cancer research, where Western blotting helps validate expression patterns of potential protein biomarkers in tumor versus normal tissues [59] [61].
Biomedical Research and Drug Development
The pharmaceutical and biotechnology industries extensively utilize Western blotting throughout the drug development pipeline. In basic research, it helps elucidate disease mechanisms by characterizing protein expression and signaling pathways. In drug discovery, it assesses target engagement and pharmacodynamic effects of therapeutic candidates. During preclinical development, Western blotting helps determine mechanism of action and identify potential biomarkers for clinical trials. The growing emphasis on targeted therapies and personalized medicine further drives adoption, as researchers require techniques that can precisely measure specific protein targets and modifications in patient samples [65] [61].
Technological Advancements and Future Perspectives
Emerging Technologies and Innovations
The Western blotting landscape continues to evolve with technological advancements addressing limitations of traditional protocols:
Automation and Throughput: Fully automated Western blotting systems are gaining traction, reducing manual hands-on time, decreasing variability, and improving reproducibility. These systems are particularly valuable in diagnostic laboratories and pharmaceutical quality control where standardized protocols are essential [66] [67].
Multiplexing Capabilities: Advances in fluorescent detection enable simultaneous measurement of multiple proteins on a single blot, providing more comprehensive protein expression profiles from limited samples. This multiplexing capability is especially valuable for analyzing signaling pathways where multiple components need to be assessed concurrently [65] [67].
Microfluidics and Miniaturization: Microfluidic Western blotting platforms are emerging that offer faster analysis times, improved sensitivity, and reduced reagent consumption. These systems overcome several challenges of conventional Western blotting, including lengthy transfer times and substantial antibody requirements [61].
Digital Imaging and Analysis: Modern digital imaging systems with CCD cameras provide wider linear dynamic ranges compared to traditional film-based detection, facilitating more accurate quantification. Coupled with sophisticated analysis software, these systems offer automated band detection, background subtraction, and data normalization [60] [67].
Artificial Intelligence Integration: AI and machine learning are beginning to transform Western blot image analysis, enabling automated interpretation of complex band patterns and identification of subtle differences that might be overlooked in manual analysis [61].
Market Outlook and Regional Trends
The Western blotting market demonstrates robust growth with regional variations in adoption and application:
North America: Currently dominates the global market (48% share in 2024), driven by advanced research infrastructure, significant R&D investments, and the presence of key market players [61].
Asia-Pacific: Expected to witness the fastest growth, fueled by expanding biotechnology investments, increasing healthcare expenditure, and growing research capabilities in countries like China and India [59] [61].
Europe: Maintains a strong market presence supported by well-established research institutions and pharmaceutical industries [65].
The Western blot quantitative analysis system market specifically is projected to grow at a remarkable CAGR of 12.5% through 2033, potentially reaching $1,500 million by 2025, highlighting the increasing demand for precise quantification in proteomic research and clinical applications [67].
Western blotting remains an indispensable technique in both proteomics research and clinical diagnostics, bridging the gap between basic science and applied medicine. The fundamental understanding of its core components—particularly the sophisticated discontinuous gel system that enables precise protein separation—provides researchers with a powerful tool for protein analysis. While traditional methods continue to serve vital roles in laboratories worldwide, technological innovations in automation, multiplexing, and quantification are expanding the technique's capabilities and applications. As proteomics continues to drive advances in personalized medicine and biomarker discovery, Western blotting maintains its relevance through ongoing adaptation and refinement, ensuring its place as a cornerstone methodology in life sciences research and diagnostic practice for the foreseeable future.
Solving Common SDS-PAGE Problems: From Smiling Bands to Poor Resolution
In the context of a broader thesis on understanding stacking and resolving gel functions, diagnosing band smearing is paramount for researchers, scientists, and drug development professionals. Electrophoresis underpins many molecular biology applications, and problems in gel electrophoresis hinder downstream applications, hamper experimental workflows, and negatively impact experimental results [68]. Smearing—characterized by diffused, fuzzy bands with a blurry appearance—results in poorly resolved bands that overlap with adjacent bands, making accurate interpretation of results difficult [68]. This technical guide provides an in-depth analysis of the causes and solutions for smearing within the framework of gel function, offering detailed methodologies and systematic troubleshooting approaches essential for ensuring data integrity in research and biopharmaceutical development.
Fundamental Causes of Smearing: A Systematic Analysis
Smearing arises from inconsistencies in sample preparation, gel fabrication, and electrophoresis conditions that disrupt the precise functioning of the discontinuous gel system. The stacking and resolving gels work in concert to concentrate samples into sharp zones before separation by size. Compromising this process leads to diffusion and poor resolution.
Sample Preparation Deficiencies
- Sample Degradation: Nucleases or proteases can partially digest nucleic acids or proteins, creating a heterogeneous mixture of fragments that migrate as a continuous smear [68]. This is especially critical when working with RNA.
- Protein Contamination: Proteins present in a nucleic acid sample may interfere with sample mobility in the gel, causing smearing [68]. Conversely, incomplete denaturation of protein samples can lead to heterogeneous charge-to-mass ratios [69].
- Incompatible Loading Buffer: Using a loading dye without denaturant for single-stranded nucleic acids (e.g., RNA) can permit formation of undesirable secondary structures [68]. For proteins, insufficient SDS or reducing agents prevents complete linearization.
- Sample Overloading: Exceeding the gel's capacity (a general recommendation is 0.1–0.2 μg of sample per millimeter of gel well width) results in trailing smears, warped or U-shaped bands, and fused band appearances [68] [70].
- High Salt Concentration: High ionic strength in the sample buffer can distort the electric field and disrupt the stacking process, leading to band broadening and smearing [68].
Gel Fabrication and Design Flaws
- Poorly Formed Wells: Wells damaged during comb removal, connected wells from overfilling the gel tray, or sample leakage through the bottom of the gel can all cause significant band distortion [68].
- Incorrect Gel Type: Using a non-denaturing gel for single-stranded nucleic acids or failing to use denaturing conditions for RNA analysis prevents proper separation [68].
- Uneven Polymerization: Acrylamide gels that polymerize unevenly, potentially due to improper pouring where one part begins to polymerize before another, create regions with different pore sizes and electroosmotic flow, resulting in smearing [70].
- Incorrect Gel Percentage: A gel percentage inappropriate for the target fragment size range prevents optimal separation. Smaller molecules require higher percentages for resolution, while larger molecules require lower percentages [68] [69].
- Thick Gels: Gel thickness beyond 3–4 mm for horizontal agarose gels can result in band diffusion during electrophoresis [68].
Electrophoresis Running Conditions
- Suboptimal Voltage: Applying very low or very high voltage creates suboptimal resolution. High voltage generates excessive heat, potentially denaturing samples and causing band diffusion, while low voltage may lead to band broadening due to diffusion [68] [71].
- Inappropriate Run Time: A very short run time prevents sufficient band separation, while excessively long runs generate heat and allow bands to diffuse [68].
- Buffer Issues: Using running buffer with incorrect ion concentration or pH, or buffer that has been exhausted through reuse, disrupts current flow and pH maintenance, critical for proper protein separation [71]. Low buffering capacity is particularly problematic for runs longer than 2 hours [68].
- Temperature Fluctuations: Excessive heat generated during electrophoresis causes gels to expand, leading to uneven migration and the characteristic "smiling" bands, which can contribute to smearing in severe cases [71].
The following tables consolidate key quantitative parameters and specifications for preventing and resolving smearing issues.
Table 1: Sample Preparation Guidelines to Prevent Smearing
| Parameter | Optimal Range/Guideline | Consequence of Deviation |
|---|---|---|
| Sample Quantity | 0.1–0.2 μg per mm of well width [68] | Overloading: trailing smears, warped bands [68] |
| Sample Volume | At least 30% of well capacity [68] | Low volume: band distortion [68] |
| Salt Concentration | Compatible with gel system; dilute if necessary [68] | High salt: distorted bands and smearing [68] |
| Nuclease-Free Conditions | Use molecular biology grade reagents; wear gloves [68] | Sample degradation: smearing [68] |
Table 2: Gel Preparation and Electrophoresis Conditions to Prevent Smearing
| Parameter | Optimal Condition | Consequence of Deviation |
|---|---|---|
| Gel Thickness (Agarose) | 3–4 mm [68] | >5 mm: band diffusion [68] |
| Voltage | 10-15 V/cm [71]; monitor per system | Too high: overheating and smearing [68] [71] |
| Run Time | Until sufficient separation; dye front nearing bottom [71] | Too long: band diffusion; too short: poor resolution [68] |
| Acrylamide Concentration | Match to target protein size [69] | Incorrect %: poor separation or runoff [71] [69] |
| Well Integrity | Clean, undamaged wells without leakage [68] | Damaged wells: distorted, smeared bands [68] |
Detailed Experimental Protocols for Smearing Mitigation
Protocol 1: Optimizing Sample Preparation for Nucleic Acids
Purpose: To obtain sharp, well-resolved nucleic acid bands by addressing common sample-related causes of smearing. Reagents: DNA/RNA sample, nuclease-free water, appropriate loading dye (denaturing for RNA), molecular biology grade reagents. Procedure:
- Quantification and Dilution: Precisely quantify nucleic acid concentration using spectrophotometry. Dilute sample to achieve a final loading amount of 0.1–0.2 μg per millimeter of well width [68].
- Salt Reduction: If the sample is in a high-salt buffer, dilute in nuclease-free water before adding loading dye. Alternatively, purify by precipitation and resuspend in nuclease-free water or TE buffer [68].
- Denaturation (for RNA): Use a loading dye containing a denaturant (e.g., formamide). Heat the sample at 65-70°C for 5-10 minutes followed by immediate placement on ice to prevent secondary structure formation [68].
- Loading Technique: Mix sample with appropriate loading dye. Ensure no air bubbles are introduced into the well during loading. Avoid puncturing the well with the pipette tip [68].
Protocol 2: Casting and Running a High-Quality Denaturing Polyacrylamide Gel for RNA
Purpose: To create a gel system that maintains nucleic acids in a denatured state for separation by size without smearing. Reagents: Acrylamide/bis-acrylamide solution, urea, TBE or TAE buffer, ammonium persulfate (APS), TEMED, denaturing loading dye. Procedure:
- Gel Solution Preparation: Prepare a denaturing gel solution containing 6-8% acrylamide (for RNA fragments 100-1000 nt) and 7-8 M urea in 1x TBE buffer [68].
- Polymerization: Add APS and TEMED to catalyze polymerization. Pour the gel immediately, inserting a clean comb without trapping bubbles. Allow complete polymerization for 30-45 minutes.
- Pre-Run: Before loading samples, pre-run the gel in 1x TBE buffer at constant power for 30 minutes to warm the gel and establish a stable ion front.
- Sample Loading and Run: Flush wells with buffer to remove residual urea. Load samples immediately after denaturation. Run the gel at constant voltage (5-8 V/cm) until the dye front migrates to the desired distance [68].
- Post-Run Processing: Proceed immediately to staining or transfer. Avoid delays to prevent band diffusion [68].
Protocol 3: Troubleshooting Protein Overloading in SDS-PAGE
Purpose: To identify and correct for protein overloading, a common cause of smeared protein gels. Reagents: Protein sample, Bradford or BCA assay reagents, Laemmli sample buffer, SDS-PAGE gel, protein standard. Procedure:
- Accurate Protein Quantification: Perform a colorimetric protein assay (e.g., Bradford) with appropriate standards. Account for any dilution factors used during sample preparation to prevent concentration miscalculations [70].
- Load Serial Dilutions: Prepare a series of dilutions of your protein sample (e.g., 5 μg, 10 μg, 20 μg, 40 μg) in Laemmli buffer. Load these alongside a prestained protein ladder.
- Electrophoresis: Run the gel at constant voltage (150V for mini-gels) until the dye front exits the gel.
- Analysis: After staining, identify the dilution where bands appear sharp and well-resolved without significant smearing or a dark background. For mixed protein samples, a mini-gel well typically has a capacity of 20-40 μg total protein [70]. Use this optimal load for future experiments.
Diagnostic Workflow and Gel Function Diagrams
The following diagnostic workflow provides a systematic approach to identifying and resolving the root causes of smearing in gel electrophoresis.
Diagram 1: Systematic diagnostic workflow for smearing causes and solutions (NA: Nucleic Acids).
The discontinuous buffer system is fundamental to achieving sharp bands. The following diagram illustrates the ion dynamics and protein behavior in stacking and resolving gels.
Diagram 2: Ion and protein dynamics in discontinuous SDS-PAGE.
Research Reagent Solutions for Optimal Band Resolution
Table 3: Essential Reagents for Smearing Prevention and Analysis
| Reagent/Chemical | Function in Preventing Smearing | Key Considerations |
|---|---|---|
| Molecular Biology Grade Reagents | Prevents nuclease contamination that degrades samples, causing smearing [68]. | Essential for RNA work; ensure labware is nuclease-free. |
| Denaturing Agents (Urea, Formamide) | Disrupts secondary structure in nucleic acids, preventing formation of heterogeneous conformations that smear [68]. | Use in both gel matrix and loading dye for single-stranded nucleic acids. |
| High-Purity Acrylamide/Bis-acrylamide | Forms consistent polyacrylamide mesh with defined pore sizes for precise size-based separation. | Impurities can lead to uneven polymerization and smearing. |
| SDS (Sodium Dodecyl Sulfate) | Denatures proteins, confers uniform negative charge, and eliminates charge as a separation factor [69]. | Insufficient SDS leads to incomplete denaturation and smearing. |
| TEMED & Ammonium Persulfate (APS) | Catalyzes acrylamide polymerization. | Fresh APS is critical for consistent, even gel polymerization. |
| Tris-Glycine Buffer System | Creates discontinuous pH environment for stacking; trailing ion (glycine) mobility is pH-dependent [69]. | Incorrect pH or concentration disrupts stacking, causing smearing. |
| Beta-Mercaptoethanol (BME) or DTT | Reduces disulfide bonds in proteins, ensuring complete unfolding and linearization [69]. | Omission causes incomplete denaturation and heterogeneous mobility. |
Within the critical research context of understanding stacking and resolving gel functions, diagnosing and resolving band smearing is fundamental to generating reliable data. This guide has detailed how smearing results from failures in the sample-gel-buffer system, which disrupts the precise mechanics of the discontinuous buffer system. By applying the systematic diagnostic workflow, adhering to the quantitative guidelines for sample and gel preparation, and implementing the detailed experimental protocols provided, researchers and drug development professionals can effectively troubleshoot and prevent smearing. Mastering these principles ensures the integrity of electrophoretic analysis, a cornerstone technique in molecular biology and biopharmaceutical characterization.
In the realm of molecular biology and protein biochemistry, gel electrophoresis serves as a fundamental technique for separating biomolecules by size. The quality of separation directly impacts the accuracy and interpretability of experimental data, particularly in critical applications like drug development. This guide addresses two common electrophoretic artifacts—the "smile effect" and skewed migration—by framing them within the core functional context of discontinuous gel systems. Understanding the mechanistic roles of stacking and resolving gels is paramount to diagnosing and resolving these band pattern irregularities, which otherwise compromise data integrity, quantitative analysis, and experimental reproducibility.
The Science of Discontinuous Gel Electrophoresis
The Stacking and Resolving Gel System
The principle of discontinuous gel electrophoresis, famously established by Laemmli for SDS-PAGE, relies on a two-layer gel system with differing pH environments and pore sizes to achieve sharp, well-resolved bands [12] [72]. This system creates a temporary state where all analyte molecules focus into a thin starting line before entering the separating matrix.
The stacking gel features a lower percentage of polyacrylamide (or agarose) and a lower pH (typically 6.8). Its primary function is to concentrate all protein or DNA samples into a sharp, unified zone before they enter the resolving gel. This process is governed by the unique electrophoretic properties of the buffer ions [72]. The resolving gel (or separating gel) has a higher percentage of polyacrylamide (or agarose) and a higher pH (8.8). Its function is to separate the now-concentrated biomolecules based on their size as they migrate through the porous matrix [72]. The successful transition of samples from the stacking zone to the resolving zone is critical for preventing band distortion and achieving optimal resolution.
Key Ionic Dynamics in SDS-PAGE
The magic of the stacking process hinges on the behavior of glycine ions in the running buffer. At the pH of the stacking gel, glycine exists predominantly as a zwitterion with no net charge, causing it to migrate slowly [72]. In contrast, chloride ions from the Tris-HCl in the gel are highly mobile. Proteins, coated uniformly with the anionic detergent SDS, have an intermediate mobility. This setup creates a steep voltage gradient between the fast-moving chloride ions (leading ions) and the slow-moving glycine zwitterions (trailing ions). The protein-SDS complexes are compressed into a thin zone between these two fronts [72].
When this ion front reaches the resolving gel at pH 8.8, the environment changes dramatically. Glycine loses protons and becomes predominantly negatively charged glycinate, gaining high mobility and overtaking the proteins [72]. Freed from the stacking effect, the proteins now encounter a gel with a higher acrylamide concentration, which slows their migration proportionally to their molecular size, thus initiating separation based on size.
Diagnosing and Resolving Band Pattern Irregularities
The "Smiling" Effect
The "smiling effect" is characterized by bands that curve upwards at the edges, forming a crescent or smile-like pattern. This artifact is primarily a consequence of uneven heat distribution across the gel [73].
Table 1: Causes and Solutions for the "Smiling" Effect
| Cause | Underlying Mechanism | Corrective Action |
|---|---|---|
| Excessive Voltage | High electrical current generates excessive heat, causing the center of the gel to warm up more than the edges. This warmer, less viscous center allows DNA/protein to migrate faster. | Run the gel at a lower voltage. This reduces overall heat generation and minimizes thermal gradients [73]. |
| Uneven Electric Field | Loose contacts or faulty wiring in the electrophoresis tank can create an uneven electric field across the gel width. | Check the tank setup for loose contacts or other wiring problems [73]. |
| Insufficient Buffer Circulation | In some setups, lack of buffer circulation can lead to localized temperature differences. | Ensure the gel is fully submerged in running buffer with a consistent depth (3–5 mm) covering the surface [73]. |
Skewed and Smeared Migration
Skewed migration, where bands are tilted, wavy, or smeared, can arise from numerous factors related to sample preparation, gel casting, and running conditions.
Table 2: Troubleshooting Skewed and Smeared Band Patterns
| Category | Problem | Solution |
|---|---|---|
| Gel Preparation | Poorly formed wells (e.g., torn, connected) [68]. | Use clean combs, avoid pushing combs to the very bottom of the tray, and remove combs carefully and steadily after gel solidification. |
| Incorrect gel concentration [73]. | Use lower agarose/acrylamide percentages for larger fragments/proteins and higher percentages for smaller ones. | |
| Overly thick gels (e.g., >5 mm) [68]. | Cast gels with a thickness of 3–4 mm to minimize band diffusion. | |
| Sample Preparation | Sample Overloading [73] [68]. | Load an appropriate amount (e.g., 0.1–0.2 μg of nucleic acid per mm of well width). Overloaded fragments run slower and appear larger. |
| Sample Degradation [68]. | Use nuclease-free reagents and labware, wear gloves, and work in designated clean areas. | |
| Incompatible Loading Buffer/High Salt [68]. | Ensure the loading buffer is appropriate (e.g., denaturing for RNA). Dilute or purify samples in high-salt buffers. | |
| Gel Run Conditions | Bubbles in Wells/Damaged Wells [68]. | Avoid introducing bubbles when loading; take care not to puncture wells with pipette tips. |
| Very Low or High Voltage [68]. | Apply the recommended voltage for the specific gel and sample type. | |
| Incorrect Buffer Level/Incompatible Buffer [73] [68]. | Ensure the gel is fully submerged in the correct, compatible running buffer (e.g., TAE vs. TBE for DNA). |
Experimental Protocols for Optimal Results
Protocol 1: Standard Agarose Gel Electrophoresis for DNA
This protocol is foundational for DNA analysis in molecular biology [74] [75].
- Prepare Gel Solution: For a standard 1% gel, mix 1 g of agarose with 100 mL of 1x TAE (or TBE) buffer in a microwavable flask [74].
- Dissolve Agarose: Microwave the mixture in short bursts (20-30 seconds) until the agarose is fully dissolved, swirling intermittently to prevent superheating. Avoid over-boiling to prevent evaporation and a consequent increase in gel percentage [74] [75].
- Cool and Add Stain: Let the solution cool to about 50-55°C (touchable but hot). Then, add a fluorescent nucleic acid stain, such as ethidium bromide or a safer alternative, to a final concentration of ~0.2-0.5 μg/mL, and mix thoroughly [74].
- Cast the Gel: Pour the melted agarose into a casting tray with a well comb in place. Push any bubbles away with a pipette tip. Allow the gel to solidify completely at room temperature for 20-30 minutes or at 4°C for 10-15 minutes [74] [75].
- Set Up Gel Box: Once solidified, remove the comb and buffer dams carefully. Place the gel in the electrophoresis chamber and fill the chamber with the same running buffer used to cast the gel (1x TAE/TBE) until the gel is submerged under 3-5 mm of buffer [73] [74].
- Prepare and Load Samples: Mix DNA samples with a loading dye containing glycerol (for density) and tracking dyes (e.g., Bromophenol Blue). Load the DNA ladder and samples into the wells [74] [75].
- Run the Gel: Connect the lid, ensuring the electrodes are correctly oriented (DNA migrates toward the anode/positive electrode—"Run to Red"). Run the gel at 80-150 V until the dye front has migrated 75-80% down the gel [74].
- Visualize: Image the gel using an ultraviolet light transilluminator. Wear appropriate personal protective equipment when using UV light [74].
Protocol 2: SDS-Polyacrylamide Gel Electrophoresis for Proteins
This protocol is standard for protein separation by molecular weight [72].
- Assemble Gel Cassette: Set up the gel casting apparatus according to the manufacturer's instructions.
- Prepare and Cast the Resolving Gel: Mix components for the resolving gel (e.g., acrylamide/bis-acrylamide, Tris-HCl pH 8.8, SDS, APS, and TEMED). Pour the solution into the cassette, leaving space for the stacking gel. Carefully layer a solvent (e.g., water or isopropanol) on top to create a flat interface. Allow the gel to polymerize completely [72].
- Prepare and Cast the Stacking Gel: Once the resolving gel has set, pour off the overlay. Prepare the stacking gel solution (e.g., lower percentage acrylamide, Tris-HCl pH 6.8, SDS, APS, and TEMED). Pour it onto the resolving gel and immediately insert a clean well comb. Allow it to polymerize [72]. Innovation Note: A time-saving one-step casting method with a colored stacking gel has been developed (Mako OT method) to provide a clear boundary between the two gel layers [12].
- Prepare Samples and Running Buffer: Dilute protein samples in Laemmli buffer (containing SDS and reducing agents like BME), and heat denature. Prepare the running buffer (Tris, Glycine, SDS, pH ~8.3) [72].
- Load and Run the Gel: Place the polymerized gel into the electrophoresis chamber filled with running buffer. Load the protein ladder and samples into the wells. Connect to a power supply and run at an appropriate constant voltage (e.g., 80-200 V) until the dye front reaches the bottom of the gel [72].
- Post-Electrophoresis Analysis: Following electrophoresis, proteins can be stained within the gel (e.g., with Coomassie Brilliant Blue) or transferred to a membrane for Western blotting analysis [12] [76].
Workflow Visualization
The following diagram illustrates the systematic troubleshooting workflow for diagnosing and resolving irregular band patterns in gel electrophoresis.
The Scientist's Toolkit: Essential Reagents and Materials
Table 3: Key Research Reagent Solutions for Gel Electrophoresis
| Item | Function/Description | Application Notes |
|---|---|---|
| DNA Ladder | A mix of DNA fragments of known sizes for molecular weight estimation. | Choose a ladder with the appropriate number of bands and size range. Chromatography-purified ladders ensure high purity and accurate sizing [73]. |
| Protein Ladder (Prestained) | A mix of proteins of known sizes, often dyed for visual tracking during electrophoresis. | Allows monitoring of run progress and preliminary size estimation before transfer or staining [12]. |
| TAE Buffer (Tris-Acetate-EDTA) | A common running buffer for DNA electrophoresis. | Better for resolving larger DNA fragments (>1 kb) and is compatible with enzymatic reactions post-electrophoresis [73]. |
| TBE Buffer (Tris-Borate-EDTA) | A common running buffer for DNA electrophoresis. | Provides better separation of small DNA fragments and has higher buffering capacity, making it suitable for longer runs [73]. |
| SDS-PAGE Running Buffer (Tris-Glycine-SDS) | The standard buffer for protein SDS-PAGE. | The Tris-Glycine system enables the discontinuous buffer effect for stacking. SDS maintains proteins in a denatured state [72]. |
| Loading Dye/Buffer | Contains a dense agent (glycerol/sucrose) and tracking dyes. | Makes sample visible and dense enough to sink into wells. Dyes (e.g., Bromophenol Blue, Orange G) migrate at predictable rates [73] [74] [72]. |
| Agarose | A polysaccharide polymer used to form gels for DNA separation. | Gel percentage (0.7%-2%) determines resolution range. Lower percentages separate larger fragments [73] [74]. |
| Polyacrylamide | A cross-linked polymer used for protein (SDS-PAGE) and high-resolution DNA separation. | Forms a porous matrix. Percentage determines resolution; higher % for smaller proteins/fragments [72]. |
| SYBR Safe / EtBr | Fluorescent nucleic acid stains that intercalate into DNA. | EtBr is a traditional but mutagenic stain. SYBR Safe is a safer alternative with similar sensitivity [73] [74]. |
| Laemmli Buffer (Sample Buffer for SDS-PAGE) | Contains SDS, reducing agent (BME), glycerol, and tracking dye. | Denatures proteins, coats them with negative charge, and allows loading into wells [72]. |
This technical guide addresses the critical parameters for optimizing the polymerization of polyacrylamide gels to achieve consistent pore size and ensure gel integrity, with a specific focus on the distinct yet complementary functions of stacking and resolving gels. Within the broader thesis of understanding stacking and resolving gel functions, this whitepaper provides researchers and drug development professionals with detailed methodologies and quantitative data to standardize and enhance the reproducibility of gel electrophoresis, a cornerstone technique in molecular biology and protein analysis. The precise control over gel matrix formation directly influences the resolution of biomolecules, the accuracy of downstream analyses, and the reliability of scientific conclusions.
The discontinuous buffer system in SDS-PAGE, comprising stacking and resolving gels, is designed to achieve high-resolution separation of protein mixtures by size. The system hinges on creating distinct physical and chemical environments within a single gel cassette to first concentrate protein samples into a sharp starting zone before they enter the sieving matrix. The resolving gel is responsible for the actual separation of proteins based on their molecular weight. Its pore size, determined by the concentration of polyacrylamide, creates a molecular sieve through which smaller proteins migrate faster than larger ones. Concurrently, the stacking gel functions not to separate but to line up all protein samples along the same narrow plane before they enter the resolving gel. This process, known as stacking, ensures that all proteins begin their separation journey simultaneously, resulting in sharper bands and improved resolution. The success of this entire process is entirely dependent on the optimized and consistent polymerization of both gel layers, which dictates the structural integrity and predictable pore architecture of the matrix.
Core Principles: Gel Composition and Pore Size Determinants
The polyacrylamide gel matrix is formed through the co-polymerization of acrylamide monomers and a cross-linker, most commonly N,N'-methylenebisacrylamide (bis-acrylamide). This reaction is driven by a free-radical mechanism initiated by ammonium persulfate (APS) and catalyzed by TEMED (N,N,N',N'-Tetramethylethylenediamine). The resulting three-dimensional network defines the gel's pore size and its mechanical strength.
- Polymerization Mechanism: The generation of free radicals from APS is accelerated by TEMED, triggering the chain reaction that links acrylamide monomers into long polymers, which are bridged by bis-acrylamide to form a rigid, cross-linked network. The concentrations of APS and TEMED critically influence the rate of polymerization; higher concentrations lead to faster gelation, which can result in shorter polymer chains and smaller, less uniform pores.
- Pore Size Control: The pore size of the gel is not a fixed value but a distribution determined by two key variables: the total concentration of acrylamide and bis-acrylamide (%T) and the proportion of the cross-linker relative to the total (%C). A higher %T creates a denser network with smaller average pore sizes, ideal for resolving lower molecular weight proteins. Conversely, a lower %T creates larger pores for separating higher molecular weight proteins. The cross-linker ratio further fine-tunes this matrix.
The following table summarizes the recommended gel percentages for optimal separation of different protein size ranges, leveraging the relationship between %T and pore size.
Table 1: Recommended Polyacrylamide Gel Percentages for Protein Separation by Molecular Weight
| Gel Percentage (%T) | Effective Separation Range (kDa) | Primary Application |
|---|---|---|
| 6-8% | 50 - 200 | High molecular weight proteins |
| 10% | 20 - 100 | Standard protein separation |
| 12% | 15 - 70 | Standard protein separation |
| 15% | 10 - 50 | Low molecular weight proteins |
The Science of Stacking and Resolving Gels
The discontinuity of the system is engineered through differences in gel composition and pH between the stacking and resolving layers, with the mobility of glycine ions in the running buffer being the key orchestrator.
- The Resolving Gel: This lower layer has a higher percentage of acrylamide (e.g., 10-15%) and is buffered at a higher pH (typically pH 8.8). This creates the sieving matrix with appropriately small pores for size-based separation. The high pH also ensures that the gel buffering capacity is sufficient to maintain a stable environment during electrophoresis.
- The Stacking Gel: This upper layer has a low acrylamide concentration (typically 4-5%) and is buffered at a lower pH (pH 6.8). The low % acrylamide creates large pores that offer little resistance to protein movement, while the low pH is critical for the "stacking" phenomenon.
- The Role of Glycine: In the running buffer (pH ~8.3), glycine exists predominantly as a zwitterion with a net charge close to zero. When current is applied, glycine ions enter the pH 6.8 stacking gel, where a greater proportion of molecules gain a positive charge and become zwitterions, significantly slowing their mobility. Chloride ions (Cl⁻) from the gel buffer, being highly mobile, form a leading ion front. The proteins, with their SDS-derived negative charges, have a mobility intermediate between the fast Cl⁻ and the slow glycine. This configuration creates a steep voltage gradient that squeezes the protein samples into a extremely narrow band between the two ion fronts, "stacking" them into a sharp line before they reach the resolving gel. Upon entering the high-pH resolving gel, glycine gains a strong negative charge, accelerates past the proteins, and eliminates the voltage gradient, allowing size-based separation to begin from a unified, sharp starting point.
The diagram below illustrates this ion-front mechanism and the sample migration through the discontinuous gel system.
Experimental Protocols for Optimization
Standard Protocol for Casting a Discontinuous SDS-Polyacrylamide Gel
This protocol provides a detailed methodology for preparing a standard SDS-PAGE gel with stacking and resolving layers [15].
Reagents Required:
- Acrylamide/Bis-acrylamide stock solution (e.g., 30% T, 2.7% C)
- Resolving Gel Buffer: 1.5 M Tris-HCl, pH 8.8
- Stacking Gel Buffer: 0.5 M Tris-HCl, pH 6.8
- 10% Sodium Dodecyl Sulfate (SDS)
- Ammonium Persulfate (APS): 10% (w/v) solution in water (prepare fresh)
- TEMED
- Water (deionized)
Procedure:
- Assemble Gel Cassette: Clean and dry the glass plates and spacers. Assemble the cassette and secure it in the casting stand, ensuring a leak-proof seal.
- Prepare Resolving Gel: In a beaker or flask, mix the components for the resolving gel in the order listed below. Gently swirl to mix after adding each component. Avoid introducing bubbles.
- Cast Resolving Gel: Immediately after adding TEMED, pipette the resolving gel solution into the gel cassette, leaving space for the stacking gel. Carefully overlay the gel solution with isopropanol or water-saturated butanol to exclude oxygen and create a flat interface. Allow polymerization to proceed for 20-30 minutes at room temperature. Polymerization is complete when a distinct schlieren line is visible at the interface after decanting the overlay.
Prepare and Cast Stacking Gel: Pour off the overlay liquid and rinse the top of the resolving gel with deionized water. In a separate tube, prepare the stacking gel mixture.
Table 3: Sample Stacking Gel Formulation (for 5 mL, 5% gel)
Component Volume (mL) Water 3.4 0.5 M Tris-HCl (pH 6.8) 0.63 10% SDS 0.05 Acrylamide/Bis stock (30%) 0.83 10% APS 0.05 TEMED 0.005 After adding TEMED, pipette the stacking gel solution onto the polymerized resolving gel. Immediately insert a clean comb, avoiding air bubbles. Allow to polymerize for 15-20 minutes. The gel is now ready for electrophoresis or can be wrapped in moist paper towels and stored at 4°C for later use.
Protocol: Optimizing Polymerization Time and Consistency
The gelation kinetics are sensitive to environmental factors. This protocol uses a simple method to establish a reproducible polymerization timeline for your specific laboratory conditions [77].
Objective: To determine the precise gelation time for resolving and stacking gel formulations under standard lab conditions to ensure consistent cross-linking and pore structure.
Method:
- Prepare a resolving gel mixture as described in Section 3.1, but omit the APS and TEMED.
- Aliquot 1 mL of this mixture into each of five small glass vials.
- Add the appropriate volume of 10% APS and TEMED to each vial, one at a time, and start a timer immediately. Swirl gently to mix.
- Every 30 seconds, gently tilt each vial and observe the flow of the solution.
- Record the time at which the solution in a vial no longer flows when tilted. This is the gelation time for that replicate.
- Calculate the average gelation time and standard deviation from the five replicates.
- Repeat the entire process for the stacking gel formulation.
Interpretation and Optimization:
- Target Gelation Time: Ideally, polymerization should occur within 5-15 minutes for the resolving gel and slightly faster for the stacking gel. Times that are too short may indicate excessive initiator/catalyst, potentially leading to heterogeneous, coarse gels. Times that are too long increase the risk of oxygen inhibition, resulting in soft, poorly polymerized gels.
- Troubleshooting: If gelation is too fast, systematically reduce the concentration of APS and/or TEMED in subsequent tests. If gelation is too slow, ensure reagents (especially APS) are fresh, and slightly increase the concentration of APS/TEMED. Maintaining a consistent laboratory temperature is crucial for day-to-day reproducibility.
The Scientist's Toolkit: Essential Reagents and Materials
Successful and reproducible gel polymerization relies on high-quality, specific reagents. The following table details the key research solutions and their functions.
Table 4: Essential Reagents for Polyacrylamide Gel Electrophoresis
| Reagent / Material | Function / Explanation |
|---|---|
| Acrylamide / Bis-acrylamide | The monomer and cross-linker that form the polyacrylamide matrix. The ratio and total concentration determine pore size. Handle with extreme care as it is a neurotoxin. Pre-mixed solutions are recommended. |
| TEMED | Catalyst that accelerates the decomposition of APS into free radicals, initiating the polymerization chain reaction. |
| Ammonium Persulfate (APS) | Initiator that provides the free radicals necessary to begin polymerization. A 10% solution in water should be prepared fresh weekly or aliquoted and stored at -20°C. |
| Tris-HCl Buffers | Provides the pH environment for the reaction. The resolving gel uses Tris pH 8.8, and the stacking gel uses Tris pH 6.8, creating the critical pH discontinuity. |
| SDS (Sodium Dodecyl Sulfate) | Anionic detergent that denatures proteins and confers a uniform negative charge, ensuring separation is based primarily on molecular weight. |
| Glycine | The key ion in the running buffer whose charge state changes with pH, enabling the stacking phenomenon in the discontinuous system. |
| Pre-cast Gels | Commercial gels offer maximum convenience and reproducibility, ideal for standardized workflows or when troubleshooting in-house casting. |
Troubleshooting Common Polymerization Issues
Inconsistent pore size and poor gel integrity manifest as various electrophoretic artifacts. The diagram below outlines a logical workflow for diagnosing and resolving common polymerization problems.
Table 5: Troubleshooting Common Polymerization and Gel Integrity Issues
| Problem | Potential Cause | Solution |
|---|---|---|
| Smiling Bands | Irregular heat dissipation during electrophoresis, often due to uneven gel polymerization or poor contact with cooling surfaces. | Ensure the gel is properly seated in the electrophoresis unit. Use a power supply with constant voltage and, if necessary, run the gel in a cold room or with a cooling apparatus. |
| Vertical Cracks in Gel | Gel polymerization was too rapid and exothermic. | Reduce the amount of APS and/or TEMED to slow the polymerization reaction and dissipate heat more effectively. |
| Gel Does Not Polymerize | Degraded APS, insufficient TEMED, or presence of inhibitors (e.g., oxygen). | Prepare fresh 10% APS solution. Ensure TEMED is not old. Check that the gel is properly sealed during casting to exclude oxygen. |
| Swirling or Uneven Gel Texture | Incomplete mixing of solutions or polymerization initiated before pouring. | Mix components thoroughly but gently to avoid introducing oxygen. Pour the gel immediately after adding TEMED. |
| Poor Stacking of Samples | Incorrect pH of stacking or resolving gel buffers; damaged or old running buffer. | Confirm the pH of all Tris buffers. Prepare fresh running buffer. Ensure the correct buffer is used for each gel layer. |
The pursuit of optimal gel polymerization is a fundamental requirement for rigorous and reproducible protein research. A deep understanding of the scientific principles underlying the discontinuous gel system—particularly the synergistic roles of the stacking and resolving gels—empowers researchers to move beyond a rote protocol. By systematically controlling factors such as acrylamide concentration, initiator and catalyst ratios, pH, and polymerization kinetics, scientists can consistently produce gels with defined pore sizes and robust structural integrity. This level of control directly translates to superior electrophoretic resolution, reliable molecular weight determination, and increased confidence in experimental outcomes, thereby strengthening the foundation of all downstream analyses in drug development and biomedical research.
Troubleshooting Sample Leakage and Well Deformation
Within the context of a broader thesis on understanding stacking gel and resolving gel functions, the concepts of "sample leakage" and "well deformation" present significant technical challenges that can compromise experimental integrity. In protein gel electrophoresis, these issues manifest as the unintended diffusion of samples between wells or physical distortion of the well structures, leading to failed separations, blurred bands, and compromised data [78]. Similarly, in the analogous field of wellbore engineering, mechanical deformation of well structures presents parallel challenges to structural integrity and function, though stemming from vastly different physical forces [79].
This guide provides an in-depth technical framework for diagnosing, troubleshooting, and preventing these critical issues in laboratory electrophoresis, with methodologies directly informed by the precise functioning of discontinuous gel systems. By understanding the distinct roles of stacking and resolving gels in sample management and protein separation, researchers can systematically address the root causes of leakage and deformation, thereby enhancing experimental reproducibility and data quality for drug development and basic research.
Theoretical Foundation: Gel Functions and Failure Mechanisms
Distinct Roles of Stacking and Resolving Gels
The discontinuous buffer system of SDS-PAGE relies on the coordinated function of two distinct gel layers with unique pore structures and pH environments. The stacking gel (typically 4-5% acrylamide) serves primarily to concentrate disparate protein samples into sharp, defined zones before they enter the resolving gel. It operates at a neutral-to-basic pH (typically pH 6.8) where chloride ions from the buffer form a leading front, while glycinate ions form a trailing front, creating a voltage gradient that compresses protein samples into thin, discrete stacks [78].
The resolving gel (typically 10-15% acrylamide, depending on target protein size) operates at a basic pH (typically pH 8.8) and provides the molecular sieving action that separates proteins based on molecular weight. Its smaller pore size creates frictional resistance differentially experienced by proteins, with smaller molecules migrating faster than larger ones. The transition between these two gel domains is critical; any disruption in this interface can lead to sample leakage or band distortion.
Mechanisms of Sample Leakage and Well Deformation
Sample leakage typically occurs when proteins bypass the stacking mechanism and diffuse laterally between wells. This is often caused by:
- Improper gel polymerization: Incomplete polymerization of either gel layer creates channels for lateral protein migration.
- Buffer pH mismatches: Disruption of the discontinuous ion front system prevents effective stacking.
- Physical gel defects: Bubbles, cracks, or non-uniform surfaces at the gel interface disrupt the electrical field and sample migration.
Well deformation refers to physical distortion of the sample wells in the stacking gel, compromising sample loading and retention. Primary causes include:
- Comb removal damage: Premature or forceful comb removal can tear well walls.
- Incomplete polymerization: Wells lack structural integrity if the gel hasn't fully set.
- Non-uniform polymerization: Temperature gradients during polymerization create uneven well structures.
Table 1: Primary Causes and Consequences of Gel-Related Issues
| Issue Type | Primary Causes | Observed Defects | Impact on Data Quality |
|---|---|---|---|
| Sample Leakage | Improper buffer pH, incomplete polymerization, excessive voltage during stacking | Lateral band spreading, blurred bands, smile/frown effects | Reduced resolution, inaccurate molecular weight determination, cross-contamination |
| Well Deformation | Comb removal technique, incomplete polymerization, improper comb selection | Misshapen wells, torn well walls, uneven well bottoms | Variable sample volumes, inconsistent migration, failed loading |
Experimental Protocols for Diagnosis and Resolution
Standardized SDS-PAGE Gel Preparation Protocol
This optimized protocol, adapted from established methodologies [78], minimizes leakage and deformation risks through precise control of polymerization conditions.
Materials:
- 30% Acrylamide/Bis solution (37.5:1 ratio)
- 1.5 M Tris-HCl, pH 8.8 (resolving gel buffer)
- 1.0 M Tris-HCl, pH 6.8 (stacking gel buffer)
- 10% Sodium dodecyl sulfate (SDS)
- 10% Ammonium persulfate (APS) - fresh preparation recommended
- Tetramethylethylenediamine (TEMED)
- Isobutanol or water (for overlay)
- Gel cassette assembly
Resolving Gel Preparation (10 mL for 10% gel):
- Combine in a flask: 3.3 mL deionized water, 4.0 mL 30% Acrylamide/Bis, 2.5 mL 1.5 M Tris-HCl (pH 8.8), and 0.1 mL 10% SDS.
- Mix gently by swirling to avoid introducing oxygen, which inhibits polymerization.
- Immediately before pouring, add 0.1 mL 10% APS and 0.004 mL TEMED. Mix thoroughly but gently.
- Pipette the solution into the gel cassette to approximately 75% of total height.
- Carefully overlay with saturated butanol or water to create a flat interface.
- Allow to polymerize completely (approximately 20-30 minutes). A distinct schlieren line will appear at the interface when polymerization is complete.
Stacking Gel Preparation (3 mL for 5% gel):
- After removing the resolving gel overlay, combine in a flask: 2.1 mL deionized water, 0.5 mL 30% Acrylamide/Bis, 0.38 mL 1.0 M Tris-HCl (pH 6.8), and 0.03 mL 10% SDS.
- Mix gently and add 0.03 mL 10% APS and 0.003 mL TEMED.
- Pour directly onto the polymerized resolving gel and immediately insert a clean, dry comb.
- Allow to polymerize for 20-30 minutes. Do not disturb during polymerization.
Critical Step: Comb Removal
- After polymerization, slowly remove the comb in a smooth, straight upward motion.
- If resistance is felt, place a small amount of running buffer in the wells and gently rock the gel to lubricate well walls before attempting removal again.
- Immediately flush wells with running buffer to remove any unpolymerized acrylamide.
Diagnostic Workflow for Leakage and Deformation
The following workflow provides a systematic approach to identify and resolve common gel issues:
Troubleshooting Matrix for Common Issues
Table 2: Comprehensive Troubleshooting Guide for Sample Leakage and Well Deformation
| Observed Problem | Root Cause | Diagnostic Tests | Corrective Actions |
|---|---|---|---|
| Lateral sample leakage between wells | Incomplete stacking gel polymerization; Old APS; Improper buffer pH | Prepare test gel with tracking dye only; Measure pH of all buffers | Use freshly prepared APS/TEMED; Verify buffer pH values; Extend polymerization time |
| Well wall tearing during comb removal | Comb removed too forcefully; Polymerization incomplete; Comb surface rough | Visual inspection of comb for defects; Check polymerization time/temperature | Lubricate wells with buffer before removal; Use coated combs; Ensure full polymerization |
| Uneven well bottom or distorted shape | Non-uniform polymerization; Temperature gradients during setting; Improper overlay | Examine gel against light background; Document polymerization conditions | Polymerize in temperature-stable environment; Use consistent overlay technique |
| Vertical band smiling/frowning | Excessive heating during run; Improper buffer ionic strength; Gel interface bubbles | Monitor gel temperature during run; Visual inspection of gel interface | Use constant current setting; Employ cooling apparatus; Ensure bubble-free interface |
| Poor protein separation with blurred bands | Resolving gel concentration inappropriate for target protein size; Buffer contamination | Test with standard protein ladder; Verify buffer preparation | Optimize acrylamide percentage for target MW; Prepare fresh running buffer |
The Scientist's Toolkit: Essential Research Reagents and Materials
Table 3: Critical Reagents and Materials for Troubleshooting Gel Electrophoresis Issues
| Item | Specification | Function in Troubleshooting | Quality Control Measures |
|---|---|---|---|
| Acrylamide/Bis Solution | 30% concentration, 37.5:1 ratio (29:1 for smaller proteins) | Forms the porous matrix for separation; Critical for well integrity | Filter through 0.45μm membrane; Store at 4°C protected from light; Discard if discolored |
| TEMED | Molecular biology grade, stored at 4°C | Accelerates polymerization by catalyzing free radical formation | Use at recommended concentrations (0.1% v/v); Keep container tightly sealed to prevent amine oxidation |
| Ammonium Persulfate (APS) | 10% solution in deionized water, freshly prepared weekly | Initiates polymerization by generating free radicals | Prepare fresh weekly or use frozen aliquots; Discard if no effervescence occurs when added |
| Tris Buffers | 1.0M pH 6.8 (stacking) and 1.5M pH 8.8 (resolving), verified pH | Creates discontinuous pH system for proper stacking and separation | Verify pH with calibrated meter at room temperature; Filter through 0.45μm membrane |
| Protein Standard Ladder | Prestained and unstained options available | Diagnostic tool for assessing separation quality and identifying leakage | Include in every run as internal control; Store according to manufacturer specifications |
| 10% SDS Solution | Electrophoresis grade in deionized water | Maintains protein denaturation and consistent charge-to-mass ratio | Clear solution without precipitation; Store at room temperature |
Advanced Technical Considerations
Optimization Strategies for Specific Applications
For researchers working with challenging samples such as membrane proteins, low-abundance targets, or extreme molecular weight ranges, standard troubleshooting approaches may require refinement:
Small Proteins (<10 kDa): Traditional SDS-PAGE may result in poor resolution due to reduced SDS binding capacity. Consider Tricine-SDS-PAGE systems which provide enhanced resolution of low molecular weight proteins through modified buffer systems that improve band sharpness and separation efficiency [78].
Membrane Proteins: These challenging samples often require specialized detergents and sample preparation modifications. Incorporate alternative detergents alongside SDS in sample preparation, and consider gradient gels (e.g., 4-20% acrylamide) to accommodate heterogeneous protein sizes.
Quantitative Western Blotting: For experiments requiring precise quantification, ensure optimal transfer conditions by selecting appropriate membrane materials (PVDF for hydrophobic proteins, nitrocellulose for general use) and verifying complete protein transfer from gel to membrane using reversible staining techniques [64].
Quality Control and Documentation Framework
Implementing a systematic quality control protocol ensures consistent gel performance and facilitates troubleshooting:
Gel Polymerization Log: Document critical parameters for each gel preparation including acrylamide batch, APS age, polymerization time and temperature, and observable defects. This creates a reference database for identifying patterns in gel performance issues.
Standardized Running Conditions: Maintain consistent electrical parameters (constant current vs. voltage) and document any deviations. Note that excessive voltage during the stacking phase can generate heat that disrupts the stacking interface and promotes sample leakage.
Validation with Control Samples: Include standardized protein samples in each run to distinguish between gel-specific artifacts and sample-specific issues. This practice is particularly valuable when troubleshooting subtle leakage problems that might otherwise be attributed to sample composition.
Effective troubleshooting of sample leakage and well deformation in protein gel electrophoresis requires a fundamental understanding of stacking and resolving gel functions within the discontinuous buffer system. By implementing the standardized protocols, diagnostic workflows, and quality control measures outlined in this technical guide, researchers can systematically address the root causes of these common experimental challenges. The methodologies presented not only resolve immediate technical issues but also contribute to the broader research objective of generating reproducible, high-quality protein separation data essential for drug development and basic biological research. Through meticulous attention to gel preparation parameters, buffer conditions, and procedural consistency, the challenges of sample leakage and well deformation can be effectively minimized, enhancing experimental reliability and accelerating scientific discovery.
Sodium Dodecyl Sulfate–Polyacrylamide Gel Electrophoresis (SDS-PAGE) stands as a cornerstone technique in molecular biology for separating proteins by their molecular weight. The classical method utilizes a discontinuous buffer system with two distinct gel layers: a stacking gel that concentrates protein samples into a sharp starting zone, and a resolving gel where actual separation by size occurs [80]. The stacking gel features a lower percentage of acrylamide and a pH of 6.8, while the resolving gel has a higher acrylamide concentration and a pH of 8.8 [80]. This discontinuity, particularly the changing ionic state of glycine from the running buffer, is what herds proteins into a thin line before they enter the resolving gel, ensuring a sharp start for the separation [80]. This article delves into two advanced optimization strategies—the use of gradient gels and the precise adjustment of cross-linker ratios—framed within ongoing research to enhance the functionality of stacking and resolving gels for superior protein analysis.
Theoretical Framework: Principles of Gradient Gels and Cross-Linking
The Mechanism and Advantages of Gradient Gels
Unlike fixed-concentration gels, gradient gels are formulated with a continuous range of polyacrylamide concentrations, typically increasing from the top to the bottom of the gel [24]. This creates a pore structure that is large at the top and progressively smaller at the bottom. This gradient in pore size confers several key advantages:
- Enhanced Resolution of Broad Molecular Weight Ranges: A single gradient gel can effectively separate proteins across a very wide mass spectrum, eliminating the need to run multiple gels at different percentages [24]. For instance, a 4-20% gradient gel can resolve proteins from 4 kDa to 250 kDa in a single run.
- Sharper Protein Bands: As a protein migrates through a gradient gel, its leading edge encounters progressively smaller pores and slows down, while its trailing edge continues to move relatively faster. This "piling up" effect compresses the protein band, resulting in sharper, tighter bands than those typically achieved in fixed-concentration gels [24].
- Improved Separation of Similar-Sized Proteins: The sharpening effect and the non-linear relationship between migration distance and molecular weight in a gradient can increase the physical distance between proteins of similar sizes, making it easier to distinguish them [24].
The Critical Role of Cross-Linker Ratios
The polyacrylamide matrix is formed by the copolymerization of acrylamide monomers and a cross-linking agent, most commonly N,N'-methylenebisacrylamide (MBA). The cross-linker is integral to forming the three-dimensional network that defines the gel's pore structure. The concentration and nature of the cross-linker directly influence the mechanical strength, porosity, and optical clarity of the gel. Recent research extends beyond traditional cross-linkers like MBA. For example, the use of biomass-derived molecules, such as esterified rutin, as cross-linking agents has been shown to form a dense three-dimensional mesh structure that significantly enhances the tensile strength of the resulting gel matrix [81]. Furthermore, in ionic gel systems such as those using alginate, divalent cations like Ca²⁺ form "egg-box" structures between guluronic acid blocks, creating the cross-linked network [82]. Optimizing the ratio of cross-linker to acrylamide, or choosing specialized cross-linkers, allows researchers to fine-tune the gel's properties for specific applications, such as improving mechanical toughness or altering separation characteristics.
Optimization Strategies and Experimental Protocols
Designing and Preparing Gradient Gels
Protocol 1: Fabricating Gradient Gels Using a Gradient Mixer
This method provides excellent control over the gradient profile and reproducibility.
- Materials: Two-chamber gradient mixer, peristaltic pump (optional), gel casting apparatus, acrylamide stock solutions (low and high percentage), ammonium persulfate (APS), Tetramethylethylenediamine (TEMED).
- Procedure:
- Prepare the low-percentage and high-percentage acrylamide solutions in separate beakers. Do not add APS and TEMED until immediately before pouring.
- Place the high-percentage solution in the "reservoir" chamber of the gradient mixer (the chamber connected to the output tube).
- Place the low-percentage solution in the "mixing" chamber. Ensure the interconnecting channel and the output tube are closed.
- Add APS and TEMED to both chambers and stir the solution in the mixing chamber.
- Open the interconnecting channel, then start the flow from the output tube using a pump or gravity. The solution from the mixing chamber will flow into and mix with the solution in the reservoir chamber, creating a continuous gradient from low to high concentration as it fills the gel cassette.
- Carefully layer a solvent, such as water-saturated isobutanol, on top of the gel solution to create a flat interface and prevent oxygen inhibition during polymerization.
Protocol 2: A Simplified Pipette-Based Method for Gradient Gels
This frugal method is quicker and requires no specialized equipment [24].
- Materials: Serological pipette (5 or 10 mL), low and high percentage acrylamide solutions.
- Procedure:
- Prepare the low and high concentration acrylamide solutions, including APS and TEMED, in separate conical tubes.
- Using a serological pipette, draw up half of the total volume needed from the low-concentration tube.
- Draw the second half of the volume from the high-concentration tube. The two solutions will be layered in the pipette.
- Gently aspirate a small air bubble (~0.5 mL) into the pipette. Slowly move the bubble up and down the pipette a few times to mix the solutions and create a gradient.
- Slowly dispense the mixed gradient solution into the gel casting cassette [24].
Optimizing Cross-Linker Ratios for Performance
Protocol 3: Optimizing Cross-Linker Concentration using Response Surface Methodology (RSM)
For researchers aiming to systematically optimize a gel formulation for a specific property (e.g., mechanical strength), RSM is a powerful statistical technique.
- Materials: Monomer (e.g., acrylamide), cross-linker (e.g., MBA, esterified rutin), initiator system (e.g., APS/TEMED or photoinitiators), standard equipment for mechanical testing (e.g., tensile tester).
- Procedure [81]:
- Define Factors and Levels: Based on preliminary single-factor experiments, select key factors such as the mass fraction of initiator, cross-linker, and monomer. Define a range for each (e.g., -1, 0, +1).
- Experimental Design: Use a software tool to generate an experimental design (e.g., a Central Composite Design) that defines the specific combinations of factors to be tested.
- Gel Preparation and Testing: Prepare gels according to each condition in the design matrix. Measure the response variable, such as tensile strength or elastic modulus.
- Model Fitting and Analysis: Fit the experimental data to a regression model (e.g., a quadratic model). The software will generate a model that predicts the response based on the factor levels and identify optimal concentrations.
Table 1: Example Factor Levels for RSM Optimization of a Light-Curing Ionogel [81]
| Factors | Coded Value (-1) | Coded Value (0) | Coded Value (+1) |
|---|---|---|---|
| A: Initiator (wt%) | 2 | 3 | 4 |
| B: Cross-linker (wt%) | 0.1 | 0.35 | 0.6 |
| C: Monomer (wt%) | 36 | 38 | 40 |
Application-Oriented Gel Design
Selecting the correct gradient and cross-linking strategy depends entirely on the experimental goal. The following table provides a guide based on target protein characteristics.
Table 2: Guideline for Selecting Gradient Gels Based on Protein Size [24]
| Range of Protein Sizes | Low/High Acrylamide % | Recommended Application |
|---|---|---|
| 4 – 250 kDa | 4% / 20% | Discovery work; analyzing complex mixtures with an extremely broad size range. |
| 10 – 100 kDa | 8% / 15% | A targeted approach for a common protein size range, avoiding multiple gels. |
| 50 – 75 kDa | 10% / 12.5% | High-resolution separation of proteins with very similar molecular weights. |
The Scientist's Toolkit: Essential Reagents and Materials
Table 3: Key Research Reagent Solutions for Gel Optimization
| Reagent/Material | Function/Explanation | Application Context |
|---|---|---|
| Acrylamide/Bis-acrylamide | Monomer and standard cross-linker that form the backbone porous matrix of the gel. | Fundamental to all SDS-PAGE gel formation. |
| Ammonium Persulfate (APS) & TEMED | Catalyzes the free-radical polymerization of acrylamide and bis-acrylamide. | Essential for initiating gel polymerization in all protocols [80]. |
| Tris-Glycine Buffer | A discontinuous buffer system; glycine's charge shift at different pH values drives protein stacking. | Standard running buffer for Laemmli-style SDS-PAGE [80]. |
| Esterified Rutin | A biomass-derived polyphenol cross-linker that can form a dense 3D network and sacrificial hydrogen bonds. | Used to create ionogels with high mechanical strength (639.15 kPa tensile strength reported) [81]. |
| Calcium Ions (Ca²⁺) | Ionic cross-linker that forms "egg-box" structures with guluronic acid blocks in alginate chains. | Used for preparing alginate-based hydrogels via mild ionic gelation [82]. |
| Lysine | An environmentally friendly ("green") cross-linker that can form stable bonds at high temperatures. | Used in re-crosslinkable preformed particle gels (RPPG) for oilfield applications, demonstrating thermal stability at 130°C [83]. |
Workflow and Signaling Pathways
The following diagram illustrates the key decision-making workflow and experimental pathway for optimizing and utilizing gradient gels in protein analysis.
Gel Optimization and Analysis Workflow
The strategic implementation of gradient gels and the precise optimization of cross-linker ratios represent a significant advancement in SDS-PAGE methodology. Moving beyond standard protocols to tailor the gel matrix allows researchers to achieve superior resolution, especially for complex protein samples or those with similar molecular weights. The integration of advanced cross-linkers, including biomass-derived and green chemicals, further expands the functional capabilities of polyacrylamide gels, enabling applications that demand specific mechanical properties or environmental compatibility. As research continues to refine these techniques, the fundamental understanding of stacking and resolving gel functions will deepen, driving further innovation in protein separation science and accelerating discovery in fields from drug development to structural biology.
Ensuring Accuracy: Validation, Innovations, and Technique Comparisons
In the realm of molecular biology and biochemistry, the validation of experimental results often hinges on reliable standards. Molecular weight markers, also referred to as protein ladders, DNA ladders, or RNA ladders, are a set of standards that are indispensable for estimating the approximate size of molecules separated through gel electrophoresis [84]. These markers provide a logarithmic scale by which the size of unknown fragments can be determined, based on the principle that molecular weight is inversely proportional to migration rate through a gel matrix [84]. This technical guide delves into the critical function of these markers, framing their necessity within the context of understanding the synergistic functions of stacking and resolving gels—a foundational concept for researchers, scientists, and drug development professionals aiming to generate accurate, reproducible, and quantifiable data.
The Foundation: Stacking and Resolving Gel Systems
Polyacrylamide Gel Electrophoresis (PAGE), particularly in its discontinuous form, relies on a two-layer gel system to achieve high-resolution separation of proteins or nucleic acids. This system is pivotal for ensuring that molecular weight markers can provide precise calibration.
The Resolving Gel: The bottom layer, or resolving gel, is where the actual separation of molecules by size occurs. It typically has a higher percentage of polyacrylamide (often between 7% and 12%), creating a tighter mesh with smaller pore sizes [85]. The gel buffer is usually at a higher pH (e.g., Tris-HCl at pH 8.8) [86] [87]. In this environment, smaller molecules navigate the pores more easily and migrate faster, while larger molecules are impeded.
The Stacking Gel: The top layer, or stacking gel, serves as a focusing mechanism. It has a lower percentage of polyacrylamide (often around 4%), larger pores, and a lower pH (e.g., Tris-HCl at pH 6.8) [86] [87]. Its primary role is to concentrate all the protein or DNA samples from the wells into a very tight, unified band before they enter the resolving gel. This process ensures that all molecules enter the resolving gel at the same time, leading to sharper bands and more accurate size determination [86].
The Mechanism of Discontinuous Buffer Systems: The stacking effect is achieved through differences in pH and ionic strength between the stacking and resolving gels, and the running buffer. In protein electrophoresis, the glycine ions in the running buffer exist in a zwitterionic state in the stacking gel's pH, moving slowly. This creates an ion gradient that pushes the faster-moving protein or marker samples into a narrow zone at the interface between the two gels. When this zone enters the resolving gel with its higher pH, the glycine ions become deprotonated and move ahead, leaving the proteins to be separated solely by size in the resolving gel matrix [86]. The following diagram illustrates this process and the subsequent separation.
Molecular Weight Markers: Types and Selection Criteria
Molecular weight markers are commercially available with pre-determined fragment sizes and concentrations for DNA, RNA, and proteins [84]. Selecting the appropriate marker is critical for experimental validity.
DNA Markers
DNA markers, or ladders, are typically constructed using one of several methods: partial ligation of DNA fragments, restriction enzyme digestion of a known DNA sequence, or Polymerase Chain Reaction (PCR) with specific primer sets [84]. More recently, specialized plasmids like the pHAPE plasmid have been developed to allow laboratories to generate their own cost-effective DNA ladders via restriction enzyme digestion [88].
Protein Markers
Protein markers are more complex and are categorized by several key properties:
Molecular Weight Markers vs. Protein Ladders: While the terms are sometimes used interchangeably, a distinction exists. Protein ladders are composed of a mixture of highly purified proteins (typically 10-12) that form sharp, evenly spaced bands at precise, whole-number molecular weights. In contrast, molecular weight markers are often mixtures of native proteins with well-characterized but irregular molecular weights, providing an approximate size reference and are generally more cost-effective [84].
Prestained vs. Unstained Markers: Prestained markers allow for real-time visualization of protein migration during electrophoresis and enable monitoring of transfer efficiency in Western blotting. However, the covalent binding of dye can cause slight shifts in mobility, making size determination less accurate. Unstained markers offer the highest accuracy for size estimation but require a post-electrophoresis staining step for visualization [84].
Recombinant and Natural Markers: Recombinant markers are engineered for consistency, often featuring affinity tags and uniformly spaced molecular weights. Natural markers are derived from naturally occurring protein mixtures. Prestained natural markers can exhibit broader bands due to variable dye binding, further reducing sizing accuracy compared to their recombinant counterparts [84].
Table 1: Guide to Selecting Protein Molecular Weight Markers
| Marker Type | Key Characteristics | Optimal Use Cases | Sizing Accuracy |
|---|---|---|---|
| Unstained | No dye conjugated; requires post-staining | Accurate molecular weight determination; SDS-PAGE | High |
| Prestained | Dye conjugated for visual tracking | Monitoring electrophoresis progress; Western blot transfer efficiency | Moderate |
| Recombinant | Engineered proteins with uniform properties | High-precision applications; consistent banding | High |
| Natural | Mixture of native proteins | General purpose sizing; cost-sensitive workflows | Moderate |
| Biotinylated | Conjugated with biotin for high-affinity detection | Specialized detection with streptavidin systems | Varies |
Table 2: Common DNA Molecular Weight Ladders
| Ladder Type | Size Range | Fragment Increments | Common Applications |
|---|---|---|---|
| 100 bp DNA Ladder | 100 bp - 4,000 bp | 100 bp | Standard sizing of small PCR products and digests |
| 1 kb DNA Ladder | 250 bp - 10,000 bp | 1,000 bp (with some intermediate) | Sizing of large fragments and genomic DNA digests |
| Step Ladders | Varies (e.g., 50 bp - 1,200 bp) | Defined, equal increments (e.g., 50 bp, 100 bp) | Precise fragment length verification [89] |
| HAPE Ladder | 100 bp - 10,000 bp | 100 bp (between 100 bp - 1,000 bp) | Versatile, cost-effective in-house production [88] |
Experimental Protocols: Integrating Markers for Validation
Protocol 1: SDS-PAGE and Western Blotting for Protein Analysis
This protocol is essential for separating proteins and transferring them to a membrane for immunodetection [87].
Materials & Reagents:
- SDS-PAGE Gel: Pre-cast or homemade resolving and stacking gels [87]
- Running Buffer: Tris-glycine-SDS buffer [87]
- Protein Ladder: Prestained for tracking and unstained for accurate sizing [84] [87]
- Transfer Buffer: Tris-glycine-methanol buffer [87]
- Blocking Agent: 2-5% Bovine Serum Albumin (BSA) or non-fat dry milk [87]
Methodology:
- Sample Preparation: Mix protein samples with Laemmli buffer containing SDS and a reducing agent (e.g., β-mercaptoethanol or DTT). Heat denature at 95°C for 5 minutes or 70°C for 10 minutes to linearize proteins [87] [85].
- Gel Preparation: Assemble the gel cassette. A typical resolving gel is 7.5-12% acrylamide, pH 8.8. Layer with isopropanol for a flat surface. After polymerization, pour a 4% stacking gel, pH 6.8, and insert the comb [87] [85].
- Electrophoresis: Load equal volumes of samples and molecular weight markers into wells. Run the gel at 100-150 V for 40-60 minutes in running buffer until the dye front reaches the bottom [87].
- Electrotransfer: Assemble a "sandwich" in the order: cathode, sponge, filter paper, gel, membrane (PVDF or nitrocellulose), filter paper, sponge, anode. Transfer at constant voltage for 45-90 minutes on ice [87].
- Immunodetection: Block the membrane with BSA or milk. Incubate with primary antibody, wash, then incubate with an enzyme-conjugated (e.g., HRP) secondary antibody. Detect using chemiluminescent substrates [87].
Protocol 2: Gelatin Zymography for Protease Activity
This specialized technique detects active metalloproteinases (MMPs) based on their ability to digest a substrate embedded in the gel [90].
Materials & Reagents:
- Gelatin Substrate: Added to the acrylamide mix during gel preparation [90]
- Non-Reducing Sample Buffer: Lacks β-mercaptoethanol to preserve enzyme activity [90]
- Incubation Buffer: Contains Triton X-100, Tris-HCl, CaCl₂, and ZnCl₂ to renature and activate enzymes after electrophoresis [90]
- Staining Solution: Coomassie Blue in methanol/acetic acid/water [90]
Methodology:
- Gel Preparation: Prepare a 7.5% polyacrylamide gel containing 1 mg/mL gelatin. Do not add SDS to the stacking gel [90].
- Sample Preparation: Concentrate conditioned media and mix with non-reducing sample buffer. Do not boil the samples [90].
- Electrophoresis: Load samples and a protein molecular weight marker. Run at 150 V under constant cooling [90].
- Post-Electrophoresis Processing:
- Renaturation: Wash the gel in 2.5% Triton X-100 solution for 2 x 30 minutes to remove SDS [90].
- Enzymatic Digestion: Incubate the gel in incubation buffer (1% Triton X-100, 50 mM Tris-HCl, 5 mM CaCl₂, 1 μM ZnCl₂) for 24 hours at 37°C [90].
- Staining and Destaining: Stain with Coomassie Blue for 30-60 minutes, then destain. Areas of protease activity appear as clear bands against a dark blue background [90].
The workflow below summarizes the parallel processes for SDS-PAGE/Western Blot and Zymography.
The Scientist's Toolkit: Essential Research Reagent Solutions
Table 3: Essential Reagents for Gel Electrophoresis and Blotting
| Reagent / Kit | Function / Purpose | Key Characteristics |
|---|---|---|
| Agarose | Matrix for DNA/RNA electrophoresis | Isolated from seaweed; pore size determined by concentration (0.7%-2%) [91] |
| Polyacrylamide | Matrix for protein/small nucleic acid separation | Polymerized acrylamide-bisacrylamide; smaller pores than agarose [85] |
| TAE Buffer | (Tris-Acetate-EDTA) Running buffer for DNA gels | Better for large DNA fragments (>1500 bp) [84] |
| TBE Buffer | (Tris-Borate-EDTA) Running buffer for DNA/protein gels | Better resolution for small DNA fragments; used in native PAGE [84] [85] |
| SDS (Sodium Dodecyl Sulfate) | Ionic detergent for protein denaturation | Linearizes proteins and confers uniform negative charge [85] |
| TEMED & APS | (Tetramethylethylenediamine & Ammonium Persulfate) | Catalyze the polymerization of polyacrylamide gels [90] [87] |
| Ethidium Bromide | Nucleic acid intercalating dye for visualization | Fluoresces under UV light; known mutagen [91] |
| Coomassie Blue | Protein stain for polyacrylamide gels | Binds nonspecifically to proteins; destaining reveals bands [90] |
| Prestained Protein Ladder | Protein size standard for tracking and transfer | Allows visualization during electrophoresis and blotting [84] [87] |
| pHAPE Plasmid | Cost-effective source for custom DNA ladders | Digest with restriction enzymes to generate DNA marker fragments [88] |
Troubleshooting and Data Interpretation
Even with optimal protocols, challenges can arise. Understanding how to troubleshoot ensures the reliability of data validated by molecular weight markers.
- Poor Band Resolution: This can be caused by running the gel at too high a voltage, leading to overheating and smeared bands [84] [74]. Solution: Run the gel at a lower voltage for a longer duration [74]. For proteins, ensure samples are properly centrifuged to remove debris before loading [85].
- Inaccurate Size Estimation: Using a marker inappropriate for the gel percentage is a common pitfall. Higher percentage gels resolve smaller fragments better, while lower percentages are better for larger fragments [84] [89]. Using prestained markers, which can exhibit altered mobility, for precise sizing can also cause errors [84]. Solution: Select a marker with a range that brackets your molecule of interest and use unstained markers for maximum accuracy.
- Abnormal Band Appearance in Zymography: The absence of clear bands in a zymogram could be due to low enzyme activity or the presence of enzyme inhibitors in the sample. Over-digestion can result in diffuse, smeared bands. Solution: Optimize sample concentration and incubation time. Include positive controls to confirm the assay is functioning correctly [90].
Applications in Research and Drug Development
The application of molecular weight markers extends far beyond basic size determination, playing a critical role in advanced research and therapeutic development.
- Cancer and Inflammation Research: Gelatin zymography, calibrated with protein markers, is widely used to investigate the role of Matrix Metalloproteinases (MMPs) in tumor invasion, angiogenesis, and inflammatory diseases. Detecting both pro- and active forms of enzymes allows for the assessment of activation status, a key parameter in pathological processes [90].
- Biomarker Discovery and Validation: In Western blotting, the use of molecular weight markers is essential for confirming the identity of a putative biomarker based on its predicted molecular weight. This is crucial in validating findings from proteomic screens in complex biological fluids like serum or urine [87] [85].
- Therapeutic Development and Quality Control: Molecular weight markers are used to monitor the integrity and purity of recombinant protein therapeutics during production and purification. SDS-PAGE analysis can confirm the correct size of a therapeutic antibody and detect the presence of degradation products or aggregates [85].
Molecular weight markers are not merely convenient standards; they are the bedrock of validation in electrophoretic techniques. Their critical role is inextricably linked to the sophisticated function of discontinuous gel systems, which rely on the stacking gel to focus samples and the resolving gel to separate them. A deep understanding of the types of markers available—from prestained protein ladders to cost-effective, in-house generated DNA ladders—empowers researchers to select the right tool for their experimental needs. By adhering to detailed protocols for techniques like SDS-PAGE, Western blotting, and zymography, and by rigorously troubleshooting with an understanding of gel conditions, scientists can generate data that is both accurate and reliable. For professionals in drug development, where decisions hinge on precise molecular characterization, the diligent application of these markers is not just good practice—it is fundamental to scientific progress and therapeutic innovation.
In protein research, the choice of electrophoresis technique is a fundamental decision that directly impacts the quality and type of data obtained. Polyacrylamide Gel Electrophoresis (PAGE) serves as a cornerstone method for protein separation, with SDS-PAGE and Native PAGE representing two principal approaches with distinct applications and outcomes. Understanding their mechanistic differences is crucial for designing experiments that yield accurate, reproducible, and biologically relevant results. This guide provides an in-depth technical comparison of these techniques, with a specific focus on the critical functions of stacking and resolving gels within the discontinuous buffer systems that underpin their operation.
Core Principle: The Basis of Separation
The fundamental distinction between these techniques lies in what property of the protein is used for separation.
SDS-PAGE (Sodium Dodecyl Sulfate Polyacrylamide Gel Electrophoresis) employs the anionic detergent SDS to denature proteins and impart a uniform negative charge. This masks the proteins' intrinsic charge and eliminates the influence of their three-dimensional shape. Consequently, separation occurs almost exclusively based on molecular weight (mass), with smaller polypeptides migrating faster through the gel matrix [92] [93] [2].
Native PAGE is performed under non-denaturing conditions without SDS. Proteins remain in their folded, native conformation, retaining their biological activity. Separation is therefore based on a combination of the protein's intrinsic size, overall charge, and three-dimensional shape [92] [94] [2].
Table 1: Fundamental Differences Between SDS-PAGE and Native PAGE
| Criteria | SDS-PAGE | Native PAGE |
|---|---|---|
| Separation Basis | Molecular weight (mass) only [92] [95] | Size, overall charge, and shape [92] [94] |
| Protein State | Denatured and linearized [92] [96] | Native, folded conformation [92] [93] |
| Detergent (SDS) | Present (1.4 g SDS/g protein) [34] | Absent [92] [94] |
| Protein Function | Lost after separation [92] | Retained after separation [92] [2] |
| Protein Recovery | Generally not recoverable functional [92] | Can be recovered functional [92] [94] |
| Primary Applications | Molecular weight determination, purity check, expression analysis [92] | Studying protein complexes, oligomeric state, enzymatic activity [92] [93] |
The Role of the Stacking and Resolving Gel
Both SDS-PAGE and Native PAGE often utilize a discontinuous gel system to achieve sharp, high-resolution bands. This system consists of two distinct parts: the stacking gel and the resolving gel [34] [96].
Stacking Gel: The Concentration Phase
The stacking gel is layered on top of the resolving gel and has a lower percentage of acrylamide (e.g., 4-5%), creating larger pores. It is buffered at a lower pH (typically ~6.8) [96]. The purpose of this gel is not to separate proteins by size, but to concentrate all protein samples into a sharp, unified band before they enter the resolving gel. It uses a discontinuous buffer system where ions create a steep voltage gradient, forcing all protein molecules to migrate quickly and stack into a single tight zone, regardless of their size [34]. This process ensures that all proteins enter the resolving gel at the same starting point, which is critical for achieving high-resolution separation.
Resolving Gel: The Separation Phase
The resolving gel (or separating gel) has a higher percentage of acrylamide (e.g., 8-20%), creating a tighter mesh with smaller pores [2] [96]. It is buffered at a higher pH (typically ~8.8) [34]. Once the stacked protein band moves from the stacking gel into the resolving gel, the change in pH and gel pore size alters the electric field and introduces the sieving effect. Here, the actual separation based on molecular weight (in SDS-PAGE) or size/charge (in Native PAGE) occurs. Smaller molecules navigate the pores more easily and migrate faster, while larger molecules are hindered [34] [2].
Detailed Methodologies and Protocols
SDS-PAGE Experimental Workflow
The following workflow outlines the key steps for a standard reducing SDS-PAGE procedure, which includes agents to break disulfide bonds.
1. Sample Preparation: Protein samples are mixed with a loading buffer containing SDS, a reducing agent (like DTT or β-mercaptoethanol), and glycerol [34] [96]. The mixture is then heated to 95°C for 5 minutes [34]. The SDS denatures the proteins and binds in a constant ratio, the reducing agent cleaves disulfide bonds, and glycerol increases the density of the sample for easy loading [96].
2. Gel Casting: As described above, a polyacrylamide gel is cast in two parts. A resolving gel solution (e.g., 10-12% acrylamide, pH 8.8) is poured first and polymerized using ammonium persulfate (APS) and TEMED as catalysts [34] [2] [96]. After polymerization, a stacking gel (e.g., 4% acrylamide, pH 6.8) is poured on top, and a comb is inserted to create wells.
3. Electrophoresis: The cast gel is immersed in a running buffer in an electrophoresis chamber. The prepared samples and a molecular weight marker are loaded into the wells. A constant voltage (e.g., 100-150 V) is applied, causing the negatively charged proteins to migrate toward the positive anode. The run is stopped when the dye front (e.g., bromophenol blue) approaches the bottom of the gel [34].
4. Post-Electrophoresis Analysis: Proteins in the gel are visualized using stains like Coomassie Brilliant Blue or silver stain. Alternatively, proteins can be transferred to a membrane for Western blot analysis [34] [2].
Native PAGE Experimental Workflow
The Native PAGE workflow preserves protein structure and function, requiring modifications from the SDS-PAGE protocol.
1. Sample Preparation: Crucially, samples are not heated or treated with SDS or reducing agents [92]. They are typically mixed with a native sample buffer that may contain glycerol and a faint tracking dye. To maintain protein stability and prevent denaturation, the entire process is often performed at 4°C [92].
2. Gel Casting and Buffers: The gel is also a polyacrylamide matrix but is cast without SDS. Specialized native running buffers are used, such as those based on Bis-Tris or Tris-Glycine systems at a neutral pH [97] [2]. Commercial pre-cast native gels, like the NativePAGE Bis-Tris Gel System, are optimized for this purpose and should be used with their specific running buffers [97].
3. Electrophoresis: The gel is run at a constant voltage, but the apparatus is often kept cool (e.g., in a cold room) to maintain protein integrity [92]. The migration direction depends on the protein's intrinsic charge at the running buffer's pH; negatively charged proteins move toward the anode, while positively charged proteins move toward the cathode [95].
4. Analysis and Protein Recovery: After electrophoresis, proteins can be visualized with stains. A key advantage is that functional proteins can be recovered from the gel by passive diffusion or electro-elution for downstream activity assays [2].
Specialized Native Techniques: Blue Native PAGE (BN-PAGE)
BN-PAGE is a powerful variant for studying intact protein complexes [98]. The key difference is the use of Coomassie G-250 dye, which binds to proteins' surface and imparts a negative charge, allowing migration toward the anode without denaturing the complex [98]. It is particularly useful for analyzing mitochondrial complexes and their assembly intermediates [98].
Table 2: Key Reagents and Their Functions in PAGE Experiments
| Reagent / Material | Function / Purpose | Technical Note |
|---|---|---|
| SDS (Sodium Dodecyl Sulfate) | Denatures proteins; binds uniformly to impart negative charge. Masks intrinsic charge [34] [96]. | Used at ~1.4 g per gram of protein in SDS-PAGE [34]. |
| DTT / β-Mercaptoethanol | Reducing agents that break disulfide bonds, fully linearizing polypeptides [34] [96]. | Essential for "reducing SDS-PAGE" to analyze quaternary structure [95]. |
| Acrylamide / Bis-Acrylamide | Monomer and cross-linker that polymerize to form the porous gel matrix [2] [96]. | Pore size is determined by the total %T and cross-linker %C. |
| APS & TEMED | Catalysts (ammonium persulfate) and accelerator (Tetramethylethylenediamine) for gel polymerization [34] [96]. | Initiate free radical polymerization; TEMED quantity affects setting time. |
| Coomassie Blue G-250 | (For BN-PAGE) Imparts charge to native protein complexes for electrophoresis without denaturation [98]. | Does not disrupt protein-protein interactions, unlike SDS. |
| Molecular Weight Markers | Pre-stained or unstained proteins of known sizes for estimating sample protein molecular weights [34] [2]. | Essential for calibration in SDS-PAGE; Native Markers used for Native PAGE [97]. |
The choice between SDS-PAGE and Native PAGE is not a matter of one being superior to the other, but rather which is the right tool for the specific biological question at hand.
Choose SDS-PAGE when your primary goal is to determine protein molecular weight, assess purity or homogeneity, check expression levels, or analyze subunit composition under denaturing conditions. It is the standard, robust workhorse for most analytical protein biochemistry.
Choose Native PAGE when you need to study the native structure, oligomeric state, or protein-protein interactions of a sample. It is indispensable for investigating enzymatic activity directly from a gel, analyzing functional protein complexes, or when the goal is to purify and recover active proteins for downstream assays.
Understanding the critical role of the stacking and resolving gels in both systems empowers researchers to optimize their protocols for maximum resolution and reliability. By aligning your experimental goals with the fundamental principles of these powerful techniques, you can ensure that your electrophoresis work provides clear, meaningful, and actionable data.
This technical guide explores significant advancements in polyacrylamide gel electrophoresis (PAGE), focusing on the development of one-step casting methods and colored gel technologies. These innovations address long-standing challenges in traditional protein separation techniques, particularly the time-consuming, multi-step processes and quality control issues associated with conventional gel preparation. By integrating colored stacking gels and streamlined fabrication protocols, researchers can now achieve superior efficiency, visual confirmation of gel integrity, and enhanced experimental reliability. Framed within the critical context of understanding stacking and resolving gel functions, these technological improvements provide tangible benefits for research and drug development workflows, enabling faster, more reliable protein analysis for scientific and pharmaceutical applications.
The establishment of SDS-PAGE (Sodium Dodecyl Sulfate-Polyacrylamide Gel Electrophoresis) by Laemmli in 1970 created a fundamental paradigm for protein separation that has served as the backbone of proteomics research for over five decades. This discontinuous buffer system relies on the sophisticated interplay between two distinct gel layers—the stacking gel and the resolving (or separating) gel—each engineered with specific properties to achieve optimal protein separation.
The stacking gel (typically pH ~6.8) serves as the protein loading and focusing zone, with a low-concentration polyacrylamide matrix (usually ~4%) that creates minimal resistance to protein movement. Its primary function is to concentrate disparate protein samples into sharp, unified bands before they enter the resolving region. This concentration effect is achieved through a complex interplay of ions from the Tris-HCl in the gel and glycine in the running buffer, creating a steep voltage gradient that herds proteins into a narrow zone [99].
The resolving gel (typically pH ~8.8) contains a higher concentration of polyacrylamide (ranging from 8% to 20% depending on target protein sizes) that creates a molecular sieve. Within this matrix, proteins separate primarily by molecular weight as smaller proteins navigate the porous network more efficiently than larger complexes [100] [99]. The traditional process for creating this sophisticated two-layer system has historically required a sequential, two-step casting approach, first pouring and polymerizing the resolving gel, then layering the stacking gel on top—a process consuming 60-120 minutes of hands-on time and introducing potential quality control issues [12] [101].
The Innovation Drive: Challenges in Conventional Gel Methods
Despite its proven efficacy, the conventional Laemmli method presents several operational challenges that have driven innovation in gel technology:
- Time Consumption: The sequential polymerization process requires substantial researcher time (60-120 minutes), creating bottlenecks in high-throughput research environments [12] [101].
- Quality Control Issues: In conventional one-step methods (without coloring), the boundary between separating and stacking gels is often poorly defined, making it difficult to identify improper solidification or misalignment before electrophoresis is completed and samples are potentially compromised [12].
- Toxic Exposure: Traditional gel casting involves handling neurotoxic acrylamide monomers and TEMED, which has a pungent odor and can cause respiratory irritation [102].
- Consistency Challenges: Manual casting introduces batch-to-batch variability that can affect experimental reproducibility, particularly across different researchers or laboratories [102].
These limitations have motivated the development of innovative approaches that maintain the sophisticated separation mechanics of discontinuous gel systems while dramatically improving usability, safety, and reliability.
One-Step Casting Methodologies: Revolutionizing Gel Preparation
Fundamental Principles of Simultaneous Casting
One-step casting methods fundamentally redesign the gel fabrication process by enabling simultaneous preparation of both stacking and resolving gels. These approaches typically utilize density differences between the two gel solutions—often achieved through additives like glycerol—to create a stable interface during polymerization without the need for sequential pouring and solidification [12]. This paradigm shift reduces preparation time from hours to minutes while maintaining the critical chemical discontinuities essential for proper protein separation.
Implementation Platforms and Performance Metrics
Recent advancements have yielded multiple platforms for implementing one-step casting, each with distinct operational advantages:
Table 1: Comparison of One-Step Gel Casting Systems
| System Name | Time Required | Key Features | Separation Quality | References |
|---|---|---|---|---|
| Mako OT Method | ~50% time reduction vs. conventional | Colored stacking gel for visual verification | Comparable to Laemmli gels for SDS-PAGE and Western blotting | [12] |
| mPAGE Lux Casting System | 90 seconds (97% reduction) | UV irradiation curing, Bis-Tris chemistry | Clear band detection, enhanced weak band visibility | [101] |
| Yeasen PAGE Gel Quick Preparation Kit | ~2 minutes for multiple gels | Colored stacking gel, TEMED-free, improved APS solution | High resolution, minimal edge effects | [102] |
| Wu et al. Glycerol Method | Significant time saving | Uses glycerol for density-based separation | Poorly defined gel boundary without coloring | [12] |
The dramatic time reduction achieved by these systems—from 90 minutes to as little as 90 seconds—translates to substantial efficiency gains in research workflows [101]. As noted by Dr. Shizuka Takaku of the Tokyo Metropolitan Institute of Medical Science regarding the mPAGE Lux System: "I usually spend 2 hours for making gels. It is 1.5 min with this system...With mPAGE Lux Casting System, I can see the band very clearly" [101].
Chemical Innovations Enabling Rapid Casting
These methodologies leverage several chemical advancements to achieve rapid polymerization while maintaining optimal separation characteristics:
- Advanced Polymerization Catalysts: Systems like the Yeasen kit utilize improved ammonium persulfate (APS) solutions with enhanced stability and catalytic efficiency, eliminating the need for TEMED and its associated safety concerns [102].
- Specialized Buffer Systems: Bis-Tris-based buffers (pH ~6.4-6.8) provide superior pH stability during electrophoresis and storage compared to traditional Tris-HCl systems, particularly for resolving low-molecular-weight proteins and reducing protein modification [102].
- UV-Activated Polymerization: The mPAGE Lux system employs ultraviolet irradiation to initiate gel curing through specialized photoactive compounds, enabling extremely rapid solidification without traditional chemical catalysts [101].
Colored Gel Technologies: Visual Verification and Quality Control
The Colored Stacking Gel Innovation
A significant advancement in one-step casting methodologies is the incorporation of colored stacking gels. This approach addresses a critical limitation in conventional one-step methods where the boundary between stacking and resolving gels is often poorly defined, making it difficult to assess gel quality before electrophoresis [12]. The coloring system typically employs inert dyes like Brilliant Blue FCF added to the stacking gel solution, creating a clearly visible interface that allows immediate visual confirmation of proper gel formation and alignment [12].
The Mako OT method (Makoto one-step-time-saving gel preparation method) exemplifies this innovation, utilizing a colored stacking gel that maintains all functional characteristics of conventional gels while providing immediate visual feedback. The coloring agent is carefully selected to not interfere with protein migration, staining procedures, or subsequent Western blotting applications [12] [102].
Functional Advantages in Laboratory Practice
The implementation of colored stacking gels provides several practical benefits:
- Immediate Quality Assessment: Researchers can visually confirm proper gel formation, interface integrity, and horizontal solidification before committing valuable samples, reducing the risk of failed experiments due to gel defects [12].
- Precision in Sample Loading: The colored stacking gel creates a clearly visible reference for well orientation and depth, particularly beneficial for training new laboratory personnel or implementing standardized protocols across multiple users [102].
- Process Verification: The distinct coloring allows immediate confirmation that the one-step casting process has successfully created the required discontinuous layers with the proper interface, addressing a key concern with earlier one-step methods [12].
Table 2: Coloring Technologies in Modern Gel Systems
| Coloring Approach | Composition | Compatibility | Visual Characteristics | |
|---|---|---|---|---|
| Mako OT Method Dye | Brilliant Blue FCF | SDS-PAGE, Western blotting | Clear blue stacking gel, distinct boundary | [12] |
| Yeasen Colored Stacking Gel | Proprietary formula | Electrophoresis, staining, transfer | Colored stacking layer, no interference | [102] |
| FLAP Force Probe | Molecular force probes | Polymer gel stress analysis | Color change under mechanical stress | [103] |
Specialized Color-Changing Polymer Gels
Beyond simple visual verification, advanced color-changing polymer gels represent a cutting-edge innovation with broader applications. These systems utilize molecular force probes (flapping molecular force probes or FLAP) that change color from blue to green fluorescence when subjected to mechanical stress in the pico- to nanonewton range [103]. Originally developed for polymer films, recent modifications have adapted these probes for hydrogel applications by replacing anthraceneimide wings with pyreneimide structures to suppress spontaneous planarization in aqueous environments [103].
These advanced colorimetric systems enable researchers to quantitatively map stress distribution within gel matrices at the molecular level, providing insights into polymer chain dynamics and facilitating the development of tougher, more durable hydrogel materials for applications ranging from tissue engineering to energy storage [103].
Experimental Protocols: Implementing Innovative Gel Methods
Mako OT Method with Colored Stacking Gel
Materials Required:
- 30% Acrylamide-Bis Solution (29:1)
- Separating Gel Buffer (4× Tris-HCl-SDS, pH 8.8)
- Stacking Gel Buffer (4× Tris-HCl-SDS, pH 6.8)
- Coloring Agent (Brilliant Blue FCF or equivalent)
- Ammonium Persulfate (10% solution)
- TEMED
- Gel Cassettes
Protocol:
- Prepare Separating Gel Solution: Mix appropriate volumes of 30% acrylamide-bis solution, 4× separating gel buffer, and water to achieve desired final concentration (e.g., 12% resolving gel).
- Prepare Colored Stacking Gel Solution: Combine 30% acrylamide-bis solution, 4× stacking gel buffer, water, and coloring agent at a concentration that provides clear visibility without interfering with electrophoresis.
- Sequential Casting: Utilize density differences or physical barriers to simultaneously cast both gel solutions, with the higher-density separating gel forming the lower layer and the colored stacking solution forming the upper layer.
- Polymerization: Add catalysts (APS and TEMED) to both solutions immediately before casting. Allow complete polymerization (typically 30-60 minutes).
- Quality Verification: Visually inspect the colored boundary between stacking and resolving gels to confirm proper formation before electrophoresis.
Validation Results: The Mako OT gel demonstrates comparable performance to conventional Laemmli and Wu one-step gels for both SDS-PAGE and Western blotting applications, with the colored boundary providing clear visual confirmation of gel integrity [12].
mPAGE Lux Casting System Protocol
Materials:
- mPAGE Lux Reagent Kit
- UV Transparent Cassettes
- UV Polymerization Station
Procedure:
- Solution Preparation: Prepare gel solutions using the proprietary mPAGE Lux reagents according to desired separation characteristics.
- Cassette Assembly: Load solutions into specialized UV-transparent cassettes.
- UV Polymerization: Expose assembled cassettes to UV irradiation for precisely controlled polymerization (approximately 90 seconds).
- Post-Processing: Remove polymerized gels from cassettes and assemble into electrophoresis units.
Performance Characteristics: This system reduces casting time by 97% compared to conventional methods (from 90 minutes to 90 seconds) while reducing plastic and chemical waste by approximately 26% per gel casting [101].
The Scientist's Toolkit: Essential Research Reagents and Materials
Successful implementation of innovative gel technologies requires specific reagents and materials optimized for these advanced systems:
Table 3: Essential Research Reagents for Advanced Gel Electrophoresis
| Reagent/Material | Function | Innovative Formulations | Application Notes | |
|---|---|---|---|---|
| Bis-Tris Buffers | Gel buffer system | Superior pH stability (wide temperature range) | Reduces protein modification, improves resolution | [102] |
| Colored Stacking Gel Solutions | Visual boundary indication | Proprietary dyes without interference | Enables quality verification pre-electrophoresis | [12] [102] |
| Improved APS Solutions | Polymerization catalyst | Enhanced stability, TEMED-free alternatives | Safer handling, reduced odor | [102] |
| UV-Active Monomers | Rapid polymerization | Photocurable acrylamide formulations | Enables seconds-scale casting | [101] |
| Specialized Pre-cast Gels | Ready-to-use formats | Gradient concentrations (4-12%, 4-20%) | Optimal resolution across broad MW ranges | [102] |
| Tris-Mops-SDS Running Buffer | Electrophoresis buffer | Optimized for Bis-Tris gel systems | Faster separation, improved band sharpness | [102] |
Functional Analysis: Impact on Stacking and Resolving Gel Performance
The innovations in one-step casting and colored gel technologies maintain the fundamental electrophoretic functions while enhancing operational efficiency:
Preservation of Discontinuous Separation Mechanics
Despite the simplified preparation process, advanced one-step systems maintain the critical pH and porosity differences between stacking and resolving regions that enable the discontinuous electrophoresis effect. The stacking gel (pH ~6.8) continues to concentrate protein samples into sharp bands through the trailing ion (glycine zwitterions) and leading ion (chloride) interface, while the resolving gel (pH ~8.8) provides the molecular sieving function for size-based separation [99]. Independent validation confirms that protein separation patterns and Western blotting results from these innovative gels remain comparable to those obtained with traditional Laemmli gels [12].
Enhanced Resolution and Band Characteristics
Modern one-step systems frequently employ Bis-Tris chemistry rather than traditional Tris-glycine buffers, providing several electrophoretic advantages:
- Superior pH Stability: Bis-Tris maintains consistent buffering capacity across a wider temperature range, preventing the pH drift that can occur during extended electrophoresis runs [102].
- Reduced Protein Modifications: The slightly acidic environment of Bis-Tris gels (compared to traditional Tris-glycine systems) minimizes protein charge modifications such as deamidation and carbamylation, particularly beneficial for resolving low-molecular-weight proteins and enzyme analysis [102].
- Extended Separation Window: The proprietary buffer systems in technologies like the mPAGE Lux and Yeasen pre-cast gels provide extended separation ranges, enabling resolution of proteins from 10 to 300 kDa on a single gel without compromised band sharpness [101] [102].
Future Directions and Applications
The ongoing evolution of gel technologies points toward several promising research directions:
- Intelligent Response Gels: Advanced color-changing hydrogels that respond to specific biomarkers or environmental conditions could provide real-time diagnostic information during electrophoresis or enable new applications in biosensing [103].
- Integrated Multi-Analyte Platforms: Combining one-step casting methodologies with multi-parameter detection systems could enable simultaneous analysis of proteins, nucleic acids, and small molecules on a single integrated platform.
- Sustainable Gel Formulations: Continuing development of environmentally friendly alternatives that reduce toxic waste while maintaining separation performance aligns with growing emphasis on green chemistry in research laboratories [101].
- Automated High-Throughput Systems: The compatibility of one-step casting methods with robotic liquid handling systems creates opportunities for fully automated electrophoresis workflows in high-throughput drug development and clinical diagnostic applications.
These innovations in gel technology represent a significant advancement in biochemical methodology, providing researchers with tools that combine the sophisticated separation capabilities of traditional discontinuous electrophoresis with enhanced efficiency, reliability, and operational safety.
Within the context of a broader thesis on understanding stacking gel and resolving gel functions, this guide explores the pivotal practice of cross-method validation in protein analysis. The discontinuous buffer system of SDS-PAGE, fundamental to its operation, relies on the synergistic function of its two distinct gel layers [104]. The stacking gel, with its lower pH (approximately 6.8) and lower percentage of acrylamide, serves to concentrate all protein samples into a sharp, unified band before they enter the resolving gel [104]. This crucial step is mediated by the unique chemistry of glycine, which becomes a zwitterion at this pH, moving slowly and creating a voltage gradient that herds the proteins into a tight line [104]. Subsequently, the resolving gel, with its higher pH (approximately 8.8) and higher percentage of acrylamide, performs the primary separation based on molecular weight [104]. The higher pH causes glycine to gain negative charges, making it highly mobile, while the denser polyacrylamide mesh acts as a molecular sieve, slowing larger proteins more effectively than smaller ones [104].
Validating findings across complementary techniques is paramount for generating robust and reliable protein data. While SDS-PAGE provides excellent resolution and size-based separation, Western blotting (WB) adds exceptional specificity through antibody-antigen interactions, and mass spectrometry (MS) enables definitive protein identification and characterization of post-translational modifications [105] [106]. This multi-faceted approach is indispensable in research and drug development, where conclusions about protein expression, purity, and modification must be drawn with high confidence. This technical guide details the methodologies and strategies for effectively correlating data from these three cornerstone techniques.
Foundational Principles of the Individual Techniques
SDS-Polyacrylamide Gel Electrophoresis (SDS-PAGE)
SDS-PAGE is the foundational separation technique upon which the other methods are often built. Its primary function is to separate a complex mixture of proteins based on their molecular mass [104]. The principle involves denaturing proteins with sodium dodecyl sulfate (SDS) and reducing agents, which linearizes the polypeptides and imparts a uniform negative charge [104] [106]. When an electric field is applied, these proteins migrate through a polyacrylamide gel matrix, with smaller proteins moving faster than larger ones [106]. The key to the high resolution of SDS-PAGE is the discontinuous gel system, comprising a stacking gel and a resolving gel, which ensures proteins enter the separation matrix as a sharp, concentrated band [104]. The pore size of the gel, determined by the acrylamide concentration, can be optimized to resolve proteins within specific molecular weight ranges [104].
Western Blotting (Immunoblotting)
Western blotting builds upon SDS-PAGE by transferring the separated proteins from the gel onto a stable membrane, typically nitrocellulose or PVDF, where they can be probed with specific antibodies [107] [108]. This process adds a layer of immunological specificity, allowing for the detection of a single protein target within the complex background of the entire separated proteome [106] [109]. The standard procedure involves electrophoretic transfer of proteins to the membrane, blocking to prevent non-specific antibody binding, sequential incubation with a primary antibody (specific to the target protein) and a labeled secondary antibody (specific to the primary antibody), and finally detection [107]. Detection methods are diverse, with chemiluminescence being a common choice for its sensitivity, while fluorescent detection is growing in popularity for multiplexing capabilities [108]. Western blotting is routinely used for verifying protein identity, assessing post-translational modifications, and providing semi-quantitative data on protein abundance [106].
Mass Spectrometry (MS) in Proteomics
Mass spectrometry represents the gold standard for protein identification and characterization. In bottom-up proteomics workflows, proteins are first digested into peptides, which are then separated by liquid chromatography (LC) and introduced into the mass spectrometer [110] [111]. The mass spectrometer measures the mass-to-charge ratio (m/z) of these peptides and their fragmentation products (MS/MS spectra) [111]. By comparing the experimental MS/MS spectra against theoretical spectra derived from protein sequence databases, software can identify the peptide sequences and infer the original proteins present in the sample with high confidence [112]. Modern MS platforms can perform both discovery proteomics (unbiased identification and relative quantification of thousands of proteins) and targeted proteomics (high-sensitivity, absolute quantification of predefined proteins) [110] [112]. MS is particularly powerful for cataloging protein complexes, identifying post-translational modifications like phosphorylation and glycosylation, and validating hits from Western blot analyses [110].
Experimental Protocols for Cross-Method Validation
Integrated Workflow from SDS-PAGE to MS Identification
A robust strategy for cross-validation often begins with SDS-PAGE separation, followed by excision of protein bands of interest for in-gel digestion and MS analysis. This workflow directly links the visual data from the gel with definitive identity from the mass spectrometer.
Table 1: Key Research Reagent Solutions for Integrated Workflows
| Reagent/Material | Function | Key Considerations |
|---|---|---|
| SDS-PAGE Gel [104] | Matrix for protein separation by size. | Acrylamide percentage determines resolution range. |
| Transfer Buffer [107] | Medium for electrophoretic protein transfer to membrane. | Methanol concentration affects efficiency, especially for high MW proteins. |
| PVDF/Nitrocellulose Membrane [107] [108] | Solid support for immobilized proteins in WB. | PVDF is stronger; Nitrocellulose is less expensive. |
| Blocking Agent (e.g., BSA, Skim Milk) [107] [108] | Prevents non-specific antibody binding. | Skim milk is effective but not suitable for phosphoprotein detection. |
| Primary & Secondary Antibodies [107] [108] | Enable specific detection of target protein. | Specificity and concentration are critical to avoid false signals. |
| Mass Spectrometer (e.g., Orbitrap) [110] | Identifies and quantifies peptides/proteins. | Choice depends on needed throughput, sensitivity, and quantitation type. |
| Trypsin [111] | Protease for digesting proteins into peptides for MS. | Gold standard for bottom-up proteomics. |
| LC-MS/MS System [111] [112] | Separates (LC) and analyzes (MS/MS) peptide mixtures. | Core platform for most proteomics workflows. |
Procedure:
- Sample Preparation and SDS-PAGE: Prepare protein extracts from cells or tissues using an appropriate lysis buffer containing protease and phosphatase inhibitors [109]. Determine protein concentration using a spectrophotometer. Load equal masses of protein (e.g., 20-50 µg for Coomassie staining, less for silver stain or WB) alongside a pre-stained molecular weight marker onto an SDS-PAGE gel [109]. Run the gel at constant voltage until the dye front reaches the bottom.
- Post-Electrophoresis Processing:
- For Western Blotting: Transfer proteins from the gel to a PVDF or nitrocellulose membrane using a wet or semi-dry transfer system [107] [108]. Following transfer, stain the membrane with a reversible stain like Ponceau S to confirm transfer efficiency and mark the molecular weight marker positions [107]. Destain the membrane and proceed to blocking with 1-5% BSA or non-fat dry milk in TBST or PBST for 1 hour at room temperature [107]. Incubate with the primary antibody (diluted in blocking buffer) for 1 hour at room temperature or overnight at 4°C. Wash the membrane and incubate with an HRP-conjugated secondary antibody for 1 hour. After final washes, detect the signal using a chemiluminescent substrate and image with a CCD camera or X-ray film [107] [108].
- For Mass Spectrometry Analysis: After electrophoresis, stain the gel with a compatible stain (e.g., Coomassie Brilliant Blue or a mass-spectrometry-compatible silver stain). Excise the protein bands of interest from the gel with a clean scalpel. Destain the gel pieces, reduce disulfide bonds with dithiothreitol (DTT), and alkylate with iodoacetamide (IAA). Digest the proteins within the gel matrix with trypsin overnight at 37°C [111]. Extract the resulting peptides from the gel pieces, dry them in a vacuum concentrator, and reconstitute in a suitable solvent for LC-MS/MS analysis.
- LC-MS/MS Analysis and Data Processing: Inject the peptide mixture into the LC-MS/MS system. The data-dependent acquisition (DDA) mode is commonly used for discovery, selecting the most abundant precursor ions for fragmentation [112]. The raw MS data is processed using software (e.g., MaxQuant, DIA-NN, FragPipe) to identify proteins and, if applicable, provide quantitative information [112]. The critical step is database searching, where the generated MS/MS spectra are matched against a protein sequence database. Adhere to HUPO guidelines, which require at least two distinct peptides and a false discovery rate (FDR) of ≤1% for high-confidence protein identifications [112].
Correlative Analysis of Data Outputs
The core of cross-validation lies in the careful correlation of data from each method.
Table 2: Correlation of Data Across SDS-PAGE, Western Blot, and Mass Spectrometry
| Method | Primary Data Output | Key Correlative Parameters for Validation |
|---|---|---|
| SDS-PAGE | Protein band pattern and apparent molecular weight (kDa). | Band position of the target protein should align with its known/predicted molecular weight. Serves as a purity check for MS samples. |
| Western Blot | Immunoreactive band at a specific molecular weight. | Confirms the identity of the protein in the SDS-PAGE band. Band intensity provides semi-quantitative data on abundance. |
| Mass Spectrometry | Protein identity, sequence coverage, post-translational modifications (PTMs), and quantitative abundance. | Definitive confirmation of the protein's identity. Explains discrepancies in apparent vs. actual molecular weight (e.g., due to PTMs). |
Interpreting Discrepancies:
- A protein band on an SDS-PAGE gel that is recognized by a specific antibody in a Western blot confirms the presence and approximate size of the target protein.
- If the apparent molecular weight from SDS-PAGE/WB differs from the theoretical weight calculated from the amino acid sequence (as identified by MS), this can indicate the presence of post-translational modifications (e.g., phosphorylation, glycosylation), protein cleavage, or alternative splicing [104].
- MS data can directly identify these modifications, providing a mechanistic explanation for the observed electrophoretic mobility shift [110].
- The use of 2D SDS-PAGE, which separates proteins by isoelectric point (pI) in the first dimension and molecular weight in the second, provides an even higher resolution separation that can be subsequently probed by Western blotting and MS, offering a powerful platform for detecting charge variants and modifications of a protein [105].
Diagram 1: Integrated workflow for cross-method validation, showing parallel paths for Western blot and mass spectrometry analysis following SDS-PAGE separation.
Advanced Applications and Technique Variations
Native SDS-PAGE for Functional Analysis
A significant limitation of standard SDS-PAGE is the complete denaturation of proteins, which destroys functional properties like enzymatic activity and non-covalent protein-metal interactions [7]. To address this, Native SDS-PAGE (NSDS-PAGE) has been developed. This method modifies standard conditions by removing SDS and EDTA from the sample buffer, omitting the heating step, and reducing the SDS concentration in the running buffer [7]. Research demonstrates that this protocol results in excellent resolution of proteomic mixtures while allowing a majority of model enzymes to retain their activity and preserving bound metal ions (e.g., increasing Zn²⁺ retention from 26% to 98%) [7]. This variation is powerful for correlating a protein's migration with its intact functional state.
2D SDS-PAGE for Enhanced Resolution
For extremely complex samples, two-dimensional (2D) SDS-PAGE provides superior resolution. Proteins are first separated based on their isoelectric point (pI) using isoelectric focusing, followed by a second dimension separation by molecular weight using standard SDS-PAGE [105] [106]. Evidence confirms that 2D SDS-PAGE is reproducible and robust, and when combined with Western blotting and mass spectrometry, it becomes a powerful method for analyzing protein isoforms, post-translational modifications, and complex protein mixtures [105]. This technique is particularly valuable for detecting charge variants of a protein that would otherwise co-migrate in a one-dimensional gel.
Diagram 2: Logic flow for correlating data from Western blot and mass spectrometry to validate, explain, or challenge initial SDS-PAGE observations.
The integration of SDS-PAGE, Western blotting, and mass spectrometry forms a powerful triad for comprehensive protein analysis. The process begins with the fundamental size-based separation of SDS-PAGE, enabled by the precise mechanics of the stacking and resolving gels. This separation is then validated and given specificity through Western blotting, which confirms the identity of a target protein via antibody recognition. Finally, mass spectrometry provides the definitive identification, reveals detailed molecular characteristics, and enables precise quantification. By systematically correlating data from these methods—aligning band positions with immunoreactivity and MS identities—researchers can move from simple observation to robust, validated biological conclusions. This cross-method validation is indispensable in rigorous scientific inquiry, from basic research understanding protein function to applied drug development where accurate protein characterization is critical.
Comparative Analysis of Pre-cast Gels Versus Laboratory-Cast Gels
Electrophoresis techniques, particularly sodium dodecyl sulfate-polyacrylamide gel electrophoresis (SDS-PAGE), serve as fundamental tools in molecular biology, biochemistry, and clinical diagnostics for separating proteins based on molecular weight [12] [113]. The traditional method of laboratory-cast (hand-cast) gels, established by Laemmli in 1970, involves a time-intensive, multi-step process of pouring and polymerizing separating and stacking gels sequentially [12] [114]. In contrast, pre-cast gels are commercially manufactured, ready-to-use gel cassettes produced under controlled conditions to ensure consistency and reliability [115]. This technical analysis examines the comparative advantages, limitations, and appropriate applications of both gel formats within the context of understanding stacking gel and resolving gel functions, providing researchers with evidence-based selection criteria for experimental design.
The stacking and resolving gel system represents a critical innovation in electrophoretic separation. The resolving gel, with its higher acrylamide concentration and optimized pH, provides the molecular sieving matrix responsible for separating proteins based on size. The stacking gel, with larger pore size and different pH, serves to concentrate protein samples into sharp bands before they enter the resolving region, significantly enhancing resolution [12]. Both pre-cast and laboratory-cast gels must maintain the precise boundary and functional integrity between these two distinct gel phases for effective protein separation, yet they achieve this through different manufacturing and quality control approaches.
Technical Specifications and Performance Comparison
Manufacturing Processes and Quality Control
Pre-cast gels are manufactured industrially under stringent quality control protocols, ensuring standardized polymerization conditions, buffer compositions, and gel dimensions. This controlled environment minimizes lot-to-lot variability and ensures consistent pore size distribution critical for reproducible separation [115] [116]. Major manufacturers utilize specialized buffer systems such as Bis-Tris, which offers superior stability and sharper band resolution compared to traditional Tris-glycine systems used in many laboratory-cast gels [117] [116]. The manufacturing process incorporates quality verification of the critical interface between stacking and resolving gels, with some innovative methods using colored stacking gels to visually confirm proper gel formation and boundary integrity [12].
Laboratory-cast gels depend on researcher technique, reagent quality, and environmental conditions. The multi-step process involves first polymerizing the resolving gel, then layering the stacking gel, creating potential for uneven polymerization, interface irregularities, and inclusion of bubbles [114]. A recently developed one-step casting method using glycerol reduces preparation time but often produces poorly defined boundaries between stacking and resolving gels, making visual quality assessment difficult before electrophoresis is performed [12]. Variations in reagent purity, acrylamide concentration, catalyst efficiency, and temperature control during polymerization contribute to performance variability between batches and across laboratories.
Performance Metrics and Analytical Characteristics
Table 1: Comparative Analysis of Key Performance Metrics Between Pre-cast and Laboratory-Cast Gels
| Performance Metric | Pre-cast Gels | Laboratory-Cast Gels |
|---|---|---|
| Preparation Time | Ready-to-use; no preparation required [115] | 60-120 minutes hands-on time [12] [114] |
| Band Resolution | Superior and consistent due to optimized gradients and standardized polymerization [116] | Variable; depends on researcher skill and technique optimization [114] |
| Reproducibility | High lot-to-lot consistency; minimal variability [115] [116] | Moderate to low; significant batch-to-batch and user variability [114] |
| Detection Sensitivity | Enhanced through specialized formulations (e.g., Protein Plus gels) [116] | Standard sensitivity; limited by traditional formulations |
| Experiment Failure Rate | Low (<5% when properly handled) [114] | Moderate to high; increased risk with inexperienced users [114] |
| Shelf Life | 6-12 months with proper refrigeration [115] | Typically used immediately or within days |
| Customization Potential | Limited to commercially available formats [114] | Highly customizable; acrylamide percentage, buffers, additives [114] |
Separation efficiency in pre-cast gels benefits from advanced gradient technologies, with products such as 4-20% polyacrylamide gradients providing superior resolution across a broad molecular weight range without requiring multiple gels [116]. The standardized pore size distribution in pre-cast gradient gels enables precise separation of proteins with minimal band broadening, whereas laboratory-cast gradient gels require specialized equipment and significant expertise to produce reliable gradients. For both formats, the stacking gel's function remains crucial—to concentrate disparate protein samples into sharp initial bands before entering the resolving gel, thereby enhancing final resolution regardless of the casting method [12].
Functional Analysis of Stacking and Resolving Gels in Both Systems
Molecular Mechanisms of Separation
The resolving gel establishes a polyacrylamide matrix with pore sizes inversely related to acrylamide concentration, creating a molecular sieve that separates proteins based on hydrodynamic size during electrophoresis [113]. In SDS-PAGE, proteins bind SDS in proportion to their mass, acquiring uniform charge density that masks native charge differences, ensuring separation occurs primarily by molecular weight rather than charge [113]. High-percentage resolving gels (12-20% acrylamide) provide small pores optimal for separating low molecular weight proteins (10-50 kDa), while low-percentage gels (6-12%) better resolve high molecular weight proteins (50-200 kDa) [114]. The stacking gel, typically with lower acrylamide concentration (4-5%), creates a large-pore environment that initially concentrates proteins into a narrow zone before they enter the resolving gel, utilizing discontinuous buffer systems to create sharp protein fronts [12].
The integrity of the boundary between stacking and resolving gels proves critical for effective separation in both systems. Irregular boundaries can cause band distortion, poor resolution, and failed separations. Pre-cast gels maintain this boundary through precision manufacturing, while laboratory-cast gels depend on proper technique during the layering process [12]. Innovative approaches like the Mako OT method incorporate dye in the stacking gel to visualize this interface, addressing a common limitation of one-step casting methods where boundary definition is often poor [12].
Technical Considerations for Optimal Performance
Table 2: Experimental Considerations for Gel Selection and Application
| Experimental Factor | Pre-cast Gels | Laboratory-Cast Gels |
|---|---|---|
| Throughput Requirements | Ideal for high-throughput applications; multi-gel tanks [116] | Suitable for low-throughput research; manual processing |
| Sample Preciousness | Preferred for irreplaceable samples; reduced failure risk [114] | Higher risk of gel-related artifacts or failures [114] |
| Technical Expertise | Minimal training required; standardized protocols [115] | Significant technique development needed [114] |
| Budget Constraints | Higher per-unit cost; $5-$25 per gel depending on format [114] | Lower per-gel cost; approximately $1-$3 in reagents [114] |
| Specialized Applications | Limited to commercial formulations; fixed percentages [114] | Unlimited customization for unique research needs [114] |
| Regulatory Compliance | GMP manufacturing; complete documentation [115] | Variable quality; requires extensive validation |
| Downstream Applications | Optimal for publication-quality data and quantitative analysis [116] | Sufficient for qualitative assessments and optimization |
Buffer system selection significantly impacts gel performance and downstream applications. Traditional Tris-glycine systems used in most laboratory-cast gels work adequately for routine separations but can limit downstream applications due to gel acidity and reduced stability [114]. Bis-Tris-based systems, common in premium pre-cast gels, maintain neutral pH during electrophoresis, reducing protein modifications and improving transfer efficiency for western blotting [117] [116]. The choice between buffer systems also affects migration patterns, band sharpness, and compatibility with mass spectrometric analysis, with Bis-Tris systems generally providing superior performance for sensitive applications.
Methodologies and Experimental Protocols
Standardized Protocol for Pre-cast Gel Electrophoresis
Equipment and Reagents: Pre-cast gel cassettes (e.g., 4-20% gradient polyacrylamide), compatible electrophoresis chamber, power supply, 1× electrophoresis buffer (typically Tris-glycine or Bis-Tris based), protein samples, loading buffer, molecular weight standards, and heating block.
Procedure:
- Remove pre-cast gel from packaging and gently rinse the cassette with deionized water to remove any residual salts or crystals.
- Remove the comb carefully without tearing wells; if using frozen gels, ensure complete thawing at room temperature.
- Place gel cassette into electrophoresis chamber according to manufacturer orientation (notched plate typically facing inward).
- Fill inner and outer chambers with appropriate running buffer; ensure complete coverage of electrode connections.
- Prepare protein samples by mixing with 2× SDS-PAGE loading buffer (final 1× concentration) and denature at 70-95°C for 5-10 minutes.
- Centrifuge denatured samples briefly to collect condensation; load equal protein amounts (10-40 μg) into wells alongside prestained molecular weight markers.
- Assemble electrophoresis apparatus lid, connect to power supply, and run at constant voltage (150-200V for mini-gels) until dye front reaches bottom of gel (typically 35-55 minutes) [116].
- Turn off power, disassemble apparatus, and carefully open cassette using a specialized tool for gel removal.
- Proceed to staining, western transfer, or other downstream applications.
Troubleshooting: If bands appear distorted, verify proper buffer preparation and gel orientation. If electrical current fails to initiate, check buffer levels and electrode connections. Reduced separation quality may indicate expired gels or improper storage conditions.
Standardized Protocol for Laboratory-Cast Gel Electrophoresis
Equipment and Reagents: Acrylamide/bis-acrylamide solution (typically 30-40% stock), ammonium persulfate (APS), tetramethylethylenediamine (TEMED), gel casting system (glass plates, spacers, combs), resolving and stacking gel buffers, protein samples, power supply, and molecular weight standards.
Resolving Gel Preparation:
- Assemble gel casting cassette according to manufacturer instructions, ensuring no leaks.
- Prepare resolving gel solution by mixing appropriate volumes of acrylamide stock, buffer, and water to achieve desired percentage (e.g., 12% for 15-60 kDa proteins).
- Add catalysts: 0.05% TEMED and 0.1% APS (final concentrations); mix gently without introducing bubbles.
- Pour resolving gel solution into cassette, leaving space for stacking gel (approximately 2/3 of total height).
- Carefully overlay with water-saturated butanol or isopropanol to create a flat interface and exclude oxygen.
- Allow complete polymerization (20-30 minutes); a distinct interface will be visible between gel and overlay.
Stacking Gel Preparation:
- Pour off overlay liquid and rinse gel surface with deionized water; remove excess liquid with filter paper.
- Prepare stacking gel solution (typically 4-5% acrylamide) with catalysts as above.
- Pour stacking gel solution onto polymerized resolving gel; immediately insert clean comb without trapping bubbles.
- Allow stacking gel to polymerize completely (15-20 minutes).
- Carefully remove comb without tearing wells; rinse wells with running buffer to remove unpolymerized acrylamide.
- Proceed with sample loading and electrophoresis as described for pre-cast gels.
Safety Considerations: Unpolymerized acrylamide is a potent neurotoxin and potential carcinogen; always wear appropriate personal protective equipment (gloves, lab coat, eye protection) when handling liquid acrylamide solutions or unpolymerized gels [116]. Prepare gels in a well-ventilated area or fume hood to minimize exposure to TEMED vapors.
Research Reagent Solutions and Essential Materials
Table 3: Key Research Reagents and Materials for Gel Electrophoresis
| Reagent/Material | Function | Application Notes |
|---|---|---|
| Acrylamide/Bis-acrylamide | Forms polyacrylamide matrix for molecular sieving | Standard ratio is 37.5:1 (acrylamide:bis) for SDS-PAGE; neurotoxic in monomer form [114] |
| Bis-Tris Buffer | Maintains neutral pH during electrophoresis | Reduces protein modifications; improves band sharpness and transfer efficiency [117] |
| TEMED/APS | Polymerization catalysts for acrylamide | TEMED concentration affects polymerization rate; fresh APS solution required for consistent results |
| Pre-cast Gel Cassettes | Ready-to-use separation matrix | Available in various percentages and formats; require proper storage at 4°C [115] |
| SDS Sample Buffer | Denatures proteins and confers negative charge | Typically contains SDS, glycerol, tracking dye, and reducing agent (DTT or β-mercaptoethanol) |
| Protein Molecular Weight Markers | Reference standards for size determination | Prestained markers allow visual tracking; unstained markers provide higher accuracy for mass determination |
| SYBR Safe/Coomassie | Protein/nucleic acid staining | SYBR Safe for DNA; Coomassie Blue or silver stain for proteins; varying sensitivity levels [113] |
Alternative casting systems like the mPAGE Lux Casting System utilize UV irradiation for polymerization instead of chemical catalysts, reducing exposure to toxic chemicals and enabling rapid gel production (approximately 3 minutes from start to finish) [114]. These systems represent a hybrid approach, offering some customization benefits of laboratory-cast gels with reduced preparation time and improved consistency compared to traditional hand-casting methods.
Applications in Research and Drug Development
Proteomics and Biomarker Discovery
The consistency and reproducibility of pre-cast gels make them particularly valuable in proteomics research, where quantitative comparisons across multiple samples and experimental conditions are essential [118]. The global protein pre-cast gel market, valued at approximately $784.5 million in 2023 and projected to reach $1,235.8 million by 2032, reflects growing adoption in research and diagnostic applications [118]. In biomarker discovery workflows, pre-cast gradient gels enable resolution of complex protein mixtures from clinical samples, facilitating identification of disease-specific protein patterns with minimal technical variability [115] [118]. The pharmaceutical and biotechnology sectors increasingly rely on pre-cast gels for quality control of biological products, where consistent performance is necessary for regulatory compliance [115] [118].
Diagnostic and Clinical Applications
Clinical diagnostics represents a growing application area for pre-cast gel technology, particularly in characterizing protein biomarkers for disease detection and monitoring [115] [118]. The standardized format supports implementation in regulated laboratory environments, where quality control and documentation requirements favor manufactured reagents over laboratory-prepared materials. Pre-cast gels are employed in diagnostic assays for genetic disorders, cancer biomarkers, and infectious diseases, providing reproducible protein separation for clinical interpretation [115]. The expanding field of personalized medicine further drives adoption, as protein analysis becomes increasingly important for patient stratification and targeted therapy selection [118].
Decision Framework and Future Perspectives
The choice between pre-cast and laboratory-cast gels involves consideration of multiple factors, including experimental goals, technical expertise, budget constraints, and required throughput. The following decision pathway provides a systematic approach for researchers:
Gel Selection Decision Pathway
Future developments in gel electrophoresis technology include increased integration with automated systems, specialized formulations for emerging applications, and continued improvement in resolution and sensitivity [115] [117]. The Bis-Tris pre-cast gel market specifically is projected to grow significantly, driven by demand for higher resolution separations in pharmaceutical and clinical applications [117]. Emerging trends include gels with extended shelf life, reduced run times, and specialized formulations for challenging samples such as membrane proteins or protein complexes [117]. Technological innovations like the colored stacking gel method for visual quality control address specific limitations in traditional gel preparation methods [12].
For both pre-cast and laboratory-cast systems, the fundamental relationship between stacking and resolving gel functions remains central to separation performance. The stacking gel's role in concentrating disparate protein samples into sharp initial bands, combined with the resolving gel's molecular sieving properties, creates the high-resolution separation essential for modern protein analysis. Understanding these fundamental principles enables researchers to optimize their electrophoretic separations regardless of the gel format selected, ensuring robust and interpretable results across diverse applications from basic research to clinical diagnostics.
Conclusion
The precise interplay between the stacking and resolving gels is fundamental to the success of SDS-PAGE, enabling the high-resolution separation of proteins that underpins modern molecular biology and drug development. Mastering the foundational principles, coupled with robust methodological execution and systematic troubleshooting, is essential for generating reliable, reproducible data. Future directions point toward increased automation, integration with digital analytics and AI for data interpretation, and the continued development of innovative gel formulations that save time while maintaining performance. A deep understanding of this core technique ensures its continued vital role in advancing proteomic research and clinical diagnostics.
References
- 1. The Evolution of SDS-Based Protein Separation [https://www.bio-techne.com/resources/blogs/advantages-of-ce-sds]
- 2. Overview of Protein Electrophoresis [https://www.thermofisher.com/us/en/home/life-science/protein-biology/protein-biology-learning-center/protein-biology-resource-library/pierce-protein-methods/overview-electrophoresis.html]
- 3. SDS-PAGE: The science behind all those bubbles [https://www.antibodiesinc.com/pages/sds-page-demystified?srsltid=AfmBOopZzA1JUV5NxwfTO7C2XvUbO_n0rVSOyPPctia95Rwuc4gK6GMW]
- 4. How SDS-PAGE Works: 7 Key Points Every Scientist ... [https://bitesizebio.com/580/how-sds-page-works/]
- 5. 1.15: SDS-PAGE [https://bio.libretexts.org/Bookshelves/Biotechnology/Lab_Manual%3A_Introduction_to_Biotechnology/01%3A_Techniques/1.15%3A_SDS-PAGE]
- 6. SDS-PAGE Experiment Protocol [https://microbiosci.creative-biogene.com/sds-page-experiment-protocol.html]
- 7. Native SDS-PAGE: High Resolution Electrophoretic ... [https://pmc.ncbi.nlm.nih.gov/articles/PMC4517606/]
- 8. Quantification of Folded and Misfolded Proinsulin Forms ... [https://pmc.ncbi.nlm.nih.gov/articles/PMC12152102/]
- 9. A systematic evaluation of sample preparation and 2-D gel ... [https://www.sciencedirect.com/science/article/pii/S2215016124001316]
- 10. What is SDS-PAGE? Uses, How It Works & Top Companies ... [https://www.linkedin.com/pulse/what-sds-page-uses-how-works-top-companies-2025-clearsedge-research-kztwf]
- 11. Overview of Protein Electrophoresis [https://www.thermofisher.com/id/en/home/life-science/protein-biology/protein-biology-learning-center/protein-biology-resource-library/pierce-protein-methods/overview-electrophoresis.html]
- 12. A time-saving one-step polyacrylamide gel with a colored ... [https://www.sciencedirect.com/science/article/abs/pii/S0003269724002240]
- 13. Western Blot - StatPearls - NCBI Bookshelf - NIH [https://www.ncbi.nlm.nih.gov/books/NBK542290/]
- 14. SDS-PAGE: The science behind all those bubbles [https://www.antibodiesinc.com/pages/sds-page-demystified?srsltid=AfmBOoo2GuB9tX2PPFiTkTKg30jUZNy9rdv4Z5l12EA5sro0yWDUhzBT]
- 15. From Beginner to Pro: The Ultimate Western Blot Guide for ... [https://www.antibodysystem.com/archive/365.html]
- 16. Running agarose and polyacrylamide gels [https://eu.idtdna.com/page/support-and-education/decoded-plus/running-agarose-and-polyacrylamide-gels/]
- 17. Polyacrylamide Gel-electrophoresis across a Molecular ... [https://preview-www.nature.com/articles/2141334a0]
- 18. “Molecular-sieve” electrophoresis in cross-linked ... [https://www.sciencedirect.com/science/article/pii/S0021967301808700]
- 19. What is the difference between stacking gel and resolving ... [https://www.aatbio.com/resources/faq-frequently-asked-questions/What-is-the-difference-between-stacking-gel-and-resolving-gel-in-SDS-PAGE]
- 20. Polyacrylamide Electrophoresis Gel Market Expansion [https://www.datainsightsmarket.com/reports/polyacrylamide-electrophoresis-gel-197581]
- 21. Choosing Between Agarose and Polyacrylamide Gels [https://www.labx.com/resources/choosing-between-agarose-and-polyacrylamide-gels-a-comparative-guide/5537]
- 22. SDS-PAGE: The science behind all those bubbles [https://www.antibodiesinc.com/pages/sds-page-demystified?srsltid=AfmBOor9BD7q2SaCWX2itjrsigoqDwTrYRQpgQBpDl86SgNJXria6EAn]
- 23. Understanding Pore Size and Gel Properties – PAM ... [https://witcarbon.com/agarose-vs-polyacrylamide-understanding-pore-size-and-gel-properties/]
- 24. A Guide to Gradient Gels: The Why's and How's [https://bitesizebio.com/47184/gradient-gels/]
- 25. Real-time and quantitative protein detection via ... [https://www.sciencedirect.com/science/article/abs/pii/S0003267024000205]
- 26. 14.1: Background - Biology LibreTexts [https://bio.libretexts.org/Bookshelves/Cell_and_Molecular_Biology/Book%3A_Investigations_in_Molecular_Cell_Biology_(O'Connor)/14%3A_SDS-PAGE/14.01%3A_Background]
- 27. SDS-PAGE: The science behind all those bubbles [https://www.antibodiesinc.com/pages/sds-page-demystified?srsltid=AfmBOor2TMjGzbMBNqd-xFoaPsbohbFEcfVKziYscbuN864c95sSMWPh]
- 28. How does a stacking gel work? [https://www.aatbio.com/resources/faq-frequently-asked-questions/How-does-a-stacking-gel-work]
- 29. PAGE gel layers [https://theory.labster.com/gel_layers/]
- 30. A time-saving one-step polyacrylamide gel with a colored ... [https://pubmed.ncbi.nlm.nih.gov/39341484/]
- 31. A versatile electrophoresis system for the analysis of high [https://pmc.ncbi.nlm.nih.gov/articles/PMC2779374/]
- 32. In-gel refolding allows fluorescence detection of fully ... [https://www.sciencedirect.com/science/article/pii/S0003269725000995]
- 33. High-resolution native electrophoresis in-gel activity assay ... [https://www.nature.com/articles/s41598-025-24684-3]
- 34. SDS-PAGE [https://en.wikipedia.org/wiki/SDS-PAGE]
- 35. SDS-PAGE: The science behind all those bubbles [https://www.antibodiesinc.com/pages/sds-page-demystified?srsltid=AfmBOooUBPArXs0_PYXKP0ffe4q3lfG4vH6NWBxisTIKkpWutR16ULLa]
- 36. How Does SDS-PAGE Work? A Comprehensive Guide [https://www.metwarebio.com/how-sds-page-works-guide/]
- 37. How to choose an acrylamide gel concentration for western ... [https://hellobio.com/how-to-choose-an-acrylamide-gel-concentration-for-western-blot/]
- 38. Casting of a polyacrylamide gel [https://www.protocols.io/view/casting-of-a-polyacrylamide-gel-hchb2t6.html]
- 39. Comprehensive Guide to Polyacrylamide Gel Preparation ... [https://www.alfa-chemistry.com/resources/comprehensive-guide-to-polyacrylamide-gel-preparation-and-application.html]
- 40. An Easy SDS-PAGE Gel Recipe & 10-Step Protocol [https://bitesizebio.com/59429/sds-page-gel-recipe/]
- 41. 14.2: Casting SDS-PAGE gels [https://bio.libretexts.org/Bookshelves/Cell_and_Molecular_Biology/Book%3A_Investigations_in_Molecular_Cell_Biology_(O'Connor)/14%3A_SDS-PAGE/14.02%3A_Casting_SDS-PAGE_gels]
- 42. Western Blot - StatPearls - NCBI Bookshelf - NIH [https://www.ncbi.nlm.nih.gov/sites/books/NBK542290/]
- 43. SDS-PAGE: A Cornerstone of Protein Analysis in Modern ... [https://www.metwarebio.com/sds-page-protein-analysis/]
- 44. Western Blot SDS-PAGE [https://www.novusbio.com/support/support-by-application/western-blot-sds-page?srsltid=AfmBOor6EWDHKd6WLN5RCmlhV5tdodLSIy8cKXXIi3_2rQ2NCdtOHY_e]
- 45. Electrophoresis in western blot [https://www.abcam.com/en-us/technical-resources/guides/western-blot-guide/electrophoresis]
- 46. One-Dimensional SDS Gel Electrophoresis of Proteins with ... [https://www.thermofisher.com/us/en/home/references/protocols/proteins-expression-isolation-and-analysis/sds-page-protocol/one-dimensional-sds-gel-electrophoresis-of-proteins-pre-cast-gels-.html]
- 47. Troubleshooting SDS-PAGE Gel Running Issues [https://www.goldbio.com/blogs/articles/troubleshooting-sds-page-gel-running-issues?srsltid=AfmBOooEt_8q3_-WMxBIZuuP47x2e5ZyT9JFs0Lki9xHfR1tbXL77Q5m]
- 48. A 96-Well Polyacrylamide Gel for Electrophoresis and ... [https://pmc.ncbi.nlm.nih.gov/articles/PMC11923646/]
- 49. SDS-PAGE: The science behind all those bubbles [https://www.antibodiesinc.com/pages/sds-page-demystified?srsltid=AfmBOor6_e4-lLkhC200KA8wNYgo56r47z8Hx5AzFNRWCgNVJuQCY6qm]
- 50. Multiple immunoblots by passive diffusion of proteins from ... [https://pmc.ncbi.nlm.nih.gov/articles/PMC7305815/]
- 51. Stacking Buffer [https://www.bostonbioproducts.com/products/stacking-buffer-bp-95]
- 52. SDS-PAGE: The science behind all those bubbles [https://www.antibodiesinc.com/pages/sds-page-demystified?srsltid=AfmBOorvuL4sP8hcH1lXRxcPU9PCd-sz5-d6x6NHRKGommtoDJCkHVAN]
- 53. Preparing protein samples for sds-page [https://www.ruf.rice.edu/~bioslabs/studies/sds-page/denature.html]
- 54. How to Master SDS-PAGE and Western Blot in 5 Easy Steps [https://www.neobiotechnologies.com/resources/sds-page-western-blot/?srsltid=AfmBOoofFi0orJbcEybiqLnTgc_S6CODjnPwjznKpyd3OZVs65oi3pvO]
- 55. Sample preparation for western blot [https://www.abcam.com/en-us/technical-resources/guides/western-blot-guide/sample-preparation-for-western-blot]
- 56. The principle and method of polyacrylamide gel ... [https://www.mblbio.com/bio/g/support/method/sds-page.html]
- 57. Guide to Western Blot Sample Preparation [https://www.assaygenie.com/blog/guide-to-western-blot-sample-preparation?srsltid=AfmBOoqRFEC2axj81ARqgsJ_njFKDmoaXWfni0wca_S6y5vRG9Uw4cPm]
- 58. Western Blot Sample Preparation Protocol [https://www.thermofisher.com/us/en/home/life-science/protein-biology/protein-biology-learning-center/protein-gel-electrophoresis-information/western-blot-protocols/western-blot-sample-preparation.html]
- 59. Western Blot Services Market Outlook 2025-2032 [https://www.intelmarketresearch.com/western-blot-services-2025-2032-793-6141]
- 60. Quantitative vs. Qualitative Western Blot Analysis [https://www.labx.com/resources/quantitative-vs-qualitative-western-blot-analysis-what-you-need-to-know/5569]
- 61. Western Blotting Market to Grow at 6.05% CAGR by 2034 [https://www.towardshealthcare.com/insights/western-blotting-market-sizing]
- 62. Western Blot: The Complete Guide [https://www.antibodies.com/applications/western-blotting]
- 63. SDS-PAGE: The science behind all those bubbles [https://www.antibodiesinc.com/pages/sds-page-demystified?srsltid=AfmBOoqEEMdvlPVXi7SALJPdYU0Iogijwp8Ye6fgKj7_QS5M3M75NLHg]
- 64. Western Blot Protocols and Recipes [https://www.thermofisher.com/us/en/home/life-science/protein-biology/protein-biology-learning-center/protein-gel-electrophoresis-information/western-blot-protocols.html]
- 65. Western Blotting Market Size and Forecast 2025 to 2034 [https://www.precedenceresearch.com/western-blotting-market]
- 66. Western Blot Processors Market Insights and Forecast to ... [https://www.linkedin.com/pulse/western-blot-processors-market-insights-forecast-2033-wqeec/]
- 67. Western Blot Quantitative Analysis System [https://www.datainsightsmarket.com/reports/western-blot-quantitative-analysis-system-1763711]
- 68. Nucleic Acid Gel Electrophoresis Troubleshooting [https://www.thermofisher.com/us/en/home/life-science/cloning/cloning-learning-center/invitrogen-school-of-molecular-biology/na-electrophoresis-education/na-electrophoresis-troubleshooting.html]
- 69. SDS-PAGE: The science behind all those bubbles [https://www.antibodiesinc.com/pages/sds-page-demystified?srsltid=AfmBOopFvTxozUvqkM2klZCgTW4qHbU5kktL0UghFgSsURMAuBboJyBw]
- 70. Smeared protein gels [https://www.ruf.rice.edu/~bioslabs/studies/sds-page/gelgoofs/smear.html]
- 71. Troubleshooting SDS-PAGE Gel Running Issues [https://www.goldbio.com/blogs/articles/troubleshooting-sds-page-gel-running-issues?srsltid=AfmBOoqzj6RyvNXJmUFm9MqrkCMliahXqaz2ninsxP41lzuLKLteZNZE]
- 72. SDS-PAGE: The science behind all those bubbles [https://www.antibodiesinc.com/pages/sds-page-demystified?srsltid=AfmBOopQLgqN9_QO1rAIA0LUfmHUYvC2iAdGhCtYkvhKm8jD3UwP6AiX]
- 73. Eight Tips to Improve Gel Electrophoresis Results [https://www.thermofisher.com/us/en/home/brands/thermo-scientific/molecular-biology/molecular-biology-learning-center/molecular-biology-resource-library/spotlight-articles/8-DNA-ladder-tips.html]
- 74. Protocols Agarose Gel Electrophoresis [https://www.addgene.org/protocols/gel-electrophoresis/]
- 75. Biotechnology 101 Protocol: Gel Electrophoresis [https://bento.bio/protocol/biotechnology-101/gel-electrophoresis/]
- 76. Quantitative Western Blot Analysis [https://www.thermofisher.com/us/en/home/life-science/protein-biology/protein-biology-learning-center/protein-biology-resource-library/pierce-protein-methods/quantitative-western-blot-analysis.html]
- 77. Optimizing gelation time for cell shape control through active ... [https://pubs.rsc.org/en/content/articlehtml/2025/sm/d4sm01130a]
- 78. SDS-PAGE Gel Electrophoresis [https://www.protocols.io/view/sds-page-gel-electrophoresis-7hnhj5e.html]
- 79. Wellbore Deformation — A Silent Assassin [https://jpt.spe.org/wellbore-deformation-a-silent-assassin]
- 80. SDS-PAGE: The science behind all those bubbles [https://www.antibodiesinc.com/pages/sds-page-demystified?srsltid=AfmBOopcA1iU4uBY9eP4V96BxtqNF1vTGyaf8ofE7plTrgxbSBMPKssy]
- 81. Optimization of light-curing ionogels by response surface ... [https://pubs.rsc.org/en/content/articlehtml/2025/lp/d4lp00381k]
- 82. Progress in Research on Metal Ion Crosslinking Alginate ... [https://www.mdpi.com/2310-2861/11/1/16]
- 83. Development and evaluation of lysine-crosslinked re ... [https://www.sciencedirect.com/science/article/abs/pii/S0167732224011899]
- 84. Molecular-weight size marker [https://en.wikipedia.org/wiki/Molecular-weight_size_marker]
- 85. Polyacrylamide Gel Electrophoresis, How It... | Technology Networks [https://www.technologynetworks.com/analysis/articles/polyacrylamide-gel-electrophoresis-how-it-works-technique-variants-and-its-applications-359100]
- 86. proteins - What is the purpose of using two layers of gel in SDS- PAGE? [https://biology.stackexchange.com/questions/31419/what-is-the-purpose-of-using-two-layers-of-gel-in-sds-page]
- 87. Experimental Protocol for Western Blotting | AAT Bioquest [https://www.aatbio.com/resources/application-notes/experimental-protocol-for-western-blotting]
- 88. pHAPE: a plasmid for production of DNA size marker ladders ... [https://pmc.ncbi.nlm.nih.gov/articles/PMC10400483/]
- 89. Molecular Weight Markers | DNA Ladders [https://www.promega.com/products/cloning-and-dna-markers/dna-ladder-rna-ladder/]
- 90. Gelatin zymography protocol | Abcam [https://www.abcam.com/en-us/technical-resources/protocols/gelatin-zymography]
- 91. Agarose Gel Electrophoresis for the Separation of DNA ... [https://pmc.ncbi.nlm.nih.gov/articles/PMC4846332/]
- 92. Differences between SDS PAGE and Native PAGE [https://www.geeksforgeeks.org/biology/differences-between-sds-page-and-native-page/]
- 93. How Is Native PAGE Different from SDS-PAGE? [https://synapse.patsnap.com/article/how-is-native-page-different-from-sds-page]
- 94. SDS PAGE vs Native PAGE [https://byjus.com/biology/difference-between-sds-page-and-native-page/]
- 95. Gel Electrophoresis, PAGE, SDS - Biochemistry [https://www.medschoolcoach.com/gel-electrophoresis-page-sds-page-mcat-biochemistry/]
- 96. Protein Electrophoresis Using SDS-PAGE: A Detailed ... [https://www.goldbio.com/blogs/articles/protein-electrophoresis-sds-page-overview?srsltid=AfmBOopy0yKA9E-Kok4kJ7ZELMFvpunY-zyKtTQna_YQhSl2PSGBtQDX]
- 97. NativePAGE™ Running Buffer (20X) - FAQs [https://www.thermofisher.com/store/v3/products/faqs/BN2001]
- 98. Blue native electrophoresis protocol [https://www.abcam.com/en-us/technical-resources/protocols/blue-native-electrophoresis]
- 99. SDS-PAGE: The science behind all those bubbles [https://www.antibodiesinc.com/pages/sds-page-demystified?srsltid=AfmBOop6wAYx_heudpF7D0TnG04Pxfv3gqFR6Sh8NbWSox1TB3nLwEpm]
- 100. Mastering Electrophoresis: Techniques, Equipment, and ... [https://www.labx.com/resources/mastering-electrophoresis-techniques-equipment-and-applications-in-dna-rna-and-protei/5535]
- 101. mPAGE® Lux Gel Casting System: Bridging Efficacy and ... [https://www.labroots.com/trending/immunology/26588/mpage-lux-gel-casting-system-bridging-efficacy-convenience-innovation?srsltid=AfmBOoruz670XM13E6M66fkNd5GoWZgHibyueRKCAu2vpubakDtAwayS]
- 102. Yeasen Pre-cast Gel, Easily Run Beautiful Bands! [https://www.yeasenbio.com/blogs/protein/yeasen-pre-cast-gel-easily-run-beautiful-bands]
- 103. Investigating Color-Changing Polymer Gels [https://www.azom.com/article.aspx?ArticleID=21415]
- 104. SDS-PAGE: The science behind all those bubbles [https://www.antibodiesinc.com/pages/sds-page-demystified?srsltid=AfmBOopr_ri3tF8MImbfLz9NDOS3vXEN3A0BHcgpyCQ_tn9-4jys-YKe]
- 105. 2D SDS PAGE in Combination with Western Blotting and ... [https://pubmed.ncbi.nlm.nih.gov/31347071/]
- 106. Western blot [https://en.wikipedia.org/wiki/Western_blot]
- 107. The principle and method of Western blotting (WB) [https://www.mblbio.com/bio/g/support/method/westernblotting.html]
- 108. Western Blotting: Products, Protocols, & Applications [https://www.thermofisher.com/us/en/home/life-science/protein-biology/protein-biology-learning-center/protein-biology-resource-library/pierce-protein-methods/overview-western-blotting.html]
- 109. The Principle and Procedure of Western Blot [https://www.creative-proteomics.com/blog/principle-procedure-western-blot.htm]
- 110. Proteomics Mass Spectrometry Workflows [https://www.thermofisher.com/us/en/home/industrial/mass-spectrometry/proteomics-mass-spectrometry/proteomics-mass-spectrometry-workflows.html]
- 111. Introduction to Proteomics - USF Health [https://health.usf.edu/medicine/corefacilities/proteomics/introduction]
- 112. MS Proteomics Data Preprocessing: Overview & Tools [https://bigomics.ch/blog/how-to-process-raw-mass-spectrometry-data-top-tools-for-proteomics-data/]
- 113. Capillary vs. Gel Electrophoresis: Differences, Advantages, ... [https://www.bostonind.com/blog/capillary-vs-gel-electrophoresis-differences-advantages-and-applications?srsltid=AfmBOooEs6pxMd0jwZWE39Ihy0uz6r18H83fpBKY9wSqkXjohny88hzr]
- 114. Obtaining High-Quality Acrylamide Gels without Compromises [https://www.the-scientist.com/obtaining-high-quality-acrylamide-gels-without-compromises-71669]
- 115. Precast Gels in the Real World: 5 Uses You'll Actually See ... [https://www.linkedin.com/pulse/precast-gels-real-world-5-uses-youll-actually-see-2025-2rlse/]
- 116. Precast Protein Plus Gels in High-Throughput Western Blotting [https://www.iscaconsortium.org/precast-protein-plus-gels-in-high-throughput-western-blotting-reducing-hands-on-time-without-compromising-sensitivity/]
- 117. Bis-Tris Precast Gels Strategic Insights: Analysis 2025 and ... [https://www.archivemarketresearch.com/reports/bis-tris-precast-gels-290650]
- 118. Protein Precast Gel Market Report [https://dataintelo.com/report/global-protein-precast-gel-market]