Primer Design Guide: How to Avoid Hairpin Loops and Dimer Formation for Reliable PCR Results
This article provides a comprehensive guide for researchers and drug development professionals on designing PCR primers that effectively avoid hairpin loops and primer-dimer formation.
Primer Design Guide: How to Avoid Hairpin Loops and Dimer Formation for Reliable PCR Results
Abstract
This article provides a comprehensive guide for researchers and drug development professionals on designing PCR primers that effectively avoid hairpin loops and primer-dimer formation. It covers the foundational principles of secondary structures, practical methodologies for primer design using modern tools like Primer-BLAST, advanced troubleshooting strategies for failed reactions, and robust validation techniques to ensure specificity and efficiency. By integrating current guidelines on thermodynamic parameters like ΔG thresholds and GC content, this guide aims to enhance experimental success rates in genomics, diagnostics, and therapeutic development.
Understanding the Enemy: A Deep Dive into Hairpin Loops and Primer-Dimers
FAQ: Core Concepts and Definitions
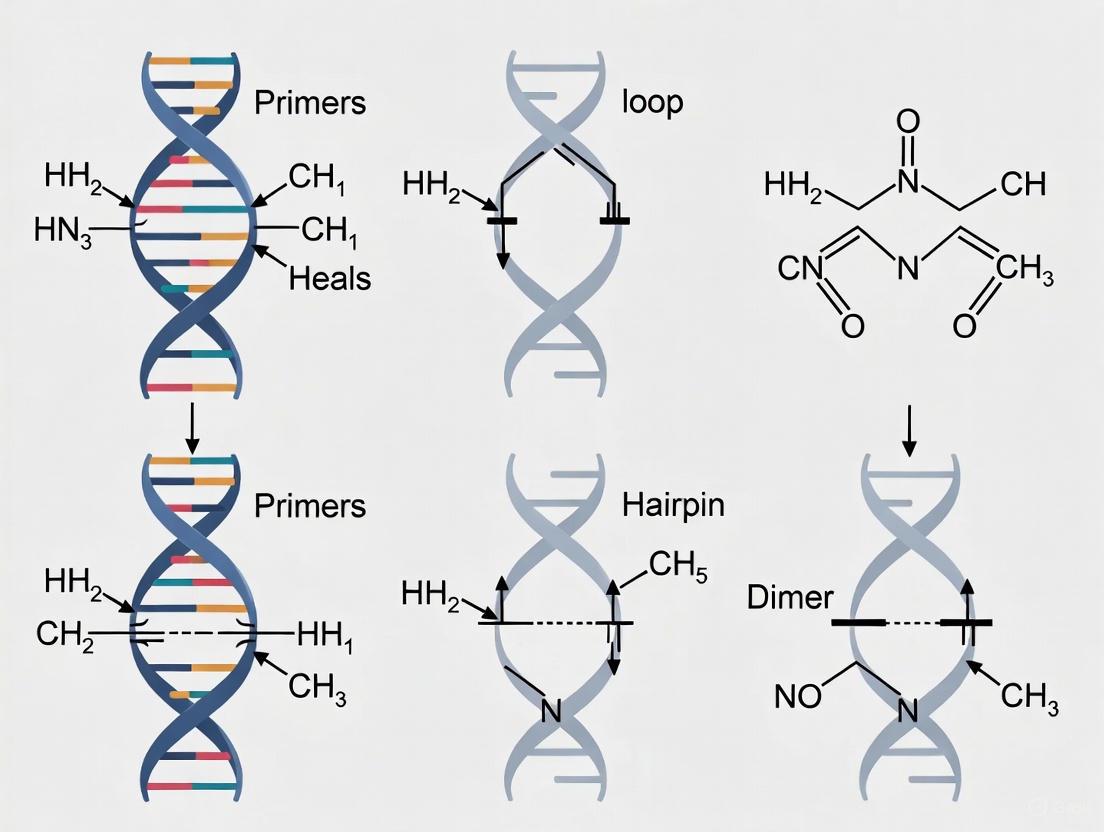
1. What are secondary structures and why are they a critical consideration in primer design? Secondary structures are stable, unintended conformations that oligonucleotides (like PCR primers) can form through intramolecular or intermolecular base pairing. These structures are problematic because they prevent primers from binding to their intended target DNA sequence. This leads to reduced PCR efficiency, non-specific amplification, low yield, or complete experimental failure [1] [2]. For researchers and drug development professionals, avoiding these structures is essential for developing reliable diagnostic assays and ensuring reproducible experimental results.
2. What is the fundamental difference between a hairpin and a dimer? The key difference lies in the number of oligonucleotide molecules involved:
- Hairpin: Formed by a single primer or oligonucleotide folding back onto itself.
- Dimer: Formed by the interaction between two separate oligonucleotides (either two copies of the same primer or two different primers).
3. How do hairpins form and what is their specific impact on PCR? Hairpins, also known as stem-loop structures, form when two regions within a single primer are complementary to each other, causing the molecule to fold [2]. This creates a double-stranded "stem" and a single-stranded "loop."
- Impact: When a hairpin forms at the 3' end of a primer, it can physically block the DNA polymerase from binding and initiating DNA synthesis, thereby preventing any amplification of the target sequence [2]. Internal hairpins can reduce binding efficiency and cause non-specific products [1] [3].
4. What distinguishes a self-dimer from a hetero-dimer (primer-dimer)?
- Self-Dimer: This occurs when two copies of the same primer molecule (e.g., two forward primers) bind to each other due to complementary regions within their sequences [4] [2]. This is a form of intra-primer homology.
- Hetero-Dimer (Primer-Dimer): This forms when the forward and reverse primers bind to each other because they share complementary sequences [4] [2]. This is a form of inter-primer homology. Hetero-dimers are particularly problematic as they create a short, unintended template that can be efficiently amplified by the DNA polymerase, consuming reaction resources and leading to false-positive results in qPCR or smeary bands on a gel [4] [5].
5. What are the key thermodynamic principles (like ΔG) for evaluating these structures? The stability of secondary structures is measured by their Gibbs Free Energy change (ΔG), which indicates the energy released when the structure forms.
- Interpretation: A more negative ΔG value indicates a more stable, and therefore more problematic, structure [2].
- Thresholds: The following table provides consensus ΔG thresholds for identifying problematic structures in primer design [2]:
| Structure Type | Acceptable (ΔG, kcal/mol) | Moderate Risk (ΔG, kcal/mol) | High Risk (ΔG, kcal/mol) | Action Required |
|---|---|---|---|---|
| Hairpins | > -3.0 | -3.0 to -6.0 | < -6.0 | Accept if > -3; redesign if < -6 |
| Self-Dimers | > -5.0 | -5.0 to -8.0 | < -8.0 | Accept if > -5; redesign if < -8 |
| Hetero-Dimers | > -5.0 | -5.0 to -8.0 | < -8.0 | Critical for primer pairs; redesign if < -8 |
Structures involving the 3' ends of primers are especially detrimental and should be prioritized for redesign [2].
Troubleshooting Guide: Resolving Secondary Structure Issues
Problem 1: Suspected Hairpin Formation
Symptoms: No PCR product, very low yield, or non-specific amplification [3].
Methodologies and Solutions:
- In Silico Redesign:
- Protocol: Use a secondary structure prediction tool (e.g., OligoAnalyzer). Input your primer sequence and set the analysis temperature to match your PCR annealing temperature. Analyze the reported hairpins and their ΔG values [2] [6].
- Action: If the hairpin ΔG falls into the "High Risk" category, redesign the primer by changing bases in the predicted stem region to non-complementary ones. Avoid long runs of identical bases [7].
- Wet-Lab Experimental Modifications:
- Protocol: If redesign is not possible, increase the annealing temperature in your PCR protocol. Structures are more stable at lower temperatures, so a higher temperature can help denature the hairpin and make the primer available for binding [2].
- Protocol: Add PCR-enhancing additives like DMSO (Dimethyl Sulfoxide) to the reaction mix. DMSO reduces the stability of secondary structures by interfering with base pairing [2] [3].
Problem 2: Suspected Primer-Dimer Formation
Symptoms: A smeary, fuzzy band below 100 bp in gel electrophoresis (for conventional PCR); false-positive signals or reduced amplification efficiency in qPCR [4].
Methodologies and Solutions:
- Diagnostic Protocol: Run a No-Template Control (NTC). Include a control reaction where no DNA template is added. If amplification occurs in the NTC, it is a clear indicator of primer-dimer formation, as the primers are amplifying each other [4].
- In Silico Redesign:
- Wet-Lab Optimizations:
- Protocol: Lower the primer concentration in the reaction. A high primer-to-template ratio increases the chance of primers encountering each other instead of the template [4] [9].
- Protocol: Use a hot-start DNA polymerase. These enzymes are inactive until a high-temperature activation step, preventing primer-dimer formation during reaction setup at lower temperatures [4].
- Protocol: Increase the annealing temperature to promote more specific binding and discourage the weaker primer-primer interactions [4].
Research Reagent Solutions
The following table details key reagents and their functions in troubleshooting secondary structure issues.
| Research Reagent | Function & Application in Troubleshooting |
|---|---|
| Hot-Start DNA Polymerase | Withholds polymerase activity until initial denaturation step at high temperature, preventing primer-dimer formation during reaction setup [4]. |
| DMSO (Dimethyl Sulfoxide) | Additive that reduces DNA secondary structure stability by interfering with hydrogen bonding; useful for GC-rich templates and hairpin-prone primers [2] [3]. |
| Secondary Structure Prediction Software | In silico tools (e.g., OligoAnalyzer, Primer-BLAST) used to calculate ΔG values and predict hairpins/dimers before physical experimentation [2] [3] [6]. |
| SAMRS-Containing Primers | Specialized primers incorporating Self-Avoiding Molecular Recognition Systems nucleotides. SAMRS bases pair with natural DNA but not with each other, inherently minimizing primer-dimer formation [5]. |
Troubleshooting Guides
Guide: Diagnosing and Resolving Hairpin Structures
What are the symptoms of a hairpin problem?
- Reduced PCR amplification efficiency or complete PCR failure [2]
- Non-specific amplification products or smeared bands in gel electrophoresis [2]
- In qPCR, increased Ct values and reduced sensitivity [2]
Step-by-Step Diagnosis and Solution Protocol:
- Confirm the Presence of Hairpins: Use a secondary structure prediction tool (e.g., OligoPool's Secondary Structure Predictor). Input your sequence and analyze at your experimental annealing temperature. A hairpin is confirmed if the free energy value (ΔG) is more negative than the acceptable threshold [2].
- Interpret the ΔG Value:
- Acceptable: ΔG > -3 kcal/mol (preferably > -2 kcal/mol)
- Moderate Risk: ΔG between -3 and -6 kcal/mol
- High Risk: ΔG < -6 kcal/mol (requires sequence redesign) [2]
- Implement Corrective Actions:
- Sequence Redesign: The most effective solution. Modify bases in the stem region to disrupt complementarity, ensuring the 3' end remains unpaired [2] [7].
- Experimental Adjustments:
- Increase the annealing temperature to prevent the primer from folding on itself [4] [10].
- Use PCR additives or co-solvents like DMSO, which can help denature stable secondary structures [10].
- Opt for a DNA polymerase with high processivity, which has a stronger affinity for the template and can be more effective at amplifying difficult targets with secondary structures [10].
Guide: Diagnosing and Resolving Primer-Dimer Formation
What are the symptoms of a primer-dimer problem?
- A fuzzy or smeary band below 100 bp on an agarose gel, well below the expected amplicon size [4].
- False-positive signals in a No Template Control (NTC) in qPCR, particularly with late amplification (e.g., beyond cycle 34 for SYBR Green assays) [11].
- Reduced yield of the desired PCR product due to competition for reagents [2] [4].
Step-by-Step Diagnosis and Solution Protocol:
- Run a No Template Control (NTC): This is critical. Include a reaction containing all PCR components except the template DNA. Amplification in the NTC indicates primer-dimer formation or contamination [4] [11].
- Analyze the Dimer Risk: Use a primer analysis tool to check for self- and cross-dimer formation. Pay close attention to complementarity at the 3' ends of the primers [2] [7].
- Interpret the ΔG Value for Dimers:
- Acceptable: ΔG > -5 kcal/mol (preferably > -3 kcal/mol)
- Moderate Risk: ΔG between -5 and -8 kcal/mol
- High Risk: ΔG < -8 kcal/mol (requires sequence redesign) [2]
- Implement Corrective Actions:
- Primer Redesign: This is the most definitive solution. Avoid regions of inter-primer homology (complementarity between forward and reverse primers) and ensure the 3' ends are not complementary [7] [1].
- Optimize Reaction Conditions:
- Lower primer concentration: A high primer-to-template ratio encourages primers to anneal to each other. Optimize primer concentrations, typically between 0.1–1 μM [4] [10].
- Increase annealing temperature: This promotes stricter binding and reduces non-specific interactions like dimerization [4] [10].
- Use a hot-start DNA polymerase: This enzyme is inactive until a high-temperature activation step, preventing spurious primer extension during reaction setup [4] [10].
Frequently Asked Questions (FAQs)
What are secondary structures in oligonucleotides, and why do they matter for my experiments?
Secondary structures are stable conformations that primers or probes adopt through intramolecular (hairpins) or intermolecular (dimers) base pairing. These structures are problematic because they prevent the oligonucleotide from binding to its intended target sequence [2]. This leads to:
- Reduced PCR efficiency and yield [2] [10].
- Non-specific amplification and false-positive results, especially in qPCR [2] [11].
- Failure of CRISPR guide RNAs to form functional complexes, reducing editing efficiency by 50-80% [2].
How do I interpret ΔG (free energy) values from a structure prediction tool?
ΔG indicates the stability of a secondary structure. A more negative ΔG value signifies a more stable, and therefore more problematic, structure [2]. The following table summarizes the key thresholds for different structure types:
Table: Interpreting ΔG Values for Secondary Structures
| Structure Type | Acceptable (ΔG, kcal/mol) | Moderate Risk (ΔG, kcal/mol) | High Risk (ΔG, kcal/mol) |
|---|---|---|---|
| Hairpins | > -3 (pref. > -2) | -3 to -6 | < -6 |
| Self-Dimers | > -5 (pref. > -3) | -5 to -8 | < -8 |
| Hetero-Dimers | > -5 (pref. > -3) | -5 to -8 | < -8 |
Structures with ΔG in the "High Risk" category require sequence redesign. Structures involving 3' ends are particularly detrimental for PCR primers [2].
My PCR results show a smeary band at ~100 bp. Is this a primer-dimer, and how can I be sure?
Yes, a fuzzy or smeary band below 100 bp is a classic sign of primer-dimer [4]. To confirm:
- Run a No Template Control (NTC): If the same smeary band appears in the NTC, it confirms the amplification is due to primer interactions and not your target DNA [4] [11].
- Run the gel longer: Primer-dimers are small and will run far ahead of your desired product. Running the gel longer can help separate them from your amplicon [4].
What are the fundamental principles for designing primers to avoid secondary structures from the start?
Adhering to these design principles during the in silico phase can prevent most issues [7] [1]:
- Check for Self-Complementarity: Use primer design software to ensure your primers have low "self-complementarity" and "self 3'-complementarity" scores [1].
- Avoid Long Repeated Bases: Do not include runs of 4 or more of the same base (e.g., AAAA or CCCC) or dinucleotide repeats (e.g., ATATAT) [7].
- Follow General Design Rules:
Experimental Protocol: A Workflow for Primer Analysis and Validation
The following diagram illustrates a systematic workflow for analyzing primers to prevent amplification issues.
Research Reagent Solutions
This table lists key reagents and tools essential for troubleshooting and preventing issues related to secondary structures.
Table: Essential Reagents and Tools for Troubleshooting Secondary Structures
| Reagent / Tool | Function / Application | Key Consideration |
|---|---|---|
| Hot-Start DNA Polymerase | Reduces primer-dimer formation and non-specific amplification by remaining inactive until a high-temperature activation step [4] [10]. | Essential for high-sensitivity applications like qPCR and multiplex PCR. |
| PCR Additives (e.g., DMSO) | Helpts denature GC-rich templates and reduce the stability of secondary structures, improving amplification efficiency [10]. | Concentration must be optimized, as excess can inhibit the polymerase [10]. |
| Secondary Structure Predictor | In silico tool to detect and analyze potential hairpins and dimers by calculating stability (ΔG) [2]. | Always set the analysis temperature to match your experimental annealing temperature for accurate prediction [2]. |
| NCBI Primer-BLAST | Designs primers and checks their specificity against a selected database to ensure they bind only to the intended target [12]. | Crucial for avoiding false positives from off-target amplification [11] [12]. |
| Optical Tweezer Single-Molecule Assay | A research technique for characterizing the binding kinetics of proteins (e.g., transcription factors) to DNA, revealing how sequence and methylation affect residence time [13]. | Provides high-level mechanistic insights but is typically used for foundational research rather than routine troubleshooting. |
In the context of molecular biology and primer design, Gibbs Free Energy (ΔG) is a fundamental thermodynamic parameter that predicts the spontaneity and stability of nucleic acid interactions [14] [15]. A negative ΔG value indicates a spontaneous, favorable process, while a positive ΔG suggests a non-spontaneous one that requires energy input [15]. For researchers designing primers to avoid hairpin loops and dimer formation, understanding and calculating ΔG is not merely theoretical—it is a critical, practical necessity for experimental success.
The formation of problematic secondary structures, such as hairpins and primer-dimers, is governed by the same thermodynamic principles. These structures, if present, can outcompete the intended primer-target binding, leading to failed amplification, high background, or false-positive results [16]. The nearest-neighbor model, which calculates the overall ΔG of a structure by summing the free energy contributions of adjacent base pairs, provides the quantitative framework for predicting these interactions [16] [17]. Consequently, a thorough thermodynamic analysis during the primer design phase is a primary strategy for preemptively troubleshooting PCR and related assays.
Key Thermodynamic Concepts and Their Calculations
The Fundamental Equation
The Gibbs Free Energy of a system is defined by the equation: [ G = H - TS ] where (H) is enthalpy, (T) is the absolute temperature, and (S) is entropy [14] [15].
For biochemical processes, including nucleic acid hybridization and the formation of secondary structures, the relevant parameter is the change in free energy, ΔG: [ \Delta G = \Delta H - T \Delta S ] A negative ΔG signifies a spontaneous, exergonic process, while a positive ΔG signifies a non-spontaneous, endergonic one [15].
The Nearest-Neighbor Model
The stability of DNA secondary structures is predominantly calculated using the nearest-neighbor model [16] [17]. This model estimates the total ΔG for the formation of a DNA duplex or other structure by summing the independent, incremental free energy values of all adjacent base-pair stacks in the sequence, rather than considering each base pair in isolation. This approach has been experimentally validated as highly accurate for predicting the behavior of DNA oligonucleotides [17].
Table: Interpretation of ΔG Values in Primer Design
| ΔG Value (kcal/mol) | Thermodynamic Interpretation | Practical Implication for Primers |
|---|---|---|
| Highly Negative (e.g., < -5 kcal/mol) | Very stable, spontaneous interaction | High risk of stable secondary structure formation; likely to cause assay failure. |
| Slightly Negative or Positive | Weak or non-spontaneous interaction | Low risk of interference; primer is likely available for target binding. |
FAQs and Troubleshooting Guide
Frequently Asked Questions
Q1: Why do my primers form hairpins, and how does ΔG predict this? Hairpins form due to self-complementarity within a single primer sequence, where two regions within the same molecule are complementary and can base-pair, forming a stem-loop structure [1]. The likelihood and stability of a hairpin are directly determined by the ΔG of its formation. A highly negative ΔG for the hairpin structure indicates a very stable configuration that will readily form and effectively sequester the primer, making it unavailable for the intended reaction [16]. This is quantitatively represented by the "self 3′-complementarity" parameter in primer analysis software.
Q2: What is the thermodynamic basis for primer-dimer formation? Primer-dimer formation occurs due to complementarity between two primers (cross-dimer) or within a single primer (self-dimer) [1]. Thermodynamically, if the ΔG for the dimerization reaction is more negative than the ΔG for the correct primer-template binding, the system will favor the formation of the dimer product. This is often driven by strong, complementary regions at the 3' ends of the primers, which allow the DNA polymerase to efficiently extend the dimer, consuming reagents and outcompeting the desired amplification [16] [18].
Q3: My PCR has a high background or smeared gel. Could thermodynamics be the cause? Yes. A slowly rising baseline in real-time PCR or smeared bands on a gel can often be attributed to the non-specific amplification of stable primer-dimers or self-amplifying hairpin structures [16] [18]. These structures have a negative ΔG and are being extended by the polymerase, generating a background of non-specific DNA products that can obscure your target amplicon.
Troubleshooting Common Experimental Issues
Table: Troubleshooting Guide Based on Thermodynamic Principles
| Observed Problem | Potential Thermodynamic Cause | Recommended Solution |
|---|---|---|
| No or low yield of the desired product. | Primers are sequestered in highly stable (very negative ΔG) secondary structures or dimers [16] [18]. | Redesign primers to minimize self-complementarity. Use software to check and ensure ΔG of secondary structures is not highly negative. |
| Non-specific amplification or multiple bands. | Low reaction stringency allows primers to bind to non-target sites with a marginally negative ΔG. The 3' ends of primers may have strong complementarity [10] [19]. | Increase the annealing temperature to favor only the most stable (correct) binding. Redesign primers to avoid GC-rich 3' ends and inter-primer complementarity [19]. |
| Primer-dimer formation. | The ΔG of dimerization is more favorable (more negative) than correct annealing [16] [18]. | Lower primer concentration to reduce interaction probability. Redesign primers to eliminate 3'-end complementarity. Use a hot-start polymerase to prevent extension during reaction setup [10] [19]. |
Experimental Protocols and Validation
Protocol: In-silico Thermodynamic Analysis of Primers
Purpose: To predict the stability of secondary structures in primer sequences before synthesis and experimental use.
Materials:
- Primer sequences in FASTA or plain text format.
- Primer analysis software (e.g., IDT OligoAnalyzer [20], NCBI Primer-BLAST [21]).
Method:
- Input Sequence: Enter your candidate primer sequence into the analysis tool.
- Analyze Secondary Structures:
- Select the "Hairpin" function. The tool will use the nearest-neighbor model to calculate and report the ΔG of the most stable hairpin structure predicted [20].
- Select the "Self-Dimer" and "Hetero-Dimer" functions to analyze interactions between two identical primers or between forward and reverse primers, respectively.
- Interpret Results:
- For hairpins, a ΔG that is more negative than -3 kcal/mol is often a cause for concern and may require sequence revision.
- For dimers, pay close attention to the ΔG of structures where the 3' ends are involved, as these are most prone to extension.
Protocol: Empirical Validation and Optimization
Purpose: To experimentally verify that in-silico optimized primers perform robustly in amplification assays.
Materials:
- Synthesized, desalted primers.
- High-fidelity or hot-start DNA polymerase (e.g., Q5 Hot Start High-Fidelity DNA Polymerase [19]).
- Appropriate template DNA.
- Thermal cycler, preferably with gradient functionality.
Method:
- Annealing Temperature Gradient:
- Set up a series of PCR reactions with an annealing temperature gradient, for example, from 55°C to 70°C [10].
- Thermodynamic Principle: Increasing temperature (T) makes the ( -T\Delta S ) term in the ΔG equation more positive, thereby making ΔG less negative. This reduces the stability of all duplexes but has a greater effect on less stable, incorrect interactions.
- The optimal temperature is one that permits efficient amplification of the target (negative enough ΔG for correct binding) while suppressing non-specific products (positive enough ΔG for incorrect binding).
- Analyze Results:
- Run PCR products on an agarose gel. The condition that produces a single, bright band of the expected size represents the optimal thermodynamic balance.
- If non-specific products or primer-dimer persist even at high annealing temperatures, the primer design itself is likely at fault, and a further round of in-silico design is recommended.
Visualizing the Thermodynamic Relationships
The following diagram illustrates the critical decision points in primer design where ΔG analysis is essential to prevent assay failure.
The Scientist's Toolkit: Research Reagent Solutions
Table: Essential Tools for Thermodynamic Analysis and Primer Optimization
| Tool / Reagent | Function / Purpose | Example / Supplier |
|---|---|---|
| Oligo Analyzer Tool | Calculates Tm, ΔG for secondary structures, and potential for dimerization. Essential for in-silico screening. | IDT OligoAnalyzer [20] |
| Specificity Check Tool | Verifies that primers bind uniquely to the intended genomic target, a key factor for a favorable ΔG of the correct reaction. | NCBI Primer-BLAST [21] |
| Hot-Start DNA Polymerase | Remains inactive at low temperatures, preventing enzymatic extension of primed dimers formed during reaction setup, which have a negative ΔG. | NEB OneTaq Hot-Start, Thermo Fisher Scientific enzymes [10] [19] |
| PCR Additives | Can help denature templates with high GC content (stable duplexes with negative ΔG) by altering local thermodynamics. | Betaine, DMSO, GC Enhancers [10] [19] |
| High-Fidelity Polymerase | Reduces misincorporation errors, which can be viewed as introducing destabilizing motifs (positive ΔΔG) into the nascent DNA strand. | NEB Q5 Hot-Start [19] |
Frequently Asked Questions (FAQs)
1. What are secondary structures and why are they problematic in oligonucleotide design?
Secondary structures are stable conformations that oligonucleotides adopt through intramolecular or intermolecular base pairing. The three main types are hairpins (sequences that fold back on themselves), self-dimers (a single oligonucleotide binding to itself), and hetero-dimers (two different sequences binding to each other). These structures interfere with experimental success by preventing binding to target sequences, reducing PCR efficiency, causing non-specific amplification, and interfering with hybridization assays or CRISPR guide RNA activity [2].
2. How do I interpret ΔG (free energy) values for secondary structures?
The ΔG value represents the free energy required to break a secondary structure, with larger negative values indicating more stable, problematic structures [2] [22]. The following table provides comprehensive thresholds for different structure types:
Table: ΔG Value Interpretation and Risk Assessment Guidelines
| Structure Type | Acceptable Range (ΔG, kcal/mol) | Moderate Risk Range (ΔG, kcal/mol) | High Risk Range (ΔG, kcal/mol) | Action Required |
|---|---|---|---|---|
| Hairpins | > -3 (pref. > -2) | -3 to -6 | < -6 | Accept if > -3; redesign if < -6 [2] |
| Self-Dimers | > -5 (pref. > -3) | -5 to -8 | < -8 | Accept if > -5; redesign if < -8 [2] |
| Hetero-Dimers | > -5 (pref. > -3) | -5 to -8 | < -8 | Critical for primer pairs; redesign if < -8 [2] |
3. Why are structures involving the 3' end particularly problematic for PCR primers?
Complementarity at the 3' ends is especially problematic as it allows extension and amplification of the dimer, which prevents proper primer extension by DNA polymerase. This is the most common cause of PCR failure in multiplex reactions [2].
4. How does temperature affect secondary structure formation and analysis?
Structures are more stable at lower temperatures. Using a lower temperature (like 37°C) provides a conservative assessment—if structures are acceptable at 37°C, they'll be even less problematic at higher experimental temperatures. For accurate prediction, always match your actual experimental conditions when possible [2].
5. What are the critical thresholds for hairpin stability?
Optimally, a 3' end hairpin with a ΔG of -2 kcal/mol and an internal hairpin with a ΔG of -3 kcal/mol is generally tolerated. Hairpins with ΔG < -6 kcal/mol are considered high risk and require sequence redesign [2] [22].
Troubleshooting Guides
Issue 1: Problematic Hairpin Structures (ΔG < -3 kcal/mol)
Identification:
- Analyze sequences using secondary structure prediction tools
- Check for ΔG values below -3 kcal/mol
- Identify sequences with long stems and small loops
Resolution Strategies:
- Sequence Redesign:
- Change bases in stem regions to non-complementary nucleotides
- Introduce mismatches that break base pairing
- Modify sequence length to avoid problematic regions
- Maintain critical functional regions (e.g., 3' end for primers) [2]
Experimental Modifications:
- Increase annealing temperature
- Add denaturants (DMSO, formamide) to reduce structure stability
- Use touchdown PCR to minimize structure formation
- Optimize salt concentrations [2]
Modified Bases (for critical applications):
- Consider locked nucleic acids (LNAs) to reduce structure formation
- Use 2'-O-methyl bases to modify base pairing properties
- Implement phosphorothioate linkages [2]
Issue 2: Primer-Dimer Formation (Hetero-Dimers)
Identification:
- Check for complementarity between forward and reverse primers
- Analyze ΔG values for hetero-dimer formation
- Look for complementarity at 3' ends, which is particularly problematic
Resolution Strategies:
- Sequence-Based Solutions:
- Redesign primers to break 3' end complementarity
- Adjust primer positioning to avoid complementary regions
- Ensure dimer ΔG > -5 kcal/mol (preferably > -3 kcal/mol) [2]
- Experimental Optimization:
- Increase annealing temperature
- Optimize primer concentration
- Use hot-start polymerase to prevent mispriming
- Implement touchdown PCR protocols [2]
Issue 3: Self-Dimer Formation
Identification:
- Analyze individual primers for self-complementarity
- Check for ΔG values below -5 kcal/mol
- Identify regions with inverted repeats
Resolution Strategies:
- Primer Redesign:
- Modify sequences to break self-complementarity
- Change bases in dimer-forming regions
- Maintain overall length and Tm requirements [2]
- Alternative Approaches:
- Use software tools to identify optimal primer sequences
- Consider nested primer approaches if redesign fails
- Test multiple primer candidates experimentally [22]
Experimental Protocols
Protocol 1: Secondary Structure Analysis for Primer Design
Materials Needed:
- Secondary structure prediction tool
- Oligonucleotide sequences
- Experimental temperature parameters
Step-by-Step Methodology:
- Access Prediction Tool: Navigate to secondary structure predictor [2]
- Input Sequences: Paste oligonucleotide sequence(s) into input field
- Set Temperature: Configure analysis temperature to match experimental conditions:
- PCR Primers: 55-65°C (match annealing temperature)
- qPCR Probes: 60-65°C (hybridization temperature)
- CRISPR Guides: 37°C (physiological temperature)
- General Analysis: 37°C default (conservative assessment) [2]
Select Structure Types:
- Hairpins (for single sequences)
- Self-dimers (for individual primers)
- Hetero-dimers (for primer pairs) [2]
Interpret Results:
- Review ΔG values for all detected structures
- Compare against threshold tables
- Identify high-risk structures requiring redesign [2]
Implement Solutions:
- Redesign sequences breaking complementarity
- Adjust experimental conditions
- Re-analyze modified sequences [2]
Protocol 2: PCR Primer Validation with Secondary Structure Analysis
Materials Needed:
- Primer design software
- Secondary structure prediction tool
- Template sequence
Methodology:
- Design Primers following standard guidelines:
- Length: 18-22 bp
- Tm: 52-58°C
- GC content: 40-60%
- GC clamp: Avoid >3 G/C in last 5 bases [22]
- Analyze Secondary Structures for all primer candidates
- Check Specificity using BLAST or similar tools [22]
- Validate Primer Pairs:
- Ensure Tm mismatch <5°C between forward and reverse primers
- Check for hetero-dimer formation
- Verify product length meets experimental needs [22]
The Scientist's Toolkit: Research Reagent Solutions
Table: Essential Materials for Secondary Structure Analysis and Troubleshooting
| Reagent/Resource | Function/Application | Usage Notes |
|---|---|---|
| Secondary Structure Predictor | Computational analysis of hairpins, dimers, and ΔG values | Input sequence, set temperature, select structure types to analyze [2] |
| DMSO (Dimethyl Sulfoxide) | Denaturant to reduce secondary structure stability | Add to PCR reactions to improve amplification of structured templates [2] |
| Formamide | Denaturing agent for structure destabilization | Use in hybridization assays to improve probe binding [2] |
| Locked Nucleic Acids (LNAs) | Modified nucleotides that reduce structure formation | Incorporate into probes or primers to minimize secondary structures [2] |
| Touchdown PCR Protocols | Temperature-based approach to minimize mispriming | Gradually decrease annealing temperature to favor specific amplification [2] |
| Salt Optimization Kits | Adjust ionic conditions to influence structure stability | Modify monovalent ion concentration to affect ΔG values [2] |
Application-Specific Guidance
PCR Primer Design
- Always check both individual primers and primer pairs
- Pay special attention to last 3-5 bases at 3' end
- Primers with hairpins at 3' end reduce amplification efficiency by up to 90%
- Hetero-dimers between primer pairs are leading cause of primer-dimer artifacts [2]
CRISPR Guide RNA Design
- Analyze structures at 37°C (physiological temperature)
- Guides with ΔG < -4 kcal/mol for hairpins typically show reduced activity
- Self-dimers can interfere with guide loading into Cas proteins [2]
qPCR Probe Design
- Analyze at hybridization temperature (typically 60-65°C)
- Probes with hairpins involving fluorophore or quencher sites are particularly problematic
- For multiplex qPCR, check all probe combinations for hetero-dimers [2]
Workflow Visualization
Secondary Structure Analysis and Troubleshooting Workflow
Key Principles in Secondary Structure Risk Assessment
Why is the 3' end of a primer considered so critical for successful PCR amplification?
The 3' end of a PCR primer is where DNA polymerase binds and initiates the addition of new nucleotides to synthesize the new DNA strand [23]. For the elongation process to begin, the DNA polymerase requires a stable and perfectly complementary double-stranded structure at this point.
- Primer Function: Primers are short, single-stranded DNA oligonucleotides that bind (anneal) to a specific complementary region of the template DNA, providing a starting point for the DNA polymerase [3].
- Polymerase Specificity: DNA polymerase enzymes extend the primer from its 3' hydroxyl group [23]. A mismatch or weak binding at this terminus can prevent the enzyme from functioning or lead to mis-extension.
- The "GC Clamp": It is recommended that the 3' end terminates with one or two G or C bases. This is because G and C bases form three hydrogen bonds with their complements (as opposed to two for A and T), creating a more stable bond that promotes specific binding and initiation of the polymerization reaction [3] [7]. However, avoid placing more than 3 G/C bases in the final five nucleotides, as this can promote non-specific binding [3].
What specific problems are caused by non-specific complementarity at the primer's 3' end?
When the 3' end of a primer has high complementarity to an unintended sequence—whether to itself, another primer, or an off-target site on the template—it can lead to several experimental failures as summarized in the table below.
Table 1: Problems Caused by 3' End Complementarity
| Problem Type | Description | Consequence |
|---|---|---|
| Primer-Dimer Formation | Two primers anneal to each other via complementary sequences, particularly at their 3' ends. The DNA polymerase can then extend both primers, creating a short, undesired double-stranded product [23]. | Consumes primers and reagents, reducing the efficiency of the target amplification. Generates false-positive signals or nonspecific bands that can obscure results [3] [23]. |
| Mispriming / Off-Target Amplification | The primer, especially its 3' end, binds to a partially complementary but incorrect site on the template DNA [3]. | Amplification of non-target sequences, leading to ambiguous or incorrect results, reduced yield of the desired product, and poor sequencing data [3]. |
| Self-Dimer & Cross-Dimer Formation | A self-dimer occurs when two copies of the same primer anneal. A cross-dimer forms between the forward and reverse primers [3]. | These interactions reduce the pool of functional primers available for the intended reaction, lowering PCR efficiency and yield [3]. |
The following diagram illustrates the logical relationship between 3' end complementarity and its detrimental outcomes in a PCR reaction.
How can I check my primer designs for potential 3' end issues?
A combination of in silico (computational) tools and careful design principles is essential for preventing problems related to the 3' end.
In Silico Validation Tools and Workflow
Before ordering primers, always analyze their sequences with specialized software. The following workflow integrates key checks to ensure primer specificity and stability.
Table 2: Key Parameters for In Silico Primer Analysis
| Parameter | Recommended Value | Tool/Method | Rationale |
|---|---|---|---|
| 3' End Self-Dimer / Cross-Dimer ΔG | > -5 kcal/mol (weaker, more positive) [22] | OligoAnalyzer Tool [24], UNAFold Tool [24] | A ΔG value more negative than -5 kcal/mol indicates a stable dimer that is likely to form and interfere with the reaction [22]. IDT recommends a ΔG value weaker than -9 kcal/mol for any dimer or hairpin [24]. |
| 3' End Hairpin ΔG | > -2 kcal/mol [22] | OligoAnalyzer Tool [24] | A less stable hairpin at the 3' end ensures the primer remains available for binding to the template. |
| 3' End Complementarity | Avoid >3-4 complementary bases between primers [3] | Manual inspection & software | Limits the potential for primer-dimer formation. |
| Specificity | Unique to the target sequence | NCBI Primer-BLAST [3] | Confirms the primer will bind only to the intended target, avoiding off-target amplification. |
Design Guidelines to Avoid 3' End Problems
Adhere to the following rules during the initial design phase:
- Prioritize Perfect 3' End Complementarity: The last 5-6 nucleotides at the 3' end should have perfect, 100% complementarity to the target template. Even a single mismatch here can drastically reduce amplification efficiency [25].
- Incorporate a GC Clamp: End the primer with a G or C base (or two) to strengthen binding through stronger hydrogen bonding [3] [7] [26].
- Avoid Repeated Nucleotides: Avoid runs of the same base (e.g., "AAAA") or dinucleotide repeats (e.g., "ATATAT") especially near the 3' end, as these can cause slippage or mispriming [3] [7] [22].
- Screen for Homology: Use BLAST analysis to ensure the entire primer, particularly the 3' end, is not complementary to other sequences in your sample that could cause off-target binding [3] [24].
What experimental results indicate a problem with the primer 3' end?
When a PCR experiment fails, the symptoms observed on an agarose gel can often point to issues rooted in primer 3' end design.
Table 3: Troubleshooting Common 3' End-Related PCR Failures
| Experimental Observation | Most Likely Cause | Corrective Action |
|---|---|---|
| A low molecular weight band (~20-50 bp), often faster than the expected product. | Primer-dimer formation [23]. | Redesign primers to eliminate 3' end complementarity. Increase annealing temperature. Use a hot-start polymerase. |
| Multiple non-specific bands or a smeared gel. | Mispriming due to the primer binding to off-target sites [3]. | Increase annealing temperature. Use touchdown PCR. Verify primer specificity with BLAST and redesign if necessary. |
| No amplification product (no bands). | Severe primer-dimerization or self-structure that prevents template binding. A 3' end mismatch with the intended target. | Check for secondary structures and dimers in silico. Verify primer sequence alignment to the template. Redesign primers. |
| Weak band of the correct size. | Partial competition from dimer formation or low-level mispriming, consuming reagents [3]. | Optimize primer concentration. Check and optimize Mg²⁺ concentration. Redesign primers for better specificity. |
Research Reagent Solutions for Primer Design and Validation
The following table lists key reagents, tools, and software essential for designing and troubleshooting primers, with a focus on avoiding 3' end issues.
Table 4: Essential Research Toolkit for Primer Design & Validation
| Item | Function / Description |
|---|---|
| NCBI Primer-BLAST | A web-based tool that designs primers and checks their specificity by comparing them against sequence databases to predict off-target binding [3]. |
| IDT OligoAnalyzer Tool | A free online tool for analyzing oligonucleotide properties, including melting temperature (Tm), hairpins, self-dimers, and heterodimers, providing crucial ΔG values [24]. |
| Hot-Start DNA Polymerase | A modified polymerase that is inactive until a high-temperature step, preventing enzyme activity during setup and reducing primer-dimer formation [3]. |
| Gradient PCR Thermocycler | An instrument that allows a single PCR run to test a range of annealing temperatures (Ta), which is critical for optimizing specificity and minimizing mispriming [25]. |
| Synthetic Oligo Pools (for RNN Training) | Defined mixtures of synthetic DNA sequences used to generate large datasets for training machine learning models (e.g., RNNs, CNNs) to predict PCR success from sequence data [27] [28]. |
A Practical Workflow for Designing Robust, Structure-Free Primers
Core Parameter Tables for Primer Design
The success of PCR experiments heavily depends on the careful selection of primer parameters. The following tables summarize the foundational guidelines for standard PCR primer design.
Optimal Ranges for Key Primer Properties
| Parameter | Optimal Range | Critical Considerations |
|---|---|---|
| Primer Length | 18 - 24 nucleotides [1] [25] [29] | Longer primers (e.g., 28-35 bases) can be used for highly heterogeneous sequences [25]. |
| GC Content | 40% - 60% [1] [25] [3] | A content of 30-60% is also considered acceptable [25]. Avoid extremes: <30% is unstable, >70% promotes secondary structures [30]. |
| Melting Temperature (Tm) | 55°C - 65°C [1] [30]; 56°C - 62°C [25] | The Tm of a primer pair should differ by no more than 2-5°C [25] [29]. |
| Annealing Temperature (Ta) | 2°C - 5°C below the Tm [1] [3] | The Ta is often set based on the lower Tm of the primer pair [3]. |
3' End Design and Structural Pitfalls
| Feature | Guideline | Rationale |
|---|---|---|
| GC Clamp | 1-2 G or C bases in the last 5 bases at the 3' end [1] [29]. | Promotes stable binding; more than 3 consecutive G/C can cause non-specific binding [1] [25]. |
| Self-Complementarity | Keep it low [1]. | Minimizes the risk of a primer forming hairpins (intramolecular binding) [1] [29]. |
| 3'-Complementarity | Keep it low, especially at the 3' end [1]. | Minimizes the risk of primer-dimers (inter-primer binding), which are a major source of failure [1] [4]. |
| Runs & Repeats | Avoid di-nucleotide repeats (e.g., ATATAT) or single base runs (e.g., AAAAA) of more than 4 bases [25] [29] [3]. | Prevents mispriming and slippage along the DNA template [29]. |
Experimental Protocol for Primer Validation
Before ordering primers, follow this methodology for in silico design and validation to prevent hairpins and dimer formation.
Step 1: Define the Target and Initial Design
- Obtain Template Sequence: Use a curated sequence from a reliable database (e.g., NCBI RefSeq) in FASTA format [3].
- Use a Design Tool: Input your sequence into a specialized tool like NCBI Primer-BLAST [21] or Primer3 [29].
- Set Core Parameters: Configure the tool using the optimal ranges from the tables above (e.g., product size 200-500 bp, Tm 58-62°C) [3].
Step 2: Analyze and Select Candidate Primers
The design tool will generate candidate primer pairs. Evaluate them based on:
- Parameter Check: Ensure Tm, GC content, and length are within optimal ranges [3].
- Specificity Check: Primer-BLAST automatically checks for off-target binding. Select primer pairs with minimal or no matches to unintended genomic loci [21] [3].
- Secondary Structure Analysis: Use tools like OligoAnalyzer to check for hairpins and self-dimers. Avoid primers with strong, stable folding (ΔG < -3 kcal/mol) [3] [30].
Step 3: In Silico PCR and Final Checks
- Simulate Amplification: Use an in silico PCR tool to confirm the primer pair produces a single amplicon of the expected size [3].
- Manual 3' End Inspection: Visually confirm the 3' ends of the forward and reverse primers are not complementary to each other, as this is a common cause of primer-dimer formation [29] [31].
The following workflow visualizes the key decision points in this protocol:
The Scientist's Toolkit: Research Reagent Solutions
| Tool / Reagent | Primary Function in Primer Design & Validation |
|---|---|
| NCBI Primer-BLAST [21] | Integrates primer design with specificity checking against genomic databases to avoid off-target amplification. |
| Primer3 [29] | A widely used open-source tool for selecting primers based on a wide array of user-defined parameters. |
| OligoAnalyzer Tool (e.g., IDT) [3] [30] | Analyzes oligonucleotides for Tm, hairpins, self-dimers, and hetero-dimers using thermodynamic calculations. |
| Hot-Start DNA Polymerase [4] | A modified enzyme inactive at room temperature, preventing primer-dimer formation during reaction setup. |
| DMSO [29] [30] | An additive that reduces secondary structure formation in GC-rich templates and lowers effective Tm. |
Frequently Asked Questions (FAQs)
How can I quickly troubleshoot primer-dimer formation in an existing assay?
Primer-dimers are a common cause of PCR failure and appear as fuzzy smears below 100 bp on an agarose gel [4]. To address them:
- Increase Annealing Temperature: Raise the temperature by 2-5°C to discourage non-specific primer binding [4] [31].
- Lower Primer Concentration: High primer concentration increases dimer risk; try reducing it while maintaining sensitivity [4] [31].
- Use a Hot-Start Polymerase: This prevents enzyme activity during reaction setup, where primer-dimer formation often begins [4].
- Redesign Primers: If optimization fails, redesign the primers, paying critical attention to minimizing 3'-end complementarity [31].
My primers have passed all in-silico checks but my PCR still fails. What should I do next?
- Run a Gradient PCR: Empirically determine the optimal annealing temperature by testing a range (e.g., 50°C to 68°C) in a single run [25] [31].
- Include a No-Template Control (NTC): This reveals if your product is genuine or a primer-dimer artifact. Bands in the NTC indicate a primer-specific problem [4].
- Check Template Quality and Concentration: Ensure your template DNA is intact and at an appropriate concentration (e.g., 1-1000 ng for a 50 μL reaction) [29].
- Consider Additives: For difficult templates (e.g., high GC content), additives like DMSO (1-10%) or betaine can enhance specificity and yield [29] [30].
Technical Troubleshooting Guides
Troubleshooting Common GC Clamp Issues
Problem 1: Non-Specific Amplification or False-Positive Results
- Problem Description: The PCR reaction produces multiple bands on a gel or shows amplification in negative controls. This is often due to a GC clamp that is too stable, causing the primer to bind to non-target sequences [1].
- Root Cause: Having more than 3 G or C bases consecutively at the 3' end of the primer. This creates an overly stable "anchor" that tolerates mismatches with the template DNA [1] [22].
- Solution:
- Redesign the Primer: Ensure the 3' end has no more than 2-3 G or C bases in the last five nucleotides [7] [3].
- Increase Annealing Temperature: Raise the annealing temperature (
Tₐ) in increments of 2-3°C to increase stringency and favor only perfect primer-template matches [32]. - Validate Specificity: Use tools like NCBI BLAST or Primer-BLAST to check for and avoid off-target binding sites [3] [33].
Problem 2: Poor PCR Yield or No Amplification
- Problem Description: Little to no PCR product is detected, indicating a failure of the primer to initiate DNA synthesis efficiently.
- Root Cause: A combination of a weak GC clamp and a low annealing temperature, leading to inefficient binding and extension. Alternatively, the primer itself may have formed a stable hairpin structure at its 3' end, preventing it from binding to the template [22] [33].
- Solution:
- Optimize the Clamp: Redesign the primer to include 1-2 G or C bases in the last 5 bases at the 3' end if it is lacking. This strengthens initial binding [25] [3].
- Check for Secondary Structures: Use oligo analyzer software to screen for hairpins. Avoid primers where the 3' end is involved in a stable hairpin (ΔG < -2 kcal/mol) [22] [33].
- Optimize Reaction Conditions: Adjust magnesium ion (
Mg²⁺) concentration or add PCR enhancers like betaine or DMSO, especially if the target region is GC-rich [30] [32].
Problem 3: Primer-Dimer Formation
- Problem Description: A short, unwanted PCR product is formed when two primers anneal to each other instead of the DNA template. This depletes primer concentration and competes with the desired reaction.
- Root Cause: Complementarity between the 3' ends of the forward and reverse primers, which is often exacerbated by GC-rich sequences that form stable duplexes [1] [7].
- Solution:
- Check for 3' Complementarity: Use software tools to analyze inter-primer homology. Redesign primers if there is significant complementarity, especially at the 3' ends [7] [3].
- Adjust Primer Concentration: If redesigning is not possible, try lowering the primer concentration in the reaction to reduce the chance of primers interacting with each other [32].
Experimental Protocol: Validating GC Clamp Performance
This protocol provides a step-by-step method to empirically test and optimize primers with GC clamps.
I. Purpose
To experimentally determine the optimal annealing temperature (Tₐ) and confirm the specificity of a newly designed primer pair featuring a GC clamp.
II. Background
In-silico design and thermodynamic calculations (e.g., melting temperature, Tₘ) provide a starting point. However, the actual performance of a primer, particularly the stability provided by its GC clamp, must be validated in a laboratory PCR reaction to ensure high yield and specificity [32] [33].
III. Reagents and Equipment
- Designed forward and reverse primers (lyophilized or in solution)
- DNA template (e.g., genomic DNA, plasmid)
- PCR master mix (containing DNA polymerase, dNTPs,
Mg²⁺, and buffer) - Nuclease-free water
- Thermocycler with gradient functionality
- Gel electrophoresis system (agarose gel, buffer, DNA stain, DNA ladder)
IV. Procedure
- Primer Reconstitution and Dilution:
- Centrifuge lyophilized primers and resuspend in nuclease-free water to create a 100 µM stock solution.
- Prepare a working dilution of each primer at 10 µM [34].
Gradient PCR Setup:
- Prepare a master mix for
n+1 reactions. - For a 25 µL reaction: 12.5 µL PCR master mix, 1 µL forward primer (10 µM), 1 µL reverse primer (10 µM), 1 µL template DNA (10-100 ng), and 9.5 µL nuclease-free water.
- Aliquot the master mix into
nPCR tubes. - Program the thermocycler with a gradient across the annealing step. Set the gradient range from 5°C below to 5°C above the calculated
Tₘof the primers [25] [32].
- Prepare a master mix for
PCR Amplification:
- Run the following program:
- Initial Denaturation: 95°C for 2-5 minutes.
- Amplification (30-35 cycles):
- Denaturation: 95°C for 20-30 seconds.
- Annealing: Gradient from Low Temp to High Temp for 20-30 seconds.
- Extension: 72°C for 1 minute per kb of expected product.
- Final Extension: 72°C for 5-10 minutes.
- Hold: 4°C.
- Run the following program:
Analysis:
- Analyze the PCR products using agarose gel electrophoresis.
- Identify the annealing temperature that produces the strongest band of the expected size with the least non-specific amplification or primer-dimer.
Frequently Asked Questions (FAQs)
Q1: What is a GC clamp and why is it important in primer design? A: A GC clamp refers to the presence of one or more G or C bases within the last five nucleotides at the 3' end of a primer [1] [3]. Guanine and cytosine form three hydrogen bonds with their complements (compared to two for A-T base pairs), resulting in stronger binding [1]. A GC clamp promotes specific and stable binding of the primer's 3' end to the template DNA, which is critical because DNA polymerase initiates synthesis from this point. This improves amplification efficiency and reduces false priming [25] [33].
Q2: How many G or C bases should be in a GC clamp? A: The optimal number is 1-2 G or C bases in the final 3-5 nucleotides. It is critical to avoid more than 3 consecutive G or C bases at the 3' end, as this can lead to non-specific binding and false-positive results [1] [22] [7]. The goal is to balance stability for efficient initiation without promoting mispriming.
Q3: Can a strong GC clamp cause problems? A: Yes. While a GC clamp enhances binding, an excessively stable one (e.g., with 3 or more consecutive G/C bases) can be detrimental. It can force the 3' end to bind stably even to sequences that are not a perfect match, leading to non-specific amplification and false positives [1] [32]. Therefore, the clamp must be designed carefully to balance stability with specificity.
Q4: How does a GC clamp help prevent primer-dimer and hairpin formation? A: A properly designed GC clamp itself does not directly prevent these issues. However, by promoting correct and stable binding at the intended target site, it reduces the likelihood of the 3' end being available for off-target interactions. To prevent hairpins and primer-dimers, you must specifically screen your primer sequence for self-complementarity and complementarity to the other primer, ensuring the 3' end is not involved in these secondary structures [1] [7] [3].
Q5: My primer has a good GC clamp but my PCR still fails. What else should I check? A: A GC clamp is just one parameter of a well-designed primer. If PCR fails, also check the following:
- Overall Primer Length: Ensure it is between 18-24 nucleotides for standard PCR [1] [25].
- Melting Temperature (
Tₘ): Confirm that theTₘof both primers is between 55-65°C and within 2-5°C of each other [1] [32]. - Overall GC Content: This should be between 40-60% for the entire primer sequence [1] [30].
- Secondary Structures: Use software tools to check for and avoid stable hairpins or self-dimers, particularly those involving the 3' end [22] [3].
Research Reagent Solutions
The following reagents are essential for implementing and validating the GC clamp design principles discussed in this guide.
| Reagent/Category | Specific Examples | Function in Primer Design/Validation |
|---|---|---|
| DNA Polymerase | Taq DNA Polymerase, Bst 2.0 WarmStart, PrimeSTAR GXL [34] | Enzyme that initiates DNA synthesis from the 3' end of the primer. Its fidelity and processivity impact amplification success. |
| PCR Additives | Betaine, DMSO [30] [34] | Additives that help reduce secondary structures in the template or primer, especially useful for GC-rich targets. |
| Oligo Analysis Software | NCBI Primer-BLAST, IDT OligoAnalyzer, Primer3 [16] [3] | In-silico tools for designing primers, calculating Tm, GC%, and predicting secondary structures like hairpins and dimers. |
| Purification Methods | Desalting, HPLC [32] | Post-synthesis purification of primers to remove truncated sequences and impurities that can inhibit PCR efficiency. |
The table below consolidates the key numerical parameters for designing an effective GC clamp, as established by current molecular biology guidelines.
| Parameter | Optimal Value | Risk of Deviation | Key References |
|---|---|---|---|
| Number of G/C bases | 1-2 in the last 5 bases | >3 bases: High risk of non-specific binding and false positives. | [1] [22] [7] |
| Position | Last 5 nucleotides at the 3' end | Internal or 5' end: Does not serve the function of stabilizing the priming point for the polymerase. | [1] [3] |
| Stability (ΔG) | ΔG > -2 kcal/mol for 3' end hairpins | More negative ΔG: Stable secondary structures that hinder primer binding. | [22] [33] |
| Consecutive Bases | Avoid runs of >3 G/C | Long runs: Increased probability of non-specific annealing and secondary structures. | [7] [32] |
FAQ: Core Principles and Troubleshooting
What are the fundamental principles for designing primers to avoid secondary structures like hairpin loops and dimer formation?
The following table summarizes the key design parameters crucial for preventing problematic secondary structures, which is a core focus of primer design research [26] [1] [24].
| Design Factor | Optimal Range or Characteristic | Rationale in Research Context |
|---|---|---|
| Length | 18-30 nucleotides [24] (Ideal: 18-24 [26] [1]) | Balances specificity (longer) with efficient hybridization and annealing (shorter) [1]. |
| GC Content | 40-60% [26] [1] [24] | Ensures stable binding (3 H-bonds for G:C) without promoting non-specific, high-Tm binding [1]. |
| Melting Temperature (Tm) | 50-65°C [26] [1]; Ideal for PCR: 60-64°C [24] | Ensures both primers in a pair bind simultaneously and efficiently. A Tm >54°C maintains specificity [1]. |
| 3' End Stability (GC Clamp) | 1-2 G/C pairs [26]; Avoid >3 consecutive G/C residues [1] | Promotes correct initiation by polymerase but prevents mispriming from stable non-specific binding [1]. |
| Self-Complementarity | Low scores; ΔG > -9.0 kcal/mol [24] | Minimizes formation of hairpins (intra-primer) and primer-dimers (inter-primer), which sabotage amplification [1] [24]. |
I keep getting "No primers found" in Primer-BLAST. What are the main causes and solutions?
This common error typically stems from overly stringent search parameters. The table below outlines specific causes and evidence-based troubleshooting steps.
| Observation | Possible Cause | Evidence-Based Solution |
|---|---|---|
| No primers found | Overly strict Tm constraints or short product size range [35]. | Increase the "Max Tm difference" between primers to 10°C [35]. Iteratively adjust the "Opt" Tm by 1-degree increments between 59°C and 63°C [35]. |
| Poor primer design space in the selected template region. | If designing for cloning, relax the "PCR product size" range (e.g., 800-1200 bp for homologous recombination) [35]. | |
| Non-specific priming | Primers match multiple regions in the database. | In the "Primer Pair Specificity Checking Parameters," select the smallest relevant database (e.g., Refseq mRNA) and specify the source organism [21] [12]. |
| Inadequate mismatch stringency. | Adjust advanced parameters like "Number of mismatches to unintended targets" and "Max amplicon size for non-specific target" [21]. | |
| Incorrect product size | Mispriming or suboptimal annealing temperature [36]. | Recalculate primer Tm using a reliable calculator and validate that primers are complementary only to the intended target [36]. |
| Multiple bands | Primer annealing temperature is too low [36]. | Increase the annealing temperature in a gradient PCR to find the optimal condition. Use a hot-start polymerase [36]. |
How can I use Primer-BLAST to ensure my primers are specific to my target mRNA and not genomic DNA?
Primer-BLAST offers specific parameters to support research requiring transcript-specific amplification.
- Design Primers to Span Exon-Exon Junctions: In the "Primer Parameters" section, use the option "Primer must span an exon-exon junction." This directs the tool to design at least one primer that sits across a junction between two exons, a sequence arrangement not present in genomic DNA, thus ensuring amplification only from spliced mRNA [21].
- Select an mRNA Template: For the most robust results, use an NCBI mRNA reference sequence accession number (e.g., an NM accession) as your PCR template. Primer-BLAST will automatically leverage exon-intron information from the NCBI database to design primers specific to that splice variant [12].
- Check for Intron Separation: Alternatively, you can select the option to "find primer pairs that are separated by at least one intron on the corresponding genomic DNA." This ensures that any amplification from genomic DNA would produce a much larger product, easily distinguishable from the cDNA amplicon on a gel [21].
Step-by-Step Experimental Protocol for Primer-BLAST
This protocol provides a detailed methodology for using NCBI's Primer-BLAST to design target-specific primers, a critical technique for research focused on minimizing amplification artifacts.
Procedure
- Access Primer-BLAST: Navigate to the NCBI Primer-BLAST tool [12].
- Input Template Sequence:
- In the "PCR Template" section, enter your target sequence using an NCBI accession number (e.g., an NM_ RefSeq ID for mRNA) or a FASTA sequence [12].
- Optional: Use the "Range" fields to constrain primer design to a specific region of your template (e.g., a specific domain of a gene). You can set a "Forward Primer To" and "Reverse Primer From" to define the product location without fixing the primer start sites [21] [35].
- Set Primer Parameters:
- Product Size: Define the range. For qPCR, use 70-150 bp [24]. For gene cloning, 800-1200 bp may be suitable [35].
- Tm Parameters: Set the "Opt" Tm to ~60°C. The "Min" and "Max" can often be left at defaults, but can be adjusted to, for example, 57°C and 63°C respectively. Increase "Max Tm difference" if few results are found [35].
- Optional: Enter pre-designed primer sequences if you only need to check their specificity [21] [12].
- Configure Specificity Checking Parameters:
- Database: Select the smallest relevant database. "Refseq mRNA" is often a good choice for eukaryotic gene targets [21] [12].
- Organism: Always specify the source organism (e.g., "Homo sapiens"). This dramatically speeds up the search and increases the relevance of specificity checks [21] [12].
- Exon Junction Span: For mRNA-specific amplification, select "Primer must span an exon-exon junction" [21].
- Submit and Analyze:
- Evaluate Results:
- Examine the "Graphical view of primer pairs." Verify that primers bind only to your intended target region [35].
- Under "Primers on intended targets," confirm the product is the expected size.
- Check the "Self-complementarity" and "Self 3'-complementarity" scores for each primer; lower values (ideally below 4) are better [1] [35].
The Scientist's Toolkit: Research Reagent Solutions
The following reagents and tools are essential for the primer design and validation workflow.
| Reagent / Tool | Function in Primer Design & Validation |
|---|---|
| High-Fidelity DNA Polymerase (e.g., Q5, Phusion) | Provides high accuracy for amplifying the intended sequence with minimal errors, crucial for downstream cloning and sequencing [36]. |
| Hot-Start DNA Polymerase | Reduces non-specific amplification and primer-dimer formation by inhibiting polymerase activity until the first high-temperature denaturation step [36]. |
| NCBI Primer-BLAST | The core tool that integrates primer design with in-silico specificity checking against biological databases to ensure target-specific amplification [21] [12]. |
| OligoAnalyzer Tool (IDT) | Used to analyze oligonucleotide properties, including Tm calculation, and to check for secondary structures like hairpins and self-dimers (ΔG > -9.0 kcal/mol is ideal) [24]. |
| dNTPs | The building blocks for DNA synthesis. Unbalanced concentrations can lead to sequence errors; use fresh, balanced mixes [36]. |
Workflow Visualization
The following diagram illustrates the logical workflow and decision points for designing specific primers using Primer-BLAST, emphasizing strategies to avoid co-amplifying genomic DNA.
Core Concepts and FAQs
What is the significance of the ΔG value in primer analysis, and how is it interpreted?
The Gibbs free energy (ΔG) value, measured in kcal/mol, indicates the stability strength of secondary structures formed by oligonucleotides. It serves as a key predictive parameter for assessing potential primer issues [37].
- Interpretation Guide:
- ΔG > 0: The secondary structure is unstable and will not form spontaneously [38].
- ΔG > -9 kcal/mol: The structure is weak. IDT recommends that ΔG be more positive than -9 kcal/mol for both self-dimers and hetero-dimers to avoid significant issues [37] [38] [39].
- ΔG ≤ -9 kcal/mol: The structure is strong and stable. An oligo with a ΔG in this range is likely to be problematic as the secondary structure may form and interfere with the experiment [39].
What are the critical thresholds for other physical properties of a well-designed primer?
For optimum performance in PCR and qPCR analyses, primers should conform to the following established guidelines [38] [1]:
Table 1: Critical Thresholds for Primer Design
| Property | Ideal Range or Value | Rationale |
|---|---|---|
| Length | 18–24 nucleotides [1] | Balances specificity and efficient hybridization. |
| GC Content | 40%–60% [1] | Ensures stable binding without promoting mismatches. |
| Melting Temperature (Tm) | 54°C–65°C [1] | The difference between the Tm of paired primers should be < 5°C [38]. |
| Self-Dimer / Hetero-Dimer ΔG | > -9 kcal/mol [38] [39] | Prevents stable primer-dimer formation. |
| Hairpin ΔG | > -9 kcal/mol [37] | Prevents stable internal secondary structures. |
| 3'-End Complementarity | Avoid [38] | Prevents primer-dimer formation. |
Troubleshooting Guides
How do I diagnose and resolve non-specific amplification or a rising baseline in my amplification assay?
A slowly rising baseline during real-time monitoring, often caused by amplifiable primer-dimers or self-amplifying hairpins, depletes primers and creates a fluorescent background, reducing assay efficiency and sensitivity [16].
Diagnosis:
- Analyze Individual Primers: Use the OligoAnalyzer tool to perform a Self-Dimer and Hairpin analysis on each primer sequence. Look for structures with a Tm higher than your reaction annealing temperature and a ΔG of -9 kcal/mol or more negative [37] [39].
- Analyze Primer Pairs: Use the Hetero-Dimer function in OligoAnalyzer to check for complementarity between your forward and reverse primers, applying the same ΔG threshold [39].
Resolution:
- Modify Primer Sequences: If problematic structures are found, consider making minor sequence changes to disrupt complementarity. Even bumping the priming sites by a single base can dramatically reduce non-specific background amplification [16].
- Adjust Reaction Conditions: Increase the annealing temperature (Ta) so that it is above the Tm of the problematic secondary structures. This prevents them from forming during the critical amplification step [1] [39].
Troubleshooting Workflow for Non-Specific Amplification
How do I use the OligoAnalyzer tool for a complete primer analysis?
The OligoAnalyzer tool provides a comprehensive suite for analyzing oligonucleotide physical characteristics and secondary structures [37].
Step-by-Step Protocol:
- Sequence Input: Access the OligoAnalyzer tool from the "Tools" menu on the IDT website. Enter your oligo sequence into the "Sequence" box in the 5' to 3' orientation [37].
- Define Reaction Conditions: For an accurate Tm calculation, input the specific Mg++ concentration and dNTP concentration you will use in your experiment. The default values (0 nM Mg++, 0 mM dNTPs) will not reflect real-world conditions [37].
- Primary Analysis: Click "Analyze" to receive a report on the oligo's basic properties: complementary sequence, GC content, Tm, molecular weight, and extinction coefficient [37].
- Secondary Structure Analysis: From the same sequence entry screen, initiate the Self-Dimer and Hairpin analyses. For hairpin analysis, you can adjust the default concentrations to match your reaction conditions [39].
- Hetero-Dimer Analysis: Click the 'Hetero-Dimer' button. This will open a second sequence input box where you can enter the sequence of your second primer (e.g., the reverse primer). Click "Calculate" to analyze potential interactions between the two primers [39].
- Interpret Results: For all dimer and hairpin analyses, use the ΔG value and Tm of the structures as your primary guide for deciding if a primer is acceptable [37] [39].
OligoAnalyzer Tool Workflow
Advanced Analysis & Experimental Context
What is the experimental evidence for the impact of primer dimers and hairpins?
Research on Reverse Transcription Loop-Mediated Isothermal Amplification (RT-LAMP) provides quantitative evidence of how secondary structures affect assays. The large number of primers in LAMP (six per target) and the length of inner primers (40–45 bases) increase the potential for primer-dimer interactions and stable hairpin formation [16].
Experimental Findings:
- Impact on Assay Performance: The formation of amplifiable primer-dimers and hairpins leads to a slowly rising fluorescent baseline in real-time assays, depletes primers, and reduces overall assay efficiency and sensitivity [16].
- Stable Hairpins are Problematic: While some hairpin formation is common, structures with 3' complementarity can become self-amplifying. Research showed that even primers with hairpin complementarity one or two bases away from the 3' end can still self-amplify, leading to non-specific signals [16].
- Validation of Thermodynamic Predictions: The application of the nearest-neighbor model to estimate the stability of secondary structures allowed researchers to compute a single thermodynamic parameter that correlated with the probability of non-specific amplification. Modifying primers to eliminate these stable structures, based on these predictions, directly improved assay performance [16].
Table 2: Research Reagent Solutions for Advanced Oligo Analysis
| Reagent / Tool | Function in Analysis |
|---|---|
| OligoAnalyzer Tool | Determines physical characteristics (Tm, GC%, MW) and analyzes secondary structures (dimers, hairpins) via ΔG [37]. |
| Multiple Primer Analyzer | Tool for performing multiple primer dimer analysis, crucial for techniques like LAMP with many primers [16]. |
| mFold Tool | Used for in-depth hairpin analysis and predicting nucleic acid folding [16]. |
| Bst 2.0 WarmStart DNA Polymerase | Common enzyme used in isothermal amplification assays like LAMP to study primer behavior [16]. |
| Nearest-Neighbor (NN) Model | A thermodynamic model used to predict the stability (ΔG) of nucleic acid secondary structures, forming the basis for in-silico predictions [16]. |
This technical support guide provides detailed troubleshooting and frequently asked questions to assist researchers in designing robust PCR assays. Proper primer design is a critical step in ensuring successful amplification, especially for complex applications like gene expression analysis and variant detection. This resource focuses on two advanced strategies: designing primers across exon-intron boundaries to ensure transcript-specific amplification, and avoiding single nucleotide polymorphisms (SNPs) to prevent experimental artifacts. By addressing these key areas, researchers can significantly improve assay specificity and reliability while minimizing common pitfalls associated with nonspecific amplification and primer failure.
Primer Design Fundamentals and Strategic Considerations
Core Principles for Effective Primer Design
Before addressing advanced concepts, researchers must master fundamental primer design parameters that govern PCR success. The following specifications provide the foundation for reliable amplification:
- Length: Optimal primer length should be between 18-24 nucleotides to balance specificity and binding efficiency [3] [1] [29].
- Melting Temperature (Tₘ): Primers should have a Tₘ between 52-65°C, with paired primers having Tₘ values within 2°C of each other for synchronous binding [3] [1] [29].
- GC Content: Maintain GC content between 40-60% for stable binding, avoiding extremes that promote nonspecific amplification [3] [1] [29].
- GC Clamp: Include a G or C base at the 3' end to enhance binding stability, but avoid more than 3 G/C residues in the last five bases to prevent mispriming [3] [1].
- Structural Considerations: Avoid primers with self-complementarity, long runs of single nucleotides (>4), or di-nucleotide repeats that promote secondary structure formation [3] [29].
Strategic Placement at Exon-Intron Boundaries
Designing primers across exon-exon junctions is essential for distinguishing cDNA amplification from genomic DNA contamination. This approach ensures that amplification occurs only from processed transcripts, as the primer binding site spans two exons that are separated by potentially large introns in genomic DNA [40] [41]. When primers flank exon-intron junctions, the resulting amplicon from genomic DNA is typically too large to amplify under standard PCR conditions, thereby ensuring transcript-specific detection [41].
Comprehensive SNP Avoidance Strategy
Single nucleotide polymorphisms present a significant challenge in primer design, as even a single base mismatch can reduce priming efficiency, particularly at the 3' end where extension initiates [42] [41]. SNPs occurring at splice sites can be particularly problematic as they may create or modulate "SNPtic exons"—cryptic exons whose splicing is regulated by common polymorphisms [42]. These variants can dramatically alter splicing patterns and lead to unexpected experimental outcomes.
Primer Design and Validation Workflow
Research Reagent Solutions
The following reagents and tools are essential for implementing advanced primer design strategies:
| Resource Type | Specific Tool/Reagent | Function in Primer Design |
|---|---|---|
| Bioinformatics Tools | ExonSurfer [40] | Automated primer design at exon-exon junctions with SNP avoidance |
| Primer-BLAST [3] [29] | Integrates primer design with specificity checking | |
| UCSC Genome Browser [42] | Visualize genomic context and SNP locations | |
| Databases | dbSNP [40] [42] | Comprehensive database of single nucleotide polymorphisms |
| Ensembl [40] [41] | Genomic annotation with exon-intron boundaries | |
| GWAS Central [42] | Repository of genotype-phenotype associations | |
| Experimental Reagents | Hot-Start DNA Polymerases [10] [43] | Reduce nonspecific amplification during reaction setup |
| PCR Additives (DMSO, Betaine) [10] [29] | Improve amplification of difficult templates | |
| DNA Cleanup Kits [43] | Remove PCR inhibitors from template preparations |
Quantitative Design Parameters
Adherence to established quantitative parameters significantly improves primer performance:
| Design Parameter | Optimal Range | Impact of Deviation |
|---|---|---|
| Primer Length | 18-24 nucleotides [3] [1] | Short: Reduced specificityLong: Secondary structures |
| Melting Temperature (Tₘ) | 52-65°C [3] [1] [29] | Low: Nonspecific bindingHigh: Reduced efficiency |
| Tₘ Difference (Primer Pair) | ≤2°C [3] [1] | Asymmetric amplification |
| GC Content | 40-60% [3] [1] [29] | Low: Weak bindingHigh: Nonspecific amplification |
| GC Clamp (3' end) | 1-2 G/C bases [3] [29] | >3 G/C: Mispriming |
| Amplicon Length | 75-200 bp (qPCR) [41] | Long: Reduced efficiency |
Frequently Asked Questions
How can I design primers that avoid amplifying genomic DNA? Design primers that span exon-exon junctions, placing one primer's 3' end directly at the junction. This ensures amplification only occurs from cDNA, as the continuous genomic sequence lacks this exact junction. For maximum effectiveness, verify that the selected junction is not present in any processed pseudogenes [40] [41].
What is the most efficient method to check for SNPs in my primer binding sites? Use integrated tools like ExonSurfer, which pre-masks common SNPs during primer design, or manually check primer sequences against the dbSNP database via the UCSC Genome Browser. Pay particular attention to SNPs near the 3' end of primers, as these have the greatest impact on amplification efficiency [40] [42].
Why do my primers form secondary structures even with acceptable self-complementarity scores? Self-complementarity calculations may not account for all structural possibilities. Use specialized tools like mFold or OligoAnalyzer to evaluate potential hairpin formation, particularly for longer primers (>40 bases) commonly used in techniques like LAMP. Stable hairpins with 3' complementarity can self-amplify, creating significant background [16].
How can I improve primer specificity for a target with multiple splice variants? Use tools like ExonSurfer to identify junctions specific to your target variant. Select exon junctions present only in the desired transcript(s) and absent in others. When this is not possible, position primers in exons that are skipped in non-target variants to ensure specific amplification [40].
What should I do if my target region has unavoidable high GC content or secondary structure? Incorporate PCR additives such as DMSO (1-10%), formamide (1.25-10%), or betaine (0.5-2.5 M). These co-solvents help denature GC-rich templates and disrupt secondary structures. Additionally, consider using polymerases with high processivity specifically designed for challenging templates [10] [29].
Troubleshooting Guides
Problem: Persistent Genomic DNA Amplification
Possible Causes and Solutions:
- Cause: Primers not properly positioned at exon junctions
- Cause: Target gene has processed pseudogenes
- Solution: Design primers to target regions unique to the functional gene, or include intron-flanking primers that generate larger products from genomic DNA that can be distinguished by size [41]
- Cause: Insufficient DNase treatment during RNA isolation
- Solution: Implement rigorous DNase treatment protocols and include no-RT controls to detect residual genomic DNA [10]
Problem: SNP-Induced Amplification Failure
Possible Causes and Solutions:
- Cause: SNP at primer binding site, particularly near 3' end
- Cause: SNP creating or strengthening cryptic splice sites
- Solution: Analyze SNP impact using MaxEntScan or HExoSplice to predict splicing changes; avoid primers in regions where SNPs alter splice site strength [42]
- Cause: Population-specific SNPs affecting primer binding
- Solution: Check SNP frequency in relevant populations using dbSNP; design degenerate primers if working across diverse genetic backgrounds [42]
Problem: Secondary Structure Interference
Possible Causes and Solutions:
- Cause: Self-complementary sequences forming hairpins
- Cause: Primer-dimer formation between forward and reverse primers
- Cause: Template secondary structure inhibiting primer access
PCR Problem and Solution Mapping
Advanced primer design incorporating exon-intron boundaries and SNP avoidance requires careful planning and validation. By utilizing specialized bioinformatics tools, following established design parameters, and implementing thorough troubleshooting protocols, researchers can significantly improve PCR specificity and reliability. These strategies are particularly crucial for applications requiring high specificity, such as gene expression analysis, diagnostic assay development, and genetic variant detection. Regular validation of primer performance through both in silico and experimental methods remains essential for successful implementation of these advanced design principles.
Diagnosing and Fixing Failed Reactions: A Troubleshooting Manual
FAQs: Addressing Common PCR Challenges
Q1: My PCR reaction shows multiple unexpected bands or a smeared appearance on the gel. What is the most common cause and how can I fix it?
This problem, known as non-specific amplification, frequently occurs when primers anneal to incorrect regions on the template DNA [44]. To resolve this:
- Increase annealing temperature: Raise the temperature by 1-2°C increments to enhance specificity [10] [45].
- Use hot-start DNA polymerases: These enzymes remain inactive until high temperatures are reached, preventing mispriming during reaction setup [10] [45] [18].
- Optimize Mg²⁺ concentration: High Mg²⁺ concentrations can promote non-specific binding [10] [45].
- Reduce primer concentration: High primer concentrations can promote primer-dimer formation and non-specific binding [10] [44].
Q2: I see no amplification product at all. What should I investigate first?
Complete amplification failure requires systematic troubleshooting:
- Verify template quality and quantity: Ensure DNA is intact, pure, and in the appropriate concentration range (1 pg-1 μg per 50 μL reaction, depending on complexity) [45]. Assess integrity by gel electrophoresis [10].
- Check primer design and concentration: Confirm primers are specific to your target and used at optimal concentrations (typically 0.1-1 μM) [10] [29].
- Confirm thermal cycler programming: Verify that denaturation, annealing, and extension temperatures and times are appropriate for your template and primers [10] [45].
- Include appropriate controls: Always run a positive control (with known working primers and template) and negative control (no template) to identify reagent or contamination issues [29].
Q3: What are primer dimers and how do I prevent them?
Primer dimers are short, unintended DNA fragments that form when primers anneal to each other instead of the target template [4] [46]. They typically appear as bands or smears around 20-100 bp on gels [44] [4]. Prevention strategies include:
- Optimize primer design: Ensure primers have minimal self-complementarity, especially at 3' ends [1] [29].
- Lower primer concentration: Reduce primer concentration to decrease interaction probability [4] [46].
- Increase annealing temperature: Higher temperatures reduce non-specific primer interactions [4].
- Use hot-start polymerases: Prevent enzymatic activity during reaction setup [10] [4].
- Set up reactions on ice: Maintain low temperature until PCR begins [10].
Q4: How can I improve amplification of difficult templates like GC-rich regions?
GC-rich sequences (over 60%) form stable secondary structures that impede amplification [10]:
- Use PCR additives: Incorporate DMSO (1-10%), formamide (1.25-10%), or betaine (0.5-2.5 M) to help denature stable structures [10] [29].
- Choose high-processivity polymerases: These enzymes have higher affinity for difficult templates [10].
- Increase denaturation temperature and time: More stringent denaturation helps separate stubborn double-stranded DNA [10].
- Incorporate a GC clamp: Include Gs or Cs in the last five nucleotides at the 3' end of primers to promote binding, but avoid more than 3 consecutive G/C residues [1].
Troubleshooting Guide: PCR Problems and Solutions
Complete Amplification Failure
| Possible Cause | Recommendations |
|---|---|
| Insufficient template DNA | Examine input quantity and increase amount if needed; choose high-sensitivity polymerases [10]. |
| Poor template quality | Assess DNA integrity by gel electrophoresis; re-purify template to remove inhibitors [10] [45]. |
| Suboptimal cycling conditions | Optimize annealing temperature using gradient PCR; increase number of cycles (up to 40 for low-copy targets) [10] [45]. |
| Insufficient Mg²⁺ concentration | Optimize Mg²⁺ concentration (typically 0.5-5.0 mM); chelators or high dNTPs may require higher Mg²⁺ [10] [29]. |
Non-Specific Bands and Primer Dimers
| Possible Cause | Recommendations |
|---|---|
| Low annealing temperature | Increase temperature incrementally (1-2°C steps); optimal is typically 3-5°C below primer Tm [10] [45]. |
| Problematic primer design | Review design for specificity; avoid complementary regions at 3' ends; use design tools [10] [1]. |
| High primer concentration | Optimize concentration (usually 0.1-1 μM); high concentrations promote primer-dimer formation [10] [44]. |
| Excess Mg²⁺ concentration | Lower Mg²⁺ concentration to reduce non-specific products [10] [45]. |
Fidelity and Sequencing Issues
| Possible Cause | Recommendations |
|---|---|
| Low fidelity polymerase | Use high-fidelity enzymes for cloning, sequencing, and mutagenesis applications [10] [45]. |
| Unbalanced dNTP concentrations | Ensure equimolar dATP, dCTP, dGTP, and dTTP concentrations [10]. |
| Excess Mg²⁺ concentration | Review and reduce Mg²⁺ concentrations to minimize misincorporation [10]. |
| High number of cycles | Reduce cycle number without drastically lowering product yield [10]. |
Primer Design Framework to Minimize Amplification Issues
Proper primer design is fundamental to avoiding PCR problems. The following workflow illustrates the systematic approach to designing primers that minimize hairpin loops and dimer formation:
Critical Primer Design Parameters
Optimal Length and Melting Temperature (Tₘ)
- Length: 18-24 nucleotides provides optimal specificity and binding efficiency [1] [29].
- Melting Temperature (Tₘ): 52-65°C for both primers, with Tₘ difference ≤2°C between forward and reverse primers [1] [29].
- Annealing Temperature (Tₐ): Typically 3-5°C below the primer Tₘ [10] [1].
GC Content and Secondary Structure Prevention
- GC Content: Maintain 40-60% for stable priming without excessive binding strength [1] [29].
- GC Clamp: Include 1-2 G or C bases at the 3' end to prevent "breathing" (fraying of primer ends), but avoid more than 3 consecutive G/C residues [1] [29].
- Secondary Structures: Avoid repeats (e.g., ATATAT) or single base runs (e.g., AAAAA) longer than 4 bases [29].
Advanced Design Strategies
Self-Avoiding Molecular Recognition Systems (SAMRS) SAMRS technology incorporates modified nucleobases that pair with natural DNA but not with other SAMRS components, significantly reducing primer-dimer formation [5]. This approach is particularly valuable for:
- Multiplex PCR applications
- SNP detection assays
- High-sensitivity detection where resource competition is problematic [5]
Thermodynamic Stability Calculations Using nearest-neighbor models to estimate Gibbs free energy (ΔG) of potential secondary structures helps identify primers with minimal self-complementarity [16]. This computational approach predicts stability of primer dimers and hairpin structures before experimental validation.
Essential Research Reagent Solutions
| Reagent Category | Specific Examples | Function and Application |
|---|---|---|
| DNA Polymerases | Hot-start Taq, Q5 High-Fidelity, Phusion, OneTaq | Hot-start versions prevent pre-amplification activity; high-fidelity enzymes reduce error rates; specialty enzymes handle GC-rich templates [10] [45]. |
| PCR Additives | DMSO (1-10%), Betaine (0.5-2.5 M), Formamide (1.25-10%) | Destabilize DNA secondary structures, particularly beneficial for GC-rich templates; improve amplification efficiency [10] [29]. |
| Buffer Components | MgCl₂ (1.5-5.0 mM), KCl (35-100 mM), BSA (10-100 μg/mL) | Mg²⁺ is essential cofactor for polymerase activity; BSA helps overcome inhibition in problematic samples [45] [29]. |
| Specialized Primers | SAMRS-modified primers, HPLC-purified primers | SAMRS components reduce primer-dimer formation; purified primers remove truncated sequences that cause non-specific amplification [10] [5]. |
Experimental Protocol: Systematic PCR Optimization
Master Mix Preparation
- Prepare reagents: Thaw all PCR components completely and keep on ice throughout setup [29].
- Create master mix: Combine components in this order for multiple reactions to ensure consistency [29]:
- Sterile water (QS to final volume)
- 10X PCR buffer (1X final)
- dNTPs (200 μM of each nucleotide final)
- MgCl₂ (1.5-5.0 mM final, if not in buffer)
- Forward primer (0.1-1 μM final)
- Reverse primer (0.1-1 μM final)
- DNA polymerase (0.5-2.5 units/50 μL reaction)
- Mix thoroughly: Gently pipette up and down at least 20 times to ensure complete mixing [29].
- Aliquot: Distribute master mix to individual PCR tubes, then add template DNA.
Thermal Cycling Optimization
- Initial denaturation: 94-98°C for 2-5 minutes (depending on polymerase and template complexity) [10].
- Amplification cycles (25-40 cycles):
- Final extension: 68-72°C for 5-15 minutes to ensure complete product extension [10].
Troubleshooting Experimental Design
- Annealing temperature gradient: Essential for new primer sets; test range of Tₘ±5°C [10] [45].
- Mg²⁺ titration: Test concentrations from 1.0-5.0 mM in 0.5 mM increments [45].
- Additive screening: Test DMSO, betaine, or formamide at recommended concentrations for difficult templates [10] [29].
- No-template control: Critical for identifying contamination issues [4] [45].
- Positive control: Verify reaction components and conditions with known working system [45].
Troubleshooting Guides
Problem 1: High-Risk Secondary Structures in Oligonucleotides
Problem: Your oligonucleotide sequences (e.g., PCR primers, CRISPR guides) are predicted to form stable, problematic secondary structures like hairpins or primer-dimers, indicated by highly negative ΔG values.
Why this happens: Complementary regions within a single sequence can cause it to fold back (hairpin), or complementary regions between two primers can cause them to bind to each other (hetero-dimer), especially at their 3' ends. These structures interfere with the oligonucleotide's ability to bind to its intended target [2] [1] [4].
Solution: Redesign the sequence to disrupt complementarity.
- Step 1: Analyze your sequence using a Secondary Structure Predictor tool. Input your sequence and set the analysis temperature to match your experimental conditions (e.g., 55-65°C for PCR annealing, 37°C for CRISPR) [2].
- Step 2: Interpret the ΔG values using the thresholds below. Structures with ΔG values more negative than these thresholds are considered problematic [2]:
| Structure Type | Acceptable ΔG (kcal/mol) | Moderate Risk ΔG (kcal/mol) | High Risk ΔG (kcal/mol) | Action Required |
|---|---|---|---|---|
| Hairpins | > -3 | -3 to -6 | < -6 | Accept if > -3; redesign if < -6 |
| Self-Dimers | > -5 | -5 to -8 | < -8 | Accept if > -5; redesign if < -8 |
| Hetero-Dimers | > -5 | -5 to -8 | < -8 | Critical for primer pairs; redesign if < -8 |
- Step 3: Implement sequence redesign strategies [2] [47]:
- Change bases in stem regions: Identify the complementary regions forming the structure's stem and introduce base substitutions that break complementarity (e.g., change a G to an A). Ensure the amino acid sequence remains unchanged if coding for a protein.
- Introduce mismatches: Deliberately place non-complementary bases to weaken the stem's stability.
- Prioritize the 3' end: For PCR primers, complementarity at the 3' end is especially problematic as it can be extended by polymerase. Ensure the last 3-5 bases at the 3' end are free of complementarity [2].
- Step 4: Re-analyze the redesigned sequence to confirm the problematic structure has been resolved and ΔG values are now in the acceptable range.
Problem 2: Non-Specific Amplification and Rising Baseline in LAMP Assays
Problem: Your Loop-mediated Isothermal Amplification (LAMP) assays show a slowly rising fluorescent baseline or non-specific amplification in no-template controls, leading to false positives and reduced sensitivity.
Why this happens: LAMP uses 4-6 primers, increasing the chance of primer-dimer interactions. The long inner primers (FIP/BIP, typically 40-45 bases) are particularly prone to forming stable, self-amplifying hairpin structures. Even hairpins with 3' complementarity a few bases away can self-amplify, consuming reagents and generating background signal [16].
Solution: Modify primers to eliminate amplifiable secondary structures.
- Step 1: Perform thermodynamic analysis. Use tools like the nearest-neighbor model or mFold to evaluate the stability (ΔG) of all possible secondary structures for each primer [16].
- Step 2: "Bump" the priming sites. Make minor sequence changes to the primer (e.g., shifting the binding site by a few nucleotides or changing specific codons in the target region) to disrupt the stable hairpin or dimer formation while maintaining target specificity [16].
- Step 3: For complex cases like designing DNA for Tandem Repeat (TR) proteins, employ a structured computational protocol like TReSR (Tandem Repeat DNA Sequence Redesign) [47]:
- Divide the amino acid sequence into short segments (e.g., 5-7 residues).
- For each segment, generate all possible DNA codon combinations that encode the same amino acids.
- Use hybridization simulations (e.g., with DINAMelt) to filter out codon combinations that form stable homodimers (TFF, TRR) or hybridize with wild-type sequences (TWT), while selecting for those with strong correct heterodimerization (TFR).
- Calculate pairwise percent identities between codon combinations and group them to avoid high similarity (≥80% identity).
- Assemble a final DNA sequence from selected codon segments that minimizes overall complementarity.
- Step 4: Validate the modified primer set experimentally. Compare the performance of the original and modified primers in real-time LAMP assays with intercalating dyes (e.g., SYTO dyes) to confirm the reduction of non-specific background and improved assay clarity [16].
Experimental Protocols
Detailed Methodology: TReSR for Tandem Repeat DNA Sequence Redesign
This protocol is designed to redesign repetitive DNA sequences to be compatible with assembly PCR (aPCR) and downstream molecular biology manipulations [47].
1. Calculation and Design of Tandem Repeat DNA Sequences
- Segment Definition: Divide the target amino acid sequence of the tandem repeat into consecutive segments of 5 to 7 amino acid residues. This reduces the combinatorial space of silent mutations to be evaluated.
- Codon Combination Generation: For each amino acid segment, generate a list of all possible DNA codon combinations that encode it.
- Thermodynamic Evaluation:
- Use a two-state melting hybridization application (e.g., DINAMelt via the UNAfold web server) to predict melting temperatures (Tm) for:
- TFF: Homodimer of forward sequences.
- TRR: Homodimer of reverse complement sequences.
- TFR: Heterodimer between forward and reverse complement sequences.
- TWT: Hybridization with the wild-type sequence.
- Filtering: Apply percentile-based thresholds to filter codon combinations. Use a stringent threshold (e.g., 50th percentile) to reject segments with high TFF, TRR, and TWT, and a less stringent threshold (e.g., 10th percentile) to favor segments with high TFR.
- Use a two-state melting hybridization application (e.g., DINAMelt via the UNAfold web server) to predict melting temperatures (Tm) for:
2. Similarity Analysis and Grouping
- Calculate pairwise percent sequence identities between all codon combinations for a given segment.
- Group codon combinations that share high sequence complementarity (e.g., ≥80% identity) and have highly similar identity profiles with other combinations (e.g., cosine similarity ≥ 0.9975).
- To manage computational complexity, randomly select a limited number of groups (e.g., four) for each segment and exclude all other codon combinations.
3. Adjacent Pair Evaluation
- Join all combinations of adjacent pairs of codon combinations from the selected groups.
- Re-evaluate TFF, TRR, and TFR values for these joined segment pairs.
- Filter out adjacent pairs predicted to have high homodimerization affinities (using a threshold like the 20th percentile) and low heterodimerization (e.g., TFR < 80.0°C).
4. Path Selection and Template Construction
- Use a depth-first-search algorithm to design the full-length DNA sequence.
- Select paths (e.g., 100) that visit distinct codon combinations from different groupings to ensure dissimilarity between duplicated DNA sequences.
- Choose a single optimal path to serve as the final redesigned TR DNA sequence template.
- Partition this final DNA sequence into overlapping oligonucleotide primers for synthesis by aPCR.
Detailed Methodology: Evaluating and Correcting LAMP Primers
This protocol describes how to identify and modify LAMP primers causing non-specific amplification [16].
1. Primer and Reagent Preparation
- Obtain or design LAMP primer sets (FIP, BIP, F3, B3, LoopF, LoopB).
- Synthesize primers and prepare necessary reagents: Isothermal amplification buffer, MgSO4, dNTPs, betaine, Bst 2.0 WarmStart DNA polymerase, and AMV Reverse Transcriptase for RT-LAMP.
- Prepare a LAMP-compatible intercalating dye (e.g., SYTO 9, SYTO 82) for real-time monitoring.
2. Thermodynamic Analysis of Primers
- Use software tools (e.g., Multiple Primer Analyzer from Thermo Fisher, mFold from IDT) to analyze all primers for potential dimerization and hairpin formation.
- Pay special attention to the long inner primers (FIP and BIP), checking for stable hairpins with 3' complementarity.
- Calculate the free energy (ΔG) of formation for problematic structures.
3. Primer Modification
- For primers with problematic structures, introduce minor sequence changes. This may involve "bumping" the binding site or substituting specific bases to disrupt complementarity while preserving target specificity.
- For hairpins in FIP/BIP primers, ensure changes do not create new, stable secondary structures.
4. RT-LAMP Assay and Real-Time Monitoring
- Set up RT-LAMP reactions containing:
- 1× Isothermal amplification buffer with 8 mM Mg++
- 1.4 mM each dNTP
- 0.8 M betaine
- Primers (0.2 µM each F3/B3, 1.6 µM each FIP/BIP, 0.8 µM each LoopF/LoopB)
- 3.2 units Bst 2.0 WarmStart DNA polymerase
- 2.0 units AMV Reverse Transcriptase
- 1–2 µM intercalating dye
- Template RNA
- Incubate reactions at 63°C in a real-time PCR instrument, monitoring fluorescence (e.g., FAM for SYTO 9) over time.
- Include a no-template control (NTC) for both original and modified primer sets.
5. Data Interpretation
- Compare the amplification curves of the original and modified primer sets.
- Successful modification is indicated by a significant reduction or elimination of the rising baseline in the NTC and a clearer, steeper exponential phase in the positive sample with the modified primers.
The Scientist's Toolkit: Research Reagent Solutions
| Research Reagent / Tool | Function / Explanation |
|---|---|
| Secondary Structure Predictor | Computational tool to input oligonucleotide sequences and predict formation of hairpins, self-dimers, and hetero-dimers, providing ΔG values for stability assessment [2]. |
| Hot-Start DNA Polymerase | A modified enzyme inactive at room temperature, preventing primer-dimer formation and non-specific amplification during reaction setup before the initial denaturation step [4]. |
| DINAMelt / UNAFold Server | A web server used for two-state melting hybridization simulations to predict melting temperatures (Tm) and stability of DNA duplexes, useful for evaluating codon combinations in sequence redesign [47]. |
| Betaine | A PCR and LAMP additive that reduces the stability of secondary structures by equalizing the contribution of GC and AT base pairs, helping to amplify difficult templates [16]. |
| SYTO Dyes (e.g., SYTO 9) | Cell-permeant, green-fluorescent nucleic acid stains used for real-time monitoring of LAMP and PCR amplification, allowing observation of non-specific background amplification [16]. |
| mFold Tool | A tool for predicting the secondary structure formation of nucleic acids, used to analyze primers for stable hairpins [16]. |
| Multiple Primer Analyzer | A tool for analyzing multiple primers simultaneously for potential cross-dimerization, essential for LAMP primer sets with 4-6 primers [16]. |
| Assembly PCR (aPCR) | A polymerase chain reaction technique that assembles long DNA sequences from overlapping oligonucleotides, requiring designed sequences with low inter-primer complementarity to prevent misassembly [47]. |
Frequently Asked Questions (FAQs)
Q1: What are secondary structures, and why are they problematic in molecular biology? Secondary structures are stable conformations that oligonucleotides (like primers and probes) form through intramolecular or intermolecular base pairing. The main types are hairpins (a sequence folds back on itself), self-dimers (a sequence binds to itself), and hetero-dimers (two different sequences bind to each other). These structures are problematic because they prevent the oligonucleotide from binding to its intended target, reduce PCR efficiency and yield, cause non-specific amplification, and can lead to experimental failure [2] [1].
Q2: How do I interpret ΔG (free energy) values from secondary structure analysis? ΔG represents the stability of a secondary structure. A more negative ΔG indicates a more stable (and thus more problematic) structure. Use these general thresholds as a guide:
- Hairpins: ΔG > -3 kcal/mol is acceptable; ΔG < -6 kcal/mol requires redesign.
- Dimers (Self- and Hetero-): ΔG > -5 kcal/mol is acceptable; ΔG < -8 kcal/mol requires redesign. Structures with ΔG values between these ranges pose a moderate risk and may need attention depending on the application. Always pay special attention to structures involving the 3' end of primers [2].
Q3: What are the most effective strategies to break sequence complementarity?
- Sequence Redesign: This is the most direct method. Change bases in the complementary stem regions to non-complementary ones. Introduce mismatches or use the degeneracy of the genetic code to create a DNA sequence with reduced similarity while preserving the amino acid sequence [2] [47].
- Experimental Adjustments: If minor redesign is not enough, you can adjust experimental conditions. Increasing the annealing temperature can reduce non-specific interactions. Using hot-start polymerases prevents activity during setup, and additives like DMSO or betaine can help destabilize secondary structures [2] [4].
- Computational Protocols: For complex tasks like designing non-repetitive DNA for tandem repeat proteins, use structured methods like the TReSR protocol to systematically evaluate and select codon combinations that minimize complementarity [47].
Q4: How can I identify primer dimer in my PCR results? In gel electrophoresis, primer dimers typically appear as a fuzzy, smeary band at a very low molecular weight (often below 100 bp), well below your expected amplicon. To confirm, always run a no-template control (NTC). If the smeary band appears in the NTC, it is a primer dimer and not your specific product. Running the gel for a longer time can help separate the fast-migrating primer dimers from your product [4].
Q5: My LAMP assay has a high fluorescent background. Could primers be the cause? Yes. A slowly rising baseline in real-time LAMP is often due to the formation of amplifiable primer dimers or self-amplifying hairpin structures, particularly in the long FIP and BIP primers. These structures are extended by the polymerase, generating double-stranded DNA that is detected by the intercalating dye, thereby increasing the background fluorescence and reducing assay efficiency and clarity [16].
Workflow Visualization
Diagram 1: Secondary Structure Analysis and Redesign Workflow
Diagram 2: TReSR Computational Redesign Protocol
FAQs and Troubleshooting Guides
▷ Frequently Asked Questions (FAQs)
1. How does adjusting the annealing temperature improve PCR specificity?
The annealing temperature (Tₐ) is critical for ensuring that primers bind specifically to their intended target sequence. Setting the Tₐ too low can lead to non-specific binding and primer-dimer formation, as primers will anneal to even partially complementary sites. Conversely, a Tₐ that is too high may prevent primers from binding at all, resulting in no amplification. The optimal annealing temperature is typically 3–5°C below the melting temperature (Tₘ) of the primers [10]. For primer pairs with mismatched Tₘ, the Tₐ should be based on the primer with the lowest Tₘ [25]. Using a gradient PCR to test a range of temperatures in 1–2°C increments is the most reliable way to determine the ideal Tₐ for a given primer set [10].
2. When should I consider using DMSO in a PCR reaction? DMSO is a common additive used to improve the amplification of difficult templates. You should consider adding DMSO when:
- Amplifying GC-rich DNA sequences (typically >60% GC content), as it helps destabilize secondary structures [48] [49].
- You observe no yield or poor yield with a template known for complex secondary structures [10].
- Performing high-resolution melting (HRM) analysis, as DMSO can improve detection sensitivity by enlarging the melting profile differences between wild-type and mutant DNA [49]. DMSO is thought to work by reducing the stability of DNA duplexes, thereby helping to denature stubborn secondary structures that would otherwise prevent efficient primer binding and polymerase extension [48] [49].
3. What is the recommended concentration for DMSO, and can I use too much? Yes, you can use too much DMSO. While it can be beneficial, excessive DMSO can inhibit Taq polymerase activity [48]. The recommended final concentration typically falls between 2% and 10%, with many protocols successfully using 5% DMSO [48] [49]. It is crucial to empirically test a range of concentrations for your specific reaction. High concentrations can also weaken primer binding to the target, which may require you to adjust the annealing temperature accordingly [10].
4. What are the primary causes of primer-dimer formation? Primer-dimer is an unintended amplification artifact where primers anneal to each other rather than the template. Common causes include [31]:
- Inadequate primer design, especially complementarity between the 3' ends of the forward and reverse primers.
- Low annealing temperature, which facilitates non-specific annealing.
- High primer concentration, leaving an excess of unused primers that are more likely to interact.
- Prolonged PCR cycles, which can promote dimer formation after the template is exhausted.
- Poor laboratory practice, such as assembling reactions at room temperature, allowing the polymerase to synthesize short products before thermal cycling begins.
▷ Troubleshooting Common PCR Problems
This guide addresses two common issues, their potential causes, and solutions.
Problem 1: No or Weak Amplification
| Possible Cause | Recommendations & Solutions |
|---|---|
| Suboptimal Annealing Temperature | - Calculate the Tₘ for both primers and set the Tₐ to 3–5°C below the lowest Tₘ [10] [3].- Perform a gradient PCR to empirically determine the best Tₐ [10]. |
| Complex Template (GC-rich, secondary structures) | - Use PCR additives like DMSO (2-10%), betaine (1.0-1.7 M), or non-ionic detergents [48] [10].- Increase the denaturation temperature or time [10].- Use a DNA polymerase with high processivity designed for difficult templates [10]. |
| Insufficient Primer Quality/Concentration | - Use HPLC-purified primers to ensure quality [50].- Check primer concentration spectrophotometrically and use within the 0.1–1.0 µM range [50] [10]. |
Problem 2: Non-Specific Amplification or Primer-Dimers
| Possible Cause | Recommendations & Solutions |
|---|---|
| Low Annealing Temperature | - Increase the Tₐ in 1–2°C increments to enhance stringency [10].- Consider using Touchdown PCR to improve specificity [50]. |
| Poor Primer Design | - Check for and avoid self-complementarity and 3'-end complementarity between primers [50] [3].- Redesign primers using software (e.g., Primer-BLAST) to ensure specificity and optimal parameters [3]. |
| High Primer Concentration | - Titrate primer concentration downwards, starting from the recommended 0.1–1.0 µM range, to reduce non-specific interactions [10] [31]. |
| Excessive Cycle Number | - Reduce the number of PCR cycles (e.g., 25-35 cycles) to prevent accumulation of non-specific products in later cycles [10]. |
▷ Experimental Protocols
Protocol 1: Optimizing Annealing Temperature Using a Gradient PCR
Purpose: To empirically determine the ideal annealing temperature for a specific primer pair to maximize yield and specificity.
Materials:
- Standard PCR reagents: DNA template, primers, dNTPs, reaction buffer, Mg²⁺, DNA polymerase.
- Thermal cycler with gradient functionality.
Methodology:
- Prepare Master Mix: Create a master mix containing all standard PCR components, ensuring primer concentration is within 0.1–1.0 µM [50].
- Aliquot: Dispense equal volumes of the master mix into PCR tubes.
- Set Gradient: Program the thermal cycler with an annealing temperature gradient that spans a range (e.g., 50°C to 68°C), typically around 5°C below to 5°C above the calculated
Tₘof your primers [25]. - Run PCR: Execute the cycling protocol.
- Analyze Results: Analyze the PCR products using gel electrophoresis. The well with the strongest specific band and the absence of primer-dimer indicates the optimal annealing temperature.
Protocol 2: Incorporating DMSO for GC-Rich Amplification
Purpose: To enhance the amplification efficiency of GC-rich templates or templates with strong secondary structures.
Materials:
- Standard PCR reagents.
- Molecular biology grade DMSO.
Methodology:
- Prepare Reaction: Prepare the PCR reaction as usual, but include DMSO in the master mix.
- DMSO Concentration: Start with a final concentration of 5% DMSO (v/v) [49]. For further optimization, test a concentration series (e.g., 2%, 5%, 7%) [48].
- Adjust Cycling Parameters: Because DMSO can lower the effective
Tₘof the primers, you may need to lower the annealing temperature by 1-3°C [10]. The denaturation temperature can be maintained or slightly increased. - Include Controls: Always run a parallel reaction without DMSO as a control to assess improvement.
The following workflow summarizes the decision-making process for optimizing a challenging PCR:
▷ The Scientist's Toolkit: Research Reagent Solutions
This table details key reagents used in PCR optimization, their functions, and considerations for use.
| Reagent | Function in PCR Optimization | Key Considerations |
|---|---|---|
| DMSO (Dimethyl Sulfoxide) | Destabilizes DNA secondary structures; improves amplification of GC-rich templates and increases HRM sensitivity [48] [49]. | - Test at 2-10% final concentration [48].- Can inhibit polymerase at high concentrations; requires optimization [48]. |
| Betaine | Reduces formation of secondary structures; improves amplification of GC-rich templates by eliminating base pair composition dependence of DNA melting [48]. | - Use at 1.0-1.7 M final concentration.- Use betaine or betaine monohydrate, not betaine HCl [48]. |
| Mg²⁺ (Magnesium Ions) | Essential cofactor for DNA polymerase activity. Concentration directly affects enzyme fidelity and yield [48] [10]. | - Optimize concentration (1.0-4.0 mM in 0.5-1 mM steps) [48].- Excess Mg²⁺ can reduce fidelity and increase non-specific binding [10]. |
| BSA (Bovine Serum Albumin) | Binds to contaminants; stabilizes reaction components and prevents them from sticking to tube walls [48]. | - Effective at combating PCR inhibitors like phenolic compounds [48].- Use at up to 0.8 mg/ml [48]. |
| Hot-Start DNA Polymerase | Enzyme is inactive at room temperature, preventing non-specific priming and primer-dimer formation before thermal cycling begins [10]. | - Crucial for improving specificity and yield of the desired product [10].- Requires a high-temperature activation step (e.g., 95°C for several minutes). |
FAQs: Identifying and Troubleshooting Dimer Formation
What is a primer dimer and how does it form on a gel? A primer dimer is a small, unintended DNA fragment that forms when PCR primers anneal to each other instead of to the intended target DNA template. On an agarose gel, primer dimers have two key identifying features [4]:
- Short Length: They are typically very short, appearing below 100 bp, which is often below the last band of a standard DNA ladder.
- Smeary Appearance: They usually look like a fuzzy, diffuse smear rather than a crisp, well-defined band.
What is the difference between a primer dimer and an adapter dimer? While both are artifacts, it is important to distinguish them as they have different consequences.
| Feature | Primer Dimer | Adapter Dimer |
|---|---|---|
| Composition | Formed from PCR primers [4] | Formed from sequencing library adapters [51] |
| Sequence Content | Does not contain complete adapter sequences [51] | Contains full-length adapter sequences [51] |
| Impact on Sequencing | Cannot bind to a flow cell and is not sequenced [51] | Can bind and cluster on a flow cell, generating sequencable data that consumes throughput [51] |
How can I confirm that a band is a primer dimer? The most reliable method is to run a No-Template Control (NTC). Prepare a PCR reaction identical to your test samples but without adding any template DNA. If the same smeary, low molecular weight band appears in the NTC lane, it confirms the band is a primer-derived artifact and not a specific PCR product [4].
My gel shows a primer dimer band, but also my desired product. Is the experiment ruined? Not necessarily. The presence of a primer dimer indicates a degree of non-specific amplification, but if your target band is strong and the correct size, the experiment can still be interpretable [4]. However, for downstream applications like cloning, it is best to optimize the reaction to minimize dimers and/or gel-purify the desired band.
Troubleshooting Guide: How to Reduce Primer Dimer Formation
The following workflow outlines a systematic approach to diagnosing and resolving primer dimer issues.
Step 1: Optimize Primer Design and Quality
The most effective solution is often to redesign primers with the following principles in mind [1] [52]:
- Avoid 3'-End Complementarity: Ensure the 3' ends of your primer pairs, especially the last 5 nucleotides, are not complementary to each other. This prevents cross-dimer formation [1].
- Check for Self-Complementarity: Use primer analysis software to check for and minimize regions within a single primer that can bind to itself, forming hairpins or self-dimers [1].
- Optimal GC Content: Maintain a GC content between 40-60%. Avoid runs of Gs or Cs, and more than three G or C bases at the 3' end (a strong "GC clamp"), as this can promote non-specific binding [1] [52].
- Primer Length: Design primers between 18-30 nucleotides for optimal specificity and binding efficiency [1] [52].
- Primer Quality: Use high-quality, purified primers (e.g., HPLC-purified) to avoid truncated oligonucleotides that can contribute to non-specific amplification [52].
Step 2: Adjust PCR Thermodynamics and Components
- Increase Annealing Temperature: A higher annealing temperature helps prevent primers from binding nonspecifically to each other or off-target sites. Perform a temperature gradient PCR to determine the highest possible annealing temperature that still yields your specific product [4] [52].
- Lower Primer Concentration: High primer concentration increases the chance of primer-primer interactions. Titrate the primer concentration downward from the standard 0.05-1.0 µM to find the lowest concentration that supports efficient amplification of your target [4] [52].
- Use a Hot-Start DNA Polymerase: Hot-start polymerases remain inactive until a high-temperature activation step, preventing enzymatic activity during reaction setup when primers are most likely to form dimers at lower temperatures [4].
Step 3: Modify Gel Analysis if Dimers Persist
If primer dimers are unavoidable in a given assay, you can adjust your gel analysis:
- Run the Gel Longer: Since primer dimers are small, running the gel for a longer time will ensure they migrate well past your desired, larger PCR product, preventing confusion [4].
Research Reagent Solutions
The following table details key reagents used in experiments to diagnose and prevent dimer formation.
| Reagent | Function & Application | Key Considerations |
|---|---|---|
| Hot-Start DNA Polymerase | Enzyme inactive at room temp; prevents pre-PCR primer-dimer extension [4]. | Critical for low-template and multiplex PCR. Choose based on fidelity and buffer system. |
| No-Template Control (NTC) | Negative control to identify reagent/lab contamination and confirm primer dimers [4]. | Essential for diagnostic interpretation. Must be included in every run. |
| DNA Ladder | Sizing standard for agarose gels to estimate DNA fragment length [53] [54]. | Select a ladder with strong bands in the low range (e.g., 100 bp) to identify dimers. |
| Agarose | Matrix for gel electrophoresis to separate DNA by size [53] [55]. | Use higher percentage gels (2-3%) for better separation of small primer dimers. |
| SYBR Safe / EtBr | Fluorescent dyes that intercalate DNA for visualization under UV light [53] [55]. | SYBR Safe is less toxic. EtBr is a known mutagen; handle with gloves and dispose of properly. |
| AMPure XP Beads | Magnetic beads for post-PCR clean-up; removes primer dimers and free primers [51]. | A 0.8x to 1x bead ratio is typically used to selectively remove short dimer fragments. |
Technical Troubleshooting Guide
Q1: What are the common symptoms of PCR failure in GC-rich regions?
When amplifying GC-rich regions (typically defined as sequences with >60% GC content), researchers often encounter specific symptoms of PCR failure. These include:
- No Amplification: A complete absence of the desired product on an agarose gel.
- Smearing or Multiple Bands: Non-specific amplification due to primers binding to incorrect sites.
- Low Yield: A faint band of the correct size, indicating inefficient amplification [56].
The root causes are primarily the formation of stable secondary structures (like hairpins) within the template and the primers themselves, and the general thermal stability of GC-rich DNA, which requires higher denaturation temperatures [56].
Q2: What is a systematic approach to troubleshoot and rescue a failing GC-rich PCR assay?
A methodical, step-by-step approach is crucial for diagnosing and resolving issues with GC-rich amplification. The following workflow outlines this process, from initial checks to advanced solutions.
Step 1: Verify and Optimize Primer Design
The first line of defense is to ensure your primers are optimally designed.
- Melting Temperature (Tm): Primer pairs should have Tms within 2–5°C of each other, ideally in the 65–75°C range [7].
- GC Content and Clamp: Aim for a primer GC content between 40–60%. A 'GC clamp'—one or two G or C bases at the 3' end—can enhance binding stability, but avoid more than three consecutive G/C bases [57] [7] [3].
- Avoid Secondary Structures: Use software tools to check for and eliminate primers with self-dimers, cross-dimers, or hairpin structures, as these compete with proper template binding [57] [3].
Step 2: Optimize Thermal Cycling and Reaction Chemistry
If primer design is sound, the next step is to fine-tune the reaction conditions.
- Increase Denaturation Temperature: Raise the denaturation temperature to 95–98°C to help melt stable GC-rich secondary structures. However, be cautious as very high temperatures can degrade the polymerase over many cycles [56].
- Use Additives: Include PCR enhancers such as DMSO (typically 2–10%), betaine, formamide, or glycerol. These additives help destabilize secondary structures and lower the template's effective melting temperature. Note that DMSO generally lowers the primer Tm by ~0.5–0.7°C per 1% added [56] [30].
- Optimize Magnesium Concentration: Magnesium (Mg²⁺) is a critical cofactor. Perform a gradient PCR to titrate Mg²⁺ concentrations (e.g., 1.5 mM to 3.0 mM) to find the optimal concentration for your specific reaction, as excessive Mg²⁺ can promote non-specific binding [56] [58].
Step 3: Employ Specialized Reagents and Polymerases
If optimization fails, switching to reagents specifically designed for challenging templates can be decisive.
- Specialized Polymerases: Use DNA polymerases known for high processivity and performance on GC-rich or complex templates. These are often engineered from hyperthermophilic archaea [56] [59].
- GC-Rich Buffers: Many manufacturers offer specialized buffers that are optimized for GC-rich amplification and often contain proprietary enhancers [56].
Step 4: Utilize Advanced PCR Methods
As a last resort, consider changing the fundamental PCR protocol.
- Slow-down PCR: This method involves adding a dGTP analog (7-deaza-2'-deoxyguanosine) to the PCR mix, which reduces the Tm of GC base pairs. It uses a standardized cycling protocol with lowered temperature ramp rates and additional cycles [56].
- Touchdown PCR: This technique starts with an annealing temperature higher than the estimated Tm of the primers and gradually reduces it in subsequent cycles. This ensures that only the most specific primer-template hybrids are amplified in the initial cycles, improving specificity [57].
Q3: How do I validate that the rescued PCR product is correct and error-free?
After successfully obtaining an amplicon, it is critical to confirm its sequence integrity, especially when using polymerases with different fidelity profiles.
- Sequencing: The gold standard for validation is Sanger sequencing of the cloned PCR product. This directly reveals any mutations introduced during amplification [60].
- Restriction Digest: If the amplicon contains a known restriction site, digestion with the corresponding enzyme can provide a quick check for the correct insert size.
- Cloning and Colony Analysis: For high-fidelity applications, clone the PCR product and sequence multiple clones to assess the error rate across the population. White/blue colony screening can be a preliminary test when using a system like lacZα [60] [59].
Experimental Protocol: Rescuing a GC-Rich Amplicon
This protocol provides a detailed methodology for rescuing a PCR amplicon from a GC-rich template using a combination of specialized reagents and optimized cycling conditions.
Objective: To amplify a 1.2 kb GC-rich (72%) fragment of the human CFTR gene promoter region that has previously failed with standard PCR conditions.
Materials:
- Template: Human genomic DNA (50 ng/µL)
- Primer Pair (validated in silico):
- Forward: 5'-AGC TGG GCA GGG TCA GTA G-3'
- Reverse: 5'-GCC TGC TGG GTT CAG TTC T-3'
- Specialized DNA Polymerase (e.g., a proofreading enzyme like Pfu or an engineered high-fidelity polymerase)
- 5x GC-Rich Reaction Buffer (commercial, often includes enhancers)
- PCR Additives: DMSO, Betaine (5M stock)
- dNTP Mix (10 mM each)
- Nuclease-free Water
Procedure:
- Reaction Setup: Prepare a 50 µL reaction mix on ice.
- Nuclease-free water: to 50 µL
- 5x GC-Rich Buffer: 10 µL
- dNTP Mix (10 mM each): 1 µL
- Forward Primer (10 µM): 2 µL
- Reverse Primer (10 µM): 2 µL
- Template DNA: 1 µL (50 ng)
- DMSO: 2.5 µL (5% final)
- Betaine (5M): 7 µL (0.7 M final)
- DNA Polymerase: 0.5–1.0 µL (as per manufacturer's instructions)
Thermal Cycling: Run the following program in a thermal cycler.
- Initial Denaturation: 98°C for 2 minutes (to fully denature GC-rich structures).
- 35 Cycles of:
- Denaturation: 98°C for 20 seconds.
- Annealing: 68°C for 20 seconds (set based on primer Tm).
- Extension: 72°C for 90 seconds (1 kb/min).
- Final Extension: 72°C for 5 minutes.
- Hold: 4°C.
Analysis: Analyze 5 µL of the PCR product by agarose gel electrophoresis alongside a DNA ladder to confirm the size and yield of the amplicon.
Research Reagent Solutions
The following table details key reagents and their roles in troubleshooting PCR amplification of difficult templates like GC-rich regions.
| Reagent | Function in GC-Rich PCR | Example Usage & Notes |
|---|---|---|
| DMSO (Dimethyl Sulfoxide) | Destabilizes DNA secondary structures by interfering with base pairing. Lowers overall Tm [56] [30]. | Use at 2–10%. Higher concentrations can inhibit polymerase. Account for Tm reduction (~0.6°C per 1% DMSO). |
| Betaine | Equalizes the stability of AT and GC base pairs, reducing the high melting temperature of GC-rich duplexes [56]. | Commonly used at 0.5–1.5 M. Often included in commercial GC-rich buffers. |
| Specialized GC Buffers | Proprietary formulations that often include a combination of enhancers like betaine, DMSO, and other stabilizing agents [56]. | e.g., OneTaq GC Buffer (NEB). Follow manufacturer's instructions for use with their polymerases. |
| Proofreading Polymerases | High-fidelity enzymes (e.g., Pfu, Phusion) with 3'→5' exonuclease activity to correct misincorporated nucleotides, crucial for cloning [60] [59]. | Error rates can be >10x lower than Taq. Often have slower extension rates. |
| Engineered High-Performance Polymerases | Polymerases engineered for high processivity and resistance to inhibitors, enabling amplification of long, GC-rich, or complex templates [59]. | e.g., Platinum SuperFi II (ThermoFisher). Ideal for challenging amplicons where standard enzymes fail. |
| 7-deaza-dGTP | dGTP analog that incorporates into DNA and disrupts Hoogsteen base pairing, thereby preventing secondary structure formation [56]. | Used in "Slow-down PCR" protocols. Often requires partial substitution (e.g., 3:1 ratio of 7-deaza-dGTP:dGTP). |
Frequently Asked Questions (FAQs)
Q: My primers have a high potential for dimer formation. Should I redesign them, or can I troubleshoot this with conditions?
A: While you can try to suppress dimers by optimizing Mg²⁺ concentration, increasing annealing temperature, or using a hot-start polymerase [57] [59], the most robust long-term solution is to redesign the primers. Avoid complementarity, especially at the 3' ends, between the forward and reverse primers [7] [3].
Q: How critical is polymerase choice for GC-rich PCR?
A: It is highly critical. Standard Taq polymerase may be insufficient. Hyperthermostable polymerases (e.g., from Pyrococcus species) withstand higher denaturation temperatures needed to melt GC-structures. Furthermore, high-fidelity polymerases are essential for applications where sequence accuracy is paramount, such as cloning [60] [59].
Q: What is the most common mistake when first attempting to amplify a GC-rich region?
A: The most common mistake is using standard PCR protocols and reagents. GC-rich templates routinely require specialized conditions, including higher denaturation temperatures, the use of enhancers like DMSO or betaine, and often, a polymerase system specifically designed for high GC content [56]. Assuming a one-size-fits-all approach for PCR will often lead to failure with these challenging sequences.
Ensuring Specificity and Efficiency: Validation and Future Technologies
FAQ: Addressing Common In-Silico PCR Challenges
1. What is the primary purpose of running an in-silico PCR analysis? In-silico PCR is a computational approach used to test the specificity of primers, predict the location and size of amplicons, and check for potential off-target binding sites before conducting wet-lab experiments. It helps ensure that your primers will amplify only the intended target sequence, which is crucial for the accuracy of PCR applications in diagnostics, genotyping, and DNA sequencing [61].
2. My wet-lab PCR shows multiple bands, but in-silico PCR predicted a single product. What could be wrong? This discrepancy often arises because the in-silico search parameters were too stringent. If the algorithm allowed for too few mismatches, it may have missed legitimate off-target binding sites present in the actual genome under your experimental conditions. Re-run the in-silico analysis, adjusting parameters to allow for a more realistic number of mismatches (e.g., by increasing the E-value or reducing the minimum perfect match at the 3' end), and verify that the genome assembly used computationally matches your sample's genome [62] [61].
3. Which tool should I use for large-scale primer design and specificity checking? For large-scale projects involving hundreds of target sites, a tool like CREPE (CREate Primers and Evaluate) is highly effective. CREPE automates the process by integrating Primer3 for initial primer design and In-Silico PCR (ISPCR) for specificity analysis, processing all targets in parallel. For smaller-scale projects or single primer pairs, NCBI's Primer-BLAST is an excellent and user-friendly web-based tool that combines primer design with automatic specificity checking against a selected database [21] [62].
4. How can I use in-silico PCR to design primers that avoid amplifying genomic DNA in RT-PCR? You can configure your in-silico PCR tool to design primers that span an exon-exon junction. This ensures that the primer pair will only produce an efficient amplicon from cDNA (where the exons are joined) and not from genomic DNA (which contains introns). Both Primer-BLAST and CREPE offer options to enforce this constraint during the design process [21] [62].
Troubleshooting Guide: In-Silico PCR and Specificity Analysis
| Problem | Possible Cause | Solution |
|---|---|---|
| No viable primers found | Overly strict design parameters (e.g., Tm, GC%, amplicon size). | Widen the acceptable parameter ranges. For example, allow a broader melting temperature (Tm) range or a larger amplicon size window [21]. |
| High-quality off-targets (HQ-Off) predicted | Insufficient primer specificity; primers have significant homology to other genomic regions. | Re-design primers, focusing on unique regions. Use the "mispriming" checks in Primer3 or adjust the specificity stringency in Primer-BLAST [62] [61]. |
| Primer-dimer formation predicted | High self-complementarity or 3'-end complementarity between forward and reverse primers. | Use primer design tools that check for these features. Re-design primers to minimize complementarity, especially at the 3' ends [63] [1]. |
| Discrepancy between in-silico and wet-lab results | Mismatched genome reference; incorrect in-silico PCR parameters. | Ensure the in-silico reference genome matches your sample's strain/species. Adjust alignment parameters (e.g., minGood, tileSize in ISPCR) to better mimic experimental conditions [62] [61]. |
Experimental Protocol: Confirming Primer Specificity with NCBI Primer-BLAST
This protocol provides a step-by-step method for designing and validating target-specific primers using the public tool NCBI Primer-BLAST.
1. Input Template Sequence:
- Navigate to the Primer-BLAST tool [21].
- Input your template sequence using a valid NCBI Accession number (e.g., NM_000492.3) or by pasting a sequence in FASTA format into the provided box.
2. Set Primer Design Parameters:
- Under "Primer Parameters," set the following based on proven design principles [63] [1]:
- Primer Length: 18-24 nucleotides.
- Tm: Opt for 54-65°C, with forward and reverse primers having Tms within 5°C of each other.
- GC Content: 40-60%.
- Adjust the "PCR Product Size" range to fit your experimental needs.
3. Configure Specificity Check Parameters:
- In the "Specificity Check" section, select the appropriate database (e.g., RefSeq mRNA, genome sequences).
- Critical: Enter the scientific name of your target organism in the "Organism" field. This restricts the specificity check to the relevant genome and is strongly recommended to improve search speed and relevance [21].
- To design primers for RT-PCR that will not amplify genomic DNA, select the option "Primer must span an exon-exon junction." [21].
4. Run and Analyze Results:
- Click "Get Primers" to run the analysis.
- Review the results. Primer-BLAST will provide a list of candidate primer pairs and a detailed alignment view showing any potential off-target binding sites in the selected database. Select a pair with no significant off-targets.
Workflow for Target-Specific Primer Design and Validation
The diagram below illustrates the integrated computational and experimental workflow for ensuring primer specificity.
Research Reagent Solutions for Specific PCR
The following table lists key tools and reagents essential for conducting robust in-silico and wet-lab PCR experiments.
| Research Reagent | Function in Specificity Confirmation |
|---|---|
| Hot-Start DNA Polymerase | Suppresses non-specific amplification and primer-dimer formation by remaining inactive until a high-temperature activation step [4] [10]. |
| Primer Design Software (e.g., Primer3) | Automates the design of primers with optimal length, Tm, and GC content, forming the foundation for specific amplification [62] [63]. |
| Specificity Check Tool (e.g., Primer-BLAST, ISPCR) | Computationally predicts off-target binding sites by aligning primer sequences against a genome database, flagging non-specific primers before synthesis [21] [62]. |
| In-Silico PCR Tool (e.g., CREPE Pipeline) | Integrates primer design and specificity analysis for high-throughput projects, generating a summarized report on primer quality and off-target likelihood [62]. |
| Gradient Thermocycler | Empirically determines the optimal annealing temperature (Ta) for a primer pair, which is critical for maximizing specificity and yield in the wet-lab [10] [64]. |
Frequently Asked Questions (FAQs)
FAQ 1: What is the relationship between predicted ΔG and PCR efficiency? The Gibbs free energy (ΔG) is a key thermodynamic parameter that quantifies the stability of nucleic acid secondary structures, such as hairpin loops and primer-dimers. A more negative ΔG value indicates a more stable, and therefore more likely, structure. The empirical relationship is that primers with highly negative predicted ΔG values for self- or cross-dimer formation are associated with poor PCR efficiency. This is because these stable secondary structures compete with proper primer binding to the template DNA, leading to reduced amplification yield, non-specific products, or even complete reaction failure [16] [65]. Empirical validation involves calculating these ΔG values for your primers and correlating them with experimental efficiency metrics, such as those derived from a standard curve.
FAQ 2: How can I experimentally measure PCR efficiency to validate my predictions? PCR efficiency is most accurately determined by running a standard curve with a dilution series of a known template concentration.
- Protocol:
- Prepare a minimum of 3-5, 10-fold serial dilutions of your target DNA.
- Run your qPCR assay with these dilutions.
- The instrument's software will generate a standard curve by plotting the Cycle Threshold (Ct) values against the logarithm of the initial template concentration.
- The slope of this curve is used to calculate PCR efficiency (E) using the formula: ( E = (10^{-1/slope} - 1) \times 100\% ).
- Interpretation: An ideal reaction with 100% efficiency has a slope of -3.32. Efficiency between 90% and 105% (slope between -3.6 and -3.1) is generally considered acceptable [66]. Primers with problematic ΔG values will typically result in reactions with poor efficiency falling outside this range.
FAQ 3: My primers have favorable ΔG predictions but my PCR efficiency is still low. What are other common causes? While ΔG is critical, other factors can severely impact PCR efficiency. If your primer design is sound, you should investigate the following:
- PCR Inhibitors: Samples may contain contaminants like phenol, heparin, or proteins that inhibit the polymerase enzyme. This can be identified by a inhibition plot and addressed by further purifying your nucleic acid samples [66].
- Suboptimal Reaction Conditions: The concentration of MgCl₂, which acts as a cofactor for the polymerase, is crucial. Too little or too much Mg²⁺ can lead to poor efficiency [67] [65]. The annealing temperature must also be optimized to be high enough for specificity but low enough for primer binding.
- Human Error: Inaccurate pipetting, especially with small volumes, can lead to inconsistent reagent concentrations and high Ct value variations, compromising perceived efficiency [66] [68].
Troubleshooting Guide
| Observed Problem | Potential Cause Linked to ΔG | Experimental Validation & Solution |
|---|---|---|
| Low Yield / Poor Efficiency | Stable hairpin structures in primers, particularly near the 3' end, prevent binding. | Validate: Check for hairpins using oligo analyzer software. Compare ΔG of predicted hairpins; more negative ΔG indicates a stronger, more problematic structure.Solve: Redesign primers to avoid regions with high self-complementarity [1] [65]. |
| Non-Specific Amplification or Primer-Dimers | Low ΔG (high stability) for cross-dimer formation between forward and reverse primers. | Validate: Analyze primer pairs for complementarity, especially at the 3' ends. A highly negative dimer ΔG is a strong predictor of failure.Solve: Redesign primers to minimize 3' complementarity. Increase annealing temperature [16] [68]. |
| Ct Value Variations & Inconsistent Replicates | Minor, stable secondary structures can cause stochastic binding, leading to inconsistency. | Validate: Use software to check for "self 3'-complementarity" parameters. A lower score is better.Solve: Improve pipetting precision with calibrated equipment or automation. Ensure a homogeneous reaction mixture [68] [65]. |
Experimental Protocol: Validating ΔG Predictions for Primer Dimers
This protocol provides a step-by-step method to empirically test whether computationally predicted primer-dimer ΔG values correlate with observed PCR efficiency.
1. Design and In Silico Analysis:
- Design several primer pairs targeting your gene of interest using a reliable tool (e.g., Primer-BLAST).
- For each primer pair, use oligonucleotide analysis software (e.g., Oligo Analyzer, Primer3) to calculate the ΔG (kcal/mol) for the most stable potential cross-dimer and self-dimer structures. Record these values.
2. Experimental QC via Polyacrylamide Gel Electrophoresis (PAGE):
- Procedure: Before running full PCRs, anneal the forward and reverse primers of each pair in a tube without template, polymerase, or dNTPs. Run the product on a high-resolution PAGE gel.
- Validation: Visually check for low molecular weight bands, which indicate physical dimer formation. Primer pairs that show strong dimer bands on the gel should correlate with more negative predicted ΔG values.
3. qPCR Efficiency Determination:
- Procedure: For each primer pair, perform a qPCR assay with a 5-point, 10-fold serial dilution of template, as described in the FAQ section above.
- Data Collection: Record the slope and R² of the standard curve and calculate the PCR efficiency (E%).
4. Data Correlation and Analysis:
- Create a scatter plot with predicted dimer ΔG on the X-axis and experimental PCR efficiency on the Y-axis.
- A strong negative correlation (i.e., as ΔG becomes more negative, efficiency decreases) validates the predictive power of the ΔG calculation for your specific experimental setup.
Research Reagent Solutions
The following reagents and tools are essential for conducting the empirical validation described in this guide.
| Item | Function in Validation | Example/Brand |
|---|---|---|
| Oligo Analysis Software | Calculates predicted ΔG values for secondary structures. | Primer3, Oligo Analyzer (IDT), Netprimer [65] |
| High-Fidelity DNA Polymerase | Amplifies target with low error rate, crucial for sensitive quantification. | Q5 Hot Start (NEB), Platinum SuperFi II (Thermo Fisher) |
| qPCR Master Mix | Provides optimized buffer, salts, and enzyme for efficient real-time PCR. | PowerUp SYBR Green (Thermo Fisher), Luna Universal qPCR (NEB) |
| Standard Template DNA | A known, pure sample of the target sequence for generating the standard curve. | GBlocks Gene Fragments (IDT), Plasmid DNA |
| Automated Liquid Handler | Ensures highly accurate and reproducible pipetting of reagents and standards, reducing Ct variations. | I.DOT Liquid Handler [68] |
Workflow for Empirical Validation
The diagram below outlines the logical workflow for correlating computational predictions with experimental results.
In molecular biology and drug development, the success of polymerase chain reaction (PCR) experiments fundamentally depends on the specificity and structural integrity of oligonucleotide primers. Poorly designed primers that form hairpin loops or primer-dimers can compromise experimental results, leading to false positives, reduced amplification efficiency, or complete reaction failure. This technical support article provides a comparative analysis of popular primer design tools—Primer-BLAST, Primer3, and commercial suites—framed within the context of designing primers to avoid secondary structures. We present troubleshooting guides, FAQs, and detailed protocols to assist researchers in selecting and optimizing primer design tools for robust, reproducible results in their experimental workflows.
Tool Comparison: Features, Strengths, and Limitations
The following table summarizes the core characteristics, advantages, and disadvantages of major primer design tools, with particular emphasis on their capabilities for preventing hairpin loops and dimer formation.
Table 1: Comparative Analysis of Primer Design Tools
| Tool Name | Primary Developer/Affiliation | Key Features | Strengths | Limitations | Hairpin/Dimer Analysis |
|---|---|---|---|---|---|
| Primer-BLAST | National Center for Biotechnology Information (NCBI) [21] | Integrates Primer3 design engine with BLAST specificity checking [21] [65] | Gold standard for specificity validation against selected databases; configurable for cDNA/genomic DNA [21] [3] | Web interface only; slower processing for large-scale designs [21] | Primer3 core checks secondary structures; specificity check reduces dimer-prone designs [21] |
| Primer3 | Whitehead Institute for Biomedical Research [65] | Highly configurable standalone algorithm; extensive parameter customization [65] [28] | Extensive parameter control; widely integrated into other pipelines and local applications [69] | Lacks built-in specificity checking against genomic databases [3] | Comprehensive calculation of self-complementarity and 3'-complementarity scores [1] |
| OligoAnalyzer Tool | Integrated DNA Technologies (IDT) [20] | Suite of analysis tools (Tm calculator, hairpin, self-dimer, hetero-dimer prediction) [20] | User-friendly interface; detailed thermodynamic analysis of secondary structures [20] | Commercial platform; analysis of pre-designed sequences only (not a design tool) [20] | Dedicated modules for hairpin, self-dimer, and hetero-dimer analysis [20] |
| Multiple Primer Analyzer | Thermo Fisher Scientific [70] | Batch analysis of multiple primers; calculates Tm, GC%, and primer-dimer potential [70] | Efficient batch analysis of multiple primer sequences simultaneously [70] | Commercial platform; provides preliminary dimer guidance only [70] | Reports possible primer-dimers based on user-defined detection parameters [70] |
| AutoPVPrimer | Academic Research (2025) [69] | AI-enhanced pipeline with random forest classifier; visualizes primer dimers [69] | Visualizes primer dimer interactions; machine learning optimization for specific virus targets [69] | Specialized for plant viruses; relatively new tool [69] | Unique visualize_primer_dimer module for visual assessment of dimer potential [69] |
Troubleshooting Guides and FAQs
Frequently Asked Questions (FAQs)
Q1: Why do my reactions consistently show multiple bands or smears on agarose gels, even with in-silico optimized primers? This typically indicates non-specific binding or primer-dimer formation. First, verify primer specificity using Primer-BLAST against the relevant genome database to ensure your primers bind to a unique region [21] [3]. Second, use tools like IDT's OligoAnalyzer to check for cross-dimers between your forward and reverse primers [20]. Finally, experimentally, try performing a temperature gradient PCR to optimize the annealing temperature, increasing it in 2°C increments to enhance stringency [3].
Q2: What does a "slowly rising baseline" in my real-time PCR/qPCR data signify? A slowly rising baseline, particularly in techniques like LAMP or qPCR, is often a classic symptom of amplifiable primer-dimers or self-amplifying hairpin structures [16]. These structures are extended by the polymerase, generating a low-level background signal that consumes reagents and reduces assay efficiency. To resolve this, redesign primers to eliminate stable 3' complementarity, using thermodynamic analysis tools to ensure the free energy (ΔG) of dimer formation is not overly negative [16] [20].
Q3: How can I design primers for a template with very high (>70%) GC content? High GC content promotes strong, potentially non-specific binding and stable secondary structures. In addition to adjusting primer parameters, include additives in your PCR mix such as DMSO (0-5%), betaine, or formamide, which can help destabilize secondary structures [30]. When designing, you may need to lengthen the primer to maintain an optimal Tm if the GC content is slightly below the ideal 40-60% range, as lower GC content requires more nucleotides to achieve the same melting temperature [1] [30].
Troubleshooting Guide for Common Experimental Issues
Table 2: Troubleshooting Common Primer-Related Experimental Issues
| Problem | Potential Causes | In-Silico Diagnostic Steps | Corrective Actions |
|---|---|---|---|
| No amplification | Primers form stable hairpins, especially at 3' end; Tm too high [3] | Check hairpin formation using OligoAnalyzer (ΔG < -3 kcal/mol is problematic) [30] [16] | Redesign primers to avoid self-complementary regions; lower annealing temperature [3] |
| Primer-dimer artifacts | High complementarity between primers, especially at 3' ends [1] [65] | Run hetero-dimer analysis in OligoAnalyzer or Multiple Primer Analyzer [20] [70] | Redesign one primer to eliminate 3' complementarity; increase annealing temperature [3] |
| Non-specific amplification | Low primer specificity; annealing temperature too low [3] | Re-run Primer-BLAST with stricter organism parameter [21] [3] | Increase annealing temperature; redesign primers from a more unique genomic region [3] |
| Poor yield/weak signal | Intra-primer secondary structure sequesters primers [3] | Use mFold or OligoAnalyzer to check for stable secondary structures [16] [20] | Redesign primer to avoid folding; optimize Mg²⁺ concentration; use additives like DMSO [3] [30] |
Experimental Protocols and Workflows
Standard Workflow for Primer Design and Validation
The following diagram illustrates a robust, iterative workflow for designing and validating primers, emphasizing the prevention of secondary structures.
Detailed Protocol: Thermodynamic Analysis of Primer Secondary Structures
Objective: To quantitatively evaluate the potential for hairpin and primer-dimer formation in candidate primer sequences using thermodynamic parameters [16].
Background: The stability of secondary structures is governed by the change in Gibbs free energy (ΔG). More negative ΔG values indicate more stable, and therefore more problematic, structures [30] [16]. The nearest-neighbor model, based on SantaLucia's unified parameters, is the gold standard for these calculations [30] [28].
Procedure:
- Input Primer Sequences: Enter the candidate forward and reverse primer sequences into the IDT OligoAnalyzer tool [20].
- Set Reaction Conditions: Configure the tool parameters to match your intended experimental conditions:
- Execute Analyses:
- Run the Hairpin module. Examine the results for any predicted structures with a ΔG more negative than -3 kcal/mol [30].
- Run the Self-Dimer module for each primer individually.
- Run the Hetero-Dimer module using both forward and reverse sequences.
- Interpret Results: For all dimer and hairpin analyses, prioritize primers where the predicted ΔG of formation is weak (less negative than -9 kcal/mol for dimers) [3]. Crucially, ensure there is no stable complementarity at the 3' ends, as this is a major driver of non-specific amplification [1] [16].
The Scientist's Toolkit: Essential Reagent Solutions
Table 3: Key Research Reagents for Primer Optimization and Validation
| Reagent / Solution | Function / Purpose | Example Application / Note |
|---|---|---|
| Bst 2.0 WarmStart DNA Polymerase | Isothermal amplification; used in LAMP assays [16] | Reduces non-specific activity at low temperatures; ideal for complex primer sets [16] |
| DMSO (Dimethyl Sulfoxide) | Additive to reduce secondary structure formation [30] | Lowers Tm by ~0.5-0.7°C per 1%; use at 0-5% for GC-rich targets [30] |
| Betaine | Additive to destabilize GC-rich secondary structures [16] | Used at 0.8 M concentration in LAMP and PCR of difficult templates [16] |
| MgSO₄ / Mg²⁺ | Essential cofactor for DNA polymerase; stabilizes DNA duplex [30] [16] | Concentration is critical; typically 1.5-2.5 mM for PCR, 8 mM for LAMP [30] [16] |
| SYTO 9 / SYTO 82 Dyes | Intercalating dyes for real-time monitoring of DNA amplification [16] | Used in LAMP and qPCR to monitor amplification kinetics and background [16] |
| dNTPs | Building blocks for DNA synthesis by polymerase [16] | Standard concentration is 1.4 mM each dNTP; chelates Mg²⁺, affecting free concentration [30] [16] |
The strategic selection and use of primer design tools are paramount for successful molecular experiments. Primer-BLAST stands out for ensuring specificity, while tools like Primer3 offer deep customization. Commercial analyzers from IDT and Thermo Fisher provide essential, user-friendly validation of thermodynamic properties to mitigate hairpin and dimer risks. A combined workflow, leveraging the strengths of multiple tools, is often the most robust strategy. The field is rapidly evolving with the integration of artificial intelligence, as seen in AutoPVPrimer, which uses random forest classifiers and visual dimer analysis to enhance prediction accuracy [69]. Furthermore, machine learning approaches, including recurrent neural networks (RNNs), are being developed to predict PCR success directly from primer and template sequences, potentially revolutionizing primer design by learning from vast experimental datasets [28]. By adhering to the protocols and troubleshooting guides outlined herein, researchers can systematically overcome the challenges of secondary structure formation, thereby enhancing the reliability and efficiency of their work in drug development and diagnostic applications.
The Emerging Role of Machine Learning in Predicting PCR Success
Frequently Asked Questions (FAQs) and Troubleshooting
This guide addresses common challenges in PCR experiment design and how machine learning (ML) offers new solutions, particularly for avoiding hairpin loops and dimer formation.
FAQ 1: How can machine learning predict PCR success better than traditional methods?
Traditional primer design software relies on known thermodynamic rules to flag potential issues like dimer formation [28]. In contrast, machine learning models, particularly Recurrent Neural Networks (RNNs), learn from vast datasets of experimental PCR results. They consider complex, non-linear relationships between primer and template sequences that are difficult to capture with explicit rules [28]. These models analyze the entire sequence context to predict amplification success with high accuracy, helping to pre-emptively flag primers that might form dimers or hairpins despite seeming thermodynamically suitable [28].
FAQ 2: My primers were designed with traditional software but still form primer dimers. What ML-based solutions can help?
Primer dimers remain a key cause of PCR failure, consuming reagents even when primers meet standard design criteria [5]. Emerging ML approaches address this in two ways:
- Advanced Prediction: RNNs are trained to recognize sequence patterns that lead to dimerization, offering a more reliable prediction than traditional checks [28].
- Novel Biochemistry: Machine learning aids in developing and designing primers with self-avoiding molecular recognition systems (SAMRS) [5]. SAMRS nucleobases pair with natural DNA but not with each other, inherently reducing primer-primer interactions. ML models help determine the optimal number and placement of SAMRS components in a primer to maximize specificity while maintaining efficient amplification [5].
FAQ 3: What specific data is used to train ML models for PCR prediction?
ML models are trained on diverse experimental data. The foundational study for this approach used [28]:
- Template Sequences: 31 unique 16S rRNA gene sequences (v6-v8 regions) from 30 bacterial phyla.
- Primer Sets: 126 primer sets (72 for model training/validation and 54 for testing).
- Experimental Outcomes: Results from 3,906 individual PCR reactions, each scored as success or failure.
- Feature Encoding: Primer-template relationships (complementarity, dimerization potential, hairpins) were converted into symbolic "pseudo-sentences" for the RNN to process [28].
Key Experimental Protocol: Using RNN to Predict PCR Success
The following methodology is adapted from a landmark study that applied a Recurrent Neural Network (RNN) to predict PCR amplification [28].
1. Data Generation:
- Template Preparation: Synthesize double-stranded DNA templates (e.g., 435-481 bp fragments of the 16S rRNA gene).
- Primer Design: Design primer sets targeting these templates. For a robust model, include primers that violate standard design rules (e.g., high single-base repetition) to generate both positive and negative examples.
- PCR Experimentation: Perform PCR with all primer-template combinations under standardized conditions (e.g., 33 cycles, annealing at 56°C). Verify amplification success via agarose gel electrophoresis.
2. Data Encoding for ML:
- For each primer-template pair, analyze their interaction to generate features. This includes assessing:
- Hairpin structures within each primer.
- Dimer formation between the forward and reverse primers.
- Homology and binding positions between each primer and the template sequence.
- Encode these interactions into a series of five-character codes ("pseudo-words") assembled into a "pseudo-sentence" that represents the specific primer-template relationship [28].
- For each primer-template pair, analyze their interaction to generate features. This includes assessing:
3. Model Training and Prediction:
- Train an RNN model using the pseudo-sentences as input and the experimental PCR results (success/failure) as the output.
- The trained model can then predict the success probability for new primer-template pairs based on their generated pseudo-sentences.
The workflow for this process is outlined below.
Quantitative Performance of ML in PCR Prediction
The table below summarizes key performance data from relevant studies.
Table 1: Summary of Experimental Performance Data for ML and Advanced Primer Technologies in PCR
| Method / Technology | Reported Performance / Effect | Key Application |
|---|---|---|
| RNN-based Prediction [28] | 70% accuracy in predicting PCR success/failure from sequence. | In-silico screening of primer sets to avoid experimental failure. |
| SAMRS-modified Primers [5] | Significant reduction in primer-dimer formation; improved SNP discrimination over conventional allele-specific PCR. | Multiplex PCR and diagnostics where specificity is critical. |
Research Reagent Solutions
This table lists essential reagents and technologies used in the featured experiments.
Table 2: Essential Research Reagents and Technologies for Advanced PCR
| Research Reagent / Technology | Function in Experiment |
|---|---|
| Recurrent Neural Network (RNN) [28] | The machine learning model that learns from encoded primer-template sequences to predict PCR outcomes. |
| Pseudo-Sentence Encoding [28] | A method to convert complex primer-template interactions (hairpins, dimers, homology) into a format suitable for RNN processing. |
| Self-Avoiding Molecular Recognition Systems (SAMRS) [5] | Modified nucleobases that pair with natural DNA but not with each other, used in primer synthesis to reduce primer-dimer formation. |
| GoTaq Green Hot Master Mix [28] | A ready-to-use PCR mix used in the foundational ML study to generate experimental training data. |
The mechanism of SAMRS, which helps prevent primer-dimer formation, is illustrated in the following diagram.
Establishing a QC Checklist for Publication-Ready Primer Pairs
FAQ 1: What are the essential design parameters for a publication-ready primer?
For a primer to be publication-ready, its design must meet specific quantitative benchmarks to ensure specificity and efficiency in PCR experiments. The following parameters are considered essential.
Table 1: Essential Design Parameters for Publication-Ready Primers
| Parameter | Optimal Range | Rationale & Technical Notes |
|---|---|---|
| Primer Length | 18-24 nucleotides (nt) for standard PCR; 20-30 nt for complex templates [1] [71]. | Shorter primers hybridize faster but may lack specificity; longer primers are more specific but can anneal less efficiently [1]. |
| Melting Temperature (Tm) | 54°C - 65°C; Tm of primer pairs should be within 2-5°C of each other [1] [71]. | The annealing temperature (Ta) is typically set 2-5°C above the Tm. Consistent Tm between primers ensures synchronized binding [1]. |
| GC Content | 40% - 60% [1] [71]. | GC base pairs form three hydrogen bonds, providing stronger binding than AT pairs. Content outside this range can lead to non-specific binding or inefficient annealing [1]. |
| GC Clamp | Presence of G or C bases within the last 5 bases at the 3' end. Avoid more than 3 G/C residues at the 3' end [1]. | Promotes specific binding at the site of polymerase extension. An excessively strong clamp can cause non-specific binding [1]. |
| Self-Complementarity | Keep the "self-complementarity" and "self 3'-complementarity" scores as low as possible [1]. | Low scores minimize the risk of hairpin formation (within a single primer) and primer-dimer formation (between two primers) [1]. |
FAQ 2: How do I experimentally validate that my primers are specific and will not form dimers?
Specificity and the absence of dimerization are critical for a reliable assay. Validation involves a combination of in silico analysis and bench experiments.
Detailed Methodology for Specificity and Dimer Validation
- In Silico Specificity Check: Use the NCBI Primer-BLAST tool to verify that your primers are specific to your intended target sequence and do not align to other non-target sequences in the database [21]. This step is crucial for ensuring your PCR will amplify only the desired gene or region.
- In Silico Secondary Structure Analysis: Before ordering primers, use reliable primer design software (e.g., tools from Eurofins Genomics, IDT's mFold) to analyze potential self-dimers, cross-dimers, and hairpin structures [1] [16]. The goal is to minimize these interactions thermodynamically.
- Empirical Validation with No-Template Control (NTC): Run a PCR or qPCR reaction using your optimized primer pair in the absence of any template DNA. Analyze the reaction products using gel electrophoresis (for standard PCR) or by monitoring the amplification curve (for qPCR).
- Interpretation: A clean NTC with no amplification products on a gel or a flat amplification curve in qPCR indicates the absence of amplifiable primer-dimers or self-amplifying hairpins [16]. A rising baseline or a late-amplifying signal in the NTC suggests problematic primer interactions that must be addressed.
FAQ 3: What is the MIQE guideline, and what primer-related information must I include for publication?
The MIQE (Minimum Information for Publication of Quantitative Real-Time PCR Experiments) guidelines are a standardized framework to ensure the transparency, reproducibility, and credibility of qPCR experiments [72] [73]. Adherence to MIQE is now a common requirement for publication in scientific journals.
For primer-related information, you must disclose the following [72] [73]:
- Final Primer Sequences: The complete nucleotide sequences (5' to 3') for both forward and reverse primers.
- A Unique Identifier: If using a commercially predesigned assay (e.g., TaqMan), the Assay ID is required.
- Context Sequence: Either the probe context sequence or the full amplicon context sequence must be provided to allow others to locate the primer binding sites precisely. This can be generated using the assay ID and NCBI resources as detailed by Thermo Fisher Scientific [73].
- Location and Amplicon Length: The exact base-pair location of the primers on the target sequence and the length of the resulting amplicon.
- Quantification Method: Detail how primer concentration was measured and quantified (e.g., spectrophotometry at 260 nm).
FAQ 4: My qPCR shows a rising baseline in the no-template control. What is the cause and solution?
A rising baseline or late-amplifying signal in the No-Template Control (NTC) is a classic symptom of amplifiable primer-dimers or self-amplifying hairpin structures [16]. These structures are extended by the DNA polymerase, generating non-specific amplification products that deplete reagents and create background signal.
Troubleshooting Protocol:
- Confirm the Problem: First, ensure the signal is from primer-dimer by analyzing the reaction melt curve. Primer-dimer products typically have a lower melting temperature than the specific amplicon.
- Thermodynamic Analysis: Re-analyze your primer sequences using software (e.g., Multiple Prime Analyzer from Thermo Fisher) to identify stable dimer or hairpin formations, particularly those with 3' complementarity [16].
- Optimize Annealing Temperature: Increase the annealing temperature in increments of 2°C. A higher temperature can destabilize the weak bonds in primer-dimers without significantly affecting specific primer binding [1] [71].
- Primer Redesign: If optimization fails, redesign the primers. Make minor sequence adjustments, such as shifting the primer a few bases upstream or downstream, to disrupt complementarity while maintaining target specificity [16]. Avoid G/C-rich stretches at the 3' end.
FAQ 5: What tools and reagents are essential for implementing this QC checklist?
A robust primer QC workflow relies on specific software for design and analysis, as well as high-quality reagents for validation.
Table 2: Research Reagent Solutions for Primer QC
| Item | Function / Application |
|---|---|
| NCBI Primer-BLAST | A free online tool for designing target-specific primers and checking their specificity against public database sequences to avoid off-target amplification [21]. |
| Secondary Structure Prediction Tools | Software like mFold (IDT) or the Multiple Prime Analyzer (Thermo Fisher) is used to calculate the thermodynamic stability of hairpins and primer-dimers before synthesis [16]. |
| High-Fidelity DNA Polymerase | Enzymes with high fidelity reduce the chance of errors during amplification, which is crucial for cloning and sequencing applications following PCR [71]. |
| Spectrophotometer / Fluorometer | Essential for accurately measuring the concentration and assessing the purity of synthesized oligonucleotide primers before use in sensitive assays like qPCR [71]. |
| TaqMan Assays | Predesigned probe-based assays that offer high specificity and are accompanied by the necessary sequence information for MIQE compliance [73]. |
Conclusion
Successful PCR is fundamentally dependent on primers free of disruptive secondary structures. By integrating foundational knowledge of thermodynamics with a rigorous methodological workflow—encompassing in-silico design, systematic troubleshooting, and thorough validation—researchers can consistently generate specific and efficient primers. Adhering to established ΔG thresholds for hairpins (> -3 kcal/mol) and dimers (> -5 kcal/mol) provides a quantitative framework for design decisions. The future of primer design is being shaped by machine learning models that predict amplification success directly from sequence data, promising even greater accuracy and reliability for critical applications in clinical diagnostics and drug development. Embracing these comprehensive strategies will significantly reduce experimental time and cost while increasing data integrity.
References
- 1. Primer design guide - 5 tips for best PCR results [https://the-dna-universe.com/2022/09/05/primer-design-guide-the-top-5-factors-to-consider-for-optimum-performance/]
- 2. 2025 Guide: Detecting Secondary Structures - OligoPool.com [https://oligopool.com/resources/tutorials/detecting-secondary-structures]
- 3. How to Design Primers for DNA Sequencing | Practical Lab ... [https://www.cd-genomics.com/resource-how-to-design-primers-for-dna-sequencing.html]
- 4. Troubleshooting primer dimer in PCR [https://www.minipcr.com/primer-dimer-pcr/]
- 5. Eliminating primer dimers and improving SNP detection ... [https://pmc.ncbi.nlm.nih.gov/articles/PMC7200914/]
- 6. A Definitive, Practical Guide to Designing Primers for PCR ... [https://medium.com/@zweyehtut/a-definitive-practical-guide-to-designing-primers-for-pcr-qpcr-88d7bf6e2d93]
- 7. PCR Primer Design Tips - Behind the Bench [https://www.thermofisher.com/blog/behindthebench/pcr-primer-design-tips/]
- 8. Proven tips for PCR primer design [https://www.neb.com/en-us/nebinspired-blog/proven-tips-for-pcr-primer-design?srsltid=AfmBOopTTb0BQWCh5jd4035bMA1fjwmJbhsIB3lJJZ6hDnhkxJ9sXNP3]
- 9. PCR Setup—Six Critical Components to Consider [https://www.thermofisher.com/us/en/home/life-science/cloning/cloning-learning-center/invitrogen-school-of-molecular-biology/pcr-education/pcr-reagents-enzymes/pcr-component-considerations.html]
- 10. PCR Troubleshooting Guide | Thermo Fisher Scientific - US [https://www.thermofisher.com/us/en/home/life-science/cloning/cloning-learning-center/invitrogen-school-of-molecular-biology/pcr-education/pcr-reagents-enzymes/pcr-troubleshooting.html]
- 11. Avoiding false positives with PCR | IDT [https://www.idtdna.com/page/support-and-education/decoded-plus/how-to-avoid-false-positives-in-pcr-and-what-to-do-if-you-get-them/]
- 12. Design PCR primers and check them for specificity - NCBI - NIH [https://www.ncbi.nlm.nih.gov/guide/howto/design-pcr-primers]
- 13. Single molecule characterization of the binding kinetics of a ... [https://pmc.ncbi.nlm.nih.gov/articles/PMC8565314/]
- 14. Gibbs free energy [https://en.wikipedia.org/wiki/Gibbs_free_energy]
- 15. Gibbs (Free) Energy [https://chem.libretexts.org/Bookshelves/Physical_and_Theoretical_Chemistry_Textbook_Maps/Supplemental_Modules_(Physical_and_Theoretical_Chemistry)/Thermodynamics/Energies_and_Potentials/Free_Energy/Gibbs_(Free)_Energy]
- 16. Impact of Primer Dimers and Self-Amplifying Hairpins on ... [https://pmc.ncbi.nlm.nih.gov/articles/PMC5922443/]
- 17. High-throughput methods for measuring DNA ... [https://pmc.ncbi.nlm.nih.gov/articles/PMC7470960/]
- 18. PCR Troubleshooting: Common Problems and Solutions [https://www.mybiosource.com/learn/pcr-troubleshooting-common-problems-and-solutions/]
- 19. PCR Troubleshooting Guide [https://www.neb.com/en-us/tools-and-resources/troubleshooting-guides/pcr-troubleshooting-guide?srsltid=AfmBOoq_80da8TpZ7IwVwy4DwtE85NoB8WvXTV2BQmn6wNtbiG__qO1n]
- 20. Primer Analysis Tool and Tm Calculator | IDT [https://www.idtdna.com/pages/tools/oligoanalyzer]
- 21. Primer designing tool - NCBI - NIH [https://www.ncbi.nlm.nih.gov/tools/primer-blast/]
- 22. PCR Primer Design Guidelines [http://www.premierbiosoft.com/tech_notes/PCR_Primer_Design.html]
- 23. Primer Dimer - an overview [https://www.sciencedirect.com/topics/biochemistry-genetics-and-molecular-biology/primer-dimer]
- 24. Rules and Tips for PCR & qPCR Primer Design | IDT [https://www.idtdna.com/page/support-and-education/decoded-plus/how-to-design-primers-and-probes-for-pcr-and-qpcr/]
- 25. 8 Basic Concepts for Designing Primers for a Standard PCR [https://bitesizebio.com/24608/designing-luck-8-basic-concepts-for-designing-primers-for-a-standard-pcr/]
- 26. Protocol - How to Design Primers [https://www.addgene.org/protocols/primer-design/]
- 27. Predicting sequence-specific amplification efficiency in ... [https://www.nature.com/articles/s41467-025-64221-4]
- 28. Prediction of PCR amplification from primer and template ... [https://www.nature.com/articles/s41598-021-86357-1]
- 29. Polymerase Chain Reaction: Basic Protocol Plus ... [https://pmc.ncbi.nlm.nih.gov/articles/PMC4846334/]
- 30. 2025 Oligonucleotide Design Guide: Complete User Manual [https://oligopool.com/resources/user-guide]
- 31. PCR Troubleshooting 103: How to Address Primer-Dimers [https://geneticeducation.co.in/pcr-troubleshooting-103-how-to-address-primer-dimers/]
- 32. Proven tips for PCR primer design [https://www.neb.com/en-us/nebinspired-blog/proven-tips-for-pcr-primer-design?srsltid=AfmBOoovekqMJZhg95aAhxw2bAamHlqld7kNjim_sqb0_LHP26Qtbyid]
- 33. Guide to Primer Design for PCR [https://www.benchling.com/primer-design-for-pcr]
- 34. A guide to long-range PCR for Nanopore sequencing V.2 [https://www.protocols.io/view/a-guide-to-long-range-pcr-for-nanopore-sequencing-gz6cbx9ax.html]
- 35. Primer Blast | protocols [http://lowepowerlab.ucdavis.edu/protocols/primerblast.html]
- 36. PCR Troubleshooting Guide [https://www.neb.com/en-us/tools-and-resources/troubleshooting-guides/pcr-troubleshooting-guide?srsltid=AfmBOoqnZdGk4RuZWOmFl4VtkMGzOsbIqxmjYsJ614YohpRWK3tC3fWc]
- 37. How to use the OligoAnalyzer Tool [https://eu.idtdna.com/page/support-and-education/decoded-plus/using-the-oligoanalyzer-program/]
- 38. How to check PCR primers for primer design issues | IDT [https://www.idtdna.com/pages/support/faqs/how-can-i-check-my-pcr-primers-using-the-oligoanalyzer-program-to-ensure-there-are-no-significant-primer-design-issues-]
- 39. How To Check For Primer-Dimers & Hairpins In Your Oligos [https://www.idtdna.com/pages/support/faqs/how-do-i-use-the-oligoanalyzer-tool-to-analyze-possible-hairpins-and-dimers-formed-by-my-oligo]
- 40. ExonSurfer: a web-tool to design primers at exon–exon junctions [https://bmcgenomics.biomedcentral.com/articles/10.1186/s12864-024-10456-2]
- 41. PCR/qPCR/dPCR Assay Design [https://www.sigmaaldrich.com/US/en/technical-documents/protocol/genomics/pcr/pcr-qpcr-dpcr-assay-design?srsltid=AfmBOor2WKTY4bK4Q0yiaZrD3eVAziP5s_8MBAda0ugo-gzS-osZjXKd]
- 42. A spotter's guide to SNPtic exons: The common splice variants ... [https://pmc.ncbi.nlm.nih.gov/articles/PMC8801146/]
- 43. PCR Troubleshooting Guide [https://www.neb.com/en-us/tools-and-resources/troubleshooting-guides/pcr-troubleshooting-guide?srsltid=AfmBOoppzEJDkxU9DhRwAur6lMbajft8J0HRkYNlJuMzxR1ky6eNtBh6]
- 44. Troubleshooting Non-Specific Amplification [https://bento.bio/resources/bento-lab-advice/troubleshooting-non-specific-amplification-with-bento-lab/]
- 45. PCR Troubleshooting Guide [https://www.neb.com/en-us/tools-and-resources/troubleshooting-guides/pcr-troubleshooting-guide?srsltid=AfmBOoosCjR9kMzWFyajM-Zvp2heEduKOPT_jcGmswpWBY7iH-kUdndM]
- 46. PCR Optimization: Strategies To Minimize Primer Dimer [https://genemod.net/blog/pcr-optimization]
- 47. TReSR: A PCR-compatible DNA sequence design method ... [https://pmc.ncbi.nlm.nih.gov/articles/PMC10096509/]
- 48. Just What Do All These Additives Do? [https://bitesizebio.com/19420/just-what-do-all-these-additives-do/]
- 49. DMSO increases mutation-scanning detection sensitivity in ... [https://pmc.ncbi.nlm.nih.gov/articles/PMC5156568/]
- 50. Proven tips for PCR primer design [https://www.neb.com/en-us/nebinspired-blog/proven-tips-for-pcr-primer-design?srsltid=AfmBOor2ya-ojaV_CRTmIWO4IFOyCN9q3qg9zAgaisk5pOGh3Guh88oN]
- 51. Adapter dimers causes, effects, and how to remove them [https://knowledge.illumina.com/library-preparation/general/library-preparation-general-troubleshooting-list/000001911]
- 52. Proven tips for PCR primer design [https://www.neb.com/en-us/nebinspired-blog/proven-tips-for-pcr-primer-design?srsltid=AfmBOooI62uaLl-42WGx38mP2VhWsqIBbMGusFh3S3hjYkEOln22y89H]
- 53. Protocols Agarose Gel Electrophoresis [https://www.addgene.org/protocols/gel-electrophoresis/]
- 54. Eight Tips to Improve Gel Electrophoresis Results [https://www.thermofisher.com/us/en/home/brands/thermo-scientific/molecular-biology/molecular-biology-learning-center/molecular-biology-resource-library/spotlight-articles/8-DNA-ladder-tips.html]
- 55. Agarose Gel Electrophoresis for the Separation of DNA ... [https://pmc.ncbi.nlm.nih.gov/articles/PMC4846332/]
- 56. 5 easy tips to address problems amplifying GC-rich regions [https://bitesizebio.com/24002/problems-amplifying-gc-rich-regions-problem-solved/]
- 57. Proven tips for PCR primer design [https://www.neb.com/en-us/nebinspired-blog/proven-tips-for-pcr-primer-design?srsltid=AfmBOoql-A19N551pHE2-CasHF65HZ8aoP0M1lK4AtI8dxOxa4R_dKfp]
- 58. Primer Validation Was a No-Go – Now What? [https://bitesizebio.com/38408/primer-validation-was-a-no-go-now-what/]
- 59. DNA Polymerase—Four Key Characteristics for PCR [https://www.thermofisher.com/us/en/home/life-science/cloning/cloning-learning-center/invitrogen-school-of-molecular-biology/pcr-education/pcr-reagents-enzymes/dna-polymerase-characteristics.html]
- 60. Error Rate Comparison during Polymerase Chain Reaction ... [https://pmc.ncbi.nlm.nih.gov/articles/PMC4150459/]
- 61. In silico PCR analysis: a comprehensive bioinformatics tool ... [https://www.frontiersin.org/journals/bioinformatics/articles/10.3389/fbinf.2024.1464197/full]
- 62. A Computational Tool for Large-Scale Primer Design and ... [https://pmc.ncbi.nlm.nih.gov/articles/PMC12469620/]
- 63. Proven tips for PCR primer design [https://www.neb.com/en-us/nebinspired-blog/proven-tips-for-pcr-primer-design?srsltid=AfmBOoqvbiXtPfhCuOaOGQy3plk3ZllqxqqRTYbH2E191VnUxlYx7MaE]
- 64. PCR Troubleshooting Guide [https://www.neb.com/en-us/tools-and-resources/troubleshooting-guides/pcr-troubleshooting-guide?srsltid=AfmBOoqq1DtOQxaZg_cwsdxZuibbmLgJhy7rkg4cdyQO4bstaWTDTrYt]
- 65. Primer Dimer - an overview [https://www.sciencedirect.com/topics/neuroscience/primer-dimer]
- 66. Poor PCR Efficiency [https://www.thermofisher.com/us/en/home/life-science/pcr/real-time-pcr/real-time-pcr-learning-center/real-time-pcr-basics/real-time-pcr-troubleshooting-tool/gene-expression-quantitation-troubleshooting/poor-pcr-efficiency.html]
- 67. Mathematical Modeling and Thermodynamic Integration for ... [https://pmc.ncbi.nlm.nih.gov/articles/PMC12620865/]
- 68. qPCR Troubleshooting: How to Ensure Successful ... [https://dispendix.com/blog/qpcr-troubleshooting]
- 69. AutoPVPrimer: A comprehensive AI-Enhanced pipeline for ... [https://pmc.ncbi.nlm.nih.gov/articles/PMC11781739/]
- 70. Multiple Primer Analyzer | Thermo Fisher Scientific - US [https://www.thermofisher.com/us/en/home/brands/thermo-scientific/molecular-biology/molecular-biology-learning-center/molecular-biology-resource-library/thermo-scientific-web-tools/multiple-primer-analyzer.html]
- 71. Proven tips for PCR primer design [https://www.neb.com/en-us/nebinspired-blog/proven-tips-for-pcr-primer-design?srsltid=AfmBOoq2tJwjv4EG0hTb-OvMu6Q-ijBVzaZPYRd4L3kUXXctk4CF63qg]
- 72. The MIQE guidelines: minimum information for publication of quantitative real-time PCR experiments - PubMed [https://pubmed.ncbi.nlm.nih.gov/19246619/]
- 73. MIQE Guidelines | Thermo Fisher Scientific - US [https://www.thermofisher.com/us/en/home/life-science/pcr/real-time-pcr/real-time-pcr-assays/why-choose-taqman-assays/publish-real-time-pcr-results.html]