How SDS-PAGE Separates Proteins by Molecular Weight: A Complete Guide for Life Science Researchers
This article provides a comprehensive resource for researchers, scientists, and drug development professionals on Sodium Dodecyl Sulfate-Polyacrylamide Gel Electrophoresis (SDS-PAGE).
How SDS-PAGE Separates Proteins by Molecular Weight: A Complete Guide for Life Science Researchers
Abstract
This article provides a comprehensive resource for researchers, scientists, and drug development professionals on Sodium Dodecyl Sulfate-Polyacrylamide Gel Electrophoresis (SDS-PAGE). It covers the core biochemical principles enabling protein separation by molecular weight, detailed methodological protocols and applications in biopharmaceutical development, common troubleshooting and optimization strategies for high-resolution results, and a comparative analysis with advanced techniques like capillary electrophoresis. The content synthesizes foundational knowledge with practical insights to ensure accurate protein analysis in research and quality control contexts.
The Core Principle: How SDS-PAGE Unlocks Protein Separation by Size
In the analysis of complex protein mixtures, researchers are often confronted with a fundamental problem: how to separate and characterize proteins based on a single, unambiguous property. Proteins naturally vary in multiple characteristics simultaneously—including molecular size, intrinsic charge, hydrophobicity, and three-dimensional structure. This multidimensional heterogeneity presents significant challenges for analytical techniques that seek to resolve, identify, and compare proteins reliably. Sodium Dodecyl Sulfate-Polyacrylamide Gel Electrophoresis (SDS-PAGE) addresses this fundamental problem by transforming multivariate protein characteristics into a single separation parameter—molecular weight [1] [2].
This technical guide examines the core principles and methodologies of SDS-PAGE, focusing on its unique ability to separate proteins exclusively by molecular size. We will explore the chemical basis of this transformation, detailed experimental protocols, and the critical reagents that enable this widely utilized technique. The discussion is framed within the broader context of proteomic research and drug development, where precise protein characterization is essential for applications ranging from biomarker discovery to quality control of biopharmaceuticals [3] [4].
Core Principles: How SDS-PAGE Achieves Separation by Size Alone
The Role of Sodium Dodecyl Sulfate (SDS) in Protein Denaturation
The foundational innovation that enables SDS-PAGE to separate proteins by molecular weight alone lies in the application of sodium dodecyl sulfate (SDS), a potent anionic detergent. SDS serves two critical functions in protein denaturation:
Charge Uniformity: SDS molecules bind tightly to protein backbone at a consistent ratio of approximately 1.4 grams of SDS per gram of protein, which translates to roughly one SDS molecule per two amino acid residues [2]. This uniform coating masks the proteins' intrinsic charges and confers a uniform negative charge density to all proteins in the mixture. This ensures that during electrophoresis, all proteins migrate toward the anode (positive electrode), with charge differences eliminated as a variable affecting migration [1] [5].
Protein Unfolding: The chemical structure of SDS features both a hydrophobic tail and an ionic head group. The hydrophobic region interacts with and disrupts the non-polar core of proteins, while the ionic portion disrupts hydrogen bonds and other non-covalent interactions that stabilize secondary and tertiary structures [1]. This action linearizes the polypeptide chains, dismantling higher-order protein structures into their primary sequence components. The resulting SDS-polypeptide complexes assume a rod-like shape whose length corresponds directly to the protein's molecular weight [2].
The Sieving Effect of the Polyacrylamide Gel Matrix
While SDS treatment ensures all proteins have similar charge-to-mass ratios, the polyacrylamide gel matrix provides the molecular sieving necessary for size-based separation. This matrix is created through the polymerization of acrylamide monomers cross-linked by N,N'-methylenebisacrylamide, forming a three-dimensional network with tunable pore sizes [6].
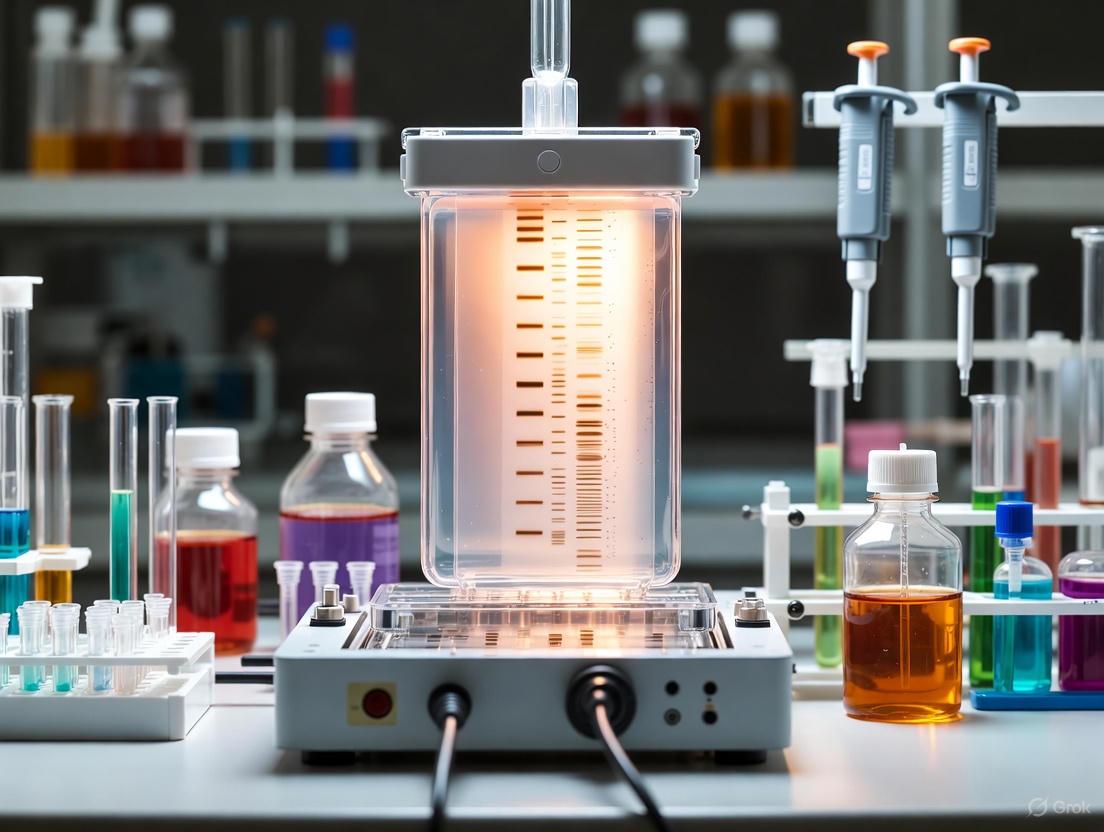
The migration of proteins through this mesh-like structure is inversely related to their molecular size. As an electric field is applied, the negatively charged SDS-protein complexes travel through the gel toward the anode. Smaller proteins navigate the pores more easily and migrate farther, while larger proteins encounter greater resistance and migrate shorter distances [1] [2]. This relationship between migration distance and molecular size enables both the separation of protein mixtures and the estimation of protein molecular weights when compared to standards of known size [6] [7].
SDS-PAGE Separation Mechanism Flowchart
The Discontinuous Buffer System and Gel Architecture
SDS-PAGE employs a discontinuous buffer system that significantly enhances separation resolution compared to continuous systems. This system utilizes two distinct gel layers with different pH values and pore sizes, which work in concert to concentrate protein samples into sharp bands before separation [1] [5]:
Stacking Gel (pH ~6.8): The upper portion of the gel contains a low percentage of acrylamide (typically 4-5%) and operates at pH 6.8. In this slightly acidic environment, glycine molecules from the running buffer exist primarily as zwitterions with minimal net charge. This creates a steep voltage gradient that concentrates protein samples into extremely narrow bands before they enter the separating gel [6] [5].
Separating/Resolving Gel (pH ~8.8): The lower portion contains a higher percentage of acrylamide (typically 8-20%) and operates at pH 8.8. When protein bands reach this interface, the increased pH causes glycine to become predominantly negatively charged (glycinate ions), eliminating the stacking effect. Proteins then begin to separate according to size as they migrate through the sieving matrix with uniform buffer conditions [1] [6].
This sophisticated two-layer system enables proteins to enter the resolving gel simultaneously as sharp, concentrated bands, dramatically improving resolution compared to what could be achieved with a uniform gel system [5].
Experimental Methodology: A Detailed Protocol
Reagent Preparation and Gel Casting
Successful SDS-PAGE requires precise preparation of reagents and gels. The following table summarizes key solutions and their compositions:
Table 1: Essential Reagents for SDS-PAGE
| Reagent | Composition | Function | Critical Parameters |
|---|---|---|---|
| 10% Separating Gel [6] | 3.3 mL 30% Acrylamide/Bis, 2.5 mL 1.5 M Tris-HCl (pH 8.8), 100 μL 10% SDS, 3.9 mL dH₂O, 50 μL 10% APS, 5 μL TEMED | Size-based separation of proteins | Acrylamide concentration (8-20%) determines resolution range; pH 8.8 |
| 5% Stacking Gel [6] | 0.83 mL 30% Acrylamide/Bis, 0.63 mL 1.0 M Tris-HCl (pH 6.8), 50 μL 10% SDS, 3.4 mL dH₂O, 25 μL 10% APS, 5 μL TEMED | Concentration of protein samples into sharp bands | Low acrylamide (4-5%); pH 6.8 |
| Running Buffer [6] [5] | 25 mM Tris, 192 mM glycine, 0.1% SDS (pH 8.3) | Conducts current and maintains pH during electrophoresis | Proper pH critical for glycine function; SDS maintains protein denaturation |
| Sample Buffer (Laemmli Buffer) [6] [5] | 100 mM Tris-HCl (pH 6.8), 4% SDS, 20% glycerol, 0.004% bromophenol blue, 10% β-mercaptoethanol or DTT | Denatures proteins and prepares for loading | Must include reducing agents; glycerol adds density for loading |
Gel Casting Procedure [6]:
- Assemble gel cassette using clean glass plates and spacers
- Prepare separating gel mixture without APS and TEMED; degas to remove oxygen
- Add APS and TEMED to initiate polymerization; pour between glass plates
- Overlay with isopropanol to create a flat interface and exclude oxygen
- After polymerization (20-30 minutes), remove isopropanol and prepare stacking gel
- Pour stacking gel, insert comb, and allow to polymerize (15-20 minutes)
Safety Note: Acrylamide monomer is a neurotoxin. Always wear gloves and work in a fume hood when handling unpolymerized solutions [6].
Sample Preparation and Electrophoresis Conditions
- Combine protein sample with equal volume of 2× sample buffer (containing reducing agent)
- Denature at 95°C for 5 minutes to ensure complete unfolding and SDS binding
- Cool and centrifuge briefly to collect condensation and particulates
- Load 20-50 μg total protein per lane for Coomassie staining; 1-10 μg for silver staining
Electrophoresis Conditions [6]:
- Assemble electrophoresis apparatus with running buffer
- Load samples and molecular weight markers into wells
- Apply constant voltage: 80 V through stacking gel, then 120-150 V through separating gel
- Run until dye front reaches bottom of gel (typically 45-90 minutes total)
- Terminate electrophoresis and process gel for staining or western blotting
Table 2: Acrylamide Concentration Guidelines for Optimal Separation
| Acrylamide Percentage | Optimal Separation Range | Typical Applications |
|---|---|---|
| 8% | 50-200 kDa | Large proteins; protein complexes |
| 10% | 30-100 kDa | Standard separation range |
| 12% | 20-80 kDa | Intermediate size proteins |
| 15% | 10-50 kDa | Small to medium proteins |
| 4-20% Gradient | 10-200 kDa | Broad range separation |
Visualization and Analysis
Protein Staining Methods [6]:
- Coomassie Brilliant Blue: Standard sensitivity (50-100 ng/band); fix gel in 40% ethanol/10% acetic acid for 30 minutes, stain with 0.1% Coomassie R-250 for 1-2 hours, destain with 10% ethanol/7% acetic acid
- Silver Staining: High sensitivity (0.1-1 ng/band); involves fixation, sensitization, silver impregnation, and development steps
- Fluorescent Stains: Modern alternative with wide dynamic range; compatible with downstream mass spectrometry
Molecular Weight Determination [6] [7]:
- Measure migration distances of protein standards and unknown proteins
- Calculate Rf values (migration distance relative to dye front)
- Prepare semi-log plot of molecular weight versus Rf for standards
- Interpolate unknown molecular weights from standard curve
SDS-PAGE Experimental Workflow
The Scientist's Toolkit: Essential Reagent Solutions
Table 3: Critical Reagents for SDS-PAGE Experiments
| Reagent/Chemical | Function | Mechanism of Action | Alternatives |
|---|---|---|---|
| SDS (Sodium Dodecyl Sulfate) [1] [2] | Protein denaturation and charge uniformity | Binds protein backbone, disrupts hydrophobic interactions, confers negative charge | CTAB (for cationic systems) |
| β-Mercaptoethanol (BME) or DTT [1] [7] | Reduction of disulfide bonds | Cleaves covalent S-S bridges, completes protein unfolding | Dithioerythritol (DTE), TCEP |
| Acrylamide/Bis-acrylamide [1] [6] | Gel matrix formation | Polymerizes to form molecular sieve with tunable pore sizes | Pre-cast gels for consistency |
| Ammonium Persulfate (APS) & TEMED [1] [6] | Polymerization catalysts | Generate free radicals to initiate acrylamide chain formation | Riboflavin (alternative initiator) |
| Tris-Glycine Buffer [6] [5] | Running buffer system | Conducts current; glycine charge state enables discontinuous stacking | Bis-Tris, Tricine (for special applications) |
| Molecular Weight Markers [6] [7] | Size calibration standards | Pre-stained or unstained proteins of known molecular weight | Custom marker mixtures |
Technical Considerations and Limitations
Factors Affecting Accuracy and Resolution
Several technical factors can influence the accuracy and resolution of SDS-PAGE separations:
Protein Characteristics: Highly hydrophobic proteins may bind excess SDS, while heavily glycosylated or phosphorylated proteins may bind less SDS, leading to slight deviations from expected migration [5]. Proteins with extreme isoelectric points or unusual amino acid compositions may also exhibit anomalous migration.
Gel Composition: The acrylamide-to-bis-acrylamide ratio affects pore size and mechanical properties. Lower crosslinking creates larger pores, while higher crosslinking creates smaller pores. Gradient gels provide expanded separation ranges by varying acrylamide concentration throughout the gel [2].
Sample Preparation: Incomplete denaturation or reduction can result in protein aggregation or partial folding, causing smearing or aberrant migration. Overloading wells can cause band distortion, while underloading may prevent detection [6].
Troubleshooting Common Issues
Table 4: Troubleshooting Common SDS-PAGE Problems
| Problem | Possible Causes | Solutions |
|---|---|---|
| Smearing/Streaking | Incomplete denaturation, protein degradation, overloaded wells | Extend boiling time, add protease inhibitors, reduce loading amount |
| Vertical Streaks | Air bubbles in gel, uneven polymerization | Degas gel solution before polymerization, ensure proper mixing of catalysts |
| Aberrant Migration | Uneven SDS binding, incorrect buffer pH, high salt concentrations | Use fresh DTT and sample buffer, check buffer pH, desalt samples |
| Poor Band Resolution | Improper acrylamide percentage, too fast electrophoresis | Match gel percentage to protein size range, reduce voltage for better resolution |
| Failed Polymerization | Degraded APS or TEMED, oxygen inhibition | Prepare fresh APS weekly, ensure proper sealing of gel cassette |
SDS-PAGE remains a cornerstone technique in molecular biology and proteomics due to its elegant solution to the fundamental problem of multivariate protein separation. By systematically eliminating charge and structural differences through SDS denaturation while exploiting molecular sieving in polyacrylamide gels, this method achieves separation based primarily on molecular weight. The discontinuous buffer system further refines this approach by concentrating samples before separation, enabling exceptional resolution.
While emerging technologies like capillary electrophoresis and microfluidic systems offer automation and miniaturization [3] [8], SDS-PAGE maintains its relevance through simplicity, cost-effectiveness, and versatility. Its applications span basic research, clinical diagnostics, biotechnology, and pharmaceutical development [4]. As proteomics continues to advance, the fundamental principles of SDS-PAGE continue to underpin more sophisticated analytical workflows, ensuring its enduring value to the scientific community.
Understanding both the capabilities and limitations of this technique empowers researchers to implement it effectively while appropriately interpreting results within the broader context of their protein characterization objectives.
Sodium Dodecyl Sulfate-Polyacrylamide Gel Electrophoresis (SDS-PAGE) represents a foundational methodology in biochemical research for separating proteins by molecular weight. The technique's resolving power fundamentally depends on SDS, which acts as a "great equalizer" by masking intrinsic protein charge characteristics and imposing a uniform negative charge density. This whitepaper examines the molecular mechanism of SDS-protein interactions, details standardized experimental protocols, and presents quantitative data critical for research applications in drug development and protein science. We establish how SDS binding enables molecular weight-based separation by creating consistent charge-to-mass ratios across diverse protein structures, facilitating accurate size determination and analysis in pharmaceutical and research contexts.
The Molecular Mechanism of SDS Action
SDS (Sodium Dodecyl Sulfate) serves as the fundamental agent that enables protein separation primarily by molecular size rather than intrinsic charge properties. This anionic detergent performs two critical functions that transform native proteins into molecular weight standards.
Protein Denaturation and Linearization
SDS molecules effectively unfold higher-order protein structures by disrupting hydrophobic interactions and hydrogen bonds that maintain secondary and tertiary conformations [9] [10]. The SDS molecule contains both hydrophobic and ionic regions that facilitate this process: the hydrophobic tail interacts with nonpolar regions of proteins, while the ionic sulfate group disrupts polar interactions [10]. This comprehensive denaturation converts globular proteins into random coil polypeptides, eliminating shape variations that could influence electrophoretic mobility.
Charge Equalization Mechanism
Following denaturation, SDS binds to polypeptide chains at a consistent ratio of approximately 1.4 grams of SDS per 1 gram of protein [2] [11]. This binding stoichiometry translates to approximately one SDS molecule per two amino acid residues along the protein backbone [2]. The anionic sulfate groups of bound SDS create a uniform negative charge envelope around each protein molecule, effectively masking intrinsic charge differences derived from variable amino acid sequences [9] [11] [10]. This results in all proteins achieving a nearly identical charge-to-mass ratio, ensuring electrophoretic migration depends primarily on molecular dimensions rather than native charge characteristics [2] [11].
Table 1: Quantitative Protein-Denaturant Interactions in SDS-PAGE
| Parameter | Value | Functional Significance |
|---|---|---|
| SDS Binding Ratio | 1.4 g SDS / 1 g protein [2] [11] | Creates consistent charge-to-mass ratio |
| SDS Molecules per Amino Acid | 1 SDS / 2 amino acids [2] | Ensures complete charge coverage |
| Critical Micelle Concentration | 7-10 mM [2] | Monomeric SDS required for protein binding |
| SDS Concentration in Running Buffer | 0.1% (standard); 0.0375% (native) [12] | Maintains denatured state during separation |
Comprehensive SDS-PAGE Methodology
Sample Preparation Protocol
Proper sample preparation is crucial for effective SDS-mediated separation. The following steps ensure complete denaturation and charge equalization:
Sample Buffer Composition: Combine protein sample with Laemmli buffer containing:
- SDS (1-2%): Denatures proteins and provides initial negative charge [9] [13]
- Reducing agent (DTT or β-mercaptoethanol): Breaks disulfide bonds for complete linearization [13] [14] [10]
- Glycerol (5-10%): Increases density for well loading [9] [13]
- Tracking dye (Bromophenol Blue): Visualizes migration progress [9] [2]
- Tris-HCl buffer (pH 6.8): Maintains optimal pH environment [9] [13]
Denaturation Process: Heat samples at 95°C for 5 minutes [14] [10] or 70°C for 10 minutes [2] to disrupt hydrogen bonds and complete protein unfolding.
Centrifugation: Briefly spin samples to pellet insoluble debris that could cause smearing [14].
Table 2: SDS-PAGE Sample Buffer Standard Composition
| Component | Final Concentration | Primary Function |
|---|---|---|
| SDS | 1-2% | Protein denaturation and charge conferment |
| Tris-HCl | 63 mM, pH 6.8 | Buffering capacity |
| Glycerol | 10% | Sample density for well loading |
| Bromophenol Blue | 0.0025% | Migration tracking |
| β-mercaptoethanol or DTT | 5% or 10-100 mM [2] [13] | Disulfide bond reduction |
Gel Preparation and Electrophoresis Conditions
The discontinuous buffer system in SDS-PAGE enhances resolution through sequential stacking and separation phases:
Gel Polymerization Chemistry:
Discontinuous Gel System:
Buffer System and Electrophoresis:
- Running buffer: Tris-glycine with 0.1% SDS, pH 8.3-8.8 [9] [2] [13]
- Glycine zwitterion function: In stacking gel (pH 6.8), glycine exists as zwitterion with low mobility, creating ion gradient that stacks proteins between chloride (fast) and glycine (slow) ions [9]. In resolving gel (pH 8.8), glycine becomes negatively charged, overtaking proteins and eliminating stacking effect [9].
- Electrophoresis conditions: 100-150V constant voltage for 40-60 minutes [2] [14]
SDS-Mediated Protein Denaturation and Separation Workflow
Research Reagent Solutions Toolkit
Table 3: Essential Reagents for SDS-PAGE Experiments
| Reagent/Category | Specific Examples | Research Function |
|---|---|---|
| Denaturing Agents | Sodium Dodecyl Sulfate (SDS) | Primary charge equalizer and denaturant [9] [10] |
| Reducing Agents | Dithiothreitol (DTT), β-mercaptoethanol, Tris(2-carboxyethyl)phosphine [2] | Disulfide bond reduction for complete unfolding |
| Gel Matrix Components | Acrylamide, Bis-acrylamide, TEMED, Ammonium Persulfate [9] [13] [10] | Polymeric sieve formation for size separation |
| Buffer Systems | Tris-glycine, Tris-HCl, MOPS, Bis-Tris [9] [2] [12] | pH maintenance and discontinuous electrophoresis |
| Molecular Weight Standards | Prestained/Unstained protein ladders (Precision Plus, Bio-Rad, JULE) [2] [11] [13] | Molecular weight calibration and run monitoring |
| Visualization Reagents | Coomassie Brilliant Blue, Silver stain, SYPRO Ruby [2] [13] | Protein band detection post-electrophoresis |
Experimental Design and Optimization
Gel Percentage Selection Guidelines
The acrylamide concentration directly determines separation range and resolution:
Table 4: Gel Percentage Selection Based on Protein Size
| Acrylamide Percentage | Separation Range (kDa) | Optimal Application |
|---|---|---|
| 5% | 57-212 [13] | Very high molecular weight proteins |
| 7.5% | 36-94 [13] | High molecular weight complexes |
| 10% | 16-68 [13] | Standard mixture separation |
| 12% | 12-43 [13] | Moderate to small proteins |
| 15% | <30 | Small proteins and peptides |
Critical Optimization Parameters
- Sample Loading: ≤2 µg purified protein or ≤20 µg complex mixtures per well for Coomassie staining [14]
- Temperature Control: Maintain 10°C-20°C during separation to prevent "smiling" effect [14]
- Reducing Conditions: Essential for analyzing multi-subunit proteins; omit for studying disulfide-linked complexes [4] [14]
- Gradient Gels: 4-20% gradients provide broad separation range for unknown targets [2] [14]
Advanced Applications and Methodological Variations
Specialized Electrophoresis Formats
- Tricine-SDS-PAGE: Enhanced resolution for proteins <30 kDa [2] [4]
- Native SDS-PAGE (NSDS-PAGE): Reduced SDS (0.0375%) preserves some functional properties and metal cofactors while maintaining size-based separation [12]
- Two-Dimensional Electrophoresis: Combines isoelectric focusing with SDS-PAGE for high-resolution proteomic analysis [15]
Food Science Applications
SDS-PAGE enables species authentication, allergen detection, and quality assessment across food categories including cereals, dairy, meats, and seafood [4]. The technique identifies protein degradation patterns during processing and detects adulteration in plant-based alternatives [4].
Discontinuous Gel Electrophoresis Mechanism
SDS serves as the fundamental equalizing agent in SDS-PAGE by systematically eliminating charge and conformational variations among proteins. The precise mechanism of SDS binding creates uniform charge-to-mass ratios across diverse polypeptide sequences, enabling molecular weight-based separation with exceptional reproducibility. This charge equalization principle remains foundational for protein characterization in drug development, proteomic research, and diagnostic applications. Ongoing methodological refinements continue to enhance resolution while maintaining the core principle of SDS-mediated charge standardization.
In the realm of protein science, accurate molecular weight determination serves as a cornerstone for understanding protein function, purity, and structure. SDS-PAGE (Sodium Dodecyl Sulfate-Polyacrylamide Gel Electrophoresis) has emerged as the gold standard technique for separating proteins based primarily on their molecular weight, with applications spanning from basic research to drug development [2] [11]. This technique relies on a fundamental principle: the elimination of structural variables that could compromise the relationship between protein migration distance and molecular mass. While the anionic detergent SDS plays a crucial role in denaturing proteins and imparting a uniform negative charge, it cannot alone disrupt the covalent disulfide bonds that stabilize tertiary and quaternary protein structures [13] [16].
This technical guide explores the indispensable role of reducing agents in achieving complete protein denaturation for SDS-PAGE analysis. Reducing agents specifically target disulfide bonds (-S-S-) that form between cysteine residues within and between polypeptide chains. Without these agents, disulfide bonds would maintain structural elements that affect electrophoretic mobility, leading to inaccurate molecular weight estimations and misinterpretations of protein composition [16] [11]. The strategic application of reducing agents ensures proteins migrate strictly according to molecular weight rather than native conformation, thereby fulfilling the core premise of SDS-PAGE as a molecular weight-based separation technique [2].
The Mechanism of Protein Denaturation in SDS-PAGE
Coordinated Action of SDS and Reducing Agents
The denaturation process in SDS-PAGE represents a coordinated biochemical assault on protein structure, designed to transform complex three-dimensional proteins into linear polypeptide chains with consistent charge-to-mass ratios. This transformation occurs through two distinct but complementary mechanisms:
SDS-Mediated Denaturation: The anionic detergent SDS disrupts non-covalent interactions, including hydrogen bonds, hydrophobic interactions, and ionic bonds, effectively unraveling the secondary and tertiary structures of proteins [2] [11]. SDS binds to the protein backbone at an approximate ratio of 1.4g SDS per 1g of protein, creating a uniform negative charge along the polypeptide chain that masks the protein's intrinsic charge [2]. This charge uniformity ensures that all proteins migrate toward the anode during electrophoresis, with molecular size becoming the primary determinant of mobility.
Reducing Agent Intervention: While SDS effectively addresses non-covalent interactions, it cannot break the covalent disulfide linkages that form between cysteine residues. These disulfide bonds, which stabilize the three-dimensional structure of many proteins, represent the final structural barrier to complete linearization [16]. Reducing agents specifically target these bonds through redox reactions, reducing them to sulfhydryl groups (-SH) and allowing polypeptide chains to assume fully extended conformations [17].
The following diagram illustrates this sequential denaturation process:
Consequences of Incomplete Denaturation
The critical importance of reducing agents becomes evident when considering the analytical artifacts that occur in their absence. When disulfide bonds remain intact during SDS-PAGE, several problematic scenarios may emerge:
Abnormal Electrophoretic Mobility: Proteins with intact disulfide bonds maintain compact structures that migrate faster than their fully denatured counterparts, leading to underestimation of molecular weight [16]. This compaction effect can cause a single protein to appear as multiple bands or create smeared patterns that complicate interpretation.
Occluded Subunit Structure: Oligomeric proteins stabilized by interchain disulfide bonds may not dissociate into their constituent subunits, preventing accurate analysis of polypeptide composition and stoichiometry [11]. For example, antibodies without reduction maintain their multichain structure through disulfide linkages, masking the actual molecular weights of their light and heavy chains.
Impaired Purity Assessment: Protein samples that appear pure under non-reducing conditions may reveal contaminating bands or unexpected complexity when properly reduced, providing crucial information about sample composition that would otherwise remain hidden [18].
Major Classes of Reducing Agents
Thiol-Based Reducing Agents
Thiol-based reducing agents represent the traditional workhorses for disulfide bond reduction in SDS-PAGE. These compounds contain sulfhydryl groups (-SH) that nucleophilically attack disulfide bonds, forming mixed disulfide intermediates that subsequently undergo thiol-disulfide exchange reactions, resulting in complete reduction of the target disulfide bonds [17].
β-Mercaptoethanol (BME): One of the earliest reducing agents adopted for SDS-PAGE, BME is typically used at concentrations of 5% (v/v) in sample buffer [16]. Despite its effectiveness, BME has significant limitations, including a pungent odor and volatility that can lead to oxidative reversion over extended electrophoresis runs. These characteristics have diminished its popularity in favor of more stable alternatives.
Dithiothreitol (DTT) and Dithioerythritol (DTE): These compounds represent a significant advancement in reducing agent technology. DTT and its stereoisomer DTE operate at lower concentrations (typically 10-100 mM) and form stable cyclic disulfide products that drive the reduction equilibrium toward complete breakdown of protein disulfide bonds [2] [17]. Their higher redox potential and reduced volatility make them more effective and reliable than BME for most applications.
Phosphine-Based Reducing Agents
Phosphine-based reducing agents offer a mechanistically distinct approach to disulfide bond cleavage that addresses several limitations of thiol-based compounds:
- Tris(2-carboxyethyl)phosphine (TCEP): This potent reducing agent operates through a different mechanism that does not involve disulfide intermediates, making it effective at lower concentrations (typically as a 0.5 M solution) and across a wider pH range [17]. TCEP offers significant advantages, including odor-free operation, greater stability in aqueous solutions, and resistance to air oxidation, which eliminates the need for preparation immediately before use. As a thiol-free compound, TCEP does not interfere with subsequent modification of protein thiols for downstream applications [17].
The table below provides a quantitative comparison of these major reducing agents:
Table 1: Comparison of Common Reducing Agents for SDS-PAGE
| Reducing Agent | Typical Working Concentration | Mechanism of Action | Key Advantages | Key Limitations |
|---|---|---|---|---|
| β-Mercaptoethanol (BME) | 5% (v/v) [16] | Thiol-disulfide exchange | Inexpensive, widely available | Pungent odor, volatile, less stable |
| Dithiothreitol (DTT) | 10-100 mM [2] | Thiol-disulfide exchange via cyclic disulfide | Higher redox potential, less volatile | Still susceptible to air oxidation |
| Tris(2-carboxyethyl)phosphine (TCEP) | 0.5 M solution [17] | Direct reduction without disulfide intermediates | Odor-free, stable, works at wider pH range | Higher cost, may interfere with some assays |
Experimental Protocols and Methodologies
Standard Reducing SDS-PAGE Protocol
The following detailed protocol ensures complete protein denaturation for accurate molecular weight determination:
Sample Buffer Preparation: Prepare 2× or 5× Laemmli sample buffer containing:
Sample Denaturation:
Electrophoresis Conditions:
Table 2: Troubleshooting Common Issues with Reduction
| Problem | Potential Cause | Solution |
|---|---|---|
| Smearing bands | Incomplete denaturation or reduction | Increase reducing agent concentration; extend heating time |
| Vertical streaking | Insufficient reducing agent | Freshly prepare reducing agent; check concentration |
| Discrepant molecular weights | Disulfide bonds not fully broken | Use stronger reducing agent (TCEP instead of DTT); add fresh agent |
| Disappearing bands | Oxidized reducing agent | Prepare fresh reducing agent; include in both sample and buffer |
Specialized Applications and Modified Protocols
For specific research applications, standard reduction protocols may require modification:
Non-reducing SDS-PAGE: Intentional omission of reducing agents allows researchers to study proteins with intact disulfide bonds, particularly useful for assessing disulfide-mediated oligomerization or when maintaining antibody structure for immunodetection [16]. In this approach, samples are prepared without reducing agents and typically without heating to preserve disulfide linkages.
Two-Dimensional Electrophoresis: When SDS-PAGE serves as the second dimension following native gel electrophoresis, additional reduction between dimensions may be necessary to ensure complete denaturation [12].
Native SDS-PAGE (NSDS-PAGE): Recent methodological developments demonstrate that modified electrophoresis conditions (reduced SDS concentration, omitted heating) can maintain some native protein features while still achieving separation by molecular weight [12]. In these protocols, reducing agents may be omitted or used at lower concentrations to preserve metalloprotein metal ions and enzymatic activity.
The Scientist's Toolkit: Essential Reagents for Protein Reduction
Successful protein denaturation for SDS-PAGE requires carefully selected reagents optimized for specific applications. The following table catalogues essential reducing agents and their properties:
Table 3: Research Reagent Solutions for Protein Reduction
| Reagent | Chemical Properties | Primary Function | Application Notes |
|---|---|---|---|
| Bond-Breaker TCEP Solution | Neutral pH, 0.5 M solution [17] | Stable, odor-free reduction of disulfide bonds | Ideal as 10× stock for SDS-PAGE sample buffers; thiol-free |
| TCEP-HCl | Pure crystalline solid [17] | Protein disulfide reduction without thiol contamination | Useful for preparing custom concentrations; stable when dry |
| 2-Mercaptoethanol | Pure liquid (14 M) [17] | Cleavage of protein disulfide bonds | Traditional agent; requires careful handling due to volatility and odor |
| Dithiothreitol (DTT) | Dry aliquots or powder [17] | Effective disulfide reduction via cyclic intermediate | Preferred over 2-ME for stability; prepare fresh solutions |
| Immobilized TCEP Gel | TCEP covalently immobilized to agarose [17] | Solid-phase reduction without reagent contamination | Enables easy removal of reducing agent post-reduction |
Advanced Applications in Research and Drug Development
The strategic application of reducing agents in SDS-PAGE extends far beyond basic molecular weight determination, enabling critical analyses in pharmaceutical and biomedical research:
Biopharmaceutical Characterization: Reducing SDS-PAGE provides essential quality control for therapeutic proteins, including monoclonal antibodies. Analysis under reducing conditions verifies proper light and heavy chain molecular weights and detects fragmentation or incorrect disulfide bonding that could impact drug efficacy and safety [11].
Post-Translational Modification Analysis: Many post-translational modifications, including phosphorylation and glycosylation, cause measurable shifts in electrophoretic mobility. Reduction ensures these mobility shifts reflect actual molecular weight changes rather than conformational differences, enabling accurate modification analysis [16] [11].
Disease Biomarker Discovery: Comparative proteomics using reducing SDS-PAGE can reveal disease-associated protein patterns in complex biological samples. Complete denaturation ensures quantitative comparisons reflect actual protein abundance rather than extraction or solubility differences [11] [12].
Metalloprotein Research: Modified approaches like NSDS-PAGE demonstrate that controlled reduction preserves metal cofactors in metalloproteins while still providing molecular weight information, enabling simultaneous analysis of protein size and metal content [12].
Reducing agents serve as indispensable components in the SDS-PAGE workflow, fulfilling the critical function of disrupting disulfide bonds to achieve complete protein denaturation. Through their specific action on covalent linkages inaccessible to SDS alone, these reagents enable the accurate molecular weight determination that forms the foundation of protein characterization in research and drug development. As electrophoretic methodologies continue to evolve with techniques like NSDS-PAGE that preserve certain native protein features, the strategic application of reducing agents—whether included, excluded, or modified—remains essential for extracting meaningful biological information from electrophoretic separations. The appropriate selection and application of these reagents, guided by the principles outlined in this technical guide, ensures researchers can leverage the full analytical power of SDS-PAGE in their scientific investigations.
In molecular biology and biochemistry, the separation of proteins based on their molecular weight is a fundamental analytical technique, with sodium dodecyl sulfate–polyacrylamide gel electrophoresis (SDS-PAGE) serving as the cornerstone method [2]. This technique enables researchers to separate complex protein mixtures with high resolution, typically resolving proteins with molecular masses between 5 and 250 kDa [2]. The core principle governing this separation is the molecular sieving effect created by the polyacrylamide gel matrix, which acts as a tunable filter that sorts proteins primarily by their size [19] [20]. The polyacrylamide gel's ability to create a precisely controlled pore structure has established it as an indispensable tool in proteomics research, drug development, and diagnostic applications [21]. This technical guide explores the fundamental properties of the polyacrylamide gel matrix, its formulation, and its critical function as a molecular sieve that enables precise size-based separation of proteins in SDS-PAGE.
The Molecular Sieve: Polyacrylamide Gel Structure and Properties
Chemical Composition and Polymerization
The polyacrylamide gel matrix is a synthetic polymer network formed through the chemical cross-linking of acrylamide monomers with N,N'-methylene bis-acrylamide [19] [2]. This polymerization reaction is initiated by a free-radical generating system typically comprising ammonium persulfate (APS) as the catalyst and N,N,N',N'-tetramethylethylenediamine (TEMED) as the stabilizer [19] [2]. TEMED catalyzes the formation of free radicals from APS, which then initiate the polymerization of acrylamide monomers into long chains [19]. These chains are cross-linked by bis-acrylamide, resulting in a three-dimensional mesh-like network with porous properties ideal for separating biomolecules [19].
The resulting gel structure is hydrophilic, thermostable, transparent, and relatively chemically inert, ensuring no breakages or melting during electrophoresis and allowing easy protein visualization after separation [22]. Unlike agarose gels used for nucleic acid separation, which have larger pore sizes (100-500 nm) and are thermoreversible, polyacrylamide gels form permanent, chemically cross-linked networks with much smaller pore sizes (5-100 nm), making them particularly suitable for separating smaller proteins and peptides [23].
Pore Size Control and Tunability
The key to the polyacrylamide gel's effectiveness as a molecular sieve lies in the precise tunability of its pore size, which is controlled by two independent parameters [23]:
- Total monomer concentration (%T): The sum of acrylamide and bis-acrylamide concentrations, expressed as grams per 100 mL
- Cross-linker ratio (%C): The percentage of bis-acrylamide relative to the total monomer concentration
Table 1: Relationship Between Acrylamide Concentration and Protein Separation Range
| Acrylamide Concentration (%) | Effective Separation Range (kDa) | Typical Pore Size (nm) |
|---|---|---|
| 6-8% | 50-200 | ~50-100 |
| 10% | 30-100 | ~20-50 |
| 12% | 20-80 | ~10-20 |
| 15% | 10-50 | ~5-10 |
As shown in Table 1, increasing the acrylamide concentration decreases the average pore size of the gel, making it suitable for separating smaller proteins [23]. For example, a 15% gel with smaller pores (~5-10 nm) is ideal for separating proteins in the 10-50 kDa range, while a 7.5% gel with larger pores (~50-100 nm) can separate larger proteins up to 200 kDa [22]. This tunability allows researchers to select gel formulations optimized for their protein size of interest.
The mathematical relationship between electrophoretic mobility (μ) and gel concentration is described by the Ferguson equation: μ = μ₀ × exp(-Kᵣ × %T), where μ₀ is the free electrophoretic mobility, Kᵣ is the retardation coefficient, and %T is the total acrylamide concentration [23]. This relationship highlights how migration speed decreases exponentially as gel density increases, demonstrating the molecular sieving effect.
SDS-PAGE: Integrating the Molecular Sieve with Protein Denaturation
Principles of SDS-PAGE
SDS-PAGE is a discontinuous electrophoretic system that combines the molecular sieving properties of polyacrylamide gels with the denaturing power of sodium dodecyl sulfate (SDS) to separate proteins based almost exclusively on molecular weight [2]. The method employs two distinct gel regions—a stacking gel and a resolving gel—with different pore sizes, pH values, and ionic compositions to achieve high-resolution separation [22] [2].
The critical innovation of SDS-PAGE lies in its use of SDS, an anionic detergent that binds to proteins at a relatively constant ratio of approximately 1.4 g SDS per 1 g of protein [2]. This binding confers a uniform negative charge density to all proteins, effectively masking their intrinsic charges [19] [24]. Additional sample treatment with reducing agents such as β-mercaptoethanol or dithiothreitol (DTT) breaks disulfide bonds, while heating at 95°C for 5 minutes disrupts hydrogen bonds, ensuring complete protein denaturation into linear polypeptides [19] [2]. The result is that all proteins assume a similar charge-to-mass ratio and shape, ensuring that separation through the polyacrylamide matrix occurs primarily based on polypeptide chain length rather than native charge or conformation [20] [24].
Discontinuous Gel System: Stacking and Resolving Gels
The standard SDS-PAGE system employs a discontinuous buffer system with two distinct gel sections [2]:
Stacking Gel: A low-density gel (typically 4-6% acrylamide) with a pH of approximately 6.8 [25] [2]. This region serves to concentrate the protein sample into a sharp starting zone before it enters the resolving gel. The concentration occurs due to differential migration speeds of chloride ions (leading ions), glycinate ions (trailing ions), and proteins in the pH gradient between the stacking and resolving gels [2].
Resolving Gel: A higher-density gel (typically 8-15% acrylamide depending on target protein size) with a higher pH (approximately 8.8) [25] [2]. This is where the actual molecular weight-based separation occurs, with the polyacrylamide matrix acting as a molecular sieve to separate proteins based on size [22].
Table 2: Typical Compositions of Stacking and Resolving Gels
| Component | Stacking Gel (4%) | Resolving Gel (10%) | Resolving Gel (15%) |
|---|---|---|---|
| H₂O | 2.70 mL | 4.0 mL | 2.3 mL |
| 30% Polyacrylamide | 0.67 mL | 3.3 mL | 5.0 mL |
| Tris-HCl Buffer | 0.5 mL (pH 6.8) | 5.0 mL (pH 8.8) | 5.0 mL (pH 8.8) |
| 10% APS | 0.04 mL | 0.1 mL | 0.1 mL |
| TEMED | 0.004 mL | 0.02 mL | 0.02 mL |
Experimental Protocol for SDS-PAGE
Gel Preparation
The preparation of polyacrylamide gels requires precision and careful handling due to the neurotoxic nature of unpolymerized acrylamide monomers [23]. The following protocol outlines the standard procedure for casting discontinuous SDS-PAGE gels:
Assemble the gel cassette: Thoroughly clean two glass plates with ethanol and assemble them with spacers (typically 0.75 mm or 1.5 mm thick) in a casting stand [20].
Prepare the resolving gel solution: Mix appropriate volumes of acrylamide/bis-acrylamide solution, resolving gel buffer (typically 1.5 M Tris-HCl, pH 8.8), 10% SDS, and water in a flask according to the desired percentage (Table 2) [25] [20]. Add ammonium persulfate (APS) and TEMED last to initiate polymerization, then mix gently without introducing bubbles.
Pour the resolving gel: Transfer the resolving gel solution into the assembled gel cassette using a pipette, filling approximately two-thirds of the available height. Carefully layer the gel surface with a small volume of water-saturated butanol or isopropanol to exclude oxygen and create a flat interface [20] [2].
Allow polymerization: Let the resolving gel polymerize completely (approximately 20-30 minutes) until a distinct interface appears between the gel and the overlay solution [20].
Prepare and pour the stacking gel: Remove the overlay solution and rinse the gel surface with water. Prepare the stacking gel solution (typically 4% acrylamide in 0.5 M Tris-HCl, pH 6.8) with APS and TEMED [25]. Pour the stacking gel solution onto the polymerized resolving gel and immediately insert a clean comb without trapping air bubbles.
Complete polymerization: Allow the stacking gel to polymerize completely (approximately 15-20 minutes) before carefully removing the comb to reveal the sample wells [20].
Sample Preparation and Electrophoresis
Proper sample preparation is critical for successful SDS-PAGE separation:
Sample buffer preparation: Prepare 2X sample buffer containing 62.5 mM Tris-HCl (pH 6.8), 25% glycerol, 2% SDS, and 0.01% bromophenol blue [25]. For reduced conditions, add 0.55M β-mercaptoethanol or 10-100 mM DTT to break disulfide bonds [24] [2].
Protein denaturation: Mix protein samples with an equal volume of 2X sample buffer and heat at 95°C for 5 minutes (or 70°C for 10 minutes) to denature proteins [24] [2]. Centrifuge at 15,000 rpm for 1-3 minutes to pellet any debris [20] [24].
Gel electrophoresis:
- Mount the polymerized gel in the electrophoresis apparatus and fill both chambers with running buffer (typically Tris-glycine-SDS buffer, pH ~8.3) [25] [2].
- Load samples (5-35 μL per lane) and appropriate molecular weight markers into the wells [24].
- Connect the power supply and run at constant voltage (150-200 V) until the bromophenol blue dye front reaches the bottom of the gel (approximately 45-90 minutes depending on gel size and voltage) [25] [24].
- Turn off the power supply and proceed with protein detection methods such as Coomassie staining, silver staining, or western blotting [20] [24].
Visualization of the Separation Process
The following diagram illustrates the process of protein separation by SDS-PAGE, from sample preparation to final separation in the polyacrylamide gel matrix:
Diagram 1: Protein Separation Process in SDS-PAGE
The Scientist's Toolkit: Essential Reagents for SDS-PAGE
Table 3: Essential Research Reagents for SDS-PAGE Experiments
| Reagent | Function | Typical Concentration/Formula |
|---|---|---|
| Acrylamide/Bis-acrylamide | Gel matrix formation; creates molecular sieve | 30% stock solution (29:1 or 37.5:1 acrylamide:bis ratio) [25] [2] |
| Ammonium Persulfate (APS) | Free radical initiator for polymerization | 10% solution in water [25] |
| TEMED | Catalyst for polymerization; stabilizes free radicals | 0.1-0.5% of gel volume [2] |
| SDS (Sodium Dodecyl Sulfate) | Protein denaturation; uniform negative charge | 0.1-0.5% in running buffer; 2-4% in sample buffer [24] [2] |
| Tris-HCl Buffer | pH control during electrophoresis | 1.5 M pH 8.8 (resolving gel); 0.5 M pH 6.8 (stacking gel) [25] |
| Glycine | Leading ion in discontinuous buffer system | 192 mM in running buffer [25] [2] |
| β-Mercaptoethanol or DTT | Reducing agent; breaks disulfide bonds | 0.55M β-ME or 10-100 mM DTT in sample buffer [24] [2] |
| Coomassie Brilliant Blue | Protein staining; visualizes separated bands | 0.1% Coomassie G-250 in methanol:acetic acid:water [25] |
Advanced Applications and Variations
Gradient Gels and Specialized Applications
For separating proteins with a broad molecular weight range, gradient gels with increasing acrylamide concentration (e.g., 4-12% or 5-15%) provide an extended separation range in a single gel [2]. These gels are produced using a gradient mixer that creates a continuous change in acrylamide concentration during gel casting [2]. The decreasing pore size along the migration path causes proteins to slow down at different positions corresponding to their sizes, resulting in improved resolution across a wide mass range [22].
While standard SDS-PAGE effectively separates proteins between 5-250 kDa, very large protein complexes (700-4,200 kDa) may be better separated using agarose gels, which have larger pore sizes [22]. Conversely, for enhanced separation of small proteins and peptides (0.5-50 kDa), the Tris-Tricine buffer system developed by Schägger and von Jagow offers superior resolution compared to traditional Tris-glycine systems [2].
Native SDS-PAGE for Functional Analysis
A significant modification of standard SDS-PAGE, known as native SDS-PAGE (NSDS-PAGE), has been developed to retain protein functional properties while maintaining high resolution [12]. This method involves removing SDS and EDTA from the sample buffer, omitting the heating step, and reducing SDS concentration in the running buffer from 0.1% to 0.0375% [12]. These modifications dramatically increase the retention of bound metal ions (e.g., Zn²⁺ retention increased from 26% to 98%) and preserve enzymatic activity in most model enzymes tested, while maintaining excellent separation resolution [12]. This advancement addresses a key limitation of conventional SDS-PAGE by enabling separation of native proteins with retention of functional properties.
The polyacrylamide gel matrix serves as a precisely tunable molecular sieve that enables high-resolution separation of proteins by size through the SDS-PAGE technique. Its effectiveness stems from the controllable pore structure created by the cross-linked acrylamide polymer network, which can be optimized for specific protein size ranges by adjusting monomer and cross-linker concentrations. When combined with the protein-denaturing and charge-uniforming properties of SDS, this molecular sieving effect allows researchers to separate complex protein mixtures with remarkable precision based primarily on molecular weight. The continued evolution of this methodology, including developments such as native SDS-PAGE that preserve protein function, ensures that polyacrylamide gel electrophoresis remains an indispensable tool in biochemical research and diagnostic applications.
The Laemmli system, named after its developer Ulrich K. Laemmli, represents a foundational methodology in molecular biology that revolutionized protein separation through discontinuous gel electrophoresis. This technique, specifically SDS-polyacrylamide gel electrophoresis (SDS-PAGE), serves as an indispensable tool for researchers investigating protein composition, purity, and molecular weight. The system's core innovation lies in its clever exploitation of discontinuities in pH, gel composition, and buffer ions to achieve superior resolution compared to continuous electrophoresis systems. Within the context of protein separation research, the Laemmli system provides the critical methodological framework that enables precise molecular weight determination by effectively eliminating the confounding effects of protein charge and structural heterogeneity.
The significance of this discontinuous system extends across multiple scientific domains, from basic research characterizing recombinant protein expression to applied pharmaceutical development where analyzing protein therapeutic purity is paramount. By creating conditions where proteins migrate based primarily on molecular size rather than inherent charge characteristics, SDS-PAGE has become the gold standard technique for protein analysis in laboratories worldwide. The system's versatility supports applications ranging from simple purity assessments to complex proteomic studies, making it an essential component of the modern biologist's toolkit [26] [27].
Principles of the Discontinuous System
System Components and Their Roles
The Laemmli discontinuous electrophoresis system employs a tripartite configuration consisting of distinct gel regions and buffer compositions that work in concert to concentrate samples before separation. This sophisticated arrangement creates multiple discontinuities that collectively enhance resolution beyond what continuous systems can achieve.
Table: Components of the Discontinuous Laemmli System
| Component | Composition | Primary Function |
|---|---|---|
| Stacking Gel | Low-concentration polyacrylamide (4-5%), Tris-HCl (pH 6.8) | Concentrates protein samples into sharp bands before entry into separation gel |
| Separation Gel | Higher-concentration polyacrylamide (varies: 8-15%), Tris-HCl (pH 8.8) | Separates proteins based on molecular weight differences through molecular sieving |
| Electrode Buffer | Tris-Glycine (pH 8.3), SDS | Completes electrical circuit while maintaining ion mobility disparities |
The stacking gel, with its larger pore size and lower pH (6.8), creates an environment where proteins experience minimal resistance and can rapidly align based on electrophoretic mobility. When current is applied, the chloride ions from the Tris-HCl buffer in the stacking gel possess the highest mobility, followed by the protein-SDS complexes, with glycine ions from the electrode buffer migrating most slowly in this pH environment due to their minimal dissociation. This differential migration establishes a steep voltage gradient that physically compresses the protein samples into extremely narrow zones, effectively creating a unified starting line for the separation process [26] [27].
The transition to the separation gel marks a critical phase in the electrophoretic process. As proteins enter the higher-pH (8.8) environment of the separation gel, glycine ions undergo increased dissociation, acquiring greater mobility and reducing the compression effect. Simultaneously, the reduced pore size of the higher-concentration polyacrylamide matrix imposes molecular sieving effects, where smaller proteins navigate the gel meshwork more readily than larger counterparts. This combination of abolished stacking effect and introduced size-based separation resolves the protein mixture into discrete bands corresponding to molecular weight [27].
Molecular Mechanisms of Protein Separation
The Laemmli system achieves molecular weight-dependent separation through two principal mechanisms: the uniform charge conferred by SDS binding and the molecular sieving properties of the polyacrylamide matrix. Understanding these mechanisms clarifies how proteins separate strictly by size when analyzed using this methodology.
SDS, an anionic detergent, plays multiple critical roles in the process. It binds to hydrophobic regions of denatured proteins at a relatively constant ratio of approximately 1.4 grams of SDS per gram of protein, which translates to roughly one SDS molecule per two amino acids. This extensive binding accomplishes two key objectives: first, it linearizes the proteins by disrupting hydrogen bonds and eliminating secondary and tertiary structures; second, it confers a uniform negative charge density along the polypeptide backbone, effectively neutralizing the proteins' intrinsic charge characteristics. The addition of reducing agents like β-mercaptoethanol or dithiothreitol (DTT) breaks disulfide linkages, ensuring complete polypeptide dissociation and linearization [26] [28] [29].
The polyacrylamide gel matrix, formed through the polymerization of acrylamide and cross-linker N,N'-methylenebisacrylamide, creates a three-dimensional meshwork that serves as a molecular sieve. The concentration of acrylamide determines the average pore size, with higher percentages creating smaller pores that provide greater resolution for lower molecular weight proteins. As the uniformly charged protein-SDS complexes migrate toward the anode under the influence of the electric field, larger molecules experience greater frictional resistance and navigate the matrix more slowly than their smaller counterparts. This differential migration rate results in size-dependent separation along the gel path [26] [27] [29].
Table: Polyacrylamide Concentration and Separation Range
| Acrylamide Concentration (%) | Linear Separation Range (kDa) |
|---|---|
| 15 | 10-43 |
| 12 | 12-60 |
| 10 | 20-80 |
| 7.5 | 36-94 |
| 5.0 | 57-212 |
The relationship between protein size and migration distance follows a logarithmic correlation, enabling molecular weight estimation through comparison with standard proteins of known mass. This fundamental principle forms the basis for one of SDS-PAGE's most common applications—determining the molecular weight of unknown proteins [26].
Experimental Methodology
Reagent Preparation and Formulations
The successful implementation of the Laemmli system requires precise preparation of numerous specialized solutions. These formulations must adhere to strict concentration and pH specifications to maintain the discontinuities essential for proper system function.
The gel matrix components form the physical foundation for electrophoresis. The acrylamide/bis-acrylamide solution (typically 29.2:0.8 ratio for 30% stock) provides the monomers that polymerize to form the gel matrix. Freshly prepared ammonium persulfate (10%) serves as the free radical source for polymerization initiation, while TEMED (N,N,N',N'-tetramethylenediamine) acts as the polymerization catalyst. The buffer systems include high-pH Tris-HCl (1.5 M, pH 8.8) for the separation gel and lower-pH Tris-HCl (0.5 M, pH 6.8) for the stacking gel, creating the essential pH discontinuity. The electrode buffer consists of 25 mM Tris, 192 mM glycine, and 0.1% SDS, maintaining pH 8.3 during electrophoresis [26].
The Laemmli sample buffer represents a critical component that ensures proper protein denaturation and migration. The standard 2X formulation contains 0.125 M Tris-HCl (pH 6.8), 4% SDS, 20% glycerol, 10% β-mercaptoethanol (or 200 mM DTT), and 0.01% bromophenol blue. Each component serves specific functions: Tris provides buffering capacity; SDS denatures proteins and confers negative charge; glycerol increases sample density for facile well loading; reducing agents break disulfide bonds; and bromophenol blue serves as the migration tracking dye. Commercial formulations are available, such as Boster Biological Technology's SDS-PAGE Protein Loading Buffer 2X, which contains 4% SDS, 20% glycerol, 200 mM DTT, 0.01% bromophenol blue, and 0.1 M Tris HCl (pH 6.8) [30] [28].
Table: Laemmli Sample Buffer Composition (2X)
| Component | Concentration (2X) | Function | Molecular Weight |
|---|---|---|---|
| Tris Base | 0.125 M (pH 6.8) | Maintains pH, prevents peptide bond hydrolysis | 121.14 g/mol |
| SDS | 4% (0.14 M) | Denatures proteins, confers uniform charge | 288.37 g/mol |
| Glycerol | 20% | Increases density, prevents sample diffusion | 92.09 g/mol |
| β-mercaptoethanol/DTT | 10% or 200 mM | Reduces disulfide bonds | 78.13/154.25 g/mol |
| Bromophenol Blue | 0.01% | Visual tracking of migration front | 691.94 g/mol |
Proper storage conditions preserve reagent integrity. Acrylamide solutions should be protected from light and stored at 4°C, while SDS-containing solutions remain stable at room temperature. Reducing agents and complete sample buffers containing thiol compounds require storage at -20°C to prevent oxidation [26] [28].
Step-by-Step Experimental Protocol
The execution of SDS-PAGE following the Laemmli method involves sequential stages that must be performed with precision to ensure reproducible, high-quality results.
Gel Preparation begins with assembly of clean glass plates in a casting stand with secure sealing to prevent leakage. The separation gel solution is prepared by combining appropriate volumes of acrylamide stock, Tris-HCl (pH 8.8), water, 10% SDS, ammonium persulfate, and TEMED. For a standard 12% separation gel, combine 14 mL of 30% acrylamide solution, 8.75 mL of separation gel buffer (pH 8.8), 12.25 mL of double-distilled water, 175 μL of 10% SDS, 175 μL of 10% ammonium persulfate, and 15 μL of TEMED. This solution is promptly poured between the glass plates, leaving space for the stacking gel, and overlayered with water or isopropanol to ensure a flat interface and exclude oxygen, which inhibits polymerization. After complete polymerization (approximately 30 minutes), the overlay is removed, and the stacking gel solution (typically 5%) is prepared and poured atop the polymerized separation gel. A comb is immediately inserted to create sample wells, taking care to avoid air bubble formation [26].
Sample Preparation involves combining protein samples with an equal volume of 2X Laemmli sample buffer, typically at a 1:1 ratio. For example, 20 μL of protein sample would be mixed with 20 μL of 2X loading buffer. This mixture is heated at 95-100°C for 3-5 minutes to ensure complete protein denaturation and reduction. If viscous or semi-transparent material persists after initial heating, extended heating for 5-10 minutes or additional loading buffer may be required. Samples are then briefly centrifuged to collect condensation and eliminate air bubbles before loading [30].
Electrophoresis Execution begins with assembly of the gel cassette into the electrophoresis chamber and filling both inner and outer chambers with electrode buffer. Prepared samples are carefully loaded into the wells using microsyringes or pipettes, alongside molecular weight standards for calibration. The power supply is connected with correct polarity (cathode at top, anode at bottom), and electrophoresis is initiated at constant voltage. Initially, 60-80 V is applied until samples migrate through the stacking gel and concentrate at the stacking-separation gel interface. Voltage is then increased to 100-150 V for the remainder of the separation, with electrophoresis continuing until the bromophenol blue tracking dye approaches the gel bottom (typically 1-2 hours, depending on gel size and concentration) [26] [31].
Post-Electrophoresis Processing involves disassembling the gel apparatus and removing the gel from between the plates. Proteins are visualized using appropriate staining techniques. Coomassie Brilliant Blue staining (0.1% Coomassie R-250 in 45% methanol, 10% acetic acid) detects bands containing approximately 50 ng protein, followed by destaining (10% methanol, 10% acetic acid) to reduce background. For enhanced sensitivity, silver staining can detect as little as 1 ng protein per band. Alternatively, proteins may be transferred to membranes for western blot analysis [26] [31].
The Researcher's Toolkit: Essential Reagents and Materials
Successful implementation of the Laemmli discontinuous electrophoresis system requires access to specific reagents and equipment that collectively enable precise protein separation. The following comprehensive table details the essential components of the SDS-PAGE researcher's toolkit, their specific functions, and critical considerations for their use.
Table: Essential Reagents and Materials for Laemmli SDS-PAGE
| Category/Item | Specification/Composition | Primary Function | Critical Notes |
|---|---|---|---|
| Acrylamide/Bis-acrylamide | 29.2:0.8 ratio in 30% stock solution | Forms polyacrylamide gel matrix for molecular sieving | Neurotoxic; handle with gloves; protect from light; pH ≤7.0 |
| Tris Buffers | Separation: 1.5 M Tris-HCl, pH 8.8Stacking: 0.5 M Tris-HCl, pH 6.8 | Creates pH discontinuity for stacking and separation | Precise pH critical for discontinuous system function |
| SDS (Sodium Dodecyl Sulfate) | 10-20% aqueous solution; >98% purity | Denatures proteins; confers uniform negative charge | Ensure SDS:protein ratio >3:1 for complete coating |
| Reducing Agents | β-mercaptoethanol (5-10%) or DTT (200 mM) | Breaks disulfide bonds for complete unfolding | Aliquot and store at -20°C; DTT preferred for stronger reduction |
| Polymerization System | Ammonium persulfate (10%, fresh) and TEMED | Initiates and catalyzes acrylamide polymerization | TEMED has strong odor; use in well-ventilated area |
| Tracking Dye | Bromophenol blue (0.01-0.1%) | Visualizes migration progress during electrophoresis | Migrates at ~5 kDa equivalent position |
| Electrode Buffer | 25 mM Tris, 192 mM glycine, 0.1% SDS, pH 8.3 | Completes circuit; provides mobile ions for electrophoresis | Reuse 2-3 times; check pH before reuse |
| Protein Standards | Pre-stained or unstained molecular weight markers | Calibrates gel for molecular weight determination | Choose range appropriate for target proteins |
| Staining Reagents | Coomassie R-250 (0.1%) or silver stain components | Visualizes separated protein bands | Coomassie detects ~50 ng; silver detects ~1 ng protein |
| Equipment | Vertical electrophoresis apparatus, DC power supply | Provides controlled electrical field for separation | Ensure proper contact and cooling during run |
The specialized equipment required includes vertical gel electrophoresis systems with appropriate glass plates, combs, and gaskets; a DC power supply capable of delivering constant voltage up to 200 V; and a heating block or water bath for sample denaturation. Additional accessories such as gel staining trays, shaking platforms, and gel documentation systems complete the essential workstation [26].
When selecting reagents, several critical considerations ensure experimental success. Acrylamide purity is paramount, as oxidation products can inhibit polymerization and create gel irregularities. SDS quality varies between manufacturers, potentially affecting protein migration patterns, so consistent sourcing is recommended. The freshness of ammonium persulfate directly impacts polymerization efficiency, with freshly prepared 10% solutions yielding most reliable results. Finally, water purity cannot be overlooked, as impurities can interfere with polymerization and create aberrant band patterns [26] [29].
Troubleshooting and Method Optimization
Even well-established techniques like SDS-PAGE occasionally present challenges that require systematic troubleshooting. Understanding common artifacts and their underlying causes enables researchers to optimize separation quality and result reliability.
Band Artifacts and Resolution Issues represent frequent challenges in SDS-PAGE. Smiling or frowning bands (curved migration fronts) typically result from uneven heat distribution during electrophoresis, which can be addressed by reducing voltage or implementing active cooling. Vertical streaks often indicate incomplete solubilization or protein aggregation, remedied by ensuring adequate SDS concentration, more vigorous reduction, or brief sonication. Horizontal band spreading may signal salt contamination in samples, necessitating dialysis or dilution. Poor resolution between adjacent bands can stem from inappropriate gel percentage relative to target protein size, improper polymerization, or excessive sample loading [27].
Molecular Weight Anomalies occasionally occur where proteins migrate at positions inconsistent with their known molecular weights. Aberrant SDS binding due to highly hydrophobic or extensively modified proteins can cause this discrepancy, as can incomplete reduction of disulfide bonds. Glycoproteins frequently exhibit anomalous migration due to unequal SDS binding to carbohydrate moieties. Verification through alternative gel percentages or buffer systems can confirm such anomalies. Persistent overestimation or underestimation of molecular weights may indicate issues with the standard curve or buffer pH deviations affecting glycine mobility [27] [29].
Optimization Strategies for specific applications include adjusting gel percentage to match the target protein size range—lower percentages (8-10%) for high molecular weight proteins (>100 kDa) and higher percentages (12-15%) for improved resolution of smaller proteins (<30 kDa). Alternative buffer systems offer advantages for specific applications: Bis-Tris gels maintain neutral pH, reducing protein modifications and gel degradation; Tris-acetate systems improve separation of very large proteins (up to 500 kDa); while Tris-tricine systems optimize resolution of small peptides (1-30 kDa). For precise molecular weight determination, running samples alongside broad-range standards on multiple gel percentages provides the most accurate calibration [29].
Quantitative Considerations include ensuring linearity between protein amount and band intensity, particularly for densitometric analyses. Overloading wells (>50 μg total protein for standard minigels) can cause distortion, while underloading may preclude detection. For maximum sensitivity, silver staining or fluorescent detection methods surpass traditional Coomassie staining. When comparing bands across multiple gels, including internal standards controls for gel-to-gel variation [27].
Applications in Research and Drug Development
The Laemmli SDS-PAGE system serves as a foundational analytical tool with diverse applications across biological research and pharmaceutical development. Its robustness, relative simplicity, and compatibility with downstream analyses make it indispensable for protein characterization.
In basic research applications, SDS-PAGE provides critical information about protein samples. It assesses protein purity following purification procedures, identifies proteolytic degradation through the appearance of lower molecular weight bands, and confirms protein identity through molecular weight comparison. The technique monitors recombinant protein expression levels in heterologous systems and analyzes protein complexes following immunoprecipitation. When coupled with western blotting, it enables specific detection of target antigens, forming the basis for countless scientific investigations [26] [31].
In pharmaceutical development and biotechnology, SDS-PAGE performs essential quality control functions. It monitors batch-to-batch consistency of protein therapeutics like monoclonal antibodies, detects product aggregates and fragments that may impact safety or efficacy, and validates the success of conjugation reactions in antibody-drug conjugate development. The technique supports stability studies by identifying degradation products under various storage conditions and ensures the absence of protein contaminants from expression host systems [29].
Specialized methodological variants extend the utility of basic SDS-PAGE. Two-dimensional gel electrophoresis combines isoelectric focusing with SDS-PAGE to resolve complex protein mixtures by both charge and size, enabling proteomic analyses. Zymography incorporates substrate molecules into the gel matrix to detect enzymatically active proteases following electrophoresis. Fluorescent-based SDS-PAGE offers enhanced quantitative capabilities, while phosphate-modified Laemmli buffers reduce unexpected protein cleavage during sample preparation. These specialized adaptations demonstrate the technique's remarkable versatility across diverse research applications [28] [31].
The enduring legacy of the Laemmli system lies in its elegant exploitation of fundamental physicochemical principles to solve a complex biological separation challenge. Its discontinuous design creates conditions where proteins migrate primarily according to molecular dimensions, enabling reliable size estimation that has become standard practice in laboratories worldwide. As protein therapeutics and targeted biologics continue to expand in pharmaceutical importance, the Laemmli SDS-PAGE methodology remains an essential analytical tool for characterizing these sophisticated molecules throughout discovery, development, and manufacturing processes.
Mastering the SDS-PAGE Protocol: From Sample Prep to Real-World Applications
Sodium Dodecyl Sulfate-Polyacrylamide Gel Electrophoresis (SDS-PAGE) is a foundational technique in molecular biology and proteomics that allows researchers to separate complex protein mixtures based almost exclusively on their molecular weights. The efficacy of this separation hinges critically on the preparatory steps of denaturation, reduction, and loading. These steps ensure that proteins are unfolded and uniformly charged, negating the influence of inherent protein charge or tertiary structure. Within the context of a broader thesis on protein separation mechanisms, this guide details the precise methodologies required to prepare protein samples for accurate molecular weight determination, a prerequisite for downstream applications such as western blotting, protein expression analysis, and purity assessment [32] [13].
The core principle of SDS-PAGE relies on the anionic detergent SDS binding to proteins in a constant ratio of approximately 1.4 g SDS per 1.0 g protein. This binding confers a uniform negative charge density, meaning the charge-to-mass ratio is nearly identical for all proteins [33] [32]. When an electric field is applied, these SDS-coated proteins migrate through a porous polyacrylamide gel matrix toward the positive anode. The gel acts as a molecular sieve, retarding larger proteins while allowing smaller proteins to migrate more freely. The result is a separation based on polypeptide chain length, enabling molecular weight estimation by comparing migration distances to known standards [32] [13]. However, this process can be compromised if proteins retain secondary, tertiary, or quaternary structures, underscoring the indispensable role of rigorous sample preparation in achieving high-resolution separation.
Core Principles: Denaturation and Reduction
The goal of sample preparation is to convert complex, native proteins into simple, linear polypeptides ready for electrophoresis. This is achieved through a two-pronged approach: denaturation and reduction.
- Denaturation with SDS: SDS disrupts hydrogen bonds and hydrophobic interactions, effectively destroying most of the secondary and tertiary structures of proteins. This unfolding exposes the polypeptide backbone, allowing SDS molecules to bind along its length and impart a strong negative charge [33] [13].
- Reduction with Agents like BME or DTT: Many proteins contain intra- and inter-chain disulfide bonds (-S-S-) that covalently link cysteine residues. Reducing agents, such as β-mercaptoethanol (BME) or dithiothreitol (DTT), break these disulfide bonds by reducing them to sulfhydryl groups (-SH). This ensures that multi-subunit proteins are dissociated into their individual polypeptide chains and that all proteins are fully linearized [33] [34]. For accurate molecular weight determination, this reduction step is essential; without it, a protein's migration would not reliably correspond to the mass of its polypeptide chain(s).
It is crucial to note that while standard SDS-PAGE is a denaturing technique, modifications such as Native SDS-PAGE (NSDS-PAGE) exist. This method omits SDS and reducing agents from the sample buffer and eliminates the heating step to preserve certain functional properties, like enzymatic activity or bound metal ions, while still achieving good separation [12].
Experimental Protocol: A Detailed Methodology
The following section provides a detailed, step-by-step protocol for preparing protein samples for standard denaturing SDS-PAGE.
Reagent Formulations
Precise reagent preparation is critical for experimental consistency. The tables below summarize common buffer compositions.
Table 1: Composition of Sample Loading Buffers
| Component | 2X Laemmli Buffer (Typical) | 4X LDS Sample Buffer (Invitrogen) | Function |
|---|---|---|---|
| SDS | 2-4% | 2% | Denatures proteins and confers negative charge |
| Reducing Agent (BME/DTT) | 5% BME or 100-400 mM DTT | Incorporated separately | Breaks disulfide bonds |
| Glycerol | 10-20% | 10% | Increases density for easy gel loading |
| Tracking Dye | 0.005% Bromophenol Blue | 0.22 mM SERVA Blue G-250 / Phenol Red | Visualizes migration progress |
| Buffer | 62.5 mM Tris-HCl, pH ~6.8 | 106 mM Tris HCl, 141 mM Tris Base, pH 8.5 | Provides conductive medium and pH control |
Table 2: Compositions of Common Electrophoresis Buffers
| Buffer Component | Tris-Glycine-SDS (5X) | MOPS SDS Running Buffer (1X) |
|---|---|---|
| Tris Base | 0.5 M (60.6 g/L) [13] | 50 mM [12] |
| Glycine | 1.92 M (144.1 g/L) [13] | - |
| MOPS | - | 50 mM [12] |
| SDS | 0.5% (5 g/L) [13] | 0.1% [12] |
| EDTA | - | 1 mM [12] |
| pH | ~8.3 | 7.7 |
Step-by-Step Procedure
- Sample Mixing: Transfer a calculated volume of your protein sample to a clean, labeled microcentrifuge tube. Add an equal volume of 2X Laemmli sample buffer (for a final 1X concentration). If using a pre-prepared lysate already in a sample buffer, simply thaw it [33].
- Reduction: Add a reducing agent if it is not already present in your sample buffer. A common proportion is adding 1 µL of stock β-mercaptoethanol (BME) per 25 µL of sample to achieve a final concentration of approximately 0.55 M [33]. Mix well by pipetting.
- Denaturation: Cap the tubes securely and heat the samples at 95°C for 5 minutes in a heating block or boiling water bath [33] [34] [13]. This heat treatment is crucial for complete protein unfolding and SDS binding.
- Safety Note: Briefly open tube lids during or after heating to release pressure build-up, or pierce the lid with a needle to prevent tubes from popping open [13].
- Clarification: After heating, briefly centrifuge the samples (e.g., for 3 minutes in a microcentrifuge) to pellet any insoluble debris [33].
- Loading: The samples are now ready for loading. Using a pipette, carefully load the supernatant (typically 5–35 µL per lane, depending on well size) into the wells of the prepared polyacrylamide gel. Begin by loading the molecular weight standards in one lane [33].
Workflow Visualization
The following diagram illustrates the logical sequence of the sample preparation workflow.
The Scientist's Toolkit: Essential Research Reagents
Successful SDS-PAGE relies on a suite of specialized reagents. The table below details key solutions and their critical functions.
Table 3: Essential Reagents for SDS-PAGE Sample Preparation
| Reagent Solution | Function & Purpose | Key Considerations |
|---|---|---|
| SDS (Sodium Dodecyl Sulfate) | Anionic detergent that denatures proteins and confers a uniform negative charge. | Binding can be atypical for very acidic or basic proteins, affecting migration [33]. |
| Reducing Agent (β-mercaptoethanol or DTT) | Breaks disulfide bonds to fully linearize polypeptide chains. | Essential for accurate MW determination of disulfide-linked proteins [34] [13]. |
| Tris-Based Sample Buffer | Provides a stable pH environment and ions for conductivity. | Often contains glycerol for density and a tracking dye [13]. |
| Molecular Weight Standards ("Protein Ladder") | Mixture of proteins of known sizes run alongside samples to estimate molecular weight. | Pre-stained markers are used for western blotting; unstained for direct gel staining [33] [32]. |
| Polyacrylamide Gel | Porous matrix that acts as a molecular sieve to separate proteins by size. | Gel percentage determines resolution range (e.g., 12% for 16-68 kDa) [13]. |
| Tris-Glycine or MOPS Running Buffer | Conducts current and maintains pH during electrophoresis. Contains SDS to maintain protein charge. | Standard Laemmli systems use Tris-Glycine; other formulations like MOPS offer alternative resolution [12] [13]. |
Troubleshooting and Quantitative Considerations
Even with meticulous preparation, issues can arise. The success of sample preparation is often reflected in the quality of the final electrophoretogram.
- Protein Concentration and Loading Amount: The optimal amount of protein to load depends on the protein itself and the detection method. As a general guide, 1.0 µg is often sufficient to visualize a purified protein, while up to 10 µg may be needed to visualize proteins in complex lysates on a Coomassie-stained gel [33]. Overloading can lead to smeared or distorted bands.
- Common Issues and Solutions:
- No Bands: Check protein concentration. Ensure reducing agent was added and samples were heated. Verify power supply and buffer composition.
- Smearing: Can indicate incomplete denaturation (ensure heating step was performed), too much protein loaded, or protease degradation (use protease inhibitors).
- Incorrect Apparent Molecular Weight: If protein migration does not match expectations, consider potential post-translational modifications (like glycosylation) that affect mobility. Also, recall that intrinsic strong positively charged proteins may bind SDS differently and migrate anomalously [33].
- Preparation for Western Blotting: For subsequent western blotting, the use of pre-stained molecular weight markers is recommended, as they allow visualization of transfer efficiency and protein separation in real-time [33].
The steps of denaturation, reduction, and loading are not merely preliminary tasks but are fundamentally integral to the thesis of how SDS-PAGE separates proteins based on molecular weight. By systematically unfolding proteins, breaking stabilizing covalent bonds, and imparting a uniform charge, these preparatory steps create the conditions where molecular size becomes the primary determinant of electrophoretic mobility. Mastery of this protocol, including understanding the role of each reagent and the critical nature of the heating and reduction steps, is therefore essential for any researcher in drug development or basic science relying on accurate protein analysis. This rigorous preparation ensures that the subsequent separation by SDS-PAGE truly reflects the molecular weights of the protein components, providing reliable and interpretable data for scientific discovery.
In the realm of molecular biology and biochemical analysis, sodium dodecyl sulfate-polyacrylamide gel electrophoresis (SDS-PAGE) stands as a cornerstone technique for separating complex protein mixtures based on their molecular weights [6]. The efficacy of this separation hinges critically on the proper construction of the polyacrylamide gel matrix, a process known as gel casting. This technical guide delves into the precise composition and fabrication of the two essential gel layers—the stacking and resolving gels—that form the operational core of the SDS-PAGE methodology. The discontinuous buffer system created by these two distinct layers is not merely a procedural formality; it is the fundamental architecture that enables high-resolution separation, ensuring that proteins initiate their migration simultaneously and are sharply resolved into discrete bands based on their molecular dimensions [35] [36]. A deep understanding of this process is indispensable for researchers, scientists, and drug development professionals seeking to generate reproducible, publication-quality data from their protein analysis workflows, particularly within the context of western blotting and proteomic characterization [22].
The principle of SDS-PAGE separation relies on the uniform negative charge imparted by SDS binding to denatured proteins, which masks their intrinsic charge [36]. When an electric field is applied, these SDS-coated proteins migrate through a porous polyacrylamide gel matrix toward the positive anode. The gel acts as a molecular sieve, where smaller proteins navigate the pores more easily and migrate farther, while larger proteins are impeded [32]. However, this size-based separation would be far less effective without the strategic use of a two-layer gel system. The casting of this system, with its carefully orchestrated differences in pH, acrylamide concentration, and ionic composition, transforms a simple electrophoretic run into a high-resolution analytical technique [35]. This guide will provide a detailed examination of the components, protocols, and underlying principles that govern the successful casting of stacking and resolving gels, thereby forming the physical foundation for how SDS-PAGE separates proteins based on molecular weight.
The Scientific Principles of Discontinuous Gel Systems
The Role of the Discontinuous Buffer System
The high resolving power of SDS-PAGE is achieved through a discontinuous buffer system that utilizes gels with different pore sizes and pH levels to first concentrate protein samples into sharp bands before separating them by size [35] [22]. This process involves a sophisticated interplay between the ions in the running buffer and the ions within the gel matrices. The running buffer, typically composed of Tris, glycine, and SDS at pH 8.3, contains glycinate ions that are predominantly negatively charged [35]. However, when these glycinate ions enter the low-pH environment (pH ~6.8) of the stacking gel, a significant proportion of them gain a proton and become neutral zwitterions, drastically reducing their mobility [35].
This sets up a critical ion front: the highly mobile chloride ions (Cl⁻) from the Tris-HCl in the gel act as the leading ions, while the slow-moving glycine zwitterions function as the trailing ions [35]. The protein-SDS complexes, whose mobility falls between these two fronts, are compressed into an extremely thin zone as they are herded through the stacking gel. This "stacking" effect ensures that all proteins enter the resolving gel as a unified, sharp band, which is the prerequisite for high-resolution separation based solely on molecular weight [36].
Polyacrylamide Polymerization Chemistry
The gel matrix itself is formed through the polymerization of acrylamide and bis-acrylamide [6] [36]. Bis-acrylamide serves as a cross-linking agent, connecting the poly-acrylamide chains to form a three-dimensional mesh-like network [36]. The pore size of this network is determined by the concentration of acrylamide; higher percentages create a tighter mesh with smaller pores, which is more effective at separating smaller proteins, while lower percentages create a looser mesh with larger pores, better suited for resolving larger proteins [35].
The polymerization reaction is chemically initiated. Ammonium persulfate (APS) is the source of free radicals, and N,N,N',N'-Tetramethylethylenediamine (TEMED) catalyzes the formation of these radicals and stabilizes the chain reaction [6] [36]. When these two components are added to a solution of acrylamide and bis-acrylamide, they immediately initiate the polymerization process, which proceeds until the gel solidifies. This reaction is oxygen-sensitive, which is why the gel solution is often overlaid with water or isopropanol during casting to exclude air and ensure complete polymerization [37].
Composition and Preparation of Gel Components
Resolving Gel: The Separation Matrix
The resolving gel, also known as the separating gel, is the lower layer of the SDS-PAGE system where the actual size-based separation of proteins occurs. Its composition is tailored to create a molecular sieve with an optimal pore size for the target protein molecular weight range.
Table 1: Standard Resolving Gel Formulation (for a 12% gel, 10 mL volume)
| Component | Function | Volume/Amount |
|---|---|---|
| 30% Acrylamide/Bis Mix | Forms the porous polymer matrix; 37.5:1 ratio is common [37]. | 4.0 mL [6] |
| 1.5 M Tris-HCl, pH 8.8 | Provides the buffering environment at a pH conducive for separation [6]. | 2.5 mL [6] |
| 10% SDS | Anionic detergent that ensures proteins remain denatured and uniformly charged [6]. | 100 µL [6] |
| Deionized Water | Solvent that brings the mixture to the final volume. | 3.4 mL [6] |
| 10% Ammonium Persulfate (APS) | Initiator for the free-radical polymerization reaction [36]. | 50 µL [6] |
| TEMED | Catalyst that accelerates the polymerization reaction by stabilizing free radicals [36]. | 5 µL [6] |
The pH of 8.8 in the resolving gel is critical. When the ion front and stacked proteins reach this high-pH environment, the glycine zwitterions lose a proton and become rapidly moving glycinate anions again [35]. This dissipates the voltage gradient, and the proteins, now deposited at the top of the resolving gel in a sharp band, begin to be separated based on their ability to navigate the pores of the polyacrylamide mesh under the influence of the electric field [36].
Table 2: Recommended Acrylamide Concentrations for Target Protein Sizes
| Protein Size (kDa) | Recommended Acrylamide Percentage (%) |
|---|---|
| 4 - 40 | 20 [38] [37] |
| 12 - 45 | 15 [38] [37] |
| 10 - 70 | 12.5 [38] [37] |
| 15 - 100 | 10 [38] [37] |
| 25 - 200 | 8 [37] |
| >200 | 4 - 6 [38] [37] |
Stacking Gel: The Focusing Layer
The stacking gel is poured on top of the polymerized resolving gel and serves to concentrate the protein samples into a narrow starting zone. Its different composition creates the discontinuous system necessary for stacking.
Table 3: Standard Stacking Gel Formulation (5% gel, 5 mL volume)
| Component | Function | Volume/Amount |
|---|---|---|
| 30% Acrylamide/Bis Mix | Forms a large-pore polymer matrix that offers little resistance to protein migration [35]. | 0.83 mL [6] |
| 1.0 M Tris-HCl, pH 6.8 | Provides a low-pH environment (pH 6.8) that dictates the charge state of glycine [6]. | 0.63 mL [6] |
| 10% SDS | Maintains protein denaturation and negative charge. | 50 µL [6] |
| Deionized Water | Solvent. | 3.4 mL [6] |
| 10% Ammonium Persulfate (APS) | Polymerization initiator. | 25 µL [6] |
| TEMED | Polymerization catalyst. | 5 µL [6] |
The low acrylamide concentration (typically 4-5%) creates large pores that allow proteins to move freely and be focused by the ion fronts, rather than being separated by size [35]. The low pH (6.8) is the key to the stacking mechanism, as it ensures that a significant fraction of the glycine molecules from the running buffer enter the stacking gel as zwitterions with low electrophoretic mobility, establishing the trailing ion front [35].
Step-by-Step Gel Casting Protocol
Preparation of the Resolving Gel
- Assemble the Casting Apparatus: Thoroughly clean the glass plates and spacers with ethanol or methanol to ensure a dust-free surface and proper polymerization [20] [37]. Assemble the glass plate cassette according to the manufacturer's instructions, ensuring a tight seal to prevent leakage.
- Mix Resolving Gel Components: In a small beaker or flask, combine the acrylamide/bis solution, Tris-HCl (pH 8.8), SDS, and deionized water as specified in Table 1. Do not add APS and TEMED at this stage [37]. Mix gently to avoid introducing air bubbles.
- Initiate Polymerization and Pour: Add the required volumes of 10% APS and TEMED to the mixture. Swirl gently but thoroughly to ensure homogenous mixing. Immediately pipette or pour the solution into the gap between the glass plates, leaving enough space for the stacking gel and comb (approximately 2-2.5 cm from the top) [37].
- Overlay and Polymerize: Carefully overlay the resolving gel solution with a small amount of water-saturated isopropanol or n-butanol [20] [37]. This layer serves two purposes: it excludes oxygen which inhibits polymerization, and it creates a flat, even interface at the top of the resolving gel. Allow the gel to polymerize completely for 20-30 minutes at room temperature. A distinct schlieren line will become visible between the gel and the overlay once polymerization is complete.
Preparation of the Stacking Gel
- Prepare the Resolving Gel Surface: After polymerization, pour off the isopropanol overlay. Rinse the top of the gel with deionized water to remove any residual alcohol, and carefully wick away the excess water with a lint-free tissue or filter paper [37].
- Mix Stacking Gel Components: In a clean container, combine the acrylamide/bis solution, Tris-HCl (pH 6.8), SDS, and deionized water as per Table 3. Again, omit APS and TEMED initially.
- Initiate Polymerization and Pour: Add the specified amounts of APS and TEMED to the stacking gel solution and mix. Pour the mixture directly onto the surface of the polymerized resolving gel, filling the remaining space in the cassette completely.
- Insert the Comb and Finalize: Immediately insert a clean, dry comb into the stacking gel solution, being careful to avoid trapping air bubbles under the teeth of the comb [20]. The comb should be inserted at a slight angle to allow air to escape. If any bubbles are trapped, they can often be dislodged by gently lifting and re-inserting the comb. Allow the stacking gel to polymerize for 15-20 minutes.
Once polymerized, the gel can be used immediately for electrophoresis. For storage, carefully remove the comb and wrap the entire gel cassette in moist tissue paper soaked in running buffer or deionized water. Then, seal it in a plastic bag or cling film to prevent dehydration. Stored gels can be kept at 4°C for up to one week [6] [37].
The Researcher's Toolkit: Essential Reagents and Materials
Successful gel casting and protein separation rely on a suite of specific chemical reagents, each with a defined role in the process. The following table details these key components.
Table 4: Essential Research Reagents for SDS-PAGE Gel Casting
| Reagent | Function | Critical Specifications |
|---|---|---|
| Acrylamide/Bis-acrylamide | Monomer and cross-linker that polymerize to form the porous gel matrix [36]. | Typically used as a 30% (w/v) stock solution at a ratio of 37.5:1 (Acrylamide:Bis) [37]. Neurotoxin in its monomeric form; handle with gloves. |
| Tris-HCl Buffer | Provides the buffering capacity at specific pH levels (pH 6.8 for stacking, pH 8.8 for resolving) to create the discontinuous system [35]. | Concentration: 1.0-1.5 M. pH must be accurately adjusted. |
| Sodium Dodecyl Sulfate (SDS) | Anionic detergent that denatures proteins and confers a uniform negative charge, masking intrinsic charge differences [36]. | Typically used as a 10% (w/v) stock solution. |
| Ammonium Persulfate (APS) | Source of free radicals that initiates the polymerization reaction of acrylamide and bis-acrylamide [36]. | Prepared as a 10% (w/v) solution in water. Unstable in solution; store at 4°C and use within a week for best results [6]. |
| TEMED | Catalyst that stabilizes free radicals from APS and drives the polymerization reaction to completion [36]. | Stored as a liquid. Degrades over time; essential for rapid gel polymerization. |
| Glycine | An amino acid in the running buffer whose charge state change (anion zwitterion) between the different pH zones enables the stacking phenomenon [35]. | Component of the Tris-Glycine-SDS running buffer. |
| Comb | Forms the sample wells in the stacking gel for loading protein samples and molecular weight markers [20]. | Available with different numbers of teeth (e.g., 5, 10, 15) determining well number and volume capacity [37]. |
Troubleshooting Common Gel Casting and Separation Issues
Even with a meticulous protocol, issues can arise during gel casting and electrophoresis. The table below outlines common problems, their likely causes, and solutions.
Table 5: Troubleshooting Guide for Gel Casting and SDS-PAGE
| Issue | Possible Cause | Solution |
|---|---|---|
| Slow or Failed Polymerization | Degraded APS or TEMED; Oxygen inhibition [6]. | Prepare fresh APS solution; Ensure reagents are fresh; Check that overlay was effective. |
| Leaky or Wavy Wells | Comb inserted at an angle or disturbed during polymerization; Old or damaged comb [37]. | Insert comb straight and avoid moving it; Use a comb in good condition. |
| Smiling Bands (curved upwards) | Excessive heat generation during electrophoresis [22]. | Run the gel at a lower voltage; Use a cooling apparatus or perform electrophoresis in a cold room. |
| Smeared Bands | Incomplete protein denaturation; Protease degradation [6] [22]. | Ensure fresh reducing agent (DTT/BME) is used and sample is boiled adequately; Add protease inhibitors to the sample. |
| Uneven Migration Across Gel | Air bubbles trapped under the gel or at the bottom of the cassette; Inconsistent buffer concentration [22]. | Remove bubbles carefully with a syringe or pipette tip after assembling the tank; Ensure running buffer is freshly prepared and properly mixed. |
| Poor Resolution | Incorrect acrylamide percentage for the target protein size; Improperly prepared buffers [35]. | Consult Table 2 to select the appropriate gel percentage; Verify the pH and composition of all buffers. |
| Atypical Protein Migration | Post-translational modifications (e.g., glycosylation, phosphorylation) affecting SDS binding [35]. | Be aware that heavily modified proteins may not migrate exactly as predicted by molecular weight. |
The precise composition and casting of the stacking and resolving gel layers are not merely preparatory steps but are foundational to the success of SDS-PAGE. This discontinuous system, leveraging differences in pH and gel porosity, is what transforms a simple electrophoretic run into a high-resolution technique capable of separating proteins with exquisite precision based on their molecular weight [35] [36]. A deep understanding of the roles played by each component—from the pore-forming acrylamide and the cross-linking bis-acrylamide to the buffering Tris and the catalytic TEMED/APS system—empowers researchers to troubleshoot effectively, optimize protocols for specific applications, and consistently produce reliable results. Whether for qualitative assessment, western blotting, or downstream protein analysis, mastering the art and science of gel casting remains an indispensable skill in the molecular biology and biochemistry toolkit, directly enabling critical research and drug development efforts that rely on accurate protein characterization.
Sodium Dodecyl Sulfate-Polyacrylamide Gel Electrophoresis (SDS-PAGE) is a foundational analytical technique in biochemical research that separates proteins based on their molecular weight [4]. The method relies on the principle that proteins denatured by SDS and reducing agents adopt a uniform charge-to-mass ratio, allowing their migration through a polyacrylamide gel matrix to be determined primarily by polypeptide chain length [39] [2]. While the basic principles of SDS-PAGE are well-established, the optimal separation of protein complexes relies heavily on the precise control of electrophoretic parameters throughout the run. For researchers and drug development professionals, understanding these nuances is critical for obtaining reproducible, high-resolution data for downstream applications such as western blotting, protein characterization, and quality assessment [4] [40]. This technical guide examines the core parameters governing electrophoretic separation and provides evidence-based protocols for achieving optimal results.
The Fundamental System: How SDS-PAGE Separates by Molecular Weight
Core Principles of Separation
SDS-PAGE separates proteins through a dual mechanism of uniform charge conferral and molecular sieving. The anionic detergent SDS binds to hydrophobic regions of proteins at a constant ratio of approximately 1.4 g SDS per 1 g of protein, effectively unfolding the tertiary structure and imparting a uniform negative charge [2]. This process eliminates the influence of a protein's intrinsic charge and three-dimensional structure, ensuring that migration through the polyacrylamide gel matrix depends almost entirely on molecular size [39] [41]. The polyacrylamide gel acts as a molecular sieve, with smaller proteins migrating more readily through the porous network than larger proteins [41].
The discontinuous buffer system, pioneered by Laemmli, employs a stacking gel (pH ~6.8) and a resolving gel (pH ~8.8) to achieve sharp band definition [39] [2]. In the stacking gel, glycine from the running buffer exists primarily as a zwitterion with low mobility, while chloride ions from the gel buffer form a highly mobile leading ion front. Proteins, with intermediate mobility, are concentrated into a narrow zone between these fronts [39]. Upon entering the resolving gel at higher pH, glycine molecules become predominantly negatively charged and overtake the proteins, which then separate based on size in the uniform resolving gel environment [39] [2].
Experimental Workflow for SDS-PAGE Optimization
The following diagram illustrates the key decision points and workflow for optimizing electrophoresis run parameters to achieve high-quality protein separation.
Quantitative Parameters for Electrophoresis Control
Electrical Settings and Their Effects
Modern power supplies offer three modes of operation—constant voltage, constant current, and constant power—each with distinct advantages for SDS-PAGE. Understanding these modes is essential for optimizing separation quality and reproducibility.
Table 1: Comparison of Electrophoresis Control Modes in SDS-PAGE
| Control Mode | Principles | Advantages | Disadvantages | Recommended Use |
|---|---|---|---|---|
| Constant Voltage | Maintains stable electric potential (V) throughout run [42] | Limited heat production; current decreases as run progresses [42] | Migration slows late in run; may require time adjustments [42] | Standard laboratory practice; most common setting [43] |
| Constant Current | Maintains stable electron flow (amps) [42] | Consistent run timing across multiple gels [42] | Voltage/heat increase later causing "smiling bands" or warped gels [42] | When consistent timing between runs is prioritized [42] |
| Constant Power | Maintains stable power (watts = V × I) [42] | May limit heat while maintaining consistent migration [42] | Difficult to define "constant" conditions with two variables [42] | Specialized applications requiring balanced parameters [42] |
Voltage and Run Time Specifications
Optimal separation requires appropriate voltage application relative to gel size. The following table provides standard voltage parameters and run conditions for different gel configurations.
Table 2: Voltage and Run Time Guidelines for SDS-PAGE
| Gel Size / Stage | Voltage Range | Approximate Duration | Key Considerations | Expected Outcome |
|---|---|---|---|---|
| Initial Stacking | 50-60 V [42] | ~30 minutes [42] | Low voltage lines up proteins before resolving gel [42] | Proteins concentrated into sharp bands before separation |
| Mini-Gel Resolution | 100-150 V [44] [43] | 45-90 minutes [43] | Standard for small format gels; stop when dye front reaches bottom [45] [43] | Optimal separation for most analytical applications |
| Large Gel Resolution | 150-300 V [42] | 1-2 hours [42] | Higher voltage needed; 5-15 V per cm of gel [42] | Faster separation while maintaining resolution for larger formats |
Gel Composition and Protein Size
The polyacrylamide percentage directly determines the gel pore size and must be matched to the molecular weight of target proteins for optimal resolution.
Table 3: Polyacrylamide Gel Percentage Recommendations Based on Protein Size
| Target Protein Size Range | Recommended Gel Percentage | Separation Principle | Special Considerations |
|---|---|---|---|
| 4-40 kDa | Up to 20% [44] | Higher % creates smaller pores to resolve small proteins [39] [41] | Tricine-SDS-PAGE preferred for proteins <30 kDa [4] |
| 12-45 kDa | 15% [44] | Balanced pore size for medium-small proteins | Standard for cytokine, peptide hormone analysis |
| 10-70 kDa | 12.5% [44] | Versatile range for common molecular weights | Common default for unknown protein size ranges |
| 15-100 kDa | 10% [44] | Optimal for many cellular enzymes and structural proteins | Suitable for most routine laboratory applications |
| 50-200 kDa | 8% [44] | Larger pores accommodate big protein migration [40] | Ideal for receptors and large structural proteins |
| >200 kDa | 4-6% [44] | Minimal obstruction for very large proteins [40] | Low percentage gels prevent trapping near well |
The Scientist's Toolkit: Essential Reagents and Materials
Table 4: Essential Research Reagents for SDS-PAGE Experiments
| Reagent/Material | Composition / Specifications | Function in SDS-PAGE | Technical Notes |
|---|---|---|---|
| SDS Running Buffer | 25 mM Tris base, 192 mM glycine, 0.1% SDS, pH 8.3 [44] | Provides ions for conductivity and maintains protein denaturation [39] | Fresh buffer ensures proper ion concentration and pH [41] |
| Laemmli Sample Buffer | Tris-HCl, SDS, glycerol, bromophenol blue, β-mercaptoethanol or DTT [39] | Denatures proteins, provides density for loading, visual tracking [39] | β-ME has stronger odor but more stable than DTT [40] |
| Polyacrylamide Gel | Acrylamide, bis-acrylamide, Tris-HCl, SDS, APS, TEMED [39] [2] | Forms molecular sieve matrix for size-based separation [41] | APS and TEMED catalyze polymerization [2] |
| Protein Molecular Weight Marker | Pre-stained or unstained proteins of known molecular weights [43] | Reference standard for estimating protein size and monitoring run progress [43] | Pre-stained markers allow visual tracking during electrophoresis |
| Heating Block/Water Bath | Capable of maintaining 95°C [43] | Denatures protein samples completely before loading [41] | 5 minutes at 95°C standard; prevents protein renaturation [41] |
Troubleshooting Common Electrophoresis Issues
Identifying and Resolving Separation Artifacts
Smeared Bands: Often caused by excessive voltage during separation [45]. Solution: Reduce voltage to 10-15 V/cm of gel and increase run time accordingly [45]. Ensure complete protein denaturation by verifying sample heating at 95°C for 5 minutes [41] and using fresh running buffer with proper SDS concentration [41].
"Smiling" Bands (Curved Band Pattern): Results from excessive heat generation during electrophoresis, causing uneven gel expansion [42] [45]. Solution: Implement cooling strategies such as operating in a cold room, using embedded ice packs, or reducing voltage [42] [45] [41]. Maintaining gel temperature between 10°C-20°C ensures even migration [40].
Poor Band Resolution: Inadequate separation may stem from insufficient run time, incorrect gel percentage, or improper buffer composition [45]. Solution: Run gel until dye front approaches bottom (but doesn't run off) [45], match gel percentage to protein size [40], and prepare fresh running buffer with correct ionic strength [45] [41].
Edge Effect (Distorted Peripheral Lanes): Occurs when outer lanes are left empty, altering electrical field distribution [45]. Solution: Load protein samples or markers in all wells, including peripheral lanes [45]. If insufficient samples are available, load buffer with tracking dye in unused wells.
Advanced Techniques and Future Directions
While traditional SDS-PAGE remains a cornerstone technique, recent advancements focus on enhancing efficiency, precision, and compatibility with downstream analysis. Lab-on-chip systems and microfluidic approaches are transforming protein analysis by addressing challenges in efficiency and precision while maintaining methodological robustness [4]. These automated systems, such as the Simple Western platform, utilize capillary electrophoresis to separate samples followed by covalent immobilization for antibody binding and detection, providing fully quantitative and reproducible results with minimal manual intervention [44].
For specialized applications, gradient gels (e.g., 4-20% acrylamide) offer an expanded separation range ideal for analyzing complex protein mixtures or unknown molecular weights [40]. The continuous pore size gradient allows optimal resolution across a broad mass spectrum within a single gel [40]. Additionally, alternative buffer systems like Bis-tris methane with nearly neutral pH (6.4-7.2) improve gel stability and reduce protein modifications, particularly beneficial for mass spectrometry analysis [2].
The electrophoresis run represents a critical phase in SDS-PAGE where precise control of parameters determines separation quality. Optimal results require careful consideration of electrical settings—with constant voltage between 100-150 V for mini-gels providing the most reliable performance—matched with appropriate gel percentages tailored to target protein size [42] [44] [43]. Temperature management remains crucial to prevent heat-induced artifacts, while proper sample preparation ensures complete denaturation for accurate molecular weight determination [45] [41]. As protein analysis continues to evolve in pharmaceutical and biomedical research, the fundamental principles of electrophoretic separation remain essential for obtaining quantitative, reproducible data in characterization, quality assessment, and diagnostic applications [4]. By systematically optimizing these parameters, researchers can achieve the high-resolution separation necessary for confident protein analysis and downstream applications.
Sodium Dodecyl Sulfate-Polyacrylamide Gel Electrophoresis (SDS-PAGE) is a foundational technique in biochemistry that separates proteins based on their molecular weight [46] [47]. The separation principle relies on the fact that when proteins are coated with the anionic detergent SDS, they attain a uniform negative charge-to-mass ratio, causing them to migrate through a polyacrylamide gel matrix under an electric field at rates inversely proportional to their molecular weight [46] [2]. However, the separation itself is merely the first step; the true analytical power of the technique is realized only through subsequent processes of protein visualization, imaging, and computational analysis. This phase transforms the resolved protein bands into quantifiable data, enabling researchers to determine molecular weights, assess sample purity, and perform comparative expression analyses [47] [48] [49]. Within the broader thesis of how SDS-PAGE separates proteins based on molecular weight, this guide details the critical post-separation workflows that extract meaningful biological information from the gel, serving as an essential resource for researchers, scientists, and drug development professionals.
Protein Staining Techniques
Once electrophoresis is complete, the separated proteins within the gel are invisible and must be stained for visualization. The choice of staining method depends on the required sensitivity, quantitative accuracy, and downstream applications.
Table 1: Comparison of Common Protein Staining Methods for SDS-PAGE
| Staining Method | Detection Mechanism | Sensitivity (ng protein/band) | Compatibility with Downstream Analysis | Key Advantages | Major Limitations |
|---|---|---|---|---|---|
| Coomassie Brilliant Blue | Electrostatic binding to basic and hydrophobic amino acid residues [50] | ~50 [50] | High (e.g., mass spectrometry) [47] | Simple, cost-effective, quantitative, and reversible [48] [50] | Low sensitivity compared to other methods [50] |
| Silver Staining | Reduction of silver ions to metallic silver at protein sites [50] | 2–5 [50] | Low (proteins become oxidized) [50] | Very high sensitivity [47] [50] | Not quantitative, more complex protocol, high background risk [50] |
| Fluorescent Staining | Intercalation into protein hydrophobic regions or covalent labeling [47] | Low to mid ng range (higher than Coomassie) [47] | Variable (depends on specific dye) [47] | Broad dynamic range, high sensitivity, no destaining required [47] | Requires specific imaging equipment, can be more expensive [47] |
Standard Staining and Destaining Protocols
Coomassie Staining Protocol [50]:
- Staining: Following electrophoresis, incubate the gel in Coomassie staining solution (0.05% Coomassie Brilliant Blue R-250, 40% ethanol, 10% glacial acetic acid) for 30 minutes to 2 hours with gentle agitation.
- Destaining: Transfer the gel to a destaining solution (40% ethanol, 10% glacial acetic acid) and agitate gently. Change the destaining solution periodically until the gel background is clear and protein bands are sharply visible. To accelerate destaining, add a folded paper towel to the container to absorb excess dye.
- Storage: Once destained, store the gel in distilled water or a 5% acetic acid solution to preserve the stained bands.
Silver Staining Considerations: Silver staining is typically performed using commercial kits for maximum reproducibility [50]. The process is more intricate than Coomassie staining, involving multiple steps of gel fixation, sensitization, silver impregnation, washing, and development. It is critical to note that silver-stained proteins are often oxidized and less suitable for subsequent techniques like protein sequencing or mass spectrometry [50].
Figure 1: Workflow for visualizing proteins after SDS-PAGE separation.
Imaging and Band Analysis
Following staining and destaining, the gel is ready for imaging and computational analysis to convert visual band patterns into quantitative data.
Gel Imaging and Documentation
Gel documentation systems are essential for capturing high-quality images of stained protein bands for further analysis and record-keeping [47]. These systems typically consist of a light source (white light for colorimetric stains like Coomassie, specific wavelengths for fluorescent stains) and a high-resolution camera housed in a dark box to eliminate ambient light interference. The captured digital image serves as the primary data source for all subsequent analysis.
Analysis of Band Patterns
The generated band pattern provides critical information on protein purity, integrity, and identity.
- Assessing Protein Purity: The number of bands observed in a sample lane is a direct indicator of protein sample purity. A single, sharp band typically suggests a relatively pure protein, while the presence of multiple bands indicates contamination or the existence of protein isoforms [48] [49].
- Estimating Molecular Weight: The migration distance of a protein band is related to its molecular weight. This is determined by comparing the band's migration to a molecular weight standard (or "marker") run alongside the samples on the same gel [51] [47] [48]. The analysis involves constructing a standard curve.
- Quantifying Protein Abundance: The intensity of a stained protein band is proportional to the amount of protein present [47] [48]. Densitometry, the measurement of optical density, is used to quantify this intensity. Specialized gel analysis software can measure the intensity of each band, allowing for semi-quantitative comparisons of protein abundance between different samples on the same gel [47].
Molecular Weight Determination
The determination of a protein's apparent molecular weight is a fundamental application of SDS-PAGE, achieved through the construction and use of a standard curve derived from protein markers.
The Standard Curve Method
The process for molecular weight estimation is methodical [48]:
- Measure Migration Distances: For each band in the molecular weight marker lane, measure the distance it has migrated from the top of the separating gel.
- Plot Standard Curve: On a semi-logarithmic graph, plot the logarithm (log10) of the known molecular weight of each standard protein against its migration distance.
- Generate Trendline: The data points are typically fitted with a linear regression or a smooth curve, creating a standard curve.
- Estimate Unknown MWs: Measure the migration distance of an unknown protein band, find this distance on the standard curve's x-axis, and read the corresponding molecular weight from the y-axis.
It is crucial to recognize that SDS-PAGE provides an apparent molecular weight. Post-translational modifications (e.g., glycosylation, phosphorylation) can affect how a protein binds SDS and migrates through the gel, causing its apparent molecular weight to differ from its true mass calculated from the amino acid sequence [47] [52].
Figure 2: Process for determining protein molecular weight using a standard curve.
Troubleshooting Analysis Artifacts
Several common issues can compromise the accuracy of molecular weight determination and analysis [47] [48]:
- Smiling or Frowning Bands: Caused by uneven heating during electrophoresis. Ensure the electrophoresis apparatus is properly connected and that the power settings are appropriate for the gel size.
- Smearing: May result from protein overloading, incomplete denaturation, or aggregation. Reduce the amount of protein loaded, ensure samples are heated adequately (95°C for 5 minutes) in the presence of SDS and reducing agents, and centrifuge samples before loading to remove debris [51] [48].
- Atypical Band Migration: As noted, heavily glycosylated or phosphorylated proteins may bind less SDS, while highly hydrophobic proteins may bind more, leading to inaccurate molecular weight estimates [52]. Proteins with extreme isoelectric points may also behave anomalously [51].
The Scientist's Toolkit: Essential Reagents and Materials
Successful execution of SDS-PAGE and subsequent analysis requires a suite of specialized reagents and equipment.
Table 2: Key Research Reagent Solutions for SDS-PAGE Analysis
| Category | Item | Function |
|---|---|---|
| Gel Formation | Acrylamide / Bis-acrylamide [46] [11] | Forms the porous polyacrylamide gel matrix that acts as a molecular sieve. |
| Ammonium Persulfate (APS) & TEMED [46] | Catalysts that initiate and drive the polymerization reaction of the gel. | |
| Sample Preparation | SDS (Sodium Dodecyl Sulfate) [46] [52] | Anionic detergent that denatures proteins and confers a uniform negative charge. |
| DTT (Dithiothreitol) or β-Mercaptoethanol [46] [51] | Reducing agents that break disulfide bonds to fully linearize proteins. | |
| Laemmli Sample Buffer [52] | Contains SDS, reducing agent, glycerol (for loading density), and tracking dye. | |
| Electrophoresis | Tris-Glycine Running Buffer [51] [52] | Provides the ions necessary to conduct current and maintain pH during the run. |
| Protein Molecular Weight Marker [51] [48] | A mixture of proteins of known sizes for constructing standard curves. | |
| Visualization | Coomassie Brilliant Blue R-250 [50] | Dye that binds proteins nonspecifically, enabling visualization of bands. |
| Destaining Solution [50] | Removes non-specifically bound dye from the gel to reduce background. | |
| Analysis | Gel Documentation System [47] [49] | For high-resolution imaging of stained gels. |
| Densitometry Software [47] [48] | For quantifying band intensity and determining molecular weight. |
The journey of SDS-PAGE analysis extends far beyond the cessation of electric current. The processes of staining, imaging, and computational analysis are integral to transforming the physical separation of proteins into actionable quantitative data on molecular weight, purity, and abundance. Mastery of these post-electrophoresis techniques—from selecting the appropriate staining method for the required sensitivity to accurately constructing standard curves for molecular weight determination—is paramount for generating reliable and reproducible results. As a cornerstone of biochemical research, the full utility of SDS-PAGE in validating protein identity, assessing sample integrity, and informing downstream experiments is only realized through rigorous application of these analytical principles. This comprehensive guide to visualization and analysis therefore completes the narrative of how SDS-PAGE serves as an indispensable tool for separating and characterizing proteins based on molecular weight.
Sodium dodecyl sulfate-polyacrylamide gel electrophoresis (SDS-PAGE) serves as a fundamental analytical technique in biopharmaceutical development for characterizing protein-based therapeutics. This method enables the separation, identification, and characterization of proteins across diverse biopharma products, providing critical quality assessment data throughout the drug development lifecycle [4]. The technique's enduring relevance lies in its robust ability to separate proteins based on their molecular weights, a principle that makes it indispensable for purity analysis, stability testing, and demonstrating lot-to-lot consistency in manufacturing [4].
The underlying mechanism of SDS-PAGE separation relies on both electrophoretic mobility and molecular sieving through a polyacrylamide gel matrix [53]. When proteins are treated with the anionic detergent sodium dodecyl sulfate (SDS) and reducing agents, they become denatured and uniformly negatively charged. Under the influence of an electric field, these SDS-protein complexes migrate through the gel pores, with smaller proteins moving faster and larger ones being retarded, resulting in separation based primarily on molecular size [53] [4]. This review examines the specific applications of SDS-PAGE within biopharmaceutical quality control, detailing experimental protocols and data interpretation for ensuring therapeutic protein safety and efficacy.
Fundamental Principles of Protein Separation by Molecular Weight
The Role of SDS in Molecular Weight-Based Separation
The exceptional resolving power of SDS-PAGE stems from the detergent SDS, which confers uniform negative charge to all protein molecules while linearizing them [53]. SDS achieves this through two primary mechanisms: charge uniformity and protein unfolding. The negatively charged SDS molecules coat the polypeptide backbone, masking the proteins' intrinsic charges and ensuring all proteins migrate toward the positive anode during electrophoresis [53]. Simultaneously, SDS facilitates unfolding of secondary and tertiary structures through its hydrophobic region interacting with hydrophobic protein domains, while its ionic part disrupts non-covalent interactions [53]. This denaturation ensures separation occurs primarily according to molecular weight rather than native charge or conformation.
Complementary Denaturation Techniques
For complete protein denaturation, additional treatments are essential. Heating samples at 95°C disrupts hydrogen bonds that stabilize secondary structures like alpha helices and beta sheets [53]. Reducing agents such as beta-mercaptoethanol (BME) or dithiothreitol (DTT) break disulfide bridges between cysteine residues, ensuring complete unfolding of the polypeptide chain into its primary structure [53]. Without these steps, incomplete denaturation could lead to anomalous migration and inaccurate molecular weight determination.
Gel Composition and Electrophoretic Separation
The polyacrylamide gel functions as a molecular sieve, with its porosity determined by the concentration of acrylamide and bis-acrylamide cross-linker [53]. Polymerization is initiated by TEMED and ammonium persulfate (APS), which generate free radicals that drive acrylamide monomer cross-linking [53]. Discontinuous gel systems employing stacking and resolving sections optimize separation. The stacking gel (∼4% acrylamide, pH 6.8) concentrates protein samples into a sharp zone before entering the resolving gel (∼10% acrylamide, pH 8.8), where actual molecular weight-based separation occurs [53]. Smaller proteins migrate farther through the gel matrix, while larger ones remain closer to the origin.
SDS-PAGE Methodology for Biopharmaceutical Applications
Standard SDS-PAGE Protocol
The following detailed protocol outlines the standard procedure for SDS-PAGE analysis of biopharmaceutical proteins:
Sample Preparation: Dilute protein samples to appropriate concentration (typically 0.5-2 mg/mL) in buffer compatible with downstream analysis. Mix protein sample with 4X LDS sample loading buffer (Invitrogen) at 3:1 ratio [12]. For reduced conditions, include 2-mercaptoethanol (2-ME) or dithiothreitol (DTT) at final concentrations of 5% or 50 mM, respectively [4]. Heat samples at 70°C for 10 minutes (or 95°C for 5 minutes) to ensure complete denaturation [12].
Gel Electrophoresis: Load 7.5 μL of prepared protein sample (containing 5-25 μg total protein) into wells of precast polyacrylamide gel (e.g., NuPAGE Novex 4-12% or 12% Bis-Tris gels) [12]. Include appropriate molecular weight standards in at least one lane. Perform electrophoresis at constant voltage (200V) for approximately 45 minutes using MOPS SDS running buffer (50 mM MOPS, 50 mM Tris Base, 0.1% SDS, 1 mM EDTA, pH 7.7) until dye front reaches gel bottom [12].
Post-Electrophoresis Analysis: Following separation, proteins can be visualized using Coomassie Blue, silver staining, or SYPRO Ruby staining. For western blot analysis, transfer proteins to PVDF or nitrocellulose membranes using standard protocols. Alternative detection methods include zinc-imidazole reverse staining or in-gel fluorescent detection [12].
Modified Native SDS-PAGE for Functional Analysis
A modified NSDS-PAGE protocol preserves protein functionality while maintaining high resolution:
Sample Preparation for NSDS-PAGE: Mix 7.5 μL protein sample with 2.5 μL 4X NSDS sample buffer (100 mM Tris HCl, 150 mM Tris base, 10% v/v glycerol, 0.0185% w/v Coomassie G-250, 0.00625% w/v Phenol Red, pH 8.5) [12]. Omit heating step and reducing agents to maintain native structure. Remove SDS and EDTA from sample buffer to prevent denaturation and metal chelation [12].
Gel Preparation and Electrophoresis: Pre-run precast NuPAGE Novex 12% Bis-Tris mini-gels at 200V for 30 minutes in double distilled H2O to remove storage buffer and unpolymerized acrylamide [12]. Perform electrophoresis using modified running buffer (50 mM MOPS, 50 mM Tris Base, 0.0375% SDS, pH 7.7) with reduced SDS concentration and omitted EDTA [12]. This modified approach retains Zn²⁺ bound in proteomic samples (increasing from 26% to 98% compared to standard conditions) and preserves enzymatic activity in seven of nine model enzymes tested [12].
Critical Factors Affecting Accuracy and Reliability
Multiple factors influence SDS-PAGE resolution and accuracy. Gel composition, including acrylamide percentage and cross-linking density, determines pore size and separation range [4]. Buffer system pH and ionic composition affect electrophoretic mobility and band sharpness [4]. Sample preparation parameters, including protein concentration, completeness of denaturation, and reduction efficiency, significantly impact results [4]. Standardization of these parameters is essential for quantitative comparisons in biopharmaceutical applications.
The Scientist's Toolkit: Essential Research Reagents
Table 1: Essential Reagents for SDS-PAGE Analysis in Biopharma
| Reagent/Chemical | Function/Purpose | Typical Concentration/Formula |
|---|---|---|
| SDS (Sodium Dodecyl Sulfate) | Denatures proteins and confers uniform negative charge | 0.1-1% in buffers; 2% in sample buffer [53] [12] |
| Acrylamide/Bis-acrylamide | Forms porous gel matrix for molecular sieving | 4-20% acrylamide; Bis:acrylamide ~1:35 [53] |
| TEMED & APS | Initiates acrylamide polymerization | 0.1% TEMED; 0.1% APS [53] |
| DTT or β-Mercaptoethanol | Reducing agents that break disulfide bonds | 50 mM DTT or 5% BME in sample buffer [53] [4] |
| Tris-based Buffers | Maintains pH during electrophoresis | 50-250 mM, pH 6.8-8.8 [53] [12] |
| Coomassie Blue/Silver Stain | Protein visualization after separation | 0.1% Coomassie in 40% methanol/10% acetic acid [12] |
| Molecular Weight Markers | Reference standards for size determination | Pre-stained or unstained protein ladders [12] |
Quantitative Data Analysis in Biopharma Applications
Table 2: SDS-PAGE Applications and Data Interpretation in Biopharma
| Application Area | Measured Parameters | Acceptance Criteria/Data Interpretation |
|---|---|---|
| Purity Analysis | Band intensity distribution; Presence of extra bands | Main band >95% of total intensity; Identification of impurities and degradation products [4] |
| Stability Testing | Appearance/disappearance of bands over time | ≤5% change in fragment pattern under specified conditions [4] |
| Lot Consistency | Band pattern comparison between manufacturing lots | Equivalent electrophoretic profiles across multiple lots [4] |
| Molecular Weight Determination | Migration distance relative to standards | Calculated MW within 10% of theoretical value [4] |
| Aggregation Analysis | High molecular weight bands at gel top | ≤2% aggregate formation in final product [4] |
| Reduced vs Non-reduced Analysis | Subunit pattern comparison | Verification of correct disulfide bonding pattern [4] |
Applications in Biopharmaceutical Development
Purity Analysis of Therapeutic Proteins
SDS-PAGE provides critical purity assessment for recombinant proteins, monoclonal antibodies, and other biologics. The technique effectively detects host cell proteins, protein fragments, and process-related impurities that may compromise product safety [4]. In reduced SDS-PAGE, antibody heavy and light chains separate distinctly, allowing verification of correct subunit composition and detection of incomplete synthesis or processing [4]. Densitometric analysis of Coomassie or silver-stained gels quantifies the percentage of target protein relative to total protein content, with premium-grade therapeutics typically exceeding 95% purity [4].
Stability Testing and Shelf-Life Determination
Accelerated stability studies employing SDS-PAGE monitor degradation products formed under various stress conditions, including temperature, pH, and light exposure [4]. Fragmentation patterns indicate proteolytic cleavage, while increased high-molecular-weight smearing suggests aggregation. Forced degradation studies establish degradation pathways and identify optimal formulation conditions that minimize instability. These studies provide essential data for determining recommended storage conditions and establishing product shelf-life [4].
Demonstrating Manufacturing Consistency
Comparative analysis of multiple manufacturing lots by SDS-PAGE verifies process consistency and product homogeneity [4]. The technique confirms that fermentation, purification, and formulation processes consistently produce biopharmaceuticals with identical electrophoretic profiles, ensuring uniform safety and efficacy across product batches. Regulatory submissions require this demonstration of manufacturing control for marketing approval [4].
Methodological Variations and Advanced Applications
Specialized Electrophoresis Techniques
Different SDS-PAGE formats address specific analytical needs. Tricine-SDS-PAGE provides superior resolution for proteins and peptides below 30 kDa, making it valuable for analyzing fragment antigens or small therapeutic peptides [4]. Non-reducing SDS-PAGE preserves disulfide bonds, enabling assessment of correct cysteine pairing in folded proteins and detection of inappropriate interchain linkages [4]. Two-dimensional electrophoresis combining isoelectric focusing with SDS-PAGE offers enhanced resolution for characterizing complex protein mixtures, such as host cell protein contaminants [4].
Native SDS-PAGE for Metalloprotein Analysis
The NSDS-PAGE modification enables analysis of metalloproteins while maintaining bound metal ions and enzymatic activity [12]. By eliminating heating, reducing SDS concentration (0.0375% in running buffer), and removing EDTA and reducing agents, this approach preserves functional properties while maintaining high resolution [12]. Retention of Zn²⁺ increases from 26% with standard SDS-PAGE to 98% with NSDS-PAGE, allowing metalloenzyme analysis without metal stripping [12]. This technique is particularly valuable for characterizing metal-dependent biologics and enzyme therapeutics.
Emerging Technological Innovations
Lab-on-chip systems adapted from SDS-PAGE principles automate protein separation, detection, and analysis, significantly reducing analysis time and improving reproducibility [4]. These microfluidic platforms integrate sample preparation, separation, and detection, enabling rapid protein characterization with minimal sample requirements. When coupled with mass spectrometry, these advanced electrophoretic techniques provide comprehensive protein characterization, identifying post-translational modifications, degradation hotspots, and product variants critical to biopharmaceutical quality assessment [4].
SDS-PAGE remains an indispensable analytical tool in biopharmaceutical development, providing critical data on protein purity, stability, and manufacturing consistency. The technique's robust separation based on molecular weight, combined with appropriate detection methods, delivers essential information for quality control throughout the therapeutic lifecycle. Methodological adaptations, including native SDS-PAGE and lab-on-chip systems, continue to expand its applications while maintaining the core principle of molecular weight-based separation. As biopharmaceuticals grow more complex, SDS-PAGE methodology evolves to meet emerging characterization challenges, ensuring its continued relevance in developing safe and effective protein therapeutics.
Troubleshooting SDS-PAGE: Solving Common Issues for Publication-Quality Gels
Smeared bands in SDS-PAGE are a common issue that can obscure results and compromise data integrity. This guide examines the core principles of SDS-PAGE separation and provides a systematic troubleshooting approach focused on voltage, denaturation, and buffer factors.
How SDS-PAGE Separates Proteins by Molecular Weight
Sodium dodecyl sulfate-polyacrylamide gel electrophoresis (SDS-PAGE) separates proteins based almost exclusively on their molecular mass by exploiting the properties of SDS and a polyacrylamide gel matrix [32] [2] [47].
The process involves three key steps:
- Denaturation and Charge Masking: SDS, an anionic detergent, binds to hydrophobic regions of proteins at a ratio of approximately 1.4 g SDS per 1 g of protein. This binding disrupts nearly all non-covalent interactions, unfolds the protein into a linear chain, and confers a uniform negative charge that masks the protein's intrinsic charge [2] [47] [54].
- Molecular Sieving: The denatured, negatively charged protein complexes are loaded onto a polyacrylamide gel. When an electric field is applied, these complexes migrate toward the anode. The gel acts as a molecular sieve, where smaller proteins navigate the porous network more easily and migrate faster, while larger proteins are impeded and migrate more slowly [32] [47].
- The Discontinuous Buffer System: Most SDS-PAGE protocols use a discontinuous system with a stacking gel (pH ~6.8) and a resolving gel (pH ~8.8). In the stacking gel, a unique ion gradient forms, forcing all proteins into a sharply focused stack before they enter the resolving gel. Upon entering the higher-pH resolving gel, the proteins encounter a denser polyacrylamide matrix where the actual size-based separation occurs, resulting in sharp, discrete bands [2] [54].
Systematic Diagnosis of Smeared Bands
Smeared, fuzzy, or poorly resolved bands typically result from issues in one of three core areas: electrophoretic conditions, sample integrity and preparation, or buffer systems. The following diagram outlines a logical workflow for diagnosing the root cause.
Quantitative Troubleshooting and Experimental Protocols
Troubleshooting Data Table
The following table summarizes the primary causes of smeared bands and their specific solutions, incorporating quantitative data for precise optimization.
Table 1: Troubleshooting Smeared Bands in SDS-PAGE
| Causal Factor | Specific Issue | Recommended Solution | Quantitative Guidance |
|---|---|---|---|
| Electrophoretic Conditions | Voltage too high [55] [56] | Reduce voltage; use constant voltage mode. | Run at 10-15 V/cm of gel length [55] [57]. For mini-gels, start at 50-60V for stacking, then 100-150V for resolving [57] [22]. |
| Excessive heat generation [55] [57] | Implement cooling; increase run time. | Perform electrophoresis in a cold room or use an ice bath [55] [57]. | |
| Sample Denaturation | Incomplete denaturation/unfolding [58] | Optimize denaturation protocol. | Heat sample at 95°C for 5 minutes [2] [58]. |
| Insufficient reducing agent [22] | Add fresh reducing agents to sample buffer. | Use 5% (v/v) β-mercaptoethanol or 10-100 mM DTT [2] [22]. | |
| Protein aggregation or precipitation [56] | Centrifuge sample; add chaotropes. | Centrifuge sample at high speed post-denaturation [56]. Add 4-8 M urea to the sample buffer [56]. | |
| Buffer & Gel System | Incorrect buffer pH or concentration [55] [56] | Prepare fresh running buffer. | Standard Tris-glycine-SDS buffer, pH ~8.3 [2] [54]. |
| Old or contaminated buffer | Always use fresh buffer. | Discard buffer after a few uses. | |
| Gel concentration inappropriate for protein size | Adjust acrylamide percentage. | See Table 2 for detailed guidance. | |
| Sample Load & Purity | Protein overload [56] [58] | Reduce amount of protein loaded. | For Coomassie, 0.5-1 µg/band; for western, 10-100 ng/band [56]. |
| High salt concentration in sample [56] [22] | Desalt sample before loading. | Dialyze sample or use desalting columns; keep salt <500 mM [56] [22]. |
Gel Percentage Selection Protocol
Choosing the correct acrylamide concentration is fundamental for achieving optimal resolution and preventing smearing.
Table 2: Optimizing Acrylamide Concentration for Target Protein Size
| % Acrylamide | Effective Separation Range | Application Notes |
|---|---|---|
| 8% [22] | 25 - 200 kDa [22] | Ideal for high molecular weight proteins. Pore size is larger. |
| 10% [47] [22] | 15 - 100 kDa [47] | The standard and most common gel percentage. |
| 12% [47] [22] | 40 - 100 kDa [22] | Suitable for mid-range molecular weights. |
| 15% [22] | 10 - 50 kDa [22] | Best for low molecular weight proteins and peptides. |
| 4-20% Gradient [47] | 10 - 300 kDa (broad range) | Provides a large separation range in a single gel; excellent for complex or unknown samples. |
Experimental Protocol: Optimizing Sample Preparation to Prevent Smearing
- Sample Lysis and Extraction: Lyse cells or tissues in an appropriate buffer containing protease inhibitors to prevent degradation [22].
- Protein Quantification: Determine protein concentration using a colorimetric assay (e.g., Bradford, BCA) to ensure loading within the optimal detection range and avoid overloading [22].
- Denaturation Mix Preparation:
- Denaturation: Heat the mixture at 95°C for 5 minutes to ensure complete denaturation and unfolding of proteins [2] [58].
- Clarification: Briefly centrifuge the heated samples (e.g., 12,000-16,000 x g for 1 minute) to pellet any insoluble debris or aggregated protein [56].
- Loading: Carefully pipette the supernatant into the well, avoiding overfilling and the introduction of air bubbles [22].
The Scientist's Toolkit: Essential Research Reagents
Successful SDS-PAGE relies on a set of key reagents, each with a specific function in ensuring clear, sharp separations.
Table 3: Essential Reagents for SDS-PAGE
| Reagent | Function | Technical Notes |
|---|---|---|
| Sodium Dodecyl Sulfate (SDS) | Denatures proteins by disrupting non-covalent bonds; confers a uniform negative charge to polypeptides, masking intrinsic charge [47] [54]. | Ensure a sufficient excess is present in both sample and running buffer [58]. |
| Reducing Agents (DTT, β-Mercaptoethanol) | Breaks disulfide bonds between cysteine residues, ensuring complete protein unfolding into linear chains [2] [22]. | Must be fresh; degrades upon repeated freeze-thawing or exposure to air. |
| Polyacrylamide/Bis-Acrylamide | Forms the cross-linked gel matrix that acts as a molecular sieve for size-based separation [2]. | The ratio and total percentage determine pore size. |
| Tris-Glycine Buffer System | Provides the ions for conductivity and establishes the pH gradient essential for the discontinuous stacking effect [2] [54]. | Running buffer is typically pH 8.3; gel buffers are pH 6.8 (stacking) and 8.8 (resolving) [2] [54]. |
| Ammonium Persulfate (APS) & TEMED | Catalyzes the free-radical polymerization of acrylamide and bis-acrylamide to form a stable gel [2]. | TEMED should be added last. Incomplete polymerization leads to poor resolution. |
| Molecular Weight Marker | Contains proteins of known sizes, allowing estimation of the molecular weight of unknown proteins and monitoring of run progress [32] [22]. | Pre-stained markers allow real-time tracking. |
Smeared bands in SDS-PAGE are rarely an unsolvable mystery. By understanding the core principles of how SDS-PAGE separates proteins and methodically investigating the three pillars of electrophoretic conditions, sample denaturation, and buffer systems, researchers can reliably diagnose and resolve the issue. Adhering to quantitative best practices for voltage, gel percentage, and sample preparation is the most effective strategy for achieving the sharp, high-resolution bands essential for accurate protein analysis.
Sodium Dodecyl Sulfate-Polyacrylamide Gel Electrophoresis (SDS-PAGE) is a foundational technique in biochemical research that separates proteins based primarily on their molecular weight. This process relies on the anionic detergent SDS, which denatures proteins by unfolding their secondary and tertiary structures and binds to the protein backbone at a constant ratio, imparting a uniform negative charge that masks the proteins' intrinsic charge [20] [59] [2]. When an electric field is applied, these SDS-coated proteins migrate through a polyacrylamide gel matrix toward the anode, with smaller proteins moving faster through the gel's pores while larger proteins encounter greater resistance and migrate more slowly [20] [22] [47]. This size-dependent separation enables researchers to estimate molecular weights, assess sample purity, and analyze protein composition for downstream applications including western blotting and mass spectrometry [47].
The discontinuous buffer system, pioneered by Laemmli, enhances separation resolution by incorporating both stacking and resolving gels with different pH and pore sizes [2] [47]. This system creates a stacking effect that concentrates proteins into sharp bands before they enter the resolving gel, leading to significantly improved separation [59] [2]. Understanding these fundamental principles provides the necessary context for addressing the central challenge of poor or no separation in SDS-PAGE, which often stems from suboptimal gel composition and electrophoresis run conditions.
Core Factors Affecting Separation Resolution
Gel Composition and Pore Size
The polyacrylamide gel serves as a molecular sieve, with its pore size directly determined by the acrylamide concentration. Selecting the appropriate gel percentage is crucial for effective separation of target proteins within specific molecular weight ranges.
Table 1: Optimal Acrylamide Concentrations for Protein Separation
| Acrylamide Percentage | Effective Separation Range | Application Focus |
|---|---|---|
| 15% | 10–50 kDa | Small proteins |
| 12% | 40–100 kDa | Medium-sized proteins |
| 10% | 70 kDa and above | Large proteins |
| 8% | 25–200 kDa | Broad range |
| 4–20% Gradient | 10–300 kDa | Wide molecular weight range |
Higher percentage gels (e.g., 15%) create smaller pores that better resolve low molecular weight proteins, while lower percentage gels (e.g., 8%) with larger pores are more suitable for high molecular weight proteins [22] [47]. Gradient gels, which contain a continuous increase in acrylamide concentration (e.g., from 4% to 12% or 4% to 20%), provide an extended separation range for complex protein mixtures with diverse molecular weights by creating a pore size gradient that optimally resolves proteins of different sizes simultaneously [20] [2] [47].
Electrophoresis Conditions
Optimal electrophoresis conditions are essential for achieving high-resolution protein separation while maintaining band sharpness and integrity.
Voltage and Run Time: Standard SDS-PAGE is typically run at constant voltage between 100–150 V for 40–60 minutes, or until the dye front (usually bromophenol blue) reaches the bottom of the gel [20] [47]. Excessive voltage can generate significant Joule heat, leading to band distortion "smiling" or "frowning" effects and potential protein degradation, while insufficient voltage prolongs run time and may cause band diffusion [22] [47]. Recent advancements have demonstrated that optimized buffer systems can enable faster runs at higher voltages (200 V) without excessive heat generation, significantly reducing separation time to approximately 35 minutes [60].
Buffer Systems: The traditional Tris-glycine running buffer (25 mM Tris, 192 mM glycine, 0.1% SDS, pH 8.3) works well for most applications but has limitations in resolving very small proteins (<15 kDa) [60] [59] [2]. Alternative buffer systems offer improved performance for specific applications. Tris-tricine buffers provide superior resolution of low molecular weight proteins and peptides (0.5–50 kDa) but are less effective for large proteins (>100 kDa) [60] [2]. Novel composite buffers (e.g., Tris-Tricine-HEPES) enable gradient-like separation of both small (<10 kDa) and large (>400 kDa) proteins in single-percentage gels while significantly reducing running time [60].
Table 2: Buffer Systems for SDS-PAGE
| Buffer System | Separation Range | Advantages | Limitations |
|---|---|---|---|
| Tris-Glycine (Laemmli) | 15–250 kDa | Standard protocol, low cost | Poor resolution of small proteins (<15 kDa), long run times |
| Tris-Tricine | 0.5–50 kDa | Excellent for small proteins/peptides | Poor for large proteins (>100 kDa) |
| Tris-Tricine-HEPES (FRB) | <10–450 kDa | Wide range, fast separation (35 min) | Non-standard protocol requires optimization |
Experimental Protocols for Optimization
Gel Casting and Composition Optimization
Protocol for Hand-Casting Discontinuous Polyacrylamide Gels:
Assemble gel casting apparatus: Thoroughly clean glass plates with ethanol and assemble with spacers (typically 0.75 mm or 1.5 mm thickness) [20] [2].
Prepare resolving gel solution: Mix acrylamide/bis-acrylamide solution (at desired concentration), Tris-HCl (pH 8.8), SDS, and deionized water. Add ammonium persulfate (APS) and TEMED to initiate polymerization, then immediately pour the solution between glass plates, leaving space for the stacking gel [20] [2].
Overlay with solvent: Carefully layer water-saturated butanol or isopropanol over the resolving gel to exclude oxygen and ensure a flat meniscus. Allow complete polymerization (20–30 minutes) [20] [2].
Prepare and pour stacking gel: After removing the overlay solution, prepare stacking gel solution (lower acrylamide concentration, Tris-HCl pH 6.8). Add APS and TEMED, pour over the polymerized resolving gel, and immediately insert a clean comb without trapping air bubbles. Allow to polymerize completely (15–20 minutes) [20] [2].
Optimization Notes: For gradient gels, use a gradient mixer to create a continuous transition between low and high acrylamide concentrations [2]. For proteins with known post-translational modifications (e.g., glycosylation), consider increasing SDS concentration in the sample buffer to ensure complete denaturation and uniform charge distribution [59].
Electrophoresis Run Condition Optimization
Standard Protocol with Optimization Parameters:
Sample preparation: Mix protein samples with SDS-PAGE sample buffer (typically containing Tris-HCl, SDS, glycerol, bromophenol blue, and reducing agents like β-mercaptoethanol or DTT). Heat denature at 95–100°C for 3–5 minutes to ensure complete denaturation [20] [2] [47].
Apparatus setup: Mount the polymerized gel in the electrophoresis chamber and fill both upper and lower chambers with running buffer. Remove air bubbles from wells using a syringe [20].
Sample loading: Centrifuge denatured samples briefly and load equal amounts of protein (typically 10–50 μg) into wells. Include molecular weight markers in at least one well [20] [22].
Electrophoresis: Apply constant voltage appropriate for gel size. For mini-gels (8 × 10 cm), 100–150 V for 40–60 minutes is standard. Run until the dye front reaches approximately 1 cm from the bottom edge [20] [47].
Fast-Run Optimization: For rapid separation without compromising resolution, use novel buffer systems (e.g., Tris-Tricine-HEPES) with the following conditions: 150 V for 15 minutes followed by 200 V for 20 minutes (total 35 minutes) [60]. Ensure adequate cooling when running at higher voltages to prevent heat-related artifacts.
Figure 1: SDS-PAGE Optimization Workflow. This diagram outlines a systematic approach to troubleshooting poor or no separation in SDS-PAGE experiments.
Advanced Techniques and Methodological Variations
Native SDS-PAGE for Functional Analysis
Standard SDS-PAGE completely denatures proteins, destroying functional properties including enzymatic activity and non-covalently bound cofactors [12]. Native SDS-PAGE (NSDS-PAGE) is a modified approach that preserves protein function while maintaining high resolution separation. Key modifications include:
- Sample buffer: Omission of SDS and EDTA, exclusion of heating step [12]
- Running buffer: Reduced SDS concentration (0.0375% instead of 0.1%) without EDTA [12]
- Benefits: Retains Zn²⁺ bound in proteomic samples (increase from 26% to 98% compared to standard SDS-PAGE) and preserves enzymatic activity in most model enzymes [12]
This method is particularly valuable for metalloprotein analysis and functional studies where maintaining protein activity post-electrophoresis is essential [12].
Two-Dimensional Electrophoresis
For extremely complex protein mixtures, two-dimensional electrophoresis (2-DE) provides enhanced separation by combining isoelectric focusing (IEF) with SDS-PAGE [47]. Proteins are first separated based on their isoelectric point in the first dimension, followed by molecular weight separation in the second dimension SDS-PAGE [47]. This technique enables resolution of thousands of proteins in a single gel and is particularly valuable for proteomic studies, analysis of post-translational modifications, and biomarker discovery [47].
The Scientist's Toolkit: Essential Reagents and Materials
Table 3: Essential Research Reagents for SDS-PAGE Optimization
| Reagent/Material | Function | Optimization Notes |
|---|---|---|
| Acrylamide/Bis-acrylamide | Forms porous gel matrix | Ratio (typically 37.5:1) and concentration determine pore size |
| SDS (Sodium Dodecyl Sulfate) | Denatures proteins and confers negative charge | Ensure fresh preparation; critical micelle concentration ~7-10 mM [2] |
| Tris buffers | Maintain pH in stacking (pH 6.8) and resolving (pH 8.8) gels | Quality affects polymerization and resolution |
| Ammonium Persulfate (APS) & TEMED | Polymerization catalysts | Freshness affects gel polymerization quality |
| Glycine | Trailing ion in discontinuous system | Mobility changes with pH enable stacking effect [59] [2] |
| Alternative buffers (Tricine, HEPES) | Enhanced resolution for specific applications | Tricine for small proteins, composite buffers for wide range [60] |
| Reducing agents (β-mercaptoethanol, DTT) | Breaks disulfide bonds | Fresh addition essential for complete denaturation |
| Molecular weight markers | Size calibration | Include in every gel for accurate molecular weight determination |
Troubleshooting Common Separation Issues
Poor separation in SDS-PAGE manifests in various forms, each with distinct causes and solutions:
Smiling or frowning bands: Caused by uneven heating across the gel. Ensure proper buffer composition, run at appropriate voltage, and confirm even current distribution [22] [47].
Smeared bands: Often results from incomplete denaturation. Add fresh reducing agent to sample buffer, ensure adequate heating (95–100°C for 5 minutes), and reduce salt concentrations (<500 mM) [22] [47].
Incomplete separation: May stem from insufficient run time, incorrect acrylamide concentration, or improper buffer preparation. Allow sufficient run time, adjust acrylamide percentage for target protein size, and verify buffer composition [47].
Multiple or unexpected bands: Can indicate protein degradation, modification, or incomplete reduction. Use protease inhibitors, include phosphatase inhibitors if needed, and ensure fresh reducing agents in sample buffer [22].
Figure 2: SDS-PAGE Separation Principle and Optimization Levers. This diagram illustrates the core mechanism of SDS-PAGE separation and identifies key factors that can be optimized to improve results.
Optimal protein separation in SDS-PAGE requires systematic optimization of both gel composition and run conditions tailored to the specific characteristics of the target proteins. The acrylamide concentration fundamentally determines the separation range, while buffer selection and electrophoresis parameters fine-tune resolution and band sharpness. By understanding the principles of discontinuous gel electrophoresis and methodically addressing common separation issues through the protocols and troubleshooting guides presented, researchers can achieve reliable, high-resolution results across diverse applications from basic research to drug development. Continuous methodological advancements, including novel buffer systems and modified protocols like native SDS-PAGE, further expand the utility of this fundamental technique in modern protein science.
Sodium Dodecyl Sulfate-Polyacrylamide Gel Electrophoresis (SDS-PAGE) is a foundational technique in biochemistry and molecular biology, enabling the separation of proteins based almost exclusively on their molecular weight. [61] [2] The principle relies on the detergent SDS binding to and denaturing proteins, conferring a uniform negative charge, and the sieving properties of the polyacrylamide gel, which retards the migration of larger molecules more than smaller ones. [61] [62] [2] However, the integrity of this size-based separation can be compromised by artifacts that distort protein bands, leading to misinterpretation and unreliable data. Among the most common of these are 'smiling' bands, edge effects, and sample leakage. This guide details the origins and provides systematic solutions for these issues, ensuring the high-resolution data required by researchers and drug development professionals.
The Core Principle of SDS-PAGE: A Molecular Sieve
For SDS-PAGE to accurately separate proteins by molecular weight, two key conditions must be met. First, the protein's intrinsic charge must be masked. This is achieved by SDS, which binds to proteins in a constant ratio, approximately 1.4 g of SDS per 1.0 g of protein, overwhelming the protein's native charge and giving all proteins a similar charge-to-mass ratio. [61] [2] Second, proteins must be denatured into linear polypeptides. This is accomplished by combining SDS with heat and reducing agents like β-mercaptoethanol (BME) or dithiothreitol (DTT), which break disulfide bonds. [61] When these conditions are met, proteins migrate through the polyacrylamide gel matrix towards the anode under an electric field, with smaller proteins moving faster and larger ones moving slower, resulting in separation by size. [61] [2]
The following diagram illustrates the key stages of the SDS-PAGE workflow and the primary causes of the artifacts discussed in this guide:
Artifact 1: 'Smiling' Bands
Problem Definition and Causes
'Smiling' bands, characterized by an upward curvature where bands at the edges of the gel migrate slower than those in the center, are primarily a result of uneven heat distribution across the gel. [63] [64] This phenomenon, known as Joule heating, occurs when the electrical resistance of the gel generates heat. The center of the gel often becomes hotter than the edges, causing the samples in the middle lanes to migrate faster due to reduced buffer viscosity and increased ion mobility, creating the characteristic "smile." [64] This effect is exacerbated by running the gel at high voltages. [63]
Experimental Protocols for Resolution
Resolving smiling bands involves protocols aimed at ensuring uniform thermal conditions during electrophoresis.
- Protocol 1: Optimizing Electrophoresis Conditions: Run the gel at a lower voltage (e.g., 10-15 V/cm of gel length) for a longer duration. [63] This reduces the overall heat generated. Alternatively, use a power supply with a constant current mode, which helps maintain a more uniform temperature. [64]
- Protocol 2: Active Heat Dissipation: Perform the electrophoresis run in a cold room (4°C) or submerge the gel apparatus in an ice-water bath. [63] Some gel tanks are designed with cooling coils; ensure coolant is circulating if this feature is available.
- Protocol 3: Buffer Level Verification: Before starting the run, confirm that the buffer level is even across the entire gel tank and that the gel is properly submerged. An uneven buffer level can contribute to uneven current and heat distribution. [64]
Table 1: Troubleshooting 'Smiling' Bands
| Cause | Specific Effect | Solution | Preventative Measure |
|---|---|---|---|
| High Voltage | Increases Joule heating, causing the gel center to overheat. | Reduce voltage by 25-50%. [56] [63] | Use standard voltage (e.g., 150V for mini-gels) and extend run time. [63] |
| Inadequate Cooling | Prevents dissipation of generated heat, leading to thermal gradients. | Run gel in a cold room or with external cooling. [63] | Use a dedicated gel cooling system or lower ambient temperature. |
| Incorrect Buffer | Altered ionic strength can affect system resistance and heating. | Prepare fresh running buffer at the correct concentration. [64] | Aliquot buffer stocks to avoid contamination and degradation. |
Artifact 2: Edge Effects
Problem Definition and Causes
Edge effects manifest as distorted, wavy, or skewed protein bands specifically in the outermost lanes of the gel (typically the first and last lanes). [63] The primary cause is an uneven electric field across the gel, which occurs when the peripheral lanes, especially empty wells, experience a different electrical resistance compared to the inner, sample-filled lanes. [63] This distortion can compromise the accuracy of molecular weight estimation and quantitative analysis for samples in these lanes.
Experimental Protocols for Resolution
The following protocols are designed to create a homogeneous electric field.
- Protocol 1: Loading All Wells: Never leave peripheral wells empty. [63] If you have fewer samples than wells, load the unused wells, particularly those on the far left and right, with a dummy sample. This can be 1X Laemmli buffer, a control protein lysate, or a second loading of your protein ladder. [63]
- Protocol 2: Gel Apparatus Setup: Ensure the gel cassette is properly seated in the tank and that the electrodes are straight and clean. Crooked electrodes can create an uneven electric field from the outset. [64]
- Protocol 3: Sample Salt Concentration Check: While not the sole cause of edge effects, samples with very high salt concentrations can create local regions of high conductivity, distorting neighboring lanes. [64] If this is suspected, dialyze the sample or use a desalting column before loading. [56]
Table 2: Troubleshooting Edge Effects
| Cause | Specific Effect | Solution | Preventative Measure |
|---|---|---|---|
| Empty Peripheral Wells | Creates a path of lower resistance for current at the edges, distorting the electric field. | Load all unused wells with Laemmli buffer or a control protein. [63] | Plan experiments to use a full gel or always include dummy loads. |
| High Salt in Samples | Increases local conductivity, bending the electric field and affecting migration in adjacent lanes. | Desalt samples using dialysis, precipitation, or a desalting column. [56] [64] | Ensure sample buffers are prepared correctly without excess salt. |
| Misaligned Electrodes | Creates an inherently uneven electric field across the entire gel. | Check and straighten electrodes in the tank before use. [64] | Perform a visual inspection of the apparatus during setup. |
Artifact 3: Sample Leakage
Problem Definition and Causes
Sample leakage refers to the unintended diffusion of protein samples out of the wells and into the surrounding buffer or gel before the electric current is applied. This results in lost sample, faint or missing bands, and smeared lanes. [65] The main causes are an insufficient density of the loaded sample and delays between loading and starting the electrophoresis. [63] [65] Without an electric current to pull proteins into the gel, they will diffuse freely.
Experimental Protocols for Resolution
These protocols focus on securing the sample within the well until electrophoresis begins.
- Protocol 1: Optimizing Sample Buffer Density: The sample loading buffer (Laemmli buffer) must contain a sufficient concentration of glycerol or sucrose (typically 10-20%) to increase the density of the sample mixture. This ensures the sample sinks to the bottom of the well and remains there. [65] [62] If leakage is observed, check and increase the glycerol concentration in your loading buffer.
- Protocol 2: Minimizing Load-to-Run Delay: Start the electrophoresis run immediately after loading the final sample. [63] The electric current creates a cohesive force that prevents diffusion. If working with a large gel with many wells, load quickly and methodically to minimize the time the first-loaded samples sit idle.
- Protocol 3: Proper Well Preparation and Loading Technique: Before loading samples, rinse the wells gently with running buffer using a syringe or pipette to remove potential air bubbles that can displace samples. [65] When loading, be careful not to overfill the wells; do not exceed 3/4 of the well's capacity, and try to load equal volumes across all wells. [65]
Table 3: Troubleshooting Sample Leakage
| Cause | Specific Effect | Solution | Preventative Measure |
|---|---|---|---|
| Insufficient Glycerol | Sample does not sink or is easily displaced by buffer, leading to diffusion. | Increase glycerol concentration in the sample loading buffer. [65] | Verify the recipe of stock Laemmli buffer and prepare fresh if needed. |
| Delay Before Running | Proteins diffuse out of the well haphazardly without an electric field to direct them. | Start electrophoresis immediately after loading the last well. [63] | Organize all samples and equipment before beginning to load. |
| Air Bubbles in Wells | Physically displaces sample from the well during or after loading. | Rinse wells with running buffer to remove bubbles prior to loading. [65] | Use a fine gel-loading tip and pipette carefully when loading. |
The Scientist's Toolkit: Essential Reagents and Materials
The following table details key reagents used in SDS-PAGE, with their critical functions in ensuring successful protein separation and artifact prevention.
Table 4: Key Research Reagent Solutions for SDS-PAGE
| Reagent/Material | Function | Technical Note |
|---|---|---|
| Sodium Dodecyl Sulfate (SDS) | Denatures proteins and confers a uniform negative charge. [61] [62] | Use a high-purity grade. Critical for neutralizing intrinsic protein charge. |
| Acrylamide/Bis-acrylamide | Forms the cross-linked polyacrylamide gel matrix that acts as a molecular sieve. [61] | The ratio of bisacrylamide (cross-linker) to acrylamide determines gel porosity. [61] |
| TEMED & Ammonium Persulfate (APS) | Catalyzes the free-radical polymerization of acrylamide. [61] [2] | TEMED and APS must be fresh for rapid and consistent gel polymerization. [56] |
| β-Mercaptoethanol (BME) / Dithiothreitol (DTT) | Reducing agents that break disulfide bonds in proteins, aiding complete denaturation. [61] | DTT is often preferred over BME due to its lower odor and higher efficiency. [61] |
| Tris-Glycine Buffer | The standard discontinuous buffer system. Glycine's charge state is key to the stacking effect. [62] [2] | The pH difference between stacking (pH 6.8) and resolving (pH 8.8) gels is crucial. [62] |
| Laemmli Sample Buffer | Contains SDS, reducing agent, glycerol, and tracking dye to prepare samples for loading. [62] | The glycerol provides density; the dye allows visualization of migration. [65] [62] |
Within the framework of protein research, the reliability of SDS-PAGE as a tool for molecular weight determination is paramount. Artifacts like smiling bands, edge effects, and sample leakage are not merely cosmetic issues; they are symptoms of underlying physical and chemical imbalances that can directly compromise data integrity. By understanding the root causes—Joule heating, an uneven electric field, and sample diffusion—researchers can implement the detailed experimental protocols provided herein. A rigorous, systematic approach to troubleshooting, combined with the use of high-quality, properly prepared reagents as outlined in the "Scientist's Toolkit," is essential for achieving the reproducible, high-resolution protein separation required to advance scientific discovery and drug development.
In molecular weight-based protein separation using sodium dodecyl sulfate-polyacrylamide gel electrophoresis (SDS-PAGE), optimizing protein load is a critical prerequisite for obtaining reliable, interpretable results. SDS-PAGE separates proteins primarily by molecular size under denaturing conditions, with smaller proteins migrating faster through the polyacrylamide gel matrix than larger ones [32] [2]. This process relies on SDS binding to proteins at a ratio of approximately 1.4 grams of SDS per gram of protein, which linearizes the proteins and confers a uniform negative charge, effectively masking inherent charge differences [2] [6]. However, this sophisticated separation mechanism can be compromised by improper protein loading, leading to artifacts that obscure data interpretation and jeopardize experimental outcomes.
Within the broader thesis of how SDS-PAGE separates proteins based on molecular weight, load optimization represents a fundamental practical consideration that directly impacts separation quality. Both overloading and aggregation disrupt the precise size-dependent migration mechanism, introducing variables that confound the relationship between molecular weight and migration distance. This technical guide provides researchers, scientists, and drug development professionals with evidence-based strategies for determining optimal protein loads, preventing aggregation artifacts, and troubleshooting common issues, thereby ensuring the technique's full separation potential is realized.
Foundational Principles: How SDS-PAGE Separates Proteins by Molecular Weight
The SDS-PAGE Separation Mechanism
The SDS-PAGE technique employs a discontinuous system consisting of stacking and resolving gel layers with different pore sizes and pH values [2] [6]. The stacking gel (typically pH 6.8) with lower acrylamide concentration (∼5%) concentrates protein samples into sharp bands before they enter the resolving gel (typically pH 8.8) with higher acrylamide concentration (10-15%) where actual separation occurs [66] [6]. During electrophoresis, an electric field is applied, causing the negatively charged SDS-protein complexes to migrate toward the anode [32] [66].
The polyacrylamide gel matrix acts as a molecular sieve, with pore sizes determined by the concentration of acrylamide and bisacrylamide cross-linkers [22] [67]. Smaller proteins navigate these pores more easily and migrate faster, while larger proteins encounter more resistance and migrate more slowly [32] [22]. This results in proteins being separated virtually exclusively by molecular size, with the distance traveled inversely proportional to the logarithm of their molecular mass [2] [6].
Impact of Improper Protein Load on Separation Quality
When protein loads exceed the gel's capacity, the fundamental separation mechanism becomes compromised. Overloaded wells cause proteins to spill into adjacent lanes, creating distorted migration patterns and inaccurate molecular weight determinations [22]. Excessive protein concentration promotes aggregation despite the presence of SDS, leading to high molecular weight complexes that migrate anomalously or become trapped in the well [22] [6]. These artifacts directly contradict the technique's principle of size-based separation, as proteins no longer migrate according to their individual molecular weights but rather as complex aggregates.
Furthermore, overloading produces broad, smeared bands that lack the sharp resolution required for accurate analysis [22] [6]. This prevents clear separation between proteins of similar molecular weights and complicates downstream applications like western blotting, where transfer efficiency depends on well-resolved bands [22]. Insufficient protein loading presents the opposite problem—faint bands that are difficult to detect and quantify, though this is generally less detrimental than overloading [22].
Quantitative Guidelines for Optimal Protein Loading
Protein Load Recommendations by Detection Method
The optimal protein load varies significantly depending on the detection method employed post-electrophoresis. The following table summarizes recommended loading ranges for common applications:
| Detection Method | Recommended Load | Key Considerations | Primary Application |
|---|---|---|---|
| Coomassie Staining [6] | 20–50 μg/well | Sufficient for visual detection without saturation; ideal for abundance assessment. | General protein separation, purity analysis |
| Silver Staining [6] | 1–10 μg/well | High sensitivity requires minimal load; overloading causes saturation and smearing. | Low-abundance protein detection |
| Western Blotting [22] | Variable (titer required) | Depends on target abundance and antibody affinity; must avoid transfer saturation. | Specific antigen detection |
These values serve as starting points for optimization, as ideal loading conditions may vary based on specific protein characteristics, sample complexity, and experimental objectives.
Gel Concentration Selection Based on Protein Size
The appropriate acrylamide concentration directly impacts resolution for different molecular weight ranges. The table below provides guidelines for matching gel percentage with target protein sizes:
| Protein MW Range | Recommended Gel Concentration | Separation Principle |
|---|---|---|
| 100–600 kDa [67] | 4% | Larger pores allow big proteins to enter and separate |
| 50–500 kDa [67] | 7% | Moderate pores for medium-large protein resolution |
| 30–300 kDa [67] | 10% | Standard concentration for common protein sizes |
| 10–200 kDa [67] | 12% | Smaller pores optimal for lower molecular weights |
| 3–100 kDa [67] | 15% | Very small pores retard migration of small proteins |
For proteins with a wide molecular weight range, gradient gels (e.g., 4-12% acrylamide) provide superior resolution across multiple size classes [22]. The gradient creates progressively smaller pores, allowing both high and low molecular weight proteins to resolve effectively on the same gel [22].
Experimental Protocols for Sample Preparation and Quantification
Comprehensive Sample Preparation Protocol
Proper sample preparation is crucial for preventing aggregation and ensuring accurate migration. The following step-by-step protocol ensures optimal protein denaturation and charge uniformity:
- Step 1: Protein Extraction - Use appropriate lysis buffers compatible with downstream SDS-PAGE analysis. Maintain samples at 4°C during extraction to prevent proteolytic degradation [22].
- Step 2: Protein Quantification - Perform precise protein concentration measurement using Bradford, Lowry, or BCA assays [22] [68]. Always run standards in parallel with samples for accurate calibration.
- Step 3: Sample Buffer Preparation - Prepare 2× Laemmli buffer containing: 4% SDS, 20% glycerol, 0.004% bromophenol blue, 100 mM Tris-HCl (pH 6.8), and fresh 10% β-mercaptoethanol or 100 mM dithiothreitol (DTT) as reducing agent [2] [6].
- Step 4: Denaturation - Mix protein sample with equal volume of 2× Laemmli buffer. Heat at 95°C for 5 minutes (or 70°C for 10 minutes for heat-sensitive proteins) to ensure complete denaturation [2] [6].
- Step 5: Cooling and Centrifugation - Briefly cool samples on ice, then centrifuge at 12,000 × g for 1-2 minutes to pellet any insoluble material [6].
- Step 6: Loading - Load clear supernatant into gel wells, avoiding precipitation or bubbles. For uneven well loading, use colored loading buffers to visualize the process [22].
Protein Quantification via Densitometry
For precise quantification of resolved proteins, densitometric analysis of stained gels provides accurate measurement:
- Gel Staining: Use Coomassie Brilliant Blue or silver stain according to standard protocols [68] [6].
- Image Acquisition: Scan gels as grayscale images at 300-600 dpi resolution, saving as TIFF files to prevent compression artifacts [68].
- Densitometric Analysis: Utilize ImageJ/Fiji software with either the Gel Analyzer method (generates lane profiles and integrates peak areas) or Static ROI method (measures mean gray value of fixed regions) [68].
- Calibration Curve: Include BSA standards of known concentrations (e.g., 100, 250, 500 ng) to create a standard curve for converting band intensity to protein amount [68].
- Background Subtraction: Measure adjacent gel areas without bands and subtract this background value from band measurements [68].
This protocol enables researchers to not only optimize initial loading but also precisely quantify results for publication-quality data.
Troubleshooting Common Loading and Aggregation Issues
Problem Identification and Resolution Strategies
The following table outlines common artifacts related to protein loading and aggregation, along with their causes and solutions:
| Issue & Visual Signs | Primary Causes | Recommended Solutions |
|---|---|---|
| Smearing/Streaking [6] | Incomplete denaturation, protein degradation | Extend boiling time to 5-10 min at 95°C; add fresh protease inhibitors [22] [6] |
| Protein Aggregation (trapped in well) [22] | Insufficient reduction, improper SDS binding | Use fresh DTT (10-100 mM) or β-mercaptoethanol; ensure SDS excess in buffer [2] [22] |
| Vertical Streaks [6] | Air bubbles in gel, particulate matter | Degas gel solution before polymerization; centrifuge samples before loading [6] |
| "Smiling" Bands (curved upward) [22] | Buffer heating, incorrect voltage | Run gel at lower voltage; use cooling apparatus; check buffer composition [22] |
| Weak/Faint Bands [22] | Protein concentration too low | Confirm quantification assay accuracy; increase load within linear range [22] [68] |
| Multiple/Unexpected Bands [22] | Protein degradation, modification | Add protease/phosphatase inhibitors; include sodium azide to prevent microbial growth [22] |
Advanced Aggregation Prevention Techniques
For proteins prone to aggregation despite standard denaturation protocols:
- Alternative Denaturants: Incorporate 8M urea or 4M guanidine hydrochloride into sample buffer for difficult-to-denature proteins [22].
- Solubilization Enhancement: Include chaotropic agents or additional detergents (e.g., 0.5% sodium deoxycholate) for membrane proteins [22].
- Non-reducing Conditions: For analyzing disulfide-linked complexes, omit reducing agents but maintain SDS for denaturation [4].
- Sequential Extraction: For complex samples, use sequential extraction protocols to separate soluble and insoluble protein fractions [69].
The Scientist's Toolkit: Essential Research Reagents
| Reagent/Category | Function | Technical Specifications |
|---|---|---|
| SDS (Sodium Dodecyl Sulfate) [2] [66] | Denatures proteins; confers uniform negative charge | ~1.4g SDS binds/1g protein; use 0.1-1% in buffers |
| Reducing Agents (DTT, β-mercaptoethanol) [2] [6] | Breaks disulfide bonds; completes unfolding | 10-100 mM DTT; 5% β-mercaptoethanol |
| Acrylamide/Bis-acrylamide [2] [6] | Forms porous gel matrix for separation | 29:1 or 37.5:1 acrylamide:bis ratio; 5-15% total concentration |
| APS & TEMED [2] [6] | Catalyzes acrylamide polymerization | 0.1% APS; 0.01-0.1% TEMED; prepare fresh |
| Tris-Glycine Buffer [2] [66] | Running buffer for electrophoretic mobility | 25mM Tris, 192mM glycine, 0.1% SDS, pH 8.3 |
| Laemmli Buffer [66] [6] | Sample preparation; ensures denaturation | 62.5mM Tris-HCl (pH 6.8), 2% SDS, 10% glycerol, 0.01% bromophenol blue |
| Protein Ladders [32] [22] | Molecular weight calibration | Pre-stained or unstained; cover target MW range |
| Protease Inhibitors [22] | Prevents protein degradation | Cocktail tablets or solution; add fresh to samples |
Workflow Visualization: Optimized SDS-PAGE Experimental Process
The following diagram illustrates the integrated workflow for optimal protein load preparation and SDS-PAGE analysis:
This workflow integrates the critical optimization steps discussed throughout this guide, providing researchers with a systematic approach to avoid overloading and aggregation artifacts while maximizing separation quality.
Optimizing protein load in SDS-PAGE represents a critical intersection between theoretical principles and practical execution in molecular weight-based protein separation. By understanding the capacity limits of gel systems, implementing rigorous sample preparation protocols, and applying appropriate troubleshooting strategies, researchers can avoid the pitfalls of overloading and aggregation that compromise separation quality. The methodologies outlined in this guide provide a comprehensive framework for obtaining reliable, reproducible protein separation that accurately reflects the molecular weight-based separation mechanism fundamental to SDS-PAGE technology. As electrophoretic techniques continue to evolve alongside applications in drug development and diagnostic research, these core principles of load optimization remain essential for generating high-quality data and advancing scientific discovery.
Sodium Dodecyl Sulfate-Polyacrylamide Gel Electrophoresis (SDS-PAGE) remains a cornerstone technique in molecular biology and proteomics, enabling the separation of proteins based primarily on their molecular weight [2]. The principle that underpins this method is seemingly straightforward: proteins are denatured and coated with the anionic detergent SDS, imparting a uniform negative charge that allows separation through a polyacrylamide gel matrix under an electric field to be determined by size alone [70] [6]. However, beneath this apparent simplicity lies a complex biochemical process that demands meticulous attention to experimental conditions. The reproducibility of SDS-PAGE results is not guaranteed; it hinges critically on the quality of reagents and the precision of gel polymerization [71] [6]. For researchers in drug development and protein research, where quantitative and qualitative analyses form the basis for critical decisions, inconsistent results can derail projects and invalidate conclusions. This technical guide examines the foundational elements that govern SDS-PAGE reproducibility, focusing on the often-overlooked factors of reagent stability and polymerization chemistry, thereby providing a scientific framework for achieving consistent, reliable protein separation.
The Science of SDS-PAGE and Molecular Weight Separation
To appreciate the critical nature of reagents and polymerization, one must first understand the mechanistic basis of SDS-PAGE. The separation process relies on two key phenomena: the uniform charge conferral by SDS and the molecular sieving effect of the polyacrylamide gel.
Protein Denaturation and Charge Uniformity: SDS is a powerful anionic detergent that binds to hydrophobic regions of proteins, disrupting hydrogen bonds and van der Waals forces that maintain secondary and tertiary structures [70] [2]. When combined with reducing agents like β-mercaptoethanol or dithiothreitol (DTT) that cleave disulfide bonds, SDS linearizes proteins into rod-like shapes. It binds at a relatively constant ratio of approximately 1.4 g SDS per 1 g of protein, masking the protein's intrinsic charge and creating a uniform negative charge-to-mass ratio [6] [2]. This process neutralizes the influence of a protein's native charge, ensuring that migration through the gel depends almost entirely on molecular size.
Molecular Sieving in the Polyacrylamide Matrix: The polyacrylamide gel functions as a molecular sieve. It is formed through the copolymerization of acrylamide monomers and bisacrylamide cross-linkers, creating a porous network [6]. The pore size within this network is determined by the concentrations of both acrylamide and bisacrylamide [71]. When an electric field is applied, the negatively charged SDS-protein complexes migrate toward the anode. Smaller proteins navigate the porous matrix more easily and migrate farther, while larger proteins encounter more resistance and remain closer to the origin [22]. This size-dependent mobility allows for the estimation of molecular weight by comparing migration distances to those of standard proteins of known size.
The discontinuous buffer system, pioneered by Laemmli, further enhances resolution [2]. This system employs a stacking gel with a low acrylamide concentration (∼5%) and pH (6.8) layered atop a resolving gel with a higher acrylamide concentration (typically 8-15%) and pH (8.8) [70] [6]. The differing pH values manipulate the charge state of glycine ions in the running buffer, creating a transient state where proteins are concentrated into a sharp band before entering the resolving gel, thereby dramatically improving resolution [70] [2].
The Reagent Lifecycle: Stability, Degradation, and Impact on Reproducibility
The integrity of SDS-PAGE results is directly contingent upon the chemical stability of its reagents. Using compromised reagents introduces uncontrolled variables that manifest as failed experiments and irreproducible data.
Critical Reagents and Their Degradation Pathways
Table 1: Stability and Storage Guidelines for Key SDS-PAGE Reagents
| Reagent | Primary Function | Degradation Signs | Impact on Separation | Storage & Stability |
|---|---|---|---|---|
| Ammonium Persulfate (APS) | Free radical initiator for polymerization [6] | Failed or slow gel polymerization; soft, uneven gels [6] | Poorly formed gels leading to distorted protein bands [71] | Make fresh weekly; store 10% solution at 4°C [71] [6] |
| Acrylamide/Bis-acrylamide | Monomer and cross-linker for gel matrix [6] | Gel does not polymerize; hydrolysis over time changes polymerization efficiency | Altered pore size, affecting protein migration and molecular weight calibration [22] | Store in dark at room temperature; stable for months [71] |
| TEMED | Catalyst that stabilizes radical formation [6] | Failed or slow gel polymerization | Same as APS degradation | Store at 4°C; stable for months if protected from air [71] |
| SDS (Sodium Dodecyl Sulfate) | Denatures proteins and confers negative charge [2] | Precipitation at low temperatures; microbial growth | Incomplete denaturation and variable charge, causing aberrant migration [22] | Room temperature; 20% stock solution is stable |
| Reducing Agents (DTT, BME) | Cleaves disulfide bonds [2] | Oxidation leading to loss of reducing power | Incomplete unfolding, protein aggregation, and smeared bands [22] | Aliquot and store at -20°C; add fresh to sample buffer |
The Polymerization Reaction: A Delicate Balance
The creation of a consistent and uniform polyacrylamide gel is a critical foundational step. The polymerization reaction is a vinyl addition catalyzed by ammonium persulfate (APS) and tetramethylethylenediamine (TEMED) [6]. APS decomposes in water to yield sulfate free radicals, while TEMED accelerates this decomposition and stabilizes the radical chain reaction [71]. These radicals initiate the polymerization of acrylamide monomers into long chains, which are cross-linked by bisacrylamide into a three-dimensional mesh.
The freshness of APS is paramount. As a 10% solution in water, it has a limited lifespan due to the spontaneous decomposition of the persulfate ion. Degraded APS results in a reduced concentration of free radicals, leading to incomplete polymerization. This produces gels that are soft, uneven, and prone to distortion during electrophoresis, ultimately causing skewed migration and poor band resolution [6]. TEMED is also hygroscopic and volatile; exposure to air can diminish its efficacy, making it another potential point of failure.
Furthermore, the ratio of acrylamide to bisacrylamide determines the gel's pore structure. Over time, acrylamide solutions can hydrolyze, converting into acrylic acid. This chemical change alters the polymerization dynamics and the final structure of the gel, directly impacting its sieving properties and the accuracy of molecular weight determination [22].
Experimental Protocols for Quality Control
Implementing rigorous quality control protocols is essential for ensuring reagent performance and gel consistency.
Protocol for Validating Polymerization Reagents
This procedure tests the activity of APS and TEMED to prevent failed polymerizations.
- Prepare Test Solutions:
- Create a fresh 10% (w/v) APS solution in deionized water.
- Have TEMED and a 30% acrylamide/bis-acrylamide stock solution (29:1 or 37:1 cross-linker ratio) available.
- Mix Reagents:
- In a small tube, combine 1 mL of 30% acrylamide/bis, 1.5 mL of deionized water, and 50 μL of 1M Tris-HCl (pH 8.8).
- Initiate Polymerization:
- Add 10 μL of the fresh 10% APS and 2 μL of TEMED.
- Mix by gentle inversion.
- Monitor and Interpret Results:
- Quality Standard: Polymerization into a solid gel should occur within 3-5 minutes at room temperature.
- Troubleshooting: If polymerization takes longer than 10 minutes or does not occur, the APS is likely degraded and must be discarded. TEMED should also be suspected if APS is confirmed fresh.
Standardized Protocol for Casting a Reproducible 12% Gel
This protocol assumes the use of a mini-gel system (e.g., Bio-Rad Mini-PROTEAN). All reagents should be at room temperature to ensure even polymerization.
Table 2: Formulation for a 12% Resolving Gel and a 5% Stacking Gel
| Component | 12% Resolving Gel (10 mL) | 5% Stacking Gel (5 mL) |
|---|---|---|
| Water | 3.9 mL | 3.4 mL |
| 30% Acrylamide/Bis | 3.3 mL | 0.83 mL |
| Tris-HCl Buffer | 2.5 mL of 1.5 M, pH 8.8 [6] | 0.63 mL of 1.0 M, pH 6.8 [6] |
| 10% SDS | 100 μL | 50 μL |
| 10% APS | 50 μL | 25 μL |
| TEMED | 5 μL | 5 μL |
- Assemble the gel cassette according to the manufacturer's instructions, ensuring it is leak-proof.
- Prepare the Resolving Gel: In a beaker or flask, combine the water, acrylamide/bis, Tris-HCl (pH 8.8), and SDS for the resolving gel. Degas the solution for 2-3 minutes under vacuum to remove dissolved oxygen, which inhibits polymerization [71].
- Catalyze and Pour: Add the APS and TEMED to the degassed solution. Swirl gently to mix. Immediately pipette the solution into the gel cassette, leaving space for the stacking gel.
- Overlay and Polymerize: Carefully overlay the gel solution with water-saturated isopropanol or n-butanol to create a flat, even meniscus and exclude oxygen [71] [2]. Allow the gel to polymerize completely (typically 20-30 minutes). A distinct schlieren line will be visible between the gel and the overlay once polymerization is complete.
- Prepare and Pour the Stacking Gel: Pour off the overlay liquid and rinse the top of the gel with deionized water. Combine and degas the stacking gel components (excluding APS and TEMED). Add APS and TEMED, then pour the solution onto the resolving gel. Immediately insert a clean comb without introducing bubbles.
- Complete Polymerization: Allow the stacking gel to polymerize for 15-20 minutes. The gel can be used immediately or stored wrapped in moist paper towel and plastic film at 4°C for up to a week.
Graph 1: Optimal Gel Polymerization Workflow. This flowchart outlines the critical steps for preparing a reproducible polyacrylamide gel, highlighting the necessity of degassing and proper overlay.
Troubleshooting Common Issues Related to Reagents and Gels
Even with careful practice, issues can arise. A systematic approach to troubleshooting is key to maintaining reproducibility.
Table 3: Troubleshooting Guide for Common SDS-PAGE Problems
| Problem | Possible Cause | Solution |
|---|---|---|
| Gel does not polymerize | Degraded APS or TEMED [6] | Prepare fresh APS weekly; ensure TEMED is stored properly. |
| Oxygen inhibition | Degas gel solutions thoroughly before adding catalysts [71]. | |
| Slow or uneven polymerization | Old or improperly stored reagents | Use fresh APS and TEMED; validate with test polymerization. |
| Low room temperature | Perform polymerization at 20-25°C. | |
| Smeared bands | Incomplete protein denaturation | Use fresh SDS and reducing agent in sample buffer; ensure adequate boiling [22] [6]. |
| Protease activity | Add protease inhibitors to sample during preparation. | |
| Aberrant migration (e.g., smiling bands) | Overheating during electrophoresis | Run at lower voltage or use a cooling apparatus [22] [6]. |
| Incorrect buffer pH | Prepare fresh running buffer and verify pH. | |
| Multiple bands for a single protein | Incomplete reduction | Use fresh DTT or β-mercaptoethanol [22]. |
| Protein degradation | Use protease inhibitors; keep samples on ice. |
Graph 2: Diagnostic Troubleshooting Logic. A structured approach to diagnosing and resolving common SDS-PAGE issues related to reagents and gel quality.
The Scientist's Toolkit: Essential Reagent Solutions
A successful SDS-PAGE experiment relies on a suite of properly prepared and maintained core reagents.
Table 4: Essential Research Reagent Solutions for SDS-PAGE
| Item | Function | Key Considerations |
|---|---|---|
| Laemmli Sample Buffer | Denatures proteins, provides charge, and adds density for loading [70] | Contains Tris, SDS, glycerol, Bromophenol Blue, and a reducing agent (e.g., DTT). The reducing agent must be added fresh. |
| APS Solution (10%) | Initiates the free-radical polymerization of acrylamide [6] | The most labile component. Prepare fresh weekly in deionized water and store at 4°C. |
| TEMED | Catalyzes the polymerization reaction by accelerating radical formation from APS [6] | Store tightly sealed at 4°C to prevent oxidation and absorption of moisture. |
| Acrylamide/Bis Stock | Forms the backbone and cross-links of the gel matrix [71] | Typically used as a 30-40% stock solution. Store in dark bottles at room temperature; discard if hydrolyzed. |
| Tris-Glycine-SDS Running Buffer | Conducts current and maintains pH during electrophoresis [2] | Can be prepared as a 10X stock. Check pH before use and ensure SDS is fully dissolved. |
| Molecular Weight Marker | Allows estimation of protein size based on relative migration [22] | Choose a marker appropriate for the protein size range of interest. |
In the rigorous context of academic research and drug development, the reproducibility of SDS-PAGE is non-negotiable. This guide has established that achieving such consistency extends far beyond following a basic protocol. It demands a deep understanding of the underlying biochemistry, particularly the critical roles played by fresh reagents and optimal gel polymerization. The degradation of ammonium persulfate or the hydrolysis of acrylamide are not mere inconveniences; they are primary sources of experimental variance that can compromise molecular weight accuracy and quantitative analysis. By adopting the quality control measures, standardized protocols, and systematic troubleshooting outlined herein, scientists can transform SDS-PAGE from a potential source of variability into a pillar of reproducible, reliable protein analysis. This ensures that the foundational data supporting higher-level analyses—from western blot quantification to proteomic profiling—are built upon a solid and trustworthy technical foundation.
Beyond Traditional SDS-PAGE: Validation, Comparability, and Advanced Techniques
Sodium dodecyl sulfate–polyacrylamide gel electrophoresis (SDS-PAGE) stands as a cornerstone technique in molecular biology and biochemistry, providing a robust method for separating proteins based on their molecular weights. The principle relies on the fact that SDS, an anionic detergent, denatures proteins and confers upon them a uniform negative charge, effectively eliminating the influence of protein shape and intrinsic charge on their migration through a polyacrylamide gel matrix. Under an electric field, proteins then separate solely based on their molecular size, with smaller proteins migrating faster than larger ones [2] [72]. Within this established framework, the molecular weight marker (or protein ladder) emerges as an indispensable control. It provides the critical reference scale against which the size of unknown proteins is estimated, while also serving as a vital tool for monitoring experimental progress and verifying procedural success [73] [74].
This whitepaper delves into the essential role of molecular weight markers in validating protein separation by SDS-PAGE, detailing their composition, selection criteria, and application to ensure accurate and reliable results in research and drug development.
Principles of SDS-PAGE and the Need for Standards
The process of SDS-PAGE separation begins with thorough protein denaturation. Samples are heated in a buffer containing SDS and a reducing agent like β-mercaptoethanol or dithiothreitol (DTT). SDS binds to polypeptides at a consistent ratio of approximately 1.4 g SDS per 1 g of protein, linearizing them by disrupting non-covalent bonds, while the reducing agent cleaves disulfide bridges [2] [72]. This treatment confers a uniform negative charge density, meaning all proteins have a similar charge-to-mass ratio. Consequently, when an electric field is applied, their migration through the porous polyacrylamide gel is determined primarily by molecular size, not intrinsic charge [72].
The gel itself is typically composed of two sections: a stacking gel (pH ~6.8, 4-5% acrylamide) layered on top of a separating gel (pH ~8.8, 7.5-20% acrylamide). The stacking gel concentrates the protein samples into sharp bands before they enter the separating gel, where the actual size-based separation occurs [2] [72]. A tracking dye, such as bromophenol blue, allows visual monitoring of the electrophoresis progress [2].
Despite the theoretical simplicity of size-based separation, the exact position of a protein band on a gel is meaningless without a standard curve for calibration. This is the fundamental role of the molecular weight marker. By running a set of proteins with known molecular weights in parallel with unknown samples, a calibration curve can be constructed. Plotting the logarithm of the known molecular weights against their migration distance (or relative mobility) produces a standard curve, enabling the estimation of the molecular weight of any protein band within the linear range of this curve [72].
Types of Molecular Weight Markers and Their Applications
Molecular weight markers are not a one-size-fits-all reagent. They are formulated for different applications, and selecting the appropriate one is crucial for obtaining valid data. The table below summarizes the key types of markers and their primary uses.
Table 1: Types of Molecular Weight Markers and Their Applications
| Marker Type | Description | Key Features | Primary Applications | Downstream Compatibility |
|---|---|---|---|---|
| Unstained [73] [74] | A mixture of purified proteins of known molecular weights, without any dye pre-conjugation. | Invisible during electrophoresis; requires post-staining (e.g., Coomassie, silver) for visualization. | - Accurate molecular weight estimation [73].- Protein quantification. | Coomassie staining, silver staining, fluorescent staining [73]. |
| Pre-stained [74] | Proteins are covalently linked to dyes, making them visible during and after electrophoresis. | Provides real-time visual tracking of migration and transfer efficiency; colored bands aid orientation. | - Monitoring electrophoresis progress [74].- Verifying protein transfer in Western blotting [73] [74].- Approximate size estimation. | Western blotting; less ideal for precise molecular weight estimation due to dye-induced mobility shifts. |
| Pre-stained, Color-Coded [74] | A variant of pre-stained markers where different molecular weight proteins are conjugated to different colored dyes. | Easy band identification by color; simplifies orientation on the gel and membrane. | - Quick visual identification of specific size ranges [74].- Western blotting. | Western blotting. |
| Western Blot Specific [73] | Specialized markers, such as those conjugated to antibodies (e.g., IgG-labeled). | Can be detected directly by secondary antibodies during the Western blot detection step. | - Eliminates need to align the membrane with the gel image for size reference [73].- Precise molecular weight determination on the blot membrane. | Western blotting with chemiluminescent or fluorescent detection. |
Selecting the Right Marker
Choosing the correct molecular weight marker is a critical step in experimental design. The following considerations are paramount:
- Target Protein Size: The marker's range must encompass the expected size of your protein(s) of interest. Standard markers cover ~10-250 kDa, but specialized ladders are available for very small peptides (<10 kDa) or very large proteins (>250 kDa) [73].
- Downstream Application: The choice is heavily influenced by what you plan to do after SDS-PAGE. For a simple Coomassie-stained gel, an unstained ladder is sufficient and most accurate for sizing. If you are performing a Western blot, a pre-stained ladder is highly recommended to monitor transfer efficiency in real-time [73] [74].
- Required Information: If the goal is precise molecular weight calculation, an unstained marker is the gold standard. For a general idea of protein location and to track the gel run, a pre-stained marker is more practical [73].
Experimental Protocol: Utilizing Molecular Weight Markers in SDS-PAGE
A standardized protocol ensures the reliability and reproducibility of protein separation and sizing.
Sample and Marker Preparation
- Protein Sample Denaturation: Mix the protein sample with an SDS-PAGE loading buffer (typically containing Tris-HCl, SDS, glycerol, bromophenol blue, and a reducing agent). Heat the mixture at 95°C for 5 minutes (or 70°C for 10 minutes) to fully denature the proteins [2].
- Marker Reconstitution/Preparation: Commercial markers are typically supplied ready-to-use or require dilution in a specified buffer. Follow the manufacturer's instructions carefully. For pre-stained markers, gentle mixing is key to avoid foaming.
Gel Electrophoresis
- Gel Setup: Cast or obtain a polyacrylamide gel with an appropriate percentage for your target protein's size. Insert the gel into the electrophoresis apparatus and fill the tank with running buffer (e.g., Tris-Glycine-SDS buffer) [2] [72].
- Loading: Using a micro-pipette, load equal volumes (e.g., 10-20 µL) of the prepared protein samples and the molecular weight marker into adjacent wells. The marker should ideally be loaded on both ends of the sample series if wells are available, to account for any "smiling" effects across the gel.
- Electrophoresis Run: Apply a constant voltage to the gel. For a standard mini-gel, 100-150 V is typical. The run should be continued until the bromophenol blue tracking dye front has migrated to the bottom of the gel [2].
Visualization and Analysis
- Staining:
- For unstained markers, the gel must be stained post-electrophoresis. Coomassie Brilliant Blue staining is common: immerse the gel in Coomassie stain for 20-30 minutes, then destain with a methanol-acetic acid solution until the background is clear and protein bands are sharp [2] [72].
- Pre-stained markers are visible throughout the process and often do not require additional staining, though the protein samples will.
- Imaging and Molecular Weight Estimation:
- Capture an image of the stained gel under white light.
- Measure the migration distance of each band in the molecular weight marker from the top of the separating gel.
- Using graphing software, plot the logarithm (log10) of the known molecular weight of each marker protein against its migration distance to generate a standard curve.
- Measure the migration distance of your unknown protein bands and use the standard curve to interpolate their molecular weights [72].
The following workflow diagram illustrates the key steps in this process, from sample preparation to data analysis.
The Scientist's Toolkit: Essential Reagents for SDS-PAGE
Successful execution of SDS-PAGE and accurate validation with molecular weight markers requires a suite of specialized reagents and equipment.
Table 2: Essential Research Reagent Solutions for SDS-PAGE
| Reagent / Equipment | Function & Importance |
|---|---|
| SDS (Sodium Dodecyl Sulfate) [2] [72] | Anionic detergent that denatures proteins and imparts a uniform negative charge, enabling separation by size rather than native charge or shape. |
| Acrylamide/Bis-acrylamide [2] [72] | Monomer and cross-linker that polymerize to form the porous polyacrylamide gel matrix, which acts as a molecular sieve. |
| Molecular Weight Marker [73] [74] | A set of pre-defined proteins that serves as the reference standard for estimating the molecular weight of unknown proteins and monitoring electrophoresis and transfer. |
| Reducing Agents (β-ME, DTT) [2] [72] | Cleave disulfide bonds within and between protein subunits, ensuring complete denaturation and linearization of proteins. |
| Tracking Dye (Bromophenol Blue) [2] | A small, visible molecule that migrates ahead of the proteins, allowing visual monitoring of the electrophoresis progress. |
| Staining Solutions (Coomassie, Silver) [2] [72] | Dyes that bind to proteins, making the separated bands visible for imaging and analysis after electrophoresis. |
| Electrophoresis Apparatus [72] | The equipment that holds the gel and running buffer, and through which an electric field is applied to drive protein migration. |
Molecular weight markers are far more than a simple convenience in SDS-PAGE; they are a fundamental component of experimental validation. They transform the gel from a mere separation tool into a quantitative analytical platform, enabling accurate molecular weight estimation, verification of procedure success, and critical troubleshooting. For researchers and drug development professionals, the informed selection and correct application of the appropriate molecular weight marker—be it unstained, pre-stained, or specialized for Western blotting—is non-negotiable for generating robust, reliable, and publishable data on protein identity, purity, and composition.
Antibody purity analysis is a critical requirement in the successful development of monoclonal antibody (mAb) biopharmaceuticals, directly impacting manufacturing processes including protein purification, formulation, and stability evaluation. These processes demand highly accurate and reproducible analytical results to support decisions made by product developers and manufacturers. Among the various technologies employed for this purpose, sodium dodecyl sulfate-polyacrylamide gel electrophoresis (SDS-PAGE) and capillary electrophoresis-sodium dodecyl sulfate (CE-SDS) represent two foundational approaches with distinct advantages and limitations. This technical guide provides an in-depth comparison of these methodologies, framed within the broader context of how SDS-based techniques separate proteins by molecular weight, enabling researchers and drug development professionals to select the optimal approach for their specific analytical needs.
The fundamental principle underlying both techniques centers on the property of SDS to denature proteins and confer a uniform negative charge, thereby allowing separation primarily based on molecular size rather than intrinsic charge. However, as this analysis will demonstrate, the implementation of this core principle varies significantly between the traditional gel-based approach and the modern capillary electrophoresis system, resulting in substantial differences in resolution, quantitation, and applicability in regulated environments.
Fundamental Principles of SDS-Based Protein Separation
Protein Denaturation and SDS Binding Mechanism
Both SDS-PAGE and CE-SDS rely on the unique properties of sodium dodecyl sulfate (SDS) to denature proteins and normalize their charge-to-mass ratios. SDS is an anionic detergent composed of a long aliphatic chain tail group and a negatively charged sulfate head group [75]. When proteins are exposed to SDS under reducing conditions, the detergent molecules disrupt virtually all non-covalent bonds within the protein structure, effectively unfolding the tertiary and quaternary structures. Approximately 1.4 grams of SDS bind to each gram of protein, corresponding to roughly one SDS molecule per two amino acids [2]. This extensive SDS coating masks the protein's intrinsic charge and confers a consistent negative charge density across different protein species. The resulting SDS-protein complexes adopt a rod-like shape with similar charge-to-mass ratios, ensuring that separation occurs primarily according to molecular size rather than native charge or structure [2] [76].
The binding interaction between SDS and proteins occurs in distinct phases. At low concentrations (below the critical micelle concentration of 7-10 mM), SDS monomers bind stoichiometrically to proteins through hydrophobic interactions [75]. As SDS concentration increases above the CMC (typically at 1-2% SDS in most protocols), micellar binding dominates, leading to complete denaturation and consistent charge masking [75]. This robust denaturation capability forms the basis for reliable molecular weight estimation across most protein types, though exceptions exist with particularly hydrophobic membrane proteins or those with extensive post-translational modifications that may exhibit anomalous migration [76].
Molecular Weight-Based Separation in Electric Field
Once denatured into linear SDS-protein complexes, proteins are subjected to an electric field within a sieving matrix. The uniform negative charge causes all proteins to migrate toward the positively charged anode. The polyacrylamide gel matrix in SDS-PAGE or the polymer network in CE-SDS acts as a molecular sieve, retarding larger molecules while allowing smaller ones to migrate more rapidly [2] [6]. This results in separation strictly by molecular size (hydrodynamic radius) rather than charge.
In SDS-PAGE, the separation occurs through a discontinuous buffer system that enhances resolution. The system employs two distinct gel layers with different pore sizes and pH values - a stacking gel (pH 6.8) with larger pores that concentrates protein samples into sharp bands, and a separating gel (pH 8.8) with smaller pores that resolves proteins by size [76] [6]. Key to this process is the dynamic behavior of glycine ions in the running buffer, which transition between different charge states as they move through the pH gradient, creating a sharp boundary that focuses the protein samples into narrow bands before entering the separating gel [76].
SDS-PAGE Methodology
Experimental Workflow and Protocol
The SDS-PAGE procedure follows a well-established protocol involving gel preparation, sample preparation, electrophoresis, and detection:
Gel Preparation: Polyacrylamide gels are formed through free-radical polymerization of acrylamide and bis-acrylamide cross-linker, catalyzed by ammonium persulfate (APS) and tetramethylethylenediamine (TEMED) [2] [6]. The typical mini-gel system consists of a separating gel (typically 10-12% acrylamide) overlayed with a stacking gel (typically 4-6% acrylamide). The polymerization creates a three-dimensional network with tunable pore sizes that determine the separation range [6].
Sample Preparation: Protein samples are diluted with SDS-containing sample buffer (Laemmli buffer) which includes Tris-HCl, SDS, glycerol, bromophenol blue tracking dye, and reducing agents such as β-mercaptoethanol or dithiothreitol (DTT) [76] [6]. The samples are then heated to 95°C for 5 minutes to ensure complete denaturation and reduction of disulfide bonds [2].
Electrophoresis: Prepared samples are loaded into wells formed in the stacking gel. Electrophoresis is typically initiated at lower voltages (80V) during the stacking phase, then increased to 100-120V once samples enter the separating gel [6]. The process continues until the dye front approaches the bottom of the gel, typically taking 60-90 minutes depending on gel length and voltage.
Detection and Analysis: Following electrophoresis, proteins are visualized using staining methods such as Coomassie Brilliant Blue (detection limit ~50-100 ng) or silver staining (detection limit ~0.1-1 ng) [6]. Gel images are captured and analyzed using software such as Alpha View to quantify band intensities and estimate molecular weights by comparison with standard markers [77].
Key Technical Considerations
The resolution and performance of SDS-PAGE depend on several critical factors. The acrylamide concentration must be optimized for the target protein size range - lower percentages (8-10%) better resolve higher molecular weight proteins, while higher percentages (12-15%) are preferred for smaller proteins [6]. Complete protein denaturation is essential for accurate molecular weight determination, requiring fresh reducing agents and proper heating. Additionally, the discontinuous buffer system relies on precise pH differences between stacking (pH 6.8) and separating (pH 8.8) gels to create the focusing effect that yields sharp protein bands [76].
CE-SDS Methodology
Experimental Workflow and Protocol
CE-SDS represents an automated, quantitative approach to SDS-based protein separation with distinct procedural steps:
Instrument Setup: CE-SDS systems (e.g., Beckman Coulter PA 800 plus or similar) utilize bare fused-silica capillaries filled with a replaceable SDS-gel buffer (sieving polymer matrix) [77] [78]. The capillary is typically maintained at a constant temperature, and detection occurs via UV absorbance near the distal end, most commonly at 220 nm [77].
Sample Preparation: Antibody samples are diluted to an appropriate concentration (typically 1-2 mg/mL) with SDS sample buffer containing internal standards [77] [79]. For non-reduced analysis, samples may be heated at 70°C for 3-5 minutes; reduced analyses require additional reducing agents and more extensive heating [77]. The prepared samples are injected into the capillary inlet hydrodynamically or electrokinetically.
Separation and Analysis: Samples are electrophoresed through the polymer-filled capillary under application of high voltage (typically 5-15 kV) for 20-40 minutes [77]. Protein migration occurs in an anodic direction, with detection providing direct quantitation as peaks in an electropherogram. Data analysis software (e.g., Beckman Coulter 32 Karat) automatically integrates peaks and calculates percent purity based on relative areas [77].
Key Technical Considerations
CE-SDS methodology offers several advantages but requires attention to specific parameters. Capillary surface properties must be controlled to prevent protein adsorption, often requiring dynamic coating protocols [78]. Sample injection volume and technique significantly impact reproducibility, with electrokinetic injection requiring careful control of sample conductivity [78]. The composition and concentration of the sieving polymer matrix must be optimized for the specific protein size range, with commercial kits available for standardized applications [77] [79]. Method validation for regulated environments must demonstrate specificity, linearity, accuracy, precision, and robustness according to ICH guidelines [79].
Direct Comparative Analysis
Experimental Comparison Using IgG Standards
A direct comparative study evaluating the same human IgG antibody sample in both normal and heat-stressed states (14 days at 45°C) by both SDS-PAGE and CE-SDS revealed significant differences in analytical performance [77]. In this investigation, SDS-PAGE was performed using an Invitrogen NuPAGE system with 4-12% Bis-Tris gels and GelCode Blue stain, while CE-SDS analysis employed a Beckman Coulter PA 800 plus system with UV detection at 220 nm [77].
Both methods detected the primary protein species in normal IgG samples, showing a single major band at 150 kDa and a minor band at 130 kDa. However, with heat-stressed IgG samples, CE-SDS demonstrated superior resolution of degradation products, clearly resolving multiple minor bands at 300, 130, 90, and 25 kDa that appeared as smeared or poorly resolved bands in SDS-PAGE [77]. Notably, CE-SDS could detect nonglycosylated IgG species that were not resolved by SDS-PAGE, a significant advantage given the functional importance of glycosylation patterns in therapeutic antibodies [77].
Performance Metrics and Quantitative Comparison
Table 1: Direct Performance Comparison Between SDS-PAGE and CE-SDS
| Parameter | SDS-PAGE | CE-SDS |
|---|---|---|
| Resolution | Moderate; limited by band broadening | High; superior separation of similar molecular weight species |
| Signal-to-Noise Ratio | Lower due to staining background | Higher; direct UV detection minimizes background [77] |
| Quantitation | Semi-quantitative; requires staining/destaining and densitometry | Fully quantitative; direct UV detection with automated integration [77] |
| Precision | Variable; typically 5-15% RSD [80] | Excellent; 1-2% RSD for migration time, 2-4% RSD for peak areas [78] [79] |
| Detection of Nonglycosylated IgG | Not reliably detected [77] | Easily detected and quantified [77] |
| Sample Throughput | Moderate; multiple samples per gel but manual processing | High; automated operation with minimal hands-on time |
| Data Analysis | Manual or semi-automated band detection | Fully automated peak identification and integration |
Table 2: Method Validation Data for CE-SDS Based on ICH Q2(R2) Guidelines [79]
| Validation Parameter | Non-Reduced CE-SDS | Reduced CE-SDS |
|---|---|---|
| Specificity | No interference from blank | No interference from blank |
| Linearity (R²) | 0.99 for intact IgG | 0.99 for light and heavy chains |
| Accuracy | 90-116% recovery | 86-109% recovery |
| Repeatability (RSD) | 2.0% (intact IgG) | 2.4% (light/heavy chains) |
| Intermediate Precision (RSD) | 0.1% (intact IgG) | 0.5-1.0% (light/heavy chains) |
| Limit of Quantitation | 0.8% | 0.6% |
| Range | 1.25-15.0 mg/mL | 0.158-15.0 mg/mL |
Applications in Antibody Therapeutic Development
Purity Analysis and Quality Control
Both SDS-PAGE and CE-SDS play critical roles in purity analysis throughout the biopharmaceutical development lifecycle. CE-SDS has become the preferred method for lot release and stability testing of therapeutic antibodies due to its superior quantitative capabilities and regulatory acceptance [79]. Under non-reducing conditions, the method quantifies intact antibodies, disulfide-linked low-molecular-weight (LMW) species, and covalently bound high-molecular-weight (HMW) species. Under reducing conditions, it resolves free light chains, heavy chains, non-glycosylated heavy chains, and non-reducible species [79].
Forced degradation studies represent a particularly important application where CE-SDS excels. Thermal stress testing at elevated temperatures (e.g., 37°C and 50°C) demonstrates time-dependent and temperature-dependent fragmentation patterns, with CE-SDS providing precise quantification of degradation products including LMW fragments and aggregates [79]. These studies are essential for identifying critical quality attributes (CQAs) and establishing product stability profiles for regulatory filings.
Biosimilarity Assessment
In biosimilar development, comprehensive analytical characterization must demonstrate comparability to reference products. CE-SDS has emerged as a cornerstone technique for side-by-side comparison of biosimilar and originator products, as demonstrated in a recent study comparing anti-VEGF biosimilar candidate with originator products from US and EU markets [79]. This research employed validated nrCE-SDS and rCE-SDS methods to establish highly comparable degradation profiles under thermal stress conditions, providing critical evidence of biosimilarity through orthogonal analytical approaches [79].
The Scientist's Toolkit: Essential Research Reagents
Table 3: Key Reagents for SDS-PAGE and CE-SDS Experiments
| Reagent | Function | Application Notes |
|---|---|---|
| SDS (Sodium Dodecyl Sulfate) | Denatures proteins and confers negative charge | Use high-purity grade; critical for consistent charge-to-mass ratio [2] [75] |
| Acrylamide/Bis-acrylamide | Forms sieving matrix for separation | Neurotoxic; handle with gloves; concentration determines pore size [6] |
| TEMED/Ammonium Persulfate | Catalyzes acrylamide polymerization | Prepare APS fresh; TEMED concentration affects polymerization rate [2] |
| DTT or β-mercaptoethanol | Reduces disulfide bonds | Essential for complete unfolding; use fresh solutions [6] |
| Iodoacetamide (IAM) | Alkylates free thiols in non-reduced CE-SDS | Prevents reformation of disulfide bonds during analysis [79] |
| Tris-Glycine Buffer | Running buffer for SDS-PAGE | Discontinuous system relies on pH differences [76] |
| Molecular Weight Markers | Reference for size determination | Include in every run; available prestained for SDS-PAGE [2] |
| Coomassie Brilliant Blue | Protein stain for SDS-PAGE | Detects ~50-100 ng protein; compatible with downstream processing [6] |
Method Selection Guidelines
Technique Selection Criteria
Choosing between SDS-PAGE and CE-SDS depends on multiple factors pertaining to the specific analytical requirements:
Select SDS-PAGE when:
- Method development resources are limited
- Qualitative or semi-quantitative results are sufficient
- Sample throughput is moderate and automation is not required
- Equipment budget is constrained
- Downstream processing (e.g., Western blotting) is planned
Select CE-SDS when:
- Regulatory filing requires validated quantitative methods
- High precision and accuracy are essential (e.g., lot release)
- Sample throughput must be maximized
- Detection of subtle variants (e.g., nonglycosylated forms) is critical
- Objective, automated data analysis is preferred
Emerging Trends and Future Directions
The evolution of SDS-based separation techniques continues with several emerging trends. Alternative detergents such as sodium hexadecyl sulfate (SHS) show promise for improved resolution with certain therapeutic proteins, demonstrating 3-fold better resolution and 8-fold higher plate counts compared to traditional SDS [81]. Advances in detection sensitivity, particularly laser-induced fluorescence (LIF) detection, continue to lower detection limits for low-abundance variants [78]. Furthermore, the integration of CE-SDS with mass spectrometry represents an emerging frontier for direct structural characterization of separated species [78].
SDS-PAGE and CE-SDS both leverage the fundamental principle of SDS-mediated protein denaturation and molecular weight-based separation, yet they offer distinctly different capabilities for antibody purity analysis. SDS-PAGE remains a valuable tool for rapid, cost-effective screening and educational applications, while CE-SDS provides superior resolution, quantitation, and automation for regulated biopharmaceutical development and quality control. Understanding their comparative strengths and limitations enables researchers to implement the most appropriate methodology for their specific analytical needs, ultimately contributing to the development of safer and more effective antibody-based therapeutics.
Sodium dodecyl sulfate-polyacrylamide gel electrophoresis (SDS-PAGE) serves as a foundational technique in biochemistry and molecular biology for separating complex protein mixtures. The method relies on the anionic detergent SDS, which denatures proteins and confers a uniform negative charge, effectively masking proteins' intrinsic charges. Consequently, proteins migrate through the porous polyacrylamide gel matrix primarily based on their molecular weight, with smaller polypeptides moving faster than larger ones [82] [83]. This sieving effect allows researchers to separate proteins by size and estimate molecular weight by comparing their migration distances to those of standard protein markers [83].
While SDS-PAGE is unparalleled for qualitative analysis of protein mixtures, its application in quantitative analysis presents significant challenges. This whitepaper assesses the quantitative capabilities and inherent limitations of gel-based densitometry, a common method for quantifying protein bands post-electrophoresis, providing researchers and drug development professionals with a critical framework for evaluating this widely used technique.
Principles of Gel-Based Densitometry
Fundamental Concepts
Gel-based densitometry quantifies proteins by measuring the optical density of stained protein bands within a gel. The underlying principle assumes that the amount of dye bound to a protein (and thus the band intensity) is proportional to the protein's mass. Following electrophoresis and staining, gel images are captured, and software (e.g., ImageJ) analyzes lane profiles, generating data based on grayscale values or uncalibrated optical density [84]. The key quantitative parameters derived from these profiles include:
- Peak Area: The integrated signal intensity across a protein band, which is the most commonly used signal for densitometry and is linearly correlated with protein load over a certain range [84].
- Peak Maximum Intensity: The highest intensity value within a band, sometimes used in fluorescence-based imaging [84].
- Peak Volume: A three-dimensional integration of intensity, though this is less commonly used due to potential inaccuracies in protein load estimation [84].
Standard Curves and Quantification
Accurate quantification requires comparison to known standards. A standard curve is generated by plotting the measured intensities (e.g., peak areas) of a dilution series of a standard protein (like BSA) or a molecular weight marker against their known concentrations [84]. The intensity of unknown protein bands is then interpolated from this curve to estimate concentration. Notably, molecular weight markers of known concentration can themselves serve as protein standards for quantifying unknown samples in the same gel [84].
Limitations and Challenges in Quantitative Analysis
Despite its widespread use, SDS-PAGE coupled with densitometry faces several intrinsic limitations that constrain its quantitative reliability, as summarized in Table 1.
Table 1: Key Limitations of Gel-Based Densitometry for Protein Quantification
| Limiting Factor | Impact on Quantification | Potential Mitigation Strategies |
|---|---|---|
| Staining Linearity & Saturation | Dye binding is not linearly proportional across all concentrations; signal saturation occurs at high loads, compressing the dynamic range [82]. | Use a dilution series to establish the linear range for each protein-dye combination; ensure sample loads fall within this range. |
| Variable Stain Affinity | Different proteins bind dyes (Coomassie, silver, fluorescent) with varying efficiencies, leading to different intensities for equimolar amounts [82]. | Use a standard protein similar in composition to the target protein; or employ internal controls. |
| Limited Dynamic Range | The technique cannot accurately quantify very high- and very low-abundance proteins simultaneously in a single gel [82]. | Combine with other techniques like Western blotting for low-abundance proteins; adjust loading amounts. |
| Sample Preparation Artifacts | Incomplete denaturation, residual impurities, or protein aggregation can cause smearing, blurred bands, or altered migration, affecting resolution and quantification [82]. | Meticulous sample preparation, including centrifugation and use of fresh reagents. |
| Inability to Resolve Complex Mixtures | Co-migration of multiple proteins in a single band prevents accurate quantification of individual components. | Combine with 2D-PAGE or liquid chromatography for complex samples. |
A primary constraint is that SDS-PAGE is generally considered a qualitative or semi-quantitative technique. As noted, "Although the relative abundance of proteins can be estimated by the density of the bands, the technique has limitations in quantitative analysis. Staining intensity can be influenced by various factors, such as protein characteristics and staining efficiency, making precise quantification challenging" [82]. This fundamental limitation necessitates caution when interpreting densitometry data for precise quantitative comparisons.
The following workflow diagram (Figure 1) illustrates the multi-step process of gel-based quantification and key points where variability is introduced.
Methodological Advances and Refined Protocols
Image Analysis Protocol for Improved Quantification
A detailed protocol for image analysis can enhance the consistency and reliability of densitometric quantification. Key steps include:
- Image Acquisition: Capture gel images using a digital imaging system under non-saturating conditions.
- Background Subtraction: Process images using software like ImageJ with optimal background subtraction algorithms. One study used the "rolling ball" algorithm with a radius size of 250 pixels to correct for uneven background [84].
- Lane and Band Definition: Manually or automatically define lanes and bands, ensuring correct identification of the protein(s) of interest and molecular weight standards.
- Standard Curve Generation: Use the molecular weight marker as a protein standard. For instance, the band of 50 kDa in a Precision Plus Protein Unstained Standard can be used as a reference for 750 ng of recombinant protein [84]. Plot the known amounts of standard proteins or marker bands against their measured peak areas to generate a linear standard curve.
- Interpolation of Unknowns: Calculate the peak area for unknown protein bands and use the standard curve equation to estimate their quantity.
Native SDS-PAGE for Functional Quantification
A significant modification to traditional SDS-PAGE, termed Native SDS-PAGE (NSDS-PAGE), has been developed to address the limitation of complete protein denaturation. This method involves:
- Removing SDS and EDTA from the sample buffer.
- Omitting the heating step before loading.
- Reducing SDS concentration in the running buffer (e.g., to 0.0375%) and deleting EDTA [12].
This approach allows for high-resolution separation while preserving certain functional properties. For example, it dramatically increases the retention of bound metal ions in metalloproteins (e.g., Zn²⁺ retention increased from 26% to 98%) and preserves the enzymatic activity of many proteins, which is typically destroyed in standard SDS-PAGE [12]. This makes NSDS-PAGE valuable for applications where quantifying active protein is crucial.
The Challenge with Hydrophobic Proteins and 2D-PAGE
Two-dimensional PAGE (2D-PAGE), which combines isoelectric focusing (IEF) with SDS-PAGE, offers superior resolution for complex mixtures. However, it shares and even amplifies some quantitative limitations. It is particularly ineffective for separating highly hydrophobic membrane proteins, especially those with more than four transmembrane segments, which often precipitate during the first dimension [85]. Furthermore, 2D-PAGE suffers from low loadability and poor separation of very acidic, alkaline, large, or small proteins, restricting its quantitative utility for significant portions of the proteome [85].
The Scientist's Toolkit: Essential Reagents and Materials
Table 2: Key Research Reagent Solutions for Gel-Based Densitometry
| Reagent / Material | Function / Purpose | Technical Notes |
|---|---|---|
| SDS (Sodium Dodecyl Sulfate) | Anionic detergent that denatures proteins and confers uniform negative charge, enabling separation primarily by mass [82] [83]. | Critical for disrupting secondary and tertiary structures. Purity is essential for consistent results. |
| Polyacrylamide Gel Matrix | Forms a porous sieve through which proteins migrate. Pore size determines resolution range [83]. | Gel percentage must be chosen based on target protein size; gradient gels broaden the effective separation range. |
| Molecular Weight Markers | Pre-stained or unstained protein ladders with known molecular weights for estimating size and, if concentrations are known, for quantification [84] [83]. | Unstained standards are preferred for precise quantification as pre-stained markers may migrate anomalously. |
| Staining Dyes | Visualize separated proteins. Common dyes include Coomassie Brilliant Blue, silver stain, and fluorescent dyes [84] [82]. | Choice affects sensitivity and dynamic range. Silver stain is more sensitive but has a narrower linear range than Coomassie. |
| Image Analysis Software | Converts band intensity into quantitative data via densitometry; performs background subtraction and peak area analysis [84]. | Software like ImageJ is commonly used. Consistent analysis parameters are vital for reproducibility. |
| Sample Buffer | Contains SDS, reducing agent (e.g., β-mercaptoethanol), glycerol, and tracking dye to prepare samples for loading [83]. | The reducing agent breaks disulfide bonds. For NSDS-PAGE, SDS and reducing agents are omitted [12]. |
Gel-based densitometry remains an accessible and widely used method for estimating protein abundance. Its strengths lie in its semi-quantitative capability to compare relative protein levels across samples when carefully controlled. However, the technique is bounded by significant limitations, including variable dye binding, a limited dynamic range, and susceptibility to methodological artifacts. For research and drug development requiring precise, absolute quantification of proteins, especially in complex mixtures or for hydrophobic and extreme proteins, SDS-PAGE densitometry is insufficient alone. It is best employed as a qualitative tool or a first-pass quantitative assessment, with its data interpreted in the context of its inherent constraints. Advancements such as NSDS-PAGE expand its utility for functional analysis, but researchers must prioritize rigorous protocols and validation with more robust quantitative methods like mass spectrometry for critical quantitative applications.
Sodium dodecyl sulfate-polyacrylamide gel electrophoresis (SDS-PAGE) stands as a cornerstone technique in biochemical research for separating proteins based on their molecular weight. This whitepaper provides an in-depth technical analysis of SDS-PAGE, examining its fundamental principles, key advantages, and inherent limitations. Designed for researchers, scientists, and drug development professionals, this guide explores the technique's resolution, sensitivity, and applicability while addressing its constraints regarding protein native conformation and quantitative analysis. Within the broader context of molecular weight-based protein research, we detail optimal experimental protocols, troubleshooting methodologies, and advanced modifications such as Native SDS-PAGE that preserve metal cofactors and enzymatic activity. By presenting comprehensive data visualization and structured comparisons, this document serves as an essential resource for determining when SDS-PAGE represents the ideal analytical choice.
SDS-PAGE represents the most widely used electrophoresis method for separating proteins by molecular weight, forming an essential foundation for proteomic analysis, quality control in biopharmaceutical development, and basic research. The technique relies on the anionic detergent sodium dodecyl sulfate (SDS), which denatures proteins and confers a uniform negative charge, allowing separation primarily by molecular size rather than native charge or structure [83]. Since its establishment in the late 1960s, SDS-PAGE has maintained its fundamental utility despite advancements in proteomic technologies, testament to its simplicity, reliability, and cost-effectiveness [86]. In contemporary research paradigms, SDS-PAGE serves multiple roles from routine protein characterization to being an integral component of western blotting and two-dimensional electrophoresis, making critical contributions to our understanding of protein structure-function relationships in both academic and industrial settings.
The fundamental premise of SDS-PAGE within molecular weight research lies in its ability to resolve complex protein mixtures into discrete bands corresponding to individual polypeptide subunits. When applied to the broader thesis of molecular weight-based protein separation, SDS-PAGE provides a foundational methodology against which more sophisticated techniques are often compared. Its discontinuous buffer system, utilizing stacking and resolving gels with different pore sizes and pH, enables the concentration of protein samples into sharp bands before separation, thereby enhancing resolution [83]. This technical refinement allows researchers to distinguish proteins with minimal molecular weight differences, making it indispensable for analyzing protein purity, complex composition, and post-translational modifications that alter molecular mass.
Fundamental Principles of SDS-PAGE Separation
Mechanism of Molecular Weight-Based Separation
The separation of proteins in SDS-PAGE occurs through a sophisticated interplay between the uniform charge conferred by SDS and the molecular sieving properties of the polyacrylamide gel matrix. The process begins when proteins are denatured in the presence of SDS and reducing agents, with SDS binding to polypeptides at a constant ratio of approximately 1.4 g SDS per 1 g of protein [83]. This binding masks the proteins' intrinsic charges and creates a uniform negative charge density, transforming them into SDS-polypeptide complexes whose migration through the gel depends almost exclusively on molecular size [32]. The polyacrylamide matrix, formed through polymerization of acrylamide and cross-linker bisacrylamide, creates a porous network through which proteins migrate under an electric field, with smaller proteins moving more rapidly than larger counterparts due to reduced frictional resistance [83].
The relationship between gel concentration and protein separation range follows a predictable pattern that researchers can exploit for optimal resolution. As detailed in Table 1, different acrylamide percentages create varying pore sizes suitable for separating proteins across specific molecular weight ranges. This molecular sieving effect means that higher percentage gels with smaller pores provide better resolution for low molecular weight proteins, while lower percentage gels with larger pores are more suitable for high molecular weight proteins [87]. The entire process is facilitated by a discontinuous buffer system that initially concentrates proteins into sharp bands within the stacking gel before they enter the resolving gel where primary separation occurs, thereby enhancing resolution and ensuring precise molecular weight determination [83].
Table 1: Optimal Gel Percentage for Target Protein Molecular Weights
| Protein MW Range | Recommended Gel Concentration | Separation Principle |
|---|---|---|
| 100-600 kDa | 4-8% | Large pore size for big proteins |
| 50-500 kDa | 7% | Moderate pore size |
| 30-300 kDa | 10% | Standard separation |
| 10-200 kDa | 12% | Smaller pore size |
| 3-100 kDa | 15% | Very small pores for small proteins |
Workflow Visualization
The following diagram illustrates the complete SDS-PAGE workflow from sample preparation to final analysis:
Advantages of SDS-PAGE in Research and Development
High Resolution and Reproducibility
SDS-PAGE provides exceptional resolution for separating proteins with minimal molecular weight differences, a characteristic that makes it invaluable for both research and quality control applications. The technique can effectively resolve complex protein mixtures, distinguishing polypeptides with subtle mass variations that might reflect post-translational modifications, proteolytic processing, or genetic polymorphisms [82]. This high resolution stems from the discontinuous buffer system that concentrates proteins into sharp bands before separation, combined with the precise molecular sieving effect of the polyacrylamide matrix [83]. For drug development professionals, this resolution capability proves critical when analyzing protein therapeutic purity, monitoring degradation products, or confirming the identity of recombinant proteins during biomanufacturing processes.
The reproducibility of SDS-PAGE represents another significant advantage, with highly standardized procedures ensuring consistent results across experiments and laboratories [88]. This reproducibility arises from the predictable nature of SDS-binding to proteins and the well-characterized relationship between migration distance and molecular weight. When complemented with appropriate molecular weight markers, SDS-PAGE allows reliable estimation of protein sizes, enabling comparisons between research groups and longitudinal studies [86]. Such reproducibility is essential for regulatory submissions in pharmaceutical development, where consistent analytical data must be generated to demonstrate product consistency and stability throughout the drug development lifecycle.
Sensitivity and Broad Applicability
The sensitivity of SDS-PAGE enables detection of proteins present in minimal quantities, with advanced staining methods like silver staining capable of identifying nanogram amounts of protein [82]. This sensitivity makes the technique suitable for analyzing rare samples with limited protein availability, such as clinical biopsies or purified protein fractions from multi-step chromatography procedures. Even with standard Coomassie Brilliant Blue staining, detection in the microgram range remains possible, sufficient for most routine applications [88]. The compatibility of SDS-PAGE with subsequent western blotting enhances its utility for specific protein detection, with transfer to membranes enabling immunodetection of low-abundance proteins through enhanced chemiluminescence and other amplification methods.
SDS-PAGE exhibits remarkable versatility across protein types and source materials, successfully analyzing soluble proteins, membrane proteins, nuclear proteins, and proteins from cells, tissues, or other biological samples [82]. This broad applicability stems from the potent denaturing action of SDS, which solubilizes even highly hydrophobic proteins like membrane receptors and ion channels that often prove refractory to other separation methods. The technique's effectiveness across the biological spectrum makes it particularly valuable in proteomic studies characterizing complex mixtures, where it serves both as an analytical tool and a preparatory method for further protein characterization by mass spectrometry or sequencing.
Table 2: Key Advantages of SDS-PAGE in Research Applications
| Advantage | Technical Basis | Research Application |
|---|---|---|
| High Resolution | Discontinuous buffer system and molecular sieving | Detecting post-translational modifications, assessing purity |
| High Sensitivity | Compatible with sensitive detection methods (silver stain, fluorescence) | Analyzing limited samples, detecting low-abundance proteins |
| Broad Applicability | SDS solubilizes diverse protein types | Proteomic studies, membrane protein analysis |
| Reproducibility | Standardized protocols and reagents | Longitudinal studies, quality control, regulatory compliance |
| Cost-Effectiveness | Simple equipment and widely available reagents | Routine laboratory analysis, educational settings |
Limitations and Technical Constraints
Loss of Native Structure and Function
The most significant limitation of SDS-PAGE lies in its fundamental requirement for protein denaturation, which eliminates native structure and biological function. The SDS detergent disrupts non-covalent interactions including hydrogen bonds, hydrophobic interactions, and van der Waals forces, destroying secondary, tertiary, and quaternary protein structures [82]. This structural denaturation precludes functional analysis following separation, making SDS-PAGE unsuitable for studies requiring retention of enzymatic activity, ligand binding capability, or protein-protein interactions [12]. For drug development professionals investigating therapeutic proteins whose function depends on specific conformational epitopes or multi-subunit assemblies, this limitation proves particularly relevant, as SDS-PAGE cannot provide information about functional integrity or higher-order structure.
The denaturing nature of SDS-PAGE also means it cannot preserve non-covalently bound cofactors, including metal ions essential for the activity of metalloenzymes. Research has demonstrated that standard SDS-PAGE conditions result in substantial loss of bound metal ions, with one study showing only 26% zinc retention in Zn-metalloproteins under conventional protocols [12]. This limitation impedes the study of metalloprotein complexes and requires alternative approaches when investigating metal-binding properties or metal-dependent enzymatic activities. For researchers studying biologically relevant metal-protein interactions—particularly in fields like metallomics or metalloenzyme characterization—this represents a significant analytical constraint that must be addressed through complementary techniques.
Separation Constraints and Quantitative Limitations
SDS-PAGE exclusively separates proteins based on molecular weight, rendering it incapable of resolving proteins with identical or very similar molecular weights, regardless of their structural or functional differences [88]. This limitation becomes particularly problematic when analyzing protein isoforms, splice variants, or family members with conserved molecular weights but distinct biological activities. Similarly, the technique cannot separate proteins based on other intrinsic properties like isoelectric point, hydrophobicity, or post-translational modifications unless these modifications alter molecular mass [82]. While glycoproteins, phosphoproteins, or other modified proteins may exhibit altered migration due to added mass, the resolution is often insufficient to distinguish subtly modified species without specialized techniques like two-dimensional electrophoresis.
Although SDS-PAGE can provide semi-quantitative data through band intensity measurements, it faces limitations in precise quantitative analysis. Staining intensity varies between different proteins due to sequence-dependent dye binding characteristics, with Coomassie staining showing particular variability based on protein composition [82]. This differential staining complicates accurate quantification, especially in complex mixtures containing proteins with diverse amino acid compositions. Additionally, the limited linear range of most staining methods restricts accurate quantification across broad concentration ranges, requiring careful sample loading and appropriate controls for reliable interpretation [88]. For drug development applications requiring precise protein quantification for pharmacokinetic studies or potency assays, these limitations often necessitate supplemental analytical methods.
Table 3: Key Limitations of SDS-PAGE and Alternative Approaches
| Limitation | Technical Basis | Alternative/Method |
|---|---|---|
| Protein Denaturation | SDS disrupts non-covalent interactions | Native PAGE, BN-PAGE, NSDS-PAGE |
| Limited Separation Criteria | Separation primarily by MW only | 2D-PAGE, IEF, Chromatography |
| Quantitative Challenges | Variable dye binding, limited linear range | Spectroscopic assays, HPLC, BCA/Lowry |
| Ineffective for Extreme MW | Gel pore size limitations | Agarose gels (high MW), specialized Tris-Tricine (low MW) |
| Inability to Distinguish Same MW | Identical migration patterns | IEF, Immunodetection, Mass spectrometry |
When SDS-PAGE is the Ideal Choice: Application Scenarios
Optimal Research Applications
SDS-PAGE represents the ideal analytical choice for several specific research scenarios, particularly those requiring assessment of protein purity, evaluation of molecular weight, or analysis of subunit composition. In biotechnology and biopharmaceutical development, SDS-PAGE serves as a fundamental quality control measure for recombinant protein production, enabling rapid assessment of sample purity, detection of proteolytic degradation, and confirmation of expected molecular weight [82]. The technique proves exceptionally valuable when monitoring protein isolation procedures, providing visual confirmation of enrichment at each purification step through the disappearance of contaminating bands and intensification of the target protein band. These applications leverage the technique's strengths in molecular weight estimation and its ability to resolve complex mixtures without requiring specialized equipment or extensive training.
For western blot analysis, SDS-PAGE provides an essential first separation step, with the denatured, linearized proteins ideal for efficient transfer to membranes and subsequent antibody detection [22] [87]. The uniform negative charge imparted by SDS ensures consistent migration toward the anode during electroblotting, while the molecular weight-based separation allows confirmation of target protein size through comparison with pre-stained markers. SDS-PAGE also excels in diagnostic applications detecting specific proteins in clinical samples, such as immunoglobulin light chains in serum or urine for monoclonal gammopathy diagnosis. In these scenarios, the technique's simplicity, reliability, and cost-effectiveness make it preferable to more sophisticated but technically demanding alternatives.
Comparison of Electrophoretic Techniques
The following diagram compares SDS-PAGE with alternative electrophoretic methods, highlighting their respective applications in protein research:
Advanced Technical Implementation
Research Reagent Solutions and Essential Materials
Successful implementation of SDS-PAGE requires specific reagents and materials carefully selected to ensure optimal separation and reproducibility. The following table details essential components and their functions in the electrophoretic process:
Table 4: Essential Research Reagents for SDS-PAGE
| Reagent/Material | Function | Technical Considerations |
|---|---|---|
| SDS (Sodium Dodecyl Sulfate) | Denatures proteins and confers negative charge | Critical for uniform charge-to-mass ratio; purity affects reproducibility |
| Acrylamide/Bis-acrylamide | Forms porous gel matrix | Ratio determines pore size; neurotoxic in monomer form |
| Tris Buffers | Maintain pH during electrophoresis | Discontinuous system uses different pH in stacking (pH 6.8) and resolving (pH 8.8) gels |
| APS and TEMED | Polymerization catalysts | Fresh preparation required for consistent gel polymerization |
| DTT or β-Mercaptoethanol | Reducing agents break disulfide bonds | DTT has less odor but less stable; β-ME more stable but pungent |
| Coomassie Blue/Silver Stain | Protein detection | Coomassie for routine detection (μg range); silver for high sensitivity (ng range) |
| Molecular Weight Markers | Size calibration | Pre-stained markers allow tracking; unstained provide higher accuracy |
| Glycine | Leading ion in discontinuous system | Essential for stacking effect in Tris-Glycine system |
Optimized Experimental Protocol
Sample Preparation Methodology
Proper sample preparation is critical for successful SDS-PAGE separation. Proteins should be extracted in appropriate lysis buffer compatible with downstream denaturation, with total protein concentration determined using reliable quantification methods like Bradford, BCA, or Lowry assays [87]. For denaturation, protein samples should be mixed with SDS sample buffer (typically 2X or 5X concentration) containing SDS, glycerol, Tris-HCl pH 6.8, and reducing agents [89]. The optimal sample-to-buffer ratio ensures complete denaturation while maintaining appropriate salt concentrations. Critical denaturation parameters include heating at 95°C for 5 minutes to ensure complete unfolding and disruption of hydrophobic interactions, particularly important for membrane proteins [89]. Following denaturation, samples should be centrifuged at maximum speed for 2-3 minutes to pellet any insoluble aggregates that could interfere with electrophoresis [89]. For complex mixtures like whole cell lysates, optimal loading is ≤20 μg per well for Coomassie staining or western blotting, while purified proteins should be limited to ≤2 μg per well to prevent overloading and band distortion [89].
Electrophoresis Conditions
Separation conditions must be optimized based on the target protein molecular weights and gel format. For standard mini-gels, electrophoresis at 100-150 volts for 40-60 minutes provides optimal separation, though conditions should follow manufacturer recommendations for pre-cast gels [89]. Maintaining constant temperature between 10°C-20°C during separation is crucial to prevent "smiling" artifacts where outer lanes migrate slower than center lanes due to heat differentials [89]. Efficient heat transfer can be achieved by completely filling the buffer chamber and optionally stirring with a magnetic stirrer. The electrophoresis should be terminated when the dye front (typically bromophenol blue) reaches approximately 1 cm from the gel bottom, as extended runs cause loss of low molecular weight proteins from the gel matrix [89]. For high molecular weight proteins (>200 kDa), lower percentage gels (4-8%) and extended run times may be necessary, while gradient gels (e.g., 4-20%) provide broad separation range for complex samples with diverse molecular weights [89] [87].
Innovations and Modifications: Native SDS-PAGE
Principles and Applications
A significant innovation in electrophoretic methodology addresses the primary limitation of conventional SDS-PAGE by developing modified conditions that preserve certain native protein properties while maintaining high resolution separation. Termed Native SDS-PAGE (NSDS-PAGE), this approach reduces SDS concentration in the running buffer from standard 0.1% to 0.0375%, eliminates EDTA from sample buffers, and omits the heating step during sample preparation [12]. These modifications create a partially denaturing environment that preserves metal cofactors and enzymatic activity in many proteins while still providing molecular weight-based separation. Research demonstrates that zinc retention in metalloproteins increases from 26% under standard conditions to 98% using NSDS-PAGE, with seven of nine model enzymes retaining activity after separation compared to complete denaturation in conventional SDS-PAGE [12].
NSDS-PAGE finds particular application in metalloprotein research, where preservation of metal-protein interactions is essential for subsequent analysis. The method enables high-resolution separation of native metalloproteins while maintaining their metal coordination environment, allowing studies of metal incorporation, metalloprotein complexes, and metal-dependent enzyme activity [12]. This advancement bridges the gap between completely denaturing SDS-PAGE and native electrophoresis techniques, offering researchers a tool that combines the high resolution of traditional SDS-PAGE with some functional preservation capabilities. For drug development professionals working with metalloprotein therapeutics or metal-dependent enzymes, this modified approach provides an analytical option that addresses the critical limitation of conventional denaturing methods.
Comparative Methodologies
The development of NSDS-PAGE represents part of a broader effort to overcome limitations in conventional protein separation techniques, with Blue Native (BN)-PAGE representing another alternative that preserves native protein interactions. While BN-PAGE maintains protein complexes in their native state, it sacrifices the high resolution of SDS-PAGE and introduces complications for molecular weight determination due to the influence of protein shape and charge on migration [12]. NSDS-PAGE occupies an intermediate position, offering better resolution than BN-PAGE while preserving more functionality than conventional SDS-PAGE. The selection between these techniques depends on specific research objectives: conventional SDS-PAGE for maximum resolution and molecular weight determination, BN-PAGE for complete preservation of native complexes, and NSDS-PAGE when both resolution and metal retention/partial activity preservation are required [12].
SDS-PAGE remains an indispensable tool in the researcher's arsenal, offering unparalleled resolution for molecular weight-based protein separation with established protocols and broad applicability. Its advantages in sensitivity, reproducibility, and cost-effectiveness ensure its continued prominence in basic research, diagnostic applications, and biopharmaceutical development. However, researchers must remain cognizant of its inherent limitations regarding protein denaturation, restricted separation criteria, and quantitative challenges. The development of modified approaches like NSDS-PAGE demonstrates that methodological innovations continue to address these limitations, expanding the technique's utility while building upon its foundational principles. Within the broader thesis of molecular weight-based protein research, SDS-PAGE provides a fundamental separation methodology that, when applied judiciously with awareness of its constraints and complementary techniques, delivers powerful analytical capability for protein characterization across diverse scientific disciplines.
Sodium dodecyl sulfate–polyacrylamide gel electrophoresis (SDS-PAGE) stands as a cornerstone technique in molecular biology for separating proteins based on their molecular weight. The fundamental principle relies on the fact that SDS, a denaturing detergent, confers a uniform negative charge to all proteins, thereby nullifying the influence of their intrinsic charge and structure. When an electric field is applied, these denatured proteins migrate through a polyacrylamide gel matrix, with smaller proteins moving faster than larger ones, resulting in separation by molecular size alone [90] [2]. This simple yet powerful technique, foundational to protein research and diagnostics, is now undergoing a transformative evolution. Driven by the demands of modern proteomics and biopharmaceutical development, the field is moving decisively towards a new paradigm characterized by automation, miniaturization, and sophisticated data analytics. These advancements are not merely incremental improvements but are reshaping SDS-PAGE from a manual, artisanal tool into a highly reproducible, high-throughput, and data-rich analytical platform. This whitepaper explores these future directions, detailing their technical underpinnings, current applications, and profound implications for researchers and drug development professionals working within the critical context of protein separation and analysis.
The Drive for Automation: Enhancing Reproducibility and Throughput
Automation in SDS-PAGE is a key trend aimed at standardizing workflows and freeing up valuable researcher time for data interpretation. The manual process of gel casting, sample preparation, loading, and staining is not only time-consuming but also a significant source of experimental variability [91]. Automated systems are addressing these challenges head-on, enhancing both reproducibility and throughput.
- Integrated Electrophoresis Systems: Modern automated platforms encompass the entire workflow, from sample denaturation to separation. These systems often feature pre-programmed protocols that standardize running conditions, thereby minimizing human error and ensuring consistency across experiments and between different laboratory personnel [3]. This is particularly vital in regulated environments like pharmaceutical quality control labs, where data integrity and reproducibility are paramount.
- Automated Imaging and Analysis: A major bottleneck in traditional SDS-PAGE is the manual analysis of gel images. Advanced software innovations are now automating this process. Modern algorithms can automatically detect protein bands, quantify their intensity, and normalize them against internal standards or molecular weight markers [3]. This reduces user bias, enables more precise quantification, and facilitates direct inter-laboratory data comparison, which is crucial for multi-center studies and global collaborations [3].
- High-Throughput Applications: The push for automation is strongly linked to the needs of the pharmaceutical and biotechnology industries, where SDS-PAGE is indispensable for protein characterization and quality control during drug development [91] [92]. Automated, high-throughput systems allow for the rapid analysis of hundreds of samples, significantly accelerating timelines in drug discovery and biomanufacturing process optimization.
Table 1: Impact Areas of Automation in SDS-PAGE Workflows
| Area of Impact | Traditional Manual Process | Automated Solution | Key Benefit |
|---|---|---|---|
| Gel Preparation | Manual casting, leading to bubble formation and gel inconsistency | Use of pre-cast gels; automated gel casting systems | Standardized gel quality; reduced preparation time and variability |
| Sample Loading | Manual pipetting, a source of loading error and user fatigue | Automated liquid handlers for precise sample loading | High precision and reproducibility; enables 24/7 operation |
| Data Analysis | Manual band identification and densitometry, prone to bias | Automated software for band detection, quantification, and normalization | Objective, reproducible data analysis; integration with LIMS |
Miniaturization and Microfluidic Platforms
Miniaturization represents a powerful frontier in SDS-PAGE development, leveraging microfluidic technology to create compact, efficient, and resource-conserving analytical devices. The shift from macroscale slab gels to miniaturized formats is driven by the need for faster analysis, reduced consumption of often-precious samples and reagents, and enhanced portability for point-of-care diagnostics.
- Chip-Based Electrophoresis: Emerging microfluidic platforms, often referred to as "lab-on-a-chip" systems, are revolutionizing protein separation. These chips contain microfabricated channels where SDS-PAGE occurs, drastically reducing sample volume requirements from microliters to nanoliters or picoliters while simultaneously accelerating run times from hours to minutes [4] [3]. This is a critical advantage in fields like clinical diagnostics where speed is essential, and in research involving samples available in limited quantities, such as patient biopsies or single-cell analyses.
- Pre-cast and Gradient Gels: The trend towards miniaturization is also evident in the widespread adoption of commercial pre-cast gels. These ready-to-use gels, available in both uniform and gradient formulations, eliminate the variability and time associated with manual gel casting [3]. Pre-cast gradient gels, with an acrylamide concentration that increases linearly from the top to the bottom of the gel (e.g., 4-12%), provide a larger separation range for proteins of diverse molecular weights within a single run, simplifying protocol design and inventory management [2] [3].
- Enhanced Resolution and Sensitivity: The controlled environment of microfluidic channels and the advanced polymer chemistries used in pre-cast gels contribute to improved resolution and sensitivity. These innovations allow for the clear separation of proteins with very similar molecular weights and the detection of low-abundance proteins that might be missed in traditional gels [92]. This enhanced performance is pushing the boundaries of what is possible in proteomic analysis, enabling more detailed protein profiling.
Diagram 1: Microfluidic SDS-PAGE workflow.
Integration with Data Analytics and Digital Tools
The modernization of SDS-PAGE extends beyond the wet lab bench into the digital realm. The integration of sophisticated data analytics is transforming gel images from qualitative pictures into robust, quantitative datasets, thereby unlocking deeper biological insights and ensuring data integrity.
- Advanced Image Analysis Algorithms: Contemporary software tools have moved beyond simple band detection. They now incorporate advanced algorithms for background subtraction, band normalization, and statistical analysis. These tools can automatically generate standard curves from molecular weight markers, estimate the molecular weight of unknown proteins with high accuracy, and even detect subtle post-translational modifications that cause minor shifts in mobility [3]. The move is toward cloud-based platforms that allow for seamless sharing, collaborative analysis, and the creation of large, searchable databases of protein separation data.
- Unified Data Management Frameworks: A key trend is the drive toward unified solutions that combine electrophoresis data with other analytical outputs. SDS-PAGE systems are increasingly designed to integrate with upstream sample preparation robots and downstream applications like Western blotting imagers and mass spectrometers under a cohesive data management framework [3]. This end-to-end integration supports streamlined workflows and provides a more comprehensive view of the sample, from protein purity and size to identity and function.
- Interoperability and Regulatory Compliance: In pharmaceutical and clinical settings, data must comply with stringent regulatory standards (e.g., FDA 21 CFR Part 11). Modern digital SDS-PAGE systems are being built with these requirements in mind, featuring robust data encryption, audit trails, and electronic signatures [92]. Furthermore, the adoption of standardized data formats facilitates interoperability with Laboratory Information Management Systems (LIMS), ensuring that protein analysis data becomes a traceable and integral part of the larger research or production record.
Synergistic Integration with Downstream Analytical Techniques
SDS-PAGE is rarely an endpoint; it is frequently a critical sample preparation and quality control step preceding more advanced analyses. The future points toward more seamless and efficient integration with these downstream techniques, particularly mass spectrometry (MS).
- Sample Cleanup for Mass Spectrometry: A historical challenge has been the incompatibility of SDS with mass spectrometry, as SDS suppresses ionization and can damage the instrument. This traditionally required time-consuming steps like in-gel digestion and peptide extraction or solid-phase extraction to remove the detergent [93]. Novel workflows are being developed to overcome this. For instance, the use of alternative surfactants like sodium deoxycholate (SDC) in the "Fast Surfactant-Treated (FAST)" proteomic method allows for efficient protein solubilization and digestion, followed by rapid detergent removal via acetonitrile precipitation. This workflow significantly shortens sample processing time while improving peptide recovery and MS signal intensity for challenging membrane proteins [93].
- Hyphenated Techniques and 2D-PAGE: Two-dimensional gel electrophoresis (2D-PAGE), which separates proteins by isoelectric point in the first dimension and by molecular weight via SDS-PAGE in the second, remains a powerful tool for resolving complex protein mixtures. The integration of this technique with automated spot-picking robots and MS creates a powerful pipeline for proteome analysis [3]. Furthermore, the direct coupling (hyphenation) of capillary electrophoresis-based SDS-PAGE with MS is an area of active development, promising a fully automated and high-throughput path from separation to protein identification.
Table 2: Key Research Reagent Solutions for Advanced SDS-PAGE Workflows
| Reagent / Material | Function | Technical Note |
|---|---|---|
| Alternative Surfactants (e.g., SDC) | Efficient membrane protein solubilization while maintaining MS-compatibility. | Precipitates in acid, allowing easy removal post-digestion, unlike SDS [93]. |
| Tris(2-carboxyethyl)phosphine (TCEP) | Reducing agent for breaking disulfide bonds. | More stable and odorless than DTT or β-mercaptoethanol; can be used simultaneously with alkylating agents [93]. |
| Pre-cast Gradient Gels | Provide a linear porosity gradient for separating a wide range of protein sizes in a single gel. | Eliminate manual gradient casting; offer superior consistency and resolution [3]. |
| Fluorescent Protein Stains | Sensitive, quantitative protein detection for gel imaging. | Offer wider linear dynamic range for quantification compared to traditional Coomassie staining [92]. |
| Multiplexed Molecular Weight Markers | Precise protein size determination and internal lane standardization. | Contain pre-stained proteins for tracking migration and unlabeled proteins for accurate mass calibration. |
Market Dynamics and Strategic Outlook
The technological evolution of SDS-PAGE is reflected in its growing market presence. The SDS-PAGE electrophoresis market is anticipated to grow at a compound annual growth rate (CAGR) of 6.2% from 2025 to 2032, driven by increasing research in proteomics, drug discovery, and diagnostics [91] [92]. This growth is underpinned by the very trends discussed in this paper.
- Regional Adoption and Key Players: North America currently holds a significant market share due to its robust biotechnology and pharmaceutical infrastructure, but the Asia-Pacific region is projected to witness the fastest growth, fueled by rising R&D investments [91] [92]. The competitive landscape is marked by established life science leaders like Thermo Fisher Scientific, Bio-Rad Laboratories, and Merck, which are driving innovation through continuous product development and strategic acquisitions [3] [92].
- Challenges and Barriers: Despite the promising outlook, barriers to adoption remain. The high initial cost of automated and microfluidic systems can be a hurdle for smaller laboratories and academic institutions [92]. Furthermore, the existence of alternative protein analysis techniques, particularly high-resolution mass spectrometry, presents competition. However, SDS-PAGE maintains its position due to its simplicity, cost-effectiveness for routine analyses, and visual intuitiveness [92].
- Strategic Recommendations for Stakeholders: For laboratories and manufacturers to thrive in this evolving landscape, a multi-pronged strategy is essential. This includes investing in localized manufacturing to mitigate supply chain disruptions, developing flexible product portfolios that cater to both high-throughput and specialized needs, and cultivating a culture of continuous training to ensure user proficiency. Monitoring tariff policies and regulatory changes will also be critical for maintaining cost advantages and market access [3].
Diagram 2: Strategic market forces shaping SDS-PAGE evolution.
The future of protein separation via SDS-PAGE is bright and dynamic. The core principle of separating proteins based on molecular weight remains as relevant as ever, but the methods are undergoing a profound transformation. The convergence of automation, miniaturization, and deep data integration is elevating SDS-PAGE from a foundational but manual technique to a sophisticated, high-performance analytical platform. For researchers and drug development professionals, these advancements translate to tangible benefits: enhanced reproducibility, faster turnaround times, more insightful data, and the ability to tackle more complex biological questions. As these trends continue to mature and converge, SDS-PAGE will undoubtedly solidify its role as an indispensable and increasingly intelligent tool in the scientist's toolkit, powering discoveries and ensuring quality in the life sciences for years to come.
Conclusion
SDS-PAGE remains a cornerstone technique for protein analysis by molecular weight, indispensable for research and quality control in drug development. Its power lies in the elegant simplification of complex protein mixtures into components separable by size alone, achieved through SDS denaturation and the sieving properties of polyacrylamide gels. While mastering its methodology and troubleshooting common issues are vital for generating reliable data, understanding its position relative to more advanced, quantitative techniques like CE-SDS is crucial for modern laboratories. As the field advances, the principles of SDS-PAGE will continue to underpin emerging automated and high-throughput systems, ensuring its relevance in characterizing biologics, ensuring product consistency, and driving innovations in biomedical research for the foreseeable future.
References
- 1. Protein Electrophoresis Using SDS-PAGE: A Detailed ... [https://www.goldbio.com/blogs/articles/protein-electrophoresis-sds-page-overview?srsltid=AfmBOopx5fJQcA98WVtQeFASzAJV-PoaD-Jz6yHttujSmq3b6u26EDSS]
- 2. SDS-PAGE [https://en.wikipedia.org/wiki/SDS-PAGE]
- 3. SDS-PAGE Electrophoresis Market Size & Share 2025-2032 [https://www.360iresearch.com/library/intelligence/sds-page-electrophoresis]
- 4. Deciphering food proteins: The applications of SDS-PAGE ... [https://www.sciencedirect.com/science/article/abs/pii/S2212429225003025]
- 5. SDS-PAGE: The science behind all those bubbles [https://www.antibodiesinc.com/pages/sds-page-demystified?srsltid=AfmBOoq3ty5ZEpx5yf6INqNbU2s5u3bxiRWQ-EfJSgHFZCbalL4HNSgm]
- 6. How Does SDS-PAGE Work? A Comprehensive Guide [https://www.metwarebio.com/how-sds-page-works-guide/]
- 7. SDS-PAGE Protocol [https://www.rockland.com/resources/sds-page-protocol/?srsltid=AfmBOookmKelz7_4_B7fCyDueqh0d9Zp7C1qhyGF27vwspxP-BsPrnNF]
- 8. SDS-PAGE Electrophoresis Market - Global Forecast 2025- ... [https://www.researchandmarkets.com/reports/6140756/sds-page-electrophoresis-market-global?srsltid=AfmBOoryWoP_RQqs2g6S0myqjvm9KfpIQiVK-jAJI64WoXXPcRVXYIwO]
- 9. SDS-PAGE: The science behind all those bubbles [https://www.antibodiesinc.com/pages/sds-page-demystified?srsltid=AfmBOoqgytZPzQO16X7wtyLl1x1dSS_XhW7Ok1Xfj7RvGvWrrQ0Pn9qN]
- 10. Protein Electrophoresis Using SDS-PAGE: A Detailed ... [https://www.goldbio.com/blogs/articles/protein-electrophoresis-sds-page-overview?srsltid=AfmBOorJGbf2tuqfys2QSa8Qo-tYJCG0PqRLVHBxxLCaiCFHzspeW7H2]
- 11. SDS-PAGE: A Cornerstone of Protein Analysis in Modern ... [https://www.metwarebio.com/sds-page-protein-analysis/]
- 12. Native SDS-PAGE: High Resolution Electrophoretic ... [https://pmc.ncbi.nlm.nih.gov/articles/PMC4517606/]
- 13. Protein analysis SDS PAGE [https://www.qiagen.com/us/knowledge-and-support/knowledge-hub/bench-guide/protein/protein-analysis/protein-analysis-sds-page]
- 14. Tips for Optimal SDS-PAGE Separation [https://www.rockland.com/resources/tips-for-optimal-sds-page-separation/?srsltid=AfmBOorf3BsWXQK-OsmDtFBRqqzYlnyQMCLR4PZk4G_gfVeuwv-RGcPz]
- 15. Comparison of in-gel protein separation techniques ... [https://pmc.ncbi.nlm.nih.gov/articles/PMC4234072/]
- 16. : Principle, Protocol & Key Applications Explained SDS PAGE [https://www.vedantu.com/biology/sds-page]
- 17. Protein Denaturing and Reducing Agents [https://www.thermofisher.com/us/en/home/life-science/protein-biology/protein-labeling-crosslinking/protein-modification/reducing-agents-protein-disulfides.html]
- 18. - SDS - GeeksforGeeks PAGE [https://www.geeksforgeeks.org/biology/sds-page/]
- 19. Protein Electrophoresis Using SDS-PAGE: A Detailed ... [https://www.goldbio.com/blogs/articles/protein-electrophoresis-sds-page-overview?srsltid=AfmBOorQkC7UTG3US0QNX44W84G-R_Nn9c4Qs_2lL0NBB-CzDROd4CMo]
- 20. The principle and method of polyacrylamide gel ... [https://www.mblbio.com/bio/g/support/method/sds-page.html]
- 21. Polyacrylamide gel electrophoresis: a versatile tool for the ... [https://pmc.ncbi.nlm.nih.gov/articles/PMC9887536/]
- 22. Western blotting guide: Part 2, Protein separation by SDS- ... [https://www.jacksonimmuno.com/secondary-antibody-resource/technical-tips/western-blotting-guide-part-2/]
- 23. Understanding Pore Size and Gel Properties – PAM ... [https://witcarbon.com/agarose-vs-polyacrylamide-understanding-pore-size-and-gel-properties/]
- 24. SDS-PAGE Protocol [https://www.rockland.com/resources/sds-page-protocol/?srsltid=AfmBOopVl1RH_evOEGjooA8jREqKZ7lxhHKOhT1A43Wbol9HscmNxdxj]
- 25. Polyacrylamide Gel Electrophoresis (SDS-PAGE) [https://www.protocols.io/view/polyacrylamide-gel-electrophoresis-sds-page-9b7h2rn.html]
- 26. SDS-PAGE电泳的基础原理和实验步骤 [https://www.detaibio.com/topics/sds-page-technology.html]
- 27. 不连续电泳 - 生物百科 [https://wiki.bioguider.com/doc-view-1314.html]
- 28. Laemmli buffer: Preparation (1x,2x & 4x) and principle [https://sharebiology.com/laemmli-buffer-preparation/]
- 29. SDS-PAGE - 蛋白质电泳 - 欣伯玉生物 [https://www.x-biotech.com/SDS-PAGE?article_id=34]
- 30. SDS-PAGE Protein Loading Buffer 2X (Reducing) [https://www.bosterbio.com/sds-page-protein-loading-buffer-2x-reducing-ar0131-boster.html?srsltid=AfmBOoqOn6aRAicD2NIpfRNvZsa4pPhC-jcHcgb_-V1ghRrdQ2hXE-g9]
- 31. 视频: 使用SDS-PAGE 分离蛋白质:程序和应用 [https://www.jove.com/cn/v/5058/separating-protein-with-sds-page-procedure-and-applications]
- 32. How SDS-PAGE Separates Proteins [https://azurebiosystems.com/blog/how-sds-page-separates-proteins/]
- 33. SDS-PAGE Protocol [https://www.rockland.com/resources/sds-page-protocol/?srsltid=AfmBOooDZEjKVMck54_J2ebFDsYiqFONwYd5MFbO0Fstb5WkVJHNNVKL]
- 34. SDS Page Protocol [https://www.neobiotechnologies.com/protocol/sds-page-protocol/?srsltid=AfmBOopzBTSlz9TFLeJBInhyYlaho-JJWRJOACrQTO7gXRNLNV5lld0E]
- 35. SDS-PAGE: The science behind all those bubbles [https://www.antibodiesinc.com/pages/sds-page-demystified?srsltid=AfmBOorFOhOeiD_GgNi5x89K3JkJHMp44Hl01P49XSWy2JShXvAeT-NS]
- 36. Protein Electrophoresis Using SDS-PAGE: A Detailed ... [https://www.goldbio.com/blogs/articles/protein-electrophoresis-sds-page-overview?srsltid=AfmBOoppXwUdFlAmqiryjsML3t5213As99QVBPhYqRH1QCLBKE-JwPCr]
- 37. An Easy SDS-PAGE Gel Recipe & 10-Step Protocol [https://bitesizebio.com/59429/sds-page-gel-recipe/]
- 38. Western Blot SDS-PAGE [https://www.novusbio.com/support/support-by-application/western-blot-sds-page?srsltid=AfmBOooz-pgxlSw2YecRHm46gcMaWpwjmNGrPNqToCaEXtxsplMxrVmq]
- 39. SDS-PAGE: The science behind all those bubbles [https://www.antibodiesinc.com/pages/sds-page-demystified?srsltid=AfmBOooTjJlraYRVT9y9TUg3Jj8LOyvLtUhRYJMPagirzRWR6x1_8EL8]
- 40. Tips for Optimal SDS-PAGE Separation [https://www.rockland.com/resources/tips-for-optimal-sds-page-separation/?srsltid=AfmBOorLaRCUleUnOcnTrRRweXYcygYmd9pXDH2bud8CGlvZ061Igmj_]
- 41. 6 Best Tips for Troubleshooting Poor Band Separation on ... [https://azurebiosystems.com/blog/6-tips-for-troubleshooting-poor-band-separation-on-sds-page-gels/]
- 42. How current, voltage, and power settings affect SDS-PAGE [https://www.biossusa.com/blogs/news/how-current-voltage-and-power-settings-affect-sds-page?srsltid=AfmBOoqgu8DrvywxgqI8UVyFhIWua5dpePVSyD_PNOv6pRRtQQBH0Lae]
- 43. SDS-PAGE Protocol [https://www.rockland.com/resources/sds-page-protocol/?srsltid=AfmBOopibwAZlbwGCtABnRaLEzFUVoPf0baR9VXCaWcBRqBaqbgAdtt_]
- 44. Western Blot SDS-PAGE [https://www.novusbio.com/support/support-by-application/western-blot-sds-page?srsltid=AfmBOopasSHu0tWw9uJNVwG2HpSbFsH1InP7GGYcSENa_qDUCVq3bW88]
- 45. Troubleshooting SDS-PAGE Gel Running Issues [https://www.goldbio.com/blogs/articles/troubleshooting-sds-page-gel-running-issues?srsltid=AfmBOooco3C7cq44jIMVjzcLo8fW2zQlx6L4ZHsjtuPIHvq5SO13X4iI]
- 46. Protein Electrophoresis Using SDS-PAGE: A Detailed ... [https://www.goldbio.com/blogs/articles/protein-electrophoresis-sds-page-overview?srsltid=AfmBOopdIDatXoZdeC3RMIKeYsbNpepA6zGq6WQo-4tZLjNIhYAI18jw]
- 47. SDS-PAGE guide: Sample preparation to analysis [https://www.abcam.com/en-us/knowledge-center/western-blot/sds-page-guide]
- 48. Analysis of SDS-PAGE Gel Electrophoresis Results [https://www.mtoz-biolabs.com/analysis-of-sds-page-gel-electrophoresis-results.html]
- 49. SDS-PAGE Protocol [https://neutab.creative-biolabs.com/sds-page-analysis.htm]
- 50. Visualization of proteins in SDS PAGE gels [https://www.qiagen.com/us/knowledge-and-support/knowledge-hub/bench-guide/protein/protein-analysis/visualization-of-proteins-in-sds-page-gels]
- 51. SDS-PAGE Protocol [https://www.rockland.com/resources/sds-page-protocol/?srsltid=AfmBOoqmgGh8Q58Ul5i_l-KQxquOLZ62pY65R5azxMzzent2RZcQohO1]
- 52. SDS-PAGE: The science behind all those bubbles [https://www.antibodiesinc.com/pages/sds-page-demystified?srsltid=AfmBOooAOkCCvK7Jn_mKGge8FS6eb0ovqEnu6Ga6w3aO6KelYYPFX_ZN]
- 53. Protein Electrophoresis Using SDS-PAGE: A Detailed ... [https://www.goldbio.com/blogs/articles/protein-electrophoresis-sds-page-overview?srsltid=AfmBOorRSZNLP0E4PfTPA5SzeecbZ64DZU2fNaa7DaNnNaFsgi6WDA06]
- 54. SDS-PAGE: The science behind all those bubbles [https://www.antibodiesinc.com/pages/sds-page-demystified?srsltid=AfmBOoqzrnjbB4liFflkfC1JBS3JJrnUGPaCsHjhIXyc65tLzWNERLAH]
- 55. Troubleshooting SDS-PAGE Gel Running Issues [https://www.goldbio.com/blogs/articles/troubleshooting-sds-page-gel-running-issues?srsltid=AfmBOoq4fg7oH_bLpaGoYtmFHEbshr2Vplk-qRigtq8668pYj6gxAt1L]
- 56. Troubleshooting Sodium Dodecyl Sulfate- Polyacrylamide ... [https://www.hycultbiotech.com/sds-page/troubleshooting/]
- 57. How current, voltage, and power settings affect SDS-PAGE [https://www.biossusa.com/blogs/news/how-current-voltage-and-power-settings-affect-sds-page?srsltid=AfmBOoqyInHlMnF1kk_95dOX8yYg0Gsi9bc6ZIEIpMfKBZC88Ba_Zi2y]
- 58. SDS-PAGE Troubleshooting: Why Are My Protein Bands ... [https://synapse.patsnap.com/article/sds-page-troubleshooting-why-are-my-protein-bands-fuzzy]
- 59. SDS-PAGE: The science behind all those bubbles [https://www.antibodiesinc.com/pages/sds-page-demystified?srsltid=AfmBOop-u-kM4BLyY58sFXEcYJ0eqoQbcqSW63ssLz7OuRulaEYravev]
- 60. The gradient-like separation and reduced running time with ... [https://www.sciencedirect.com/science/article/abs/pii/S0003269722002457]
- 61. Protein Electrophoresis Using SDS-PAGE: A Detailed ... [https://www.goldbio.com/blogs/articles/protein-electrophoresis-sds-page-overview?srsltid=AfmBOooUmGtiiW_OD0SpxZqS4I8RS0b0ypdI32ACXuAeJ8yJKpODHhFh]
- 62. SDS-PAGE: The science behind all those bubbles [https://www.antibodiesinc.com/pages/sds-page-demystified?srsltid=AfmBOors5gB5i6JpYGXPArhARSl3rP3msSnHpTcPfZk0-cN48Q84W013]
- 63. Troubleshooting SDS-PAGE Gel Running Issues [https://www.goldbio.com/blogs/articles/troubleshooting-sds-page-gel-running-issues?srsltid=AfmBOorO2sY-mvQWf1Kzf26gB1ymZbcQWHGBHESbctyYhZnbcDnP4VG4]
- 64. Troubleshooting Common Electrophoresis Problems and ... [https://www.labx.com/resources/troubleshooting-common-electrophoresis-problems-and-artifacts/5539]
- 65. Troubleshooting SDS-PAGE Sample Preparation Issues [https://www.goldbio.com/blogs/articles/troubleshooting-sds-page-sample-preparation-issues?srsltid=AfmBOopl8q50ZjJbky-Or5Pb-7WAPLSvzmhQjPCCCgLCXmJTB7JInUHc]
- 66. SDS-PAGE: The science behind all those bubbles [https://www.antibodiesinc.com/pages/sds-page-demystified?srsltid=AfmBOooSbM7e35unMovBv3KJt4SfHtYzMv1GVQ9vlkAwKFQDJQFNVboX]
- 67. SDS-PAGE Optimization for Western Blot [https://www.bosterbio.com/protocol-and-troubleshooting/western-blotting-optimization/sds-page?srsltid=AfmBOopWFpPTpfM5E6Jc1omnDftoF_ux6q0pW6orSpA8oZAYFEoG011L]
- 68. Protein quantification in SDS‑PAGE gels by densitometry ... [https://www.protocols.io/view/protein-quantification-in-sds-page-gels-by-densito-g8aubzsex.html]
- 69. Methodological advances and strategies for high resolution ... [https://pmc.ncbi.nlm.nih.gov/articles/PMC9396402/]
- 70. SDS-PAGE: The science behind all those bubbles [https://www.antibodiesinc.com/pages/sds-page-demystified?srsltid=AfmBOopeW17bknn721ejOqjuAx0J1N82Hso_vvBEFjCkwrnbpjumRuoB]
- 71. SDS-PAGE Protocol from EnCor Biotechnology Inc. [https://files.encorbio.com/protocols/SDS-PAGE.htm]
- 72. Overview of SDS-PAGE [https://www.creative-proteomics.com/resource/overview-of-sds-page.htm]
- 73. Choosing the Right Molecular Weight Marker for SDS-PAGE [https://bitesizebio.com/8419/choosing-the-right-molecular-weight-marker-for-sds-page/]
- 74. What Are Pre-Stained Protein Ladders and Why Are They ... [https://nusep.us/blogs/protein-ladder-knowledge-hub/what-are-pre-stained-protein-ladders-and-why-are-they-essential-for-western-blotting-1?srsltid=AfmBOoqJ8CgY4H5Vy6ZQm_VfssjQpB5gH3FGMXM-bsDlhEjF7JruPvcN]
- 75. SDS protein interactions [https://www.sciencedirect.com/science/article/abs/pii/S0301462225001462]
- 76. SDS-PAGE: The science behind all those bubbles [https://www.antibodiesinc.com/pages/sds-page-demystified?srsltid=AfmBOooeMAlu3qrzD8xLK1VJEy9HOiEVlYVjd9-CsELQDCCbH5XhmicP]
- 77. Comparing SDS-PAGE and CE-SDS for Antibody Purity ... [https://www.bioprocessintl.com/qa-qc/comparing-sds-page-and-ce-sds-for-antibody-purity-analysis]
- 78. Performance of capillary electrophoresis instruments [https://www.sciencedirect.com/science/article/abs/pii/S0165993623001437]
- 79. Assessing the Comparability of Degradation Profiles ... [https://pmc.ncbi.nlm.nih.gov/articles/PMC12472202/]
- 80. A comparative study of CE‐SDS, SDS‐PAGE, and Simple ... [https://www.semanticscholar.org/paper/A-comparative-study-of-CE%E2%80%90SDS%2C-SDS%E2%80%90PAGE%2C-and-Simple-Scheller-Krebs/bc62fc900ae320fbfe3813514a5284b5a804f511]
- 81. A Novel Application For Therapeutic Protein Characterization [https://pubmed.ncbi.nlm.nih.gov/29357216/]
- 82. Advantages and Disadvantages of SDS-PAGE for Protein ... [https://www.mtoz-biolabs.com/advantages-and-disadvantages-of-sds-page-for-protein-separation.html]
- 83. Overview of Protein Electrophoresis [https://www.thermofisher.com/us/en/home/life-science/protein-biology/protein-biology-learning-center/protein-biology-resource-library/pierce-protein-methods/overview-electrophoresis.html]
- 84. A protocol for recombinant protein quantification by ... [https://pmc.ncbi.nlm.nih.gov/articles/PMC7294310/]
- 85. Effectiveness and limitation of two-dimensional gel ... [https://www.sciencedirect.com/science/article/abs/pii/S1570023204006749]
- 86. Determination of Protein Molecular Weights on SDS-PAGE [https://pubmed.ncbi.nlm.nih.gov/30426411/]
- 87. SDS-PAGE Optimization for Western Blot [https://www.bosterbio.com/protocol-and-troubleshooting/western-blotting-optimization/sds-page?srsltid=AfmBOoqtV_2wA1aIbp5kiDA3goqZkbnptDRUCujZ5bNHaEMdozZNWFzr]
- 88. Advantages and Disadvantages of SDS-PAGE Based ... [https://www.mtoz-biolabs.com/advantages-and-disadvantages-of-sds-page-based-protein-separation.html]
- 89. Tips for Optimal SDS-PAGE Separation [https://www.rockland.com/resources/tips-for-optimal-sds-page-separation/?srsltid=AfmBOop4xvmpE5sNi5B2hdoOQFh81CLxyZaCUgE7I2nk0RYAJ9y3wB53]
- 90. Protein Electrophoresis Using SDS-PAGE: A Detailed ... [https://www.goldbio.com/blogs/articles/protein-electrophoresis-sds-page-overview?srsltid=AfmBOoo7R16WEy6-L5y58fzvOmBP04QeovpABDG0Rl_6e8FtFKH5BhhR]
- 91. With an anticipated CAGR of 6.2%, the SDS-PAGE ... [https://www.linkedin.com/pulse/anticipated-cagr-62-sds-page-electrophoresis-market-xpopf]
- 92. Drivers and Barriers to Growth 2025-2033 [https://www.datainsightsmarket.com/reports/sds-page-electrophoresis-543939]
- 93. Efficient protein quantification in drug metabolism and ... [https://www.sciencedirect.com/science/article/abs/pii/S0090955625090579]