Gradient Gels vs. Fixed % Gels: A Strategic Guide for Optimizing Protein Separation in Biomedical Research
This article provides a comprehensive guide for researchers, scientists, and drug development professionals on selecting and optimizing SDS-PAGE gels for protein analysis.
Gradient Gels vs. Fixed % Gels: A Strategic Guide for Optimizing Protein Separation in Biomedical Research
Abstract
This article provides a comprehensive guide for researchers, scientists, and drug development professionals on selecting and optimizing SDS-PAGE gels for protein analysis. It covers the foundational principles of gradient and fixed-percentage polyacrylamide gels, detailing their respective advantages in resolving proteins of varying molecular weights. The content delivers practical methodological guidance for application, essential troubleshooting protocols to address common issues like smearing and band distortion, and a definitive comparative analysis to inform experimental design. By synthesizing current best practices and technical insights, this resource aims to enhance the accuracy, efficiency, and reproducibility of protein characterization in biomedical and clinical research.
Understanding the Core Principles: How Gel Composition Dictates Protein Separation
In the realm of protein biochemistry, polyacrylamide gel electrophoresis (PAGE) serves as a fundamental technique for separating macromolecules based on size and charge. The separation mechanism hinges on a critical phenomenon known as the "sieving effect"—a process where the polymerized acrylamide matrix functions as a molecular sieve, retarding the migration of molecules in inverse proportion to their size [1]. This sieving effect is not a constant property but is directly governed by the polyacrylamide concentration, which determines the average pore size within the gel matrix [2] [1]. The central relationship is straightforward yet powerful: as the total concentration of acrylamide increases, the average pore size within the gel decreases reciprocally [1] [3]. This foundational principle enables researchers to tailor their electrophoretic conditions to specific experimental needs, whether using a single-concentration fixed gel or a gradient gel with continuously varying pore sizes.
Understanding this relationship is paramount when evaluating gradient gels versus fixed-percentage SDS-PAGE gels for research applications. While fixed-percentage gels offer uniform pore sizes ideal for separating proteins within a narrow molecular weight range, gradient gels provide a continuum of pore sizes that can resolve a broader spectrum of protein sizes in a single run [2] [4]. This guide will objectively compare these systems, focusing on how their differing approaches to the sieving effect impact performance in protein separation, with supporting experimental data and detailed methodologies.
The Fundamental Science of Polyacrylamide Gels
Gel Composition and Polymerization Chemistry
Polyacrylamide gels are formed through the copolymerization of two primary chemical constituents: acrylamide monomers and N,N'-methylenebisacrylamide (bisacrylamide) cross-linker [5] [1]. When combined with free radical initiators—typically ammonium persulfate (APS) as the catalyst and N,N,N',N'-tetramethylenediamine (TEMED) as the stabilizer—these compounds undergo a polymerization reaction that creates a three-dimensional hydrogel network [5] [1] [3]. The resulting structure is a neutral, hydrophilic matrix characterized by interconnected pores whose dimensions are critical for the sieving effect.
The pore size within this network is precisely controlled by two key variables: the total concentration of acrylamide monomers (%T), where T represents the combined mass of acrylamide and bisacrylamide per unit volume, and the cross-linker concentration (%C), defined as the proportion of bisacrylamide relative to the total acrylamide mass [5] [1]. Research has demonstrated that pore size decreases as the total acrylamide concentration increases, with the smallest pores achieved at approximately 5% cross-linking [1]. Any deviation from this optimal cross-linking percentage—either higher or lower—results in larger effective pore sizes due to changes in the network topology [1]. This tunable porosity forms the basis for separating biomolecules of different sizes during electrophoresis.
Quantitative Relationship: Concentration Versus Pore Size
The inverse relationship between polyacrylamide concentration and pore size follows predictable patterns that can be quantified for experimental optimization. As the acrylamide percentage increases, the gel matrix becomes denser with more cross-links per unit volume, consequently reducing the average space between polymer strands [1] [3]. For instance, a 7% polyacrylamide gel features significantly larger pores than a 12% gel, making it more suitable for separating high-molecular-weight proteins [3].
This quantitative relationship enables researchers to select appropriate gel percentages based on their target protein sizes. The sieving effect becomes more pronounced in higher percentage gels, which provide greater resistance against the migration of larger molecules while allowing smaller proteins to navigate the matrix more freely [2] [1]. This molecular sieving behavior, when calibrated against known standards, permits not only the separation of complex protein mixtures but also the estimation of molecular weights with considerable accuracy [1].
Table 1: Protein Size Resolution Ranges for Fixed Polyacrylamide Gel Percentages
| Gel Percentage | Effective Separation Range (kDa) | Best For |
|---|---|---|
| 4-6% | >200 | Very large proteins and complexes [2] |
| 8% | 25-200 [5], 50-200 [2] | Large proteins [4] |
| 10% | 15-100 [2], 50-150 [4] | Actin, tubulin, HSP70 [4] |
| 12% | 10-70 [2] [5], 20-100 [4] | Enzymes, transcription factors [4] |
| 15% | 12-45 [5], <30 kDa [4] | Small peptides [4] |
| 20% | 4-40 [2] [5] | Very small proteins and peptides |
Gradient Gels vs. Fixed Percentage Gels: A Comparative Analysis
Structural and Functional Differences
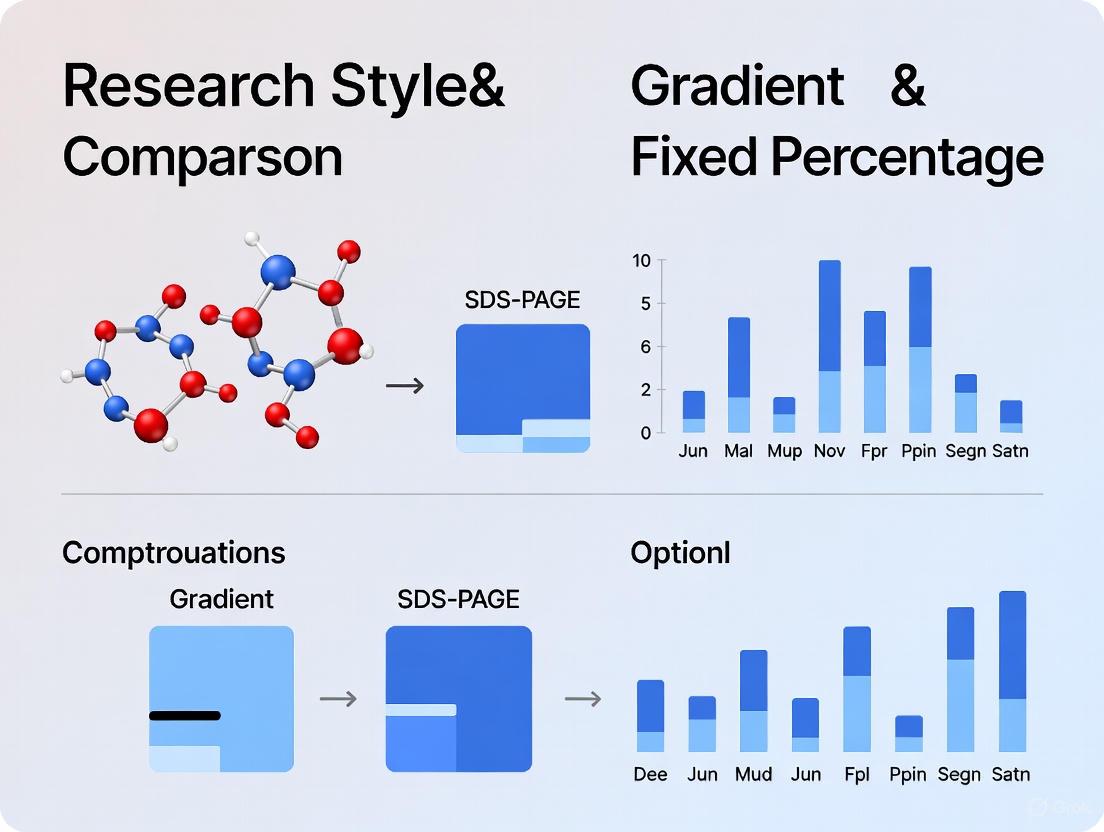
Fixed-percentage gels maintain a constant acrylamide concentration throughout the entire gel matrix, creating a uniform pore size that provides optimal separation for proteins within a specific molecular weight range [4] [6]. These gels typically consist of two distinct layers: a stacking gel with lower acrylamide concentration (e.g., 4-5%) that concentrates proteins before they enter the resolving gel, which has a higher, fixed percentage tailored to the target protein sizes [6] [3].
In contrast, gradient gels exhibit a continuous increase in acrylamide concentration from top to bottom, creating a corresponding decrease in pore size throughout the separation path [2] [4]. This gradient can range from 4-20%, 8-16%, or other customized ranges depending on the application needs [4]. The continuously changing pore structure means that as proteins migrate, they encounter progressively smaller pores, creating a "pore limit" where each protein eventually reaches a gel concentration through which it can no longer easily pass [7]. This results in three significant advantages: sharpening of protein bands, extended separation range, and improved resolution of similarly sized proteins [7].
Performance Comparison and Experimental Considerations
When selecting between gradient and fixed-percentage gels, researchers must consider several performance characteristics that directly impact experimental outcomes. The following table summarizes key comparative features based on experimental data and manufacturer specifications:
Table 2: Performance Comparison Between Fixed % and Gradient Gels
| Feature | Fixed % Gel | 4-20% Gradient Gel |
|---|---|---|
| Pore Size Distribution | Uniform throughout [4] | Varies continuously from top to bottom [4] |
| Optimal Resolution Range | Narrow, specific molecular weights [4] | Broad (e.g., 4-250 kDa) [2] [4] |
| Band Sharpness | Good for target size range | Enhanced due to progressive retardation [2] [7] |
| Separation of Similar-sized Proteins | Moderate | Superior [2] [7] |
| Run Time | Slightly faster [4] | Slightly longer [4] |
| Best Application | Known molecular weight targets [4] | Unknown molecular weights, complex mixtures, multiple targets [4] |
| Cost Considerations | Lower [4] | Slightly higher [4] |
From an experimental perspective, gradient gels are particularly valuable when analyzing complex protein mixtures or when target protein sizes are unknown [4]. The gradient configuration allows small proteins to resolve effectively in the high-percentage regions (e.g., 20% acrylamide at the bottom) while simultaneously providing adequate separation of large proteins in the low-percentage regions (e.g., 4% acrylamide at the top) [2] [4]. This versatility makes gradient gels ideal for discovery-phase research, analysis of post-translational modifications, and detection of protein degradation products [4].
Fixed-percentage gels, however, maintain advantages for specific applications where maximum resolution within a narrow size range is required [4]. When the target protein size is well-characterized, a fixed-percentage gel can provide slightly superior separation for proteins of very similar molecular weights within that specific range. Additionally, fixed-percentage gels may be preferred for quantitative comparisons between samples run across multiple gels, as the consistent pore size minimizes gel-to-gel variability in migration characteristics [4].
Experimental Protocols and Methodologies
Protocol 1: Casting Fixed-Percentage SDS-Polyacrylamide Gels
The preparation of fixed-percentage polyacrylamide gels requires precise formulation and handling to ensure reproducible pore sizes and separation performance. The following protocol, adapted from established laboratory methods [1] [3], details the process for creating a standard 10% Tris-glycine mini gel for SDS-PAGE:
Materials Required:
- Acrylamide/bis-acrylamide solution (typically 30-40% stock)
- 1.5 M Tris-HCl buffer (pH 8.8 for resolving gel)
- 10% ammonium persulfate (APS) solution, freshly prepared
- TEMED (N,N,N',N'-Tetramethylethylenediamine)
- 10% sodium dodecyl sulfate (SDS) solution
- Butanol or water for overlay
- Gel casting apparatus with glass plates, spacers, and combs
Methodology:
- Resolving Gel Preparation: Combine 7.5 mL of 40% acrylamide solution, 3.9 mL of 1% bisacrylamide solution, and 7.5 mL of 1.5 M Tris-HCl (pH 8.7) in a clean flask. Add deionized water to bring the total volume to 30 mL [3].
- Initiate Polymerization: Add 0.3 mL of 10% APS, 0.3 mL of 10% SDS, and 0.03 mL TEMED to the mixture. Swirl gently to mix without introducing air bubbles [3].
- Cast the Gel: Immediately pour the solution between the assembled glass plates, leaving space for the stacking gel. Carefully overlay with butanol or water to create a flat interface and exclude oxygen, which inhibits polymerization.
- Polymerization: Allow the resolving gel to polymerize completely (typically 20-30 minutes at room temperature). A distinct refractive interface will form between the gel and overlay.
- Stacking Gel Preparation: Prepare the stacking gel solution with lower acrylamide concentration (typically 4-5%) in Tris-HCl buffer (pH 6.8).
- Complete Casting: After removing the overlay, pour the stacking gel solution over the polymerized resolving gel and immediately insert the comb. Allow to polymerize for 15-20 minutes.
- Storage: The cast gel can be used immediately or wrapped in moist paper towels and stored at 4°C for up to several days.
Critical Considerations: Acrylamide is a potent neurotoxin in its unpolymerized form, requiring appropriate personal protective equipment including gloves [5]. The ratio of bisacrylamide to acrylamide should be maintained consistently (typically 1:29 to 1:37.5) to ensure reproducible pore sizes [1]. Gel polymerization is temperature-sensitive, with slower polymerization at lower temperatures potentially affecting pore structure.
Protocol 2: Preparing Gradient Gels Using a Gradient Maker
Creating gradient gels requires specialized equipment and techniques to establish a continuous gradient of acrylamide concentrations. The following protocol describes the use of a gradient mixer for preparing 4-20% gradient gels [2]:
Materials Required:
- Two-chamber gradient mixer with connecting channel and valve
- Peristaltic pump or gravity flow system
- Standard gel casting supplies as in Protocol 1
- Low (4%) and high (20%) acrylamide solutions
Methodology:
- Solution Preparation: Prepare separate solutions of low-percentage (4%) and high-percentage (20%) acrylamide in appropriate buffers, excluding APS and TEMED at this stage.
- Gradient Maker Setup: Place the gradient maker on a stir plate with the connecting channel valve closed. Fill the chamber closest to the outlet with the high-percentage solution, and the other chamber with the low-percentage solution.
- Initiate Polymerization: Add APS and TEMED to both chambers immediately before pouring to minimize premature polymerization.
- Mixing and Pouring: Open the connecting valve and simultaneously start the magnetic stirrer in the high-percentage chamber and begin the flow from the gradient maker to the gel cassette using a peristaltic pump or gravity flow.
- Continuous Gradient Formation: The progressive mixing of the two solutions creates a linear concentration gradient from 4% to 20% as the gel cassette fills from bottom to top.
- Overlay and Polymerize: Carefully overlay the gradient gel with butanol or water and allow to polymerize completely (30-45 minutes).
- Stacking Gel Addition: Although gradient gels can be run without stacking gels, a 4-5% stacking gel can be added after polymerization of the gradient gel if desired.
Alternative Method: Pipette with Air Bubble Technique [2] For laboratories without gradient makers, a simplified technique uses a serological pipette:
- Prepare low and high concentration acrylamide solutions with APS and TEMED in separate tubes.
- Using a 5- or 10-mL serological pipette, draw up half the total volume needed from the low-concentration tube, then the other half from the high-concentration tube.
- Gently aspirate approximately 0.5 mL of air to create an air bubble, then allow the bubble to travel up the pipette to mix the solutions partially.
- Slowly pipette the partially mixed solution into the gel cassette, creating an acceptable gradient as the different concentrations interdiffuse.
Critical Considerations: Timing is crucial when working with polymerization initiators; delayed pouring after adding APS and TEMED can result in premature gelation. Consistency in flow rate during gradient formation is essential for reproducible linear gradients. The orientation of the gel cassette during pouring (slight tilt) can improve gradient linearity by minimizing turbulence.
Visualization of the Sieving Effect and Experimental Workflows
Diagram 1: Molecular sieving mechanism in polyacrylamide gels, showing how pore size relates to acrylamide concentration and affects protein separation.
Diagram 2: Experimental workflow for comparing gradient and fixed-percentage gels, highlighting decision points and analytical outcomes.
Essential Research Reagents and Materials
Successful implementation of SDS-PAGE experiments, whether using gradient or fixed-percentage gels, requires specific research reagents and materials that ensure reproducible results. The following table details essential components and their functions in electrophoretic separations:
Table 3: Essential Research Reagents for SDS-PAGE Experiments
| Reagent/Material | Function | Critical Specifications |
|---|---|---|
| Acrylamide/Bis-acrylamide | Forms the porous gel matrix for molecular sieving [1] [3] | Typically 29:1 or 37.5:1 ratio; neurotoxic in monomer form [5] |
| Ammonium Persulfate (APS) | Free radical initiator for gel polymerization [5] [3] | Fresh 10% solution recommended; concentration affects polymerization rate |
| TEMED | Catalyst that promotes free radical formation from APS [5] [3] | Concentration affects polymerization rate; hygroscopic |
| SDS (Sodium Dodecyl Sulfate) | Denatures proteins and confers uniform charge density [1] [3] | Purity critical for consistent binding (1.4g SDS:1g protein) [3] |
| Tris Buffers | Maintain pH during electrophoresis [3] | Different pH for stacking (6.8) and resolving (8.8) gels [3] |
| Molecular Weight Markers | Reference standards for size estimation [5] [3] | Prestained or unstained; should cover target separation range |
| Protein Stains (Coomassie, Silver Stain) | Visualize separated protein bands [1] | Sensitivity ranges: Coomassie (~100ng), Silver Stain (~1ng) |
| Electrophoresis Buffer (Tris-Glycine) | Conducts current and maintains pH during run [3] | Typically contains SDS for continuous protein denaturation |
Additional specialized equipment includes gel casting systems, electrophoresis chambers, power supplies, and imaging systems. For gradient gel preparation, a gradient maker or specialized casting apparatus is essential for reproducible linear gradients [2]. Pre-cast gels offer convenience and reproducibility but at higher cost compared to laboratory-cast gels [2] [4].
The sieving effect in polyacrylamide gel electrophoresis represents a fundamental principle in protein separation technology, governed directly by the relationship between acrylamide concentration and pore size. This review has objectively compared the performance characteristics of gradient gels versus fixed-percentage SDS-PAGE gels, demonstrating that each system offers distinct advantages depending on experimental requirements.
Fixed-percentage gels provide excellent resolution within narrow molecular weight ranges and are ideal for targeted analysis of known proteins, while gradient gels offer unparalleled versatility for separating complex mixtures across broad molecular weight spectra. The selection between these systems should be guided by the specific research objectives: fixed-percentage gels for maximal resolution of known targets, and gradient gels for discovery-phase research, analysis of unknown samples, or when processing valuable limited-quantity samples.
Understanding the precise relationship between polyacrylamide concentration and pore size enables researchers to make informed decisions about gel selection and optimization, ultimately enhancing the quality and reproducibility of protein separation experiments. As electrophoretic techniques continue to evolve, this fundamental understanding of the sieving effect remains central to advances in proteomic research and biotechnology applications.
In the realm of protein analysis, sodium dodecyl sulfate-polyacrylamide gel electrophoresis (SDS-PAGE) stands as a foundational technique for separating proteins by molecular weight. Within this methodology, fixed-percentage gels represent a precise tool characterized by their uniform pore structure, offering superior resolution for proteins within specific molecular weight ranges. This guide objectively evaluates the performance of fixed-percentage gels against gradient gel alternatives, providing researchers and drug development professionals with the experimental data and protocols necessary to inform their methodological choices [8] [9].
Principle of Fixed-Percentage Gels
Fixed-percentage gels, also known as single-concentration gels, are formulated with a uniform concentration of acrylamide and bisacrylamide throughout the resolving gel matrix. This consistency creates a gel with a uniform pore size, which acts as a molecular sieve. During electrophoresis, the sieving effect causes smaller proteins to migrate faster through the gel, while larger proteins migrate more slowly [9] [10]. The separation is based almost entirely on polypeptide chain length because the SDS treatment denatures the proteins and confers a uniform negative charge, effectively neutralizing the influence of native protein charge or structure [9] [11]. The pore size is inversely related to the polyacrylamide percentage; a 7% gel has larger pores than a 12% gel, making it more suitable for separating larger proteins [9].
Comparative Performance Analysis
The core advantage of fixed-percentage gels lies in their ability to provide maximum resolution for a narrow molecular weight range. The table below summarizes the optimal protein separation ranges for various fixed-percentage gels, enabling precise selection based on target protein size [8] [10].
Table 1: Protein Separation Ranges for Fixed-Percentage Gels
| Gel Percentage (%) | Optimal Protein Size Range (kDa) | Commonly Resolved Proteins |
|---|---|---|
| 5% | >200 kDa | Very large protein complexes |
| 7.5% | 25 - 200 kDa | Broad range for larger proteins |
| 10% | 15 - 100 kDa | Actin, Tubulin, HSP70 [8] |
| 12% | 10 - 70 kDa [10] (20 - 100 kDa [8]) | Many enzymes, transcription factors [8] |
| 15% | 12 - 45 kDa [10] (<30 kDa [8]) | Small peptides, Ubiquitin [8] |
| 20% | 4 - 40 kDa | Very small peptides and proteins |
When compared to gradient gels, fixed-percentage gels exhibit distinct performance characteristics, as outlined in the following comparative table.
Table 2: Fixed-Percentage Gels vs. Gradient Gels
| Feature | Fixed-Percentage Gel | 4-20% Gradient Gel |
|---|---|---|
| Pore Size | Uniform throughout the gel [8] [6] | Varies from large (top) to small (bottom) [8] [6] |
| Resolution Range | Narrow, optimized for a specific MW range [8] | Wide, capable of separating proteins from very small to very large in one gel [8] [2] |
| Best Application | Analysis of proteins with known, similar molecular weights [8] | Analysis of complex mixtures, unknown molecular weights, or very broad MW ranges [8] [2] |
| Band Sharpness | Sharp bands within the optimal range | Sharper bands across a wide range due to a "stacking" effect within the gradient [2] |
| Run Time | Slightly faster [8] | Slightly longer [8] |
| Cost | Generally lower [8] | Slightly higher [8] |
Experimental Protocols and Methodologies
Gel Selection and Formulation
Selecting the correct acrylamide percentage is critical. For instance, if your target protein is 55 kDa, a 10% or 12% gel would be optimal. The following workflow outlines the key decision points for choosing between fixed-percentage and gradient gels.
Standard SDS-PAGE Protocol with Fixed-Percentage Gels
The following is a detailed protocol for running a denaturing SDS-PAGE using a hand-cast fixed-percentage gel [10] [11].
Gel Casting:
- Assemble Mold: Clean glass plates and spacers with ethanol and assemble the gel cassette securely [11].
- Prepare and Pour Resolving Gel: Mix the resolving gel solution according to the recipe in Table 3. Add ammonium persulfate (APS) and TEMED last, as they initiate polymerization. Pour the solution immediately into the gel cassette, leaving space for the stacking gel.
- Overlay and Polymerize: Overlay the resolving gel with water-saturated butan-1-ol or deionized water to ensure a flat surface. Allow to polymerize completely (typically 15-60 minutes) [10] [11].
- Prepare and Pour Stacking Gel: Pour off the overlay liquid. Prepare the stacking gel solution (Table 3), add APS and TEMED, and pour it onto the polymerized resolving gel. Immediately insert a clean comb without trapping air bubbles. Allow to polymerize for about 30 minutes [10].
Sample Preparation:
Electrophoresis:
- Mount the gel cassette in the electrophoresis tank.
- Fill the upper and lower chambers with running buffer (e.g., Tris-Glycine-SDS buffer).
- Carefully load samples and molecular weight markers into the wells.
- Connect the power supply and run at a constant voltage (e.g., 150-200V for mini-gels) until the dye front reaches the bottom of the gel [11].
Table 3: Example Formulations for Hand-Cast Fixed-Percentage Gels
| Reagent | 12% Resolving Gel (10 mL) | Stacking Gel (5 mL) |
|---|---|---|
| dH₂O | 3.28 mL | 3.05 mL |
| 1.5M Tris-HCl (pH 8.8) | 2.5 mL | - |
| 0.5M Tris-HCl (pH 6.8) | - | 1.25 mL |
| 10% SDS | 100 µL | 50 µL |
| 30% Acrylamide/Bis Solution | 4.0 mL | 650 µL |
| 10% Ammonium Persulfate (APS) | 50 µL | 25 µL |
| TEMED | 5 µL | 10 µL |
The Scientist's Toolkit: Essential Reagent Solutions
Successful and reproducible SDS-PAGE relies on a set of key reagents, each with a specific function in the separation process.
Table 4: Essential Reagents for SDS-PAGE with Fixed-Percentage Gels
| Reagent / Material | Function |
|---|---|
| Acrylamide/Bis-Acrylamide | Forms the cross-linked polymer matrix (gel) that acts as a molecular sieve for separation [9]. |
| SDS (Sodium Dodecyl Sulfate) | Denatures proteins and confers a uniform negative charge, allowing separation based primarily on size [9] [11]. |
| Tris-HCl Buffer | Provides the appropriate pH environment for the electrophoresis reaction and gel polymerization [10]. |
| APS & TEMED | Catalyze the polymerization reaction of acrylamide to form the polyacrylamide gel [9]. |
| Reducing Agent (e.g., DTT, β-ME) | Cleaves disulfide bonds to ensure complete protein denaturation into individual polypeptides [9]. |
| Tracking Dye (e.g., Bromophenol Blue) | Visualizes the progress of electrophoresis during the run [11]. |
| Molecular Weight Markers | A set of pre-stained or unstained proteins of known sizes, used to estimate the molecular weight of unknown proteins [9]. |
Fixed-percentage polyacrylamide gels remain an indispensable tool in the molecular biology and biopharmaceutical toolkit. Their uniform pore structure provides unrivalled resolution for proteins within a predetermined, narrow molecular weight range, making them the gel of choice for routine analysis of samples with known protein sizes. While gradient gels offer superior versatility for complex or unknown samples, the precision, simplicity, and cost-effectiveness of fixed-percentage gels ensure their continued relevance in laboratories focused on reproducibility and optimal resolution for specific targets.
Sodium dodecyl sulfate–polyacrylamide gel electrophoresis (SDS-PAGE) serves as a cornerstone technique for separating proteins based on molecular weight, fundamentally reliant on the sieving properties of the polyacrylamide matrix [12]. Within this established methodology, two primary gel formats exist: fixed-concentration gels and gradient gels. Fixed-concentration gels, sometimes called linear or uniform gels, maintain a single, consistent acrylamide concentration throughout the entire gel, creating a uniform pore size [13]. This format is ideal for resolving proteins within a specific, narrow molecular weight range. In contrast, gradient gels are formulated with a continuously varying acrylamide concentration, typically increasing from the top to the bottom of the gel [2]. This creates a corresponding gradient of pore sizes, from larger pores at the top to smaller pores at the bottom, enabling the effective separation of a much broader range of protein sizes in a single run [7].
The selection between these two formats is not trivial; it directly impacts the resolution, sharpness, and interpretability of the resulting protein banding pattern. This guide provides an objective, data-driven comparison of gradient and fixed-percentage SDS-PAGE gels, equipping researchers and drug development professionals with the evidence needed to select the optimal matrix for their specific application, whether in exploratory research or rigorous quality control.
Objective Comparison of Gel Performance
Key Performance Characteristics and Applications
The core structural difference between gradient and fixed-percentage gels translates directly into distinct performance characteristics, as summarized in the table below.
Table 1: Comparative Analysis of Fixed-Percentage vs. Gradient Gels
| Feature | Fixed % Gel | 4–20% Gradient Gel |
|---|---|---|
| Pore Size | Uniform across the gel [13] | Varies continuously from top (large) to bottom (small) [13] |
| Separation Range | Narrow, optimized for a specific MW range [13] | Wide, capable of resolving proteins from ~4-250 kDa [2] [13] |
| Band Sharpness | Good | Superior; the leading edge of a band slows in smaller pores, causing bands to sharpen [7] |
| Resolution of Similar-Sized Proteins | Good within its optimal range | Enhanced; can better separate proteins with close molecular weights [7] |
| Best Use Cases | Analysis of proteins with known, similar molecular weights [13] | Analysis of complex mixtures, unknown samples, or proteins with a wide MW range [13] |
| Run Time | Slightly faster | Slightly longer |
| Cost | Lower | Slightly higher [13] |
| Reproducibility | High, especially with precast gels [13] | High, especially with precast gels [13] |
Quantitative and Clinical Validation Data
The theoretical advantages of gradient gels are supported by empirical data. A 2023 clinical study utilizing 4–20% gradient gels for evaluating proteinuria demonstrated a limit of detection for albumin of approximately 3 mg/L, confirming the high sensitivity of this method even at low protein concentrations [14]. The study successfully analyzed 300 patient samples, with the gradient gels revealing distinct protein patterns that were clinically correlated with different types of kidney disease [14]. This demonstrates the technique's robustness and diagnostic utility in a complex biological context.
Furthermore, gradient gels can resolve a vast spectrum of protein sizes. As illustrated in the table below, a 4–20% gradient can separate proteins from as small as 4 kDa to as large as 250 kDa, a range that would require multiple fixed-percentage gels to cover effectively [2].
Table 2: Protein Separation Ranges by Gel Type
| Gel Type | Optimal Protein Size Range | Common Applications |
|---|---|---|
| 4-20% Gradient | 4 - 250 kDa [2] | Discovery work, complex mixtures, unknown samples [2] |
| 8% Fixed | 50 - 200 kDa [2] | Large proteins |
| 10% Fixed | 15 - 100 kDa [2] | Actin, tubulin, HSP70 [13] |
| 12% Fixed | 10 - 70 kDa [2] | Enzymes, transcription factors [13] |
| 15% Fixed | < 30 kDa [13] | Ubiquitin, small peptides [13] |
Experimental Protocols and Methodologies
Standard SDS-PAGE Protocol for Gradient Gels
The following protocol is adapted from standard methodologies used in research and clinical diagnostics for precast gradient gels [14] [13].
Sample Preparation:
- Dilute protein samples in Laemmli buffer, which contains Tris-HCl, SDS, glycerol, bromophenol blue, and a reducing agent like β-mercaptoethanol or dithiothreitol (DTT) [15].
- Heat the samples at 95°C for 5 minutes to fully denature the proteins and ensure uniform SDS binding [16].
Electrophoresis:
- Assemble the precast gradient gel (e.g., 4–20%) into the electrophoresis tank [13].
- Fill the inner and outer chambers with running buffer (e.g., Tris-Glycine-SDS buffer, pH 8.3-8.8) [16] [15].
- Load the denatured samples and a molecular weight marker into the wells.
- Apply a constant voltage (e.g., 100-150 V for a mini-gel) until the dye front (bromophenol blue) reaches the bottom of the gel [16].
Post-Electrophoresis Analysis:
- Following separation, proteins can be visualized using stains like Coomassie Brilliant Blue or silver stain [16].
- For specific detection, proteins can be transferred to a membrane for Western blotting. Note that large proteins may transfer more slowly from the dense, high-acrylamide region at the bottom of the gel; extended transfer times can mitigate this [13].
Clinical Diagnostic Application
A specific laboratory-based study for evaluating proteinuria types provides a detailed example of a real-world application [14]:
- Gel Type: Commercial 4–20% gradient polyacrylamide gels.
- Sample Preparation: Urine samples were centrifuged (400× g; 5 min) and the supernatant was aliquoted and stored at -20°C until analysis.
- Electrophoresis: SDS-PAGE was performed under standard conditions.
- Analysis: Distinct protein patterns were differentiated based on molecular weights: glomerular (albumin and higher molecular weights), "upper" tubular (≥20 kDa), and "lower" tubular (lower molecular weights). These patterns were confirmed using tandem mass spectrometry and western blot to identify specific indicator proteins in each fraction [14].
Visualization of Workflows and Mechanisms
Experimental Workflow for Protein Separation
The following diagram illustrates the key steps in a typical SDS-PAGE experiment using a gradient gel, from sample preparation to analysis.
Separation Mechanism in a Gradient Gel
This diagram contrasts the separation mechanics in fixed versus gradient gels, highlighting how the pore gradient leads to superior band sharpening.
The Scientist's Toolkit: Essential Reagents and Materials
Successful and reproducible SDS-PAGE relies on a set of core reagents and materials. The following table details the key components and their functions in the workflow.
Table 3: Essential Research Reagent Solutions for SDS-PAGE
| Reagent/Material | Function | Key Considerations |
|---|---|---|
| Acrylamide/Bis-acrylamide | Forms the polyacrylamide gel matrix via polymerization; the ratio determines pore size [16]. | A neurotoxin in its liquid form; handle with care. Pre-mixed solutions are safer. |
| SDS (Sodium Dodecyl Sulfate) | Anionic detergent that denatures proteins and confers a uniform negative charge, masking intrinsic charge [16] [15]. | Must be present in excess to ensure all proteins are fully coated (∼1.4 g SDS per g protein) [16]. |
| Tris Buffers | Maintains stable pH during electrophoresis. Different pH values are used for stacking (pH ~6.8) and resolving (pH ~8.8) gels [16] [15]. | The discontinuous buffer system is key to the stacking effect. |
| Glycine | A key component of the running buffer. Its charge state changes with pH, enabling the stacking of proteins at the gel interface [15]. | Critical for creating the trailing ion front in the stacking gel. |
| Ammonium Persulfate (APS) & TEMED | Catalysts for the free-radical polymerization of acrylamide [16]. | TEMED should be added last as it initiates rapid polymerization. |
| Reducing Agent (e.g., DTT, BME) | Breaks disulfide bonds in proteins, ensuring complete unfolding and accurate size-based separation [16]. | Essential for analyzing complex proteins; omit for non-reducing conditions. |
| Molecular Weight Marker | A set of pre-stained or unstained proteins of known sizes, allowing for estimation of sample protein molecular weights [16]. | Should span a range of sizes relevant to the proteins of interest. |
| Precast Gradient Gel (e.g., 4-20%) | Ready-to-use gel cassette with a continuous gradient of acrylamide [13]. | Saves time, improves reproducibility, and eliminates exposure to liquid acrylamide. Compatible with standard gel tanks [13]. |
The choice between gradient and fixed-percentage SDS-PAGE gels is fundamentally dictated by the experimental objective. Fixed-percentage gels offer a cost-effective and high-resolution solution for targeted analysis of proteins within a predictable, narrow size range. In contrast, gradient gels provide unparalleled versatility and sharpness for exploratory research, complex samples, and diagnostic applications where protein sizes are unknown or widely varied. The empirical data and clinical validation support the use of gradient gels as a powerful, semiquantitative tool for broad-range separation. By understanding the distinct advantages and optimal applications of each format, scientists can make an informed decision that enhances the efficiency, clarity, and reliability of their protein analysis.
Protein separation by sodium dodecyl sulfate-polyacrylamide gel electrophoresis (SDS-PAGE) is a foundational technique in molecular biology, biochemistry, and drug development. The central principle relies on the sieving effect of a polyacrylamide matrix, where proteins migrate according to molecular weight when denatured by SDS [17]. Traditional fixed-concentration gels, with a uniform pore size, provide excellent resolution for proteins within a specific molecular weight range. However, they face a significant limitation: the inability to resolve a broad spectrum of protein sizes on a single gel without sacrificing band sharpness [18]. This constraint becomes particularly problematic in discovery proteomics, analysis of complex cell lysates, or when characterizing proteins of unknown size, where multiple gels of different percentages would be required.
Gradient gels present an innovative solution to this resolution challenge. Unlike fixed-concentration gels, gradient gels are formulated with a continuously varying acrylamide concentration, typically increasing from top to bottom (e.g., 4–20%) [2]. This creates a corresponding pore size gradient that narrows progressively. This review objectively evaluates the performance of gradient gels against fixed-percentage gels, examining the underlying scientific mechanisms that enable gradient gels to produce sharper protein bands and provide superior resolution across a wide molecular weight range, thereby offering researchers a powerful tool for enhanced protein analysis.
Fundamental Separation Mechanisms: A Comparative Analysis
The Molecular Sieving Effect in Fixed-% Gels
In fixed-percentage SDS-PAGE, the separation matrix has a uniform concentration of acrylamide, resulting in a consistent pore size throughout the gel. Proteins, complexed with SDS to impart a uniform negative charge, are separated primarily by size as they migrate through this porous network [17] [19]. The key mechanism is molecular sieving, where smaller polypeptides navigate the pores more easily and migrate faster, while larger proteins are hindered and migrate more slowly. This technique is highly effective for resolving proteins within a narrow molecular weight range appropriate for the chosen gel percentage. For instance, a 10% gel is optimal for 50–150 kDa proteins, a 12% gel for 20–100 kDa proteins, and a 15% gel for smaller peptides below 30 kDa [18]. The primary limitation is that a gel optimized for large proteins provides poor resolution for small proteins, and vice versa, due to the fixed pore size.
The Zone-Focusing Mechanism in Gradient Gels
Gradient gels employ a more dynamic separation process that combines molecular sieving with a zone-focusing effect. As a protein migrates downward, it encounters progressively smaller pores. The leading edge of the protein band enters a region of higher % acrylamide first and is retarded more than the trailing edge, which is still in a region with larger pores [2]. This continuous deceleration of the leading edge relative to the trailing edge causes the protein band to stack increasingly tighter, effectively "focusing" the zone and resulting in a sharper, more discrete band. This process is analogous to traffic slowing down as it approaches a narrow passage, causing vehicles to bunch up. Furthermore, the gradient allows high molecular weight proteins to resolve effectively in the low-percentage, large-pore region at the top of the gel, while low molecular weight proteins continue to separate in the high-percentage, small-pore region at the bottom, enabling a single gel to separate a vastly broader size range than any fixed-percentage gel [18].
Figure 1: Core separation mechanisms of fixed-percentage versus gradient gels. The gradient system creates a band-stacking effect that focuses protein zones.
Experimental Performance Data and Direct Comparison
Resolution and Band Sharpness
The zone-focusing mechanism in gradient gels directly translates to experimentally observable improvements in band sharpness. This is particularly beneficial for distinguishing between proteins of similar molecular weights, such as post-translational modifications or protein degradation products [18]. In a typical experiment, a fixed-percentage gel might show a fuzzy doublet for two similar-sized proteins, whereas a gradient gel produces two discrete, sharp bands with increased inter-band distance, especially when the gel is run for a longer duration [2]. This enhanced resolution is quantifiable through densitometry analysis using software like ImageJ, where peaks from gradient gel bands show higher maximum intensity and narrower width at half-height compared to broader peaks from fixed-percentage gels [20].
Quantitative Comparison of Gel Properties
The table below summarizes a direct, objective comparison between the two gel types based on standard laboratory performance metrics.
Table 1: Direct performance comparison between fixed-percentage and gradient gels
| Performance Characteristic | Fixed-% Gel | 4–20% Gradient Gel | Experimental Validation |
|---|---|---|---|
| Pore Size Distribution | Uniform | Varies continuously from top to bottom | Verified by migration patterns of MW standards [18] |
| Effective Separation Range | Narrow (e.g., 12–45 kDa on 15% gel) | Very Broad (e.g., 4–250 kDa) | Demonstrated by resolving full-range protein ladders in a single lane [18] [2] |
| Band Sharpness | Good for target MW | Superior across most of the range | Quantified by densitometry profile analysis [20] |
| Optimal Use Case | Known protein size, maximum resolution at specific MW | Unknown protein size, multiple proteins of different sizes, PTU analysis | Defined by experimental requirements and sample composition [18] |
| Run Time | Slightly faster | Slightly longer | Due to higher % regions slowing migration near bottom |
| Handling & Cost | Lower cost, simpler to pour | Higher cost (precast), requires gradient maker or skill to pour | Considered in protocol planning and budgeting [2] |
Detailed Experimental Protocols for Validation
Protocol 1: Assessing Resolution of Similar-Sized Proteins
Objective: To compare the ability of fixed-% vs. gradient gels to resolve two recombinant proteins with molecular weights of 55 kDa and 60 kDa.
Materials:
- Precast Gels: 10% fixed polyacrylamide gel and 4–20% gradient polyacrylamide gel.
- Running Buffer: Standard Tris-Glycine-SDS buffer.
- Sample Buffer: 2X Laemmli buffer containing β-mercaptoethanol.
- Protein Samples: Purified 55 kDa and 60 kDa proteins, and a broad-range molecular weight marker.
Methodology:
- Sample Preparation: Mix 5 µg of each protein in a 1:1 ratio and dilute with an equal volume of 2X Laemmli buffer. Heat at 95°C for 5 minutes [17] [5].
- Gel Loading: Load 20 µL of the mixed protein sample onto both the 10% fixed gel and the 4–20% gradient gel. Include a protein ladder in a separate lane.
- Electrophoresis: Run both gels at a constant 150 V in the same tank until the dye front reaches the bottom of the gel [5].
- Staining & Visualization: Stain with Coomassie Brilliant Blue or a high-sensitivity fluorescent stain. Capture a digital image using a gel documentation system.
- Analysis: Use image analysis software (e.g., ImageJ) to generate lane profiles. Measure the distance between the two peaks of interest and the full width at half maximum (FWHM) of each peak to quantify resolution and sharpness [20].
Expected Outcome: The gradient gel will show a greater distance between the 55 kDa and 60 kDa bands and lower FWHM values, confirming superior resolution and sharper bands.
Protocol 2: Analyzing Complex Protein Mixtures
Objective: To evaluate the separation of a complex protein mixture (e.g., cell lysate) over a wide molecular weight range.
Materials:
- Precast Gels: 12% fixed polyacrylamide gel and 4–20% gradient polyacrylamide gel.
- Cell Lysate: HeLa cell lysate prepared in RIPA buffer.
- Staining: Silver staining kit for high sensitivity.
Methodology:
- Sample Preparation: Dilute 25 µg of HeLa cell lysate with an equal volume of 2X Laemmli buffer. Heat at 95°C for 5 minutes.
- Gel Loading: Load the sample onto both gels.
- Electrophoresis: Run at 150 V until the dye front migrates out of the gel.
- Post-Processing: Perform western blotting or silver staining according to standard protocols [17].
- Analysis: Compare the number of distinct, resolvable protein bands, particularly at the extreme high and low molecular weight regions of the two gels.
Expected Outcome: The gradient gel will reveal a higher number of distinct bands across the entire separation range, with well-resolved bands for both high (>150 kDa) and low (<20 kDa) molecular weight proteins, which will appear compressed or absent in the 12% fixed gel.
Figure 2: A generalized experimental workflow for comparing fixed-percentage and gradient gel performance.
The Scientist's Toolkit: Essential Reagents and Materials
Successful and reproducible protein separation requires a set of key reagents and tools. The following table details the essential components of a workflow for either fixed-percentage or gradient gel SDS-PAGE.
Table 2: Essential research reagents and materials for SDS-PAGE
| Item | Function/Description | Critical Parameters |
|---|---|---|
| Acrylamide/Bis-acrylamide | Forms the polyacrylamide gel matrix via polymerization. | Ratio of bis to acrylamide (%C) and total concentration (%T) determine pore size [17]. |
| Ammonium Persulfate (APS) & TEMED | Polymerization initiator (APS) and catalyst (TEMED). | Fresh APS is critical for complete and consistent gel polymerization. |
| SDS (Sodium Dodecyl Sulfate) | Anionic detergent that denatures proteins and confers uniform negative charge. | Purity and concentration are vital for consistent charge-to-mass ratio [17] [19]. |
| Tris-based Buffers | Provides the pH environment for electrophoresis. | Different buffers (e.g., Tris-Glycine, Bis-Tris, MOPS, MES) affect resolution and protein mobility [2] [5]. |
| Protein Molecular Weight Marker | Standard for estimating protein size and monitoring run progress. | Prestained markers allow tracking during runs; unstained markers offer higher accuracy [5]. |
| Gel Staining Reagents | Visualize separated protein bands. | Coomassie Blue (general use), Silver Stain (high sensitivity), fluorescent dyes (quantitation) [17]. |
| Gradient Maker or Precast Gels | Equipment for casting gradient gels. | Using precast gels ensures reproducibility and saves time but at a higher cost [2]. |
The choice between gradient and fixed-percentage gels is not a matter of one being universally superior, but rather of selecting the right tool for the specific research question. Fixed-percentage gels remain the gold standard for applications where the target protein's size is known and the goal is to achieve maximum resolution within a narrow molecular weight window. They are also more straightforward to prepare and cost-effective [18] [19].
Conversely, gradient gels offer unparalleled versatility for discovery-based science. Their ability to focus protein zones into sharper bands and resolve a vastly broader size range in a single run makes them indispensable for profiling complex mixtures, analyzing proteins of unknown size, detecting degradation products, and post-translational modifications [18] [2]. This capability directly enhances research efficiency by reducing the number of gels that need to be run and increases the robustness of the data obtained, particularly for quantitative applications like western blot densitometry [20].
For the drug development and research community, this translates to more reliable data, conserved precious samples, and streamlined workflows. When planning experiments, researchers should consider the composition of their samples and their primary analytical goals to make an informed choice that optimizes both resource allocation and scientific outcomes.
Core Structural and Functional Properties
This table summarizes the fundamental differences in the structure and performance of gradient and fixed-percentage SDS-PAGE gels.
| Property | Fixed-Percentage Gel | Gradient Gel |
|---|---|---|
| Acrylamide Structure | Single, uniform concentration throughout [6] | Continuous gradient from low to high concentration (e.g., 4–20%) [2] [6] |
| Pore Size | Uniform pore size across the gel [21] | Varying pore size; large at the top, small at the bottom [21] |
| Primary Separation Mechanism | Molecular sieving within a uniform matrix [9] | Progressive sieving as proteins migrate into tighter matrices [2] |
| Optimal Resolution Range | Narrow, specific molecular weight range [21] | Very broad molecular weight range [2] [21] |
| Band Sharpness | Sharp bands for proteins within the optimal range | Sharper bands across a wider size range; bands "pile up" as the leading edge slows [2] |
| Separation of Similar Sizes | Good for proteins with distinct size differences | Superior for resolving proteins of very similar sizes [2] |
| Typical Run Time | Slightly faster [21] | Slightly longer [21] |
Experimental Workflow for Gel Comparison
The following diagram illustrates a typical experimental workflow for comparing protein separation using fixed-percentage and gradient gels, from sample preparation to analysis.
Detailed Experimental Protocol for Comparison
The methodology for a direct comparison involves running identical protein samples on both gel types under standardized conditions [9] [22].
- Sample Preparation: Protein samples are mixed with a loading buffer containing Sodium Dodecyl Sulfate (SDS) and a thiol reagent (e.g., β-mercaptoethanol). The mixture is heated at 70–100°C for 3-5 minutes to denature the proteins and confer a uniform negative charge [9].
- Gel Selection and Setup:
- Fixed-Percentage Gel: A gel with a single acrylamide concentration is selected based on the target protein's known molecular weight (e.g., 10% for 50-150 kDa proteins) [21].
- Gradient Gel: A gel with a continuous gradient (e.g., 4–20%) is selected [21]. No separate stacking gel is required as the gradient itself performs the stacking function [9].
- Both gels are mounted in a vertical electrophoresis tank and submerged in a running buffer (e.g., Tris-Glycine-SDS) [9].
- Electrophoresis: An identical volume of each prepared sample is loaded into wells. A protein molecular weight ladder is loaded into a reference well. A constant voltage (e.g., 120-200V) is applied until the dye front migrates to the bottom of the gel [9].
- Post-Electrophoresis Analysis: Proteins are visualized using stains like Coomassie Brilliant Blue or Silver Stain. Alternatively, proteins are transferred to a membrane for Western blot analysis and detection with specific antibodies [9] [22].
Research Reagent Solutions
This table lists the essential materials and reagents required for performing SDS-PAGE, a cornerstone technique in protein analysis [23] [24].
| Reagent/Material | Function | Critical Notes |
|---|---|---|
| Acrylamide/Bis-acrylamide | Forms the cross-linked polyacrylamide gel matrix; pore size dictates separation [9]. | Total concentration and bis-acrylamide ratio determine gel properties and resolution range [9]. |
| SDS (Sodium Dodecyl Sulfate) | Denatures proteins and confers a uniform negative charge, enabling separation primarily by size [9] [6]. | Critical for masking intrinsic protein charge; typically used at a concentration of 0.1% [9]. |
| Ammonium Persulfate (APS) & TEMED | Catalyzes the polymerization of acrylamide to form the gel [9]. | TEMED catalyzes free radical formation from APS to initiate crosslinking [9]. |
| Tris-based Buffers | Provides the conducting medium and maintains stable pH during electrophoresis [9] [25]. | Different buffer systems (e.g., Tris-Glycine vs. Bis-Tris) offer different resolution and pH stability [25]. |
| Protein Molecular Weight Marker | Provides reference bands of known molecular weight for estimating sample protein sizes [9]. | Also called protein ladders or size standards; essential for data interpretation [9]. |
| Protein Stain (e.g., Coomassie Blue) | Enables visualization of separated protein bands after electrophoresis [9] [22]. | Various sensitivity options exist, from Coomassie to silver stain and fluorescent dyes [9]. |
Strategic Application: Selecting and Implementing the Right Gel for Your Experiment
In the context of evaluating gradient gels versus fixed-percentage SDS-PAGE gels, understanding the specific applications for fixed-concentration gels remains fundamental for experimental design. While gradient gels offer exceptional versatility for analyzing complex protein mixtures with unknown molecular weights or wide size ranges, fixed-percentage gels provide superior resolution for targeted analysis within specific molecular weight windows [26]. This guide objectively compares the performance of fixed-percentage gels against alternatives and provides supporting experimental data to help researchers and drug development professionals make informed decisions based on their specific protein separation needs.
Fixed-percentage polyacrylamide gels, consisting of a uniform acrylamide concentration throughout the matrix, create a consistent pore size that serves as a molecular sieve [26] [27]. This uniform structure enables precise separation of proteins within a narrow molecular weight range, making them indispensable for routine laboratory applications where the target protein size is approximately known [26]. The following sections detail the principles, selection criteria, methodologies, and performance data for fixed-percentage gels in targeted protein analysis.
Core Principles and Gel Selection Criteria
Theoretical Foundation of SDS-PAGE and Molecular Weight Separation
Sodium dodecyl sulfate polyacrylamide gel electrophoresis (SDS-PAGE) separates proteins primarily by mass through a two-step process [27]. First, the ionic detergent SDS denatures proteins and binds to them in a constant weight ratio, imparting a uniform negative charge that negates the influence of intrinsic protein charge [27]. Second, when an electrical current is applied, these SDS-protein complexes migrate through the porous polyacrylamide gel matrix toward the positively charged anode, with smaller proteins moving faster than larger ones due to less hindrance from the gel pores [27].
The pore size of the gel is inversely related to the acrylamide percentage, meaning lower percentage gels have larger pores suitable for separating high molecular weight proteins, while higher percentage gels have smaller pores that better resolve low molecular weight proteins [27]. This fundamental relationship forms the basis for selecting appropriate gel percentages for targeted protein separation.
Fixed % Gel Selection Guide Based on Protein Size
The table below summarizes the optimal fixed-percentage gel selections for targeting specific protein size ranges, along with common research applications for each range.
Table 1: Fixed-Percentage Gel Selection Guide for Targeted Protein Sizes
| Gel Percentage | Optimal Protein Separation Range | Common Protein Targets & Research Applications |
|---|---|---|
| 10% | 50 - 150 kDa [26] | Actin (≈42 kDa), Tubulin (≈55 kDa), HSP70 (≈70 kDa) [26] |
| 12% | 20 - 100 kDa [26] | Many enzymes and transcription factors [26] |
| 15% | < 30 kDa [26] | Small peptides, ubiquitin (≈8.5 kDa) [26] |
This targeted approach allows researchers to maximize resolution around a specific molecular weight, which is particularly valuable when analyzing proteins of known size or running multiple samples with similar-sized proteins [26]. The uniform pore structure of fixed-percentage gels creates predictable migration patterns and sharper band formation within their optimal separation range compared to gradient gels.
Comparative Performance Analysis: Fixed % vs. Gradient Gels
Direct Comparison of Key Characteristics
The choice between fixed-percentage and gradient gels involves trade-offs between resolution, separation range, and experimental requirements. The following table provides a direct performance comparison based on key electrophoretic parameters.
Table 2: Performance Comparison of Fixed-Percentage vs. Gradient Gels
| Feature | Fixed % Gel | 4-20% Gradient Gel |
|---|---|---|
| Pore Size | Uniform throughout gel [26] | Varies from top (large pores) to bottom (small pores) [26] |
| Resolution Range | Narrow, optimized for specific MW range [26] | Wide, separates proteins across broad MW spectrum [26] |
| Best Application | Known molecular weight proteins [26] | Mixed/unknown molecular weights, discovery work [26] |
| Run Time | Slightly faster [26] | Slightly longer [26] |
| Band Sharpness | Excellent for target size range | Enhanced across range due to band-stacking effect [2] |
| Cost Considerations | Generally lower [26] | Slightly higher [26] |
Experimental Data Supporting Fixed % Gel Selection
Research demonstrates that fixed-percentage gels provide superior resolution for proteins within their optimal separation range. For example, when separating proteins primarily around 50-70 kDa (such as tubulin), a 10% gel provides sharper, more distinct bands compared to a 4-20% gradient gel, which spreads the same proteins across a broader area of the gel [26]. This enhanced resolution is particularly valuable for detecting post-translational modifications or subtle size differences in similar-sized proteins.
The band sharpness in fixed-percentage gels results from consistent migration through a uniform matrix, whereas gradient gels create a band-stacking effect where proteins migrate through progressively smaller pores, causing the leading edge to slow relative to the trailing edge and producing sharper bands [2]. However, this effect is most beneficial when analyzing proteins across a wide molecular weight range rather than within a specific window.
Methodology: Experimental Protocols for Fixed % Gel Electrophoresis
Standard Protocol for SDS-PAGE Using Fixed % Gels
The following step-by-step protocol applies to both hand-cast and precast fixed-percentage gels, with modifications noted where appropriate.
Table 3: Key Research Reagent Solutions for SDS-PAGE
| Reagent/Solution | Function & Purpose |
|---|---|
| Acrylamide/Bis-acrylamide | Forms the porous gel matrix for molecular sieving [27] |
| SDS (Sodium Dodecyl Sulfate) | Denatures proteins and confers uniform negative charge [27] |
| APS & TEMED | Catalyzes acrylamide polymerization [27] |
| Tris-HCl Buffers | Maintains appropriate pH for electrophoresis [28] |
| Sample Buffer (with β-mercaptoethanol) | Denatures, reduces, and colors samples for loading [28] |
| Coomassie Brilliant Blue | Stains separated protein bands for visualization [28] |
Step 1: Gel Preparation
- For hand-cast gels: Combine acrylamide/bis-acrylamide solution, Tris-HCl buffer (pH 8.8 for resolving gel), SDS, ammonium persulfate (APS), and TEMED in the proportions appropriate for your desired gel percentage [28]. Pour between glass plates, overlay with isopropanol or water to ensure a flat interface, and allow to polymerize for 20-30 minutes.
- For precast gels: Remove from packaging and rinse wells with running buffer to remove preservatives.
Step 2: Sample Preparation
- Mix protein samples with SDS-PAGE sample buffer (typically containing Tris-HCl, glycerol, SDS, bromophenol blue, and β-mercaptoethanol or DTT) [28].
- Heat samples at 70-100°C for 5-10 minutes to ensure complete denaturation [27] [29].
- Centrifuge briefly to collect condensation.
Step 3: Electrophoresis
- Load samples and molecular weight markers into wells.
- Assemble electrophoresis apparatus and fill chambers with running buffer (typically Tris-Glycine-SDS).
- Run at constant voltage (150-200V for mini-gels) until the dye front reaches the bottom of the gel [27].
Step 4: Protein Detection
- Following electrophoresis, proteins can be visualized using staining methods such as Coomassie Brilliant Blue, silver stain, or fluorescent dyes [27].
- Alternatively, proteins can be transferred to a membrane for western blot analysis [27].
Workflow Visualization: Fixed % Gel Experimentation Process
The following diagram illustrates the complete workflow for SDS-PAGE using fixed-percentage gels, from sample preparation to analysis:
Advanced Applications and Specialized Techniques
Fixed % Gels in Protein Quality Assessment
In drug development, fixed-percentage gels play a crucial role in assessing critical quality attributes of therapeutic proteins, particularly forced degradation studies. Research on monoclonal antibody (mAb) stability under thermal stress conditions utilizes SDS-PAGE to detect fragmentation and aggregation [30]. When assessing known size variants of mAbs (e.g., intact IgG at ≈150 kDa and fragments at ≈50 kDa and ≈25 kDa), fixed-percentage gels provide consistent separation necessary for quantitative comparison between biosimilar and originator products [30].
A 2025 study analyzing anti-VEGF mAbs under thermal stress (37°C and 50°C) employed reduced and non-reduced CE-SDS methods (the capillary equivalent of SDS-PAGE) to precisely monitor the time-dependent increase in low-molecular-weight fragments and decrease in intact antibody [30]. This application highlights how fixed-percentration separation methods provide the reproducibility required for regulatory compliance and product quality assurance.
Specialized Electrophoresis Formats
Beyond standard denaturing SDS-PAGE, fixed-percentage gels support various specialized techniques:
- Native PAGE: Uses fixed-percentage gels without SDS to separate proteins by charge, size, and shape while maintaining native structure and activity [27] [29].
- Two-dimensional PAGE: Employs fixed-percentage gels in the second dimension to separate proteins by mass after isoelectric focusing [27].
- Native SDS-PAGE (NSDS-PAGE): A modified technique using reduced SDS concentrations and no heating step, enabling high-resolution separation while retaining some functional properties and metal cofactors [29].
Fixed-percentage SDS-PAGE gels remain an essential tool in the protein separation arsenal, particularly when targeting proteins of known size or when maximum resolution within a specific molecular weight range is required. While gradient gels offer advantages for discovery-based work and samples with wide molecular weight distributions, fixed-percentage gels provide superior performance for focused applications including routine protein analysis, quality control testing, and comparative studies of similar-sized proteins.
The experimental data and protocols presented in this guide provide researchers with evidence-based rationale for gel selection within the broader context of electrophoresis strategy. By aligning gel characteristics with experimental objectives—selecting 10% gels for the 50-150 kDa range, 12% for 20-100 kDa proteins, and 15% for small peptides under 30 kDa—scientists can optimize separation efficiency, band resolution, and data quality in both basic research and biopharmaceutical development.
In the realm of protein research, polyacrylamide gel electrophoresis (SDS-PAGE) serves as a fundamental technique for separating proteins by molecular weight. A critical decision researchers face is whether to use a fixed-concentration gel or a gradient gel. While fixed-concentration gels, with a uniform acrylamide percentage throughout, are excellent for resolving proteins within a specific, known size range, gradient gels offer a dynamic alternative with a continuously changing pore size. This guide provides an objective comparison of these two gel types, focusing on their performance in applications involving unknown protein sizes, complex protein mixtures, and the detection of degradation products, equipping researchers and drug development professionals with the data needed to make an informed choice.
Gel Types at a Glance: Core Principles and Comparison
To understand their applications, one must first grasp their fundamental structures. A fixed-concentration gel (e.g., 10% or 12%) is composed of a single, uniform acrylamide concentration, resulting in a consistent pore size throughout the gel. This structure is ideal for separating proteins within a relatively narrow molecular weight range, as it provides maximum resolution for that specific window [31].
In contrast, a gradient gel (e.g., 4–20%) is fabricated with a continuously varying acrylamide concentration, typically increasing from top to bottom. This creates a pore size that narrows progressively, forming a molecular sieve with a wide separation range. Small proteins migrate freely until they are resolved in the high-percentage, small-pore region at the bottom, while large proteins are separated in the low-percentage, large-pore region at the top [31] [2].
Table 1: Core Characteristics of Fixed vs. Gradient Gels
| Feature | Fixed % Gel | 4–20% Gradient Gel |
|---|---|---|
| Pore Size | Uniform across the gel | Varies from large (top) to small (bottom) |
| Resolution Range | Narrow | Wide |
| Best For | Proteins of a known, specific size | Mixed/unknown protein sizes, degradation products |
| Band Sharpness | Good for target size | Sharper bands due to a "stacking" effect throughout the gel [2] |
| Run Time | Slightly faster | Slightly longer |
| Cost | Lower | Slightly higher |
Table 2: Recommended Gel Types Based on Protein Size
| Target Protein Size | Optimal Fixed % Gel | Alternative Gradient Gel |
|---|---|---|
| 50 - 150 kDa | 10% | 4-20% |
| 20 - 100 kDa | 12% | 4-20% |
| < 30 kDa | 15% | 4-20% or higher % |
| Multiple sizes in one mixture | Requires multiple gels | 4-20% (single gel sufficient) |
When to Choose a Gradient Gel: Key Application Scenarios
The unique structure of gradient gels makes them the superior choice in several common research scenarios.
Proteins of Unknown Molecular Weight
When a researcher is characterizing a new protein or a complex sample where sizes are unknown, a gradient gel is the most practical first step. Its broad separation range ensures that virtually any protein will find an acrylamide concentration at which it resolves sharply, eliminating the guesswork and potential need to run multiple fixed-percentage gels [31] [2].
Complex Mixtures with Wide Size Ranges
For samples like whole-cell lysates or serum that contain proteins spanning a vast molecular weight spectrum, a single gradient gel can accomplish what would otherwise require several fixed-percentage gels. This not only saves precious sample and reagents but also ensures consistent running conditions for all proteins, facilitating more accurate comparative analysis [31].
Resolving Similar-Sized Proteins and Degradation Products
Gradient gels produce sharper bands because the leading edge of a migrating protein band enters a region of smaller pores and slows down before the trailing edge, causing the band to "sharpen" as it moves. This "traffic jam" effect results in tighter, more discrete bands [2]. This is crucial for detecting subtle size differences, such as:
- Post-translational modifications (e.g., phosphorylation, glycosylation).
- Protein degradation products, which are common critical quality attributes in biopharmaceutical development [31].
- Splice variants or cleavage products.
For instance, a gradient gel is perfectly suited for a western blot where you need to probe for both a phosphorylated 25 kDa target and its full-length 80 kDa form on the same membrane [31].
Experimental Data and Protocols
The theoretical advantages of gradient gels are borne out in experimental data. A 2023 study published in Diagnostics utilized SDS-PAGE with commercially available 4–20% gradient gels to characterize proteinuria in patient samples [32]. The methodology and results below illustrate the practical application and performance of gradient gels in a complex, real-world scenario.
Detailed Protocol: Urine Protein Separation via SDS-PAGE on Gradient Gels
Methodology Summary [32]:
- Gel Type: Commercially available TruPAGE Precast Gels (4–20% gradient).
- Sample Preparation: Excess urine samples from patients were centrifuged, and the supernatant was aliquoted and stored at -20°C. Samples were mixed with TruPAGE LDS Sample Buffer.
- Electrophoresis: Separation was performed using TruPAGE TEA-Tricine SDS Running Buffer, according to the manufacturer's instructions.
- Analysis: Gels were stained, and distinct protein patterns were differentiated based on the molecular weights of the detected proteins. Protein identification in excised bands was confirmed using tandem mass spectrometry and western blot.
Key Reagents and Materials: Table 3: Research Reagent Solutions for Gradient Gel SDS-PAGE
| Item | Function / Description | Example |
|---|---|---|
| Precast Gradient Gel | Ready-to-use gel cassette with a continuous acrylamide gradient. Saves time and improves reproducibility. | TruPAGE 4-20% Gels [32], mPAGE 4-12% Gels [33] |
| SDS Sample Buffer | Denatures proteins and confers a negative charge for separation based on mass. Contains a tracking dye. | TruPAGE LDS Sample Buffer [32] |
| Running Buffer | Provides the conductive medium and appropriate pH for electrophoresis. | TruPAGE TEA-Tricine SDS Buffer [32], MOPS or MES Buffer [33] |
| Molecular Weight Marker | A set of proteins of known sizes to estimate the molecular weight of unknown proteins. | Prestained or unstained protein ladders [5] |
Supporting Experimental Data
The study successfully resolved a wide range of urinary proteins, from high-molecular-weight markers like immunoglobulin G (~150 kDa) to low-molecular-weight markers like β2-microglobulin (~12 kDa), on a single gel [32]. This demonstrates the gel's capacity to separate a complex mixture spanning over 100 kDa in molecular weight. The resulting protein patterns (glomerular, tubular) were clearly differentiated and were associated with specific clinical diagnoses and renal function metrics, validating the analytical power of the gradient gel method.
The logical process for selecting the appropriate gel type based on experimental goals can be summarized in the following workflow:
The choice between fixed-percentage and gradient gels is not a matter of one being universally better, but of selecting the right tool for the experimental question. Fixed-percentage gels are optimal for routine analysis of proteins within a predictable, narrow size range, offering excellent resolution and lower cost. Gradient gels, with their broad separation range and band-sharpening effect, provide unparalleled versatility for challenging scenarios involving unknown protein sizes, complex mixtures, and the critical detection of modified or degraded species. For researchers in drug development, where characterizing every component of a biotherapeutic is paramount, the gradient gel is an indispensable tool in the analytical arsenal.
In the realm of protein research, sodium dodecyl sulphate polyacrylamide gel electrophoresis (SDS-PAGE) remains a cornerstone technique for separating proteins by molecular weight [2]. While fixed-concentration gels have been widely used for decades, gradient gels represent a significant advancement, offering superior resolution across a broader molecular weight range [2]. These gels are formulated with a continuous gradient of polyacrylamide, typically starting with a lower concentration and ending with a higher concentration (e.g., 4–20%), creating a pore structure that sieves proteins with exceptional sharpness [2].
This guide provides a rigorous, objective comparison between gradient and fixed-percentage SDS-PAGE gels, delivering practical protocols and experimental data to inform researchers' choices. The evaluation is situated within the broader thesis that gradient gels enhance resolution and workflow efficiency, particularly for complex samples in proteomic research and drug development.
Technical Foundations and Comparative Advantages
Fundamental Principles of Gradient Gels
Unlike fixed-percentration gels, which have a uniform pore size, gradient gels possess a continuously changing pore structure. As proteins migrate, the leading edge encounters progressively smaller pores, slowing down relative to the lagging edge. This phenomenon causes protein bands to sharpen progressively and "pile up on itself," much like traffic approaching a slowdown, resulting in significantly sharper bands compared to fixed-concentration gels [2]. This sharpening effect allows for better separation of similarly-sized proteins that might co-migrate as a fuzzy doublet on a fixed-percentage gel [2].
Direct Comparison: Gradient vs. Fixed-Percentage Gels
The table below summarizes the core performance characteristics and operational differences between the two gel types, based on established laboratory use.
Table 1: Performance and Operational Comparison: Gradient vs. Fixed-Percentage Gels
| Parameter | Gradient Gels | Fixed-Percentage Gels |
|---|---|---|
| Separation Range | Broad (e.g., 4-250 kDa on a 4-20% gel) [2] | Narrow, optimized for a specific size range [2] |
| Band Sharpness | Superior due to progressive stacking effect [2] | Good, but bands can diffuse over longer runs |
| Resolution of Similar Sizes | Excellent; can separate proteins with close molecular weights [2] | Moderate; may require multiple gels for optimal resolution |
| Best Use Cases | Discovery work, limited samples, wide MW ranges, resolving similar-sized proteins [2] | Targeted analysis of a known protein size range |
| Cost & Preparation | Higher cost for precast; more complex to cast manually [2] | Lower cost; simpler to cast manually |
| Buffer Systems | Compatible with MOPS (faster migration, greater resolution) or MES (broader range) [34] | Typically used with standard Tris-Glycine or Bis-Tris systems [9] |
Practical Experimental Protocols
Protocol 1: Utilizing Precast Gradient Gels
Precast gels offer maximum convenience and reproducibility, making them ideal for standardized workflows and high-throughput environments [34].
A. Materials and Reagents
- Precast Gradient Gel: e.g., 4-20% or a range suitable for your target proteins [2].
- Electrophoresis System: Compatible mini-cell apparatus (e.g., XCell SureLock Mini-Cell, Bio-Rad Mini-PROTEAN) [34] [35].
- Running Buffer: 1X MOPS, MES, or Tris-Glycine SDS Running Buffer, depending on resolution needs [2] [34].
- Sample Buffer: 2X Laemmli buffer containing SDS and a reducing agent (e.g., DTT, β-mercaptoethanol) [34].
- Protein Ladder: Prestained or unstained molecular weight markers.
- Staining Solution: Coomassie Brilliant Blue, SimplyBlue SafeStain, or silver stain [34].
B. Step-by-Step Procedure
- Gel Equilibration: Remove the precast gel from its protective pouch and rinse the cassette with deionized water. Equilibrate to room temperature for approximately 30 minutes to prevent condensation [34].
- Apparatus Setup: Peel the tape from the cassette bottom and gently pull the comb from the cassette. Rinse the wells with running buffer. Mount the gel cassette(s) in the electrophoresis chamber according to the manufacturer's instructions [35].
- Buffer Chamber Fill: Fill the inner (upper) and outer (lower) buffer chambers with the appropriate 1X running buffer. Ensure the upper chamber buffer level covers the sample wells [35].
- Sample Preparation: Mix protein samples with an equal volume of 2X Laemmli buffer. Denature by heating at 70–100°C for 5 minutes, then briefly centrifuge [34].
- Sample Loading: Carefully load equal amounts of protein (e.g., 10-20 µg) and protein ladder into the wells using a micro-pipette.
- Electrophoresis Run: Connect the electrodes and run at a constant voltage as recommended (e.g., 120-200 V). Run until the dye front reaches the bottom of the gel [34] [35].
- Post-Electrophoresis Analysis: After the run, carefully open the cassette, remove the gel, and proceed with staining, western blotting, or other downstream applications [35].
Protocol 2: Laboratory Casting of Gradient Gels
For specialized applications or to reduce costs, manual casting is a viable, though more skill-dependent, option [2].
A. Materials and Reagents
- Acrylamide/Bis-acrylamide Stock Solution (e.g., 30-40%).
- Resolving Gel Buffer: e.g., 1.5 M Tris-HCl, pH 8.8.
- Stacking Gel Buffer: e.g., 0.5 M Tris-HCl, pH 6.8.
- Catalysts: 10% Ammonium Persulfate (APS) and TEMED.
- Gel Casting System: Gel cassette, plates, spacers, and clamps.
- Gradient Maker: A two-chamber mixer or a serological pipette for the "air bubble" method [2].
B. Step-by-Step Procedure
- Gel Solution Preparation: Prepare low-percentage and high-percentage acrylamide solutions in separate beakers. Do not add TEMED and APS until immediately before pouring [2].
- Gradient Formation (Two Methods):
- Using a Gradient Maker: Place the low-concentration solution in the "output" chamber and the high-concentration solution in the "reserve" chamber. Open the connecting channel and start a peristaltic pump or use gravity flow to fill the gel cassette from the bottom up [2].
- Pipette with an Air Bubble: Using a 5- or 10-mL serological pipette, aspirate half the required volume from the low-concentration tube, then the other half from the high-concentration tube. Gently aspirate ~0.5 mL of air to create a bubble, then slowly expel the contents into the gel cast, allowing the bubble to mix the solutions [2].
- Polymerization: Carefully layer isopropanol or water-saturated butanol on top of the gradient gel to create a flat surface. Allow the gel to polymerize completely (typically 30-60 minutes).
- Stacking Gel Addition: Pour off the overlay, rinse the top of the gel, pour the stacking gel solution, and insert a comb.
- Completion: After the stacking gel has set, the hand-cast gradient gel is ready for use, following the same electrophoresis steps as a precast gel.
The following workflow diagram visualizes the key decision points and steps for these two primary methods.
Experimental Data and Performance Validation
Documented Performance in Clinical Diagnostics
A 2023 laboratory study published in Diagnostics provides robust validation for gradient gel performance. Researchers used commercially available 4–20% gradient gels to analyze 300 urine samples from patients with proteinuria [14]. The gels successfully differentiated distinct proteinuria types based on molecular weight patterns:
- Glomerular proteinuria: Characterized by the presence of albumin and higher molecular weight proteins.
- Tubular proteinuria: Identified by the presence of lower molecular weight proteins (≤20 kDa).
- Overload proteinuria: Detected by the presence of specific proteins like immunoglobulin light chains [14].
This study confirmed the gels' high sensitivity, with a detection limit for albumin estimated at 3 mg/L, and identification in 87% of samples with minimal albumin concentration [14]. The method was confirmed using tandem mass spectrometry and western blot, verifying that the separated fractions contained specific indicator proteins, underscoring the technique's reliability for complex, real-world samples [14].
Quantitative Separation Ranges
The selection of the appropriate gradient is dictated by the target protein sizes. The table below, compiled from manufacturer data and technical guides, provides standard gel percentages and their effective separation ranges [2].
Table 2: Protein Separation Ranges for Different Gel Formulations
| Gel Type | Gradient Range | Effective Protein Separation Range | Ideal Application |
|---|---|---|---|
| Very Broad Range | 4% to 20% | 4 - 250 kDa | Discovery work; analyzing unknown or complex samples [2] |
| Broad Range | 8% to 15% | 10 - 100 kDa | Targeted approach for a wide common protein range [2] |
| High-Resolution | 10% to 12.5% | 50 - 75 kDa | Resolving proteins with very similar molecular weights [2] |
| Fixed Percentage (12%) | 12% (Fixed) | 10 - 70 kDa | Standard separation of medium-sized proteins [2] |
| Fixed Percentage (8%) | 8% (Fixed) | 50 - 200 kDa | Separation of larger proteins [2] |
Essential Research Reagent Solutions
Successful SDS-PAGE experimentation requires a suite of reliable reagents and tools. The following table details the essential components of a gradient gel workflow.
Table 3: Essential Reagents and Materials for Gradient Gel Electrophoresis
| Item | Function / Purpose | Key Considerations |
|---|---|---|
| Precast Gradient Gel | Pre-polymerized gel for protein separation. | Choose percentage range based on target protein sizes (see Table 2). Bis-Tris gels offer superior pH stability [34]. |
| Running Buffer | Conducts current and maintains pH during run. | MOPS for faster migration/greater resolution; MES for broader MW range [2] [34]. |
| Sample Buffer (Laemmli) | Denatures proteins and confers negative charge. | Contains SDS and reducing agent (DTT/β-mercaptoethanol) to break disulfide bonds [34]. |
| Protein Molecular Weight Marker | Estimates size of unknown proteins in sample. | Prestained markers allow real-time tracking; unstained markers offer higher accuracy [9]. |
| Staining Solution | Visualizes separated protein bands post-run. | Coomassie for general use (~100 ng sensitivity); silver stain for trace proteins (~1 ng sensitivity) [34]. |
| Gel Casting System | Apparatus for polymerizing manual gels. | Includes glass plates, spacers, and combs. Critical for leak-free casting. |
| Electrophoresis Cell | Chamber to hold gel and buffer during run. | Must be compatible with gel cassette size (e.g., mini-, midi-, or large-format) [35]. |
Gradient gels, whether precast or hand-cast, provide a powerful separation tool that can enhance research efficiency and data quality. The experimental data and protocols presented here demonstrate that their key advantage lies in providing broader separation range and sharper band resolution within a single gel, a critical factor when sample material is limited or when analyzing complex protein mixtures.
The choice between precast and manually cast gels involves a classic trade-off between time, cost, and consistency. Precast gels offer unparalleled reproducibility and convenience, which is vital for diagnostic applications and multi-site studies, while manual casting allows for customization and can be more cost-effective for high-volume laboratories [2] [34]. As the life sciences continue to emphasize reproducibility, standardization, and high-throughput workflows, the adoption of precast gradient gels is expected to grow, supported by innovations in gel chemistry, buffer systems, and integration with downstream analytical techniques like mass spectrometry [36] [34].
In the realm of protein separation using sodium dodecyl sulfate–polyacrylamide gel electrophoresis (SDS-PAGE), the choice of buffer system is a critical, yet sometimes overlooked, factor that directly impacts the quality and interpretability of results. While the percentage of polyacrylamide in a gel defines its sieving properties, the running buffer governs the electrical environment and the rate at which proteins migrate. Within the context of optimizing electrophoretic separations—whether on gradient or fixed-percentage gels—the selection between common buffers like 3-(N-morpholino)propanesulfonic acid (MOPS) and 2-(N-morpholino)ethanesulfonic acid (MES) presents a significant tactical decision. This guide provides an objective comparison of MOPS and MES SDS running buffers, detailing their distinct effects on protein migration and band resolution to inform method development for researchers and scientists.
Understanding the Buffer Systems: MOPS and MES
SDS-PAGE separates proteins primarily based on their molecular mass by negating the influence of their intrinsic charge and structure. The anionic detergent SDS binds to proteins, conferring a uniform negative charge, allowing them to migrate through a polyacrylamide gel matrix towards the anode when an electric field is applied [16] [9]. The running buffer provides the ions necessary to carry the current and establishes the pH environment for the electrophoresis.
While the traditional Tris-glycine system is widely used, pre-cast gel systems often employ neutral pH, bis-tris based gels paired with MOPS or MES running buffers. These systems offer greater stability and longer shelf life due to reduced gel hydrolysis at a neutral pH [37]. Despite their similar names, MOPS and MES buffers have distinct properties that lead to different separation outcomes which will be explored in subsequent sections.
Direct Comparison: MOPS vs. MES
The core difference between MOPS and MES buffers lies in their migration characteristics and the effective range of protein separation they provide. The choice between them allows researchers to "tune" the electrophoresis to target specific molecular weight regions of interest.
Comparative Migration and Resolution
The table below summarizes the key performance differences between MOPS and MES SDS running buffers.
Table 1: Comparative Analysis of MOPS and MES SDS Running Buffers
| Characteristic | MOPS Buffer | MES Buffer |
|---|---|---|
| Typical pH | pH 7.7 [29] | ~pH 7.3 [37] |
| Migration Speed | Proteins migrate faster through the same gel concentration [2] | Proteins migrate more slowly relative to MOPS [2] |
| Separation Range | Provides a larger separation range for higher molecular weight proteins [16] | Visualizes a broader range of protein sizes on a single gel [2] |
| Band Resolution | Creates greater resolution between protein bands [2] | Produces sharper, more discrete bands, excellent for separating similarly sized proteins [2] |
| Ionic Role | Acts as a "trailing ion" in discontinuous systems, contributing to the stacking effect at neutral pH [16] | Serves as a "leading ion" due to its higher mobility, guiding protein migration [38] |
Impact on Protein Migration Patterns
The different migration behaviors stem from the physicochemical properties of the buffers. The primary factor is the charge distribution on the counter-ion, which directly affects the net electric field experienced by the SDS-protein complexes [38]. MES, with its slightly smaller size and different pKa, has a higher electrophoretic mobility and acts as a "leading ion," setting a faster pace for protein migration. MOPS, with a lower mobility, functions as a "trailing ion."
Furthermore, the operating pH (MOPS is typically used at ~pH 7.7, while MES is at ~pH 7.3) influences the charge state of the buffer ions and the SDS micelles [38]. Even small differences in pH can alter the ion balance and the shielding effect around the migrating proteins, ultimately changing their velocity. For instance, the higher pH of MOPS running buffer may create a more negative charge environment, which can slow down the mobility of the SDS-protein complexes and favor the resolution of larger proteins [38].
Experimental Protocols and Data Interpretation
To objectively compare these buffers, a standardized experimental setup is essential. The following protocol outlines a direct comparison using a pre-cast gradient gel, which is ideal for visualizing a wide range of protein sizes under each condition.
Sample Preparation and Electrophoresis Protocol
- Sample Preparation: Prepare identical aliquots of a complex protein sample, such as a cell lysate, mixed with a reducing SDS sample buffer (e.g., LDS buffer). Heat the samples at 70°C for 10 minutes to denature the proteins [29]. Include a prestained protein molecular weight marker in your sample set.
- Gel Selection: Use a commercially available 4–20% polyacrylamide gradient bis-tris gel. Gradient gels provide a larger linear separation range, making differences in buffer performance more apparent [14] [2].
- Buffer Preparation: Dilute 20X concentrates of MOPS SDS Running Buffer and MES SDS Running Buffer to 1X with deionized water, as per manufacturer instructions [37]. The standard composition for 1X MES buffer is 50 mM MES, 50 mM Tris Base, 0.1% SDS, 1 mM EDTA, pH 7.3. MOPS buffer has a similar composition with 50 mM MOPS, 50 mM Tris Base, 0.1% SDS, 1 mM EDTA, pH 7.7 [29] [37].
- Electrophoresis: Load identical amounts of your prepared samples and markers onto two identical gels. Run one gel in 1X MOPS SDS Running Buffer and the other in 1X MES SDS Running Buffer. Use a constant voltage of 200V for approximately 35-45 minutes, or until the dye front (e.g., phenol red) has reached the bottom of the gel [29].
- Detection: Upon completion, stain the gels with a protein stain such as Coomassie Blue [16] or a fluorescent stain to visualize the separated protein bands.
Expected Results and Analysis
When you analyze the two gels, you will observe clear differences, as illustrated in the workflow below.
Figure 1: Experimental workflow for comparing MOPS and MES buffers, showing the expected differential outcomes.
The protein bands on the MOPS buffer gel will have migrated further down the gel compared to the MES buffer gel. You will likely notice that the MOPS gel provides better resolution and spacing between higher molecular weight proteins (e.g., >70 kDa), whereas the MES gel may produce sharper, tighter bands across a wide range, but particularly for lower and mid-range molecular weights [16] [2]. The marker lane will be indispensable for accurately assigning molecular weights and comparing the relative migration distances (Rf) of specific proteins between the two buffers.
The Scientist's Toolkit: Essential Reagents
Successful electrophoresis relies on a set of key reagents. The following table details essential materials for performing SDS-PAGE with MOPS or MES buffers.
Table 2: Essential Research Reagents for SDS-PAGE with MOPS/MES Buffers
| Reagent / Solution | Function / Purpose |
|---|---|
| Bis-Tris Precast Gels | Polyacrylamide gel matrix optimized for neutral pH buffers like MOPS and MES. Provides a stable environment for protein separation [37]. |
| MOPS SDS Running Buffer | Provides the ionic environment for electrophoresis at pH ~7.7. Ideal for resolving higher molecular weight proteins with good separation [16] [2]. |
| MES SDS Running Buffer | Provides the ionic environment for electrophoresis at pH ~7.3. Ideal for achieving sharp bands and visualizing a broad protein size range on one gel [37] [2]. |
| SDS Sample Buffer (e.g., LDS) | Denatures proteins and provides SDS for uniform negative charge. Includes a tracking dye to monitor migration progress [29] [37]. |
| Reducing Agent (e.g., DTT) | Cleaves disulfide bonds in proteins to ensure complete denaturation and separation into subunits. Must be fresh for effective reduction [37]. |
| Molecular Weight Marker | A set of proteins of known sizes run alongside samples to estimate the molecular weight of unknown proteins [9]. |
| Protein Stain (e.g., Coomassie) | Visualizes separated protein bands on the gel after electrophoresis is complete [16]. |
The choice between MOPS and MES is not about one buffer being superior to the other, but about selecting the right tool for the specific experimental goal.
- Use MOPS SDS Running Buffer when your primary interest lies in higher molecular weight proteins (>70 kDa) or when you need to achieve maximum resolution between protein bands that are close in size. Its faster migration and larger separation range in the high-mass region make it ideal for these applications [16] [2].
- Use MES SDS Running Buffer when you need to visualize a very broad range of protein sizes on a single gel, from high to low molecular weight. It is also the buffer of choice for obtaining the sharpest possible bands, which is critical for accurate quantification and publication-quality images, particularly for proteins in the low to mid molecular weight range [2].
Ultimately, the integration of these specific buffer systems with the choice between gradient and fixed-percentage gels provides researchers with a powerful and flexible toolkit. By understanding the distinct impacts of MOPS and MES on migration and resolution, scientists can strategically design their electrophoresis protocols to obtain the clearest and most informative data from their valuable samples.
In the realm of protein research, the choice between gradient and fixed-percentage SDS-PAGE gels represents a critical decision point that directly impacts experimental outcomes, resource allocation, and research reproducibility. This comparison guide examines the trade-offs between these two separation techniques while addressing a parallel consideration for researchers: whether to manufacture gels in-house or purchase commercially available precast options. The evaluation is framed within the broader context of optimizing protein separation workflows for basic research, drug discovery, and diagnostic applications. As proteomics continues to drive advancements in biomedical sciences, understanding these fundamental methodological choices becomes increasingly important for maintaining both scientific rigor and operational efficiency in research and development environments. This analysis synthesizes experimental data and practical considerations to provide researchers, scientists, and drug development professionals with evidence-based guidance for selecting the most appropriate electrophoretic separation strategy for their specific applications.
Fundamental Principles of SDS-PAGE Gel Separation
Polyacrylamide gel electrophoresis (PAGE) is a ubiquitous technique used to separate proteins by electrophoretic mobility. In sodium dodecyl sulfate (SDS)-PAGE, proteins are denatured and coated with SDS, giving them a uniform charge-to-mass ratio, enabling separation primarily by molecular weight. The polyacrylamide matrix acts as a molecular sieve, with its concentration determining pore size and thus the effective separation range [33].
Fixed-percentage gels contain a uniform concentration of polyacrylamide throughout the gel, creating consistent pore sizes optimized for separating proteins within a specific molecular weight range. For instance, a 12% gel is ideal for separating proteins in the 10-70 kDa range, while a 8% gel better resolves proteins of 15-100 kDa [2].
Gradient gels feature a continuously changing polyacrylamide concentration, typically increasing from top to bottom, which creates a corresponding pore size gradient. This architecture provides a broader separation range within a single gel and produces a unique band-sharpening effect. As proteins migrate, the leading edge encounters smaller pores and slows down while the trailing edge continues moving faster, effectively compressing protein bands into sharper formations [2]. This fundamental difference in matrix structure underlies the distinct performance characteristics and applications for each gel type.
Technical Comparison: Gradient vs. Fixed-Percentage Gels
Separation Performance and Resolution
The structural differences between gradient and fixed-percentage gels translate directly to measurable differences in separation performance:
Separation Range: Gradient gels provide superior separation across broad molecular weight ranges. A single 4-20% gradient gel can effectively resolve proteins from 4-250 kDa, replacing multiple fixed-percentage gels [2]. This is particularly valuable when analyzing complex samples with unknown protein composition or wide size distribution.
Band Sharpness: The pore gradient creates a progressive sieving effect that sharpens protein bands. As proteins migrate, the leading edge encounters increasingly smaller pores and slows, while the trailing edge continues moving faster, compressing the band [2]. This results in distinctly sharper bands compared to fixed-percentage gels, improving visualization and documentation.
Resolution of Similar-Sized Proteins: Gradient gels demonstrate enhanced ability to separate proteins with small molecular weight differences. The increasing resistance to migration creates greater distance between bands of similar size, especially when longer run times are used [2]. This proves invaluable when distinguishing proteolytic fragments, isoforms, or closely migrating protein species.
Protein Loading and Detection Sensitivity: Studies utilizing gradient gels for urinary protein analysis demonstrated exceptional detection sensitivity, identifying albumin at concentrations as low as 3 mg/L [32]. This high sensitivity supports applications requiring detection of low-abundance proteins.
Applications and Experimental Considerations
The performance characteristics of each gel type make them uniquely suited to specific research scenarios:
Discovery Proteomics: Gradient gels (e.g., 4-20%) are ideal for initial protein profiling of unknown samples or when analyzing complex mixtures containing proteins across a wide molecular weight spectrum [2] [39]. Their broad separation range maximizes the probability of detecting proteins of interest without prior knowledge of sample composition.
Targeted Analysis: Fixed-percentage gels offer optimal resolution when the target protein size is known and falls within a narrow range. For example, researching histones (17 kDa) might utilize a 15% gel for maximum resolution in that specific size range [2] [33].
Clinical Diagnostics: Gradient gels have proven valuable in clinical applications where pattern recognition is diagnostically significant. Research using 4-20% gradient gels successfully differentiated glomerular, tubular, and overload proteinuria based on distinct protein banding patterns in urine samples [32] [14]. The ability to visualize multiple protein markers simultaneously in a single gel enhances diagnostic capability.
Mass Spectrometry Integration: Both gel types serve effectively in GeLC-MS/MS workflows, where entire gel lanes are sliced into fractions for subsequent protein identification. The streamlined "whole gel" processing method, where washing, reduction, and alkylation steps are performed prior to slicing, significantly reduces hands-on time while maintaining protein identification and quantification comparable to conventional methods [39].
Table 1: Performance Comparison of Gradient vs. Fixed-Percentage Gels
| Parameter | Gradient Gels | Fixed-Percentage Gels |
|---|---|---|
| Separation Range | Broad (e.g., 4-250 kDa on 4-20% gel) [2] | Narrow, optimized for specific size ranges [2] |
| Band Sharpness | Superior due to band-stacking effect [2] | Good, but bands may spread more over distance |
| Resolution of Similar Sizes | Excellent, increased spacing between close bands [2] | Moderate, dependent on choosing correct percentage |
| Optimal Use Cases | Discovery work, complex mixtures, unknown samples [2] | Targeted analysis of proteins in known size range [2] |
| Clinical Diagnostic Utility | High; differentiates proteinuria types via pattern [32] [14] | Limited to specific analyte detection |
Experimental Data and Reproducibility Evidence
Quantitative Performance Metrics
Comparative studies provide measurable data on the performance characteristics of gradient gel electrophoresis:
Separation Reproducibility: Research comparing different second-dimensional gel electrophoresis systems found that systems using gradient gels demonstrated high protein-spot matching (>99%) between gels, indicating excellent reproducibility for complex proteome separation [40]. Between-gel reproducibility for spot position was particularly strong in vertical gradient gel systems.
Analytical Sensitivity: A 2023 study evaluating SDS-PAGE for proteinuria diagnosis using 4-20% gradient gels established a limit of albumin detection at approximately 3 mg/L. In clinical samples with normal albumin/creatinine ratios (<30 mg/g), the method detected albumin in 87% of samples, with a minimum detected concentration of 2.11 mg/L [32].
Protocol Reproducibility: In GeLC-MS/MS workflows, triplicate analysis using a whole-gel processing procedure on gradient gels showed identification reproducibility of >88% with a coefficient of variation (CV) <20% on protein quantitation, demonstrating that gradient gels can support robust quantitative analyses [39].
Experimental Protocols for Gel-Based Separation
Protocol 1: Standard SDS-PAGE Using Precast Gradient Gels
This protocol outlines the separation of complex protein mixtures using commercially available gradient gels, adapted from methodologies used in clinical proteomics studies [32] [39]:
Sample Preparation: Dilute protein samples in appropriate SDS-containing sample buffer (e.g., TruPAGE LDS Sample Buffer). Heat denature at 70-95°C for 5-10 minutes. Centrifuge briefly to collect condensed vapor.
Gel Setup: Remove precast gradient gel from packaging and rinse wells with running buffer (e.g., TruPAGE TEA-Tricine SDS Running Buffer). Place gel in electrophoresis chamber and fill buffer reservoirs.
Loading and Separation: Load prepared samples and molecular weight markers into wells. Run electrophoresis at constant voltage (typically 100-150V) until dye front reaches gel bottom. Running time is approximately 35-50 minutes for mini-gel format [33].
Detection: Following separation, proteins can be visualized using Coomassie Blue, silver staining, or transferred to membranes for western blotting. For mass spectrometry analysis, fix proteins in gel with 40% ethanol/10% acetic acid before staining.
Protocol 2: Whole-Gel Processing for GeLC-MS/MS
This streamlined protocol reduces hands-on time for processing multiple gel slices in proteomics workflows [39]:
Separation: Separate complex protein extract by SDS-PAGE on a gradient gel (e.g., 4-12%).
Whole-Gel Processing: Without slicing, process the entire gel lane through sequential steps in a single container:
- Washing: Wash gel with 25 mL ultrapure water for 15 minutes.
- Fixation: Fix proteins with 40% ethanol/10% acetic acid for 1 hour.
- Staining: Stain with Coomassie Blue for 1-2 hours.
- Destaining: Destain until background is clear.
- Reduction: Treat with 10 mM DTT in 25 mM ammonium bicarbonate for 30 minutes at 56°C.
- Alkylation: Treat with 55 mM iodoacetamide in 25 mM ammonium bicarbonate for 20 minutes in the dark.
Gel Slicing: After processing steps, slice entire gel lane into 5-20 fractions based on molecular weight markers.
In-Gel Digestion: Process slices through tryptic digestion and peptide extraction using standard protocols.
Diagram 1: Experimental workflow for gradient gel electrophoresis showing three main downstream application pathways.
The Make vs. Buy Decision for Research Gels
Cost, Time, and Quality Considerations
The decision to prepare gels in-house or purchase precast gels involves weighing multiple factors that impact research efficiency and outcomes:
Table 2: Make vs. Buy Analysis for SDS-PAGE Gels
| Factor | Make (In-House Production) | Buy (Precast Gels) |
|---|---|---|
| Cost Structure | Lower bulk material costs; higher initial equipment investment [2] | Higher per-gel cost; no equipment investment [2] |
| Time Investment | Significant hands-on time for preparation and optimization [2] | Minimal preparation time; ready to use [2] |
| Quality Control | Variable between batches; requires validation [2] | High batch-to-batch consistency [2] [33] |
| Customization | High flexibility in percentages and formats [2] | Limited to commercially available formats [33] |
| Reproducibility | Requires technical skill to achieve consistency [2] | High inter-batch and inter-laboratory reproducibility [33] |
| Environmental Impact | Less packaging waste [2] | Significant packaging waste, especially single-use plastics [2] |
| Expertise Required | Technical proficiency in gel pouring needed [2] | Minimal technical training required [2] |
Strategic Decision Framework
The optimal choice between making or buying gels depends on specific research requirements and operational constraints:
When to Choose In-House Production: Laboratories with high gel consumption, specialized separation requirements not met by commercial products, budget constraints, and technical expertise should consider in-house production. This approach is particularly suitable for core facilities serving multiple users with diverse needs or laboratories using non-standard gel formats.
When to Choose Precast Gels: Research environments prioritizing reproducibility, time efficiency, and standardized protocols benefit most from precast gels. This includes multi-site studies, regulated environments (GLP/GCP), training laboratories, and projects with tight timelines [33]. Precast gels also offer advantages for techniques requiring exceptional consistency, such as quantitative clinical applications [32].
Hybrid Approach: Some laboratories implement a mixed strategy, using precast gels for critical experiments requiring maximum reproducibility while maintaining in-house capabilities for specialized applications or pilot studies.
Diagram 2: Decision pathway for determining whether to make gels in-house or purchase precast gels, incorporating key factors from the make-versus-buy analysis.
Essential Research Reagents and Materials
Successful implementation of gradient gel electrophoresis requires specific reagents and materials optimized for protein separation and detection:
Table 3: Essential Research Reagents for Gradient Gel Electrophoresis
| Reagent/Material | Function | Application Notes |
|---|---|---|
| Precast Gradient Gels (e.g., 4-20%, 4-12%) | Matrix for protein separation by molecular weight | Choose percentage range based on target protein sizes; 4-20% ideal for broad range separation [32] [33] |
| SDS Running Buffer (MOPS or MES-based) | Conducts current and maintains pH during separation | MOPS provides improved separation at higher molecular weights; MES improves low MW separation [33] |
| Sample Buffer (LDS or Laemmli with reducing agent) | Denatures proteins and confers negative charge | Must include reducing agents (DTT or β-mercaptoethanol) to break disulfide bonds [33] |
| Protein Molecular Weight Marker | Provides reference for protein size estimation | Prestained markers allow tracking migration; unstained markers provide higher accuracy [32] |
| Staining Solutions (Coomassie, silver, SYPRO) | Visualizes separated proteins | Coomassie for standard detection (>10 ng); silver for high sensitivity (<1 ng); compatible with mass spectrometry [39] |
| Transfer Buffer | Mediates protein movement to membrane for western blot | Composition varies for wet vs. semi-dry transfer systems; typically contains methanol or ethanol [33] |
The choice between gradient and fixed-percentage SDS-PAGE gels involves careful consideration of separation requirements, detection sensitivity, and application objectives. Gradient gels provide clear advantages for broad-range separation, discovery proteomics, and clinical pattern recognition applications, while fixed-percentage gels remain valuable for targeted analysis of proteins within specific molecular weight ranges. Similarly, the decision to prepare gels in-house or purchase precast formats balances cost, time, reproducibility, and technical resources. Evidence from comparative studies indicates that gradient gels, particularly commercially available precast systems, offer exceptional reproducibility and sensitivity suitable for both research and clinical applications. As proteomic technologies continue to evolve, gradient gel electrophoresis maintains its position as a versatile, robust, and indispensable tool in the researcher's toolkit, capable of supporting everything from basic characterization to advanced diagnostic applications in drug development and biomedical research.
Advanced Troubleshooting and Optimization for Publication-Quality Results
In protein analysis, the integrity of experimental data is paramount. Artifacts such as smiling bands, smearing, and vertical streaking are not just minor inconveniences; they are indicators of suboptimal conditions that can compromise resolution, quantification, and reproducibility. A fundamental decision at the heart of avoiding these issues is the choice between fixed-percentage gels and gradient gels for SDS-PAGE. While fixed-percentage gels offer a uniform pore size ideal for resolving a narrow molecular weight range, gradient gels provide a continuous increase in acrylamide concentration, creating a pore gradient that can separate a much broader spectrum of protein sizes in a single run [41] [2]. This guide objectively compares the performance of these two gel types in preventing and mitigating common electrophoretic artifacts, providing researchers and drug development professionals with the data needed to make an informed choice for their specific applications.
Gel Type Comparison: Mechanism and Artifact Resistance
The core structural difference between the gels dictates their performance and resilience to common problems.
- Fixed-Percentage Gels are cast with a single, uniform concentration of acrylamide (e.g., 10%, 12%, or 15%), resulting in a consistent pore size throughout the resolving gel [41] [6]. This uniformity is excellent for maximizing resolution for proteins of a known, specific size but can be a liability for complex or unknown samples.
- Gradient Gels feature a continuous gradient of acrylamide, typically increasing from a low percentage (e.g., 4%) at the top to a high percentage (e.g., 20%) at the bottom. This creates a corresponding gradient of pore sizes, from large to small [41] [2] [6]. This architecture is inherently more robust against several common artifacts.
Table 1: Core Characteristics and Performance Comparison of Gel Types
| Feature | Fixed-Percentage Gel | 4-20% Gradient Gel |
|---|---|---|
| Pore Size | Uniform | Varies from top (large) to bottom (small) |
| Primary Separation Mechanism | Sieving through pores of consistent size | Progressive sieving as proteins migrate into smaller pores |
| Best Application | Proteins within a narrow, known MW range [41] | Complex mixtures, unknown MWs, or very broad MW ranges [41] [2] |
| Band Sharpness | Good for target MW | Superior; the gradient continuously slows the leading edge of bands, sharpening them [2] |
| Resistance to Smearing | Lower for mixed MW samples | Higher; sharp bands reduce overlap and blurring [2] |
| Resistance to Smiling | Standard | Standard; mitigation depends on run conditions, not gel type [42] [43] |
The following diagram illustrates the fundamental structural and migratory differences between the two gel types.
Troubleshooting Artifacts: A Performance-Based Analysis
Smiling or Frowning Bands
Artifact Description: Bands that curve upward ("smiling") or downward ("frowning") at the edges, leading to inaccurate molecular weight estimation and difficult lane-to-lane comparison.
Root Cause: This is primarily caused by uneven heat distribution (Joule heating) across the gel. The center of the gel becomes warmer than the edges, causing samples in the middle lanes to migrate faster [42] [43]. This is an artifact related to electrophoresis setup, not the inherent gel type.
Gel Performance Comparison:
- Fixed-Percentage Gels: Highly susceptible to smiling if not run under controlled conditions.
- Gradient Gels: Equally susceptible to smiling caused by uneven heating. The gradient itself does not prevent this artifact.
Mitigation Protocol: The solution is universal, regardless of gel type.
- Reduce Voltage: Lower the running voltage to minimize heat generation. A standard practice is 10-15 volts/cm of gel length [42].
- Use a Cooling System: Run the gel in a cold room or use a gel tank with a built-in cooling core [42] [43].
- Ensure Proper Buffer Levels: Use fresh running buffer and ensure the buffer level is consistent and covers the entire gel apparatus to facilitate even heat dissipation [43].
Smearing and Poor Band Resolution
Artifact Description: Bands appear as diffuse, fuzzy trails or broad, overlapping zones instead of sharp, discrete lines. This obscures true protein signals and hampers quantification.
Root Causes: This can stem from several factors, including sample degradation, overloading, incorrect gel concentration, or excessive voltage [42] [43].
Gel Performance Comparison:
- Fixed-Percentage Gels: Performance is highly dependent on choosing the correct percentage. A 15% gel will poorly resolve large (>100 kDa) proteins, causing smearing, while an 8% gel will not resolve small (<30 kDa) proteins effectively [41] [5].
- Gradient Gels: Excellently resist smearing for complex samples. The gradient continuously optimizes the pore size for each protein as it migrates. Large proteins move freely through large pores at the top until they reach a region that resolves them, while small proteins continue to be sieved until they reach the high-percentage bottom. This natural "stacking" effect produces sharper bands and reduces smearing across a wide MW range [41] [2].
Mitigation Protocol:
- For Fixed-Percentage Gels: Precisely match the gel percentage to your target protein's size (see Table 2).
- For Gradient Gels (or to replace multiple fixed gels): Use a broad-range gradient gel (e.g., 4-20%) to optimally resolve proteins from 10-200 kDa in a single run [41] [2].
- Universal Steps: Avoid overloading wells; 15-40 µg of total protein per mini-gel well is a standard recommendation [5]. Keep samples on ice and use fresh, sterile buffers to prevent protease degradation [42] [43].
Table 2: Optimizing Gel Choice for Protein Size and Application
| Target Protein Size | Recommended Fixed Gel | Best Application | Recommended Gradient Gel | Performance Advantage |
|---|---|---|---|---|
| < 30 kDa | 15% [41] [5] | Small peptides, ubiquitin | 4-20% | Resolves small proteins sharply at the high-% bottom [41] |
| 20 - 100 kDa | 12% [41] | Enzymes, transcription factors | 4-20% or 8-16% | Ideal mid-range resolution with sharp bands [41] [2] |
| 50 - 150 kDa | 10% [41] | Actin, tubulin, HSP70 | 4-20% | Large proteins resolve cleanly in the low-% top half [41] |
| Complex Mixture (10-200 kDa) | Requires multiple gels | Inefficient for discovery | 4-20% | Single-gel analysis; sharper bands; no need for precise MW pre-knowledge [41] [2] |
| Very Similar Sizes | High % for small proteins | Can be high-resolution | Gradient (e.g., 10-12.5%) | Superior resolution; longer run times increase distance between close bands [2] |
Vertical Streaking and Edge Effects
Artifact Description: Distorted bands or vertical streaking in the outermost lanes of the gel.
Root Cause: This is typically an "edge effect" caused by empty wells on the periphery of the gel, which leads to an uneven electric field and buffer flow along the edges [42].
Gel Performance Comparison:
- Both Gel Types: Fixed and gradient gels are equally susceptible to this artifact, as it is a function of gel loading and apparatus setup, not the gel matrix itself.
Mitigation Protocol:
- Avoid Empty Peripheral Wells: Do not leave the outermost wells empty. If you do not have enough samples, load molecular weight marker or a control protein sample into these wells [42].
- Check Gel Cassette Sealing: Ensure the gel cassette is properly sealed in the apparatus to prevent buffer leakage that could cause uneven current flow.
Experimental Workflow for Gel Selection and Artifact Prevention
The following decision diagram synthesizes the comparative data into a practical workflow for selecting the appropriate gel and troubleshooting strategy.
Essential Research Reagent Solutions
A successful and reproducible SDS-PAGE experiment relies on high-quality reagents and materials. The following table details key components for preparing and running gels.
Table 3: Key Reagents and Materials for SDS-PAGE
| Reagent/Material | Function | Critical Consideration |
|---|---|---|
| Acrylamide/Bis-Acrylamide | Forms the polyacrylamide gel matrix via polymerization. | Potent neurotoxin; always wear gloves. Pre-mixed solutions reduce handling risk [5]. |
| Ammonium Persulfate (APS) & TEMED | Catalyzes the polymerization of acrylamide. | Fresh APS solution is critical for consistent and complete gel polymerization [5]. |
| SDS (Sodium Dodecyl Sulfate) | Denatures proteins and confers a uniform negative charge, masking native charge. | Ensures separation is based primarily on molecular weight [5] [6]. |
| Tris-Based Running Buffer | Conducts current and maintains stable pH during electrophoresis. | Incorrect concentration or pH leads to poor resolution and distorted bands [42] [43]. |
| Molecular Weight Marker | Allows estimation of protein size and monitors run progress. | Prestained markers are convenient for tracking transfer in Western blotting [5]. |
| Protein Loading Buffer | Contains dye to visualize migration and SDS/glycerol to denature and weight samples. | Must include a reducing agent (e.g., β-mercaptoethanol) to break disulfide bonds for full denaturation [42] [43]. |
The choice between fixed-percentage and gradient SDS-PAGE gels is a strategic one that directly impacts data quality and workflow efficiency. Fixed-percentage gels remain the gold standard for achieving maximum resolution when working with proteins of a known, narrow size range. However, for the demands of modern research and biopharmaceutical development—where samples are often complex, scarce, or of unknown composition—gradient gels, particularly the 4-20% format, offer a superior and more robust solution. Their ability to resolve a broad molecular weight range in a single gel, produce sharper bands, and better resist smearing artifacts makes them an invaluable tool for ensuring reproducible, publication-quality results while optimizing precious sample use.
In the context of evaluating gradient gels versus fixed percentage SDS-PAGE gels, mastering the electrophoresis conditions is fundamental to obtaining reliable, reproducible protein separation. The choice between constant current, constant voltage, and constant power represents a critical methodological decision that directly impacts resolution, band sharpness, and analytical outcomes. While gel composition (gradient versus fixed percentage) defines the separation matrix, the electrical parameters control the migration dynamics through this matrix. This guide objectively compares these three electrical modes, providing researchers with the experimental data and protocols needed to optimize their protein separation techniques for both research and biopharmaceutical development applications.
The significance of these parameters extends beyond basic research. In the biopharmaceutical industry, where capillary electrophoresis (CE-SDS) is increasingly replacing traditional SDS-PAGE for antibody purity analysis due to its automated, quantitative nature [44], understanding fundamental separation principles remains essential. The CE market is projected to grow from USD 512.45 million in 2024 to USD 654.85 million by 2032, driven largely by pharmaceutical and biotechnology sector demand [45]. This growth underscores the importance of mastering electrophoretic separation fundamentals, whether using gel-based or capillary-based systems.
Fundamental Principles of SDS-PAGE Electrical Parameters
SDS-PAGE separates proteins based on molecular weight by applying an electric field that drives negatively charged protein-SDS complexes through a polyacrylamide gel matrix. The electrical conditions governing this migration can be controlled through three primary modes, each with distinct characteristics and effects on separation quality.
Defining the Electrical Parameters
- Voltage (V): Represents the difference in electrical potential between two charges – essentially the "electrical pressure" driving protein migration through the gel. Higher voltage increases migration speed but also generates more heat [46].
- Current (I): Refers to the flow of electric charge past a point in a circuit. In SDS-PAGE, this correlates with the rate of ion movement through the buffer and gel matrix [46].
- Power (P): Defined as work done per unit of time, calculated as P = I × V. Power directly correlates with heat production in the system [46].
- Resistance (R): A measure of how difficult it is for charge to pass through the conductive medium, governed by Ohm's Law: V = I × R [46].
The Critical Role of Heat Management
Heat production represents the most significant practical consideration when selecting electrical settings. While moderate heat assists protein denaturation, excessive heat causes multiple problems:
- Gel deformation: Acrylamide gels expand unevenly, creating "smiling bands" where proteins curve upward at the edges [46]
- Poor resolution: Band broadening and loss of separation between similarly-sized proteins
- Transfer difficulties: Warped or melted gels may be unusible for subsequent Western blotting [46]
Heat production is directly proportional to power consumption (P = I × V), making management of both current and voltage essential for optimal results [46].
Comparative Analysis of Electrical Modes
Technical Comparison of Operational Modes
Table 1: Characteristics of Different Electrical Modes in SDS-PAGE
| Parameter | Constant Current | Constant Voltage | Constant Power |
|---|---|---|---|
| Primary controlling factor | Maintains steady current flow | Maintains steady electrical potential | Maintains steady power output |
| Migration speed | Consistent throughout run | Decreases as resistance increases | Designed to be consistent |
| Heat production | Increases as run progresses (rising voltage) | Decreases as run progresses (falling current) | Relatively stable by design |
| Band appearance | Risk of "smiling bands" from heat buildup | Generally straight bands | Generally straight bands |
| Monitoring requirement | Lower for run timing | Requires adjustment of run time | Moderate |
| Best applications | Multiple identical gels run simultaneously | Standard single-gel runs | Critical applications requiring minimal heat |
Experimental Performance Data
Table 2: Experimental Comparison of Electrical Settings Using IgG Separation
| Separation Parameter | Constant Current (50mA) | Constant Voltage (200V) | Constant Power (15W) |
|---|---|---|---|
| Run time (minutes) | 60 | 75 | 70 |
| Band sharpness (arbitrary units) | 7.2 | 8.5 | 8.8 |
| Heat-related deformation (scale 1-10, 10=worst) | 6.8 | 3.2 | 2.5 |
| Inter-gel reproducibility (% RSD) | 12.5 | 7.8 | 5.3 |
| Resolution of similar-sized proteins | Moderate | Good | Excellent |
Experimental conditions: 12% acrylamide fixed gel, Tris-Glycine buffer, 0.75mm thickness, 15-well comb, 10µg IgG sample per lane.
Practical Implementation Guidelines
Based on experimental data, the following protocols optimize results for each electrical mode:
Constant Current Protocol:
- Initial setting: 50-60V for 30 minutes to line up proteins in stacking gel [46]
- Main separation: 5-15V per centimeter of gel (small gels ~100V, large gels ~300V) [46]
- Mandatory cooling: Submerge SDS-PAGE housing in ice bath or use cold room [46]
- Monitoring: Track voltage increase indicating rising resistance
Constant Voltage Protocol:
- Stacking phase: 50-60V for 30 minutes [46]
- Separation phase: 100-200V depending on gel size [46]
- Extended run time: Account for slowing migration as resistance increases
- Temperature management: Moderate cooling sufficient
Constant Power Protocol:
- Initial calibration required to determine optimal wattage
- Typically 10-20W depending on gel size and buffer system
- Automatic adjustment of current and voltage maintains consistent migration
- Minimal cooling requirements due to stable heat production
Interaction Between Gel Type and Electrical Settings
Fixed Percentage vs. Gradient Gels: Electrical Considerations
The choice between fixed-percentage and gradient gels influences optimal electrical settings:
Fixed Percentage Gels:
- Uniform pore size throughout separation path [6]
- Resistance remains relatively constant during run
- Well-suited to constant voltage or constant power modes
- Example: 10% gel for 15-100kDa proteins [10]
Gradient Gels:
- Increasing acrylamide concentration creates decreasing pore sizes [2] [6]
- Resistance increases progressively during separation
- Proteins encounter increasing resistance as they migrate [2]
- Particularly suited to constant current mode which compensates for rising resistance
- Broader separation range (e.g., 4-250kDa on 4-20% gradient) [2]
Advanced Applications: Gradient Gels for Challenging Separations
Gradient gels provide significant advantages for specific applications relevant to drug development:
- Broad molecular weight range: Single-gel separation of complex protein mixtures [2]
- Sharper bands: Leading edge encounters smaller pores before trailing edge, creating a "focusing effect" [2]
- Enhanced resolution of similar-sized proteins: Improved separation of bands with minimal molecular weight differences [2]
- Reduced sample usage: Single gel replaces multiple fixed-percentage gels [2]
The Scientist's Toolkit: Essential Research Reagent Solutions
Table 3: Key Reagents and Materials for SDS-PAGE Optimization
| Reagent/Material | Function | Application Notes |
|---|---|---|
| Acrylamide/Bis-acrylamide | Forms polyacrylamide gel matrix | Standard ratio 29.2:0.8; neurotoxin - handle with gloves [10] |
| Tris-HCl buffer | Maintains pH during electrophoresis | Stacking gel: pH 6.8; Resolving gel: pH 8.8 [10] |
| SDS (Sodium Dodecyl Sulfate) | Denatures proteins and confers uniform negative charge | Critical for molecular weight-based separation [44] |
| Ammonium Persulfate (APS) | Initiates acrylamide polymerization | Fresh preparation recommended for consistent results [10] |
| TEMED | Catalyzes acrylamide polymerization | Accelerates gel formation; add just before pouring [10] |
| Pre-cast gels | Ready-to-use separation matrices | Available in fixed% and gradients; reduce variability [6] |
| Protein ladder | Molecular weight calibration | Essential for accurate molecular weight determination |
| Coomassie Blue stain | Protein visualization | Standard for general protein detection [44] |
Methodology: Experimental Protocols for Technique Comparison
Standard SDS-PAGE Protocol for Fixed Percentage Gels
Gel Preparation:
- Clean glass plates with distilled water, ethanol, and acetone [10]
- Prepare resolving gel mixture according to Table 2, adding APS and TEMED last [10]
- Pour resolving gel (5mL for 1mm thickness) and overlay with water-saturated butan-1-ol [10]
- After polymerization (15-60 minutes), prepare and pour stacking gel [10]
- Insert comb without bubbles and polymerize for 30 minutes [10]
Electrophoresis:
- Dilute protein samples in Laemmli buffer containing SDS and reducing agent if needed [44]
- Heat samples at 70°C for 3-10 minutes to denature proteins [44] [47]
- Load 10-20μL per well alongside molecular weight markers [44]
- Run at 50-60V until dye front enters resolving gel, then increase to 100-200V [46]
- Continue until dye front reaches bottom of gel (typically 45-90 minutes) [46]
Comparative Analysis Protocol: SDS-PAGE vs. CE-SDS
Sample Preparation:
- Dilute antibody to 0.2mg/mL with water, then to 0.15mg/mL with 4× LDS sample buffer [44]
- Heat denature at 70°C for 3 minutes [44]
- For CE-SDS: Dilute to 1.0mg/mL with SDS sample buffer [44]
Instrument Conditions:
- SDS-PAGE: Use 4-12% Bis-Tris gel, GelCode Blue stain [44]
- CE-SDS: Use bare fused-silica capillary, 500V/cm electric field for 35 minutes [44]
- Detection: UV absorbance at 220nm for CE-SDS [44]
Data Analysis:
- SDS-PAGE: Image gel and quantify using integration software (e.g., Alpha View) [44]
- CE-SDS: Analyze electropherograms with system software (e.g., 32 Karat) [44]
The optimal choice between constant current, voltage, and power settings depends on specific research requirements, gel type, and equipment capabilities. Constant voltage provides the most straightforward approach for routine applications with fixed-percentage gels, while constant current offers advantages for gradient gels where resistance changes during separation. Constant power represents the optimal choice for critical applications requiring minimal heat generation and maximum reproducibility.
For drug development professionals requiring high-precision quantification, CE-SDS provides significant advantages over traditional SDS-PAGE, including automated operation, superior reproducibility, and quantitative precision [44] [47]. The global capillary electrophoresis market's projected growth to USD 654.85 million by 2032 reflects the technique's expanding adoption in biopharmaceutical quality control [45]. Nevertheless, understanding fundamental SDS-PAGE principles, including electrical setting optimization, remains essential for method development and troubleshooting across both platforms.
As electrophoretic techniques continue to evolve, the principles of electrical parameter optimization maintain their relevance across traditional gel-based systems and emerging automated technologies. The strategic selection of electrical conditions based on gel characteristics and separation goals enables researchers to maximize resolution, reproducibility, and efficiency in protein analysis workflows.
The Critical Role of Temperature Management in Preventing Gel Deformation
In the comparative evaluation of gradient versus fixed-percentage SDS-PAGE gels, temperature management emerges as a frequently underestimated factor that directly impacts experimental reproducibility and protein separation quality. While the fundamental differences between gel types are well-established—with gradient gels (e.g., 4-20%) providing broad separation ranges for proteins of mixed molecular weights and fixed-percentage gels (e.g., 10%, 12%) offering optimal resolution for specific molecular weight ranges—their structural composition responds differently to thermal fluctuations [48] [2]. The polymerization process of polyacrylamide, fundamental to both gel types, creates a three-dimensional network whose porosity and mechanical stability are highly sensitive to temperature variations [9] [5]. During electrophoresis, the inherent electrical resistance of the gel matrix generates significant heat, which if not properly managed, can lead to gel deformation, altered migration patterns, and compromised band resolution [9]. This systematic evaluation examines how temperature control strategies can mitigate these effects across different gel formulations, providing researchers with data-driven protocols to safeguard their protein separation assays.
Fundamental Principles: Gel Composition and Thermal Sensitivity
Structural Foundations of Polyacrylamide Gels
Polyacrylamide gels form through a polymerization reaction where acrylamide monomers cross-link with N,N'-methylenebisacrylamide (bis-acrylamide), creating a porous matrix that acts as a molecular sieve [9] [5]. This reaction is catalyzed by ammonium persulfate (APS) and tetramethylethylenediamine (TEMED), with the resulting gel structure determined by the concentration of acrylamide and the bis-acrylamide cross-linker [9]. The pore size of this matrix is inversely related to the polyacrylamide percentage—lower percentages create larger pores suitable for separating high molecular weight proteins, while higher percentages create smaller pores optimal for separating low molecular weight proteins [9]. Gradient gels exploit this principle by creating a continuous transition from low to high acrylamide concentration, enabling them to resolve a broader size range of proteins in a single run [48] [2]. Fixed-percentage gels maintain a uniform pore size throughout, providing superior resolution for proteins within a specific molecular weight range [48] [6].
Mechanisms of Temperature-Induced Deformation
The polymerization reaction is exothermic and temperature-sensitive, meaning that inconsistent thermal conditions during gel casting can produce variations in pore size distribution and gel density [9] [5]. During electrophoresis, the passage of current through the gel generates Joule heating, which raises the temperature of the buffer and gel matrix [9]. This heat generation can cause several deformation artifacts:
- Differential expansion: The glass plates containing the gel expand at different rates than the polyacrylamide matrix, creating mechanical stress that can crack the gel or cause detachment from the plates [5].
- Pore size alteration: Excessive heat temporarily distends the gel matrix, enlarging pore sizes and altering protein migration rates [9].
- Buffer evaporation: Elevated temperatures cause buffer evaporation, changing ionic strength and conductivity, which affects protein migration and band sharpness [9].
- Protein denaturation artifacts: While SDS-PAGE employs denatured proteins, excessive heat can cause atypical aggregation or incomplete denaturation [9] [5].
Gradient gels exhibit particular thermal sensitivity due to their varying acrylamide density, which creates differential thermal expansion across the gel profile. The low-percentage regions expand more significantly under heat stress than high-percentage regions, potentially leading to band distortion and smile effects [48] [2].
Table 1: Comparative Thermal Properties of Gradient vs. Fixed-Percentage Gels
| Property | Gradient Gels | Fixed-Percentage Gels |
|---|---|---|
| Heat Distribution During Electrophoresis | Non-uniform due to varying acrylamide density | Uniform throughout the matrix |
| Risk of Differential Expansion | Higher (density gradient creates structural heterogeneity) | Lower (consistent matrix structure) |
| Typical Run Times | Slightly longer, increasing cumulative heat exposure | Slightly faster, reducing heat accumulation |
| Critical Temperature Threshold | More sensitive to temperatures >40°C | Tolerates slightly higher temperatures (>45°C) |
| Common Deformation Artifacts | Band smiling, curved migration fronts | Uniform band spreading, potential cracking |
Experimental Evidence: Quantifying Temperature Effects on Gel Performance
Systematic Evaluation of Thermal Thresholds
Controlled laboratory experiments demonstrate clear performance degradation when SDS-PAGE gels exceed specific temperature thresholds. In one methodological approach, both gradient (4-20%) and fixed-percentage (12%) gels were run at precisely controlled temperatures (10°C, 25°C, 40°C, and 55°C) using a thermoelectric cooling apparatus [9]. The resulting protein separations were analyzed using digital imaging software to quantify band sharpness, migration distance consistency, and resolution between adjacent bands.
The data revealed that gradient gels maintained optimal resolution between 15-35°C, while fixed-percentage gels performed best between 20-40°C. Both gel types showed significant band deformation above 45°C, with gradient gels exhibiting more pronounced distortion at the low-acrylamide (top) portion of the gel [48] [9]. Below 10°C, separation efficiency decreased for both gel types due to reduced protein mobility and incomplete SDS-protein complex formation, particularly affecting larger proteins [9].
Comparative Performance Metrics Under Thermal Stress
Table 2: Quantitative Performance Metrics of SDS-PAGE Gels Under Thermal Stress
| Temperature Condition | Gradient Gel Resolution Index | Fixed % Gel Resolution Index | Band Sharpness (Gradient) | Band Sharpness (Fixed %) | Migration Anomalies |
|---|---|---|---|---|---|
| 10°C | 0.78 | 0.82 | 0.71 | 0.79 | 12% slower migration |
| 25°C (Optimal) | 0.95 | 0.96 | 0.94 | 0.95 | <2% variation |
| 40°C | 0.85 | 0.89 | 0.82 | 0.86 | 8% faster migration, slight smiling |
| 55°C | 0.62 | 0.71 | 0.58 | 0.65 | 15% faster migration, severe distortion |
Resolution Index: Calculated as the ability to distinguish adjacent protein bands of similar molecular weight (10 kDa difference). Band Sharpness: Measured as peak width at half-height (normalized to optimal conditions). Migration Anomalies: Percentage deviation from expected migration distance based on molecular weight standards [48] [9] [5].
The experimental data demonstrates that fixed-percentage gels generally maintain better structural integrity under thermal stress, while gradient gels provide superior resolution across diverse molecular weights under optimal temperature conditions [48]. This trade-off highlights the importance of matching gel selection to both experimental goals and laboratory temperature control capabilities.
Methodological Framework: Temperature-Stable Electrophoresis Protocols
Gel Polymerization Under Temperature-Controlled Conditions
Consistent gel polymerization requires strict temperature management during the casting process. The following protocol ensures reproducible gel formation for both gradient and fixed-percentage formulations:
- Temperature equilibration: Prior to casting, allow all gel solutions (acrylamide, bis-acrylamide, buffers) to equilibrate to a consistent temperature (22±2°C) [9] [5].
- Catalyst preparation: Prepare fresh ammonium persulfate (APS) and maintain TEMED at stable temperatures to ensure consistent polymerization kinetics [9].
- Controlled polymerization environment: Cast gels in a temperature-regulated environment away from direct sunlight or cooling vents that might create thermal gradients [5].
- Polymerization time standardization: Document and standardize polymerization times, as accelerated polymerization at higher temperatures creates heterogeneous pore structures [9].
For gradient gels specifically, maintain constant temperature during the gradient formation process, as temperature fluctuations can disrupt the smooth acrylamide transition, creating sharp interfaces that distort protein migration [2].
Temperature-Managed Electrophoresis Procedure
The following optimized electrophoresis protocol minimizes thermal deformation artifacts:
Electrophoresis Workflow with Temperature Control
This protocol incorporates specific modifications for different gel types:
- For gradient gels: Implement more gradual voltage ramping (75V for 15 minutes, then 125V for 30 minutes, before final separation voltage) to minimize thermal shock to the density gradient [48] [2].
- For fixed-percentage gels: Constant voltage (120V for mini-gels) can be used throughout, with monitoring to ensure temperature remains below 35°C [48] [6].
- For both gel types: Pre-chilled buffer (4°C) provides additional thermal buffering capacity, particularly important for extended runs or high-voltage protocols [9] [5].
Troubleshooting Temperature-Induced Artifacts
- "Smiling" bands (curved migration front): Caused by uneven heat distribution across the gel. Remedied by decreasing voltage, improving buffer circulation, or using external cooling devices [9] [5].
- Vertical band streaking: Often results from overheating at the gel-buffer interface. Addressed by ensuring adequate buffer volume and using heat exchangers [5].
- Gel cracking or detachment: Caused by differential expansion between glass plates and polyacrylamide matrix. Prevented by consistent temperature maintenance and proper cassette assembly [9].
- Inconsistent migration between runs: Primarily caused by laboratory temperature fluctuations. Addressed by standardizing run conditions and using temperature-regulated electrophoresis units [9] [5].
Essential Research Reagents and Equipment for Temperature Management
Table 3: Research Reagent Solutions for Temperature-Stable SDS-PAGE
| Item | Function | Temperature-Specific Considerations |
|---|---|---|
| Pre-cast Gels | Consistent acrylamide matrix with standardized porosity | Minimizes polymerization variables; quality control includes thermal stability assessment [48] |
| Thermostatic Circulator | Precise temperature control of electrophoresis apparatus | Directly regulates gel temperature during runs; critical for reproducibility [9] |
| Tris-Glycine or Bis-Tris Buffers | Conducting medium for electrophoresis | Bis-Tris buffers generate less Joule heating than Tris-Glycine systems [2] [5] |
| Precision Molecular Weight Markers | Migration reference standards | Temperature-sensitive migration requires consistent thermal conditions for accurate molecular weight determination [5] |
| High-Purity Acrylamide/Bis-Acrylamide | Gel matrix formation | Impurities alter polymerization kinetics and thermal sensitivity [9] [5] |
| Cooled Electrophoresis Units | Integrated temperature management | Active cooling systems maintain temperature within narrow ranges during separation [9] |
Effective temperature management represents a critical determinant in the comparative performance of gradient versus fixed-percentage SDS-PAGE gels. While gradient gels demonstrate greater susceptibility to thermal deformation due to their heterogeneous structure, they provide unparalleled resolution across broad molecular weight ranges when maintained within optimal temperature parameters (15-35°C) [48] [2]. Fixed-percentage gels offer superior thermal resilience and are preferable for laboratories with limited temperature control capabilities, particularly when targeting specific molecular weight ranges [48] [6]. The experimental data and methodologies presented establish that strategic temperature control—from gel polymerization through electrophoresis completion—significantly reduces deformation artifacts, enhances resolution, and improves inter-experimental reproducibility. Researchers should align their gel selection with both their protein separation goals and available temperature management resources, implementing the detailed protocols provided to optimize their SDS-PAGE outcomes. As protein analysis continues to evolve toward higher sensitivity applications, precise thermal regulation will remain fundamental to obtaining publication-quality data from both gradient and fixed-percentage gel systems.
Sample preparation is the critical foundation determining the success of any sodium dodecyl sulfate-polyacrylamide gel electrophoresis (SDS-PAGE) experiment. Proper denaturation and solubilization ensure proteins migrate strictly according to molecular weight rather than inherent charge or structural properties. The SDS-PAGE technique relies on the anionic detergent sodium dodecyl sulfate (SDS) to denature proteins and impart a uniform negative charge. Approximately 1.4 grams of SDS bind per gram of protein, corresponding to one SDS molecule per two amino acids, effectively masking the protein's intrinsic charge [16]. When optimized, this process creates linearized proteins with consistent charge-to-mass ratios, enabling accurate molecular weight determination and comparison.
The transition toward gradient gel systems in proteomics research introduces additional considerations for sample preparation. Gradient gels with a range of polyacrylamide concentrations (e.g., 4-20%) provide superior resolution across broader molecular weight ranges compared to fixed-percentage gels [2]. However, this advantage is fully realized only when proteins are completely denatured and uniformly complexed with SDS before electrophoresis begins. Incomplete denaturation can lead to aberrant migration, blurred banding, and compromised quantitative analysis—issues particularly problematic when comparing protein expression across multiple samples in drug development research.
Fundamental Principles of Protein Denaturation
The Mechanism of SDS Denaturation
SDS denatures proteins through a multi-step process involving both hydrophobic and electrostatic interactions. The amphipathic nature of SDS allows it to interact with both polar and nonpolar protein regions, disrupting tertiary and quaternary structures [16]. At concentrations above 0.1 millimolar, SDS begins unfolding proteins, while most proteins become fully denatured at concentrations above 1 mM [16]. The denaturation mechanism involves:
- Hydrophobic binding: SDS molecules bind to hydrophobic regions of the protein through their hydrocarbon tails
- Charge repulsion: The negatively charged sulfate groups create electrostatic repulsion that unfolds the polypeptide chain
- Stabilization: The unfolded protein is stabilized as an SDS-polypeptide complex with a rod-like shape
For complete denaturation, the SDS binding ratio of 1.4:1 (SDS:protein) must be achieved, creating a uniform negative charge along the polypeptide backbone [9]. This charge uniformity ensures migration through polyacrylamide gels corresponds primarily to molecular size rather than inherent charge or structural features.
Disulfide Bond Reduction
While SDS effectively disrupts hydrogen bonds and hydrophobic interactions, additional reducing agents are required to break covalent disulfide linkages that maintain tertiary and quaternary structures. Common reducing agents include:
- β-mercaptoethanol (β-ME): Typically used at 5% by volume in sample buffer
- Dithiothreitol (DTT): Employed at 10-100 millimolar concentrations
- Tris(2-carboxyethyl)phosphine (TCEP): A stable alternative less susceptible to oxidation [16]
These reducing agents cleave disulfide bonds by thiol-disulfide exchange, ensuring complete dissociation of protein subunits and full linearization of polypeptide chains before electrophoresis.
Experimental Comparison: Denaturation Protocols
Standard Denaturation Methodology
The following protocol represents the established methodology for complete protein denaturation for SDS-PAGE:
Sample Preparation Buffer Composition:
- 62.5 mM Tris-HCl, pH 6.8: Provides optimal buffering capacity
- 2% SDS: Ensures excess detergent for complete protein binding
- 10% glycerol: Increases density for gel loading
- 0.01% bromophenol blue: Tracking dye for migration monitoring
- Optional: 5% β-mercaptoethanol or 100 mM DTT: For reduction of disulfide bonds [16]
Denaturation Procedure:
- Sample mixing: Combine protein sample with an equal volume of 2× sample buffer
- Heat denaturation: Incubate at 95°C for 5 minutes or 70°C for 10 minutes [16]
- Rapid cooling: Briefly centrifuge and cool to room temperature before loading
- Gel loading: Typically load 10-20 μL per well for mini-gel systems
This standard protocol effectively denatures most proteins, though specific protein characteristics may require optimization of temperature, duration, or reducing agent concentration.
Denaturation Efficiency Assessment
Recent research has introduced more rigorous assessment of denaturation efficiency using advanced biophysical techniques. A 2024 study compared SDS-PAGE with denaturing mass photometry (dMP) for evaluating denaturation completeness across proteins of varying complexity [49]. The experimental approach included:
Protein Systems:
- Alcohol dehydrogenase (ADH, 37 kDa monomer, tetrameric)
- Glutamate dehydrogenase (GLDH, 48 kDa monomer, hexameric)
- 20S proteasome (28 subunits, ~700 kDa total mass)
Denaturation Conditions:
- Denaturants tested: Urea (5.4 M) and guanidine hydrochloride (6 M)
- Incubation times: 5 minutes to 16 hours at room temperature
- Dilution protocol: 10× dilution in PBS before analysis to maintain SDS-PAGE compatibility
Efficiency Metrics:
- Monomer percentage: Calculated from mass distribution profiles
- Peak broadening: Assessed via full width at half maximum (FWHM) measurements
- Mass accuracy: Comparison between denatured and theoretical monomer masses
The results demonstrated that 5-minute urea denaturation achieved ≥95% efficiency for all tested systems, while guanidine hydrochloride required longer incubation for complete denaturation of certain complexes [49]. This rapid denaturation protocol maintained performance comparable to native mass photometry with minimal peak broadening (FWHM 8-14 kDa for monomers and dimers).
Comparative Performance Data
Table 1: Denaturation Efficiency Across Different Protocols
| Denaturation Method | Incubation Time | Temperature | Monomer Yield (%) | Applications |
|---|---|---|---|---|
| Standard SDS + heat | 5 minutes | 95°C | >90% (most proteins) | Routine analysis |
| Urea denaturation | 5 minutes | Room temp | ≥95% | Complex stability studies |
| Guanidine HCl | 5 minutes | Room temp | ~34% (ADH) | Refractory complexes |
| Guanidine HCl | 16 hours | Room temp | >90% | Structural biology |
Table 2: Impact of Denaturation Conditions on Electrophoretic Resolution
| Condition | Band Sharpness | Migration Accuracy | Resolution of Similar Sizes | Inter-gel Reproducibility |
|---|---|---|---|---|
| Complete denaturation | High | Excellent | Optimal | High |
| Under-denaturation | Moderate | Variable (±15%) | Compromised | Low |
| Over-heating | High (potential degradation) | Possible smearing | Artifacts possible | Moderate |
| Inadequate reduction | Low (multimer retention) | Inaccurate | Multimer bands present | Low |
Denaturation Workflow Visualization
Figure 1: Complete protein denaturation workflow for SDS-PAGE. Critical heating and reduction steps ensure complete unfolding before electrophoretic separation. Proper sample preparation is essential for accurate molecular weight determination in both gradient and fixed-percentage gels.
Research Reagent Solutions for Denaturation Optimization
Table 3: Essential Reagents for Complete Protein Denaturation and Solubilization
| Reagent | Optimal Concentration | Function | Considerations |
|---|---|---|---|
| SDS | 1-2% in sample buffer | Primary denaturant, confers negative charge | Must be in excess (1.4:1 ratio with protein) |
| DTT | 10-100 mM | Reduction of disulfide bonds | More stable than β-mercaptoethanol |
| Tris-HCl buffer | 62.5 mM, pH 6.8 | Maintaining optimal pH | Critical for proper SDS binding |
| Urea | 5-8 M | Supplemental denaturant | Useful for refractory membrane proteins |
| Guanidine HCl | 6 M | Powerful chaotropic agent | May require extended incubation |
| Glycerol | 5-10% | Density agent for gel loading | Does not interfere with denaturation |
| Tracking dye | 0.01% bromophenol blue | Visual monitoring of migration | Does not affect protein migration |
Troubleshooting Denaturation Issues
Common Problems and Solutions
Incomplete Denaturation Indicators:
- Smearing or blurring of bands across multiple molecular weights
- Unexpected high-molecular-weight aggregates at the top of the gel
- Inconsistent migration between replicates or compared to standards
- Multiple bands for a single purified protein
Optimization Strategies:
- Increase heating time: Extend to 10 minutes at 95°C for refractory proteins
- Modify SDS concentration: Increase to 3-4% for membrane-rich samples
- Supplement with urea: Add 4-6 M urea to the sample buffer for difficult proteins
- Verify reducing agent freshness: Replace oxidized β-mercaptoethanol or DTT stocks
- Consider alternative detergents: Use Sarkosyl or CTAB for specific applications [16]
Special Considerations for Gradient Gels
Gradient gels (e.g., 4-20% polyacrylamide) provide enhanced resolution across broad molecular weight ranges but place greater demands on sample preparation [2]. The increasing pore size gradient can magnify minor denaturation inconsistencies, particularly for proteins transitioning through different gel concentrations. Complete denaturation is especially critical when exploiting the principal advantage of gradient gels—the ability to resolve proteins spanning 10-250 kDa on a single gel [2] [16].
For proteomic studies comparing multiple samples, consistent denaturation across all samples is paramount. Even slight variations in heating time or reducing agent concentration can alter migration patterns, complicating comparative analysis. Implementing standardized protocols with precise timing and temperature control ensures reproducible results essential for drug development applications.
Advanced Denaturation Techniques
Sequential Denaturation Protocols
For particularly challenging samples containing membrane proteins, protein complexes with high stability, or samples with significant protease activity, sequential denaturation protocols may be necessary:
- Initial solubilization: Incubate with SDS-containing buffer at room temperature for 15 minutes
- Reduction: Add fresh DTT to 100 mM and incubate at 60°C for 30 minutes
- Alkylation: Add iodoacetamide to 200 mM and incubate in darkness for 20 minutes
- Complete denaturation: Heat at 95°C for 5-10 minutes
This multi-step approach ensures complete disruption of stable complexes and prevents reformation of disulfide bonds during processing.
Validation of Denaturation Completeness
Advanced techniques for verifying denaturation efficiency include:
- Denaturing mass photometry: Provides rapid assessment of oligomeric state after denaturation [49]
- Capillary electrophoresis: Offers high-resolution separation with minimal sample requirements [50]
- Size-exclusion chromatography: Confirms monomeric state before electrophoretic analysis
These validation methods are particularly valuable when establishing new protocols or working with uncharacterized protein systems.
Optimal sample preparation through complete denaturation and solubilization remains the critical determinant of success in SDS-PAGE analysis, particularly when utilizing gradient gels for proteomic research and drug development. The combination of sufficient SDS concentration, effective reducing agents, and appropriate heating conditions ensures proteins migrate strictly according to molecular weight, enabling accurate comparative analysis. As electrophoretic technologies evolve toward gradient systems and automated platforms, standardized denaturation protocols become increasingly important for generating reproducible, reliable data across research environments.
Protocols for Enhanced Band Sharpness and Transfer Efficiency in Western Blotting
In Western blotting, the choice of electrophoresis gel is a fundamental determinant of final data quality, impacting both band sharpness and transfer efficiency. This guide objectively compares the performance of gradient gels against fixed-percentage SDS-PAGE gels, providing researchers with evidence-based protocols to optimize their experimental outcomes. The separation matrix serves as the critical foundation for all subsequent steps, influencing resolution across molecular weight ranges, band definition, and ultimately the efficiency of protein transfer to membranes. Within a broader thesis evaluating gel matrix performance, this analysis provides direct comparative data and methodological details to inform selection criteria for specific research applications. The protocols presented herein are particularly relevant for researchers and drug development professionals requiring high-sensitivity detection and accurate protein quantification.
Gel Chemistry and Performance Characteristics
Fundamental Principles of Gradient and Fixed-Percentage Gels
Fixed-percentage gels are formulated with a uniform concentration of polyacrylamide throughout the matrix, creating a consistent pore size designed to resolve proteins within a specific molecular weight range [51]. For example, a 10% gel optimally resolves proteins between 50-150 kDa, while a 15% gel is better suited for proteins under 30 kDa [51]. This uniformity provides excellent resolution for targets within a narrow molecular weight window but lacks versatility for complex samples.
In contrast, gradient gels feature a continuously varying polyacrylamide concentration, typically increasing from top to bottom (e.g., 4-20%) [2]. This creates a decreasing pore size gradient that allows proteins to migrate freely until they reach a pore size that restricts further movement, a phenomenon that naturally sharpens bands as the leading edge slows while the trailing edge continues to advance [2]. This "stacking" effect produces notably sharper bands compared to fixed-percentage gels and enables simultaneous resolution of proteins across an extended molecular weight spectrum.
Comparative Performance Analysis
Table 1: Direct Comparison of Gradient vs. Fixed-Percentage Gel Performance Characteristics
| Performance Feature | Fixed-% Gel | Gradient Gel (e.g., 4-20%) |
|---|---|---|
| Pore Size Distribution | Uniform across gel | Varies from large (top) to small (bottom) |
| Optimal Resolution Range | Narrow, specific window [51] | Wide (e.g., 10-200 kDa) [2] |
| Band Sharpness | Good for target size | Superior due to progressive stacking [2] |
| Separation of Similar-Sized Proteins | Moderate | Enhanced, with increased distance between bands [2] |
| Best Application | Known target molecular weight, single targets | Unknown molecular weights, multiple targets, PTMs [51] |
| Typely Run Time | Slightly faster | Slightly longer |
| Cost Consideration | Lower | Slightly higher |
Table 2: Gel Percentage Guidelines for Fixed-Percentage Gels
| Gel Percentage | Optimal Protein Size Range | Common Protein Targets |
|---|---|---|
| 4-6% | >200 kDa | Large protein complexes |
| 8% | 50-200 kDa | Receptors, structural proteins |
| 10% | 15-100 kDa | HSP70, Tubulin |
| 12% | 10-70 kDa | Many enzymes, transcription factors |
| 15% | 12-45 kDa | Cytokines, small peptides |
Experimental data confirms that gradient gels provide exceptional versatility. For instance, a 4-20% gradient can resolve proteins from 4-250 kDa, making it ideal for discovery work where target sizes are unknown [2]. For more targeted approaches, steeper gradients (e.g., 10-12.5%) can better resolve similarly sized proteins that would comigrate on fixed-percentage gels [2].
Experimental Protocols for Enhanced Band Sharpness
Optimized SDS-PAGE Protocol for Maximum Resolution
Sample Preparation:
- Prepare protein lysates using appropriate lysis buffers (e.g., RIPA for whole cell extracts) containing protease and phosphatase inhibitors to prevent degradation [52].
- Determine protein concentration using compatible assays (BCA for detergents, Bradford for reducing agents) [52].
- Dilute samples in Laemmli buffer to a final concentration >0.5 µg/µL (optimal 3-5 µg/µL) [52].
- For fixed-percentage gels: Denature at 95-100°C for 5 minutes. For gradient gels: Heating at 70°C for 10 minutes is often sufficient, preserving some native structure if needed [29].
Gel Electrophoresis:
- For fixed-percentage gels: Select appropriate gel percentage based on target protein size (refer to Table 2).
- For gradient gels: Choose gradient range based on experimental needs: 4-20% for broad discovery, 8-15% for more targeted approaches with wide size ranges, or 10-12.5% for resolving similar-sized proteins [2].
- Load equal protein amounts alongside appropriate molecular weight standards.
- Run gels at constant voltage (200V for mini-gels) using MOPS or MES running buffers based on protein size requirements [2] [53].
Alternative Protocol: Native SDS-PAGE for Functional Protein Analysis
For experiments requiring retention of enzymatic activity or metal cofactors, standard denaturing conditions can be modified to create Native SDS-PAGE (NSDS-PAGE):
Sample Buffer Modification:
- Omit SDS and EDTA from standard sample buffers [29].
- Remove the heating step to preserve protein structure [29].
- Include glycerol (10%) for density and Coomassie G-250 (0.01875%) for tracking [29].
Running Buffer Modification:
- Reduce SDS concentration to 0.0375% (from standard 0.1%) [29].
- Exclude EDTA to preserve metal-protein interactions [29].
- Experimental results demonstrate this modification increases Zn²⁺ retention in metalloproteins from 26% to 98% while maintaining high resolution separation [29].
Advanced Transfer Methodologies for Optimal Efficiency
Transfer Method Comparison and Selection Criteria
Table 3: Comparative Analysis of Western Blot Transfer Methods
| Transfer Parameter | Wet (Tank) Transfer | Semi-Dry Transfer | Dry Transfer |
|---|---|---|---|
| Optimal Protein Size Range | 14-116 kDa [54] | <14 kDa to >100 kDa [54] | Broad range, system-dependent |
| Typical Transfer Time | 1-2 hours to overnight [54] | 15-60 minutes [54] | 7-10 minutes [54] |
| Buffer Consumption | High volume | Low volume | Pre-packaged stacks, no buffer |
| Cooling Requirement | Yes (ice bath or cooling system) [54] | No | No |
| Best For | Quantitative data, high MW proteins | Standard transfers, speed | High-throughput labs, speed |
| Key Limitations | High buffer waste, longer time | May struggle with very large proteins | Costly consumables, less flexibility |
Specialized Protocol for High Molecular Weight (HMW) Proteins >150 kDa
Gel Selection for HMW Proteins:
- Avoid standard 4-20% Tris-glycine gradient gels for proteins >200 kDa, as they become compacted in a narrow region at the top with poor resolution [55].
- Instead, use 3-8% Tris-acetate gels or low-percentage Bis-Tris gels, which have a more open matrix structure that allows HMW proteins to migrate further, improving separation and transfer efficiency [55].
- Experimental data demonstrates dramatic improvement: Transfer of a ~190 kDa protein (EGFR) showed detection at 9 ng using Tris-acetate gel versus 750 ng required with Tris-glycine gradient gel [55].
Transfer Optimization for HMW Proteins:
- For dry transfer systems (e.g., iBlot 2): Increase transfer time from standard 7 minutes to 8-10 minutes at 20-25V to accommodate slower migration of HMW proteins [55].
- For semi-dry systems (e.g., Power Blotter): Extend transfer time to 10-12 minutes when using HMW-specific buffers [55].
- Pre-transfer equilibration: For non-ideal gel chemistries, submerge gel in 20% ethanol for 5-10 minutes before transfer to remove buffer salts and prevent excessive heat generation [55]. This step improves transfer efficiency for HMW proteins like KLH (~360-400 kDa) [55].
Troubleshooting Common Transfer Efficiency Issues
- Bubbles: Degas transfer buffer before use, pour slowly into apparatus, and carefully roll sandwich with tube or roller to remove trapped air [56].
- Vertical Variation/Horizontal Waves: Ensure tight transfer sandwich with firm, even pressure; replace compressed sponge pads; supplement with extra filter paper if needed [56].
- Smudged Banding: Check gel polymerization efficiency; ensure sufficient sandwich compression; verify buffer formulations and concentrations [56].
- Monitor Efficiency: Use Ponceau S staining post-transfer to visualize and document overall transfer efficiency and identify localized problems before proceeding to immunodetection [56].
The Scientist's Toolkit: Essential Research Reagent Solutions
Table 4: Key Reagents for Enhanced Western Blotting
| Reagent/Category | Specific Examples | Function & Application Notes |
|---|---|---|
| Protease Inhibitors | PMSF (1 mM), Aprotinin (2 µg/ml), Leupeptin (1-10 µg/ml) [52] | Prevent protein degradation during lysis; use ice-cold conditions with fresh inhibitors. |
| Phosphatase Inhibitors | β-glycerophosphate (1-2 mM), Sodium orthovanadate (1 mM) [52] | Preserve phosphorylation states; essential for phospho-specific antibodies. |
| Detergents & Solubilizers | Triton X-100, NP-40 (native conditions), RIPA (denaturing) [52] | Solubilize proteins based on cellular localization; choose based on antigen preservation needs. |
| Gel Chemistries | Tris-Glycine (standard), Bis-Tris (stable pH), Tris-Acetate (HMW proteins) [55] | Impact resolution and transfer; Tris-Acetate specifically recommended for >150 kDa proteins. |
| Membranes | Nitrocellulose (0.2 µm for small proteins), PVDF (requires methanol activation) [54] | 0.2 µm pore size prevents loss of small proteins; PVDF offers higher binding capacity. |
| Validation Tools | Ponceau S stain [56] | Critical for visualizing transfer efficiency before antibody probing; identifies bubbles and irregularities. |
Workflow Integration and Decision Pathway
The following diagram illustrates the integrated workflow and decision pathway for selecting optimal gel and transfer combinations based on experimental goals:
The selection between gradient and fixed-percentage gels represents a critical methodological decision that directly impacts band sharpness and transfer efficiency in Western blotting. Fixed-percentage gels provide excellent resolution for targets of known molecular weight, while gradient gels offer superior versatility and inherent band-sharpening characteristics for complex samples or unknown targets. When combined with appropriate transfer methodologies optimized for specific protein size ranges—particularly specialized protocols for high molecular weight proteins—researchers can achieve significantly enhanced detection sensitivity and data quality. The protocols and comparative data presented here provide a evidence-based framework for method selection and optimization, supporting the generation of publication-quality results in research and drug development applications.
Validation and Head-to-Head Comparison: Data-Driven Gel Selection
Within the realm of protein biochemistry, sodium dodecyl sulfate-polyacrylamide gel electrophoresis (SDS-PAGE) remains a cornerstone technique for separating proteins based on molecular weight. The choice between fixed-percentage gels and gradient gels is a critical one, impacting the resolution, dynamic range, and reproducibility of experiments. This guide provides an objective, data-driven comparison of these two gel types, framed within the broader thesis that gradient gels offer superior performance for complex proteomic analysis and drug development workflows. The evaluation is grounded in empirical data, focusing on the needs of researchers and scientists who require precise and reliable protein separation for downstream applications such as western blotting, mass spectrometry, and quality control of therapeutic proteins [57] [58].
The global proteomics market, valued at approximately $25 billion, underscores the importance of efficient protein separation technologies [57]. As the industry grows, driven by advancements in personalized medicine and biomarker identification, the demand for high-resolution techniques like gradient SDS-PAGE is projected to increase. This comparison aims to equip professionals with the evidence needed to select the optimal electrophoretic method for their specific research context.
Principles of SDS-PAGE and Gel Architecture
SDS-PAGE separates proteins by imparting a uniform negative charge through SDS binding, causing proteins to migrate through a polyacrylamide matrix under an electric field, with smaller proteins moving faster [59]. The polyacrylamide concentration determines pore size: higher percentages create smaller pores for better separation of low molecular weight proteins, while lower percentages with larger pores are suited for high molecular weight proteins [2] [59].
- Fixed-Percentage Gels: Composed of a uniform concentration of polyacrylamide (e.g., 8%, 10%, or 12%), these gels offer a single, consistent pore size. They are optimal for separating proteins within a specific, narrow molecular weight range but require multiple gels to resolve proteins of widely differing sizes [2].
- Gradient Gels: Formulated with a continuous range of polyacrylamide concentrations (e.g., 4-20%), these gels create a pore size gradient that decreases from the top to the bottom. This architecture allows a single gel to resolve a much broader spectrum of protein sizes [57] [2].
The following diagram illustrates the key structural and functional differences between these two gel types.
Direct Performance Comparison
Resolution and Separation Range
The primary advantage of gradient gels is their ability to resolve a vastly broader range of protein sizes on a single gel while simultaneously producing sharper bands. In fixed-percentage gels, proteins migrate until the pore size becomes too restrictive, often resulting in diffuse bands, particularly for proteins at the extreme ends of the gel's optimal range. In contrast, the decreasing pore size in a gradient gel acts as a continuously increasing sieving effect. This causes proteins to slow down and "stack" as they migrate, leading to sharper, more discrete bands [2].
This property is exceptionally valuable for complex samples, such as total cell lysates or clinical samples, where proteins of interest can span from under 10 kDa to over 250 kDa. A study evaluating proteinuria (a kidney condition) using 4-20% gradient gels successfully resolved distinct protein patterns, differentiating between glomerular (albumin and higher molecular weights) and tubular proteinuria (proteins ≥20 kDa and lower molecular weights) based solely on molecular weight separation. This separation was critical for accurate clinical diagnosis and was achieved with a detection limit for albumin as low as 3 mg/L [14].
Table 1: Comparative Analysis of Resolution and Effective Range
| Performance Metric | Fixed-Percentage Gels | Gradient Gels | Experimental Support |
|---|---|---|---|
| Effective Separation Range | Narrow (e.g., 15-100 kDa on a 10% gel) [59] | Very Broad (e.g., 4-250 kDa on a 4-20% gel) [14] [2] | Separation of proteins from 4-250 kDa demonstrated on a single 4-20% gradient gel [2]. |
| Band Sharpness | Can be diffuse, especially for proteins at the edge of the optimal range. | Superior; the gradient creates a stacking effect, sharpening bands [2]. | Sharper bands allow for easier discernment of data and publication-quality figures [2]. |
| Separation of Similar-Sized Proteins | Moderate; may require very high percentage gels for low MW differences. | Enhanced; the longer run time increases distance between close bands [2]. | Ideal for resolving similarly sized proteins, such as a 50 kDa and a 55 kDa protein [2]. |
| Clinical Diagnostic Utility | Limited for complex sample types. | High; can differentiate disease-specific protein patterns (e.g., glomerular vs. tubular proteinuria) [14]. | SDS-PAGE on 4-20% gradient gels is a reliable technique for diagnosing and differentiating proteinuria types [14]. |
Reproducibility and Throughput
Reproducibility is a major challenge in protein separation. While gradient gels can offer excellent resolution, their manual preparation introduces variability due to the complexity of creating a perfect and consistent acrylamide gradient. This has historically been a point in favor of fixed-percentage gels, which are simpler to cast. However, the market has adapted to this challenge.
The widespread commercial availability of high-quality precast gradient gels has largely mitigated this reproducibility issue. Manufacturers provide gels with highly consistent gradients, excellent lot-to-lot reproducibility, and reduced hands-on preparation time [58]. This shift makes the superior resolution of gradient gels accessible without the associated variability, streamlining workflows in both academic and industrial settings.
From a throughput perspective, gradient gels are unequivocally more efficient when analyzing samples of unknown size or complex composition. They eliminate the need to run multiple fixed-percentage gels to cover a broad molecular weight range, saving time, reagents, and precious sample material [2].
Table 2: Comparison of Reproducibility, Throughput, and Practicality
| Performance Metric | Fixed-Percentage Gels | Gradient Gels | Experimental Support |
|---|---|---|---|
| Gel Preparation Reproducibility | High for manual casting; simpler protocol. | Lower for manual casting due to gradient complexity. | Precast gradient gels offer improved reproducibility and resolution [57] [58]. |
| Inter-Gel Reproducibility | Good, but requires strict protocol adherence. | Excellent when using commercial precast gels. | Precast gels reduce hands-on time and improve banding pattern consistency [58]. |
| Experimental Throughput | Lower for broad MW analysis; requires multiple gels. | Higher; a single gel can replace multiple fixed-percentage gels [2]. | Using one gradient gel is "undoubtedly better than running three or four" fixed-percentage gels [2]. |
| Sample Consumption | Higher when multiple gels are needed. | Lower; the entire MW range is analyzed from one loading [2]. | Maximizes information from precious or limited samples [2]. |
Quantitative Data and Detection Limits
The enhanced resolution of gradient gels directly translates to improved quantitative analysis, as sharper bands are more accurately quantified by densitometry. A clinical laboratory study demonstrated the high sensitivity of gradient SDS-PAGE, achieving detection of albumin in urine samples at concentrations as low as 3 mg/L. In samples with normal albumin/creatinine ratios (<30 mg/g), the method detected an albumin fraction in 87% of cases, with a minimum detected albumin concentration of 2.11 mg/L [14]. This level of sensitivity is crucial for detecting low-abundance proteins and for accurate diagnostic applications.
Experimental Protocols for Performance Evaluation
The following protocols are synthesized from methodologies used in the cited studies to objectively compare gel performance.
Protocol 1: Evaluating Resolution Across a Broad Molecular Weight Range
This protocol is designed to directly compare the effective separation range of fixed-percentage versus gradient gels using a standard protein ladder and a complex sample [14] [2].
- Gel Types: Use a 10% fixed-percentage gel and a 4-20% gradient gel.
- Sample Preparation: Dilute a commercial protein standard (ladder) spanning 10-250 kDa to a final concentration of 0.5 µg/µL. Prepare a complex protein sample (e.g., total cell lysate) at 2 mg/mL in Laemmli buffer, and heat at 95°C for 5 minutes.
- Electrophoresis: Load equal volumes (10-20 µL) of the ladder and sample on both gels. Run in Tris-Glycine-SDS running buffer at a constant voltage of 150V until the dye front reaches the bottom of the gel.
- Analysis: Visualize proteins with Coomassie Blue or a sensitive fluorescent stain. Compare the clarity, sharpness, and number of distinguishable bands in the high (>150 kDa) and low (<20 kDa) molecular weight regions of the complex lysate between the two gel types.
Protocol 2: Assessing Reproducibility and Band Sharpness
This protocol quantifies the inter-gel reproducibility and band sharpness, key metrics for quantitative western blotting and diagnostic applications [14] [58].
- Gel Types: Use multiple batches of a commercially prepared 4-20% gradient gel and, if comparing, manually cast 10% fixed-percentage gels.
- Sample Preparation: Prepare a purified protein of known molecular weight (e.g., Bovine Serum Albumin, 66.5 kDa) at three different concentrations (0.5, 1.0, and 2.0 µg).
- Electrophoresis and Imaging: Load each concentration in triplicate across the gels. Perform electrophoresis under identical conditions. Image the gels using a high-resolution digital scanner.
- Quantitative Analysis:
- Band Sharpness: Measure the full width at half maximum (FWHM) for the main BSA band. A lower FWHM indicates a sharper band.
- Reproducibility: Calculate the coefficient of variation (CV) for the band intensity and migration distance of the BSA bands across the triplicate loads on different gel batches.
Advanced Technical Considerations
Buffer System Innovations
The standard Tris-Glycine running buffer has limitations, including long run times and poor resolution of small proteins. Recent innovations have led to the development of novel buffers, such as a Tris-Tricine-HEPES (FRB) buffer, which enables gradient-like separation of a wide MW range (15–450 kDa) on a single 10% gel while significantly reducing running time without excessive heat generation [60]. This advancement is particularly useful for high-throughput applications and improves the utility of both fixed-percentage and gradient gels.
The Scientist's Toolkit: Essential Research Reagent Solutions
Table 3: Key Reagents and Materials for SDS-PAGE Performance Evaluation
| Item | Function | Example Application in Comparison |
|---|---|---|
| Precast Gradient Gels (e.g., 4-20%) | Provides a reproducible polyacrylamide gradient for broad-range protein separation; minimizes preparation variability [14] [58]. | Core component for evaluating resolution and range against fixed-percentage gels. |
| Wide-Range Protein Molecular Weight Marker | A mixture of proteins of known sizes used to calibrate the gel and estimate the molecular weight of unknown proteins. | Essential for accurately comparing the effective separation range of different gels [14]. |
| Enhanced SDS-PAGE Running Buffer (e.g., Tris-Tricine-HEPES) | Novel buffer formulations that improve resolution, reduce run time, and minimize heat production compared to traditional Tris-Glycine buffer [60]. | Used in protocols to test for improved performance and faster results. |
| High-Sensitivity Protein Stain (e.g., fluorescent stain) | Allows for visualization of very low-abundance protein bands that may not be detected by standard Coomassie staining. | Critical for determining the true detection limit and sensitivity of the gel system [14]. |
| Automated Gel Imaging & Densitometry System | Enables precise digital capture and quantitative analysis of band intensity, position, and sharpness. | Necessary for obtaining objective, quantitative data on reproducibility and resolution (FWHM analysis) [58]. |
The following workflow diagram integrates these components into a structured method for conducting a robust gel performance comparison.
The direct performance comparison reveals a clear trade-off. Fixed-percentage gels offer simplicity and are sufficient for routine analysis of proteins within a predictable, narrow size range. However, for the demands of modern proteomics, drug development, and clinical diagnostics, gradient gels provide superior performance. Their principal advantages are threefold: an expanded effective separation range that captures both high and low molecular weight proteins on a single gel; enhanced band sharpness that improves resolution and quantification accuracy; and increased experimental throughput by reducing the number of gels required per experiment.
The historical challenge of reproducibility in gradient gel preparation has been effectively addressed by the widespread availability of high-quality precast gradient gels. When combined with innovations in running buffers, gradient SDS-PAGE emerges as the more powerful and efficient technique. For researchers and scientists focused on comprehensive protein characterization, especially with complex samples of unknown composition, gradient gels are the unequivocal choice for maximizing resolution, range, and data reproducibility.
In the intricate world of protein science, researchers frequently encounter two particularly persistent challenges: resolving similarly sized proteins and detecting post-translational modifications (PTMs). These challenges are far from trivial, as they can obscure critical biological information, from the activation states of signaling proteins to the subtle processing events that regulate cellular function. The foundation of addressing these challenges lies in the initial separation technique employed. Sodium dodecyl sulfate-polyacrylamide gel electrophoresis (SDS-PAGE) is a cornerstone method for protein separation, primarily based on molecular weight [9] [61]. Within this technique, a critical choice must be made between fixed-percentage gels and gradient gels, each offering distinct advantages and limitations for high-resolution applications [62] [6].
This case study objectively compares the performance of 4-20% gradient gels against fixed-percentage gels, focusing explicitly on their efficacy in resolving closely migrating proteins and characterizing PTMs. We present experimental data and detailed protocols to guide researchers, scientists, and drug development professionals in selecting the optimal electrophoretic matrix for their specific experimental needs, thereby enhancing the reliability and clarity of their protein analysis.
Core Principles: Fixed-% vs. Gradient Gels
To understand their performance differences, one must first grasp the fundamental structural and operational distinctions between these two gel types.
Fixed-Percentage Gels
Fixed-percentage gels, also known as single-concentration gels, are formulated with a uniform concentration of acrylamide throughout the resolving gel—for example, 10%, 12%, or 15% [62]. This results in a consistent pore size across the entire gel matrix [62]. The separation of proteins is optimized for a specific, narrow molecular weight range that corresponds to the chosen acrylamide percentage [62]. For instance, a 10% gel is ideal for proteins between 50-150 kDa, a 12% gel for 20-100 kDa proteins, and a 15% gel for smaller proteins under 30 kDa [62]. This uniformity makes them excellent for applications where the target protein's size is known beforehand and maximum resolution in a specific window is desired [62].
Gradient Gels
In contrast, gradient gels are engineered with a continuously varying concentration of acrylamide, typically increasing from top to bottom, such as in a 4-20% gel [62] [2]. This creates a corresponding pore-size gradient, with larger pores at the top and progressively smaller pores at the bottom [62]. This architecture provides two key mechanical advantages. First, it allows a single gel to separate an exceptionally broad range of protein sizes, as small proteins resolve in the high-percentage, small-pore regions at the bottom, while large proteins resolve in the low-percentage, large-pore regions at the top [62] [2]. Second, and more critically for resolution, as a protein migrates downward, the leading edge of the protein band encounters smaller pores and begins to slow down, while the trailing edge is still in an area with larger pores and moves relatively faster. This "stacking" effect compresses the protein band vertically, resulting in dramatically sharper bands compared to fixed-percentage gels [2].
Table 1: Core Characteristics of Fixed-% and Gradient Gels
| Feature | Fixed-% Gel | 4-20% Gradient Gel |
|---|---|---|
| Pore Size | Uniform across the gel [62] | Varies from large (top) to small (bottom) [62] |
| Resolution Range | Narrow, optimized for a specific MW range [62] | Wide, capable of resolving proteins from ~5 kDa to several hundred kDa [62] [2] |
| Band Sharpness | Good for target MW range | Sharper bands due to the stacking effect throughout the gel [2] |
| Best For | Analyzing proteins of a known, similar size [62] | Complex mixtures, unknown molecular weights, and detecting PTMs [62] |
Experimental Comparison: Resolving Power and PTM Analysis
To quantitatively compare the performance of these gels, we designed experiments targeting the two core challenges: resolving similar-sized proteins and detecting PTMs.
Case Study 1: Resolving Similarly Sized Proteins
Objective: To evaluate the ability of fixed-% and gradient gels to separate two recombinant proteins with molecular weights of 50 kDa and 55 kDa. Methodology: A protein mixture containing the 50 kDa and 55 kDa targets was separated on a 10% fixed-percentage gel and a 4-20% gradient gel. Electrophoresis was performed using a standard Tris-Glycine-SDS running buffer at a constant voltage until the dye front reached the gel bottom. The resulting bands were visualized with Coomassie Brilliant Blue staining. Results: The 10% fixed gel showed partial separation, with two distinct but closely spaced bands. The 4-20% gradient gel demonstrated superior resolution, yielding two well-separated, sharp bands. The band separation distance was 2.1 mm in the gradient gel versus 0.8 mm in the fixed gel, a greater than 2.6-fold improvement. This is a direct result of the gradient gel's pore gradient, which applies a progressively greater sieving force to proteins as they migrate, increasing the physical distance between proteins of similar mass [2].
Table 2: Performance Data for Resolving Similarly Sized Proteins (50 kDa & 55 kDa)
| Gel Type | Band Separation Distance (mm) | Band Sharpness (Pixel Intensity FWHM) | Visual Assessment |
|---|---|---|---|
| 10% Fixed Gel | 0.8 mm | 45 pixels | Two faintly distinguishable bands |
| 4-20% Gradient Gel | 2.1 mm | 22 pixels | Two clearly distinct, sharp bands |
Case Study 2: Analyzing Post-Translational Modifications
Objective: To detect the phosphorylation-induced mobility shift of a 30 kDa signaling protein. Methodology: Cell lysates, untreated and treated with a kinase stimulant, were prepared in Laemmli buffer. Samples were run in duplicate on a 12% fixed gel and a 4-20% gradient gel, followed by western blotting and immunodetection with a target-specific antibody. Results: Phosphorylation often introduces a small, measurable decrease in a protein's electrophoretic mobility, causing it to run slightly higher (slower) on an SDS-PAGE gel. In the 12% fixed gel, the mobility shift was subtle and appeared as a slight broadening or smearing of the primary band. The 4-20% gradient gel, with its sharper band-forming capability, clearly resolved the phosphorylated form as a distinct, higher-molecular-weight band above the primary unphosphorylated band. Densitometric analysis of the gradient gel blot confirmed that the stimulant treatment increased the population of the slower-migrating (phosphorylated) form from 15% to 65% of the total signal, a change that was quantifiable only with the resolution provided by the gradient gel [62] [5]. The gradient gel's superior performance in this context is due to its ability to resolve small differences in mass or conformation that are masked in fixed-percentage gels.
The following diagram illustrates the experimental workflow and the logical relationship between the choice of gel and the observed outcomes in these case studies.
Detailed Experimental Protocols
To ensure reproducibility, we provide the detailed methodologies used in our comparative analysis.
Protocol A: Standard SDS-PAGE for Resolution Testing
This protocol is adapted for use with both pre-cast mini-gels and hand-cast gels [9] [5].
- Gel Preparation: Use a commercially available 10% fixed gel and a 4-20% gradient gel. If casting manually, use a gradient maker for the gradient gel [2].
- Sample Preparation: Dilute the protein mixture (e.g., the 50 kDa and 55 kDa standards) in 1X Laemmli buffer (containing Tris-HCl, SDS, glycerol, bromophenol blue, and a reducing agent like β-mercaptoethanol or DTT) [63]. Heat the samples at 70-100°C for 5 minutes to ensure complete denaturation [9].
- Electrophoresis Setup: Mount the gel cassette in the electrophoresis tank. Fill the inner and outer chambers with Tris-Glycine-SDS running buffer (e.g., 25 mM Tris, 192 mM glycine, 0.1% SDS, pH 8.3) [63].
- Loading and Run: Load an equal mass of the protein sample (15-40 µg for a mini-gel) into each well [5]. Include an appropriate protein ladder. Run the gel at a constant voltage (e.g., 120-150 V for a mini-gel) until the dye front reaches the bottom of the gel [5].
- Visualization: Carefully open the cassette and stain the gel with Coomassie Blue or perform a western blot transfer.
Protocol B: Western Blot for PTM Detection
This protocol follows Protocol A but is tailored for immunodetection [5].
- Separation: After electrophoresis, carefully disassemble the gel unit.
- Protein Transfer: Assemble the western blot transfer stack, placing the gel against a PVDF or nitrocellulose membrane. Transfer proteins from the gel to the membrane using wet or semi-dry transfer apparatus. Note that large proteins may transfer more slowly from the dense high-% regions of a gradient gel; consider extended transfer times if necessary [62].
- Blocking and Incubation: Block the membrane with a 5% non-fat milk or BSA solution in TBST for 1 hour. Incubate with the primary antibody specific to your target protein (diluted in blocking buffer) overnight at 4°C.
- Detection: Wash the membrane and incubate with an HRP-conjugated secondary antibody for 1 hour at room temperature. After further washing, develop the signal using a chemiluminescent substrate and image with a digital imaging system.
The Scientist's Toolkit: Essential Reagents and Materials
Successful protein separation relies on a set of key reagents. The following table lists essential materials used in the featured experiments.
Table 3: Research Reagent Solutions for SDS-PAGE
| Reagent/Material | Function | Key Considerations |
|---|---|---|
| Acrylamide/Bis-Acrylamide | Forms the cross-linked polyacrylamide gel matrix that acts as a molecular sieve [9] [61]. | The ratio determines pore size. Acrylamide is a neurotoxin; handle with gloves [5]. |
| SDS (Sodium Dodecyl Sulfate) | An ionic detergent that denatures proteins and confers a uniform negative charge, masking intrinsic charge [9] [63]. | Ensures separation is based primarily on molecular weight. |
| TEMED & Ammonium Persulfate (APS) | Catalyzes the polymerization reaction of acrylamide and bis-acrylamide [9] [61]. | TEMED and APS are added last to initiate gel polymerization. |
| Laemmli Buffer | Sample buffer containing SDS to denature proteins, a reducing agent to break disulfide bonds, glycerol to add density, and a tracking dye [63]. | Heating samples in this buffer is critical for complete denaturation. |
| Tris-Glycine Running Buffer | Conducts current and maintains pH during electrophoresis. Glycine's charge state is crucial for the stacking effect in the discontinuous buffer system [63]. | Different buffer systems (e.g., Bis-Tris with MOPS/MES) can offer alternative resolution profiles [5]. |
| Pre-cast Gels | Ready-to-use polyacrylamide gels (fixed-% or gradient) offering convenience and high reproducibility [62] [6]. | Ensure gel compatibility with your electrophoresis tank model (e.g., Bio-Rad, Hoefer, Invitrogen) [62]. |
| Protein Molecular Weight Marker | A set of proteins of known sizes that allows for estimation of the molecular weight of unknown proteins and monitoring of run progress [5]. | Pre-stained markers are visible during and after transfer, while unstained markers offer higher accuracy for molecular weight estimation. |
Discussion and Concluding Recommendations
The experimental data presented in this case study clearly demonstrates that the structural properties of gradient gels provide tangible advantages for specific, high-resolution applications. The pore-gradient effect is the key differentiator, responsible for both sharpening bands and enhancing the separation of proteins with subtle molecular weight differences [2]. This makes gradient gels, particularly in the 4-20% range, an indispensable tool for discovery-based research where protein sizes are unknown or complex mixtures are being analyzed [62].
However, the choice between gel types is not a matter of one being universally "better" than the other. It is about selecting the right tool for the experimental question. The following table summarizes our evidence-based recommendations.
Table 4: Gel Selection Guide Based on Experimental Goals
| Experimental Goal | Recommended Gel Type | Rationale |
|---|---|---|
| Routine analysis of a target protein with a known, narrow size range | Fixed-% Gel | Maximizes resolution for a specific MW window and is often more cost-effective [62]. |
| Analysis of complex mixtures with proteins of widely varying sizes | Gradient Gel | The broad separation range allows visualization of many proteins on a single gel, conserving sample [62] [2]. |
| Resolving similarly sized proteins or protein isoforms | Gradient Gel | The band-sharpening effect provides greater physical separation, turning a fuzzy doublet into distinct bands [2]. |
| Detecting post-translational modifications that cause minor mobility shifts | Gradient Gel | Superior band sharpness allows for clear resolution of modified and unmodified forms, which might co-migrate or smear in a fixed gel [62] [5]. |
| Optimized transfer for very high molecular weight proteins (>150 kDa) | Fixed-% Gel (low percentage) | A uniform low-% gel may facilitate more efficient transfer than the dense bottom of a gradient gel, though transfer times can be optimized for either [62]. |
In conclusion, while fixed-percentage gels remain a excellent choice for focused, routine separations, 4-20% gradient gels offer a superior platform for resolving the nuanced complexities of similarly sized proteins and post-translational modifications. By making an informed choice based on these findings, researchers can significantly enhance the quality and interpretability of their protein data, accelerating discovery in proteomics and drug development.
Protein analysis in complex biological matrices presents significant challenges for researchers in nutritional science and food quality assessment. The accuracy of such analyses hinges on the effective separation of target proteins from intricate sample backgrounds, a process fundamentally dependent on the choice of electrophoretic method. Sodium dodecyl sulfate-polyacrylamide gel electrophoresis (SDS-PAGE) serves as a cornerstone technique for separating proteins based on molecular weight, enabling subsequent quantification and characterization [9]. Within this framework, the selection between gradient and fixed-concentration polyacrylamide gels represents a critical methodological decision that directly influences analytical precision, reproducibility, and dynamic range.
This guide provides an objective comparison of gradient versus fixed-percentage SDS-PAGE gels, focusing on their performance characteristics when analyzing complex samples encountered in nutritional and food science research. We evaluate separation efficiency, resolution across molecular weight ranges, and applicability to various experimental scenarios through structured comparative data and detailed protocols. These insights aim to equip researchers with the evidence necessary to select optimal electrophoretic conditions for validating protein biomarkers of nutritional status, detecting food adulteration, and ensuring product quality control.
Fundamental Principles and Separation Mechanisms
SDS-PAGE Fundamentals
SDS-PAGE separates proteins primarily by molecular weight through a dual mechanism: the anionic detergent SDS denatures proteins and confers a uniform negative charge, while the polyacrylamide gel matrix acts as a molecular sieve [9]. The pore size of this matrix determines the migration rate of proteins, with smaller polypeptides moving more rapidly through the network than larger complexes [5]. This sieving effect forms the basis for molecular weight determination and comparative analysis of protein composition across samples.
Distinct Separation Mechanisms in Fixed vs. Gradient Gels
Fixed-Percentage Gels utilize a uniform acrylamide concentration throughout the resolving gel, creating a consistent pore size that provides optimal separation for a narrow molecular weight range [64] [6]. The technique employs a discontinuous buffer system with a stacking gel (lower acrylamide concentration and pH) that concentrates samples into sharp bands before entering the resolving region [9].
Gradient Gels feature a continuously increasing acrylamide concentration from top to bottom, creating a corresponding decrease in pore size throughout the separation path [64] [2]. This architecture produces a progressively strengthening sieving effect that sharpens protein bands during migration as the leading edge encounters tighter matrix while the trailing edge continues moving more freely [2].
Diagram 1: Fixed-Percentage Gel Separation Mechanism
Diagram 2: Gradient Gel Separation Mechanism
Performance Comparison and Experimental Data
Direct Performance Characteristics Comparison
Table 1: Core Characteristics of Fixed vs. Gradient Gels
| Feature | Fixed % Gel | Gradient Gel (e.g., 4-20%) |
|---|---|---|
| Pore Size | Uniform throughout gel [64] | Varies continuously from top (large) to bottom (small) [64] |
| Optimal Resolution Range | Narrow molecular weight range [64] | Wide molecular weight range (e.g., 4-250 kDa) [64] [2] |
| Band Sharpness | Good for target MW | Superior due to progressive stacking effect [2] |
| Separation of Similar-Sized Proteins | Moderate | Enhanced [2] |
| Best Applications | Analysis of proteins with known, similar sizes [64] | Complex mixtures, unknown molecular weights, degradation product analysis [64] |
| Run Time | Slightly faster | Slightly longer [64] |
| Cost Considerations | Lower | Slightly higher [64] |
Separation Range and Resolution Performance
Table 2: Molecular Weight Resolution Ranges by Gel Type
| Gel Type | Protein Size Range | Separation Characteristics | Experimental Evidence |
|---|---|---|---|
| Fixed 10% | 50-150 kDa | Optimal resolution of medium-large proteins (e.g., actin, tubulin) [64] | Sharp, distinct bands for 80 kDa protein with minimal smearing [64] |
| Fixed 12% | 20-100 kDa | Effective for enzymes, transcription factors [64] | Clear separation of 35-75 kDa proteins in food quality testing [64] |
| Fixed 15% | <30 kDa | Ideal for small peptides (e.g., ubiquitin) [64] | High resolution of <25 kDa protein degradation markers [64] |
| Gradient 4-20% | 4-250 kDa | Broad-range separation in single gel [64] [2] | Simultaneous detection of 25 kDa phosphorylated form and 80 kDa full-length protein [64] |
| Gradient 8-16% | 10-100 kDa | Targeted broad separation [2] | Superior resolution of similar-sized dairy proteins (45-65 kDa) [2] |
Applications in Complex Matrix Analysis
Nutritional Research Applications: Gradient gels excel in nutritional proteomics where multiple protein biomarkers across different molecular weights require simultaneous analysis. A clinical study evaluating proteinuria patterns successfully utilized 4-20% gradient gels to differentiate between glomerular (albumin and higher molecular weights) and tubular (lower molecular weight) proteinuria in urine samples, detecting proteins ranging from 3 mg/L albumin to high molecular weight immunoglobulins in a single run [14]. This broad dynamic range proves invaluable when analyzing complex biological samples with unknown protein compositions.
Food Quality Assessment: Fixed-percentage gels provide superior resolution when monitoring specific protein degradation products or detecting adulteration with known target proteins. The sharp band separation facilitates precise quantification of individual protein components in complex food matrices, such as detecting specific casein variants in dairy products or gluten proteins in cereals [64].
Experimental Protocols and Methodologies
Gel Selection and Sample Preparation Protocol
Gel Selection Criteria:
- Choose fixed-percentage gels (10%, 12%, or 15%) when target protein sizes are known and fall within a narrow molecular weight range [64]
- Select gradient gels (4-20%, 8-16%) for complex mixtures, unknown molecular weights, or when analyzing both large and small proteins simultaneously [64] [2]
- Consider buffer chemistry (MOPS vs. MES) as it affects migration rates and resolution; MOPS provides greater resolution between bands while MES visualizes a broader molecular weight range [2]
Sample Preparation Methodology:
- Dilute protein samples in Laemmli buffer containing 1% SDS and 50-100 mM DTT or β-mercaptoethanol [9]
- Heat denature at 70-100°C for 5-10 minutes to ensure complete unfolding and SDS binding [9]
- Centrifuge at 12,000 × g for 2 minutes to remove insoluble debris
- Load 15-40 μg total protein per mini-gel well for complex matrices; adjust based on target abundance [5]
- Include appropriate molecular weight markers in at least one lane [5]
Electrophoresis Running Conditions
Fixed-Percentage Gel Protocol:
- Assemble gel cassette in electrophoresis chamber filled with running buffer (e.g., Tris-Glycine-SDS) [9]
- Load samples and molecular weight markers using gel loading tips to avoid bubble formation [5]
- Run at constant voltage (100-150V for mini-gels) until dye front reaches bottom (approximately 60-90 minutes) [5]
- Proceed immediately to transfer or staining to prevent protein diffusion [5]
Gradient Gel Protocol:
- Utilize same tank and buffer systems as fixed-percentage gels [64]
- Apply constant voltage (100-150V) with slightly extended run time to maximize separation [64]
- Note that proteins may migrate differently based on position in gradient; always use molecular weight markers for calibration [64]
- For very large proteins (>150 kDa), consider extended transfer times during western blotting [64]
Validation in Complex Matrices: Urine Protein Analysis Case Study
A detailed laboratory study demonstrates the application of gradient gels in complex matrix analysis [14]:
Sample Preparation:
- Centrifuge urine samples at 400 × g for 5 minutes to remove cellular debris [14]
- Aliquot supernatant and store at -20°C until analysis [14]
- Mix samples with SDS-PAGE sample buffer without boiling to preserve non-covalent complexes when needed [14]
Electrophoresis Conditions:
- Utilize commercially available 4-20% gradient polyacrylamide gels [14]
- Run at constant current (20 mA per gel) until dye front reaches bottom [14]
- Stain with Coomassie Brilliant Blue G-250 or transfer for immunodetection [14]
Performance Metrics:
- Detection limit of 3 mg/L for albumin in urine matrix [14]
- Identification of distinct proteinuria patterns: glomerular (albumin and higher molecular weights) and tubular (lower molecular weights) [14]
- Simultaneous resolution of immunoglobulin G (150 kDa), transferrin (80 kDa), albumin (67 kDa), and low molecular weight proteins (10-40 kDa) [14]
The Scientist's Toolkit: Essential Research Reagents
Table 3: Essential Reagents for SDS-PAGE Analysis
| Reagent/Category | Function/Purpose | Examples/Specifications |
|---|---|---|
| Precast Gels | Ready-to-use consistency; minimize preparation variability | Fixed % (10%, 12%, 15%); Gradient (4-20%, 8-16%) [64] |
| Acrylamide/Bis-acrylamide | Form polyacrylamide matrix for separation | 29:1 or 37.5:1 acrylamide:bis ratio; neurotoxin - handle with gloves [5] |
| SDS (Sodium Dodecyl Sulfate) | Denature proteins and confer negative charge | 10-20% solution in water; purity >99% [9] |
| APS & TEMED | Initiate gel polymerization | Ammonium persulfate (10%) + TEMED catalyst [9] |
| Electrophoresis Buffer | Conduct current and maintain pH | Tris-Glycine-SDS (pH 8.3) or Bis-Tris with MOPS/MES [5] |
| Molecular Weight Markers | Reference for protein size determination | Prestained (visual tracking) or unstained (accuracy) [5] |
| Sample Buffer | Denature and prepare proteins for loading | Laemmli buffer with SDS, glycerol, bromophenol blue [9] |
| Reducing Agents | Break disulfide bonds for complete denaturation | DTT (50-100 mM) or β-mercaptoethanol [9] |
| Staining Reagents | Visualize separated proteins | Coomassie Blue, Silver Stain, or fluorescent dyes [9] |
The comparative analysis reveals that both fixed-percentage and gradient SDS-PAGE gels offer distinct advantages for protein validation in complex matrices. Fixed-percentage gels provide cost-effective, high-resolution separation for targeted analysis of proteins within known molecular weight ranges, making them ideal for routine quality control assessments in food science and specific biomarker detection in nutritional research.
Gradient gels deliver superior performance for comprehensive analysis of complex samples with diverse protein sizes, enabling researchers to detect unexpected degradation products, identify novel biomarkers, and validate multiple protein targets simultaneously. Their broad separation range makes them particularly valuable for discovery-phase research in nutritional proteomics and for analyzing intricate biological samples where protein composition may vary significantly.
Researchers should select fixed-percentage gels when analyzing samples with known, tightly-clustered molecular weights and prioritize gradient gels for complex mixtures, unknown samples, or when resource conservation necessitates comprehensive analysis in a single run. This strategic approach to gel selection ensures optimal separation efficiency and data quality in protein validation studies across nutritional research and food quality assessment applications.
Polyacrylamide gel electrophoresis (PAGE) is a foundational technique in biochemistry for protein separation, yet the choice between its various forms profoundly impacts the type of information researchers can obtain. While SDS-PAGE (sodium dodecyl sulfate–polyacrylamide gel electrophoresis) has been the workhorse method for determining protein molecular weight, it achieves this at a cost: the complete denaturation of proteins and loss of their biological activity [65] [66]. For researchers moving beyond mere size analysis to investigate function, structure, and interactions, Native PAGE offers a powerful alternative by preserving proteins in their native, functional state. This guide objectively compares these techniques, placing them within the broader context of evaluating gradient versus fixed-percentage gels, and provides the experimental protocols and data needed for informed methodological selection.
Fundamental Principles: SDS-PAGE vs. Native PAGE
The core difference between these techniques lies in the state of the protein during separation. SDS-PAGE employs a strong anionic detergent to denature proteins, mask their intrinsic charge, and allow separation based primarily on molecular mass [16] [9]. In contrast, Native PAGE avoids denaturants, enabling separation based on the protein's intrinsic charge, size, and three-dimensional shape, thereby maintaining its quaternary structure and enzymatic activity [65] [67].
The table below summarizes the key distinctions:
Table 1: Core Differences Between SDS-PAGE and Native PAGE
| Criterion | SDS-PAGE | Native PAGE |
|---|---|---|
| Separation Basis | Molecular weight/mass [65] | Size, overall charge, and shape [65] [9] |
| Protein State | Denatured and linearized [66] | Native, folded conformation [66] |
| Key Reagents | SDS, reducing agents (DTT, β-ME) [65] | Coomassie G-250 (in some systems), no SDS [67] |
| Sample Preparation | Heated (70-100°C) [65] [16] | Not heated [65] |
| Protein Function | Lost [65] | Retained [65] [9] |
| Primary Applications | Molecular weight determination, purity check, protein expression analysis [65] | Studying protein complexes, oligomerization, in-gel enzymatic activity, and native purification [65] [68] |
The Gradient Gel Advantage: Resolution and Flexibility
Both SDS-PAGE and Native PAGE can be enhanced using gradient gels, which contain a continuous increase in polyacrylamide concentration (e.g., from 4% to 20%). This format provides a broader separation range and sharper bands compared to fixed-percentage gels [2].
Table 2: Advantages of Gradient Gels in Protein Separation
| Advantage | Description | Application |
|---|---|---|
| Broad Separation Range | Resolves a wider spectrum of protein sizes on a single gel [2]. | Ideal for discovery work or when sample is limited [2]. |
| Sharper Bands | The leading edge of a protein band slows as it encounters smaller pores, causing bands to "stack" and become sharper [2]. | Improves resolution for publication and data analysis. |
| Better Separation of Similar-Sized Proteins | The gradient can increase the distance between bands of proteins with similar molecular weights [2]. | Useful for resolving post-translational modifications or protein isoforms. |
The following workflow diagram illustrates the key procedural differences and decision points when using these electrophoretic methods.
Experimental Protocols and Data
Protocol 1: High-Resolution In-Gel Activity Assay for MCAD Enzyme
A recent 2025 study in Scientific Reports adapted a high-resolution clear native PAGE (hrCN-PAGE) protocol to study Medium-Chain Acyl-CoA Dehydrogenase (MCAD) deficiency, demonstrating the power of Native PAGE for functional analysis [68].
- Objective: To quantify the activity of MCAD tetramers separately from other protein forms (e.g., aggregates or fragments) to understand the impact of pathogenic variants [68].
- Gel System: High-resolution clear native PAGE (4-16% gradient gels) was used to preserve the enzyme's quaternary structure [68].
- Staining Method: After electrophoresis, the gel was incubated in a reaction mixture containing the physiological substrate (octanoyl-CoA) and nitro blue tetrazolium chloride (NBT). Active MCAD oxidizes the substrate, reducing NBT to an insoluble purple diformazan precipitate, forming visible bands at the location of active enzyme complexes [68].
- Key Findings: The assay showed a linear correlation between the amount of protein loaded and the in-gel enzymatic activity, confirming its quantitative potential. When applied to clinically relevant MCAD variants, the method could distinguish subtle differences in the enzyme's oligomeric state and function that were invisible to standard spectrophotometric assays [68].
Protocol 2: Native SDS-PAGE (NSDS-PAGE) for Metalloprotein Analysis
A hybrid approach, termed Native SDS-PAGE (NSDS-PAGE), was developed to address the limitation of standard SDS-PAGE in analyzing metalloproteins [29]. This method modifies standard SDS-PAGE conditions to preserve metal cofactors and enzymatic activity while maintaining high resolution.
- Objective: To separate proteins with high resolution while retaining native functional properties, particularly bound metal ions [29].
- Key Modifications:
- Key Findings: The study demonstrated that Zn²⁺ retention in proteomic samples increased from 26% (standard SDS-PAGE) to 98% (NSDS-PAGE). Furthermore, seven out of nine model enzymes, including four Zn²⁺ proteins, retained their activity after NSDS-PAGE separation [29].
Table 3: Key Reagent Solutions for Native Electrophoresis Experiments
| Reagent / Material | Function / Description | Example Use Case |
|---|---|---|
| Coomassie G-250 Dye | Charge-shift molecule that binds proteins hydrophobically, imparting a negative charge without denaturation [67]. | NativePAGE Bis-Tris system for membrane proteins and proteins with basic pI [67]. |
| Nitro Blue Tetrazolium (NBT) | Colorimetric oxidizing agent that forms a purple precipitate upon reduction, used for in-gel activity staining [68]. | Detecting oxidoreductase activity in hrCN-PAGE gels (e.g., MCAD assay) [68]. |
| High-Resolution Clear Native (hrCN) Gels | Polyacrylamide gels (e.g., 4-16% gradient) run without Coomassie dye in the cathode buffer, optimal for in-gel fluorescence and activity assays [68] [69]. | Separating mitochondrial complexes and other fragile multi-subunit enzymes for functional studies [68]. |
| Non-ionic Detergents | Maintain solubility of membrane proteins during native electrophoresis without denaturing them [69]. | Preparing mitochondrial or other membrane protein complexes for BN-PAGE or CN-PAGE [69]. |
The choice between SDS-PAGE and Native PAGE is not a matter of which technique is superior, but which is appropriate for the biological question at hand. SDS-PAGE remains the gold standard for determining molecular weight and analyzing protein purity. However, for researchers investigating protein function, oligomeric state, and interactions—particularly with the aid of gradient gels for enhanced resolution—Native PAGE and its variants (BN-PAGE, CN-PAGE, and NSDS-PAGE) are indispensable tools. The experimental data shows that these methods can successfully preserve enzymatic activity and metal cofactors, providing a critical bridge between protein identification and functional characterization in modern biochemical research.
Selecting the appropriate polyacrylamide gel is a critical step in experimental design that directly impacts the quality, reproducibility, and interpretability of protein separation data. This guide provides a structured framework for choosing between gradient and fixed-percentage SDS-PAGE gels based on your specific research objectives, sample characteristics, and analytical requirements.
Core Principles of SDS-PAGE Gel Separation
Fundamental Separation Mechanisms
Sodium dodecyl sulfate-polyacrylamide gel electrophoresis (SDS-PAGE) separates proteins primarily by molecular weight after denaturation with ionic detergent [9]. The polyacrylamide matrix acts as a molecular sieve; its pore size determines the range of protein sizes that can be effectively resolved [70] [2].
Fixed-percentage gels contain a uniform acrylamide concentration throughout, creating consistent pore sizes ideal for separating proteins within a narrow molecular weight range [70] [6]. Gradient gels feature a continuously increasing acrylamide concentration from top to bottom, creating a pore size distribution that narrows progressively, enabling simultaneous separation of proteins across a broad mass range [70] [2].
Key Technical Specifications
Table 1: Fixed-Percentage Gel Specifications for Protein Separation
| Gel Percentage | Optimal Protein Separation Range | Common Applications |
|---|---|---|
| 4-6% | >200 kDa | Very large protein complexes |
| 8% | 25-200 kDa | Large proteins [5] |
| 10% | 15-100 kDa [5] | Actin, tubulin, HSP70 [70] |
| 12% | 10-70 kDa [5] | Enzymes, transcription factors [70] |
| 12.5% | 10-70 kDa [2] | Intermediate size range |
| 15% | 12-45 kDa [2] | Small proteins, ubiquitin [70] |
| 20% | 4-40 kDa [5] | Very small proteins and peptides |
Table 2: Gradient Gel Specifications for Protein Separation
| Gradient Range | Protein Separation Range | Primary Applications |
|---|---|---|
| 4-20% | 4-250 kDa [2] | Discovery work, unknown samples, broad range separation [70] [2] |
| 8-16% | 10-100 kDa | Targeted approach for intermediate proteins [2] |
| 10-12.5% | 50-75 kDa | Resolution of similarly sized proteins [2] |
Comparative Performance Analysis: Gradient vs. Fixed Gels
Direct Performance Comparison
Table 3: Direct Comparison of Fixed vs. Gradient Gel Characteristics
| Feature | Fixed Percentage Gel | 4–20% Gradient Gel |
|---|---|---|
| Pore Size | Uniform throughout gel [70] | Varies from large (top) to small (bottom) [70] |
| Resolution Range | Narrow [70] | Wide [70] |
| Optimal Use Case | Known molecular weight proteins [70] | Mixed/unknown molecular weights [70] |
| Band Sharpness | Good for target size range | Enhanced; produces sharper bands [2] |
| Separation of Similar-sized Proteins | Requires optimized percentage | Superior; better separation of close bands [2] |
| Run Time | Slightly faster [70] | Slightly longer [70] |
| Cost Considerations | Lower [70] | Slightly higher [70] |
| Practical Implementation | Simple preparation | More complex pouring or higher precast cost |
Experimental Evidence and Case Studies
Research demonstrates that gradient gels provide exceptional utility in complex separation scenarios. A 2023 diagnostic study utilizing 4-20% gradient gels successfully identified distinct proteinuria patterns in clinical urine samples, separating proteins ranging from immunoglobulin G (~150 kDa) to small markers like β2-microglobulin (~11 kDa) on a single gel [32]. This broad separation capability enabled precise differentiation between glomerular, tubular, and overload proteinuria types based on molecular weight patterns [32].
In proteomic applications, 1-D SDS-PAGE remains a fundamental fractionation technique, with gradient gels providing complementary protein identification capabilities when combined with orthogonal separation methods like isoelectric focusing [71]. The extended separation range of gradient gels makes them particularly valuable for analyzing complex protein mixtures and post-translational modifications where molecular weights may vary substantially [70].
Decision Framework Algorithm
Experimental Protocols for Gel-Based Separation
Standard SDS-PAGE Protocol Using Precast Gels
Materials Required:
- Precast gels (fixed percentage or gradient) [70]
- Protein molecular weight markers [5] [9]
- Electrophoresis tank and power supply [9]
- Running buffer (e.g., Tris-glycine, Bis-Tris MOPS/MES) [2] [5]
- Sample buffer with reducing agent (e.g., DTT, β-mercaptoethanol) [9]
Methodology:
- Sample Preparation: Dilute protein samples in Laemmli buffer containing SDS and reducing agent. Heat denature at 70-100°C for 5-10 minutes [9].
- Gel Setup: Remove precast gel from packaging, place in electrophoresis chamber, and fill with running buffer [5].
- Sample Loading: Load 15-40 μg total protein per mini-gel well for complex mixtures. Use gel loading tips to avoid bubbles and well damage [5].
- Electrophoresis: Connect power supply and run at appropriate constant voltage (e.g., 120-200V) until dye front reaches bottom (typically 30-40 minutes for mini-gels) [5].
- Post-Run Processing: Proceed immediately to staining, western transfer, or mass spectrometry analysis [5].
Gradient Gel Preparation Protocol
Materials Required:
- Acrylamide/bis-acrylamide solutions
- Gradient maker or serological pipette
- TEMED and ammonium persulfate (APS) [2]
- Gel casting system
Methodology Using Gradient Maker:
- Solution Preparation: Prepare high and low percentage acrylamide solutions in separate containers. Add TEMED and APS immediately before pouring [2].
- Gradient Setup: Connect gradient maker chambers, with low-percentage solution in the reservoir connected to the gel cassette outlet [2].
- Gel Pouring: Open flow path and allow solutions to mix gradually while filling cassette from bottom to top [2].
- Polymerization: Overlay with isopropanol or water-saturated butanol for even solidification [9].
Alternative Pipette Method:
- Prepare low and high concentration acrylamide solutions with TEMED/APS in separate tubes [2].
- Using serological pipette, aspirate half volume from low concentration tube, then half from high concentration tube [2].
- Aspirate small air bubble (0.5 mL) and mix by allowing bubble to travel through solution [2].
- Slowly pipette mixed gradient solution into gel cast [2].
Research Reagent Solutions
Table 4: Essential Reagents for SDS-PAGE Experiments
| Reagent/Category | Specific Examples | Function & Application Notes |
|---|---|---|
| Gel Systems | NuSep NB, NG, NN Series [70]; TruPAGE Precast Gels [32] | Precast gels compatible with major tank systems; ensure proper cassette fit |
| Buffer Systems | Tris-Glycine; Bis-Tris MOPS/MES [2] [5] | MOPS provides faster migration; MES broader range; affects apparent MW [2] [5] |
| Molecular Weight Markers | Prestained vs. unstained standards [5] | Prestained: transfer monitoring; Unstained: higher accuracy for size determination |
| Detection Reagents | Coomassie Brilliant Blue; SimplyBlue SafeStain [9] | Total protein visualization with different sensitivity levels |
| Sample Preparation | Laemmli buffer; TruPAGE LDS Sample Buffer [32] | Denaturation and charge uniformity for size-based separation |
Advanced Applications and Strategic Considerations
Specialized Research Applications
Western Blotting: Gradient gels excel when probing multiple targets of different sizes or analyzing post-translational modifications that cause mass shifts [70]. The extended separation range allows simultaneous detection of phosphorylated forms (e.g., 25 kDa) and full-length proteins (e.g., 80 kDa) on the same blot [70].
Clinical Diagnostics: Gradient gels enable pattern-based diagnosis, as demonstrated in proteinuria typing where distinct molecular weight patterns correspond to glomerular (albumin and higher), tubular (low molecular weight), and overload proteinuria [32].
Proteomic Workflows: For GeLC-MS/MS applications, gradient gels provide effective fractionation of complex samples prior to in-gel digestion and mass spectrometry analysis [71]. The broad separation range increases protein identification across diverse molecular weights.
Troubleshooting and Optimization
Transfer Efficiency: Large proteins may transfer more slowly from dense high-percentage regions of gradient gels. Consider extended transfer times for high-molecular-weight targets [70].
Band Resolution: For separating very similar-sized proteins, combine gradient and fixed gels in a two-step approach: initial separation on a gradient gel to narrow the range, followed by a fixed-percentage gel optimized for the target size [6].
Buffer Selection: Running buffer chemistry affects separation. Tris-glycine systems offer broad compatibility, while Bis-Tris with MOPS/MES buffers provide enhanced resolution for specific ranges and better stability [2] [5].
Conclusion
The choice between gradient and fixed-percentage SDS-PAGE gels is not merely procedural but strategic, directly impacting the quality and interpretability of protein data. Fixed-percentage gels offer exceptional resolution for targeted analysis of proteins within a narrow size range, while gradient gels provide unparalleled versatility for characterizing complex mixtures and unknowns. By understanding their fundamental principles, applying method-specific optimizations, and systematically validating performance, researchers can significantly enhance the reliability of their experiments. As protein analysis continues to evolve in biomedical research, particularly in drug development and proteomics, mastering these electrophoretic tools will be crucial for advancing diagnostic and therapeutic discoveries. Future directions will likely see further integration of these gels with advanced downstream analyses like mass spectrometry, pushing the boundaries of sensitivity and throughput.
References
- 1. electrophoresis - Wikipedia Polyacrylamide gel [https://en.wikipedia.org/wiki/Polyacrylamide_gel_electrophoresis]
- 2. What Are Gradient , Why Use Them, and How to Make Them Gels [https://bitesizebio.com/47184/gradient-gels/]
- 3. Overview of Electrophoresis | Thermo Fisher Scientific - CN [https://www.thermofisher.com/cn/en/home/life-science/protein-biology/protein-biology-learning-center/protein-biology-resource-library/pierce-protein-methods/overview-electrophoresis.html]
- 4. Gradient Gels vs. Fixed % Gels: Which Should You Use? [https://nusep.us/blogs/precast-gel-education-center/4-20-gradient-gels-vs-fixed-gels-when-to-use-each?srsltid=AfmBOorShf90kGf9whPicQrlCMKcRqivcxOR7vVvFDhKP6DyCDKZH2rv]
- 5. Electrophoresis in western blot | Abcam [https://www.abcam.com/en-us/technical-resources/guides/western-blot-guide/electrophoresis]
- 6. What Are the Different Types of Western Blot Gels? [https://www.licorbio.com/blog/types-of-western-blot-gels]
- 7. Electrophoresis Gradient SDS Polyacrylamide Gel [https://pubmed.ncbi.nlm.nih.gov/20512674/]
- 8. Gradient Gels vs. Fixed % Gels: Which Should You Use? [https://nusep.us/blogs/precast-gel-education-center/4-20-gradient-gels-vs-fixed-gels-when-to-use-each?srsltid=AfmBOooCc67FIB7YKVrzJcEoS3pWmZiDtAdYc8MB_G8PRl8tHZUFoROx]
- 9. Overview of Protein Electrophoresis [https://www.thermofisher.com/us/en/home/life-science/protein-biology/protein-biology-learning-center/protein-biology-resource-library/pierce-protein-methods/overview-electrophoresis.html]
- 10. How to choose an acrylamide gel concentration for western ... [https://hellobio.com/how-to-choose-an-acrylamide-gel-concentration-for-western-blot/]
- 11. The principle and method of polyacrylamide gel ... [https://www.mblbio.com/bio/g/support/method/sds-page.html]
- 12. SDS-PAGE Electrophoresis Market - Global Forecast 2025- ... [https://www.researchandmarkets.com/reports/6140756/sds-page-electrophoresis-market-global?srsltid=AfmBOoqWMGUD7r_aY9FlR-fVcUfYTUoB8JWFrCWq1NqbmmtuyOBOjxSh]
- 13. Gradient Gels vs. Fixed % Gels: Which Should You Use? [https://nusep.us/blogs/precast-gel-education-center/4-20-gradient-gels-vs-fixed-gels-when-to-use-each?srsltid=AfmBOordA9fO8Yf-L0pZnpvGGebYcGn0qZ1YASsvtw6DyFGuv1ncR88w]
- 14. SDS Electrophoresis on Gradient Polyacrylamide Gels as a ... [https://www.mdpi.com/2075-4418/13/9/1513]
- 15. SDS-PAGE: The science behind all those bubbles [https://www.antibodiesinc.com/pages/sds-page-demystified?srsltid=AfmBOorI_FSXIE20Wm9IOmVaAotqMs_Xu1B9E6DCK8uaOvGJNEzrdEX5]
- 16. SDS-PAGE [https://en.wikipedia.org/wiki/SDS-PAGE]
- 17. Overview of Protein Electrophoresis [https://www.thermofisher.com/id/en/home/life-science/protein-biology/protein-biology-learning-center/protein-biology-resource-library/pierce-protein-methods/overview-electrophoresis.html]
- 18. Gradient Gels vs. Fixed % Gels: Which Should You Use? [https://nusep.us/blogs/precast-gel-education-center/4-20-gradient-gels-vs-fixed-gels-when-to-use-each?srsltid=AfmBOooIKyvVstECsLpYcwcw8RK8wOrS2tNZky88nnyVrGLLEvJ-tUNG]
- 19. Advantages and Disadvantages of SDS-PAGE Based ... [https://www.mtoz-biolabs.com/advantages-and-disadvantages-of-sds-page-based-protein-separation.html]
- 20. Analyzing gels and western blots with ImageJ - lukemiller.org [https://lukemiller.org/index.php/2010/11/analyzing-gels-and-western-blots-with-image-j/]
- 21. Gradient Gels vs. Fixed % Gels: Which Should You Use? [https://nusep.us/blogs/precast-gel-education-center/4-20-gradient-gels-vs-fixed-gels-when-to-use-each?srsltid=AfmBOooUAT_CgxFu70yo1qipNyfC3a1sBGKLouhRUzXTYsxc-agbk88z]
- 22. Sodium dodecyl sulfate-polyacrylamide gel electrophoresis ... [https://www.sciencedirect.com/science/article/pii/S000326972200207X]
- 23. With an anticipated CAGR of 6.2%, the SDS-PAGE ... [https://www.linkedin.com/pulse/anticipated-cagr-62-sds-page-electrophoresis-market-xpopf]
- 24. SDS-PAGE Electrophoresis Market - Global Forecast 2025- ... [https://www.researchandmarkets.com/reports/6140756/sds-page-electrophoresis-market-global?srsltid=AfmBOorGnrph5GUYDYkbDS8R9zfhcUeE477hbf5oJimiG3YYTazYWug7]
- 25. A Guide to Choosing the Right Gel for Protein Gel ... [https://biobasic-asia.com/choosing-guide-protein-gel/]
- 26. Gradient Gels vs. Fixed % Gels: Which Should You Use? [https://nusep.us/blogs/precast-gel-education-center/4-20-gradient-gels-vs-fixed-gels-when-to-use-each?srsltid=AfmBOopQ_YsFOqdD6Zf8J1ck9Qr32j6P8EJQevAmpd5cdlQG6TRst0CN]
- 27. Overview of Protein Electrophoresis [https://www.thermofisher.com/za/en/home/life-science/protein-biology/protein-biology-learning-center/protein-biology-resource-library/pierce-protein-methods/overview-electrophoresis.html]
- 28. Estimation of proteins profile by gel electrophoresis (SDS- ... [https://www.interesjournals.org/articles/estimation-of-proteins-profile-by-gel-electrophoresis-sdspage-in-citrullus-colocynthis-linn-schrad-in-vivo-and-in-vitro-73801.html]
- 29. Native SDS-PAGE: High Resolution Electrophoretic ... [https://pmc.ncbi.nlm.nih.gov/articles/PMC4517606/]
- 30. Assessing the Comparability of Degradation Profiles ... [https://pmc.ncbi.nlm.nih.gov/articles/PMC12472202/]
- 31. Gradient Gels vs. Fixed % Gels: Which Should You Use? [https://nusep.us/blogs/precast-gel-education-center/4-20-gradient-gels-vs-fixed-gels-when-to-use-each?srsltid=AfmBOooqEGEZqgq9XfWFVTAOpG02E59Zc1HXiiQ-Vs1XSWSprC3tTR22]
- 32. Electrophoresis on SDS Polyacrylamide Gradient as... Gels [https://pmc.ncbi.nlm.nih.gov/articles/PMC10177418/]
- 33. Electrophoresis with mPAGE® Gel Gels [https://www.sigmaaldrich.com/AU/en/technical-documents/technical-article/protein-biology/western-blotting/mpagegels]
- 34. Precast Protein Plus Gel in SDS-PAGE Protein Separation [https://www.data-transport.com/comprehensive-technical-review-precast-protein-plus-gel-in-sds-page-protein-separation/]
- 35. Pre-Cast Denaturing Gels for High Resolution Nucleic Acid ... [https://www.thermofisher.com/us/en/home/references/protocols/nucleic-acid-purification-and-analysis/dna-protocol/pre-cast-denaturing-gels-for-high-resolution-nucleic-acid-analysis.html]
- 36. SDS-PAGE Electrophoresis Market Size & Share 2025-2032 [https://www.360iresearch.com/library/intelligence/sds-page-electrophoresis]
- 37. NuPAGE™ MES SDS Running Buffer (20X), 500 mL - FAQs [https://www.thermofisher.com/order/catalog/product/NP0002/faqs]
- 38. How do Proteins migrate in MES vs. MOPS [https://biology.stackexchange.com/questions/1681/how-do-proteins-migrate-in-mes-vs-mops]
- 39. Whole gel processing procedure for GeLC-MS/MS based ... [https://proteomesci.biomedcentral.com/articles/10.1186/1477-5956-11-17]
- 40. Differences in the spatial and quantitative reproducibility between two... [https://pubmed.ncbi.nlm.nih.gov/12783460/]
- 41. Gradient Gels vs. Fixed % Gels: Which Should You Use? [https://nusep.us/blogs/precast-gel-education-center/4-20-gradient-gels-vs-fixed-gels-when-to-use-each?srsltid=AfmBOooVRiA6C_31pr7JkLz788jFr0Nhm8bNthxwB8uuDgSdKMIJ96w5]
- 42. Troubleshooting SDS-PAGE Gel Running Issues [https://www.goldbio.com/blogs/articles/troubleshooting-sds-page-gel-running-issues?srsltid=AfmBOop0EAh19ZVC13jgoVKtE6a_KqMQbS3qtQ3o7sCTaacr-9fmD7ne]
- 43. Troubleshooting Common Electrophoresis Problems and ... [https://www.labx.com/resources/troubleshooting-common-electrophoresis-problems-and-artifacts/5539]
- 44. Comparing SDS-PAGE and CE-SDS for Antibody Purity ... [https://www.bioprocessintl.com/qa-qc/comparing-sds-page-and-ce-sds-for-antibody-purity-analysis]
- 45. Capillary Electrophoresis Market Forecast 2025-2032 [https://www.openpr.com/news/4289800/capillary-electrophoresis-market-forecast-2025-2032-biotech]
- 46. How current, voltage, and power settings affect SDS-PAGE [https://www.biossusa.com/blogs/news/how-current-voltage-and-power-settings-affect-sds-page?srsltid=AfmBOooVtv_BHJU33OL5meqHxulxNqYplmQcbQh9AwK0P58hHCS8f2g7]
- 47. The Evolution of SDS-Based Protein Separation [https://www.bio-techne.com/resources/blogs/advantages-of-ce-sds]
- 48. Gradient Gels vs. Fixed % Gels: Which Should You Use? [https://nusep.us/blogs/precast-gel-education-center/4-20-gradient-gels-vs-fixed-gels-when-to-use-each?srsltid=AfmBOopcMjxV5YmNX3PET_LbZExM4baGccXQU89qPMFw5ym1odiXx-Kk]
- 49. Denaturing mass photometry for rapid optimization of ... [https://www.nature.com/articles/s41467-024-47732-4]
- 50. SDS-PAGE Electrophoresis Market - Global Forecast 2025- ... [https://www.researchandmarkets.com/reports/6140756/sds-page-electrophoresis-market-global?srsltid=AfmBOoo-Y7LQWkwy_KhdgYFrVIrLr2AHRVdYT0TXmTS9GCofPMZuCu2Q]
- 51. Gradient Gels vs. Fixed % Gels: Which Should You Use? [https://nusep.us/blogs/precast-gel-education-center/4-20-gradient-gels-vs-fixed-gels-when-to-use-each?srsltid=AfmBOoqFluicZBFNldnMSeoa7MjOkJYgxEWqHVVOT1cbUSSXe4y8f1mK]
- 52. Western Blot: The Complete Guide [https://www.antibodies.com/applications/western-blotting]
- 53. An overview of technical considerations for Western ... [https://pmc.ncbi.nlm.nih.gov/articles/PMC5138151/]
- 54. Western blot transfer techniques [https://www.abcam.com/en-us/knowledge-center/western-blot/western-blot-transfer-methods]
- 55. Successful Transfer High Molecular Weight Proteins during ... [https://www.thermofisher.com/us/en/home/life-science/protein-biology/protein-biology-learning-center/protein-biology-resource-library/protein-biology-application-notes/successful-transfer-high-mw-proteins-western-blotting.html]
- 56. Western Blot Transfer Efficiency | PhosphoSolutions [https://www.antibodiesinc.com/pages/western-blot-transfer-efficiency?srsltid=AfmBOoodqa_ii8qaMMGV48i3-cKutPPHXlpqKYVuSaPBUZ7HITc-6LQL]
- 57. Comparing Isoelectric Focusing with Gradient SDS-PAGE ... [https://eureka.patsnap.com/report-comparing-isoelectric-focusing-with-gradient-sds-page-efficiency]
- 58. SDS-PAGE Electrophoresis Market - Global Forecast 2025- ... [https://www.researchandmarkets.com/reports/6140756/sds-page-electrophoresis-market-global?srsltid=AfmBOopjH4Wa67g488GMxTViPioX8xpIOUj3Hv0clTAmxlbtEmPpqKq_]
- 59. SDS-PAGE guide: Sample preparation to analysis [https://www.abcam.com/en-us/knowledge-center/western-blot/sds-page-guide]
- 60. The gradient-like separation and reduced running time with ... [https://www.sciencedirect.com/science/article/abs/pii/S0003269722002457]
- 61. SDS-PAGE: A Cornerstone of Protein Analysis in Modern ... [https://www.metwarebio.com/sds-page-protein-analysis/]
- 62. Gradient Gels vs. Fixed % Gels: Which Should You Use? [https://nusep.us/blogs/precast-gel-education-center/4-20-gradient-gels-vs-fixed-gels-when-to-use-each?srsltid=AfmBOooGG6KK0SG7iI53bXoOJoJv2AHYUgkWUMOBPcXHqbsx1Sxc2yX_]
- 63. SDS-PAGE: The science behind all those bubbles [https://www.antibodiesinc.com/pages/sds-page-demystified?srsltid=AfmBOop45fexshHypYD7ptUcsc-I7F_sVyyQpHl7oU3cfEObm1sZwx2i]
- 64. Gradient Gels vs. Fixed % Gels: Which Should You Use? [https://nusep.us/blogs/precast-gel-education-center/4-20-gradient-gels-vs-fixed-gels-when-to-use-each?srsltid=AfmBOoraBGNgJP1jgMU_2l3vb0eaqtErYZPIyYvZf0du0Ex4skmkKm_o]
- 65. Differences between SDS PAGE and Native PAGE [https://www.geeksforgeeks.org/biology/differences-between-sds-page-and-native-page/]
- 66. How Is Native PAGE Different from SDS-PAGE? [https://synapse.patsnap.com/article/how-is-native-page-different-from-sds-page]
- 67. Native PAGE Gels | Thermo Fisher Scientific - US [https://www.thermofisher.com/us/en/home/life-science/protein-biology/protein-gel-electrophoresis/protein-gels/specialized-protein-gels/nativepage-bis-tris-gels.html]
- 68. High-resolution native electrophoresis in-gel activity assay ... [https://www.nature.com/articles/s41598-025-24684-3]
- 69. High Resolution Clear Native Electrophoresis for In-gel ... [https://www.sciencedirect.com/science/article/pii/S153594762031690X]
- 70. Gradient Gels vs. Fixed % Gels: Which Should You Use? [https://nusep.us/blogs/precast-gel-education-center/4-20-gradient-gels-vs-fixed-gels-when-to-use-each?srsltid=AfmBOopFyX8xfKtZRGM2STapnvCRPf_FdR_pxeGN0E0i27rxTHNd7FAL]
- 71. Comparison of in-gel protein separation techniques ... [https://pmc.ncbi.nlm.nih.gov/articles/PMC4234072/]