Fixing Smiling and Frowning Bands in Protein Electrophoresis: A Complete Troubleshooting Guide for Researchers
This article provides a comprehensive guide for researchers and drug development professionals facing the common yet disruptive issue of smiling or frowning bands in protein gel electrophoresis.
Fixing Smiling and Frowning Bands in Protein Electrophoresis: A Complete Troubleshooting Guide for Researchers
Abstract
This article provides a comprehensive guide for researchers and drug development professionals facing the common yet disruptive issue of smiling or frowning bands in protein gel electrophoresis. It covers the foundational science behind these artifacts, detailing how uneven heat distribution and electrical field effects cause band distortion. The content delivers actionable methodological protocols for prevention, a systematic troubleshooting flowchart for optimization, and advanced validation techniques using modern staining and image analysis to ensure data integrity and reproducibility in biomedical research.
Understanding Band Distortion: The Science Behind Smiling and Frowning Gels
FAQ: What are smiling and frowning bands?
A: "Smiling" and "frowning" bands are common artifacts in protein gel electrophoresis where protein bands do not migrate in straight lines. Smiling bands curve upwards at the edges, resembling a smile, and are typically caused by uneven heating across the gel, which causes the center to become hotter and proteins in the middle lanes to migrate faster [1] [2]. Frowning bands curve downwards at the edges and can result from issues such as incorrect buffer concentration, high salt in samples, or an improperly seated gel creating a non-uniform electric field [2].
The following table summarizes the primary characteristics of these artifacts:
| Artifact | Band Shape | Primary Cause |
|---|---|---|
| Smiling Bands | Curved upwards (U-shaped) | Uneven heat distribution; center of gel is hotter than edges [1] [2]. |
| Frowning Bands | Curved downwards (n-shaped) | Non-uniform electric field from incorrect buffer, high salt, or improper gel setup [2]. |
FAQ: What causes smiling and frowning bands, and how do I fix them?
A: These distortions are almost always a consequence of an uneven electric field or uneven heat distribution across the gel. Diagnosing the specific cause is the first step to a solution. The following troubleshooting guide outlines common culprits and their remedies.
| Problem | Possible Causes | Recommended Solutions |
|---|---|---|
| Smiling Bands | Excessive voltage generating too much heat ("Joule heating") [1] [2]. | Run gel at a lower voltage for a longer time [1] [2]. Use a cooled apparatus or run in a cold room [3] [1] [4]. |
| Use a power supply with a constant current mode to maintain uniform temperature [2]. | ||
| Frowning Bands | Incorrect or depleted running buffer [2]. | Ensure fresh running buffer is used at the correct concentration [3] [2]. |
| High salt concentration in samples [2] [4]. | Desalt samples via dialysis, desalting columns, or precipitation before loading [3] [2] [4]. | |
| Improper gel tank setup (e.g., uneven buffer levels, crooked electrodes) [2]. | Verify the gel is properly aligned, buffer levels are even, and electrodes are straight [2]. Check that the cassette is not inserted backwards [3]. | |
| General Band Distortion | Overloading of sample wells [2]. | Load a smaller sample volume or reduce protein concentration [2] [4]. |
| Edge effects from empty peripheral wells [1]. | Avoid empty wells; load ladder or control samples in peripheral lanes [1]. | |
| Expired or improperly polymerized gels [3]. | Use fresh gels and ensure proper polymerization when casting [3] [4]. |
This systematic decision-making pathway helps diagnose and resolve the root cause of gel artifacts:
The Scientist's Toolkit: Essential Research Reagent Solutions
Success in electrophoresis relies on the quality and appropriate use of key reagents. This table details essential materials for preventing and troubleshooting gel artifacts.
| Item | Function in Experiment |
|---|---|
| Fresh Running Buffer | Ensures correct ionic strength and pH for consistent current flow and protein migration. Depleted or incorrect buffer is a common cause of distortion and poor resolution [1] [2]. |
| Pre-cast Gels | Provide consistent, reliable polymerization quality and well formation, reducing artifacts from improper gel casting [3]. |
| Molecular Biology Grade Water | Used to prepare buffers and dilute samples without introducing interfering ions or contaminants [5]. |
| Desalting Columns / Dialysis Devices | Critical for removing excess salt from protein samples, which can cause band distortion and smearing [3] [2] [4]. |
| Reducing Agents (DTT, BME) | Fresh agents ensure complete protein denaturation and prevent re-oxidation during the run, which can cause artifact bands [3] [4]. |
| Ice Packs / Cooling Apparatus | Act as a heat sink to dissipate Joule heating, minimizing the "smiling" effect during electrophoresis [1]. |
FAQ: How can I prevent smiling and frowning bands in my experiments?
A: Consistent, high-quality results are achievable by adhering to a rigorous pre-electrophoresis protocol. The following checklist outlines a systematic approach to prevent the conditions that lead to band artifacts.
Core Mechanism and Troubleshooting Guide
The Primary Culprit: How Joule Heating Causes Band Distortion
During electrophoresis, the resistance of the buffer and gel to the electrical current generates heat; this is known as Joule heating. When this heat is not distributed evenly across the gel, it creates a temperature gradient. Typically, the center of the gel becomes hotter than the edges. Since the migration rate of proteins is temperature-dependent—faster at higher temperatures—the proteins in the center lanes migrate more quickly than those on the sides. This differential migration results in the characteristic curved pattern known as "smiling" (if the center is faster) or "frowning" (if the edges are faster) [2].
The table below summarizes the primary causes and solutions for this effect.
| Cause | Description | Solution |
|---|---|---|
| Uneven Heat Dissipation | Joule heating causes the gel's center to be warmer than its edges, creating a temperature gradient and differential migration speeds [2]. | Use a power supply with a constant current mode, which helps control the rate of heat generation [2]. |
| Incorrect Voltage | Running the gel at an excessively high voltage intensifies Joule heating and temperature gradients [2] [6]. | Reduce the voltage to minimize heat production. Run the gel slower and for a longer duration [2] [6]. |
| Incorrect Buffer | Using an incorrect, depleted, or overly concentrated buffer can alter the system's resistance, leading to inconsistent heating [2] [3]. | Ensure fresh buffer is used at the correct concentration and that the level is consistent across the tank [2] [6]. |
| High Salt in Samples | Excess salt in a sample creates a localized region of high conductivity, leading to local heating and distortion of the electric field [2] [7]. | Desalt samples using dialysis, gel filtration, or ultrafiltration. Dilute samples to reduce salt concentration [2] [7] [3]. |
Systematic Troubleshooting Workflow
When band distortion occurs, follow this logical troubleshooting pathway to identify and correct the issue.
In-Depth Troubleshooting FAQs
My protein bands are curved ("smiling" or "frowning"). What should I check first?
The first and most common step is to reduce the voltage of your run [2] [6]. High voltage is a primary driver of Joule heating. Running the gel at a lower voltage for a longer duration allows heat to dissipate more evenly, preventing the temperature gradient that causes distortion. Simultaneously, check that your running buffer is fresh and filled to the correct, even level in the tank [6].
I've reduced the voltage, but the bands are still distorted. What else could be wrong?
If adjusting the voltage does not solve the problem, investigate your samples and equipment setup.
- Sample Composition: Check for high salt concentrations in your samples. Salt increases local conductivity and can cause significant band distortion [7] [3]. Desalt your samples using dialysis, gel filtration, or ultrafiltration. Also, ensure you are not overloading the wells with too much sample volume, which can have a similar effect [2] [3].
- Equipment: Verify that the gel cassette is properly seated and that all electrical contacts are secure. Loose contacts can create an uneven electric field [3] [6]. For persistent issues, using a cooled electrophoresis apparatus can actively remove heat and maintain a uniform temperature.
How can I prevent smiling/frowning bands from happening in my experiments?
Prevention involves optimizing your protocol and setup.
- Use Constant Current: If your power supply has the feature, use the constant current mode instead of constant voltage. This helps maintain a more uniform rate of heat generation throughout the run [2].
- Optimize Sample Preparation: Make it a standard practice to keep salt concentrations low (e.g., below 50-100 mM) [3] and avoid overloading wells with excessive sample volume [2].
- Proper Setup: Always ensure the buffer level is even and sufficient, covering the gel surface by 3-5 mm [6]. Using a power supply with the 'Load Check' feature turned off can also prevent automatic shutdowns that might occur due to low current at the end of a run, which is normal for some systems like IEF [7].
Are there other common electrophoresis issues related to heating?
Yes, excessive heat is a root cause for several other common problems.
- Band Smearing: Running at a very high voltage can cause protein denaturation or degradation, leading to a continuous smear instead of sharp bands [2].
- Poor Band Resolution: High voltage can also increase diffusion and reduce the effective separation between bands, resulting in poor resolution [2].
- Gel Artifacts: In extreme cases, too much heat can cause the gel to lift off the cassette or even melt, especially if the running buffer level is insufficient [3] [6].
Research Reagent Solutions
The following table lists key reagents and materials essential for preventing band distortion and achieving high-quality protein electrophoresis results.
| Reagent/Material | Function & Importance in Preventing Distortion |
|---|---|
| Constant Current Power Supply | Critical for controlling the rate of heat generation, promoting even temperature distribution, and minimizing the "smiling" effect [2]. |
| Fresh Running Buffer | Ensures correct ionic strength and pH. Depleted or incorrect buffer alters system resistance, leading to uneven heating [2] [6]. |
| Desalting Columns / Dialysis Devices | Essential for removing high salt concentrations from protein samples, which can cause local heating and severe band distortion [7] [3]. |
| Cooled Electrophoresis Apparatus | Actively dissipates heat from the gel, preventing the formation of temperature gradients across the gel plane [3]. |
| Proper Gel Matrix | Using fresh, properly polymerized gels that are within their expiration date ensures consistent sieving and prevents artifacts like smiling due to gel degradation [3]. |
Troubleshooting Guides
Why Are My Bands "Smiling" or "Frowning"?
Problem: Your gel shows distorted bands, where bands in the middle lanes migrate faster ("smiling") or slower ("frowning") than those on the edges.
Root Cause: This artifact is primarily caused by uneven heat distribution (Joule heating) across the gel. The electrical resistance of the buffer and gel generates heat. An incorrect or uneven buffer concentration can alter this resistance, leading to inconsistent heating and an irregular electric field, which distorts band migration [2].
Solutions:
- Reduce the voltage to minimize heat generation [2].
- Ensure fresh buffer at the correct concentration is used and that the buffer level is consistent across the tank [2] [8].
- Use a constant current power supply to maintain a more uniform temperature [2].
- Desalt your samples or dilute them to reduce high salt concentrations that create local zones of high conductivity and heating [2] [8].
- Load smaller sample volumes to prevent overloading wells, which can disrupt the local buffer capacity [2].
- Verify your gel tank setup, ensuring the gel is properly aligned and electrodes are straight [2].
How Do I Resolve Poor Band Resolution and Smearing?
Problem: Bands are poorly resolved, fuzzy, or appear as a continuous smear.
Root Cause: Buffer concentration and composition are critical. A suboptimal buffer can fail to provide the proper pH and ion concentration needed for sharp separations. High salt in samples can also cause smearing [2] [8].
Solutions:
- Optimize your gel concentration for the size range of your target molecules [2].
- Use fresh running buffer at the correct concentration; do not reuse old buffer [2] [8].
- Run the gel at a lower voltage for a longer duration to improve separation and reduce heating-induced diffusion [2] [9].
- Remove excess salt from samples via dialysis, desalting columns, or precipitation [8].
- Check that protein samples are properly denatured with fresh SDS and reducing agents [2] [8].
Frequently Asked Questions (FAQs)
How does buffer concentration directly affect the electric field and migration?
The buffer concentration determines the ionic strength of the running solution. This directly influences the current and heat generation (Joule heating) within the system.
- A buffer that is too concentrated increases current and heat, potentially causing uneven heating, band distortion, and decreased resolution [2] [8].
- A buffer that is too dilute can lead to insufficient buffering capacity, unpredictable pH shifts, and a weak electric field, resulting in slow or failed migration [8].
My gel failed to run—no migration occurred. Could the buffer be the issue?
Yes. The first things to check are:
- Buffer concentration: An overly dilute or incorrectly prepared buffer can prevent current flow [8].
- Electrode connections: Ensure the power supply is connected properly [8].
- Buffer level: Confirm there is sufficient buffer in the tank to cover the electrodes and gel wells [2] [8].
I'm separating very similar molecules. How can I optimize buffer conditions for maximum resolution?
For high-resolution separations, especially of molecules with nearly identical sizes, a systematic optimization of buffer conditions is key. A study separating two decapeptides that differed by only a single amino acid (and had identical molecular weights) found that all of the following parameters significantly influenced resolution [10]:
- Buffer pH: This affects the charge and protonation state of the molecules. The study found pH to be the most critical factor [10].
- Buffer concentration: It influences migration rate and resolution. A moderate concentration (e.g., 25 mM in the cited study) often provides the best balance between analysis time and resolution [10].
- Applied voltage and temperature: Higher voltages speed up analysis but can reduce resolution beyond an optimal point. Temperature affects buffer viscosity and analyte mobility [10] [9].
Experimental Protocols & Data
Detailed Methodology: Optimizing Buffer Conditions for Peptide Separation
The following protocol is adapted from a study that successfully resolved two isomeric hybrid peptides using capillary electrophoresis [10].
1. Background Electrolyte (BGE) Preparation:
- Prepare a 25 mM sodium monophosphate buffer.
- Adjust the pH to 2.5 using 0.1 M phosphoric acid.
- Filter the buffer through a 0.45 µm membrane filter.
2. Instrumental Setup:
- Capillary: Fused silica capillary.
- Detection: UV at 200 nm.
- Temperature: Maintained at 25°C.
- Voltage: Applied voltage of 10 kV.
- Sample Injection: Hydrodynamic injection.
3. Separation:
- Introduce the peptide samples (in aqueous solution or serum) into the capillary.
- Apply voltage and monitor the electropherogram. Under these optimized conditions, the two nearly identical peptides were baseline resolved with a resolution factor (Rs) of 1.4 in just 6 minutes [10].
Quantitative Data: Effects of Operational Parameters
The table below summarizes findings from recent investigations into how key parameters affect electrophoretic mobility and resolution.
Table 1: Effects of Operational Parameters on Electrophoretic Separation
| Parameter | Effect on Electrophoretic Mobility | Effect on Resolution | Key Finding |
|---|---|---|---|
| Electric Field Strength | Increases with higher field strength [9] | Decreases above an optimal point (e.g., >500 V/cm) due to conformational changes and Joule heating [2] [9] | High field strength can alter conformation of SDS-protein complexes, hurting resolution [9]. |
| Buffer Concentration | Low concentration can reduce migration rate; high concentration can increase it at the expense of resolution [10] | An optimal, moderate concentration (e.g., 25 mM) provides the best resolution [10] | Buffer ions affect the degree of analyte ionization and convergence of electrophoretic mobilities [10]. |
| Temperature | Increases with temperature due to reduced buffer viscosity [10] [9] | Has a complex, non-linear relationship; initial increase can improve resolution [10] | The activation energy for electromigration can be calculated using the Arrhenius equation [9]. |
| Buffer pH | Lower pH increases protonation of peptides, accelerating migration [10] | Critical for achieving separation; must be optimized for specific analytes [10] | Found to be the most important factor affecting migration rate and resolution for peptides [10]. |
Visualizing the Impact of Buffer and Electric Field
The following diagram illustrates the core concepts of how buffer concentration and the electric field interact to cause common gel artifacts and how to correct them.
The Scientist's Toolkit: Key Research Reagent Solutions
Table 2: Essential Reagents for Troubleshooting Migration Problems
| Reagent/Material | Function in Experiment | Troubleshooting Application |
|---|---|---|
| Tris-Acetate-EDTA (TAE) Buffer | Common running buffer for DNA agarose gel electrophoresis [11]. | Provides standard ionic strength and pH for nucleic acid separation. |
| Phosphate Buffer (low pH) | Background electrolyte (BGE) for capillary electrophoresis [10]. | Optimized for separating challenging peptides by controlling protonation and charge. |
| Sodium Dodecyl Sulfate (SDS) | Anionic detergent that denatures proteins and confers a uniform negative charge [9]. | Essential for SDS-PAGE; improper denaturation leads to smearing [2] [8]. |
| Fresh Reducing Agents (DTT/BME) | Breaks disulfide bonds in proteins to ensure complete denaturation [8]. | Prevents smearing and artifact bands caused by re-oxidation or incomplete unfolding during the run. |
| Propidium Iodide (PI) | Fluorescent dye used for in-capillary labeling and detection of proteins [9]. | Enables high-sensitivity laser-induced fluorescence (LIF) detection in capillary gel electrophoresis. |
| Desalting Columns / Dialysis Kit | Removes excess salts and small molecules from protein or nucleic acid samples [8]. | Critical for eliminating high salt concentrations that cause band distortion and smearing. |
Troubleshooting Guides
Table 1: Troubleshooting Gel Polymerization and Apparatus Setup
| Problem | Cause | Solution |
|---|---|---|
| Poor Gel Polymerization [3] [4] | Incorrect TEMED/APS amounts; Old reagents; Low temperature. | Use fresh ammonium persulfate (APS) and TEMED; polymerize at room temperature [4]. |
| Uneven Gel Interface [3] [4] | Improper casting; Uneven overlay of the separating gel. | Carefully overlay the resolving gel with water-saturated butanol or isopropanol during casting to create a flat, even surface [3] [12]. |
| Leaking Buffer Chamber [3] [4] | Improperly seated gel cassette; Damaged gaskets; Overfilled chamber. | Ensure the gel cassette is properly seated and the clamping gaskets are in good condition and creating a tight seal [3]. |
| Wavy Dye Front [3] | Different buffer levels between inner/outer chambers; Old or over-diluted running buffer. | Fill both the inner and outer buffer chambers to the appropriate level and use fresh, correctly diluted running buffer [3]. |
| No Current Flow [3] | Tape left on cassette bottom; Loose power supply connections; Insufficient buffer. | Remove tape from the bottom of the gel cassette, check all power connections, and ensure buffer covers the gel wells [3]. |
Table 2: Troubleshooting Buffer and Electrical Conditions
| Problem | Cause | Solution |
|---|---|---|
| Smiling Bands (Faster migration in center) [2] [13] [14] | Uneven heat distribution (Joule heating); Excessive voltage. | Run the gel at a lower voltage; Use a power supply with constant current mode; Ensure adequate buffer volume to act as a heat sink [2] [13] [3]. |
| Frowning Bands (Faster migration on edges) [2] [14] | Inadequate heat dissipation on the edges; Poor apparatus alignment. | Check that the gel apparatus is properly leveled and seated; Use a cooling apparatus or run in a cold room [2]. |
| Run Time Abnormally Long [4] | Buffers too concentrated; Current set too low. | Check buffer recipe for correct dilution; Adjust power settings to recommended voltage/current [3] [4]. |
| Run Time Abnormally Fast [4] | Buffers too diluted; Current set too high. | Remake running buffer to correct ionic strength; Decrease the voltage [3] [4]. |
| Edge Effect (Distorted peripheral lanes) [13] | Empty wells on the periphery of the gel. | Load protein samples or ladder in all outer wells to create a uniform electric field across the entire gel [13]. |
Frequently Asked Questions (FAQs)
Q: Why do my protein gels consistently show "smiling" bands, and how is the equipment setup involved?
A: "Smiling" bands, where bands in the middle lanes curve upward, are primarily caused by uneven heat distribution across the gel, a phenomenon known as Joule heating [2] [14]. The center of the gel becomes hotter than the edges, causing proteins in the center to migrate faster. Key setup-related fixes include:
- Reducing the voltage to minimize heat generation [2] [13].
- Using a constant current power supply to maintain a more uniform temperature [2].
- Ensuring the buffer level is sufficient and even across the tank to act as an effective heat sink [2] [3].
Q: How can improper gel polymerization lead to distorted bands or poor resolution?
A: Inconsistent or incomplete gel polymerization creates an irregular polyacrylamide matrix with inconsistent pore sizes [3] [4]. This can cause:
- Skewed or distorted bands as proteins migrate through regions of different resistance [4].
- Poor band resolution because the sieving effect is not uniform across the gel [2].
- Vertical streaking if there are pockets of inconsistent polymerization [4]. To ensure proper polymerization, always use fresh ammonium persulfate (APS) and TEMED, and cast gels at room temperature [4].
Q: What is the "edge effect," and how can apparatus setup prevent it?
A: The "edge effect" occurs when the outermost lanes of the gel show distorted band patterns. This is caused by a non-uniform electric field, which is intensified when wells on the very edge of the gel are left empty [13]. The simple solution is to load a sample or ladder into every well, including the outermost ones. If you have unused wells on the edge, load a dummy sample or buffer with sample buffer to maintain a consistent electric field across all lanes of interest [13].
Q: My power supply is on, but no current is flowing through my gel. What are the first things I should check in my setup?
A: This is a common setup issue. Before assuming equipment failure, check these points:
- Buffer Level: Is there sufficient running buffer in the tank to completely cover the electrodes and the gel wells? [3]
- Cassette Tape: Did you remember to remove the plastic tape from the bottom of the precast gel cassette? [3]
- Connections: Are the lid electrodes making firm contact with the buffer in the tank? Are the power supply cables securely connected? [3]
- Gel Orientation: Is the gel cassette inserted in the correct direction? [3]
Experimental Protocols & Workflows
Protocol 1: Standard Gel Polymerization and Casting
This protocol ensures a uniform polyacrylamide gel matrix, which is critical for straight, well-resolved bands [12].
- Clean and Assemble Glass Plates: Thoroughly clean and dry the glass plates and spacers. Assemble the cassette according to the manufacturer's instructions, ensuring it is sealed properly to prevent leaks [12] [4].
- Prepare Resolving Gel Solution: For a standard 10% resolving gel, mix the following components in the order listed [12]:
- Water
- 1.5 M Tris-HCl (pH 8.8)
- Acrylamide/Bis-acrylamide solution (30%)
- SDS (10%)
- Ammonium Persulfate (10% w/v, fresh)
- TEMED
- Cast the Resolving Gel: Immediately after adding TEMED, pipette the resolving gel solution into the assembled cassette. Leave space for the stacking gel [12].
- Overlay with Alcohol: Carefully layer a small amount of water-saturated isopropanol or butanol on top of the resolving gel. This excludes oxygen and creates a flat, even interface [12].
- Polymerize: Allow the resolving gel to polymerize completely (typically 20-30 minutes at room temperature) [12].
- Prepare and Cast Stacking Gel: After polymerization, pour off the overlay. Prepare a stacking gel solution (e.g., 4-5% acrylamide in Tris-HCl, pH 6.8) with APS and TEMED. Pour it on top of the resolving gel and immediately insert a clean comb without introducing bubbles [12].
- Final Polymerization: Allow the stacking gel to polymerize for another 20-30 minutes before carefully removing the comb and proceeding with electrophoresis [12].
Protocol 2: Apparatus Assembly and Run Setup for Optimal Band Straightness
This protocol minimizes factors that cause uneven heating and electric fields [2] [3].
- Inspect Apparatus: Check the electrophoresis tank and lid for any damage or corrosion on the electrodes. Ensure the lid's connectors are clean [3].
- Install Gel Cassette: Place the polymerized gel cassette into the tank. For most mini-gel systems, the gel cassette locks into the central core, creating separate inner and outer buffer chambers. Ensure it is seated correctly and forms a watertight seal [3].
- Fill with Running Buffer: Fill the inner (upper) and outer (lower) buffer chambers with fresh 1X running buffer (e.g., Tris-Glycine-SDS). Ensure the buffer level in the upper chamber completely covers the sample wells [3].
- Load Samples: Use gel-loading tips to carefully pipette protein samples and molecular weight markers into the wells. Avoid overloading wells with volume [3].
- Connect to Power Supply: Place the lid on the tank, aligning the electrodes correctly. Connect the leads to the power supply, ensuring cathode (black, negative) to cathode and anode (red, positive) to anode.
- Set Electrophoresis Parameters: Apply a constant voltage. For a standard mini-gel, 150V is common. If smiling occurs, reduce the voltage to 100-120V to minimize Joule heating and run for a longer duration [2] [13].
- Monitor the Run: Stop the run when the bromophenol blue dye front reaches the bottom of the gel [13].
Diagram: Troubleshooting workflow for band distortion, focusing on equipment and setup factors.
The Scientist's Toolkit: Research Reagent Solutions
Table 3: Essential Reagents for SDS-PAGE Setup
| Item | Function | Key Consideration |
|---|---|---|
| Acrylamide/Bis-acrylamide [12] [15] | Forms the polyacrylamide gel matrix that acts as a molecular sieve. | The ratio of acrylamide to bis-acrylamide (typically ~37.5:1) determines the gel's pore structure and mechanical properties [12]. |
| Ammonium Persulfate (APS) [12] [15] | A radical initiator that, when combined with TEMED, catalyzes the polymerization of acrylamide. | Must be fresh or freshly prepared for efficient polymerization. Old APS will lead to soft or incomplete gels [4]. |
| TEMED [12] [15] | Catalyzes the formation of free radicals from APS, which initiates the acrylamide polymerization reaction. | The polymerization reaction is temperature-sensitive; casting at room temperature ensures optimal results [4]. |
| Tris-Glycine-SDS Running Buffer [2] [15] | Provides the ions necessary to conduct current and maintains the pH for electrophoresis. The SDS helps keep proteins denatured. | Must be fresh and at the correct concentration (usually 1X). Old or over-diluted buffer can cause slow runs, wavy dye fronts, or poor resolution [3] [4]. |
| Tris-HCl Gel Buffer [12] [15] | Provides the appropriate pH environment in the stacking (pH ~6.8) and resolving (pH ~8.8) gels, which is critical for the discontinuous buffer system to work. | The precise pH of the stacking and resolving gel buffers is essential for proper protein stacking and separation [12] [15]. |
Proactive Protocols: Methodological Strategies to Prevent Band Distortion
Within the context of a broader thesis on resolving smiling or frowning bands in protein electrophoresis, mastering the interplay between voltage, current, and temperature is paramount. These parameters are not independent settings but are intrinsically linked physical forces that directly control the quality of your separation. "Smiling" or "frowning" bands—where bands curve upwards or downwards—are classic artifacts of uneven heat distribution across the gel, a direct consequence of improper run condition management [2]. This guide provides a systematic, troubleshooting-focused approach to optimizing these core parameters, ensuring your data is both reproducible and publication-ready.
Troubleshooting Guides: Diagnosing and Resolving Common Issues
Troubleshooting Smiling and Frowning Bands
The phenomenon of smiling (bands curving upwards at the edges) and frowning (bands curving downwards at the edges) is almost universally a symptom of uneven heat distribution, or Joule heating, across the gel [2].
- Primary Cause: The center of the gel becomes hotter than the edges during the run. Samples in the warmer center experience lower buffer viscosity and thus migrate faster, causing the center of the band to lead and creating a smile. Conversely, frowning can occur if the edges run hotter, though this is less common.
- Underlying Triggers and Solutions:
- Excessive Voltage: Running at too high a voltage generates excessive heat.
- Inconsistent Cooling: Lack of active cooling or poor heat dissipation from the gel apparatus.
- Solution: Use a power supply with a constant current mode, which helps manage heat generation. Ensure your gel tank is properly seated in a cooling apparatus or is of a design that facilitates efficient passive heat exchange [2].
- Incorrect or Depleted Buffer: The buffer's ionic strength directly affects the system's resistance and heat generation.
- Solution: Always use fresh running buffer at the correct concentration [2].
- High Salt Concentration in Samples: Excess salt in a sample creates a local pocket of high conductivity, leading to localized heating and distortion of the band as it leaves the well.
- Solution: Desalt samples prior to loading or dilute them in a low-salt buffer [2].
Troubleshooting Poor Band Resolution and Smearing
When bands are poorly resolved, fuzzy, or appear as smears, it indicates a failure to cleanly separate proteins by size. This is often tied to the conditions of the electrophoresis run.
- Primary Cause: Suboptimal gel porosity combined with run conditions that cause band broadening, often due to overheating or inappropriate voltage [2] [5].
- Underlying Triggers and Solutions:
- Voltage Too High: While high voltage speeds up the run, it can cause localized heating that denatures proteins and increases diffusion, leading to smearing.
- Solution: Run the gel at a lower voltage for a longer duration. This improves resolution by minimizing diffusion and thermal band broadening [2].
- Incorrect Gel Concentration: Using a gel percentage with pore sizes not optimized for your target protein size range.
- Sample Overloading: Loading too much protein per lane overwhelms the gel's capacity, causing bands to become thick, diffuse, and merge.
- Solution: Load a smaller mass of protein. For diagnostic purposes, 0.1–0.2 µg of nucleic acid per millimeter of gel well width is a good guideline, which can be analogously applied to protein samples with optimization [5].
- Sample Degradation: Protease activity can create a heterogeneous mixture of protein fragments, resulting in a smear.
- Voltage Too High: While high voltage speeds up the run, it can cause localized heating that denatures proteins and increases diffusion, leading to smearing.
Optimizing Electrophoresis Run Conditions: A Quantitative Guide
Achieving sharp, well-resolved bands requires a deliberate balance of electrical and thermal parameters. The table below summarizes key optimization strategies.
Table 1: Optimization Guide for Key Electrophoresis Parameters
| Parameter | Effect on Separation | Common Pitfalls | Optimization Strategy |
|---|---|---|---|
| Voltage | Controls migration speed & electric field strength [18]. | Too High: Smiling/frowning bands, smearing, overheating [2] [16].Too Low: Long run times, band diffusion. | Use moderate voltage (e.g., 110-130V for DNA; optimize for protein). Lower voltage improves resolution [2] [16]. |
| Current | Proportional to ion movement & heat generation (Joule heating) [19]. | High current = excessive heat, leading to band distortion and poor resolution. | Use constant current mode to stabilize heat generation. Monitor current for stability [2] [19]. |
| Temperature | Affects buffer viscosity & protein stability. | Uneven heating causes smiling/frowning bands. High temperature denatures proteins. | Use active cooling (chilled tank) or passive cooling. Keep temperature stable and cool [2]. |
| Run Time | Determines extent of separation. | Too Short: Poor resolution.Too Long: Band diffusion & loss of sharpness. | Run until the dye front is near the bottom. Optimize for your protein size and gel percentage [2]. |
| Buffer Conditions | Provides ions for conductivity & maintains pH. | Old/depleted buffer alters resistance & pH, causing artifacts. | Use fresh buffer at the correct concentration. For long runs, use a buffer with high buffering capacity [2] [5]. |
Advanced Insights: The E-t Band Model
Emerging research offers a more refined framework for optimization. The Electric Field and Runtime driven (E-t) band model proposes that band migration and dispersion can be accurately described by the product of the electric field strength (E) and runtime (t), minimizing direct reliance on complex temperature measurements [18]. This model demonstrates that shorter runtimes at higher electric fields can be effective if the associated thermal load is managed, providing a new perspective for designing fast, efficient separations.
Experimental Protocols for Optimization
Protocol: Systematically Determining Optimal Voltage
This protocol helps identify the maximum voltage you can apply without introducing thermal artifacts.
- Preparation: Prepare identical protein samples and load them across multiple lanes of the same gel.
- Initial Run: Start the electrophoresis run at a low voltage (e.g., 80-100 V).
- Monitor: Observe the run for the first 10-15 minutes. If the bands are straight and the buffer feels cool to the touch, proceed to the next step.
- Incremental Increase: In a separate, identical run, start at the same low voltage and then incrementally increase the voltage in steps of 10-20 V every 10-15 minutes.
- Identify Threshold: The point at which the dye front or protein bands begin to show curvature (smiling) is your practical voltage upper limit. The optimal voltage for high-resolution work is typically 10-20 V below this threshold.
- Documentation: Record the optimal voltage, current, and run time for your specific gel apparatus and buffer system for future reproducibility.
Protocol: Verifying Heat Distribution
This protocol diagnoses whether your setup has inherent cooling problems.
- Setup: Cast a blank gel (no samples) and place it in the electrophoresis tank with buffer.
- Run: Turn on the power supply and run at your standard operating voltage.
- Measure: After 15-20 minutes, carefully use an infrared thermometer to measure the temperature of the buffer at the center of the gel and at both edges.
- Analysis: A temperature difference of more than 5°C between the center and the edges indicates poor heat dissipation, which will likely cause smiling bands. This suggests a need for better cooling or a lower operating voltage.
Visualization: Troubleshooting Logic and Parameter Relationships
The following diagram outlines a systematic decision-making process for diagnosing and resolving common electrophoresis issues related to run conditions.
Diagram 1: A logical workflow for troubleshooting common electrophoresis band artifacts. The relationship between key parameters is complex. The diagram below maps how core adjustments to voltage and buffer directly influence current and temperature, which ultimately determine the success or failure of the separation.
Diagram 2: A parameter relationship map showing how adjustments impact electrophoresis results.
The Scientist's Toolkit: Essential Research Reagent Solutions
The following table details key reagents and materials critical for controlling electrophoresis run conditions and preventing common artifacts.
Table 2: Essential Reagents and Materials for Optimized Electrophoresis
| Item | Function & Importance in Run Optimization |
|---|---|
| Constant Current Power Supply | Maintains a consistent rate of heat generation, preventing thermal runaway and ensuring even migration across the gel, which is crucial for preventing smiling/frowning bands [2] [20]. |
| Active Cooling System | A gel tank with a cooling core or used in a cold room actively dissipates Joule heat, stabilizing buffer viscosity and preventing temperature gradients that cause band distortion [2]. |
| Fresh Electrophoresis Buffer | Provides consistent ionic strength and pH. Depleted or incorrect buffer alters system resistance, leading to uneven heating and poor resolution [2] [5]. |
| Protease Inhibitor Cocktail | Added to lysis and sample buffers to prevent protein degradation by proteases during sample preparation, which is a primary cause of smearing [17]. |
| High-Purity Agarose/Polyacrylamide | Forms a gel matrix with consistent pore size. Impurities or improper polymerization can lead to non-uniform sieving and poor resolution [16] [3]. |
| Protein Standard (Ladder) | Contains proteins of known molecular weights, essential for monitoring the progress of the run, assessing resolution, and accurately determining the size of target proteins. |
Frequently Asked Questions (FAQs)
Q1: My bands are always smiling, even at lower voltages. What else can I check? A: First, confirm you are using fresh running buffer, as depleted buffer can have altered conductivity. Second, ensure your gel apparatus is properly assembled and that the buffer level is even and sufficient to cover the entire gel surface. Finally, check for even contact between the gel and the electrodes, as a crooked electrode can create an uneven electric field [2].
Q2: How does constant current mode help with temperature control? A: Constant current mode works by automatically adjusting the voltage to maintain a set current. Since Joule heating is directly proportional to the square of the current (Heat ∝ I² * R * t), holding the current constant results in a much more stable and predictable heat output, leading to a more uniform temperature across the gel [2] [19].
Q3: I need to run my gel faster. Is it ever okay to use a very high voltage? A: While increasing voltage reduces run time, it comes at a significant cost to resolution due to increased Joule heating. For analytical work requiring high resolution, it is not recommended. However, for quick preparative runs or checking sample presence, shorter, high-voltage runs can be acceptable if the resulting loss in resolution is not critical to your objective [18].
Q4: Why do my bands smear even when I use protease inhibitors and load the correct amount of protein? A: If sample integrity and loading are confirmed, the most likely culprit is the voltage being too high. Excessive voltage causes overheating, which can denature proteins during the run and create a smear. Try reducing the voltage by 20-30% and extending the run time. Additionally, verify that your gel percentage is appropriate for the size of your target protein [2] [3].
Within the context of protein electrophoresis research, achieving reliable and reproducible results is foundational to progress in fields like drug development. A critical, yet often problematic, step is the preparation of the polyacrylamide gel itself. Issues during gel casting and polymerization are frequent sources of artifacts, including the notorious "smiling" or "frowning" bands that can compromise data interpretation. This technical support center is designed to help researchers troubleshoot and resolve these specific challenges, ensuring the integrity of their electrophoretic separations.
Troubleshooting Common Gel Casting Issues
The following guides address the most frequently encountered problems related to gel casting and their solutions.
Problem 1: Non-Parallel or Smiling/Frowning Bands
- Observation: Protein bands are not straight and parallel. They may curve upwards (smiling) or downwards (frowning) across the gel.
- Causes and Solutions:
| Cause | Solution |
|---|---|
| Uneven Gel Polymerization | Ensure complete and uniform polymerization. Use a slightly higher acrylamide concentration (e.g., 1% more) if polymerization is inconsistent [21]. |
| Uneven Gel Interface | When pouring the resolving gel, top it with a uniform layer of water-saturated butanol or isopropanol to create a perfectly flat surface before casting the stacking gel [21] [22]. |
| Excessive Heat During Run | Use a cooled apparatus or reduce the current. Excessive heat can cause the gel to degrade, leading to smiling bands [3]. |
| Incorrect Buffer Levels | Ensure both the inner and outer buffer chambers of the electrophoresis tank are filled to the electrodes, as an imbalance can cause wavy dye fronts and band distortion [3]. |
Problem 2: Samples Leaking from Wells
- Observation: Sample leaks out of the well during or after loading, leading to distorted, missing, or cross-contaminated bands.
- Causes and Solutions:
| Cause | Solution |
|---|---|
| Damaged Wells During Comb Removal | Always remove the comb carefully and steadily after placing the gel in the running chamber filled with buffer [21]. |
| Punctured Wells During Loading | Use gel-loading tips and be careful not to touch the bottom or sides of the wells with the pipette tip [21] [3]. |
| Poorly Formed Wells | Ensure the gel comb is clean and do not push it all the way to the bottom of the gel cassette. Avoid overfilling the gel tray, which can result in connected wells [5]. |
| Use of Old or Expired Gels | Check the expiration date of precast gels. For hand-cast gels, use them promptly and store properly [21]. |
Problem 3: Poor Band Separation or Smearing
- Observation: Bands are poorly resolved, appear smeared, blurry, or do not separate adequately during the run.
- Causes and Solutions:
| Cause | Solution |
|---|---|
| Incorrect Gel Percentage | Use a lower acrylamide percentage for high molecular weight proteins and a higher percentage for low molecular weight proteins to optimize pore size [21] [22]. |
| Sample Overloading | Do not overload the well. The general recommendation is to load an appropriate protein mass per millimeter of well width [5] [3]. |
| Sample Preparation Issues | Ensure fresh reducing agents are used. Excess salt in the sample can be removed by dialysis or desalting columns. Add SDS to the upper buffer chamber (0.1-0.4%) if there is insufficient SDS in the sample [3]. |
| Poor Polymerization | Check that gels have polymerized fully and are not expired. Use fresh ammonium persulfate (APS) and TEMED catalysts [3] [22]. |
Experimental Protocol: Casting a Standard SDS-PAGE Gel
This detailed protocol ensures uniform polymerization and well integrity, directly preventing issues like smiling bands and sample leakage.
Materials Required (Research Reagent Solutions)
| Reagent/Material | Function |
|---|---|
| Acrylamide/Bis-acrylamide Stock (30%) | Forms the polyacrylamide matrix for protein separation. Note: Acrylamide is a neurotoxin; always wear gloves and use in a well-ventilated area [22]. |
| Tris-HCl Buffer (pH 8.8 for resolving gel; pH 6.8 for stacking gel) | Provides the appropriate pH environment for electrophoresis and stacking. |
| Sodium Dodecyl Sulfate (SDS) | Denatures proteins and confers a uniform negative charge. |
| Ammonium Persulfate (APS) | Initiates the polymerization reaction. |
| Tetramethylethylenediamine (TEMED) | Catalyzes the polymerization reaction. |
| Water-Saturated Butanol | Overlays the resolving gel to exclude oxygen and create a flat, level surface [22]. |
| Gel Comb | Forms the sample wells in the stacking gel. |
Methodology
- Assemble Cassette: Clean glass plates and spacers thoroughly. Assemble the cassette and secure it in the casting stand, ensuring it is upright and level to prevent leaks [22].
- Prepare Resolving Gel Mix: For a 10 ml gel, mix the following in an Erlenmeyer flask:
- 2.5 ml of 4X Tris-HCl/SDS buffer (pH 8.8)
- Appropriate volume of 30% acrylamide stock (e.g., 2.33 ml for a 7% gel)
- Distilled water to a final volume of 10 ml.
- Degas and Catalyze: Place the gel mix under a vacuum for about 5 minutes to remove dissolved oxygen, which inhibits polymerization. Then, add 100 µl of fresh 10% APS and 10 µl of TEMED. Swirl gently to mix [22].
- Pour and Overlay: Immediately pour the gel solution into the cassette. Carefully overlay the solution with a thin, uniform layer of water-saturated butanol to exclude air and create a flat interface [22].
- Polymerize: Allow the gel to polymerize completely (typically 15-30 minutes). Polymerization is confirmed when the remaining mix in the flask solidifies.
- Prepare and Pour Stacking Gel: Pour off the butanol overlay and rinse the top of the resolved gel with water. For a 4% stacking gel, mix the following (volumes for 3 cassettes):
- 1.0 ml of 4X Tris-HCl/SDS buffer (pH 6.8)
- 1.0 ml of 30% acrylamide stock
- 6.0 ml of distilled water. Add 100 µl of 10% APS and 10 µl of TEMED, swirl, and pour onto the resolving gel. Immediately insert a clean comb without trapping air bubbles [22].
- Final Polymerization: Allow the stacking gel to polymerize for 15-30 minutes. The gel is now ready for electrophoresis.
Gel Casting Workflow and Integrity Checks
The following diagram illustrates the critical steps for ensuring a properly cast gel, highlighting key decision points to prevent common issues.
Frequently Asked Questions (FAQs)
Q1: My gel polymerized too quickly, before I could pour it. What went wrong? A: This is typically caused by using excessive amounts of the polymerization catalysts, APS and TEMED. The gel mixture should be prepared and poured immediately after adding these components. For future preparations, try reducing the volume of APS and/or TEMED added to the gel mix [22].
Q2: The very top of my resolving gel did not polymerize and remained liquid. Is the gel usable? A: Yes, this is common. A small layer of gel mix directly under the butanol overlay may not polymerize due to exposure to oxygen. Simply pour off the butanol and the liquid layer, rinse the polymerized gel surface, and proceed with pouring the stacking gel. The solid portion of the resolving gel is perfectly functional [22].
Q3: Why did my protein bands appear wavy or distorted, even though the gel looked fine after casting? A: Wavy bands are often related to running conditions, not necessarily casting. The most common cause is uneven heating during electrophoresis. Ensure the running buffer level is sufficient to act as a heat sink, and consider running the gel at a lower constant current to generate less heat [3]. Also, verify that the running buffer is fresh and correctly diluted.
Q4: I see extra bands or ghost bands in my lanes. Could this be related to the gel? A: Yes. Ghost bands can be caused by the gel lifting slightly from the cassette during the run, which can happen due to insufficient polymerization, expired gels, or excessive heat. Ensure your gels are fresh and polymerized correctly. Another common cause of extra bands, especially with sensitive stains, is keratin contamination from skin or dust, so always wear gloves and use clean equipment [3].
Q5: How can I test for well integrity before loading my precious samples? A: A good practice is to fill the wells with a little bit of gel loading dye prior to loading your samples. If the dye leaks out of a well, you will know it is damaged and can avoid using that lane for your experimental sample [21].
Troubleshooting Guides
Q1: How do high salt concentrations disrupt my protein gel and cause smiling bands?
High salt concentrations in your protein sample increase its conductivity. During electrophoresis, this creates localized heating and distorts the electric field, leading to uneven migration and the characteristic "smiling" or "frowning" of bands [2] [3]. This effect is often most pronounced in the outer lanes, a phenomenon known as the "edge effect" [23].
Solutions:
- Dialysis: Use a dialysis membrane with an appropriate molecular weight cutoff to remove salts from your sample [24].
- Desalting Columns: Pass your sample through a desalting column, such as Sephadex G-25, to exchange the buffer [3].
- Precipitation and Resuspension: Precipitate your proteins using a method like acetone or TCA precipitation, then resuspend the pellet in a low-salt buffer or deionized water [24] [3].
Q2: Why does my viscous sample cause smearing and poor band resolution?
Viscous samples, often due to the presence of genomic DNA in cell lysates, prevent proteins from migrating uniformly through the gel. This results in smeared bands, poor resolution, and distorted migration patterns [24].
Solutions:
- Shear DNA: Pass the lysate through a small-gauge needle (e.g., 25-27 gauge) several times. Alternatively, brief sonication can effectively shear genomic DNA [24].
- Benzonase Treatment: Use Benzonase nuclease (a recombinant endonuclease) to digest both DNA and RNA directly in the lysate, effectively reducing viscosity.
- Centrifugation: Clarify the lysate by high-speed centrifugation (e.g., 12,000-16,000 x g for 15 minutes) to remove insoluble debris, including any unsheared nucleic acids [24].
Q3: What are the critical steps in sample preparation to prevent aggregation and fuzzy bands?
Incomplete protein denaturation and aggregation are primary causes of fuzzy, diffuse bands or proteins clumping in the wells [25] [26]. This occurs when proteins are not fully linearized and coated with SDS.
Solutions:
- Fresh Reducing Agents: Always use fresh Dithiothreitol (DTT) or β-mercaptoethanol to break disulfide bonds. Add them to the sample buffer shortly before use [24] [27].
- Proper Heating: Heat samples at 85-100°C for 2-5 minutes to ensure complete denaturation [24] [27].
- Add SDS/Urea: Ensure your sample buffer contains sufficient SDS. For hydrophobic proteins prone to aggregation, adding 4-8M urea to the lysis buffer can help maintain solubility [25].
Frequently Asked Questions (FAQs)
Q4: My protein ladder runs fine, but my samples won't migrate. What's wrong?
This classic issue indicates a problem with your sample preparation, not the gel or running system. The ladder is pre-denatured and ready to run, but your proteins may not be. The cause is likely incomplete denaturation, so proteins remain in complex structures that cannot enter the gel [27]. Ensure your sample buffer contains SDS and fresh reducing agent, and that you have heated your samples sufficiently (95°C for 5 minutes is common) [27].
Q5: I've desalted my sample, but my bands are still fuzzy. What should I check next?
Follow this systematic troubleshooting diagram to diagnose fuzzy bands:
Q6: How can I prevent the "edge effect" that distorts the lanes on the sides of my gel?
The edge effect, which causes distorted bands in the peripheral lanes, is often due to uneven heat distribution. A key preventive measure is to avoid leaving outer wells empty [23]. If you do not have enough experimental samples to fill the entire gel, load molecular weight markers, a control protein, or a dummy sample (like Laemmli buffer) into the outer wells. This ensures a uniform electric field and even heat dissipation across the entire gel [23].
Research Reagent Solutions
The following table lists essential reagents for managing salt and viscosity issues during sample preparation.
| Reagent | Function & Purpose | Key Considerations |
|---|---|---|
| Dialysis Membranes [24] | Removes salts and other small contaminants via selective diffusion. | Choose a pore size (MWCO) suitable for your target protein. Process can take several hours. |
| Desalting Columns (e.g., Sephadex G-25) [3] | Rapid buffer exchange to remove high salt via size exclusion chromatography. | Fast method (minutes). Ideal for small sample volumes. Ensure the column exclusion limit fits your protein. |
| Dithiothreitol (DTT) [24] | Reducing agent that breaks protein disulfide bonds to prevent aggregation. | Must be prepared fresh; unstable in solution. Use a final concentration of 50 mM. |
| Benzonase Nuclease [24] | Digests DNA and RNA in cell lysates to drastically reduce sample viscosity. | Highly effective; requires Mg²⁺ as a cofactor. Adds cost but saves time. |
| Urea (4-8 M) [25] | Chaotropic agent that solubilizes hydrophobic proteins and prevents aggregation. | Avoid heating urea solutions to prevent protein carbamylation. |
| Protease Inhibitor Cocktails | Prevents protein degradation by inhibiting proteases, a source of smearing. | Add fresh to lysis buffer. Different cocktails are optimized for specific sample types (e.g., mammalian, bacterial). |
Experimental Protocols
Protocol 1: Rapid Desalting Using a Spin Column
Purpose: To quickly reduce salt concentration in a protein sample (e.g., after elution from an ion-exchange column).
Materials:
- Commercial desalting spin column (e.g., Zeba, PD-10)
- Low-salt buffer or deionized water
- Microcentrifuge
Method:
- Equilibrate the spin column by centrifuging it according to the manufacturer's instructions.
- Apply your protein sample (typically 100-200 µL) to the center of the compact resin bed.
- Place the column in a clean collection tube and centrifuge at a recommended speed (e.g., 1500 x g for 2 minutes).
- The desalted protein will be in the flow-through. The salt and other small molecules are retained in the resin.
Protocol 2: DNA Shearing for Viscosity Reduction
Purpose: To reduce the viscosity of a cell lysate by mechanically shearing genomic DNA.
Materials:
- Cell lysate
- Syringe (1 mL) and small-gauge needle (25-27 gauge)
- Microcentrifuge tube
Method:
- Prepare your cell lysate using your standard method.
- Draw the lysate into a 1 mL syringe.
- Attach a 25-27 gauge needle and forcefully expel the lysate back into the tube.
- Repeat this process 10-15 times.
- Centrifuge the lysate at >12,000 x g for 15 minutes at 4°C to pellet cell debris and any unsheared DNA.
- Carefully transfer the clarified supernatant to a new tube for downstream analysis.
Troubleshooting Guides
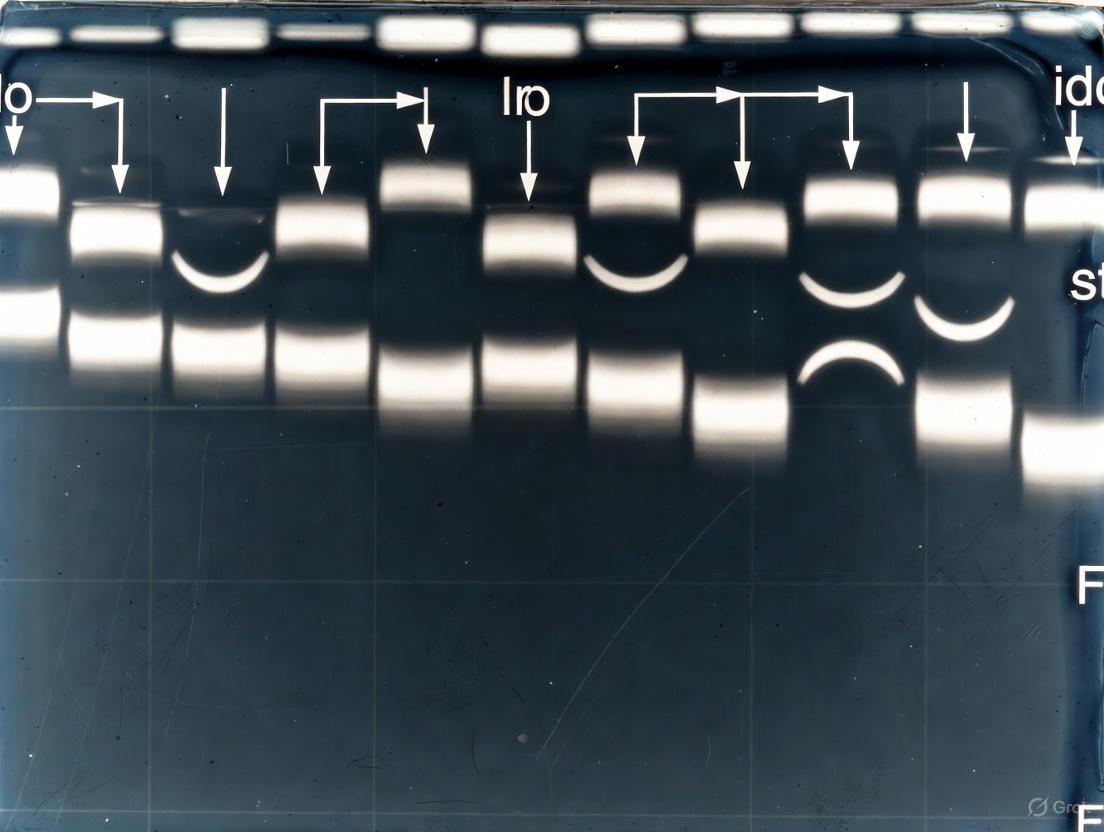
Why are my protein bands "smiling" or "frowning"?
Problem: Distorted bands, often referred to as "smiling" (bands in middle lanes migrating faster) or "frowning" (bands in middle lanes migrating slower), are a common issue in protein gel electrophoresis. This problem is almost always a result of uneven heat distribution across the gel during the run [2].
Causes and Solutions:
| Cause | Solution | |
|---|---|---|
| Uneven Heat Dissipation (Joule Heating) | The center of the gel becomes hotter than the edges, causing samples in the middle to migrate faster. This effect is more pronounced at higher voltages [2]. | - Reduce the voltage to minimize heat generation [2].- Use a power supply with a constant current setting, which helps maintain a more uniform temperature [2]. |
| Incorrect Buffer Concentration | An incorrect or depleted buffer can alter the system's resistance, leading to inconsistent heating and migration [2]. | - Ensure fresh, correctly prepared buffer is used [2]. |
| High Salt Concentration in Samples | Excess salt in a sample creates a region of high conductivity in the well, leading to local heating and distortion of the electric field [2]. | - Desalt samples or dilute them to reduce salt concentration [2].- Dialyze the sample or use a desalting column [3]. |
| Overloading Wells | Too much sample in a single well can overwhelm the local buffer capacity and create a high-conductivity effect [2]. | - Load a smaller volume of sample [2].- Concentrate the protein and load a smaller volume to create a "thinner" starting zone [3]. |
| Improper Gel Tank Setup | An improperly seated gel, crooked electrodes, or uneven buffer levels can create a non-uniform electric field [2]. | - Verify the gel is properly aligned and the electrodes are straight [2].- Ensure sufficient buffer covers the gel wells completely [3]. |
How do I prevent fuzzy or smeared bands?
Problem: Band smearing, where distinct bands appear as a continuous smear down the lane, indicates that the molecules in the sample are not all of the same size or are being degraded [2].
Causes and Solutions:
| Cause | Solution | |
|---|---|---|
| Sample Degradation | Proteins can be degraded by proteases, creating a continuous spectrum of sizes [2]. | - Handle samples gently and keep them on ice to minimize degradation [2].- Include protease inhibitors in your lysis buffer [28].- Avoid repeated freeze-thaw cycles [3]. |
| Excessive Voltage | Running the gel at a very high voltage causes localized heating, which can denature proteins [2]. | - Run the electrophoresis at a lower voltage for a longer time [2]. |
| Incorrect Gel Concentration | A gel with a pore size not optimized for your target protein size can cause poor resolution and smearing [2]. | - Select the correct gel concentration for the size range of your target proteins [2]. |
| Overloading the Gel | Loading too much protein can cause bands to become thick, merge, and appear smeared [28]. | - Load a smaller amount of protein per lane (e.g., 20–50 µg total protein is a common starting point) [28]. |
| Issues with Sample Preparation | Incomplete denaturation or re-oxidation of proteins during the run can cause smearing or multiple band artifacts [2] [3]. | - Ensure samples are properly denatured with fresh SDS and reducing agents (e.g., fresh DTT or beta-mercaptoethanol) [2] [3].- For some systems, adding an antioxidant to the running buffer can prevent re-oxidation [3]. |
Frequently Asked Questions (FAQs)
Q1: What is the single most important setting on my power supply to prevent smiling bands? Using a constant current setting is highly recommended. This mode helps control the rate of heat generation, thereby maintaining a more uniform temperature across the gel compared to constant voltage modes, which directly reduces band distortion [2].
Q2: My lab doesn't have a dedicated cooling system. What are some practical cooling methods I can use? Several effective methods can be implemented with common lab equipment:
- Ice Packs or Cold Water Circulation: Applying ice packs or circulating cold water around the gel tank chamber can help dissipate heat [29].
- Cold Room: Running the electrophoresis apparatus inside a cold room (4°C) is a very effective way to manage Joule heating [2].
- Ensure Proper Buffer Volume: A sufficient volume of running buffer acts as a heat sink. Always ensure the buffer level covers the gel wells completely [3].
Q3: I've fixed the heating, but my bands are still fuzzy. What should I check next? After ensuring proper cooling, the next most likely culprit is sample integrity. Check that your samples are freshly prepared, properly reduced with fresh DTT or beta-mercaptoethanol, and kept on ice. Also, verify that you are not overloading the gel [2] [3].
Q4: Are "smiling" bands only a problem with protein gels? No, the phenomenon of smiling or frowning bands due to uneven heating is common to all forms of gel electrophoresis, including DNA and protein gels [2]. The underlying principle of Joule heating and its effect on migration is the same.
Experimental Protocol: Systematic Troubleshooting for Distorted Bands
This step-by-step protocol guides you through diagnosing and resolving smiling/frowning bands and smearing.
Goal: To achieve straight, sharp, and well-resolved protein bands. Principle: Control heat generation and dissipation during electrophoresis to ensure a uniform electric field and prevent protein degradation.
Materials:
- Protein samples
- Appropriate gel percentage
- Fresh running buffer
- Electrophoresis apparatus and power supply
- Ice bucket or cold room
- Constant current power supply
Methodology:
- Initial Assessment:
- Examine your gel after the run. Identify the pattern: is it smiling, frowning, or smeared?
- Confirm your power supply settings and note the voltage/current used.
Implement Immediate Cooling Corrections:
- Reduce Voltage: Lower the voltage by 25-50% for the next run. This is the quickest way to reduce Joule heating [2].
- Apply Active Cooling: Place the entire gel tank in an ice bath or run it in a cold room (4°C). If using a tank with a cooling core, ensure it is properly connected to a circulator [2].
Check Buffers and Equipment:
Optimize Sample Conditions:
- Desalt Samples: If you suspect high salt, desalt your samples using a spin column or dialysis [2] [3].
- Reduce Load Volume: Concentrate your sample and load a smaller volume to minimize local conductivity effects and overloading [2] [28].
- Fresh Reducing Agents: Always prepare sample buffer with fresh DTT or beta-mercaptoethanol to ensure complete denaturation and prevent re-oxidation [3].
Validate with a Controlled Run:
- Use Constant Current: Switch your power supply to constant current mode for a more consistent run temperature [2].
- Monitor Temperature: If possible, monitor the buffer temperature during the run to ensure it remains stable and cool.
Visual Guide: Troubleshooting Workflow
The following diagram outlines the logical process for diagnosing and fixing band distortion issues.
The Scientist's Toolkit: Essential Reagents and Materials
This table details key materials and their specific functions in preventing band distortion and ensuring high-quality protein electrophoresis.
| Item | Function in Preventing Distortion/Smearing |
|---|---|
| Constant Current Power Supply | Maintains a consistent rate of heat generation, preventing the uneven heating that causes smiling/frowning bands [2]. |
| Pre-cast Gels or Fresh Acrylamide | Ensures consistent gel matrix and polymerization, preventing artifacts from degraded gels or irregular pores [3]. |
| Fresh Running Buffer | Maintains correct pH and ion concentration for stable conductivity and heat distribution [2]. |
| Fresh Reducing Agents (DTT/BME) | Ensures complete and permanent denaturation of proteins, preventing smearing from re-folding or re-oxidation during the run [3]. |
| Ice Packs / Cold Bath / Cold Room | Provides active cooling to dissipate Joule heat, directly combating the primary cause of band distortion [2] [29]. |
| Protease Inhibitor Cocktail | Prevents proteolytic degradation of samples during preparation, which is a major cause of smeared bands [28]. |
Systematic Troubleshooting: Diagnosing and Fixing Distorted Bands
Step-by-Step Diagnostic Flowchart for Smeling and Frowning Bands
Frequently Asked Questions
Q1: What causes smiling bands in my protein gel? A: Smiling bands (curved bands that bend upwards at the ends) are primarily caused by excessive heat generation during electrophoresis. This heat can cause the gel to expand slightly in the center, leading to faster migration in the middle lanes compared to the sides [30]. This often occurs when the gel is run at too high a voltage [30].
Q2: My gel shows frowning bands—what does this mean? A: Frowning bands (curved bands that bend downwards at the ends) are typically a result of the "edge effect." This happens when the outermost lanes of the gel (the edges) are left empty. The current behaves differently in these empty lanes, causing samples in the adjacent lanes to migrate faster and curve downwards [30].
Q3: How can I prevent bands from curving during the run? A: To prevent smiling bands, run your gel at a lower voltage for a longer time, use a cooled apparatus, or run the gel in a cold room [30] [3]. To prevent frowning bands, avoid leaving the outermost wells empty; load them with a sample, ladder, or a dummy protein sample [30].
Troubleshooting Guide: Smiling and Frowning Bands
This guide provides a systematic approach to diagnosing and resolving the issue of curved bands in protein gel electrophoresis.
Diagnose the Pattern of Curvature
The first step is to identify the specific type of curvature, as this points directly to the underlying cause.
- Are the bands curved upwards, forming a "smile"? → This is "Smiling." Proceed to Section 2.
- Are the bands curved downwards, forming a "frown"? → This is "Frowning." Proceed to Section 3.
Troubleshooting Smiling Bands
Smiling is almost universally caused by uneven heating across the gel. The following flowchart outlines the diagnostic and corrective process.
Troubleshooting Frowning Bands
Frowning bands are caused by an electrical distortion at the edges of the gel, known as the edge effect.
Experimental Protocols for Correction
Protocol 1: Optimizing Run Conditions to Prevent Smiling
This protocol is designed to minimize heat generation.
- Voltage and Run Time: Instead of a high-voltage/short-time run, lower the voltage. A standard practice is to run SDS-PAGE gels at around 150V, but if smiling occurs, reduce this to 100-120V and extend the run time accordingly [30].
- Cooling the Gel:
- Option A (Cold Room): Perform the electrophoresis run in a 4°C cold room.
- Option B (Ice Packs): If a cold room is unavailable, place sealed ice packs into the gel-running apparatus buffer tank, ensuring they do not touch the gel cassette [30].
- Buffer Preparation: Always use freshly prepared 1X running buffer. Do not reuse buffer from previous runs, as changes in ion concentration can affect current flow and heat generation [30] [3].
Protocol 2: Eliminating the Edge Effect to Prevent Frowning
This protocol ensures even current distribution across the gel.
- Lane Loading Strategy: When loading your samples, never leave the first and last well empty. Always load them with a sample.
- Sample Options for Outer Wells:
- Load your protein ladder in one of the outer wells.
- Load a control sample or a dummy protein sample from lab stock in the other outer well [30].
- If no samples are available, load a well with 1X loading buffer to provide a conductive path for the current.
- Apparatus Check: Before starting the run, ensure the gel cassette is properly sealed in the tank according to the manufacturer's instructions to prevent buffer leaks that can disrupt current flow [3].
Quantitative Data for Gel Electrophoresis
The following table summarizes key parameters to help optimize your electrophoresis conditions and prevent band curvature and other artifacts.
Table 1: Optimal Electrophoresis Conditions and Parameters
| Parameter | Recommended Specification | Effect of Deviation |
|---|---|---|
| Running Voltage | 150V (standard); 100-120V (if smiling) [30] | Too High: Excessive heat, smiling, smearing. Too Low: Long run times, poor resolution. |
| Running Buffer | Fresh 1X concentration (e.g., Tris-Glycine-SDS) [30] [3] | Incorrect/Reused: Altered conductivity, wavy dye fronts, poor resolution, smiling. |
| Gel Thickness | 3–4 mm (horizontal agarose) [5] | Too Thick (>5 mm): Increased risk of band diffusion and smearing. |
| Outer Well Loading | Always load outermost wells [30] | Left Empty: Causes "frowning" (edge effect) in adjacent lanes. |
The Scientist's Toolkit: Research Reagent Solutions
Table 2: Essential Materials for Troubleshooting Protein Electrophoresis
| Item | Function | Troubleshooting Application |
|---|---|---|
| Pre-cast Protein Gels | Provide consistent gel matrix for separation. | Ensures proper polymerization and eliminates a variable; check expiration date to prevent smiling from gel degradation [3]. |
| SDS Running Buffer | Provides ions for current flow and maintains pH. | Fresh, correctly diluted buffer is critical for even runs and preventing smiling/frowning [30] [3]. |
| Protein Ladder | Contains proteins of known sizes for calibration. | Should be loaded in an outer well to help prevent frowning and serves as a migration control [30]. |
| Ice Packs / Cooling Unit | Dissipates heat from the gel tank. | Directly addresses the root cause of smiling bands by maintaining an even temperature [30]. |
Troubleshooting Guides
Why are my protein bands curved ("smiling" or "frowning")?
The primary cause of smiling or frowning bands is uneven heat distribution across the gel during the electrophoresis run [2]. This phenomenon, known as Joule heating, occurs when the center of the gel becomes hotter than the edges. The uneven temperature causes samples in different parts of the gel to migrate at different speeds, resulting in curved bands [2].
Corrective Actions:
- Reduce the applied voltage to decrease overall heat generation [2] [16].
- Use a power supply with a constant current mode, which can help maintain a more uniform temperature [2].
- Employ active cooling by running the electrophoresis in a cold room, submerging the apparatus in an ice bath, or using a specialized cooling unit [31] [32].
- Ensure the buffer level is consistent and adequate across the gel tank to act as a heat sink [3] [2].
How do power settings (current, voltage, power) affect heat generation?
The choice of constant current, voltage, or power directly influences heat production and band quality [31] [32]. The relationship is defined by the power equation: Power (P) = Voltage (V) x Current (I), where the power generated is directly proportional to the heat produced [32].
The table below summarizes the characteristics of each mode:
| Power Mode | Impact on Heat & Migration | Key Considerations |
|---|---|---|
| Constant Current | Migration rate is constant. Voltage and heat increase as resistance rises during the run, risking "smiling" bands [31] [32]. | Ideal for consistent run times but requires cooling for long runs [32]. |
| Constant Voltage | Current and power decrease during the run, leading to lower heat production but slower migration and potentially diffuse bands [31] [32]. | Safer option that minimizes overheating; multiple chambers can run from one power pack [32]. |
| Constant Power | Aims to keep heat production constant. Voltage and current vary, making the migration rate less predictable [31] [32]. | Prevents boiling but may lead to longer run times [32]. |
What other factors can cause distorted bands?
Beyond general heating, several other issues can lead to poor results.
- Sample Issues: High salt concentration in samples can create local heating and distortion [3] [2]. Overloading wells with too much sample or too large a volume can also cause band distortion and "barbell-shaped" bands [3].
- Gel Issues: Using expired gels, gels that were improperly stored, or gels that have undergone insufficient polymerization can lead to degradation and irregular migration [3].
- Apparatus Setup: An improperly seated gel, crooked electrodes, or a damaged buffer core can create an uneven electric field [3] [2].
Frequently Asked Questions (FAQs)
What is the recommended voltage to prevent smiling?
A common rule of thumb is to set your voltage to 5–15 V per centimeter of gel [31] [32]. For small mini-gels, this often translates to 100-120V, while larger gels may require up to 300V [31]. If smiling occurs at your standard voltage, the most direct corrective action is to lower the voltage and extend the run time [2] [16].
My gel is still smiling even at low voltage. What should I check?
If the problem persists after lowering the voltage, investigate these areas:
- Cooling Efficiency: Ensure your cooling method is effective. An ice bath should have sufficient ice, and a circulating cooler should be set to the correct temperature (e.g., 4°C) [31] [32].
- Buffer Condition: Always use fresh running buffer. Old or reused buffer can have altered ion concentration and pH, affecting conductivity and heating [3] [2] [16].
- Gel Integrity: Check the expiration date of your pre-cast gels or ensure your hand-cast gels were polymerized correctly and used promptly [3].
Are there any sample preparation steps to minimize smiling?
Yes, proper sample preparation is crucial.
- Reduce Salt Concentration: Desalt your samples using dialysis, desalting columns, or concentrators if the salt concentration exceeds 50-100 mM [3].
- Avoid Overloading: Do not overload your wells with too much protein or too large a sample volume. Concentrate your protein samples if necessary [3].
- Ensure Proper Denaturation: Make sure your samples are fully denatured using fresh reducing agents like DTT or beta-mercaptoethanol [3].
The Scientist's Toolkit: Key Reagent Solutions
The following table lists essential materials and their functions for troubleshooting heat-related smiling in SDS-PAGE.
| Tool/Reagent | Function in Troubleshooting |
|---|---|
| Pre-cast Gels (Bis-Tris) | Ensures consistent gel matrix and polymerization; preferred for reproducibility [3]. |
| Fresh Running Buffer | Maintains correct pH and ionic strength for stable conductivity and minimal excessive heat [3] [2]. |
| Fresh Reducing Agents (DTT/BME) | Ensures complete protein denaturation, preventing smearing and aberrant migration [3]. |
| Antioxidant (for NuPAGE gels) | Added to running buffer to prevent protein re-oxidation during the run, which can cause artifactual bands [3]. |
| Ice Bath or Circulating Chiller | Actively dissipates Joule heat, preventing the localized overheating that causes band curvature [31] [32]. |
Experimental Workflow and Cause-Effect Relationships
The following diagram illustrates the core causes of heat-related smiling and the primary corrective actions, providing a quick visual reference for troubleshooting.
Diagram 1: Cause-Effect and solution map for heat-related smiling.
SDS-PAGE Optimization Protocol for Sharp Bands
This workflow outlines a step-by-step protocol to optimize your SDS-PAGE run and prevent heat-related distortion.
Diagram 2: SDS-PAGE optimization workflow.
Troubleshooting Guides
Guide: Fixing Frowning Bands
Problem: "Frowning" bands, where bands in the center lanes migrate slower than those on the edges, forming a U-shaped curve.
Primary Cause: Uneven heat distribution across the gel, with the center being cooler than the edges [2]. This can be caused by excessive cooling in the center of the gel apparatus or a heat sink effect [2].
Troubleshooting Table
| Cause | Diagnostic Check | Corrective Action |
|---|---|---|
| Excessive/Uneven Cooling | Check if gel apparatus is in an overly cold environment or if a cooling block is directly contacting the center. | Run the gel at room temperature; ensure cooling elements contact the gel evenly, not just the center [2]. |
| High Voltage | Monitor if the running buffer feels warm to the touch. | Reduce the voltage; run the gel at a constant current to manage heat generation [2]. |
| Incorrect Buffer Concentration | Confirm buffer age and preparation. | Use fresh running buffer at the correct concentration to ensure even conductivity [2] [33]. |
| High Salt in Samples | Review sample preparation protocol. | Desalt samples or dilute in nuclease-free water to reduce local conductivity and heating [5] [2]. |
Guide: Eliminating Edge Effects
Problem: Distorted bands in the outermost lanes (left and right) of the gel, while inner lanes appear normal.
Primary Cause: The "edge effect" caused by empty peripheral wells, which distorts the electric field at the gel's edges [34].
Troubleshooting Table
| Cause | Diagnostic Check | Corrective Action |
|---|---|---|
| Empty Peripheral Wells | Visually confirm empty wells at the gel's edges. | Load unused wells with a dummy sample, such as 1X loading buffer, a control protein, or an extra ladder [34]. |
| Uneven Buffer Levels | Check that the buffer level is even and covers the gel surface uniformly. | Ensure the gel is fully submerged with 3–5 mm of buffer above it, and that the tank is on a level surface [6] [5]. |
| Improper Gel Tank Setup | Inspect for loose wires, crooked electrodes, or an improperly seated gel cassette. | Ensure all contacts are tight, electrodes are straight, and the gel cassette is seated correctly in the tank [6] [2]. |
Frequently Asked Questions (FAQs)
Q1: What is the fundamental physical difference between 'smiling' and 'frowning' bands?
Both are caused by uneven heat distribution. Smiling occurs when the center is hotter than the edges, causing faster migration in the middle. Frowning occurs when the center is cooler than the edges, causing slower migration in the middle [2].
Q2: I always load my ladder in the first well. Why are my edge lanes still distorted?
The edge effect is caused by the physical edge of the gel and the adjacent buffer space. Even with a ladder in one end lane, the well on the opposite end is likely empty, still causing distortion. For the best results, load samples or dummy reactions in all peripheral wells [34].
Q3: Can the type of running buffer I use contribute to these effects?
Yes. Old, depleted, or incorrectly prepared buffers can alter the system's ionic strength and conductivity, leading to uneven heating and poor band morphology. Always use fresh, correctly formulated buffer for each run [2] [33].
Q4: My bands are frowning, but I'm not using any external cooling. What could be wrong?
Check your power supply settings. Running at a very high voltage can generate significant Joule heating. While this often causes smiling, the specific geometry of your gel tank can sometimes create a frowning pattern. Reducing the voltage is a good first step [34] [2].
Experimental Protocols
Protocol: Systematic Diagnosis of Band Distortion
This protocol helps methodically identify the root cause of frowning or edge effects.
Workflow for Diagnosing Band Distortion
Steps:
- Visual Inspection: After electrophoresis and staining, examine the band pattern.
- Identify Pattern:
- Implement Corrective Actions: Follow the specific actions outlined in the troubleshooting tables above.
Protocol: Buffer Management for Optimal Conductivity
Proper buffer handling is critical for preventing uneven heating and band distortion.
Steps:
- Preparation: Prepare TAE or TBE buffer for nucleic acids, or SDS-PAGE running buffer for proteins, using high-purity water and reagents. Verify pH [33].
- Storage: Store buffers at room temperature and note the preparation date. Do not use buffers stored for extended periods.
- Usage:
- In-run Check: If the buffer feels excessively warm during the run, reduce the voltage to prevent overheating.
Research Reagent Solutions
Essential materials and their functions for preventing gel artifacts.
| Reagent/Material | Function in Preventing Distortion |
|---|---|
| Fresh Running Buffer | Ensures consistent ionic strength and conductivity for even current flow and heat distribution [33]. |
| Protein Ladder/Dummy Sample | Loaded into empty peripheral wells to maintain a uniform electric field and prevent edge effects [34]. |
| Constant Current Power Supply | Helps manage heat generation by regulating current, leading to a more uniform temperature across the gel [2]. |
| Properly Formulated Loading Dye | Contains glycerol to make samples sink into wells, preventing diffusion and uneven start points [6] [35]. |
Troubleshooting Guides
Guide 1: Diagnosing and Resolving Smiling or Frowning Bands
Problem: Protein bands appear curved (smiling or frowning) instead of straight.
Root Causes & Advanced Solutions:
| Cause | Underlying Mechanism | Advanced Fix |
|---|---|---|
| High Salt in Samples | Creates a local zone of high conductivity, distorting the electric field and causing uneven migration and heating. [2] [3] | Desalt samples using dialysis, gel filtration, or ultrafiltration. Aim for salt concentrations below 50-100 mM and ideally ≤10 mM for sensitive systems like IEF. [7] [3] |
| Protein Aggregation | Partially aggregated or misfolded proteins migrate irregularly, causing smearing and distortion, often due to incomplete denaturation. [36] | Increase solubilizing agents (8M Urea), use fresh reducing agents (DTT), and alkylate with iodoacetamide to prevent reoxidation. [7] [3] [37] |
| Excessive Joule Heating | Uneven heat distribution across the gel causes samples in the center to migrate faster ("smiling"). [2] [38] | Use a power supply in constant current mode. Run the gel at a lower voltage for a longer time, or in a cold room/with a cooling unit. [2] [38] |
| Improper Buffer Conditions | Incorrect ion concentration or pH alters system resistance and electric field uniformity. [2] [3] | Always use fresh running buffer at the correct concentration and pH. For high-salt situations, add SDS (0.1-0.4%) to the upper buffer chamber. [3] |
Guide 2: Troubleshooting Poor Band Resolution and Smearing
Problem: Bands are poorly separated, fuzzy, or appear as smears instead of sharp, distinct bands.
Root Causes & Advanced Solutions:
| Cause | Underlying Mechanism | Advanced Fix |
|---|---|---|
| Protein Degradation/Aggregation | Protease activity or inherent protein instability generates a heterogeneous mixture of fragments and aggregates. [2] [36] | Use protease inhibitors during prep. For aggregation-prone proteins, use denaturing conditions (8M Urea) and consider charge-altering mutations that promote misfolding. [7] [36] [39] |
| Suboptimal Gel Concentration | The gel pore size is not appropriate for the target protein's size range, impairing sieving. [2] | Optimize the acrylamide percentage for your protein's molecular weight. Use lower % gels for large proteins and higher % gels for small proteins. [2] [38] |
| Overloaded Wells | Too much protein overwhelms the gel's capacity, causing bands to merge and smear. [2] [3] | Load a smaller amount of protein or a smaller volume of concentrated sample. [2] [3] |
| Incomplete Denaturation | Proteins not fully unfolded migrate based on structure and charge, not just size, leading to smearing. [2] | Ensure sample buffer is fresh and contains adequate SDS and reducing agent (DTT/BME). Boil samples properly before loading. [2] [3] |
Frequently Asked Questions (FAQs)
My protein samples have high salt from the purification process. What is the fastest way to desalt them for electrophoresis?
A: Ultrafiltration (using centrifugal concentrators with an appropriate molecular weight cutoff) is typically the fastest method for buffer exchange and desalting. As an alternative for smaller volumes, gel filtration spin columns can be used to rapidly remove salts. These methods are preferable to dialysis when time is a constraint. [3]
I've desalted my sample, but I still see smearing and poor resolution. What could be happening?
A: The issue may be protein aggregation. High salt can promote aggregation, and some proteins are inherently prone to it. Ensure your sample buffer contains strong denaturants like 8M urea and fresh reducing agents like DTT to break disulfide bonds and disrupt non-covalent interactions that lead to aggregation. [7] [36] [37]
My bands are smiling, but I've already lowered the voltage. What else can I check?
A: First, verify that the buffer levels are equal across the gel tank and that the gel is properly seated with straight electrodes. [2] Second, ensure you are not reusing old running buffer, as its ion composition changes. Third, if your gel apparatus has an inner chamber, check that it is not leaking, which can create an uneven current flow. [3]
What is the "edge effect" and how is it related to high salt?
A: The "edge effect" causes distorted bands in the outermost lanes of a gel. While often caused by empty wells, it can be exacerbated by high salt in samples in adjacent lanes, which locally distorts the electric field. To prevent this, avoid leaving outer wells empty; load a dummy sample or ladder if necessary, and ensure all samples have low, consistent salt. [38] [3]
The Scientist's Toolkit: Research Reagent Solutions
| Reagent/Material | Function in Troubleshooting High Salt & Aggregation |
|---|---|
| Dithiothreitol (DTT) | A strong reducing agent that breaks protein disulfide bonds, preventing aggregation and reoxidation during the run. Must be fresh. [3] [37] |
| Urea (8M) | A powerful denaturant that disrupts hydrogen bonding and unfolds proteins, solubilizing aggregates and ensuring linear migration. [7] |
| Iodoacetamide | An alkylating agent used after reduction to covalently modify cysteine residues, permanently blocking disulfide bond reformation and preventing smearing. [3] |
| Protease Inhibitor Cocktails | Added to lysis buffers to prevent proteolytic degradation of samples, which is a common cause of smearing and faint bands. [7] [39] |
| Ultrafiltration Devices | Centrifugal concentrators used for rapid buffer exchange and desalting of protein samples before loading. [3] |
Validation and Analysis: Ensuring Gel Quality and Data Accuracy
Troubleshooting Guides
Guide 1: Troubleshooting Distorted, Smeared, and Poorly Resolved Bands
This guide addresses the most common issues affecting band sharpness and resolution in protein electrophoresis, building upon the foundational work of correcting "smiling" or "frowning" bands.
Problem 1: Distorted Bands ("Smiling" or "Frowning")
- Question: My protein bands are curved, either faster in the middle ("smiling") or at the edges ("frowning"). I've corrected the buffer level and tank setup. How do I validate that my bands are now migrating straight?
- Answer: After addressing basic setup issues, validate your protocol by assessing band linearity across all lanes. Persistent distortion indicates unresolved issues with heat distribution or electrical field uniformity [2] [6].
- Validation Protocol:
- Run a Test Gel: Use a pre-stained protein ladder and a well-characterized control lysate.
- Image and Analyze: Capture an image post-electrophoresis. Use a ruler or software to draw a line connecting the same molecular weight band across every lane.
- Assessment: A straight line confirms successful correction. Curvature requires further optimization based on the causes below.
| Cause of Distortion | Validation Check | Corrective Action |
|---|---|---|
| Uneven Heat Dissipation (Joule heating) [2] | Touch the gel apparatus; the center should not be noticeably warmer. | Run the gel at a lower constant voltage [2] [40] [41]. Use a power supply with constant current mode to manage heat generation [2]. |
| High Salt in Samples [2] [42] | Review sample preparation protocol for salt concentration. | Desalt samples using dialysis or buffer exchange [42]. Ensure final salt concentration does not exceed 100 mM [42]. |
| Overloaded Wells [2] | Compare band shape to a lightly loaded control lane. | Load a smaller mass of protein per well (e.g., 10–15 µg of total cell lysate for a mini-gel) [40] [42]. |
Problem 2: Band Smearing and Fuzziness
- Question: My bands are not sharp; they appear as broad smears down the lane. What causes this and how can I achieve crisp, defined bands?
- Answer: Smearing indicates a heterogeneous population of protein sizes or poor separation conditions, often related to sample integrity or denaturation [2] [40].
| Cause of Smearing | Validation Check | Corrective Action |
|---|---|---|
| Incomplete Protein Denaturation [40] [17] | Check that samples were heated with SDS and reducing agent. | Denature samples at 98°C for 5 minutes in sample buffer [40]. After heating, immediately place samples on ice to prevent renaturation [40]. |
| Sample Degradation [2] [17] | Look for a high-molecular-weight smear and absence of sharp, low-MW bands. | Always use fresh protease and phosphatase inhibitors in lysis buffer [17]. Keep samples on ice during preparation [2]. |
| Excessively High Voltage [2] | Note the voltage and run time. | Run the gel at a lower voltage for a longer duration to minimize heating-induced denaturation and diffusion [2] [41]. |
| Incorrect Gel Percentage [2] | Confirm the gel percentage is appropriate for your protein's size. | Use a higher percentage polyacrylamide gel for better resolution of low molecular weight proteins [40] [41]. |
Problem 3: Poor Band Resolution
- Question: The bands in my gel are too close together and are difficult to distinguish. How can I improve the separation?
- Answer: Poor resolution prevents accurate size determination and quantification. The gel concentration is the single most important factor [2].
| Cause of Poor Resolution | Validation Check | Corrective Action |
|---|---|---|
| Suboptimal Gel Concentration [2] [40] | Check if the protein of interest is in the linear separation range of the gel. | Optimize the polyacrylamide percentage for your target's size. Use lower percentage gels for large proteins and higher percentage gels for small proteins [40] [41]. |
| Overloading the Wells [2] [40] | Bands are thick and merge into one another. | Load the minimum amount of protein required for detection. For a standard mini-gel, a maximum of 0.5 µg per band is recommended [42]. |
| Incomplete Gel Polymerization [40] | The gel is soft or has uneven consistency. | Ensure all gel components are fresh and added correctly, especially TEMED and ammonium persulfate (APS) [40]. Allow sufficient time for complete polymerization before use. |
Problem 4: Faint or Absent Bands
- Question: I see very faint bands or no bands at all after transfer and detection. What should I investigate?
- Answer: This critical problem can originate from sample preparation, transfer efficiency, or detection issues [2] [28] [42].
| Cause of Faint/No Signal | Validation Check | Corrective Action |
|---|---|---|
| Inefficient Protein Transfer [28] [42] | Stain the gel post-transfer with Coomassie to see if protein remains. | For high MW proteins, add 0.01-0.05% SDS to transfer buffer. For low MW proteins, add 20% methanol and consider reducing transfer time [28]. |
| Insufficient Antigen or Antibody Issues [28] [42] | Confirm a positive control (e.g., ladder) is visible. | Load more protein (20-50 µg per lane is a good start) [28]. Titrate antibody concentrations and ensure the secondary antibody matches the primary host species [28]. |
| HRP Inhibition [28] | Check buffers for sodium azide. | Do not use sodium azide in any buffers if using HRP-conjugated antibodies [28]. Make fresh buffers without azide. |
Decision Workflow for Band Sharpness Issues
This workflow helps diagnose band sharpness problems after correcting smiling/frowning bands.
Frequently Asked Questions (FAQs)
FAQ 1: I've fixed the 'smiling' by lowering the voltage, but now my run takes too long. Is there a way to speed this up without losing resolution?
Yes, you can optimize for speed and resolution by using a different buffer system. While lowering voltage is correct, you can also use TBE buffer for better heat tolerance during longer runs [6]. Furthermore, ensure you are using a gel percentage that provides the best resolution for your protein size, as a more appropriate gel matrix can improve separation efficiency, potentially allowing for slight adjustments in voltage without sacrificing quality [2] [40].
FAQ 2: My bands are straight but still fuzzy. I've checked denaturation. What else could it be?
The most common culprit after denaturation is sample degradation. Validate this by ensuring your lysis buffer always contains a fresh, broad-spectrum protease inhibitor cocktail [17]. Keep samples on ice at all times during preparation. Another possibility is overloading; try loading a series of decreasing protein amounts to see if the bands become sharper [40] [42].
FAQ 3: How can I systematically validate that my corrected protocol is robust?
Implement a standardized validation protocol:
- Use a Pre-stained Ladder: This allows you to visually monitor band migration in real-time and confirms transfer post-blotting [42].
- Include a Control Lysate: Run a well-characterized, positive control sample (e.g., from a known overexpressing cell line) on every gel. Consistent, sharp bands from this control indicate your system is working [28].
- Document Everything: Keep a detailed log of all parameters: gel batch, buffer age, voltage, run time, and protein load. This is essential for tracing the source of any variability [28] [41].
Research Reagent Solutions
The following materials are essential for executing and validating the protocols discussed in this guide.
| Item | Function | Application in Protocol Validation |
|---|---|---|
| Pre-stained Protein Ladder [42] | Provides molecular weight standards visible during and after electrophoresis. | Validates electrophoretic separation and blotting transfer efficiency. Essential for assessing band linearity. |
| Protease/Phosphatase Inhibitor Cocktails [17] | Prevents protein degradation and modification during sample preparation. | Critical for eliminating smearing caused by proteolysis. Validates sample integrity. |
| TEMED & APS [40] | Catalyzes the polymerization of polyacrylamide gels. | Ensures complete and consistent gel polymerization, which is fundamental for reproducible band resolution. |
| DTT or β-Mercaptoethanol [40] [17] | Reducing agents that break disulfide bonds for complete protein denaturation. | Eliminates smearing caused by residual secondary/tertiary structure. Validates denaturation efficiency. |
| PVDF or Nitrocellulose Membrane [28] [43] | Solid support for immobilizing proteins after gel separation. | Different pore sizes (e.g., 0.2 µm vs. 0.45 µm) can be tested to optimize transfer for specific protein sizes. |
| SDS-PAGE Sample Buffer (Laemmli Buffer) [17] | Denatures proteins and provides charge for electrophoresis. | The quality and freshness of this buffer are critical for achieving sharp, well-resolved bands. |
This technical support guide is framed within a broader research context focused on resolving common protein electrophoresis anomalies, such as smiling or frowning bands. These band shape distortions often result from uneven heat distribution during electrophoresis, which can be caused by running the gel at too high a voltage or inadequate cooling [44]. Such issues affect the gel's appearance and can impact subsequent analysis, including the staining process. Effective staining is critical for accurate protein visualization, and the choice of method depends on the experiment's goals, including the required sensitivity, need for quantification, and compatibility with downstream applications like mass spectrometry. This guide provides detailed troubleshooting and protocols for Coomassie and silver staining, the two most common methods, to help researchers achieve reliable and interpretable results. It's important to note that while fluorescent dyes are a powerful and sensitive alternative, their specific protocols and troubleshooting fall outside the current scope of this article.
Selecting the appropriate staining method is a critical first step in experimental design. The table below provides a direct comparison of Coomassie and silver staining based on key performance metrics to guide your choice.
Table 1: Comparative Analysis of Coomassie Blue and Silver Staining Methods
| Parameter | Coomassie Blue Staining | Silver Staining |
|---|---|---|
| Detection Sensitivity | ~0.1 - 0.5 μg [45] | 0.25 - 0.86 ng (ultra-sensitive) [46] |
| Dynamic Range | Moderate | Narrow |
| Suitable for Quantification | Yes, good quantitative capability [47] | Not reliable [48] |
| Compatibility with Mass Spectrometry | Yes, fully compatible [45] [47] | Traditional protocols are incompatible; requires specialized, aldehyde-free kits [46] [48] |
| Typical Protocol Time | 20 minutes to overnight [45] | ~1 to 2 hours [46] |
| Ease of Use & Cost | Simple, cost-effective [47] | Complex, more expensive, labor-intensive [48] |
| Primary Staining Mechanism | Non-covalent binding to basic amino acids (van der Waals, hydrophobic) [45] | Reduction of ionic silver (Ag+) to metallic silver (Ag) on protein functional groups [48] |
The following workflow can help visualize the decision-making process for selecting a staining method based on your experimental requirements:
Coomassie Blue Staining: Protocols and Troubleshooting
Detailed Staining Protocol
Coomassie Blue staining is a robust and widely used method for visualizing proteins after SDS-PAGE [45]. The following protocol ensures clear visualization of protein bands.
Table 2: Reagents for Coomassie Blue Staining
| Reagent/Solution | Typical Composition | Function |
|---|---|---|
| Fixing Solution | 50% Ethanol, 10% Acetic Acid | Prevents protein diffusion and removes SDS [49]. |
| Washing Solution | 50% Methanol, 10% Acetic Acid | Further removes interferents and fixes proteins [45]. |
| Coomassie Stain | 0.1% Coomassie Blue, 20% Methanol, 10% Acetic Acid | Visualizes proteins by binding to basic residues [49]. |
| Destaining Solution | 20-50% Methanol, 10% Acetic Acid | Removes background dye for clearer band visualization [45] [49]. |
| Storage Solution | 5% Acetic Acid | Prevents gel dehydration during long-term storage [49]. |
Step-by-Step Procedure [49]:
- Electrophoresis & Fixation: After SDS-PAGE, carefully transfer the gel to a staining tray. Immerse it in a sufficient volume of Fixing Solution and incubate for 10 minutes to 1 hour with gentle agitation. Decant the solution.
- Washing: Cover the gel with Washing Solution. Agitate gently on an orbital shaker for at least 2 hours or overnight for thorough fixation.
- Staining: Decant the wash solution and add Coomassie Stain to fully cover the gel. Agitate for a minimum of 3 hours or until distinct, dark blue protein bands are visible against a uniform blue background.
- Destaining: Remove the stain and add Destaining Solution. Agitate, changing the solution as needed, until the background is clear and blue protein bands are sharp.
- Storage: For preservation, equilibrate the gel in Storage Solution for at least 1 hour. For long-term storage, seal the gel in a polyethylene bag with a small amount of solution.
Troubleshooting Guide (FAQs)
Q1: My protein bands are very faint or absent after Coomassie staining. What could be the cause?
A: This is a common issue with several potential causes and solutions [45] [50] [47]:
- Cause: Insufficient protein loaded onto the gel.
- Solution: Increase the amount of total protein loaded per lane. Include a control sample with a known amount of purified protein to verify your staining process.
- Cause: SDS not completely washed from the gel before staining, which can interfere with dye binding.
- Solution: Increase the number and/or volume of washes with the gel-washing solution before you begin the staining step.
- Cause: Over-staining and destaining, which can remove too much dye from the protein bands.
- Solution: Optimize staining and destaining times. If bands are faint, you can place the gel back into the staining solution to darken them [50].
Q2: How do I resolve a high blue background that obscures the protein bands?
A: A persistent high background is often due to incomplete destaining or the presence of interferents [45] [47].
- Cause: Incomplete washing of the gel before staining, leaving SDS or salts that trap the dye.
- Solution: Implement additional washing steps before staining. You can also destain for a longer period or with fresh changes of destaining solution.
- Cause: Insufficient destaining time or volume.
- Solution: Ensure the gel is fully submerged in a large enough volume of destaining solution with continuous, gentle agitation. Replace the solution as it becomes saturated with blue dye.
- Advanced Solution: For stubborn background, destain the gel with a solution of 25% isopropanol and 10% acetic acid for 5-10 minutes [50].
Q3: Why is my staining patchy and uneven across the gel?
A: Uneven staining typically results from poor reagent distribution during the process [47].
- Cause: Inadequate stain coverage or inconsistent agitation during staining and destaining.
- Solution: Ensure the gel is fully and consistently immersed in all solutions. Use an orbital shaker for continuous and gentle agitation throughout all incubation steps to ensure even exposure.
Silver Staining: Protocols and Troubleshooting
Detailed Staining Protocol
Silver staining offers ultra-high sensitivity for detecting low-abundance proteins. The protocol is more complex and requires high-purity reagents and water to minimize background staining [48].
Table 3: Overview of Commercial Silver Staining Kits
| Kit Name | Reported Sensitivity | Approx. Staining Time | Key Features & Compatibility |
|---|---|---|---|
| Pierce Silver Stain Kit | 0.25 ng | 1 hr 30 min | Quick staining protocol, versatile for 1D and 2D gels [46]. |
| SilverQuest Silver Staining Kit | 0.3 ng | Standard: 1 hr 30 minMicrowave: 30 min | Sensitizing solution without glutaraldehyde; MS compatible [46]. |
| Pierce Silver Stain for Mass Spec | 0.25 ng | 1 hr 13 min | Includes destaining reagents for optimal peptide recovery for MS analysis [46]. |
General Silver Staining Workflow [48]:
The diagram below outlines the key steps in a standard silver staining procedure, highlighting the critical points where timing and reagent purity are essential for success.
Troubleshooting Guide (FAQs)
Q1: I see high background staining throughout my gel. How can I reduce this?
A: Background staining is the most frequent challenge in silver staining and is often related to reagent purity and protocol execution [50] [48].
- Cause: Poor water quality or impure reagents.
- Solution: Always use ultrapure water (e.g., >18 MΩ/cm resistance) for preparing all solutions and for all wash steps.
- Cause: Contaminated equipment (staining trays, etc.).
- Solution: Use staining trays dedicated to silver staining. Wash trays thoroughly and rinse with ultrapure water before use.
- Cause: Over-development, where the gel is left in the developer for too long.
- Solution: Carefully monitor the development step and stop the reaction as soon as the desired band intensity is achieved. It may be necessary to stop slightly before the ideal intensity, as development continues briefly after adding the stop solution [50].
- Cause: Skipped or reduced wash steps.
- Solution: Do not skip or shorten the washing steps between phases of the protocol.
Q2: No protein bands are visible after development. What went wrong?
A: The absence of bands indicates a failure in the staining process, often related to development or sample issues [50].
- Cause: Insufficient development time.
- Solution: Develop the gel for more than 5 minutes, or add freshly prepared Developer Working Solution to the tray.
- Cause: Minimal or no protein present in the sample.
- Solution: Check the protein concentration of your original sample. Ensure you have loaded at least 1-5 ng of a target protein on the gel.
- Cause: Excessive water wash before the development step, which can wash out the silver ions.
- Solution: Do not over-wash prior to incubation in the developer. Follow the protocol's washing times precisely.
Q3: My gel shows dark or black specks and spots that are not protein bands. What are these?
A: These specks are typically caused by contamination [50].
- Cause: Keratin contamination from skin, hair, or dust.
- Solution: Always wear gloves and a lab coat during electrophoresis and all staining steps. Use clean equipment and work in a dust-free environment as much as possible.
- Cause: Particulate matter in reagents or water.
- Solution: Ensure all solutions are filtered or prepared with high-purity reagents and water.
Q4: I need to analyze my proteins by mass spectrometry. Can I use silver staining?
A: Yes, but you must use a specialized mass spectrometry-compatible silver stain [46] [48]. Traditional silver staining protocols use glutaraldehyde or formaldehyde as sensitizers, which cross-link proteins and hinder enzymatic digestion for MS analysis. MS-compatible kits replace these aldehydes with other sensitizing agents like tetrathionate and thiosulfate and include destaining reagents to facilitate peptide recovery [46] [48].
Leveraging Software for Band Analysis and Quantification
Troubleshooting Guides and FAQs
FAQ: Resolving Gel Electrophoresis Artifacts
What causes 'smiling' or 'frowning' bands in my protein gel, and how can I fix it?
These distortions, where bands curve upwards (smile) or downwards (frown), are primarily caused by uneven heat distribution across the gel during electrophoresis [3] [2]. This uneven heating, known as Joule heating, causes samples in the warmer sections of the gel to migrate faster than those in cooler sections [2].
Solutions:
- Reduce Voltage: Lower the voltage to minimize heat generation [3] [2].
- Use Constant Current: Employ a power supply with a constant current mode to maintain a more uniform temperature [2].
- Ensure Proper Buffer Levels: Use fresh buffer at the correct concentration and ensure the buffer level is consistent and sufficient to cover the gel wells [3] [2].
- Check Setup: Verify the gel is properly aligned and that electrodes are straight [2].
Why are my protein bands smeared or fuzzy, and how can I achieve sharper resolution?
Band smearing indicates that the protein molecules are not migrating as a uniform population and can result from several issues related to sample integrity or the electrophoresis setup [2].
Solutions:
- Prevent Sample Degradation: Handle samples gently and keep them on ice to minimize degradation by proteases [2].
- Ensure Complete Denaturation: Check that protein samples are properly denatured with fresh SDS and reducing agents (e.g., DTT or beta-mercaptoethanol) [3] [2].
- Optimize Gel Concentration: Use a gel percentage appropriate for the size of your target proteins; higher percentages are better for resolving smaller proteins [3] [2].
- Avoid Overloading: Do not load too much protein per lane, as this can overwhelm the gel matrix [3] [2].
- Reduce Voltage: Run the gel at a lower voltage for a longer duration to reduce heating-induced denaturation and smearing [2].
My gel has faint bands or no bands at all. What is the first thing I should check?
- Verify the Electrophoresis Run: Check if the DNA/Protein ladder is visible. If the ladder is absent, the problem lies with the electrophoresis setup (e.g., power supply not connected, incorrect buffer, or a short circuit) [2].
- Investigate Sample Issues: If the ladder is visible, the problem is likely with your sample, such as degradation during preparation, insufficient starting concentration, or a error during sample loading [2].
Troubleshooting Quantitative Band Analysis with Software
How can I compensate for uneven band distortion during software-based quantification?
Modern analysis software often includes tools to correct for geometric distortions. You can use a well-defined ladder lane as a reference to straighten all lanes in the image before quantification. This process involves defining a curved path along the ladder and allowing the software to apply a corresponding transformation to all lanes, ensuring that bands for the same protein are aligned correctly across the gel.
What are critical steps for ensuring accurate quantification from gel images?
- Image Linearity: Ensure your imaging system operates in a linear range. Saturated pixels (where the signal is too bright) do not accurately represent protein abundance.
- Background Subtraction: Always use the software's background subtraction tool. Set the background region adjacent to the bands of interest to account for uneven background staining.
- Manual Verification: Software algorithms can sometimes miss faint bands or incorrectly merge closely spaced bands. Manually verify the automatic band detection and adjust the lanes and bands as needed.
Experimental Protocol: Diagnosing and Correcting Smiling Bands
The following workflow provides a systematic method for diagnosing and resolving the issue of smiling bands in protein gel electrophoresis.
Methodology
- Initial Assessment: Begin by examining the gel immediately after the run. Note the pattern of the smiling effect—whether it affects all lanes or is more pronounced in the center lanes [2].
- Check Running Conditions:
- Inspect Buffer System:
- Analyze Sample Composition:
- Salt Content: High salt concentration in a sample can create a local region of high conductivity, distorting the electric field and migration [2].
- Solution: If high salt is suspected, desalt samples using dialysis, desalting columns, or precipitate and reconstitute the protein in a low-salt buffer [3].
Research Reagent Solutions
The following table details key reagents and materials essential for troubleshooting and optimizing protein gel electrophoresis.
| Reagent/Material | Function in Troubleshooting | Key Considerations |
|---|---|---|
| Fresh Running Buffer (e.g., MOPS, MES) [3] | Ensures correct pH and ionic strength for proper protein migration and heat dissipation. | Avoid reusing old buffer. Check recipe for correct concentration [3] [2]. |
| Reducing Agents (DTT, Beta-mercaptoethanol) [3] | Breaks disulfide bonds for complete protein denaturation, preventing smearing from improper unfolding. | Always use fresh aliquots. Prepare fresh sample solution before loading [3]. |
| SDS (Sodium Dodecyl Sulfate) [3] | Denatures proteins and confers a uniform negative charge. Critical for separation by molecular weight. | Add SDS to the upper buffer chamber (0.1-0.4%) if smearing suggests insufficient SDS in the sample [3]. |
| Appropriate Gel Percentage [3] [2] | Provides the correct pore size for resolving proteins in your target molecular weight range. | Use higher percentage gels for better resolution of smaller proteins; lower percentages for larger proteins [3] [2]. |
| Desalting Columns / Dialysis Devices [3] | Removes excess salts from protein samples that can cause band distortion and smearing. | Use if sample conductivity is high. Precipitating and reconstituting protein is an alternative [3]. |
This case study examines the systematic troubleshooting and resolution of "smiling" and "frowning" band distortions in SDS-PAGE gels within a protein purification pipeline. Such distortions, indicative of uneven migration, can compromise data integrity, leading to inaccurate molecular weight estimation and poor quantification—critical failures in drug development workflows. By implementing a targeted diagnostic framework, we rectified these artifacts, restoring gel reliability and ensuring robust, reproducible protein analysis for downstream applications.
In protein purification and characterization, SDS-Polyacrylamide Gel Electrophoresis (SDS-PAGE) is a foundational analytical technique. It provides critical data on protein purity, integrity, and molecular weight. However, the appearance of "smiling" (bands curving upward at the edges) or "frowning" (bands curving downward at the edges) distortions undermines this data's reliability. These artifacts signal uneven electrophoretic migration, which can obscure the presence of protein impurities, lead to incorrect molecular weight assignments, and complicate the quantification of purification yields. For researchers and scientists in drug development, where precision is paramount, such inconsistencies can cause significant workflow delays and increase experimental costs. This case study details a real-world investigation into the root causes of these distortions and the validated solutions that restored diagnostic-quality gel performance.
Troubleshooting Guide: A Systematic Approach
A systematic approach is essential for diagnosing and resolving the root causes of distorted bands. The following table provides a structured troubleshooting guide.
Table 1: Troubleshooting Smiling and Frowning Bands
| Problem Appearance | Primary Cause | Underlying Reason | Recommended Solution |
|---|---|---|---|
| Smiling Bands (Curving Upwards) | Excessive Heat Generation [3] [51] [2] | High voltage causes uneven heating, with the gel center becoming hotter than edges (Joule heating), making proteins in the middle migrate faster [2] [52]. | - Run gels at a lower voltage (e.g., 120V instead of 200V) for a longer duration [51] [52].- Use a cooled apparatus or run in a cold room [3] [40].- Ensure both buffer chambers are filled to the electrodes to act as a heat sink [3]. |
| Frowning Bands (Curving Downwards) | Uneven Sample Composition or Loading [52] | Outer lanes contain less protein than inner lanes, or samples have varying salt/detergent concentrations, altering local conductivity and migration rates [52]. | - Ensure uniform protein loading across all lanes [52].- Dialyze or dilute samples to standardize salt, urea, and detergent concentrations [3] [52].- Load critical samples in the center lanes of the gel [52]. |
| Wavy or Skewed Bands | Poor Gel Polymerization [3] [4] | Inconsistent gel matrix due to expired reagents, improper mixing, or air bubbles creates uneven sieving and migration paths. | - Use fresh ammonium persulfate (APS) and TEMED [4] [52].- Mix gel solutions thoroughly and degas before pouring [4].- Pour gels carefully and layer with ethanol or isopropanol for a flat interface [4] [53]. |
| Distorted Bands on Gel Periphery (Edge Effect) | Empty Wells at the Gel Edges [51] | Empty lanes alter the electric field and buffer flow at the edges of the gel, causing distorted migration in adjacent lanes. | - Avoid leaving outer wells empty. Load ladder, control samples, or sample buffer in unused wells [51]. |
Visual Guide to Troubleshooting Distorted Gels
The following workflow diagram synthesizes the troubleshooting process into a logical, step-by-step diagnostic tree.
Detailed Experimental Protocols
Protocol 1: Optimizing Electrophoresis Conditions to Minimize Heat
Objective: To separate proteins under conditions that prevent smiling artifacts caused by excessive Joule heating [51] [2].
Materials:
- Standard SDS-PAGE apparatus and power supply.
- Precast or freshly cast Bis-Tris or Tris-Glycine gel.
- Fresh 1X SDS-PAGE running buffer.
- Ice pack or cooling unit (optional).
Method:
- Prepare the Gel: Insert the gel cassette into the apparatus according to the manufacturer's instructions. Ensure the tape is removed from the bottom of precast cassettes [3].
- Fill Buffer Chambers: Fill both the inner and outer buffer chambers with fresh 1X running buffer. Ensure the buffer level completely covers the wells in the inner chamber and reaches the electrodes in the outer chamber to act as an effective heat sink [3].
- Load Samples: Load predetermined protein amounts (typically 1-40 µg, depending on stain sensitivity) into the wells [53].
- Set Power Parameters: Connect the apparatus to the power supply, ensuring correct polarity. Set the power supply to constant voltage mode.
- Monitor Temperature: If the apparatus feels hot to the touch, interrupt the run and employ cooling strategies [52].
- Place the entire apparatus in a cold room.
- Use an integrated cooling unit or insert a compatible ice pack into the buffer chamber if available [40].
- Stop the Run: Terminate the run when the dye front is approximately 0.5-1 cm from the bottom of the gel.
Protocol 2: Standardizing Sample Preparation
Objective: To eliminate frowning artifacts and smearing by ensuring uniform sample composition and load [3] [52] [40].
Materials:
- Protein samples.
- 2X Laemmli sample buffer (containing SDS and a reducing agent like DTT or β-mercaptoethanol).
- Heating block or water bath.
- Dialysis membranes or desalting columns (if needed).
Method:
- Normalize Salt Concentration: If samples are in high-salt buffers (>50-100 mM), desalt them using dialysis, a desalting column (e.g., Sephadex G-25), or precipitation to prevent band distortion and smearing [3] [4].
- Prepare Sample Mixture: Mix the protein sample with an equal volume of 2X Laemmli sample buffer. Ensure the final concentration of SDS is sufficient to coat all proteins (typically 1-2%) [3] [53].
- Denature Proteins: Heat the samples at 98°C for 5 minutes to ensure complete denaturation [40]. Using fresh DTT or β-mercaptoethanol is critical to break disulfide bonds and prevent re-oxidation artifacts [3] [4].
- Cool and Load: Immediately place the heated samples on ice to prevent renaturation. Briefly spin down condensation before loading [40]. Load a consistent volume and protein mass across all wells to ensure even migration.
Visual Guide to the Optimized SDS-PAGE Workflow
The optimized experimental workflow integrates the key troubleshooting fixes into a standardized procedure.
Research Reagent Solutions
The consistent performance of an SDS-PAGE workflow relies on the quality and appropriate use of key reagents. The following table details essential materials and their critical functions.
Table 2: Essential Reagents for Diagnostic-Quality SDS-PAGE
| Reagent | Function | Critical Parameters & Notes |
|---|---|---|
| Acrylamide/Bis-Acrylamide | Forms the cross-linked porous gel matrix that sieves proteins by size [40]. | - Concentration: Choose based on target protein size (e.g., 8% for large >100kDa, 12% for medium, 15% for small <30kDa proteins) [40].- Quality: Use high-purity grades; polymerize and dispose of safely due to neurotoxicity [53]. |
| SDS (Sodium Dodecyl Sulfate) | - Denatures proteins by binding to the polypeptide backbone.- Imparts a uniform negative charge, allowing separation primarily by mass [53] [40]. | - Binding Ratio: Ensure a sufficient excess (typically 1.4g SDS/g protein) [53].- Precipitation: Can precipitate if stored at 4°C; bring to room temperature and mix before use [3]. |
| Reducing Agents (DTT, BME) | Breaks intra- and inter-molecular disulfide bonds to fully linearize proteins [53]. | - Freshness: Must be fresh or stored properly; old reagents lead to incomplete reduction and artifact bands [3] [4].- Over-reduction: Excess can cause band narrowing; use recommended concentrations [3]. |
| APS & TEMED | Catalyzes the free-radical polymerization of acrylamide. | - Freshness: APS solution should be made fresh weekly; TEMED should be stored cool and dark. Old catalysts cause poor polymerization and wavy bands [4] [52]. |
| Running Buffer (Tris-Glycine) | Carries the current and maintains the pH necessary for the discontinuous buffer system [53]. | - Concentration: Use the correct dilution (typically 1X). Over-concentrated or depleted buffer alters migration [3] [51].- Freshness: Do not reuse buffer, as its buffering capacity diminishes [3]. |
Frequently Asked Questions (FAQs)
Q1: My bands are smiling even at lower voltages (100-120V). What else can I check? A1: First, verify that your running buffer is fresh and correctly diluted, as old or improper buffer can increase system resistance and heat generation [3] [51]. Second, ensure both the inner and outer buffer chambers are filled to the recommended levels, as sufficient buffer acts as a crucial heat sink. If problems persist, implement active cooling by running the gel in a cold room or using a apparatus with a built-in cooling element [40].
Q2: I see a faint band at ~67 kDa in all reduced samples. Is this an artifact? A2: Yes, this is a common artifact. A band at approximately 67 kDa in reduced samples is often caused by excess reducing agent (β-mercaptoethanol) in the sample buffer [4]. This can be eliminated by adding iodoacetamide to the equilibration buffer to alkylate the sulfhydryl groups, which prevents this artifact from forming [4].
Q3: How does leaving outer wells empty cause distortion? A3: Empty wells at the edges of the gel create an uneven electric field and buffer flow pattern, a phenomenon known as the "edge effect" [51]. This causes samples in the adjacent lanes to migrate differently, resulting in distorted or skewed bands. Always load unused wells on the periphery with a control sample, ladder, or even 1X sample buffer to maintain a uniform electric field across all lanes of interest [51].
Q4: When should I consider switching to a precast gel? A4: Precast gels are an excellent solution to eliminate variability and artifacts stemming from inconsistent gel polymerization. If you are consistently experiencing wavy bands, poor resolution, or irregular dye fronts despite using fresh reagents and optimized casting protocols, the issue likely lies with the gel matrix itself [52] [40]. Precast gels offer guaranteed consistency, convenience, and are highly recommended for critical applications or when troubleshooting in-house gel casting proves difficult.
Conclusion
Successfully resolving smiling and frowning bands is crucial for obtaining reliable, high-quality data from protein electrophoresis, a foundational technique in drug development and biomedical research. By understanding the underlying principles of Joule heating and electrical fields, implementing robust methodological protocols, and applying systematic troubleshooting, researchers can eliminate these common artifacts. Mastering these techniques ensures data integrity, improves reproducibility, and accelerates research progress. Future advancements in real-time temperature monitoring and integrated cooling systems within electrophoresis apparatus will further enhance the precision and reliability of protein analysis in clinical and research settings.
References
- 1. Troubleshooting SDS-PAGE Gel Running Issues [https://www.goldbio.com/blogs/articles/troubleshooting-sds-page-gel-running-issues?srsltid=AfmBOorGfeLMEzX7xplu0Kb1SED4UyGX0Aj2zjVChyxx0doY_2E_8Wsp]
- 2. Troubleshooting Common Electrophoresis Problems and ... [https://www.labx.com/resources/troubleshooting-common-electrophoresis-problems-and-artifacts/5539]
- 3. Protein Gel 1D Electrophoresis Support—Troubleshooting [https://www.thermofisher.com/us/en/home/technical-resources/technical-reference-library/protein-electrophoresis-western-blotting-support-center/protein-gel-1d-electrophoresis-support1/protein-gel-1d-electrophoresis-support-troubleshooting.html]
- 4. Troubleshooting Sodium Dodecyl Sulfate- Polyacrylamide ... [https://www.hycultbiotech.com/sds-page/troubleshooting/]
- 5. Nucleic Acid Gel Electrophoresis Troubleshooting [https://www.thermofisher.com/us/en/home/life-science/cloning/cloning-learning-center/invitrogen-school-of-molecular-biology/na-electrophoresis-education/na-electrophoresis-troubleshooting.html]
- 6. Eight Tips to Improve Gel Electrophoresis Results [https://www.thermofisher.com/us/en/home/brands/thermo-scientific/molecular-biology/molecular-biology-learning-center/molecular-biology-resource-library/spotlight-articles/8-DNA-ladder-tips.html]
- 7. Protein Gel 2D Electrophoresis Support—Troubleshooting [https://www.thermofisher.com/us/en/home/technical-resources/technical-reference-library/protein-electrophoresis-western-blotting-support-center/protein-gel-2d-electrophoresis-support/protein-gel-2d-electrophoresis-support-troubleshooting.html]
- 8. Gel 1D Protein ... | Thermo Fisher Scientific - UK Electrophoresis [https://www.thermofisher.com/uk/en/home/technical-resources/technical-reference-library/protein-electrophoresis-western-blotting-support-center/protein-gel-1d-electrophoresis-support1/protein-gel-1d-electrophoresis-support-troubleshooting.html]
- 9. Effect of the operational parameters on the electromigration ... [https://www.sciencedirect.com/science/article/pii/S0039914025000876]
- 10. Capillary Electrophoresis as a Useful Tool to Separate ... [https://pmc.ncbi.nlm.nih.gov/articles/PMC12609530/]
- 11. Comparison of Four Electrophoresis Buffer for Good ... [https://biomedres.us/fulltexts/BJSTR.MS.ID.007829.php]
- 12. Protein Electrophoresis Using SDS-PAGE: A Detailed ... [https://www.goldbio.com/blogs/articles/protein-electrophoresis-sds-page-overview?srsltid=AfmBOorW9IydRZn7ZGRdNNVbJgF6jLMI7QArkT_f47H9zZS1n7ICocvo]
- 13. Troubleshooting SDS-PAGE Gel Running Issues [https://www.goldbio.com/blogs/articles/troubleshooting-sds-page-gel-running-issues?srsltid=AfmBOoqdQn4z4rfXmbqsouBXPCCvIPsJ3gwTwOopnPZDe1iNuD9FCGSU]
- 14. SDS-PAGE guide: Sample preparation to analysis [https://www.abcam.com/en-us/knowledge-center/western-blot/sds-page-guide]
- 15. SDS-PAGE: The science behind all those bubbles [https://www.antibodiesinc.com/pages/sds-page-demystified?srsltid=AfmBOorENtjOvxARjUC0NqXX3lv1cj20HjjGUve81Uiw1gR-B1CVLaTm]
- 16. Troubleshooting Nucleic Acid Gel Electrophoresis—Solved in ... [https://www.yeasenbio.com/blogs/molecular-biology/troubleshooting-nucleic-acid-gel-electrophoresis-solved-in-one-go]
- 17. Western Blot: The Complete Guide [https://www.antibodies.com/applications/western-blotting]
- 18. An Electric Field and Runtime Driven Band Model for High- ... [https://www.sciencedirect.com/science/article/abs/pii/S0003267025002673]
- 19. Method Development for Capillary Electrophoresis [https://www.labx.com/resources/method-development-for-capillary-electrophoresis-optimization-strategies/5638]
- 20. High Current Power Supply for Electrophoresis Market [https://www.futuremarketinsights.com/reports/high-current-power-supply-for-electrophoresis-market]
- 21. Troubleshooting Gel Casting/ Polymerization Issues in ... [https://www.goldbio.com/blogs/articles/troubleshooting-gel-casting-polymerization-issues-in-sds-page?srsltid=AfmBOoovvPRvlCbkOP_mAsj0SC9U45mJ9pEs0teHhsnR1I-__t7lk6YQ]
- 22. Preparing SDS gels [https://www.ruf.rice.edu/~bioslabs/studies/sds-page/gellab2a.html]
- 23. Troubleshooting SDS-PAGE Gel Running Issues [https://www.goldbio.com/blogs/articles/troubleshooting-sds-page-gel-running-issues?srsltid=AfmBOor9urDgJZqcFIVS98KNi-KebCvbYgB0Riqntyt7j2ftoNMK3_Bd]
- 24. Gel Electrophoresis Sample | Thermo Fisher Scientific - KZ Preparation [https://www.thermofisher.com/kz/en/home/references/protein-analysis-guide/protein-separation/gel-electrophoresis-sample-preparation.html]
- 25. Troubleshooting SDS-PAGE Sample Preparation Issues [https://www.goldbio.com/blogs/articles/troubleshooting-sds-page-sample-preparation-issues?srsltid=AfmBOooB5EtWp0AFoCs9Aqgc3xC7neoUr7zIvbEndrhc0A84JMctsAiv]
- 26. SDS-PAGE Troubleshooting: Why Are My Protein Bands ... [https://synapse.patsnap.com/article/sds-page-troubleshooting-why-are-my-protein-bands-fuzzy]
- 27. Foolproof Guide to SDS-Page Ladder Migration [https://azurebiosystems.com/blog/sds-page-troubleshooting-protein-separation-but-my-ladder-is-fine/]
- 28. The 8 Western Blot Failures and How to Prevent Them (2025 ... [https://wildtypeone.substack.com/p/the-8-western-blot-failures-and-how?utm_campaign=post&triedRedirect=true]
- 29. Cooling Techniques for Hyperthermia - StatPearls - NCBI - NIH [https://www.ncbi.nlm.nih.gov/books/NBK459311/]
- 30. Troubleshooting SDS-PAGE Gel Running Issues [https://www.goldbio.com/blogs/articles/troubleshooting-sds-page-gel-running-issues?srsltid=AfmBOoobhs_x5h6uV-nDku7sUBouzYqhrpjnz13ZSvFn1rNueaAP53EQ]
- 31. How current, voltage, and power settings affect SDS-PAGE [https://www.biossusa.com/blogs/news/how-current-voltage-and-power-settings-affect-sds-page?srsltid=AfmBOoqECCmDwt4Rr-kVrh2oM2Y-RSM23Td9D6Q2v5N4CNGRxCkwuhyn]
- 32. Constant Current or Voltage in SDS-PAGE [https://bitesizebio.com/51744/constant-current-or-voltage-in-sds-page/]
- 33. Mastering Gel Electrophoresis: 10 Tips and Tricks for ... [https://americanlaboratorytrading.com/mastering-gel-electrophoresis-10-tips-and-tricks-for-successful-results/?srsltid=AfmBOopGTgBSfhKKORc6xfEXTNap4KoWQ93al7rrPBl3gKRUuIKBN7uP]
- 34. Troubleshooting SDS-PAGE Gel Running Issues [https://www.goldbio.com/blogs/articles/troubleshooting-sds-page-gel-running-issues?srsltid=AfmBOoomvKsjZ3wwaorrt7Kx8HO7h0YZrlCOuHZDtuERuD23DCeA31rQ]
- 35. How to load a gel for electrophoresis [https://www.minipcr.com/how-to-load-a-gel-electrophoresis/]
- 36. Uncovering the protein aggregation process through effect ... [https://www.nature.com/articles/s41598-025-16910-9]
- 37. Gel electrophoresis tips and troubleshooting [https://lclane.net/text/geltips.html]
- 38. Troubleshooting SDS-PAGE Gel Running Issues [https://www.goldbio.com/blogs/articles/troubleshooting-sds-page-gel-running-issues?srsltid=AfmBOooyHdAiC5g7H-MrrrkebdWsTBMRjLnZ1RaxvUcQXEaEP17OJBe1]
- 39. Comparing In vitro Protein Aggregation Modelling Using ... [https://pmc.ncbi.nlm.nih.gov/articles/PMC11906958/]
- 40. 6 Best Tips for Troubleshooting Poor Band Separation on ... [https://azurebiosystems.com/blog/6-tips-for-troubleshooting-poor-band-separation-on-sds-page-gels/]
- 41. Mastering Gel Electrophoresis: 10 Tips and Tricks for ... [https://americanlaboratorytrading.com/mastering-gel-electrophoresis-10-tips-and-tricks-for-successful-results/?srsltid=AfmBOopdvVpZZxnQYMcKrEoJ3hD3YcpAceLP2LXvwMD42MbN0AN8DXy-]
- 42. Western Blot Troubleshooting [https://www.thermofisher.com/us/en/home/life-science/protein-biology/protein-biology-learning-center/protein-gel-electrophoresis-information/western-blot-troubleshooting.html]
- 43. Guide to western blot quantification [https://www.abcam.com/en-us/knowledge-center/western-blot/western-blot-quantification]
- 44. Troubleshooting SDS-PAGE Gel Running Issues [https://www.goldbio.com/blogs/articles/troubleshooting-sds-page-gel-running-issues?srsltid=AfmBOort5gp-xPqB4cdmskeDWZ-jBDdsH7sDMZXf3YIUxE-74Fn--o11]
- 45. Coomassie blue staining - Proteins and protein analysis [https://www.abcam.com/en-us/knowledge-center/proteins-and-protein-analysis/coomassie-blue-staining]
- 46. Silver Stains | Thermo Fisher Scientific - AR [https://www.thermofisher.com/br/en/home/life-science/protein-biology/protein-gel-electrophoresis/protein-gel-staining-imaging/silver-protein-gel-stains.html]
- 47. Coomassie Staining SDS-PAGE: Common Issues & Fixes [https://thesiliconreview.com/2025/05/troubleshooting-coomassie-blue-staining-in-sds-page-common-issues-and-fixes]
- 48. Mastering Silver Staining for Protein Gel Analysis [https://www.abcam.com/en-us/knowledge-center/western-blot/silver-staining-protein-gel-detection-guide]
- 49. Protocol for Coomassie Staining [https://www.aatbio.com/resources/application-notes/protocol-for-coomassie-staining]
- 50. Protein Stains Support—Troubleshooting [https://www.thermofisher.com/us/en/home/technical-resources/technical-reference-library/protein-electrophoresis-western-blotting-support-center/protein-stains-support/protein-stains-support-troubleshooting.html]
- 51. Troubleshooting SDS-PAGE Gel Running Issues [https://www.goldbio.com/blogs/articles/troubleshooting-sds-page-gel-running-issues?srsltid=AfmBOorm7oQSr1R2mNz7z0QJC6WBN3JCCfM5sR-SyiEhTShOZwyrq2Va]
- 52. Western Blot Wednesday (Pt. 4) - How to fix curved, wavy ... [https://www.linkedin.com/posts/wildtypeone_western-blot-wednesday-pt-4-how-to-fix-activity-7318166399435067392-4FFt]
- 53. SDS-PAGE - Mullins Lab - [https://mullinslab.ucsf.edu/sds-page/]