A Complete Guide to Casting a Protein Gel for Vertical Electrophoresis
This article provides a comprehensive guide for researchers and drug development professionals on how to cast a protein gel for vertical electrophoresis, a foundational technique in protein analysis.
A Complete Guide to Casting a Protein Gel for Vertical Electrophoresis
Abstract
This article provides a comprehensive guide for researchers and drug development professionals on how to cast a protein gel for vertical electrophoresis, a foundational technique in protein analysis. It covers the core principles of SDS-PAGE and native-PAGE, delivers a detailed, step-by-step protocol for gel casting and operation, addresses common troubleshooting scenarios for optimal results, and explores advanced applications and validation techniques to ensure data reliability and reproducibility in biomedical research.
Protein Gel Electrophoresis Fundamentals: Principles and System Setup
What is Vertical Gel Electrophoresis and How Does It Work?
Vertical gel electrophoresis is a fundamental laboratory technique for separating biomolecules based on their size and charge. Unlike horizontal systems where the gel is submerged in buffer, this method orients the gel vertically between two buffer chambers [1]. It is the predominant method for protein analysis and is also used for high-resolution nucleic acid separation [1] [2].
The core principle relies on creating an electric field across a polyacrylamide gel matrix. Charged molecules migrate through the pores of this gel, with smaller molecules moving faster than larger ones, resulting in precise size-based separation [2]. The vertical configuration and the use of a discontinuous buffer system are key to its high resolving power [1]. This technique is indispensable in modern research, with the global vertical gel electrophoresis systems market demonstrating substantial growth, driven by applications in drug discovery, clinical diagnostics, and proteomics [3] [4].
Key Principles and Comparative Advantages
Fundamental Mechanism of Separation
The effectiveness of electrophoresis is governed by the equation for electrophoretic mobility (μ): μ = v/E = q/f Where:
- v is the velocity of the molecule.
- E is the electric field strength.
- q is the net charge of the molecule.
- f is the frictional coefficient [2].
For proteins, which have varying intrinsic charges, the sample is treated with sodium dodecyl sulfate (SDS), a denaturing detergent. SDS binds to proteins and confers a uniform negative charge-to-mass ratio. This, combined with a reducing agent that breaks disulfide bonds, ensures that separation occurs almost exclusively based on molecular weight [2]. In the vertical apparatus, a cathode is in the top chamber and an anode in the bottom chamber. When current is applied, molecules migrate from the cathode through the gel to the anode [1].
Vertical vs. Horizontal Gel Electrophoresis
The choice between vertical and horizontal systems depends on the experimental goal. The table below summarizes their key differences.
Table 1: Comparison between Vertical and Horizontal Gel Electrophoresis Systems
| Feature | Vertical Gel Electrophoresis | Horizontal Gel Electrophoresis |
|---|---|---|
| Gel Orientation & Buffer System | Vertical gel; discontinuous buffer with separate top and bottom chambers [1]. | Horizontal gel submerged in a continuous, single buffer chamber [1]. |
| Gel Matrix | Polyacrylamide [1] [2]. | Agarose [1]. |
| Pore Size | Small, adjustable pores (down to ~200 nm) [1]. | Larger pores (up to ~500 nm) [1]. |
| Primary Applications | Separation of proteins (SDS-PAGE) and high-resolution nucleic acid analysis (e.g., sequencing) [1] [2]. | Standard separation of DNA and RNA fragments [1]. |
| Key Advantage | Superior resolution for separating molecules of similar size [1]. | Simplicity of use and ability to run multiple gels simultaneously [1]. |
The vertical system's design prevents exposure to atmospheric oxygen, which is critical for the polymerization of polyacrylamide gels [1]. Furthermore, the control over voltage gradients as buffer flows through the gel from the top to the bottom chamber enables more effective separation and enhanced resolution [1].
The Scientist's Toolkit: Essential Reagents and Equipment
Successful vertical gel electrophoresis requires a set of specific reagents and instruments. The following table details the core components of a standard workflow.
Table 2: Essential Research Reagent Solutions and Equipment for Vertical Gel Electrophoresis
| Item | Function & Importance |
|---|---|
| Polyacrylamide | A synthetic polymer that forms the gel matrix. Its uniform, small pore size is essential for high-resolution separation of proteins and small nucleic acids [2] [5]. |
| SDS (Sodium Dodecyl Sulfate) | An ionic detergent that denatures proteins and imparts a uniform negative charge, ensuring separation is based on molecular weight rather than native charge [2]. |
| Tris-based Buffers (Running & Stacking) | Provides the necessary ions to conduct current and maintains a stable pH. The discontinuous system (different pH in stacking and resolving gels) concentrates samples into sharp bands before separation [2]. |
| Reducing Agents (e.g., DTT, β-mercaptoethanol) | Breaks disulfide bonds in proteins, ensuring complete denaturation and linearization for accurate molecular weight determination [2]. |
| Protein Molecular Weight Ladder | A mixture of proteins of known sizes run alongside samples to allow estimation of the molecular weight of unknown proteins [2]. |
| Vertical Electrophoresis Unit & Power Supply | The core apparatus that holds the gel vertically between two buffer chambers and applies a controlled electrical field. A capable power supply is needed to provide constant voltage, current, or power [6]. |
| Staining Solutions (e.g., Coomassie Blue, SYPRO Ruby) | Used to visualize separated protein bands after the run. Different stains offer varying levels of sensitivity and detection limits [2]. |
Technical Specifications of a Standard System
Modern vertical electrophoresis systems are designed for versatility, throughput, and safety. The specifications of the Labtron LVES-A12 model illustrate a typical setup:
- Gel Dimensions: 82 × 88 mm (W × L)
- Throughput: Can run 1 to 4 gels simultaneously, accommodating 11 to 60 samples total [6].
- Buffer Volume: Uses 1000 ml of buffer, which provides a cooling effect and stable pH during the run [6].
- Power Supply Capabilities: Typically operates within ranges of 5–300 V, 1–400 mA, and 1–120 W, with safety features like auto-switch-off and short-circuit detection [6].
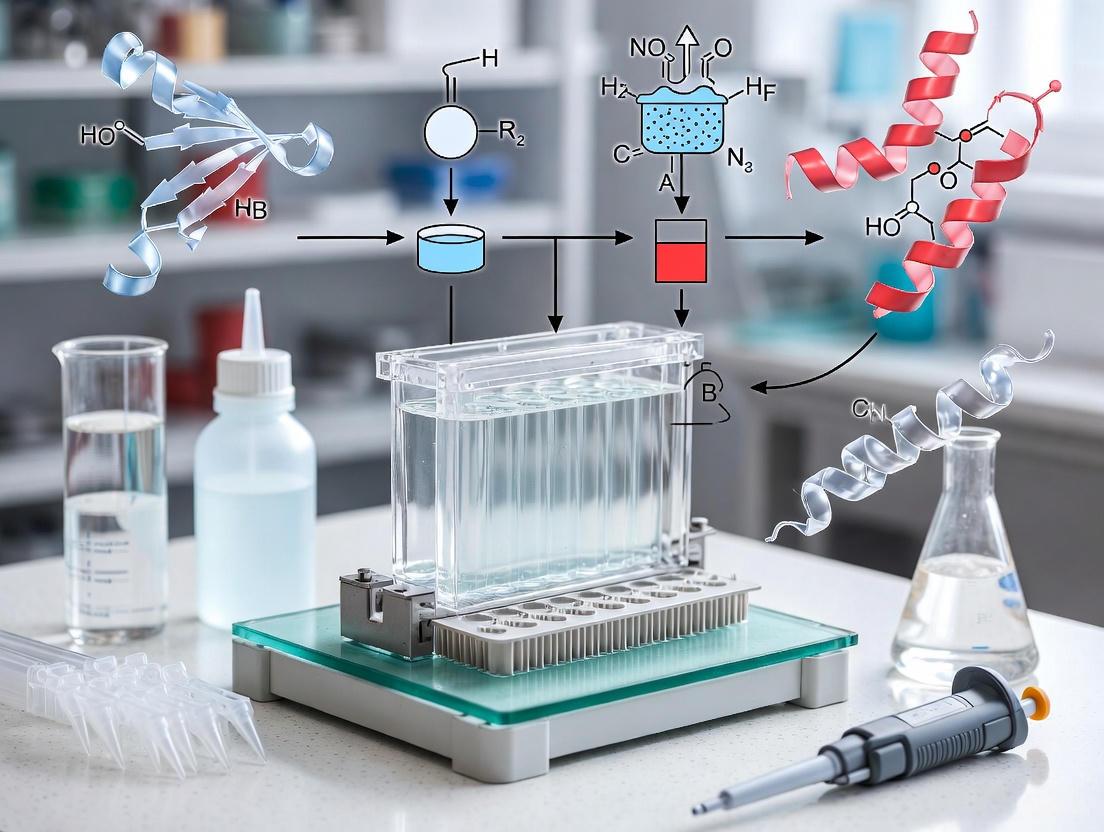
Experimental Protocol: Casting and Running a Vertical Protein Gel (SDS-PAGE)
The following workflow details the primary steps for preparing and performing SDS-PAGE (Sodium Dodecyl Sulfate PolyAcrylamide Gel Electrophoresis), the most common application of vertical gel electrophoresis.
Sample Preparation
- Dilution: Mix the protein sample with an appropriate volume of SDS-PAGE sample buffer. A typical 2X or 5X buffer contains SDS, a reducing agent (like DTT), glycerol, and a tracking dye.
- Denaturation: Heat the mixture at 95–100°C for 5–10 minutes. This heat-denatures the proteins, allowing SDS to bind uniformly and linearize the polypeptide chains.
Gel Casting
- Assemble Cassette: Secure clean glass plates with spacers in the casting frame to create a leak-proof cassette.
- Prepare Resolving Gel: Mix the components for the resolving (or separating) gel. A standard recipe includes acrylamide/bis-acrylamide, a Tris buffer (pH ~8.8), SDS, ammonium persulfate (APS, the initiator), and TEMED (the catalyst).
- Pour Resolving Gel: Pipette the resolving gel solution into the cassette, leaving space for the stacking gel. Carefully layer a few millimeters of isopropanol or water-saturated butanol on top to create a flat, even interface and exclude oxygen during polymerization. Allow it to polymerize completely (typically 15–30 minutes).
- Prepare and Pour Stacking Gel: Once set, pour off the alcohol layer. Mix and pour the stacking gel solution (lower acrylamide concentration, Tris buffer pH ~6.8) on top of the resolving gel. Immediately insert a clean comb, avoiding bubbles. Allow it to polymerize.
Apparatus Setup and Electrophoresis Run
- Mount Gel: Once polymerized, remove the comb and casting frame. Mount the gel cassette into the vertical electrophoresis tank according to the manufacturer's instructions (e.g., Labtron LVES-A12) [6].
- Fill Buffer Chambers: Fill the inner (top) and outer (bottom) chambers with the appropriate running buffer (e.g., Tris-Glycine-SDS buffer).
- Load Samples: Using a micro-pipette, load equal amounts of prepared protein samples and a protein molecular weight ladder into the wells.
- Run: Connect the unit to a power supply. Apply a constant voltage, typically 80-150 V. The run should continue until the tracking dye front has migrated to the bottom of the gel. Higher voltages reduce run time but may cause band smiling or overheating.
Visualization and Analysis
- Staining: After the run, carefully open the cassette and remove the gel. Place the gel in a staining solution (e.g., Coomassie Brilliant Blue) to visualize the protein bands. Destain the gel in a methanol/acetic acid solution to remove background stain.
- Imaging and Sizing: Capture an image of the gel using a documentation system. Estimate the molecular weight of unknown proteins by comparing their migration distance to the logarithmic curve generated by the protein ladder [2].
Applications and Future Outlook
Vertical gel electrophoresis, particularly SDS-PAGE, is a foundational technique with critical applications. It is routinely used for Western blotting, assessing protein purity, analyzing protein expression, and vaccine and drug discovery [2] [6]. The global electrophoresis market, valued at USD 2,477.5 million in 2025, is projected to grow at a CAGR of 4.1% through 2035, underscoring its enduring importance [4].
Future trends point toward greater automation, integration of AI-driven data analysis, and the development of miniaturized, high-throughput systems to improve efficiency and reproducibility [3] [4]. Furthermore, a growing emphasis on sustainability is driving the adoption of eco-friendly gel alternatives and biodegradable materials [4]. Despite these advancements, the core principles of vertical gel electrophoresis will remain a cornerstone of biomolecular separation in research and diagnostics.
Key Differences Between Vertical and Horizontal Gel Systems
Gel electrophoresis is a foundational technique in molecular biology and proteomics, enabling the separation of macromolecules like proteins and nucleic acids based on size and charge. The choice between a vertical and horizontal gel system is fundamental and is dictated by the specific experimental goals, as each configuration offers distinct advantages for different applications. This application note details the key differences between these systems, with a particular focus on the methodology for casting and running protein gels in a vertical electrophoresis apparatus, a critical skill for research in drug development and life sciences.
Core Differences Between Vertical and Horizontal Systems
The orientation of the gel and its accompanying buffer system constitutes the primary physical difference between the two setups, which in turn dictates the type of gel matrix used and its optimal applications [7].
Horizontal Gel Electrophoresis features a gel cast horizontally and submerged entirely in a continuous running buffer within a single chamber [8] [9]. This setup is almost exclusively used with agarose gel, a polysaccharide derived from seaweed [10]. The pores of agarose gels are relatively large, typically between 100 to 500 nm in diameter, making them ideal for separating large molecules like nucleic acids [8]. However, agarose cannot be used in a vertical format as it requires complete submersion in buffer, and acrylamide polymerization is inhibited by exposure to oxygen in an open horizontal tank [8] [7].
Vertical Gel Electrophoresis employs a gel cast vertically between two glass plates [11]. This system uses a discontinuous buffer system, with separate upper and lower chambers containing the cathode and anode, respectively [8] [7]. The buffer flows only through the gel, which allows for precise control of voltage gradients and results in superior resolution [8] [9]. This configuration is necessary for polyacrylamide gels, which have much smaller and more uniform pores (10–200 nm in diameter) and are the matrix of choice for separating proteins and small nucleic acids with high resolution [8] [11]. The vertical setup protects the oxygen-sensitive acrylamide polymerization process from air [7].
Table 1: Comparative Overview of Horizontal and Vertical Gel Electrophoresis Systems
| Feature | Horizontal Gel System | Vertical Gel System |
|---|---|---|
| Gel Orientation | Horizontal, submerged in buffer [7] | Vertical, between glass plates [11] |
| Buffer System | Continuous [8] | Discontinuous [8] [7] |
| Typical Gel Matrix | Agarose [8] | Polyacrylamide (PAGE) [8] [11] |
| Gel Pore Size | 100–500 nm [8] | 10–200 nm [8] |
| Primary Applications | Separation of DNA and RNA fragments [8] [7] | Separation of proteins and small nucleic acids [8] [11] |
| Key Advantage | Simplicity of use; access to gel during run [8] | High resolution and separation power [8] [9] |
Applications and Selection Guidelines
The choice between a horizontal and vertical system is primarily determined by the target molecule and the required resolution.
Horizontal Systems for Nucleic Acids: Horizontal agarose gel electrophoresis is the standard method for separating DNA and RNA fragments [8] [12]. Its simplicity and the ability to easily excise DNA bands from the gel make it ideal for routine analysis, such as PCR product verification, DNA quantification, and restriction digestion analysis [10]. The separation range can be tuned by adjusting the agarose concentration, as detailed in Table 2.
Vertical Systems for Proteins: Vertical polyacrylamide gel electrophoresis is the preferred method for protein analysis [8] [11]. The smaller pore size of polyacrylamide provides the high resolution needed to separate proteins, which are generally smaller than DNA molecules [8]. The most common form is SDS-PAGE (sodium dodecyl sulfate–polyacrylamide gel electrophoresis), which denatures proteins and confers a uniform negative charge, allowing separation based almost exclusively on molecular weight [12] [11]. This is indispensable for techniques like western blotting and proteomic analysis.
High-Resolution Nucleic Acid Applications: While horizontal gels are standard for DNA, vertical polyacrylamide systems are used for nucleic acid applications requiring single-base-pair resolution, such as dye-termination sequencing or the analysis of small DNA/RNA fragments [8] [10].
Table 2: Agarose Gel Percentage and DNA Separation Range
| Agarose Gel Percentage (%) | Efficient Separation Range (Base Pairs) |
|---|---|
| 0.5 | 2,000 – 50,000 [10] |
| 0.7 | 800 – 12,000 [10] |
| 1.0 | 400 – 8,000 [10] |
| 1.5 | 200 – 3,000 [10] |
| 2.0 | 100 – 2,000 [10] |
| 4.0 | 10 – 500 [10] |
Table 3: Polyacrylamide Gel Percentage and Protein Separation Range
| Polyacrylamide Gel Percentage (%) | Recommended Protein Separation Range (kDa)* |
|---|---|
| 8 | 30 – 200 [11] |
| 10 | 20 – 100 [11] |
| 12 | 10 – 60 [11] |
| 15 | < 50 [11] |
Note: These ranges are general guidelines for SDS-PAGE. Gradient gels (e.g., 4-20%) provide a broad separation range in a single gel [11].
Protocol: Casting and Running a Denaturing SDS-Polyacrylamide Gel for Vertical Electrophoresis
This protocol details the steps for preparing and running a protein gel using a vertical electrophoresis system, specifically for SDS-PAGE.
The following diagram illustrates the complete workflow for protein gel electrophoresis, from sample preparation to visualization.
Materials and Reagents
Table 4: Research Reagent Solutions for SDS-PAGE
| Reagent/Material | Function |
|---|---|
| Acrylamide/Bis-acrylamide | Forms the cross-linked polyacrylamide gel matrix that acts as a molecular sieve [11]. |
| Ammonium Persulfate (APS) | Initiator of the free-radical polymerization reaction to form the gel [11]. |
| TEMED (N,N,N',N'-Tetramethylethylenediamine) | Catalyst that accelerates the polymerization reaction initiated by APS [11]. |
| SDS (Sodium Dodecyl Sulfate) | Anionic detergent that denatures proteins and confers a uniform negative charge [12] [11]. |
| Tris-HCl Buffers | Provides the appropriate pH for gel polymerization (resolving gel pH ~8.8, stacking gel pH ~6.8) and running conditions [11]. |
| Tris-Glycine-SDS Running Buffer | Conducts current and maintains pH during electrophoresis [12]. |
| Protein Molecular Weight Marker | Provides reference bands of known size for estimating the molecular weight of sample proteins [11]. |
| Coomassie Blue Stain | Dye that binds to proteins, allowing visualization of separated bands as dark blue bands on a clear background after destaining [12]. |
Step-by-Step Methodology
Step 1: Prepare the Gel Cassette
- Assemble the gel cassette according to the manufacturer's instructions, typically by sealing two glass plates with spacers in between to form a thin chamber [11] [13].
Step 2: Cast the Resolving Gel
- Prepare the resolving gel solution. A typical recipe for a 10% mini gel might include 7.5 mL of 40% acrylamide, 3.9 mL of 1% bisacrylamide, 7.5 mL of 1.5 M Tris-HCl (pH 8.8), water to 30 mL, and initiators 0.3 mL of 10% APS and 0.03 mL TEMED [11].
- Pour the mixture between the glass plates, leaving space for the stacking gel.
- Carefully overlay the gel solution with isopropanol or water to create a flat, even interface.
- Allow the gel to polymerize completely (approximately 15-30 minutes) [11].
Step 3: Cast the Stacking Gel
- Pour off the overlay and prepare the stacking gel solution, which has a lower acrylamide concentration (e.g., 4-5%) and a lower pH (e.g., Tris-HCl, pH 6.8) [11].
- Add APS and TEMED to the stacking gel solution, pour it on top of the polymerized resolving gel, and immediately insert a well comb.
- Allow the stacking gel to polymerize fully [11].
Step 4: Prepare Protein Samples
- Mix protein samples with SDS-PAGE loading buffer containing SDS and a reducing agent (like DTT or β-mercaptoethanol) [12] [11].
- Heat the samples at 70–100°C for 3-5 minutes to fully denature the proteins [11].
Step 5: Apparatus Setup and Sample Loading
- Mount the polymerized gel cassette into the vertical electrophoresis chamber [13].
- Fill the upper and lower chambers with Tris-Glycine-SDS running buffer [12] [11].
- Carefully remove the well comb and load the prepared samples and protein molecular weight marker into the wells using a micropipette [13].
Step 6: Electrophoretic Run
- Connect the chamber to a power supply and apply a constant voltage. A typical setting for a mini-gel is 100-150 V [13].
- Run the gel until the dye front (from the loading buffer) migrates to the bottom of the gel.
Step 7: Protein Visualization
- After electrophoresis, carefully disassemble the cassette and remove the gel.
- Stain the gel with Coomassie Blue or another protein stain to visualize the separated bands [12] [13].
- For Coomassie, the gel is typically stained for 30-60 minutes and then destained in a methanol-acetic acid solution to remove background stain until clear bands are visible against a clear background [12].
The Scientist's Toolkit: Essential Materials for Vertical Gel Electrophoresis
Table 5: Essential Equipment and Materials for Vertical Gel Electrophoresis
| Item | Function |
|---|---|
| Vertical Electrophoresis Unit | Apparatus that holds the gel cassette and provides separate upper and lower buffer chambers with electrodes [7] [13]. |
| Glass Plates & Spacers | Form the cassette for casting thin, uniform polyacrylamide gels [11]. |
| Power Supply | Provides the electrical current to drive the movement of molecules through the gel [13]. |
| Pre-cast Gels or Gel Casting System | Pre-cast gels save time and ensure consistency; hand-casting systems offer flexibility in gel formulation [13]. |
| Micropipette and Gel-Loading Tips | For accurate loading of samples into the small wells of the polyacrylamide gel [13]. |
| Digital Imager or UV Transilluminator | For documenting and analyzing the stained protein or nucleic acid bands [13]. |
The decision to use a horizontal or vertical gel electrophoresis system is fundamental to experimental success. Horizontal agarose gel systems are perfectly suited for the routine separation of nucleic acids, offering simplicity and robustness. In contrast, vertical polyacrylamide gel systems are the cornerstone of protein analysis, providing the high resolution necessary for techniques like SDS-PAGE and western blotting. Mastering the protocol for casting and running protein gels in a vertical system, as outlined in this application note, is an essential skill for researchers engaged in biomarker discovery, drug target validation, and other proteomic-driven endeavors in life sciences and drug development.
Polyacrylamide gel electrophoresis (PAGE) is a fundamental laboratory technique for separating protein molecules based on their physicochemical properties using an electrical field and a polyacrylamide gel matrix [11]. This method serves as a critical analytical tool in proteomic research, enabling scientists to characterize protein samples by size, charge, or isoelectric point. The polyacrylamide gel matrix creates a porous network that acts as a molecular sieve, differentially retarding the migration of proteins based on their size and structure [11].
When an electrical current is applied, charged protein molecules migrate through the gel matrix toward the electrode of opposite charge. The rate of migration depends on several factors including field strength, the molecule's net charge, molecular size and shape, ionic strength of the buffer, and the physical properties of the matrix itself such as viscosity and pore size [11]. The versatility of polyacrylamide gels stems from the ability to precisely control pore size by adjusting the concentration of acrylamide and bis-acrylamide, allowing researchers to optimize separation for specific protein size ranges [11].
Fundamental Principles of Protein Separation
Gel Matrix Composition and Pore Formation
Polyacrylamide gels are formed through the polymerization of acrylamide monomers cross-linked with bis-acrylamide (N,N'-methylenebisacrylamide) [11]. This polymerization creates a three-dimensional network with tunable pore sizes typically ranging between 20-150 nanometers in diameter [10]. The pore size is inversely related to the polyacrylamide percentage - lower percentage gels have larger pores suitable for separating high molecular weight proteins, while higher percentage gels with smaller pores provide better resolution for lower molecular weight proteins [11].
The polymerization reaction is initiated by ammonium persulfate (APS), which generates free radicals, and catalyzed by TEMED (N,N,N',N'-tetramethylethylenediamine) [11]. The ratio of bis-acrylamide to acrylamide, along with the total concentration of both components, determines the final pore size and mechanical rigidity of the gel matrix, which directly affects the resolution and separation range for proteins [11].
Modes of Separation: Denaturing vs. Native Conditions
Polyacrylamide gel electrophoresis can be performed under different conditions to achieve specific separation goals:
SDS-PAGE (Denaturing Conditions): In this most widely used form, the ionic detergent sodium dodecyl sulfate (SDS) denatures proteins and binds to polypeptides in a constant weight ratio (approximately 1.4g SDS:1g polypeptide) [11]. This process confers a uniform negative charge to all proteins, effectively neutralizing their intrinsic charges. Consequently, separation occurs primarily based on molecular mass rather than charge or structural features [11]. The addition of reducing agents like dithiothreitol (DTT) cleaves disulfide bonds, ensuring complete denaturation into polypeptide subunits [11].
Native-PAGE: Under non-denaturing conditions, proteins retain their native conformation, enzymatic activity, and subunit interactions [11]. Separation depends on the protein's intrinsic charge, size, and three-dimensional structure, making it valuable for studying protein complexes, quaternary structure, and functional analyses [11].
Two-Dimensional PAGE (2D-PAGE): This high-resolution technique combines two separation principles - isoelectric focusing (IEF) in the first dimension separates proteins according to their isoelectric point (pI), followed by SDS-PAGE in the second dimension which separates by molecular mass [11]. This method can resolve thousands of proteins simultaneously and is particularly valuable in proteomic research [14] [11].
Research Reagent Solutions: Essential Materials
Successful polyacrylamide gel electrophoresis requires specific reagents and materials, each serving a critical function in the separation process:
Table 1: Essential Reagents for Polyacrylamide Gel Electrophoresis
| Reagent/Material | Function | Application Notes |
|---|---|---|
| Acrylamide-Bis Solution | Forms the gel matrix; pore size determines separation range [11] | Typically used as 30% w/w solution at 37.5:1 or 29:1 acrylamide:bis ratio [15] |
| Tris Buffers | Maintains pH during electrophoresis; different pH for stacking (pH 6.8) and resolving (pH 8.8) gels [15] | Creates discontinuous buffer system for optimal resolution [11] |
| Ammonium Persulfate (APS) | Initiates polymerization of acrylamide and bis-acrylamide [11] | Prepared as 10% w/v solution; free radical generator [15] |
| TEMED | Catalyzes polymerization reaction by accelerating free radical production from APS [11] | Critical for controlling gel polymerization rate [15] |
| SDS (Sodium Dodecyl Sulfate) | Denatures proteins and confers uniform negative charge [11] | Enables separation primarily by molecular weight [11] |
| Protein Molecular Weight Markers | Provides size references for estimating molecular weights of unknown proteins [11] | Available in various size ranges; often include pre-stained or unstained options [11] |
Gel Formulation and Separation Optimization
Acrylamide Percentage and Protein Separation Range
The appropriate acrylamide percentage is critical for achieving optimal protein separation. The percentage should be selected based on the molecular weights of the target proteins:
Table 2: Recommended Acrylamide Percentages for Protein Separation by SDS-PAGE
| Protein Size Range (kDa) | Optimal Acrylamide Percentage | Separation Characteristics |
|---|---|---|
| 4-40 kDa | 20% | High percentage for small proteins; provides tight bands |
| 12-45 kDa | 15% | Moderate-high percentage for lower MW proteins |
| 10-70 kDa | 12.5% | Versatile mid-range percentage |
| 15-100 kDa | 10% | Standard percentage for common protein sizes |
| 25-200 kDa | 8% | Low percentage for high molecular weight proteins |
For proteins spanning a broad molecular weight range, gradient gels (e.g., 4-20%) provide superior resolution across multiple size classes [11]. These gels have a low percentage of polyacrylamide at the top and a high percentage at the bottom, creating a pore size gradient that enables sharper band focusing and simultaneous resolution of both large and small proteins [11].
Gel Casting Protocol
The following workflow outlines the complete process for casting and running polyacrylamide gels for protein separation:
Diagram 1: Protein Gel Electrophoresis Workflow
Detailed Gel Casting Methodology
Based on established protocols, the following steps ensure consistent, high-quality polyacrylamide gels [15]:
Gel Cassette Preparation: Clean glass plates with ethanol or methanol and assemble the casting apparatus according to manufacturer specifications. Ensure plates are properly aligned to prevent leakage.
Resolving Gel Preparation: Combine components in the following order for a standard 10% resolving gel (volumes for 4 mini-gels):
- 3.75 mL of 1.5 M Tris-HCl, pH 8.8
- 5.0 mL of 30% acrylamide solution (37.5:1 acrylamide:bis)
- 150 µL of 10% SDS
- 6.0 mL of distilled water
- Mix gently without introducing bubbles [15]
Polymerization Initiation and Casting: Add 75 µL of 10% ammonium persulfate and 7.5 µL TEMED. Mix gently and immediately pour the solution between the glass plates, leaving approximately 2.5 cm space for the stacking gel. Carefully overlay with isopropanol or water to create a flat interface. Allow polymerization for 30-45 minutes [15].
Stacking Gel Preparation: After polymerization, pour off the overlay and prepare the stacking gel mixture:
- 3.78 mL of 0.5 M Tris-HCl, pH 6.8
- 1.98 mL of 30% acrylamide solution
- 150 µL of 10% SDS
- 9.0 mL of distilled water
- Add 75 µL of 10% APS and 15 µL TEMED, then mix [15]
Complete Gel Assembly: Pour the stacking gel mixture onto the polymerized resolving gel, immediately insert a clean comb without introducing bubbles, and allow to polymerize for 20-30 minutes. Carefully remove the comb and rinse wells with running buffer before use [15].
Electrophoresis Conditions and Technical Considerations
Buffer Systems and Running Conditions
The discontinuous buffer system using Tris-glycine buffers with SDS is the most common for SDS-PAGE [11]. The running buffer typically contains 25 mM Tris, 192 mM glycine, and 0.1% SDS, pH ~8.3 [11]. Electrophoresis is typically performed at constant voltage (100-200V for mini-gels) for 45-90 minutes, depending on gel thickness and percentage [13]. Thinner gels (0.75 mm) run faster than thicker gels (1.5 mm), but thicker gels accommodate larger sample volumes [15].
Table 3: Sample Volume Capacity Based on Gel Thickness and Well Number
| Number of Wells | 0.75-mm Thick Gel | 1.00-mm Thick Gel | 1.50-mm Thick Gel |
|---|---|---|---|
| 5 wells | 70 µL | 105 µL | 166 µL |
| 10 wells | 33 µL | 44 µL | 66 µL |
| 15 wells | 20 µL | 36 µL | 40 µL |
Troubleshooting Common Issues
Several technical challenges may arise during gel casting and electrophoresis:
- Leaky wells: Often caused by improper comb insertion or damaged combs. Use intact combs and ensure straight vertical insertion and removal [15].
- Wavy or distorted bands: May result from uneven polymerization, buffer concentration errors, or excessive heating during electrophoresis. Ensure proper mixing of gel components and use appropriate voltage [13].
- Poor resolution: Can occur from incorrect gel percentage, insufficient polymerization time, or improper buffer pH. Verify reagent concentrations and follow polymerization times precisely [11] [15].
- Gel detachment from plates: Often due to improperly cleaned plates or incomplete polymerization. Thoroughly clean plates with alcohol before casting and ensure complete polymerization before use [15].
Advanced Applications: Two-Dimensional Gel Electrophoresis
Two-dimensional PAGE (2D-PAGE) provides the highest resolution for protein analysis, capable of resolving thousands of proteins simultaneously [11]. The technique combines isoelectric focusing (IEF) in the first dimension with SDS-PAGE in the second dimension [14] [11].
Critical Factors for 2D-PAGE Reproducibility
Minimizing technical variability is essential for reliable 2D-PAGE results. Key considerations include:
- Sample Preparation: Optimal solubilization buffers contain chaotropes (urea, thiourea), surfactants (CHAPS, SB 3-10), reducing agents (DTT), and protease inhibitors [14]. Studies have identified that a buffer containing 5 M urea, 2 M thiourea, 2% CHAPS, 2% SB 3-10, ampholytes, DTT, and protease inhibitors yields high spot detection with low variability [14].
- Isoelectric Focusing: Using immobilized pH gradient (IPG) strips provides more reproducible first-dimension separation compared to carrier ampholyte gradients [11].
- Spot Detection and Analysis: Fluorescent stains like Sypro Ruby offer wide linear dynamic ranges for quantification [14]. Software-assisted analysis (e.g., PDQuest) enables matching and quantification of protein spots across multiple gels [14].
Variability in 2D-PAGE differs across isoelectric point ranges, with specific buffer combinations showing optimal performance in different pH regions [14]. For example, samples homogenized in specific buffers and focused in appropriate focusing buffers demonstrate significantly different coefficients of variation across the pI spectrum [14].
Polyacrylamide gel electrophoresis remains an indispensable technique in protein research, providing robust, reproducible separation of protein mixtures. The understanding of gel matrix composition, proper casting techniques, and optimal running conditions is fundamental to obtaining reliable results. The continued refinement of PAGE methodologies, particularly in two-dimensional electrophoresis, maintains its relevance in modern proteomic research and drug development. By mastering both the theoretical principles and practical implementation of polyacrylamide gel electrophoresis, researchers can ensure high-quality protein separation as a foundation for subsequent analytical techniques including western blotting, mass spectrometry, and functional protein characterization.
In vertical protein gel electrophoresis, the polyacrylamide gel serves as the core separation matrix, a porous medium that acts as a molecular sieve to resolve protein mixtures based on size. This matrix is formed through the copolymerization of acrylamide and bisacrylamide, creating a three-dimensional network whose pore size determines its resolving power [11] [16]. The polymerization reaction is a critical, vinyl-addition process initiated by free radicals, and mastering it is fundamental to producing gels with consistent, reliable properties for protein analysis [17]. The ability to customize the gel's porosity by adjusting the concentrations and ratios of these core components makes this system exceptionally versatile for proteomic research, western blotting, and protein characterization in drug development [11] [18].
The Core Chemical Components
Acrylamide and Bisacrylamide: The Building Blocks
The gel matrix is built from two primary monomers:
- Acrylamide: The primary monomeric unit that forms the backbone of the polymer chains. A 30% (w/v) solution of acrylamide is typically the stock solution used for gel preparation [15].
- N,N'-Methylenebisacrylamide (Bisacrylamide): The cross-linking agent that covalently bridges adjacent polyacrylamide chains, forming the porous network. The ratio of bisacrylamide to acrylamide is typically about 1:37.5 in a standard 30% stock solution [11] [15].
The pore size of the resulting gel is inversely related to the total percentage of acrylamide (the sum of acrylamide and bisacrylamide). A higher percentage creates a denser matrix with smaller pores, ideal for resolving lower molecular weight proteins, while a lower percentage creates larger pores for better separation of high molecular weight proteins [11] [18].
Table 1: Guide to Polyacrylamide Gel Percentage for Protein Separation
| Percentage of Acrylamide in Resolving Gel | Effective Separation Range (kDa) |
|---|---|
| 8% | 25 - 200 |
| 10% | 15 - 100 |
| 12% | 10 - 70 |
| 15% | 12 - 45 |
Polymerization Initiators and Catalysts
The conversion from liquid monomer solution to solid gel matrix is driven by a chemical reaction requiring an initiator and a catalyst.
- Ammonium Persulfate (APS): The initiator that provides the free radicals to begin the polymerization chain reaction [11] [16].
- N,N,N',N'-Tetramethylethylenediamine (TEMED): A catalyst that stabilizes the free radicals generated by APS and greatly accelerates the polymerization reaction. TEMED is always added last to the gel solution immediately before casting [11] [16].
Safety Considerations
Acrylamide and bisacrylamide are potent neurotoxins and are suspected carcinogens. Strict safety protocols must be followed when handling these chemicals in powder or liquid form [16]. Always wear appropriate personal protective equipment, including powder-free nitrile gloves, and perform all weighing and handling procedures within a certified fume hood to prevent inhalation or skin contact [16].
The Polymerization Process
Traditional Chemical Polymerization Mechanism
The standard method for gel formation relies on a free-radical chain reaction initiated by APS and TEMED. This process consists of three key stages [17]:
- Initiation: TEMED catalyzes the decomposition of APS, generating free sulfate radicals.
- Chain Propagation: These sulfate radicals attack the vinyl groups of acrylamide monomers, converting them into free radicals. These activated monomers then react with other acrylamide and bisacrylamide molecules, leading to the elongation of polymer chains and their cross-linking.
- Termination: The polymerization cascade stops when the free radicals are consumed, either by reacting with impurities, oxygen (an inhibitor), or through mutual termination of two radical chains [17].
This reaction is most efficient in a basic pH environment (pH 8-9) [17]. The presence of oxygen can inhibit polymerization; therefore, the gel solution is often degassed or prepared without vigorous mixing to minimize oxygen incorporation [17].
Advanced Photocatalytic Polymerization (TIPPAGE)
An innovative alternative to chemical initiation is the Titanium Dioxide Photocatalytic Polymerization of Acrylamide for Gel Electrophoresis (TIPPAGE) [17]. This method uses ultraviolet light to excite titanium dioxide (TiO₂) nanoparticles suspended in the gel solution. The excited TiO₂ generates highly reactive hydroxyl radicals (·OH) from water, which then initiate the polymerization of acrylamide and bisacrylamide [17].
Key advantages of TIPPAGE:
- Efficiency in Acidic Conditions: Unlike APS/TEMED, TIPPAGE works effectively in acidic pH, enabling easier preparation of gels like Triton-Acid-Urea (TAU) gels used for separating basic proteins such as histones [17].
- No Degassing Required: The photocatalytic reaction consumes oxygen, eliminating the need for degassing the gel solution [17].
- Enhanced Mechanical Properties: The incorporation of TiO₂ nanoparticles can improve the gel's mechanical strength [17].
Standard Protocol for Preparing a Discontinuous SDS-PAGE Gel
This protocol details the preparation of a standard Tris-Glycine SDS-PAGE gel for vertical electrophoresis.
Reagent Preparation
Table 2: Research Reagent Solutions for Gel Casting
| Reagent/Solution | Composition and Function |
|---|---|
| Acrylamide/Bis Solution | 30% (w/v) stock, typically at a 37.5:1 ratio (Acrylamide:Bis). Primary building blocks of the gel matrix [15]. |
| Resolving Gel Buffer | 1.5 M Tris-HCl, pH 8.8. Creates the high-pH environment for optimal protein separation in the resolving gel [16]. |
| Stacking Gel Buffer | 0.5 M Tris-HCl, pH 6.8. The lower pH is critical for the stacking effect to concentrate protein samples [16]. |
| 10% SDS (w/v) | Sodium Dodecyl Sulfate. Anionic detergent added to both gel and running buffer to ensure uniform protein charge [11] [16]. |
| 10% APS (w/v) | Ammonium Persulfate. Free radical initiator for polymerization. Prepared fresh in water [11] [16]. |
| TEMED | Catalyst for polymerization. Added last due to rapid initiation of the reaction [11] [16]. |
| Running Buffer (10X) | 250 mM Tris, 1.92 M Glycine, 1% (w/v) SDS. Diluted for use; provides ions to conduct current and maintains pH for migration [16]. |
| Isopropanol (or water) | Used to overlay the resolving gel to exclude oxygen and ensure a flat, even polymerization surface [15]. |
Step-by-Step Gel Casting Protocol
Step 1: Assemble Glass Plates Thoroughly clean and dry the short and tall glass plates, along with spacers. Assemble the cassette securely on the casting stand, ensuring all edges are properly sealed to prevent leaks [15].
Step 2: Prepare and Cast the Resolving Gel For a 10% resolving gel, combine the following in a beaker: 3.4 mL of 30% acrylamide/bis solution, 2.6 mL of 1.5 M Tris-HCl (pH 8.8), 100 µL of 10% SDS, and 3.8 mL of water. Mix gently. Just before pouring, add 75 µL of 10% APS and 7.5 µL of TEMED, and mix again. Immediately pour the solution into the gel cassette, leaving space for the stacking gel (~2.5 cm from the top). Carefully overlay with isopropanol or water to create a flat interface [16] [15].
Step 3: Polymerize the Stacking Gel After the resolving gel has polymerized (20-30 minutes), pour off the overlay. Prepare the stacking gel solution by combining 1.98 mL of 30% acrylamide/bis, 3.78 mL of 0.5 M Tris-HCl (pH 6.8), 150 µL of 10% SDS, and 9 mL of water. Add 75 µL of 10% APS and 15 µL of TEMED, mix, and pour on top of the resolving gel. Immediately insert a clean comb without introducing air bubbles. Allow to polymerize for 20-30 minutes [16] [15].
Step 4: Final Preparation for Electrophoresis Once polymerized, carefully remove the comb and rinse the wells with deionized water or running buffer to remove any unpolymerized acrylamide. The gel is now ready for sample loading and electrophoresis. Cast gels can be stored wrapped in moist tissue paper and sealed in plastic film at 4°C for several weeks [15].
Troubleshooting the Polymerization Process
Several common issues can arise during gel casting, often traceable to specific causes [18].
- Slow or Failed Polymerization: Caused by old or degraded APS, inhibited TEMED, or the presence of oxygen. Always use fresh APS and TEMED and ensure the overlay step is performed correctly [18] [17].
- Wavy or Uneven Gel Surfaces: Often due to improper or uneven overlay of the resolving gel, or failure to keep the casting apparatus level during polymerization [15].
- Bubbles in the Gel Matrix: Caused by pouring the gel too vigorously or trapping air when inserting the comb. Pour slowly along an angle to minimize bubbles [15].
Choosing the Right Buffer System for Your Experiment
In vertical protein gel electrophoresis, particularly SDS-PAGE (Sodium Dodecyl Sulfate–Polyacrylamide Gel Electrophoresis), the buffer system is a foundational component that dictates the success of the separation. SDS-PAGE is a fundamental analytical method for protein characterization, enabling the separation, identification, and characterization of proteins across diverse products and research applications, including drug development [19]. This technique separates proteins primarily by their molecular mass by negating the effects of protein charge and shape [11].
The function of the buffer system extends beyond simply conducting current. It is designed to establish a specific ionic environment and pH gradient that ensures proteins are focused into sharp bands before they enter the resolving gel, thereby maximizing resolution [20]. The most common system for vertical SDS-PAGE is the discontinuous buffer system (or Ornstein-Davis system), which utilizes different ions in the gel and running buffer to achieve this stacking effect [20] [11]. Understanding and selecting the correct buffer is therefore not a mere preparatory step but a critical variable that directly impacts the accuracy, reliability, and reproducibility of experimental data.
Core Principles of the Discontinuous Buffer System
The discontinuous buffer system employs differences in gel composition, pH, and ion mobility to concentrate protein samples into narrow bands within the stacking gel before they begin separation in the resolving gel [20]. This process is orchestrated by three key components: the leading ion (usually chloride, Cl⁻), the trailing ion (glycine), and the common counter-ion (Tris) [20].
In the stacking gel (pH ~6.8), glycine from the running buffer (pH ~8.3) exists predominantly as a zwitterion with a net charge near zero. This causes glycine to migrate slowly. In contrast, the Cl⁻ ions from the gel buffer have a high electrophoretic mobility and move ahead rapidly. The proteins, whose mobility is intermediate due to their SDS-derived negative charge, are compressed into a sharp zone between these two ion fronts [20]. When this protein stack reaches the resolving gel (pH ~8.8), the environment changes dramatically. The higher pH causes glycine to gain negative charges, transforming into glycinate ions that migrate faster and overtake the proteins. The proteins, now deposited as a tight band at the top of the resolving gel, are slowed by the higher concentration of polyacrylamide and begin to separate based solely on molecular weight [20] [11].
Table 1: Key Components of a Standard Tris-Glycine-SDS Discontinuous Buffer System
| Component | Location | Primary Function | Typical Concentration/Value |
|---|---|---|---|
| Tris-HCl | Stacking Gel Buffer | Maintains pH at 6.8; provides Cl⁻ as leading ions [20]. | 0.125 M, pH 6.8 [11] |
| Tris-HCl | Resolving Gel Buffer | Maintains pH at 8.8 for proper glycine charge transition [20]. | 0.375 M, pH 8.8 [11] |
| Tris, Glycine, SDS | Running Buffer | Conducts current; provides trailing ion (glycine) and keeps proteins denatured [20]. | 25 mM Tris, 192 mM glycine, 0.1% SDS, pH 8.3 [20] |
| Glycine | Running Buffer | Functions as the trailing ion in the stacking phase [20]. | 192 mM [20] |
Diagram 1: Ion Dynamics in Discontinuous SDS-PAGE. This workflow illustrates the transition of glycine ions and the stacking and separation of proteins as they migrate through the different gel layers.
Selecting and Optimizing Your Buffer
Buffer Selection Criteria
Choosing the appropriate buffer involves considering several factors to ensure compatibility with your experimental goals:
- pH and pKa: The buffer must have a pKa within 1 pH unit of the desired operating pH for optimal buffering capacity. For Tris-based systems, the pKa of 8.1 at 25°C makes it ideal for the physiological pH range (7-9) relevant to most biological samples [20].
- Ionic Strength and Conductivity: High ionic strength can generate excessive heat, causing protein denaturation or gel distortion. The Tris-glycine system offers a balance of sufficient conductivity without excessive Joule heating under standard running conditions [21].
- Sample Compatibility: The buffer should not interfere with the proteins of interest. SDS, an anionic detergent, is a mandatory component for protein denaturation and uniform charge masking [19] [11].
- Downstream Applications: If proteins will be extracted for mass spectrometry or other analyses, buffer components should be easy to remove. Tris-glycine is widely compatible, but specialized buffers may be required for specific applications like phosphoprotein analysis.
Alternative Buffer Systems
While Tris-glycine is the workhorse for standard SDS-PAGE, other systems offer advantages for specific needs. Tricine-SDS-PAGE is preferred for resolving very low molecular weight proteins (< 10 kDa) more effectively than Tris-glycine systems [19]. Bis-Tris buffers offer superior stability and can be used at lower voltages, and are often preferred when minimizing protein modifications like deamidation or for running pre-cast gels over extended periods. Phosphate buffers are versatile and biochemically compatible, often used in capillary gel electrophoresis [22] [21].
Table 2: Common Buffer Systems for Vertical Protein Gel Electrophoresis
| Buffer System | Optimal Separation Range | Key Features & Applications | Considerations |
|---|---|---|---|
| Tris-Glycine | 10 - 300 kDa | Standard for most proteins; well-characterized and simple to prepare [19] [11]. | Limited resolution for very small proteins (<10 kDa). |
| Tris-Tricine | 1 - 100 kDa | Superior resolution of low molecular weight polypeptides and proteins under 30 kDa [19]. | More complex and costly recipe than Tris-glycine. |
| Bis-Tris | 10 - 300 kDa | Chemically stable; allows gels to be cast in advance; reduces gel artifacts; ideal for long runs and pre-cast gels. | Requires proprietary recipes and specific running buffers. |
| Phosphate | Varies with setup | High biochemical compatibility; used in capillary gel electrophoresis and other specialized formats [21]. | Less common for traditional slab gel SDS-PAGE. |
Detailed Protocol: Casting and Running a Tris-Glycine SDS-PAGE Gel
Reagent Preparation
The Scientist's Toolkit: Essential Materials and Reagents
- Acrylamide/Bis-acrylamide Solution (30-40%): The monomer solution for forming the gel matrix. Neurotoxin in liquid and powder form—always wear appropriate personal protective equipment (PPE) [10] [11].
- Tris-HCl Buffer (1.5 M, pH 8.8): For the resolving gel.
- Tris-HCl Buffer (0.5 M, pH 6.8): For the stacking gel.
- SDS Solution (10% w/v): Anionic detergent for denaturing proteins and imparting uniform charge.
- Ammonium Persulfate (APS, 10% w/v): Polymerization initiator. Prepare fresh weekly or store aliquots at -20°C.
- TEMED (N,N,N',N'-Tetramethylethylenediamine): Catalyst for polymerization. Acrylamide will not polymerize efficiently without it [20] [11].
- Running Buffer (10X): 250 mM Tris, 1.92 M Glycine, 1% (w/v) SDS. Dilute to 1X with deionized water before use [20].
- Sample Loading Buffer (2X Laemmli Buffer): 125 mM Tris-HCl (pH 6.8), 4% SDS, 20% glycerol, 0.02% Bromophenol Blue. Add 10% β-mercaptoethanol (BME) or DTT immediately before use to reduce disulfide bonds [20].
Step-by-Step Gel Casting and Electrophoresis Protocol
Assemble Gel Cassette: Clean and dry the glass plates and spacers. Assemble the cassette according to the manufacturer's instructions to create a leak-proof seal [23].
Prepare and Pour the Resolving Gel:
- Choose the appropriate acrylamide percentage based on your target protein size (see Table 3).
- In a vacuum flask, mix the components for the resolving gel (e.g., for a 10% gel: 4.0 mL 40% acrylamide, 3.0 mL 1.5 M Tris-HCl pH 8.8, 4.9 mL H₂O, 0.1 mL 10% SDS, 0.1 mL 10% APS, and 0.01 mL TEMED). Swirl gently to mix. Avoid introducing bubbles. [11]
- Immediately pipette the resolving gel mixture into the assembled cassette, leaving space for the stacking gel (typically ~2 cm from the top).
- Carefully overlay the gel solution with isopropanol or water-saturated butanol to exclude oxygen and ensure a flat gel surface.
- Allow the gel to polymerize completely (20-30 minutes). A distinct schlieren line will appear at the gel-alcohol interface.
Prepare and Pour the Stacking Gel:
- After polymerization, pour off the overlay liquid and rinse the top of the gel with deionized water. Blot away any residual liquid with filter paper.
- Prepare the stacking gel mixture (e.g., 0.65 mL 40% acrylamide, 1.25 mL 0.5 M Tris-HCl pH 6.8, 3.05 mL H₂O, 0.05 mL 10% SDS, 0.05 mL 10% APS, and 0.005 mL TEMED).
- Pour the stacking gel solution directly onto the resolving gel and immediately insert a clean comb. Avoid trapping air bubbles under the wells.
- Allow the stacking gel to polymerize for 15-20 minutes.
Prepare Samples and Load Gel:
- Mix your protein samples with an equal volume of 2X Laemmli Buffer containing reducing agent.
- Denature the samples by heating at 70-100°C for 5-10 minutes [11].
- Once the stacking gel has set, carefully remove the comb and place the cassette into the electrophoresis chamber. Fill the inner and outer chambers with 1X running buffer.
- Using a fine-tip pipette, load the denatured samples and molecular weight standards into the wells.
Run the Gel:
- Connect the electrodes (cathode to the top tank, anode to the bottom).
- Apply a constant voltage. For a mini-gel (8 x 8 cm), 80-120 V through the stacking gel and 120-150 V through the resolving gel is typical. The bromophenol blue dye front will migrate towards the anode.
- Stop the run when the dye front reaches the bottom of the gel (typically 1-1.5 hours).
Table 3: Recommended Polyacrylamide Concentrations for Protein Separation
| Acrylamide Percentage (%) | Effective Linear Separation Range (kDa) | Application Guidance |
|---|---|---|
| 8 | 30 - 150 | Optimal for resolving high molecular weight proteins. |
| 10 | 20 - 100 | A standard, versatile concentration for most mixtures. |
| 12 | 15 - 70 | Good general purpose range; ideal for many monoclonal antibody subunits. |
| 15 | 10 - 50 | Excellent for resolving lower molecular weight proteins. |
| 4-20% Gradient | 10 - 300 | Broad-range separation; automatically stacks proteins; no need for a separate stacking gel [11]. |
Troubleshooting and Optimization of Buffer Conditions
Several key operational parameters can be optimized to improve resolution and reproducibility. Recent research using SDS capillary gel electrophoresis highlights the importance of fine-tuning these variables, which also apply to traditional slab gel formats [21].
- Temperature: Increased gel temperature reduces buffer viscosity, leading to higher electrophoretic mobility. However, excessive heat can cause band smiling, diffusion, or protein degradation. Using a cooling system or running at a lower voltage is advised for heat-sensitive samples. The activation energy for protein migration can be modeled using the Arrhenius equation to understand temperature effects quantitatively [21].
- Gel Concentration (%T): The relationship between gel concentration and protein mobility is described by the Ferguson plot. Linear Ferguson plots indicate predictable sieving, which is critical for accurate molecular weight determination. The presence of certain fluorescent dyes in the buffer has been shown to improve this linearity [21].
- Electric Field Strength: While higher voltage shortens run time, it can compromise resolution. Above a critical field strength (e.g., >500 V/cm in some systems), resolution between adjacent bands may decrease, potentially due to conformational changes in the SDS-protein complexes or increased Joule heating [21].
Market Context and Research Reagent Solutions
The global market for biological buffers, a category essential for electrophoresis, is significant and growing. It was valued at approximately USD 805 million to USD 874 million in 2024 and is projected to exhibit a compound annual growth rate (CAGR) of 7.45% to 7.50%, reaching nearly USD 1.8 billion by 2034 [24] [25]. This growth is driven by increasing biopharmaceutical research, diagnostic testing, and strict quality control standards in pharmaceutical manufacturing [22] [24].
Key players in the market providing high-quality buffer reagents, pre-cast gels, and automated systems include Merck KGaA, Thermo Fisher Scientific Inc., Avantor, Bio-Rad Laboratories, Inc., and GE Healthcare [24] [25]. A major trend is the shift toward automated buffer preparation systems, which enhance precision, reproducibility, and efficiency while reducing human error—a critical factor in regulated drug development environments [22]. Furthermore, there is a rising demand for customized buffer solutions tailored to specific applications, such as the analysis of sensitive biopharmaceuticals [22] [24].
Step-by-Step Protocol: Casting and Running Your Vertical Protein Gel
Essential Reagents and Safety Equipment for Gel Casting
Casting a protein gel for vertical electrophoresis is a foundational technique in molecular biology and biochemistry research, enabling the separation of protein mixtures by size. The quality of the gel cast directly impacts the resolution, reliability, and reproducibility of subsequent electrophoretic analysis and protein characterization, which are critical in drug development. This process requires precise preparation and a thorough understanding of the necessary reagents and safety equipment to ensure both experimental success and researcher protection. This application note details the essential materials, safety protocols, and a standardized methodology for casting protein gels for vertical electrophoresis systems, providing researchers with a comprehensive guide to establish robust laboratory practices.
Essential Reagents and Equipment
The process of gel casting requires specific reagents to create the polyacrylamide matrix and specialized equipment to form the gel. The following sections itemize these core components.
Research Reagent Solutions
The table below catalogs the key reagents required for casting a standard polyacrylamide gel.
Table 1: Essential Reagents for Protein Gel Casting
| Item | Function |
|---|---|
| Acrylamide/Bis-acrylamide Solution | Forms the cross-linked polymer matrix that acts as a molecular sieve for separating proteins based on size. |
| Tris Buffer | Provides the appropriate pH environment for gel polymerization and subsequent electrophoresis. |
| Sodium Dodecyl Sulfate (SDS) | A detergent that denatures proteins and confers a uniform negative charge, allowing separation by size alone. |
| Ammonium Persulfate (APS) | A catalyst that initiates the free-radical polymerization reaction of acrylamide and bis-acrylamide. |
| Tetramethylethylenediamine (TEMED) | A stabilizer that promotes the formation of free radicals from APS, thereby accelerating the polymerization process. |
| Water (Deionized) | Solvent for preparing all aqueous reagent solutions. |
Core Equipment for Gel Casting
The physical setup for casting gels involves a system designed to hold the liquid gel solution until it polymerizes into a solid matrix.
- Vertical Gel Caster: This apparatus is designed to hold multiple glass plate sandwiches in a leak-proof seal, allowing several gels to be cast simultaneously from the same solution to ensure uniformity [26]. Models are available that can cast ten, four, or two gels at a time, accommodating common plate sizes such as 10 x 8 cm or 10 x 10.5 cm [26].
- Glass Plates: A pair of rectangular and notched glass plates form the sandwich that defines the dimensions of the gel. They seal leak-free without messy grease or tape in specialized casters [26].
- Spacers and Combs: Spacers, typically made of flexible plastic, are placed between the glass plates to determine the thickness of the gel. Combs are inserted at the top of the gel cassette to form the wells into which protein samples are loaded.
Safety Considerations
Working with gel electrophoresis involves potential electrical, chemical, and physical hazards. Adherence to safety protocols is non-negotiable [27].
Personal Protective Equipment (PPE)
Appropriate PPE is the first line of defense against laboratory hazards.
- Body: Wear a long-sleeved lab coat and long pants to protect skin from chemical splashes [27].
- Hands: Wear nitrile gloves (not latex, which is less effective) when handling chemicals, gels, or electrophoresis equipment [27].
- Eyes: Always wear safety goggles to protect against splashes of chemical reagents or unpolymerized acrylamide [27].
- Feet: Closed-toe shoes are mandatory [27].
Chemical Hazard Controls
Many reagents used in gel casting are highly toxic and require careful handling.
- Acrylamide Monomer: A potent neurotoxin and suspected carcinogen. Always handle the powdered form in a fume hood to avoid inhalation. Consider purchasing pre-mixed acrylamide solutions to minimize exposure [27].
- TEMED: Is corrosive and flammable. Ensure tight sealing of the container and use it within a fume hood or with adequate ventilation.
- Ammonium Persulfate (APS): An irritant. Handle powdered APS in a fume hood [27].
Physical Hazard Controls
- Electrical Safety: Electrophoresis units pose a risk of severe electrical shock. Always ensure the power supply is turned off and unplugged before connecting or disconnecting leads or reaching into the gel tank. Use equipment with three-prong plugs and connect to Ground Fault Circuit Interrupters (GFCIs) [27].
- Thermal Safety: Use caution when handling hot agarose solutions (for other applications); wear insulated gloves and point the container opening away from yourself [27]. While less common for protein gels, this is a key safety point for related techniques.
- Ultraviolet (UV) Light: If using UV light for visualization (e.g., with certain stains), wear appropriate eye and skin protection to shield from UV radiation exposure [27].
Experimental Protocol: Casting a Vertical Polyacrylamide Gel
This protocol outlines the steps for casting a homogeneous SDS-polyacrylamide gel for vertical electrophoresis using a multiple-gel caster.
Pre-Casting Setup
- Assemble Glass Plate Sandwiches: Clean the rectangular and notched glass plates thoroughly. Place a spacer on each side of the rectangular plate, then carefully position the notched plate on top. Clamp the assembly together securely.
- Prepare the Gel Caster: Position the gel caster body according to the manufacturer's instructions. Insert the clamped glass plate sandwiches into the caster's slots, ensuring they are properly seated against the gasket to prevent leaks [26]. Place the face plate and secure it.
Gel Solution Preparation
- Work in a fume hood while handling acrylamide, TEMED, and APS.
- Prepare the gel solution according to the desired percentage (e.g., 10%, 12%) for resolving proteins in your expected molecular weight range. The volumes provided are typical for casting multiple mini-gels.
Table 2: Example Recipe for a 10% Resolving Gel (for 1 gel, scale as needed)
| Component | Volume | Final Concentration |
|---|---|---|
| Water (Deionized) | 4.0 mL | - |
| 1.5 M Tris-HCl (pH 8.8) | 2.5 mL | 375 mM |
| 10% SDS | 100 µL | 0.10% |
| 30% Acrylamide/Bis Solution | 3.3 mL | 10% |
| 10% Ammonium Persulfate (APS) | 100 µL | 0.10% |
| TEMED | 10 µL | 0.01% |
- In a clean beaker or flask, mix the water, Tris-HCl, SDS, and acrylamide solution in the order listed. Swirl gently to mix.
- Immediately before pouring, add the APS and TEMED. Swirl the mixture thoroughly but gently to avoid introducing air bubbles. Polymerization will begin rapidly.
Pouring and Polymerization
- Pour the Gel: Using a 50 mL serological pipette or a funnel, slowly and steadily pour the gel solution into the top inlet of the gel caster. The solution will fill all glass plate sandwiches simultaneously from the bottom [26]. Continue until the solution reaches the top of the notched plate.
- Overlay with Solvent: Gently pipette a saturated butanol or isopropanol solution over the top of the gel solution in each cassette. This creates a flat, smooth interface at the top of the resolving gel by preventing oxygen inhibition of the polymerization process.
- Allow to Polymerize: Let the gel caster sit undisturbed at room temperature for 20-45 minutes. Polymerization is complete when a distinct schlieren line is visible between the set gel and the overlying solvent.
Post-Casting Procedures
- Prepare and Pour the Stacking Gel: Once the resolving gel has set, rinse off the overlay solution thoroughly with deionized water. Prepare a 4-5% stacking gel solution (e.g., using 0.5 M Tris-HCl, pH 6.8). Add APS and TEMED, then pour it on top of the resolving gel.
- Insert Combs: Immediately insert a clean comb into each gel sandwich, being careful to avoid air bubbles. Allow the stacking gel to polymerize for 15-30 minutes.
- Storage: Once fully polymerized, gels can be used immediately or wrapped in moist paper towels and plastic wrap, then stored at 4°C for several weeks [26].
Workflow and Safety Relationship Diagrams
The following diagrams illustrate the logical workflow for gel casting and the integral relationship between procedural steps and safety measures.
Gel Casting Workflow
Safety Links to Procedure
In vertical gel electrophoresis, a technique fundamental to protein research and drug development, the precise assembly of the gel cassette is a critical first step. The cassette, formed by a pair of glass plates, contains the liquid polyacrylamide solution until it polymerizes into a gel matrix that will separate proteins based on their molecular weight [11] [28]. A properly assembled cassette is leak-proof and forms uniform wells, which is essential for obtaining high-resolution, reproducible protein separation, a cornerstone of applications like SDS-PAGE and western blotting [29] [11]. This protocol details the methodology for assembling the glass plates to create a robust foundation for casting a protein gel.
Materials and Reagents
Research Reagent Solutions
Table 1: Essential materials for assembling a gel cassette.
| Item | Function in Assembly |
|---|---|
| Glass Plates | One clean, standard glass plate and one notched glass plate form the walls of the cassette. The notch allows contact with the upper buffer chamber [11] [28]. |
| Spacers | Thin strips of plastic, typically 0.75-1.5 mm thick, placed along the two vertical edges to define the thickness of the gel and create a sealed chamber [28]. |
| Casting Frame or Gaskets | A metal or plastic frame or silicone gaskets that apply even pressure to hold the glass plates and spacers together in a tight seal, preventing leakage [28]. |
| Comb | A plastic template inserted at the top of the cassette during gel pouring to form the sample wells [29] [11]. |
Experimental Protocol: Gel Cassette Assembly
The following diagram outlines the logical sequence for preparing the gel cassette.
Detailed Methodology
Step 1: Plate Cleaning and Preparation
- Procedure: Thoroughly wash both the standard and notched glass plates with a mild laboratory detergent. Rinse completely first with tap water and then with deionized water to remove all residue. Dry the plates using a lint-free wipe or Kimwipe. Handle plates by the edges to avoid transferring oils from fingers to the gel-facing surfaces [29]. Any dust, grease, or polymerized gel residue will prevent a proper seal and can lead to gel leakage.
Step 2: Spacer and Plate Alignment
- Procedure: Place one clean glass plate on a flat, stable surface. Position two spacers vertically along the left and right edges of the plate. Ensure the spacers are flush with the plate's edges and seated squarely against the surface. Carefully place the second (notched) glass plate on top, aligning its edges with the first plate and the spacers to form a "sandwich" [28]. The spacers must run the full length of the plate to form a uniform gel thickness.
Step 3: Cassette Sealing and Stabilization
- Procedure: Slide the assembled glass plate sandwich into the casting frame or clamp set. Follow the manufacturer's instructions to tighten the frame, applying firm and even pressure across the entire assembly. An uneven clamp can cause gaps, leading to leaks. Once secured, verify the assembly by checking that the bottom and side edges of the plates are aligned and that the spacers are not protruding. The assembled cassette should stand vertically on a level surface without wobbling [28].
Step 4: Pre-Pour Leak Test (Optional but Recommended)
- Procedure: Before pouring the gel solution, perform a leak test by adding a small amount of deionized water or running buffer into the cassette up to a height of 1-2 cm. Let it stand for 5-10 minutes. If no leakage is observed, pour out the liquid and proceed to cast the gel. If a leak is detected, disassemble the cassette, re-clean the plates and spacers, and reassemble, ensuring the casting frame is tightened evenly [29].
Critical Parameters for Success
Table 2: Key parameters and troubleshooting for gel cassette assembly.
| Parameter | Optimal Specification | Consequence of Deviation |
|---|---|---|
| Plate Cleanliness | Free of dust, grease, and old gel fragments [29]. | Leads to leaking cassettes and air bubbles in the polymerized gel. |
| Spacer Alignment | Flush with glass plate edges along entire length [28]. | Creates a gel of uneven thickness, causing distorted protein bands [30]. |
| Clamp Pressure | Firm and uniform pressure from casting frame. | Insufficient pressure causes leaks; excessive pressure can crack glass plates. |
| Vertical Alignment | Cassette stands perfectly perpendicular on a level surface. | Results in a gel with a slanted well bottom, leading to uneven ("smiling" or "frowning") bands during electrophoresis [30]. |
Discussion
A meticulously assembled gel cassette is the non-negotiable foundation for successful protein gel electrophoresis. The integrity of this assembly directly dictates the quality of the final gel, impacting the formation of wells, the uniformity of the electric field, and ultimately, the resolution of separated proteins [29] [30]. Errors in assembly, such as misaligned spacers or a poorly sealed cassette, manifest during electrophoresis as smeared bands, distorted migration, or complete gel failure, compromising data integrity and wasting precious samples and reagents [29] [30]. For researchers in drug development, where quantitative analysis of protein expression and purity is paramount, mastering this fundamental skill is essential for generating reliable and reproducible data. Following this detailed protocol ensures that the subsequent steps of gel casting and electrophoresis begin on a solid footing.
Formulating the Resolving and Stacking Gel Solutions
In vertical protein gel electrophoresis, particularly in the discontinuous SDS-Polyacrylamide Gel Electrophoresis (SDS-PAGE) system developed by Laemmli, the successful separation of proteins relies critically on the precise formulation of two distinct gel layers: the resolving (or separating) gel and the stacking gel [31]. These gels work in concert to first concentrate protein samples into sharp bands before separating them by molecular weight. This protocol details the formulation of these essential components, providing researchers with the methodologies required to produce reliable and reproducible results in protein analysis, immunodetection, and drug development applications.
Research Reagent Solutions
The following table catalogues the essential reagents required for formulating polyacrylamide gel solutions for vertical SDS-PAGE.
Table 1: Key Reagents for Gel Formulation
| Reagent | Function |
|---|---|
| Acrylamide/Bis-acrylamide mixture | Forms the porous polymer matrix that acts as a molecular sieve for separation [11]. |
| Ammonium Persulfate (APS) | Initiates the free radical polymerization reaction of acrylamide monomers [11] [31]. |
| TEMED (N,N,N',N'-Tetramethylethylenediamine) | Catalyzes the polymerization reaction by accelerating the production of free radicals from APS [11] [31]. |
| Tris-HCl Buffer | Provides the appropriate pH environment for the polymerization reaction and subsequent electrophoresis [11]. |
| SDS (Sodium Dodecyl Sulfate) | An ionic detergent that denatures proteins and confers a uniform negative charge, allowing separation by size alone [11] [31]. |
| Butanol or Isopropanol | A water-soluble alcohol used to overlay the resolving gel solution to exclude oxygen and create a flat, even surface [31]. |
Gel Formulation Data
The composition of the resolving and stacking gels differs in acrylamide concentration, buffer pH, and ionic strength to achieve their distinct functions. The tables below provide standard formulations for a traditional mini-gel system.
Table 2: Standard Resolving Gel Formulation (for a 10% gel, 10 mL volume)
| Component | Final Concentration/Amount | Purpose |
|---|---|---|
| 40% Acrylamide/Bis (29:1 or 37.5:1) | 2.5 mL | Forms the polyacrylamide matrix at the desired percentage for size-based separation [11]. |
| 1.5 M Tris-HCl (pH 8.8) | 2.5 mL | Provides a basic pH (∼8.8) for the separating gel, crucial for the discontinuous buffer system [31]. |
| 10% SDS | 100 µL | Ensures the presence of SDS in the gel matrix to maintain protein denaturation [31]. |
| 10% Ammonium Persulfate (APS) | 50 µL | Free radical initiator for polymerization [11] [31]. |
| TEMED | 10 µL | Catalyst that accelerates the polymerization process [11] [31]. |
| Deionized Water | To 10 mL | Solvent for the gel solution. |
Table 3: Standard Stacking Gel Formulation (for a 5% gel, 5 mL volume)
| Component | Final Concentration/Amount | Purpose |
|---|---|---|
| 40% Acrylamide/Bis (29:1 or 37.5:1) | 0.625 mL | Creates a large-pore polyacrylamide matrix that allows proteins to stack into sharp bands [31]. |
| 0.5 M Tris-HCl (pH 6.8) | 1.25 mL | Provides a lower pH (∼6.8) for the stacking gel, a key factor in the discontinuous buffer system [31]. |
| 10% SDS | 50 µL | Ensures the presence of SDS in the gel matrix [31]. |
| 10% Ammonium Persulfate (APS) | 25 µL | Free radical initiator for polymerization [11] [31]. |
| TEMED | 5 µL | Catalyst that accelerates the polymerization process [11] [31]. |
| Deionized Water | To 5 mL | Solvent for the gel solution. |
Experimental Protocol
Workflow for Gel Casting
The following diagram outlines the sequential workflow for preparing and casting a vertical protein gel.
Detailed Methodology
Part A: Casting the Resolving Gel
- Assemble the Gel Cassette: Clean and dry the glass plates and spacers thoroughly. Assemble the cassette according to the manufacturer's instructions and clamp it securely into the vertical casting stand. Ensure the bottom is sealed to prevent the liquid gel from leaking [31].
- Prepare the Resolving Gel Solution: In a clean beaker or conical flask, combine the components for the resolving gel as listed in Table 2. Add the acrylamide solution, Tris-HCl buffer (pH 8.8), water, and SDS. Mix gently by swirling to avoid introducing excessive air bubbles.
- Initiate Polymerization: Immediately before pouring, add the catalysts, 10% Ammonium Persulfate (APS) and TEMED. Swirl the mixture gently but thoroughly to ensure even distribution. Note: The addition of APS and TEMED will start the polymerization process rapidly; work efficiently from this point.
- Pour the Gel: Using a pipette or by carefully pouring, transfer the resolving gel solution into the assembled cassette. Leave sufficient space for the stacking gel (typically, the height of a comb plus 1 cm).
- Overlay with Solvent: Carefully overlay the gel solution with a thin layer of saturated butanol or isopropanol. This step excludes oxygen, which inhibits polymerization, and results in a flat, even gel surface [31].
- Polymerize: Allow the gel to polymerize completely for approximately 30 minutes at room temperature. Polymerization is indicated by a distinct refractive line visible between the set gel and the overlying liquid.
Part B: Casting the Stacking Gel
- Prepare the Resolving Gel Surface: Once polymerized, pour off the overlying butanol or isopropanol. Rinse the top of the gel several times with deionized water to remove any residual solvent and unpolymerized acrylamide. Tip the cassette to remove all excess water [31].
- Prepare the Stacking Gel Solution: In a clean container, combine the components for the stacking gel as listed in Table 3. Add the acrylamide, Tris-HCl buffer (pH 6.8), and water. Mix gently.
- Initiate Polymerization and Pour: Add APS and TEMED to the stacking gel solution and mix. Pour the solution directly onto the surface of the polymerized resolving gel.
- Insert the Sample Comb: Immediately after pouring the stacking gel, carefully insert a clean, dry sample comb between the glass plates without introducing air bubbles. Ensure the comb's teeth are fully submerged in the gel solution and are not touching the resolving gel below.
- Polymerize: Allow the stacking gel to polymerize for another 20-30 minutes. After polymerization, the gel can be used immediately or stored wrapped in moist paper towels and sealed in a plastic bag at 4°C for short-term storage (typically up to 2-3 days).
Troubleshooting Guide
Proper formulation and casting are critical to avoid experimental artifacts. The table below addresses common issues related to gel solutions.
Table 4: Troubleshooting Gel Formulation and Casting
| Problem | Potential Cause | Solution |
|---|---|---|
| Gel does not polymerize | Degraded or inactive APS; expired TEMED; oxygen inhibition. | Prepare fresh APS solution monthly; use fresh TEMED; ensure a proper overlay step [11] [31]. |
| Well deformation or tearing | Comb pulled out too early or unevenly; residual unpolymerized acrylamide. | Allow full polymerization time (≥30 min); flush wells with water before loading to remove residual acrylamide and urea [29]. |
| U-shaped or distorted bands | Poorly formed wells; uneven heat distribution during run. | Use clean combs, avoid pushing comb to bottom of cassette, and ensure proper buffer levels to prevent uneven heating [29] [30]. |
| Poor resolution of bands | Incorrect gel percentage; incorrect buffer pH. | Use a gel percentage appropriate for target protein size; ensure Tris buffers are at correct pH (8.8 for resolving, 6.8 for stacking) [29] [30] [31]. |
A Detailed, Sequential Protocol for Pouring the Gel
In vertical electrophoresis research, particularly for protein analysis via Sodium Dodecyl Sulfate–Polyacrylamide Gel Electrophoresis (SDS-PAGE), the process of pouring a homogeneous, defect-free polyacrylamide gel is a foundational step. The quality of the gel directly impacts the resolution, reproducibility, and reliability of the subsequent protein separation and analysis [2]. This protocol provides a detailed, sequential guide for casting a vertical polyacrylamide gel, ensuring researchers can consistently produce high-quality gels for robust proteomic research.
Principles of Gel Polymerization
The effectiveness of SDS-PAGE hinges on creating a polyacrylamide gel matrix that acts as a molecular sieve. The separation is driven by an electric field, where the electrophoretic mobility of a protein is determined by its charge, the electric field strength, and its frictional coefficient within the gel [2]. The pore size of this matrix is precisely controlled by the concentrations of acrylamide and bisacrylamide, allowing for the size-based separation of denatured proteins [2]. A key to success is the use of a discontinuous gel system, comprising a lower resolving gel (or separating gel) where protein separation occurs, and an upper stacking gel that concentrates the protein samples into sharp bands before they enter the resolving gel, thereby enhancing resolution [2].
Reagents and Equipment
Research Reagent Solutions
The following table details the essential chemical solutions required for preparing a standard Tris-glycine SDS-PAGE gel.
Table 1: Essential Reagent Solutions for SDS-PAGE Gel Casting
| Reagent Solution | Function and Description |
|---|---|
| Acrylamide/Bis-Acrylamide (30%/0.8-37.5:1) | The stock solution of monomer and cross-linker that forms the polyacrylamide matrix upon polymerization. The ratio and concentration determine gel pore size [2]. |
| Resolving Gel Buffer (e.g., 1.5 M Tris-HCl, pH 8.8) | Provides the appropriate buffering conditions for the resolving gel, ensuring proteins maintain a consistent charge during separation. |
| Stacking Gel Buffer (e.g., 0.5 M Tris-HCl, pH 6.8) | Provides a different pH environment for the stacking gel, which is critical for the concentration of protein samples prior to separation. |
| 10% Sodium Dodecyl Sulfate (SDS) | An anionic detergent that denatures proteins and confers a uniform negative charge, making separation dependent on molecular weight alone [2]. |
| Ammonium Persulfate (APS) | A catalyst that, when combined with TEMED, initiates the free-radical polymerization reaction of acrylamide and bisacrylamide. |
| N,N,N',N'-Tetramethylethylenediamine (TEMED) | A catalyst that stabilizes free radicals and accelerates the polymerization reaction initiated by APS. |
| Water-Saturated Isobutanol | Or n-butanol. Layered on top of the resolving gel mixture to exclude oxygen and create a flat, even interface for the stacking gel. |
| Running Buffer (10X or 1X) | Typically Tris-glycine buffer with SDS. Provides the ions necessary to conduct current and maintain the pH environment during electrophoresis. |
Required Equipment
- Vertical gel electrophoresis unit (e.g., Mini-PROTEAN system)
- Glass plates, spacers, and combs
- Gel casting cassette or stand
- Micropipettes and tips
- Reagent reservoirs and mixing vessels
- Timer
- Protective laboratory equipment (lab coat, gloves, safety glasses)
Step-by-Step Gel Casting Protocol
The diagram below outlines the logical sequence and key decision points in the gel pouring workflow.
Detailed Sequential Procedure
Step 1: Assembly of the Gel Casting Cassette
- Carefully clean the short and tall glass plates, along with the spacers, with a mild detergent and rinse thoroughly with deionized water. Ensure they are completely dry.
- Place a spacer on each side of the short plate, aligned with the edges. Clamp the tall glass plate firmly over the short plate and spacers to create a leak-proof cassette. Mount the cassette securely into the casting stand.
Step 2: Preparation and Pouring of the Resolving Gel
- In a clean beaker or conical flask, combine the reagents for the resolving gel in the order listed in Table 2, typically for a 10 mL volume. Gently swirl to mix after adding each component. Add TEMED last, as it will immediately initiate polymerization.
- Immediately after adding TEMED, use a pipette to transfer the resolving gel solution into the corner of the gel cassette, allowing it to flow smoothly to the bottom. Fill the cassette to approximately 75% of its total height, leaving space for the stacking gel.
- Gently overlay the resolving gel solution with a thin layer (~0.5-1 cm) of water-saturated isobutanol or deionized water. This step is critical for excluding oxygen and creating a flat, horizontal gel surface.
- Allow the gel to polymerize completely at room temperature for 15-30 minutes. Polymerization is indicated by a distinct refractive boundary visible just below the overlay.
Step 3: Preparation and Pouring of the Stacking Gel
- Once the resolving gel has polymerized, pour off the isobutanol or water overlay. Rinse the top of the gel several times with deionized water to remove any residual unpolymerized acrylamide and isobutanol. Carefully blot away excess liquid with filter paper or a lint-free tissue, ensuring the gel surface is not damaged.
- In a fresh tube, prepare the stacking gel solution according to Table 2. Add TEMED last, mix gently, and proceed quickly.
- Pour the stacking gel solution directly onto the surface of the polymerized resolving gel. Fill the cassette completely.
Step 4: Insertion of the Comb and Final Polymerization
- Tilt the cassette slightly and slowly insert a clean, dry comb into the stacking gel solution, avoiding the introduction of air bubbles. Ensure the comb is fully seated.
- If necessary, add more stacking gel mixture to fill any voids.
- Allow the stacking gel to polymerize for 15-30 minutes at room temperature.
- Once polymerized, the gel can be used immediately or stored wrapped in moist paper towel and sealed in a plastic bag at 4°C for several days.
Table 2: Example Recipes for a Discontinuous SDS-Polyacrylamide Gel These volumes are suitable for a mini-gel format (e.g., ~8 cm x 10 cm glass plates). Adjust proportions accordingly for different gel sizes or acrylamide percentages.
| Component | 12% Resolving Gel (10 mL) | 4% Stacking Gel (5 mL) |
|---|---|---|
| Deionized Water | 3.3 mL | 3.05 mL |
| 1.5 M Tris-HCl (pH 8.8) | 2.5 mL | - |
| 0.5 M Tris-HCl (pH 6.8) | - | 1.25 mL |
| 30% Acrylamide/Bis Mix | 4.0 mL | 0.65 mL |
| 10% SDS | 100 µL | 50 µL |
| 10% Ammonium Persulfate (APS) | 100 µL | 50 µL |
| TEMED | 10 µL | 5 µL |
Troubleshooting and Quality Control
Even with careful execution, issues can arise during gel polymerization. The following table addresses common problems and their solutions.
Table 3: Troubleshooting Common Gel Casting Issues
| Problem | Potential Cause | Solution |
|---|---|---|
| Slow or No Polymerization | Old or degraded APS; Insufficient TEMED; Low temperature. | Prepare fresh APS solution; Ensure TEMED is added; Allow polymerization at room temperature (20-25°C). |
| Bubbles in the Gel Matrix | Overly vigorous mixing after TEMED addition; Pouring gel solution too rapidly. | Mix solutions gently by swirling; Pour solution slowly down the corner of the cassette. |
| Uneven or Wavy Gel Surface | Incomplete or uneven overlay of resolving gel; Improper cassette assembly. | Ensure a smooth, continuous layer of butanol/water; Check that glass plates and spacers are clean and evenly clamped. |
| Leaking Cassette | Spacers not aligned properly; Cassette not clamped tightly. | Disassemble, clean, and reassemble the cassette carefully; Ensure all clamps are secure before pouring. |
| Poor Resolution in Electrophoresis | Incorrect buffer pH; Improperly prepared stock solutions; Air bubbles trapped during comb insertion. | Verify pH of all Tris buffers; Prepare fresh stock solutions; Insert comb slowly and carefully. |
Mastering the detailed protocol for pouring a polyacrylamide gel is a prerequisite for obtaining high-quality, reproducible results in vertical gel electrophoresis. A properly cast gel, with well-defined resolving and stacking layers, ensures optimal protein separation, which is critical for downstream applications such as Western blotting and protein expression analysis [2]. Adherence to this sequential protocol, coupled with careful attention to reagent quality and technique, will provide researchers with a reliable foundation for their protein separation work.
In vertical gel electrophoresis for protein analysis, meticulous sample preparation is the critical first step that dictates the success of all subsequent procedures. Proper denaturation, reduction, and loading ensure that proteins are separated precisely by molecular weight during SDS-PAGE, enabling accurate analysis for western blotting, protein characterization, and drug development research. This application note provides detailed protocols and best practices to prepare high-quality protein samples, ensuring reliable and reproducible results.
Theoretical Foundations
The Principle of Denaturation and Reduction in SDS-PAGE
In denaturing SDS-PAGE, the strong anionic detergent sodium dodecyl sulfate (SDS) plays a dual role. It denatures proteins by binding to the polypeptide backbone in a constant weight ratio (approximately 1.4 g SDS per 1 g of protein), masking the protein's intrinsic charge. Simultaneously, reducing agents such as DTT (dithiothreitol) or β-mercaptoethanol cleave disulfide bonds, ensuring proteins are fully dissociated into their individual subunits [32] [11]. This process creates uniformly negatively charged, linear polypeptides whose migration through the polyacrylamide gel is determined primarily by molecular weight rather than by native charge or three-dimensional structure [11].
The sample preparation process involves a logical sequence of steps to transition from a complex biological sample to a ready-to-load protein solution. The following workflow outlines the key stages.
Reagents and Materials
The Scientist's Toolkit: Essential Research Reagents
Table 1: Key Reagents for Protein Sample Preparation
| Reagent | Function | Key Considerations |
|---|---|---|
| Lysis Buffer (with detergents, e.g., SDS, Triton X-100) | Breaks open cells and solubilizes proteins; SDS is highly efficient for denaturing and solubilizing membrane proteins [32] [33]. | Select based on protein localization and solubility; SDS is ideal for complete denaturation [32]. |
| Protease/Phosphatase Inhibitors | Prevents co-extracted proteases from degrading target proteins, preserving protein integrity [32] [34]. | Add fresh to lysis buffer immediately before use [34]. |
| SDS Sample Loading Buffer (e.g., Laemmli Buffer) | Prepares sample for loading; contains SDS for charge masking, reducing agents, glycerol, and a tracking dye [32]. | Typically used at 1X or 2X final concentration [32]. |
| Reducing Agents (DTT or β-mercaptoethanol) | Cleaves disulfide bonds to fully unfold proteins and dissociate subunits [32] [11]. | DTT is often preferred due to its lower odor [32]. |
| Protein Standard (Ladder) | Provides molecular weight reference for estimating sample protein sizes [11]. | Pre-stained markers allow visual tracking; load 2-4 µL to avoid background [35]. |
Detailed Protocols
Protocol 1: Standard Sample Denaturation and Reduction
This protocol describes how to treat a protein lysate with SDS sample loading buffer to achieve full denaturation and reduction for SDS-PAGE [32].
- Determine Protein Concentration: Use an assay like BCA or Bradford to determine the concentration of your protein lysate. Accurate quantification is crucial for equal loading across gels [32] [34].
- Mix Sample with Loading Buffer: Combine your protein lysate with an equal volume of 2X Laemmli sample buffer. The final buffer composition should be:
- SDS: For denaturing proteins and imparting negative charge.
- Reducing Agent (DTT or β-mercaptoethanol): To reduce disulfide bonds.
- Glycerol: To increase density for easy gel loading.
- Bromophenol Blue: A tracking dye to monitor electrophoresis progress [32].
- Tris-HCl: To buffer the sample to pH 6.8 [32].
- Heat Denaturation: Cap the tubes tightly and heat the samples at 95–100°C for 5 minutes. For multi-pass membrane proteins prone to aggregation, heating at 70°C for 5–10 minutes is a suitable alternative [32].
- Brief Centrifugation: After heating, vortex the samples briefly and then centrifuge them for 30-60 seconds at high speed. This step collects all condensation from the tube walls and cap, ensuring accurate and bubble-free loading [32].
- Load onto Gel: The samples are now ready to be loaded into the wells of a polyacrylamide gel. Avoid loading bubbles.
Protocol 2: Preparation of Lysate from Cell Culture
This protocol begins with a cell culture pellet and details the steps to obtain a clarified, total protein lysate [32].
- Wash Cells: Place the cell culture dish on ice. Wash adherent or pelleted cells with ice-cold PBS to remove culture medium.
- Add Lysis Buffer: Aspirate the PBS and add ice-cold lysis buffer containing protease inhibitors (approx. 1 mL per 10⁷ cells).
- Harvest Cells: For adherent cells, scrape them off the dish using a cold plastic cell scraper and transfer the suspension to a pre-cooled microcentrifuge tube.
- Incubate: Maintain constant agitation for 30 minutes at 4°C to ensure complete lysis.
- Clarify Lysate: Centrifuge the lysate at approximately 12,000 rpm for 20 minutes at 4°C. Note that centrifugation force may need adjustment for different cell types (e.g., leukocytes require light centrifugation).
- Collect Supernatant: Gently remove the tubes and place them on ice. Aspirate the supernatant (which contains the soluble proteins) and transfer it to a fresh tube. Discard the pellet containing insoluble debris [32].
Data Presentation and Optimization
Selecting the Correct Gel Percentage
The concentration of acrylamide in the resolving gel determines its pore size, which directly affects the resolution of proteins of different sizes. Use Table 2 as a guide for selecting the appropriate gel percentage [15].
Table 2: Optimal Acrylamide Concentrations for Protein Separation
| Size of Protein (kDa) | % Acrylamide in Resolving Gel |
|---|---|
| 4 – 40 | 20% |
| 12 – 45 | 15% |
| 10 – 70 | 12.5% |
| 15 – 100 | 10% |
| 25 – 200 | 8% |
Troubleshooting Common Sample Preparation Issues
Even with careful preparation, issues can arise. Table 3 outlines common problems, their causes, and solutions [34].
Table 3: Troubleshooting Guide for Sample Preparation
| Problem | Potential Cause | Solution |
|---|---|---|
| Protein Degradation (faint target band, smearing, or lower MW bands) | Protease activity due to inactive inhibitors or delays on ice [34]. | Use fresh protease inhibitor cocktail and keep samples on ice at all times. |
| Poor Band Resolution (fuzzy or smeared bands) | Incomplete denaturation or reduction; sample overload [34]. | Ensure fresh DTT/β-ME and proper heating. Reduce the amount of protein loaded. |
| High Background in Fluorescent Western Blot | Autofluorescence from buffers, membranes, or contaminants [35]. | Use fluorescence-compatible sample buffers (no bromophenol blue), low-fluorescence PVDF membranes, and filtered buffers [35]. |
Advanced Applications: Non-Denaturing and Multiplexing Techniques
Native and Non-Reduced Samples
While denaturation and reduction are standard, some experimental questions require alternative conditions. If an antibody recognizes an epitope dependent on the protein's three-dimensional structure (a conformational epitope), or if you need to study a protein in its native, active state, you must run the gel under non-denaturing (native) conditions. In this case, SDS is omitted from the buffers, and the sample is not heated. Similarly, if an antibody specifically recognizes a protein in its non-reduced form, reducing agents must be omitted [32]. The table below summarizes the different conditions.
Table 4: Guide to Protein States and Corresponding Gel Conditions
| Protein State | Gel Condition | Loading Buffer | Migration Buffer |
|---|---|---|---|
| Reduced, Denatured | Reducing and Denaturing | With DTT/β-ME and SDS | With SDS |
| Reduced, Native | Reducing and Native | With DTT/β-ME | No SDS |
| Oxidized, Denatured | Non-reducing and Denaturing | No DTT/β-ME, with SDS | With SDS |
| Oxidized, Native | Non-reducing and Native | No DTT/β-ME | No SDS |
Special Considerations for Fluorescent Western Blotting
Fluorescent detection enables multiplexing, where multiple proteins are detected on the same blot. Sample preparation requires specific optimizations to minimize background fluorescence [35].
- Sample Buffer: Standard buffers containing bromophenol blue can fluoresce and increase background. Use fluorescence-compatible sample buffers without this dye [35].
- Protein Ladder: Overloading prestained markers can cause high background. Typically, 2–4 µL of ladder is sufficient for visualization [35].
- Membrane Selection: Standard PVDF membranes have high autofluorescence. Use nitrocellulose or specialty low-fluorescence PVDF membranes for optimal results [35].
Assembling the Electrophoresis Chamber and Setting Run Parameters
Within the context of casting a protein gel for vertical electrophoresis research, the correct assembly of the electrophoresis chamber and the precise setting of run parameters are critical steps that directly impact the resolution, quality, and reproducibility of the final results. This protocol details the methodologies for assembling vertical gel systems, preparing necessary buffers, and establishing optimal electrical parameters to achieve high-resolution separation of protein samples.
Chamber Assembly and Buffer Preparation
Assembly of the Vertical Gel Apparatus
The following procedure assumes a standard, two-chamber vertical electrophoresis unit is used.
Materials Needed:
- Cast gel sandwich (short and glass plates with polymerized gel)
- Upper (cathode) and lower (anode) buffer chambers
- Buffer seal or gasket
- Clamping frame or lid
Methodology:
- After the gel has polymerized, carefully remove any combs, tape, or clamps used during the casting process.
- Rinse the gel sandwich with deionized water to remove any residual polyacrylamide.
- Place the lower buffer chamber on the work surface. Fill the lower chamber with the appropriate anode buffer to the indicated level.
- Position the gel sandwich securely into the chamber's gasket or buffer seal, ensuring a leak-proof fit. For systems requiring it, place the sandwich between two rubber gaskets in the clamping frame.
- Clamp the gel sandwich firmly in place according to the manufacturer's instructions.
- Attach the upper buffer chamber to the assembly. Ensure the top of the gel is exposed to the upper chamber.
- Pour the appropriate cathode buffer into the upper chamber, checking for leaks. The buffer should fill the upper chamber and contact the electrodes.
Buffer Systems for Protein Electrophoresis
The choice of buffer system depends on the electrophoretic technique (e.g., native vs. denaturing PAGE). For standard SDS-PAGE, the discontinuous Tris-Glycine system is most common. The table below summarizes key buffer compositions.
Table 1: Common Buffer Compositions for Vertical Protein Electrophoresis
| Buffer Name | Function | Composition | pH | Storage |
|---|---|---|---|---|
| Anode Buffer (Lower Chamber) | Completes electrical circuit; facilitates ion migration | 25 mM Tris, 192 mM Glycine, 0.1% SDS | ~8.3 (not adjusted) | Room Temperature, protect from light |
| Cathode Buffer (Upper Chamber) | Completes electrical circuit; facilitates ion migration | 25 mM Tris, 192 mM Glycine, 0.1% SDS | ~8.3 (not adjusted) | Room Temperature, protect from light |
| 5X SDS-PAGE Running Buffer | Concentrate for convenience | 125 mM Tris, 960 mM Glycine, 0.5% SDS | ~8.3 (not adjusted) | Room Temperature; dilute to 1X before use |
| Laemmli Sample Buffer | Denatures and loads sample | 62.5 mM Tris-HCl, 2% SDS, 10% Glycerol, 0.01% Bromophenol Blue, 5% β-mercaptoethanol (added fresh) | 6.8 | 1 mL aliquots at -20°C |
Setting Electrophoretic Run Parameters
Parameter Optimization for Protein Separation
The applied voltage and run time are interdependent and critical for achieving optimal resolution. Running a gel at too high a voltage can generate excessive heat, causing protein denaturation, smile effects, and poor band resolution. Conversely, low voltages prolong the experiment and can lead to band diffusion.
Table 2: Optimized Run Parameters for SDS-PAGE Protein Separation
| Gel Type | Gel Dimensions (W x H, cm) | Recommended Voltage | Approximate Run Time | Key Consideration |
|---|---|---|---|---|
| Mini-Gel | 8 x 7 cm | 150 - 200 V | 40 - 60 minutes | Fast results for quick analysis; monitor temperature. |
| Midi-Gel | 10 x 8 cm | 120 - 180 V | 60 - 90 minutes | Balance between speed and resolution. |
| Standard Gel | 16 x 16 cm | 80 - 120 V | 4 - 6 hours (or overnight) | Ideal for high resolution; often run overnight at lower voltage. |
A Stepwise Protocol for Initiating the Electrophoretic Run
- Final Check: Confirm the chamber is correctly assembled and filled with the appropriate 1X running buffer. Ensure no leaks are present.
- Sample Loading: Using a microsyringe, gently load the prepared protein samples and molecular weight marker into the wells. Note the order of loaded samples.
- Chamber Lid Placement: Secure the lid onto the upper buffer chamber, ensuring the electrodes (black to cathode, red to anode) are correctly aligned. Connect the lid to the power supply.
- Power Supply Settings: On the power supply, set the parameters. For most standard mini-gel runs, a constant voltage of 180 V is a reliable starting point.
- Initiate Run: Start the electrophoretic run. You should observe bubbles forming at the electrodes, confirming current flow.
- Monitor the Run: Track the migration of the colored dye front (e.g., Bromophenol Blue). The run is typically complete when the dye front has reached the bottom of the gel (∼1 cm from the end).
- Termination: Once complete, turn off the power supply, disconnect the leads, and carefully disassemble the chamber to proceed with gel staining or further analysis.
The Scientist's Toolkit: Essential Research Reagent Solutions
Table 3: Key Reagents for Protein Gel Electrophoresis
| Reagent / Solution | Function / Purpose | Critical Notes |
|---|---|---|
| Acrylamide/Bis-Acrylamide (29:1 or 37.5:1) | Forms the porous gel matrix for size-based separation. | Neurotoxin in its unpolymerized form. Handle with gloves; prepare in a fume hood. |
| SDS (Sodium Dodecyl Sulfate) | Anionic detergent that denatures proteins and confers a uniform negative charge. | Ensures separation is based primarily on molecular weight. |
| APS (Ammonium Persulfate) | Initiator of the acrylamide polymerization reaction. | Prepare fresh solutions or store aliquots at -20°C for short periods. |
| TEMED (N,N,N',N'-Tetramethylethylenediamine) | Catalyst that accelerates the free-radical polymerization of acrylamide by APS. | Add last; gel solution will begin to polymerize immediately. |
| Tris-Based Buffers | Provides the required pH environment for electrophoresis and stacking. | Accuracy in pH adjustment is critical for reproducible results. |
| Glycine | A trailing ion in discontinuous buffer systems that allows for protein stacking. | Essential for the sharpening of protein bands at the stacking-resolving gel interface. |
| β-Mercaptoethanol (BME) or DTT | Reducing agents that break disulfide bonds in proteins. | Adds to the complete denaturation of protein structure. BME has a strong odor. |
| Coomassie Brilliant Blue Stain | A dye that binds non-specifically to proteins, allowing visualization post-electrophoresis. | Requires a destaining step (methanol/acetic acid solution) to clear background. |
Troubleshooting Common Issues and Optimizing Gel Performance
Optimizing Gel Percentage for Your Protein's Molecular Weight
Sodium dodecyl sulfate-polyacrylamide gel electrophoresis (SDS-PAGE) is a foundational technique in molecular biology and biochemistry, enabling the separation of complex protein mixtures based on their molecular weights. The core principle of this method relies on the fact that proteins treated with the anionic detergent SDS become uniformly negatively charged and linearized, causing their migration through a polyacrylamide gel matrix to be determined primarily by size rather than intrinsic charge or shape. The selection of an appropriate gel percentage is not merely a technical detail but a critical experimental variable that directly determines the resolution and success of the separation. When the gel pore size is optimally matched to the target protein size, researchers achieve sharp, well-defined bands suitable for accurate molecular weight determination, western blotting, and subsequent protein analysis. This application note provides a comprehensive framework for selecting and optimizing gel percentages tailored to specific protein targets, ensuring reproducible and high-quality results in vertical electrophoresis research.
The relationship between gel percentage and separation efficacy stems from the molecular sieving properties of the cross-linked polyacrylamide matrix. In essence, the gel acts as a labyrinth with tunable pore sizes; higher acrylamide concentrations create a denser network with smaller pores, ideal for resolving smaller proteins that would otherwise migrate too rapidly through a more open structure. Conversely, lower percentage gels feature larger pores that facilitate the passage of high molecular weight complexes which would be impeded or trapped in a denser matrix. Understanding and applying this size-pore relationship is fundamental to designing electrophoretic separations that meet the specific needs of your research, whether you are characterizing a single protein of interest or analyzing complex mixtures in proteomic studies [2].
Core Principles of Gel Percentage Selection
The Science of Molecular Sieving
The effectiveness of SDS-PAGE hinges on the creation of a polyacrylamide gel matrix with specific sieving properties. When an electric field is applied, SDS-coated proteins, which carry a uniform negative charge, migrate toward the anode. Their journey through the gel is impeded by the cross-linked acrylamide polymer network, which acts as a molecular sieve. The electrophoretic mobility (μ) of a protein in this system is described by the equation: μ = v/E = q/f, where v is the migration velocity, E is the electric field strength, q is the net charge, and f is the frictional coefficient. Since SDS confers a uniform charge-to-mass ratio to all proteins, the primary variable affecting mobility becomes the frictional coefficient f, which is largely determined by the protein's size and the gel's pore size [2].
Smaller proteins navigate the porous network more easily, experiencing less friction and thus migrating faster through the gel. Larger proteins, in contrast, are hindered by the matrix and migrate more slowly. The pore size of the gel is controlled by the concentration of acrylamide and bisacrylamide; higher total percentages create a tighter mesh with smaller pores, while lower percentages create a more open structure [2] [36]. This inverse relationship between protein size and migration rate is the cornerstone of molecular weight determination via SDS-PAGE. However, this relationship only holds true when the gel pore size is appropriate for the protein size being separated. A mismatched gel percentage can lead to poor resolution, inaccurate molecular weight estimation, and failed downstream applications.
Quantitative Guidance for Gel Selection
The most direct method for choosing a gel percentage is to reference the molecular weight of your target protein against established guidelines. Data compiled from multiple authoritative sources provides a consistent framework for this selection, as summarized in the table below.
Table 1: Optimal Gel Percentage Based on Protein Molecular Weight
| Protein Molecular Weight Range (kDa) | Recommended Gel Percentage (%) | Primary Application Context |
|---|---|---|
| 4 - 40 | 20% | Very low molecular weight proteins [37] [38] |
| 12 - 45 | 15% | Low molecular weight proteins [37] [38] |
| 10 - 70 | 12% - 12.5% | Medium-low molecular weight proteins [37] [38] |
| 15 - 100 | 10% | Medium molecular weight proteins [37] [38] |
| 25 - 200 | 7.5% - 8% | Medium-high molecular weight proteins [15] [38] |
| >200 | 4% - 6% | High and very high molecular weight proteins [37] [38] |
For experiments targeting a single protein or several proteins of similar size, a single-concentration (also known as fixed-percentage) resolving gel is typically sufficient. This approach simplifies gel preparation and is ideal for routine analyses such as checking protein expression or purity. The guidelines in Table 1 should be used as a starting point; if the initial separation is suboptimal, adjusting the gel percentage by 1-2% can significantly improve resolution [38].
When an experiment requires the simultaneous resolution of proteins with a broad molecular weight range, a gradient gel is the superior choice. Gradient gels are cast with an increasing acrylamide concentration from top to bottom (e.g., 4-20%), creating a pore size that decreases along the migration path. This allows large proteins to separate effectively in the low-percentage region of the gel while smaller proteins continue to be resolved as they encounter the tighter matrix further down. Gradient gels are particularly valuable in proteomic applications where complex mixtures of proteins are analyzed, as they provide clear separation across a wide mass spectrum [37] [39] [38].
Experimental Protocol for Gel Casting and Electrophoresis
Reagent Preparation and Gel Casting Protocol
The following protocol is adapted from established laboratory methods and provides a reliable procedure for casting vertical SDS-PAGE gels. Always wear appropriate personal protective equipment, including gloves, as acrylamide is a potent neurotoxin [15] [38].
Table 2: Research Reagent Solutions for SDS-PAGE Gel Casting
| Reagent | Function | Preparation & Handling |
|---|---|---|
| Acrylamide/Bis-Acrylamide (30%) | Forms the cross-linked polymer matrix that acts as a molecular sieve. The standard ratio is 29:1 or 37.5:1 (acrylamide:bis). | Pre-mixed solution. Highly toxic. Handle with gloves in a designated area. |
| Tris-HCl Buffer (1.5 M, pH 8.8) | Provides the buffering environment for the resolving gel, maintaining a stable pH for optimal separation. | For resolving gel. Adjust to pH 8.8 with HCl. |
| Tris-HCl Buffer (0.5 M, pH 6.8) | Provides the buffering environment for the stacking gel. | For stacking gel. Adjust to pH 6.8 with HCl. |
| SDS Solution (10% w/v) | Anionic detergent that ensures proteins are linearized and uniformly charged. | Add to both resolving and stacking gel solutions. |
| Ammonium Persulfate (APS, 10% w/v) | Initiator of the free-radical polymerization reaction. | Prepare fresh in water or store aliquots at -20°C for short-term use. |
| TEMED | Catalyst that accelerates the polymerization reaction by stabilizing free radicals. | Add last. Polymerization begins immediately upon addition. |
| Isopropanol or Water-Saturated Butan-1-ol | Used to overlay the resolving gel to exclude oxygen and ensure a flat, even interface. | Apply gently after pouring resolving gel [15] [38]. |
10-Step Gel Casting Protocol:
- Assemble Casting Apparatus: Clean the glass plates and spacers thoroughly with distilled water and ethanol. Assemble the gel cassette according to the manufacturer's instructions, ensuring a tight seal to prevent leaks [15].
- Prepare Resolving Gel Mixture: In a small beaker or flask, combine the components for the resolving gel in the order listed in Table 3 below, adding APS and TEMED last. Mix gently by swirling to avoid introducing air bubbles.
- Pour Resolving Gel: Immediately pour the resolving gel solution into the assembled cassette, leaving enough space for the stacking gel (approximately 2.5 cm from the top). A serological or plastic Pasteur pipette provides good control [15].
- Overlay with Solvent: Gently overlay the resolving gel with isopropanol or water-saturated butan-1-ol to create a flat, horizontal interface and exclude oxygen, which inhibits polymerization [38].
- Polymerize Resolving Gel: Allow the gel to polymerize completely for 30-45 minutes at room temperature. Polymerization is complete when a distinct schlieren line is visible between the gel and the overlay.
- Prepare and Pour Stacking Gel: Pour off the overlay liquid and wick away any residue with a lint-free tissue. Combine stacking gel components (Table 3), add APS and TEMED last, and pour the mixture directly onto the polymerized resolving gel.
- Insert Comb: Immediately insert a clean comb into the stacking gel, being careful to avoid trapping air bubbles in the wells.
- Polymerize Stacking Gel: Allow the stacking gel to polymerize for 20-30 minutes.
- Remove Comb and Clean Wells: Once set, carefully remove the comb in a smooth, vertical motion to prevent tearing the wells. Rinse the wells gently with deionized water or running buffer to remove any unpolymerized acrylamide.
- Store or Use: Gels can be used immediately or wrapped in moist tissue paper, sealed in plastic wrap, and stored at 4°C for up to several weeks [15].
Table 3: SDS-PAGE Gel Recipe for a 10% Resolving Gel (10 mL volume) [15] [38]
| Component | Resolving Gel (10%) | Stacking Gel |
|---|---|---|
| dH₂O | 4.0 mL | 3.05 mL |
| 1.5 M Tris-HCl, pH 8.8 | 2.5 mL | - |
| 0.5 M Tris-HCl, pH 6.8 | - | 1.25 mL |
| 30% Acrylamide/Bis Mix | 3.3 mL | 0.65 mL |
| 10% SDS | 100 µL | 50 µL |
| 10% APS | 50 µL | 25 µL |
| TEMED | 5 µL | 10 µL |
The following workflow diagram illustrates the logical relationship and sequence of the key stages in preparing and running an SDS-PAGE experiment.
Diagram 1: SDS-PAGE Experimental Workflow
Electrophoresis Conditions and Sample Preparation
Protein Sample Preparation: For optimal separation, protein samples must be properly denatured and reduced. Dilute your protein sample with an equal volume of 2X Laemmli sample buffer (containing SDS and a reducing agent like DTT or β-mercaptoethanol). Heat the mixture at 95°C for 5 minutes to ensure complete denaturation [39]. This step is critical for membrane proteins or complexes with strong hydrophobic interactions. After heating, briefly centrifuge the samples at maximum speed for 2-3 minutes to pellet any insoluble aggregates that could interfere with loading [39].
Gel Electrophoresis Run:
- Assemble Apparatus: Place the polymerized gel into the vertical electrophoresis chamber according to the manufacturer's instructions.
- Fill with Buffer: Fill the inner and outer chambers with 1X running buffer (25 mM Tris base, 192 mM glycine, 0.1% SDS, pH 8.3) [37].
- Load Samples: Using gel-loading tips for precision, load equal amounts of protein (typically 10-50 µg for cell lysates or 10-100 ng for purified protein) and a protein molecular weight marker into the wells [37] [39].
- Run Gel: Connect the electrodes and run the gel at a constant voltage of 100-150 V for approximately 40-60 minutes, or until the dye front (bromophenol blue) reaches the bottom of the gel [37] [39]. To prevent the "smiling" effect (curved bands at the edges), maintain a constant temperature between 10°C-20°C by using a magnetic stirrer in the outer buffer chamber or by controlling the running current [39].
Advanced Optimization and Troubleshooting
Fine-Tuning Separation Parameters
Beyond selecting the correct gel percentage, several additional parameters can be optimized to achieve superior results:
Sample Loading: The ideal protein load depends on the complexity of the sample and the detection method. For Coomassie staining, load ≤2 µg of a purified protein or ≤20 µg of a complex mixture like whole cell lysates. For more sensitive downstream applications like western blotting or silver staining, lower amounts can be used. Overloading will cause smearing and band distortion, while underloading may result in weak or undetectable bands [39].
Reducing vs. Non-Reducing Conditions: The use of reducing agents like DTT or β-mercaptoethanol is standard practice to break disulfide bonds and fully denature proteins. However, if the goal is to analyze native molecular weight complexes or disulfide-linked multimers, a non-reducing SDS-PAGE should be performed by omitting these agents from the sample buffer [39].
Gel Temperature Management: Maintaining an even gel temperature during the run is paramount. Overheating, often indicated by "smiling" bands (where outer lanes migrate slower than center lanes), can be mitigated by ensuring efficient heat transfer. This is achieved by completely filling the buffer chamber and using a magnetic stirrer to circulate the buffer during the run [39].
Troubleshooting Common Issues
Diffuse or Smearing Bands: This is often a result of incomplete denaturation. Ensure samples are heated thoroughly at 95°C for 5 minutes. Overloading the gel or using an old running buffer can also cause smearing [39].
Poor Resolution in Specific Size Ranges: If resolution is poor for your protein of interest, confirm that the gel percentage is appropriate using Table 1. For a broad range of proteins, switch to a gradient gel. Running the gel for too short a time will result in poor resolution, especially for low molecular weight proteins, while running too long will cause smaller proteins to be lost from the gel [39].
Uneven Migration Across the Gel ("Smiling"): This artifact is caused by uneven heating. Use a magnetic stirrer in the outer buffer chamber to ensure even temperature distribution and prevent this effect [39].
By systematically applying these guidelines for gel percentage selection, following the detailed casting and running protocols, and implementing advanced optimization tips, researchers can consistently achieve high-quality protein separations. This ensures reliable data for downstream analyses, accelerating progress in drug development and basic research.
Troubleshooting Poor Polymerization and Gel Defects
In vertical gel electrophoresis for protein analysis, successful separation hinges on the quality of the polyacrylamide gel. Poor polymerization and various gel defects represent significant obstacles that can compromise resolution, reproducibility, and data interpretation. These issues manifest as distorted bands, smearing, or complete gel failure, ultimately undermining experimental integrity. This application note provides a systematic framework for diagnosing, troubleshooting, and preventing common gel polymerization and casting problems, enabling researchers to achieve consistent, high-quality results in their protein separation workflows.
Common Polymerization and Gel Defects: Causes and Solutions
The following table summarizes frequent issues, their potential causes, and recommended solutions for rectifying polymerization problems and gel defects.
| Observed Problem | Potential Causes | Recommended Solutions |
|---|---|---|
| Gel does not polymerize or polymerization time is too long [40] | TEMED or ammonium persulfate (APS) omitted; reagents old or degraded; temperature too low; acrylamide quality poor; excessive thiol reagents [40]. | Use fresh APS and TEMED; increase concentrations of APS/TEMED by 25%; cast gels at room temperature; degas acrylamide solution; use high-quality reagents [40]. |
| Gel is too soft or fragile [40] | Poor quality acrylamide/bis-acrylamide; insufficient cross-linker (bis-acrylamide) [40]. | Check acrylamide and bis-acrylamide quality; increase the amount of bis-acrylamide in the gel recipe [40]. |
| Uneven or skewed gel interface [40] [41] | Improper overlaying of the resolving gel; rapid or uneven polymerization [40] [41]. | Carefully overlay the resolving gel with isopropanol, water, or butanol to ensure a flat interface; degas the gel solution to slow polymerization [42] [40]. |
| White or opaque gel appearance [40] | Concentration of bis-acrylamide is too high [40]. | Recheck and adjust the amount of bis-acrylamide used in the gel recipe [40]. |
| Cracks in the polymerized gel [40] | Excess heat generation during polymerization [40]. | Use cooled reagents and ensure the gel polymerizes in a cool environment [40]. |
| Poorly formed or damaged wells [40] [43] | Comb removed too forcefully or before complete polymerization; comb pushed to the bottom of the cassette; residual polyacrylamide in wells [29] [40]. | Allow stacking gel to polymerize for at least 30 minutes; remove comb slowly and steadily after placing the gel in the running chamber filled with buffer; flush wells with buffer to remove residual acrylamide [42] [29] [40]. |
Quantitative Troubleshooting Guide for Band Artifacts
Band distortions observed during visualization are often direct consequences of underlying polymerization and casting issues. The table below links common band artifacts to their root causes and corrective actions.
| Band Artifact | Root Cause | Corrective Action |
|---|---|---|
| Skewed or distorted bands [40] [41] | Poor polymerization around wells; high salt concentration in sample; uneven gel interface; air bubbles in gel [40] [41] [43]. | Increase APS/TEMED by 25% for stacking gel; desalt samples; ensure even gel interface; remove air bubbles during casting [40] [41]. |
| Smeared bands [42] [40] [30] | Protein overload; voltage too high; incorrect gel percentage; insufficient SDS; sample degradation [42] [40] [30]. | Reduce amount of protein loaded; decrease voltage by 25-50%; use appropriate acrylamide percentage; ensure sufficient SDS in sample buffer [42] [40] [30]. |
| Vertical streaking [40] [41] | Sample overloaded; protein precipitation; insufficient SDS to coat proteins [40] [41]. | Dilute sample or load less; centrifuge sample before loading; increase SDS-to-protein ratio (typically 1.4:1 w/w) [40] [41]. |
| Horizontal band spreading [41] | Diffusion of samples from wells before current is applied; ionic strength of sample lower than gel [41]. | Minimize time between loading and starting electrophoresis; use same buffer in sample as in stacking gel [41]. |
| "Smile" or "frowning" effects [30] [41] | Uneven heat distribution (center of gel hotter than edges); excessive power conditions [30] [41]. | Decrease voltage; use a power supply with constant current mode; ensure buffer is well-mixed and levels are even [30] [41]. |
| Poor band resolution [42] [40] [30] | Incorrect gel concentration; run time too short; voltage too high; expired gel [42] [40] [30]. | Optimize acrylamide percentage for target protein size; prolong run time; decrease voltage; use fresh gel [42] [40] [30]. |
Experimental Protocol for Robust Gel Casting
Reagent and Equipment Preparation
- Acrylamide/Bis-acrylamide Solution: Use a high-purity, reliable source. A common ratio for a resolving gel is 37.5:1 (acrylamide:bis). For a 10% resolving gel, use 3.75 mL of a 40% acrylamide solution in a 15 mL total volume [11].
- Ammonium Persulfate (APS): Prepare a fresh 10% (w/v) solution in deionized water. For older solutions, a slight increase in volume may be necessary.
- TEMED: Use fresh and store as recommended. It is highly hygroscopic and sensitive to oxidation.
- Gel Casting Apparatus: Ensure glass plates and spacers are meticulously clean, aligned, and free of chips or cracks that could cause leaks [40].
Gel Casting Workflow
Critical Steps and Best Practices
- Degassing: Degassing the acrylamide solution for 5-10 minutes before adding APS and TEMED removes oxygen, which can inhibit polymerization and lead to uneven gel formation [40].
- Consistent Polymerization: After adding APS and TEMED, mix the solution gently but thoroughly and pour it immediately. Inconsistent mixing can create regions of varying pore size [40].
- Proper Overlaying: Overlaying the resolving gel with a non-miscible solvent like isopropanol, water, or butanol is critical for achieving a sharp, linear interface between the resolving and stacking gels, which ensures proteins enter the resolving gel at a uniform baseline [42] [40].
- Stacking Gel Polymerization: Allow the stacking gel to polymerize fully for at least 30 minutes before carefully removing the comb. Removing the comb too early can damage the wells [40].
The Scientist's Toolkit: Essential Research Reagents
The following table details key reagents and materials critical for successful gel polymerization and electrophoresis.
| Reagent/Material | Function/Purpose | Critical Considerations |
|---|---|---|
| Acrylamide/Bis-acrylamide | Forms the porous polymer matrix of the gel. Bis-acrylamide is the cross-linker [11]. | Quality and purity are paramount. The total concentration (%T) and cross-linking ratio (%C) determine gel pore size. Poor quality leads to soft gels [40]. |
| Ammonium Persulfate (APS) | Initiates the polymerization reaction by generating free radicals [11]. | Must be fresh. A 10% solution in water is common but decays rapidly. Old APS is a primary cause of failed polymerization [40]. |
| TEMED | Catalyzes the polymerization reaction by accelerating the production of free radicals from APS [11]. | Temperature and oxygen sensitive. Degassed solutions improve efficiency. Increased amounts accelerate gel setting [40]. |
| Tris Buffers | Provides the appropriate pH environment for polymerization and electrophoresis [11]. | Resolving gel is typically pH 8.8; stacking gel is pH 6.8. This pH discontinuity is key for band stacking [11]. |
| SDS (Sodium Dodecyl Sulfate) | Denatures proteins and confers a uniform negative charge, allowing separation by size alone [11]. | Must be present in excess (typically 1.4g SDS per 1g protein) to coat proteins fully and prevent smearing [40] [11]. |
Mastering the art of gel casting is a foundational skill for reliable protein electrophoresis. Successful outcomes depend on a meticulous approach: using fresh, high-quality reagents, following a standardized casting protocol with attention to critical steps like degassing and overlaying, and systematically troubleshooting defects when they arise. By integrating the guidelines and troubleshooting frameworks provided in this application note, researchers can significantly enhance the reproducibility and quality of their electrophoretic data, thereby strengthening the foundation of their scientific research and drug development efforts.
Solving Smearing, Streaking, and Distorted Band Patterns
Vertical gel electrophoresis, specifically SDS-Polyacrylamide Gel Electrophoresis (SDS-PAGE), is a foundational technique in molecular biology and proteomics for separating proteins based on their molecular weight. This process involves a polyacrylamide gel cast between two glass plates, which is then mounted vertically in an electrophoresis tank. The technique is indispensable for researchers, scientists, and drug development professionals in applications ranging from protein purity analysis and expression studies to western blotting. The quality of the gel and the subsequent separation is paramount; issues such as smearing, streaking, and band distortion can severely compromise data integrity, leading to inaccurate protein characterization and erroneous conclusions in critical research and diagnostic workflows. This application note details the protocols and troubleshooting methods to identify, address, and prevent these common anomalies, ensuring reliable and reproducible results.
Principles of SDS-PAGE and Gel Casting
The resolution of proteins in SDS-PAGE relies on the denaturing action of sodium dodecyl sulfate (SDS), which binds to proteins and confers a uniform negative charge. This allows separation to occur primarily based on polypeptide chain length as molecules migrate through the polyacrylamide gel matrix under an electric field. The gel itself acts as a molecular sieve, where its pore size—determined by the concentration of acrylamide and bisacrylamide—dictates the range of protein sizes that can be effectively resolved.
A key feature of a standard SDS-PAGE setup is the discontinuous buffer system, which utilizes two distinct gel layers: a resolving gel (or separating gel) and a stacking gel. The resolving gel, typically with a higher percentage of acrylamide (e.g., 10-12%), is where the actual size-based separation of proteins occurs. The stacking gel, with a lower percentage of acrylamide (e.g., 4-5%), is designed to concentrate all protein samples into a sharp, unified band before they enter the resolving gel, which is critical for achieving well-defined bands. The entire process is dependent on a meticulously cast gel, as imperfections in polymerization or geometry directly introduce artifacts during the electrophoretic run.
The following workflow outlines the core procedure for preparing and running a vertical protein gel, highlighting steps where specific issues often arise.
Troubleshooting Common Artifacts: Causes and Solutions
A systematic approach to troubleshooting is essential for diagnosing and resolving common protein band artifacts. The issues and their solutions are summarized in the table below, with detailed protocols provided in the subsequent section.
Table 1: Troubleshooting Guide for SDS-PAGE Band Artifacts
| Artifact | Primary Cause | Recommended Solution |
|---|---|---|
| Band Smearing | Protein degradation (proteases) [40]. | Use fresh protease inhibitors; avoid freeze-thaw cycles [40]. |
| Sample overloading [44] [40]. | Load 10-20 µg total protein per well; quantify accurately [44]. | |
| High salt concentration in sample [40]. | Desalt via dialysis, precipitation, or desalting column [40]. | |
| Voltage too high [40]. | Decrease voltage by 25-50% [40]. | |
| Vertical Streaking | Protein precipitation in the well [44] [40]. | Centrifuge sample before loading; add 4-8 M urea for hydrophobic proteins [44] [40]. |
| Sample overloaded [41] [40]. | Dilute sample or load less volume [41]. | |
| Insufficient SDS [41]. | Ensure SDS:protein ratio is at least 1.4:1 [41]. | |
| "Smile" Effect (bands curve upward) | Gel center runs hotter than edges [41]. | Decrease power setting; ensure buffer is properly mixed [41]. |
| Excessive power conditions [41]. | Reduce voltage (e.g., from 200V to 150V) [41]. | |
| Smeared or distorted bands near well | Poor well integrity [29]. | Rinse wells with buffer before loading; avoid damaging wells during comb removal or sample loading [29]. |
| Protein aggregation [44]. | Ensure solubility; add reducing agent (DTT/BME) to lysis buffer; heat samples adequately [44]. | |
| Horizontal Band Spreading | Sample diffusion before current is applied [41]. | Minimize time between loading and starting the run [41]. |
| Low ionic strength in sample [41]. | Use the same buffer in the sample as in the gel/stacking gel [41]. | |
| Poor Band Resolution | Incorrect gel percentage [40]. | Use a gradient gel (e.g., 4-20%) or a gel % appropriate for target protein size [40]. |
| Run too fast (diluted buffers/ high current) [40]. | Use correct buffer concentration; decrease voltage [40]. | |
| Old or improperly polymerized gel [40]. | Cast a fresh gel; check reagent quality and polymerization time [40]. |
Detailed Experimental Protocols for Prevention and Resolution
Protocol 1: Optimizing Sample Preparation to Prevent Smearing and Streaking
Purpose: To obtain a clean, fully denatured protein sample that will migrate uniformly through the gel.
- Reagents: Lysis buffer, Protease inhibitor cocktail, SDS sample buffer (with β-mercaptoethanol or DTT), Urea.
- Procedure:
- Cell Lysis and Extraction: Lyse cells or tissues using a detergent-based lysis buffer. Critical: Include a protease inhibitor cocktail immediately upon lysis to prevent degradation-induced smearing [40].
- Protein Quantification: Accurately determine protein concentration using a colorimetric assay (e.g., Bradford, BCA). Normalize all samples to the same concentration with lysis buffer to ensure equal loading [45].
- Denaturation: Mix protein sample with 2X or 4X SDS sample buffer. For complex or hydrophobic samples, consider adding urea to a final concentration of 4-8 M to prevent aggregation [44] [40].
- Heat Denaturation: Heat samples at 70-100°C for 5-10 minutes. Note: Some samples may aggregate if boiled; if this is suspected, try heating at 60°C for 15 minutes [40].
- Clarification: Centrifuge heated samples at >12,000 x g for 5-10 minutes to pellet any insoluble debris or precipitated protein. Load only the supernatant into the gel well to prevent vertical streaking [40].
Protocol 2: Casting a High-Quality Vertical Gel to Prevent Distortion
Purpose: To produce a uniform, properly polymerized polyacrylamide gel with well-defined wells.
- Reagents: Acrylamide/Bis-acrylamide stock, Resolving gel buffer (e.g., 1.5 M Tris-HCl, pH 8.8), Stacking gel buffer (e.g., 0.5 M Tris-HCl, pH 6.8), 10% Ammonium Persulfate (APS), TEMED, Water-saturated butanol or isopropanol.
- Procedure:
- Assemble Cassette: Clean glass plates thoroughly and assemble the casting cassette according to the manufacturer's instructions. Ensure it is sealed properly to prevent leaks.
- Prepare and Pour Resolving Gel: Combine all components for the resolving gel, adding TEMED last to initiate polymerization. Swirl gently to mix. Pour the solution between the glass plates, leaving space for the stacking gel.
- Overlay: Carefully overlay the gel solution with a thin layer of water-saturated butanol or isopropanol. This excludes oxygen and ensures a flat, even gel interface [40].
- Polymerize: Allow the gel to polymerize completely for 20-30 minutes. A distinct schlieren line will appear at the gel-overlay interface.
- Prepare and Pour Stacking Gel: Pour off the overlay liquid. Prepare the stacking gel mixture, add TEMED, and pour it onto the top of the resolved gel. Immediately insert a clean, dry comb without introducing air bubbles.
- Polymerize Stacking Gel: Allow the stacking gel to polymerize for at least 20-30 minutes. Critical: Do not remove the comb prematurely, as this can damage the well structure [40]. After polymerization, the gel can be used immediately or stored wrapped in moist paper towels and plastic film at 4°C for a short period.
Protocol 3: Electrophoresis Run Conditions for Optimal Resolution
Purpose: To separate proteins under conditions that maximize band sharpness and minimize heat-related artifacts.
- Reagents: Running buffer (e.g., Tris-Glycine-SDS).
- Equipment: Vertical electrophoresis unit, Power supply.
- Procedure:
- Assemble Apparatus: Place the polymerized gel cassette into the electrophoresis chamber. Fill the inner and outer chambers with running buffer. Check for leaks.
- Load Samples: Rinse wells gently with running buffer using a pipette to remove any residual acrylamide or urea and to dispel air bubbles [44] [29]. Load samples and a protein ladder carefully, avoiding overfilling wells (do not exceed 3/4 of well capacity) [44].
- Apply Current: Connect the power supply, ensuring correct polarity. For a standard mini-gel, run at a constant voltage of 80-150 V. Troubleshooting: If "smiling" occurs or bands appear smeared due to heat, reduce the voltage. Running at a lower voltage for a longer time improves resolution and minimizes heat-induced distortion [40].
- Completion: Stop the run when the tracking dye (e.g., bromophenol blue) front has reached the bottom of the gel.
The Scientist's Toolkit: Essential Reagents and Materials
Successful SDS-PAGE relies on a set of core reagents and equipment, each serving a specific function in the process of protein separation and analysis.
Table 2: Essential Research Reagent Solutions for Vertical Protein Gel Electrophoresis
| Item | Function in SDS-PAGE |
|---|---|
| Acrylamide/Bis-acrylamide | Forms the cross-linked polyacrylamide gel matrix that acts as a molecular sieve for size-based separation [11]. |
| SDS (Sodium Dodecyl Sulfate) | Denatures proteins and binds linearly to impart a uniform negative charge, masking intrinsic charge [11]. |
| Reducing Agent (DTT, BME) | Breaks disulfide bonds to fully denature proteins into individual polypeptide subunits [11]. |
| APS & TEMED | Catalyzes and initiates the free-radical polymerization of acrylamide to form a gel (APS: initiator; TEMED: catalyst) [11]. |
| Tris-based Buffers | Maintains stable pH during electrophoresis; discontinuous systems use different pH in stacking vs. resolving gels [11]. |
| Coomassie Blue Stain | A common protein dye that binds non-specifically to proteins, allowing visualization of bands post-electrophoresis [28]. |
| Protein Molecular Weight Ladder | A set of pre-stained or unstained proteins of known sizes used to estimate the molecular weight of unknown samples [11]. |
| Vertical Electrophoresis Unit | Apparatus that holds the gel cassette vertically between two buffer chambers containing cathode and anode [13]. |
| Power Supply | Provides a controlled electrical current to drive protein migration through the gel matrix [13]. |
Achieving publication-quality results in vertical protein gel electrophoresis demands meticulous attention to detail at every stage, from gel casting and sample preparation to the final electrophoretic run. Smearing, streaking, and distortion are not inevitable; they are diagnostic tools that point to specific, correctable issues in the experimental workflow. By adhering to the detailed protocols and troubleshooting guidelines outlined in this application note—particularly the rigorous optimization of sample integrity, gel polymerization, and running conditions—researchers and drug developers can consistently obtain clear, reliable, and high-resolution protein separations. This robustness is fundamental for downstream applications like western blotting and mass spectrometry, ensuring the accuracy and reproducibility of scientific data.
Addressing Faint Bands and Poor Resolution
In vertical protein gel electrophoresis, obtaining high-quality results with sharp, well-resolved bands is fundamental for accurate analysis. However, researchers often encounter the dual challenges of faint bands and poor band resolution. These issues can compromise data integrity, hinder accurate molecular weight determination, and delay downstream applications such as western blotting or mass spectrometry. This application note provides a systematic troubleshooting guide and detailed protocols to address these common problems, ensuring reliable and reproducible results in protein separation by SDS-PAGE.
Troubleshooting Faint Bands
Faint bands or a complete absence of bands indicate insufficient sample detection and can stem from problems at multiple stages of the electrophoresis workflow.
Primary Causes and Solutions
- Insufficient Sample Concentration: The most common cause of faint bands is loading an inadequate amount of protein. General recommendations suggest loading 0.1–0.2 μg of protein per millimeter of well width for mini-gels [29]. If bands are faint, progressively increase the protein load. For very low-abundance proteins, consider using a more sensitive detection method like silver staining or fluorescent dyes instead of Coomassie Blue [46] [40].
- Sample Degradation or Loss: Protein degradation by proteases can break down proteins into smaller fragments, resulting in a smear or no visible bands at the expected size. Implement strict cold handling conditions, use fresh protease inhibitors in all buffers, and avoid repeated freeze-thaw cycles of samples [30] [40]. Ensure samples are properly centrifuged before loading to prevent precipitation.
- Inefficient Transfer (for Western Blotting): If faint bands are observed during western blotting, the issue may be inefficient transfer from the gel to the membrane. Optimize transfer time and power, ensure proper contact between gel and membrane, and verify the transfer buffer composition [13].
- Electrophoresis Setup Errors: Simple errors, such as the power supply not being turned on, electrodes connected in reverse, or a short circuit, will prevent proteins from migrating into the gel. Always verify that the current is flowing by checking for bubbles forming on the electrodes after initiating the run [30].
Protocol: Optimizing Protein Load and Staining
Objective: To determine the ideal protein load and staining method for clear visualization. Materials: Protein samples, pre-stained protein ladder, SDS-PAGE gel, running buffer, staining solution (Coomassie Blue, silver stain, or fluorescent stain), destaining solution (if applicable).
- Sample Preparation: Prepare a dilution series of your protein sample (e.g., 5 μg, 10 μg, 20 μg, 40 μg) in 1X SDS-PAGE loading buffer.
- Gel Loading: Load the pre-stained ladder and the sample series into adjacent wells of the same gel.
- Electrophoresis: Run the gel at the appropriate constant voltage (e.g., 150V for a mini-gel) until the dye front reaches the bottom.
- Staining:
- For Coomassie Blue: Incubate the gel in Coomassie staining solution with gentle agitation for at least 1 hour. Destain with multiple changes of destaining solution until the background is clear and bands are sharp.
- For Fluorescent Stains: Follow the manufacturer's protocol for staining duration and destaining. Image using the appropriate excitation wavelength.
- Analysis: Identify the lowest protein load that yields a clearly visible, sharp band. Use this as your standard load for future experiments.
Troubleshooting Poor Resolution
Poorly resolved, blurry, or overlapping bands prevent accurate analysis of protein composition and size.
Primary Causes and Solutions
- Incorrect Gel Percentage: The concentration of polyacrylamide is the single most important factor for resolution [30]. A gel with pores that are too large will not resolve smaller proteins, while pores that are too small will impede the migration of larger proteins.
- Suboptimal Electrophoresis Conditions: Running the gel at too high a voltage generates excessive heat (Joule heating), leading to denatured proteins and smeared, poorly resolved bands [47] [30]. Conversely, running at too low a voltage or for an insufficient time does not allow adequate separation. Always use a constant voltage as recommended for your gel system.
- Improper Sample Preparation: Incomplete denaturation of proteins by SDS and reducing agents is a major cause of poor resolution. This can cause proteins to migrate in their native state or as aggregates, leading to smearing [30] [40]. Ensure your sample buffer contains fresh SDS and DTT (or β-mercaptoethanol) and that samples are heated at 95°C for 5-10 minutes.
- Sample Overloading: Loading too much protein overwhelms the gel's sieving capacity, causing thick, diffuse bands that merge together [29] [30]. Reduce the total protein amount loaded per well.
- Old or Contaminated Reagents: Degraded acrylamide, improper running buffer, or microbial contamination in buffers can all lead to aberrant migration and poor resolution [30]. Always prepare fresh running buffer from stock solutions and use reagents within their expiration date.
Protocol: Achieving Optimal Band Separation
Objective: To establish electrophoresis conditions that yield sharp, well-resolved protein bands. Materials: Protein samples and ladder, 30% acrylamide/bis-acrylamide solution, Tris buffers (for resolving and stacking gel), APS, TEMED, SDS, running buffer.
- Gel Selection and Casting:
- Refer to Table 1 to select the appropriate gel percentage for your protein's molecular weight.
- Prepare and cast the resolving gel according to your lab's standard protocol, ensuring the solution is well-mixed and degassed to facilitate even polymerization.
- Overlay with isopropanol or water for a straight gel interface.
- Once polymerized, pour the stacking gel and insert the comb without introducing bubbles.
- Optimized Sample Preparation:
- Mix protein samples with a fresh 1X SDS-PAGE loading buffer.
- Heat at 95°C for 5-10 minutes to ensure complete denaturation.
- Centrifuge at high speed for 2 minutes to pellet any insoluble debris.
- Running the Gel:
- Assemble the gel apparatus and fill with fresh running buffer.
- Load samples and ladder.
- Run the gel at a constant voltage. For a standard mini-gel, 150V is typical, but if smearing occurs, reduce to 100-120V [47] [40]. Use a constant current power supply if available for more uniform heat distribution.
- Stop the run when the dye front is about 1 cm from the bottom of the gel.
- Visualization: Proceed with staining immediately after electrophoresis to prevent band diffusion.
Quantitative Data and Parameters
The following tables summarize key parameters for optimizing gel electrophoresis to prevent faint and poorly resolved bands.
Table 1: Guidelines for Polyacrylamide Gel Concentration Based on Protein Size [11]
| Polyacrylamide Percentage (%) | Optimal Separation Range (kDa) |
|---|---|
| 8% | 30 - 200 |
| 10% | 20 - 150 |
| 12% | 15 - 100 |
| 15% | 10 - 70 |
Table 2: Troubleshooting Guide for Common Electrophoresis Issues
| Problem | Possible Cause | Recommended Solution |
|---|---|---|
| Faint Bands | Insufficient protein loaded [29] [40].Protein degraded by proteases [40].Inefficient staining [29].Proteins ran off the gel [47]. | Increase protein load.Use protease inhibitors; avoid freeze-thaw cycles.Use fresh stain; increase staining time; try a more sensitive stain.Use a higher % gel; reduce run time. |
| Poor Resolution | Incorrect gel percentage [30].Voltage too high [47] [30].Incomplete sample denaturation [30].Sample overloading [29] [30]. | Use appropriate gel % for target protein size (see Table 1).Reduce voltage by 25-50%; run gel longer at lower voltage.Ensure fresh DTT and SDS; heat samples at 95°C for 5-10 min.Load less protein per well; do not exceed 0.2 μg/mm of well width. |
| Smeared Bands | High salt concentration in sample [40].Voltage too high [47] [40].Air bubbles in wells during loading.Well damaged during loading [29]. | Desalt sample via dialysis or precipitation.Run gel at lower voltage.Load samples carefully to avoid introducing bubbles.Avoid puncturing well bottoms with pipette tips. |
Workflow and Signaling Pathways
The following workflow diagram outlines the systematic troubleshooting process for diagnosing and resolving faint bands and poor resolution in protein gel electrophoresis.
The Scientist's Toolkit: Essential Research Reagents
Successful protein electrophoresis relies on high-quality reagents. The following table details essential materials and their functions.
Table 3: Essential Reagents for Protein Gel Electrophoresis
| Reagent/Material | Function |
|---|---|
| Acrylamide/Bis-acrylamide (e.g., 30% solution) | Forms the cross-linked polyacrylamide matrix that acts as a molecular sieve for size-based separation [11]. |
| SDS (Sodium Dodecyl Sulfate) | Denatures proteins and confers a uniform negative charge, ensuring separation is based primarily on molecular weight [11]. |
| Reducing Agent (DTT or β-mercaptoethanol) | Breaks disulfide bonds within and between protein subunits, ensuring complete denaturation and linearization [11]. |
| APS (Ammonium Persulfate) and TEMED | Catalyzes the polymerization reaction of acrylamide and bis-acrylamide to form the polyacrylamide gel [11]. |
| Tris-based Buffers | Provides the appropriate pH environment for gel polymerization (Tris-HCl) and electrophoresis running buffer (e.g., Tris-Glycine) [11]. |
| Protein Molecular Weight Ladder | A set of pre-stained or unstained proteins of known molecular weights, used as a reference to estimate the size of unknown proteins [11]. |
| Coomassie Blue/Silver/Fluorescent Stains | Binds to proteins, making the separated bands visible for imaging and analysis [13]. |
| Protease Inhibitor Cocktails | Added to sample preparation buffers to prevent proteolytic degradation of the target protein, preserving band integrity [40]. |
Optimizing Voltage, Run Time, and Temperature for Sharp Bands
In vertical protein gel electrophoresis, achieving sharp, well-resolved bands is fundamental to accurate analysis. The interplay between voltage, run time, and temperature is a critical determinant of success, influencing everything from band resolution to gel integrity. This protocol provides a detailed framework for optimizing these key parameters to ensure reproducible, publication-quality results in SDS-PAGE.
Comprehensive Optimization Parameters
The following table summarizes the core parameters for optimization. Note that specific values are interdependent and must be balanced for optimal results.
| Parameter | Recommended Range | Effect on Separation | Risk of Suboptimal Setting |
|---|---|---|---|
| Voltage | 80-150 V for mini-gels (8x10 cm) [48] [2] | Higher voltage speeds up migration but can generate excessive heat [48]. | Band smiling, smearing, or gel melting [48]. |
| Run Time | ~45-90 minutes (varies with voltage and gel composition) [13] | Longer run times improve separation of similar-sized proteins [13]. | Bands running off the gel or diffusion causing blurriness [48]. |
| Temperature | Maintained at 4-10°C (via cooling system or lower voltage) [48] | Prevents heat-induced denaturation during separation and gel deformation. | Increased background noise, distorted bands, and compromised gel structure [48]. |
| Gel Percentage | 10-12% for most proteins; 15-20% for small peptides [48] | Higher percentage gels have smaller pores, better resolving smaller proteins [10]. | Poor resolution if the pore size is not matched to the target protein size range [10]. |
Optimization Workflow
Experimental Protocol for Parameter Optimization
This protocol outlines a systematic approach to establishing the ideal voltage, run time, and temperature conditions for your specific experimental setup.
Materials and Reagent Solutions
| Item | Function | Specification |
|---|---|---|
| Vertical Electrophoresis System | Houses the gel and buffer for the run. | Must be compatible with the chosen gel cassette size and have a lid with safety interlock [13]. |
| Power Supply | Provides the electrical current. | Capable of delivering constant voltage between 80-150 V [13]. |
| Polyacrylamide Gel | Acts as a molecular sieve for separation. | Pre-cast or hand-cast gel (e.g., 4-20% gradient or fixed percentage like 10-12%) [48]. |
| Running Buffer | Conducts current and maintains pH. | Tris-Glycine-SDS buffer, pH ~8.3 [12]. |
| Protein Ladder | Provides molecular weight reference. | Pre-stained or unstained, covering the expected size range of your samples. |
| Heating/Cooling System | Regulates buffer temperature. | Circulating chiller or cold room; alternatively, lower voltage to manage heat [48]. |
Step-by-Step Methodology
Gel and Buffer Preparation
Sample Loading
Initial Electrophoretic Run
- Set the power supply to a constant voltage of 80 V.
- Allow the samples to migrate through the stacking gel. This concentrates the proteins into a sharp line before they enter the resolving gel [2].
- Once the dye front enters the resolving gel, increase the voltage to 120-150 V for the remainder of the run [2].
Monitoring and Adjustment
- Monitor Temperature: If the buffer feels warm to the touch, the temperature is likely too high. Mitigate by reducing the voltage or using an external cooling system [48].
- Monitor Run Time: Stop the electrophoresis just before the leading dye front runs off the bottom of the gel [48]. Typical run times are between 45-90 minutes [13].
Troubleshooting and Re-optimization
- If bands are smeared: This can indicate overheating or sample degradation. Solution: Run the gel at a lower voltage or ensure the apparatus is in a cold room or using a cooling unit [48].
- If bands are curved ("smiling"): This is often caused by uneven heat distribution across the gel. Solution: Reduce the voltage to decrease overall heat generation [48].
- If migration is too slow: The voltage may be too low or the gel concentration too high. Solution: Slightly increase the voltage on the next run, ensuring temperature is controlled [13].
Troubleshooting Common Band Issues
The Scientist's Toolkit: Essential Research Reagents
| Reagent | Function in SDS-PAGE |
|---|---|
| SDS (Sodium Dodecyl Sulfate) | A denaturing detergent that binds to proteins and confers a uniform negative charge, allowing separation based solely on molecular weight [12] [2]. |
| Polyacrylamide Gel | A synthetic polymer gel that forms a matrix with tunable pore sizes, acting as a sieve to separate proteins by size [10] [2]. |
| Tris-Glycine Buffer | The standard running buffer that provides the ions necessary to conduct current and maintains a stable pH throughout the electrophoresis run [12]. |
| Loading Dye | Contains a tracking dye to monitor migration progress and glycerol to increase sample density, ensuring it sinks properly into the well [13]. |
| Coomassie Blue Stain | A dye that binds non-specifically to proteins, allowing visualization of separated bands after electrophoresis [12] [2]. |
Advanced Applications and Validation for Robust Protein Analysis
In vertical gel electrophoresis for protein research, the accuracy of your results hinges on robust experimental validation. Protein ladders and controls are not mere reference points; they are critical tools that verify the success of every stage of your protocol, from gel casting and electrophoretic separation to protein transfer and detection. Within the context of casting and running a protein gel, these components provide objective evidence that your system is functioning correctly, enabling precise molecular weight determination and ensuring the reliability of your data. This application note details the strategic use of protein ladders and controls to validate your vertical gel electrophoresis protocol, providing methodologies for researchers and drug development professionals to generate reproducible, publication-quality data.
The Scientist's Toolkit: Key Reagent Solutions
The following table catalogues essential reagents and their specific functions in validating a vertical gel electrophoresis protocol.
Table 1: Essential Research Reagents for Protocol Validation
| Reagent | Primary Function & Rationale |
|---|---|
| Prestained Protein Ladder | Provides visual monitoring of electrophoretic progression and transfer efficiency during western blotting. The colored bands allow you to track the run in real-time and confirm successful transfer from the gel to the membrane [49]. |
| Unstained Protein Ladder | Enables precise molecular weight determination after protein staining (e.g., Coomassie). The absence of dye prevents alterations in protein migration, ensuring accurate size estimation [49]. |
| Western Blot Protein Standard | Acts as a positive control on the blot membrane. Composed of recombinant proteins with IgG-binding sites, it is detected by the primary or secondary antibody, validating the immunodetection process [49]. |
| His-Tagged Protein Standard | A specialized unstained ladder where each band contains a 6X His-tag. It can be detected with specific stains, providing a high-precision reference for western blotting [49]. |
| Running Buffer (e.g., MES, MOPS) | Conducts electrical current and maintains stable pH during electrophoresis. The choice of buffer (MES for proteins 3.5-160 kDa, MOPS for proteins >200 kDa) directly impacts resolution [50]. |
| Loading Buffer | Prepares samples for loading by denaturing proteins, imparting a negative charge via SDS, and adding density (glycerol) to sink samples into wells. The dye provides a visual front to monitor migration [13]. |
Theoretical Foundations and Workflows
The Role of Controls in Experimental Validation
A well-designed experiment incorporates controls that authenticate each step. The protein ladder verifies proper electrophoretic separation. A loading control, such as a housekeeping protein or a total protein stain, confirms consistent loading across all lanes and is run on the same gel as the experimental samples [51]. For western blotting, a western blot standard validates the transfer and immunodetection phases [49]. This multi-layered approach isolates the source of any problem, whether it lies in the gel run, the transfer, or the antibody staining.
Selection Logic for Protein Ladders
Choosing the appropriate ladder is critical for effective validation. The selection should be guided by the experimental application and the molecular weight range of your target proteins. Broad-range ladders (e.g., 10-250 kDa) are suitable for routine applications, while high-range ladders (e.g., 30-460 kDa) are essential for analyzing large proteins and require specific gel types like Tris-Acetate for optimal separation [49]. Furthermore, the choice between prestained and unstained ladders depends on the need for real-time monitoring versus precise size determination.
The following diagram illustrates the decision-making process for selecting the appropriate protein ladder:
Quantitative Data for Reagent Selection
To make an informed selection, comparing the specifications of commercially available ladders is essential. The tables below summarize key metrics for different categories of protein ladders.
Table 2: Comparison of Prestained Protein Ladders for Separation Monitoring
| Product Description | Molecular Weight Range (kDa) | Number of Bands | Recommended Gel | Visualization Method |
|---|---|---|---|---|
| PageRuler Plus Prestained | 10 - 250 | 9 | All SDS-PAGE gels | Colorimetric, NIR fluorescence [49] |
| Spectra Multicolor Broad Range | 10 - 260 | 10 | All SDS-PAGE gels | Colorimetric, NIR & RGB fluorescence [49] |
| HiMark Prestained Standard | 31 - 460 | 9 | NuPAGE Tris-acetate | Colorimetric [49] |
| SeeBlue Prestained Standard | 3 - 200 | 9 | All SDS-PAGE gels | Colorimetric [49] |
Table 3: Comparison of Protein Ladders for Western Blotting and Precise Sizing
| Product Description | Molecular Weight Range (kDa) | Number of Bands | Primary Function & Properties |
|---|---|---|---|
| iBright Prestained Ladder | 11 - 250 | 12 | Western blot detection; has IgG-binding sites on 2 bands for positive control [49] |
| MagicMark XP Standard | 20 - 220 | 9 | Western blot detection; all bands contain IgG-binding sites [49] |
| PageRuler Unstained Broad Range | 5 - 250 | 11 | Accurate MW estimation; proteins contain Strep-tag II for immunodetection [49] |
| HiMark Unstained Standard | 40 - 500 | 9 | Analysis of high molecular weight proteins [49] |
Detailed Experimental Protocol for Validation
The following diagram outlines the core experimental workflow, highlighting the key validation steps where ladders and controls are critical. This protocol assumes the use of a handcast or pre-cast vertical polyacrylamide gel.
Step-by-Step Methodologies
Sample and Gel Preparation
- Sample Preparation: Homogenize tissue samples in an appropriate extraction buffer (e.g., RIPA buffer) at a 1:10 (w/v) ratio. Centrifuge at 20,000 x g for 20 minutes at 4°C and collect the supernatant [50]. Determine protein concentration using a BCA or Bradford assay, ensuring a standard curve with an R-squared value ≥ 0.99 [50].
- Sample Denaturation: Dilute protein samples to the desired concentration (e.g., 15 μg in 10 μL dH₂O). Add 5 μL of loading buffer, vortex, and heat at 98°C for 2 minutes [50].
- Gel and Buffer Setup: For a vertical gel system, select a 4-12% Bis-Tris gradient gel for broad molecular weight separation [50]. Prepare 1X running buffer—MES for proteins 3.5-160 kDa or MOPS for proteins >200 kDa [50]. Remove the comb, wash wells with running buffer, and assemble the gel in the tank, ensuring the inner and outer chambers are filled.
Gel Loading, Electrophoresis, and Validation
- Strategic Loading: Into the first well, load 3 μL of a prestained molecular weight standard [50]. Load denatured samples (e.g., 10 μL) into subsequent wells. Plan the loading order logically to facilitate future figure assembly, placing samples to be compared adjacent to one another [51].
- Electrophoretic Separation: Run the gel at a constant voltage. Initiate the run at 80 V for 4 minutes to allow uniform entry of samples into the gel matrix, then increase to 180 V for approximately 50 minutes, or until the dye front reaches the bottom of the gel [50].
- Validation Point 1 - Separation: Upon completion, visually inspect the gel. The prestained ladder should show sharp, well-separated bands. Smiling or frowning bands can indicate excessive heat due to high voltage [43]. Irregular band shapes may also result from sample overload, excess salt, or insufficient reducing agent [43].
Transfer and Immunodetection
- Protein Transfer: Assemble the wet or semi-dry transfer stack (gel and membrane). For wet transfer, use an appropriate buffer and transfer at 30 V for 90 minutes or as optimized for your system.
- Validation Point 2 - Transfer Efficiency: After transfer, observe the membrane. The colored bands of the prestained ladder should be clearly visible on the membrane, confirming successful protein elution from the gel and binding to the membrane [49]. The gel can subsequently be stained with Coomassie to confirm depletion of proteins.
- Immunoblotting:
- Blocking: Incubate the membrane in a commercial blocking buffer (e.g., SuperBlock) or 5% non-fat milk for 1 hour to prevent nonspecific antibody binding [52].
- Antibody Incubation: Incubate with primary antibody diluted in blocking buffer overnight at 4°C. Wash the membrane 3-5 times for 5 minutes each with TBST or PBST [52]. Incubate with a fluorophore- or HRP-conjugated secondary antibody for 1 hour at room temperature, followed by another wash series.
- Validation Point 3 - Detection: During imaging, the western blot protein standard (e.g., MagicMark) will be visible only upon antibody detection, serving as a positive control for the entire immunodetection process and providing a molecular weight estimate directly on the blot [49].
Troubleshooting Common Issues
Even with careful validation, issues can arise. The table below lists common problems related to ladders and controls, their potential causes, and solutions.
Table 4: Troubleshooting Guide for Gel and Blot Validation
| Problem | Potential Cause | Recommended Solution |
|---|---|---|
| No or distorted ladder bands | Precipitated SDS/LDS in cold buffer; Improper gel orientation; Leaking buffer chamber. | Bring sample buffer to room temperature; Ensure gel cassette is inserted correctly (lettering reads left-to-right); Check tank seals and gaskets [43]. |
| 'Smiling' or 'frowning' bands | Excessive heat during electrophoresis. | Ensure both buffer chambers are filled to act as a heat sink; Decrease the applied voltage to recommended conditions [43]. |
| Diffuse or smeary bands | Sample overload; Old or improperly prepared reducing agent. | Concentrate the protein and load a smaller volume; Prepare fresh sample solution using fresh DTT or beta-mercaptoethanol [43]. |
| Poor transfer efficiency | Incomplete contact in transfer stack; Incorrect transfer method for protein size. | Ensure no air bubbles are trapped in the transfer stack; For proteins >300 kDa, consider wet transfer instead of semi-dry for better efficiency [52]. |
| High background in blot | Inadequate blocking; Insufficient washing. | Extend blocking time; Try a different blocking agent (e.g., switch from milk to BSA); Increase number or duration of washes with TBST/PBST [52]. |
Documentation and Publication Standards
Adhering to community standards for image documentation is paramount for scientific integrity.
- Image Capture: Save a raw, unmanipulated image file with a resolution of at least 300 DPI and a minimum width of 190 mm [51]. Record all imaging settings (exposure time, resolution, etc.).
- Image Processing: If adjustments like brightness or contrast are applied, they must be applied evenly across the entire image. Keep a detailed record of all manipulations [51]. It is never acceptable to digitally alter the data itself (e.g., to remove background bands).
- Figure Preparation: Minimize cropping of gel and blot images to provide context. Always include the molecular weight ladder and essential controls in the published image [51]. For final publication, many journals (e.g., Nature Portfolio) require unprocessed, original images of all gels and blots to be submitted as supplementary information [51].
Comparing Denaturing (SDS-PAGE) vs. Native-PAGE Approaches
Polyacrylamide Gel Electrophoresis (PAGE) is a foundational technique in biochemistry and molecular biology for separating protein mixtures. The choice between its two primary forms—denaturing (SDS-PAGE) and native (Native-PAGE)—is critical and depends entirely on the experimental objectives. SDS-PAGE, which employs sodium dodecyl sulfate to denature proteins, separates polypeptides based almost exclusively on their molecular mass [53] [11]. In contrast, Native-PAGE separates proteins in their folded, functional state based on a combination of their intrinsic charge, size, and three-dimensional shape [54] [11]. This article provides a detailed comparison of these two approaches, including their principles, applications, and step-by-step protocols, framed within the context of preparing and casting protein gels for vertical electrophoresis systems.
Principle and Mechanism
The core difference between these techniques lies in the state of the protein during separation and, consequently, the properties that govern their migration through the polyacrylamide gel matrix.
SDS-PAGE: Separation by Molecular Weight
In SDS-PAGE, the anionic detergent Sodium Dodecyl Sulfate (SDS) is the key denaturing agent. It binds to hydrophobic regions of proteins in a constant ratio (approximately 1.4 g SDS per 1 g of protein), effectively unfolding them into linear polypeptides [11] [55]. This SDS coating masks the proteins' intrinsic charges and imparts a uniform negative charge density. Consequently, when an electric field is applied, all proteins migrate towards the anode at a rate inversely proportional to their molecular weight, as smaller polypeptides navigate the gel's pores more easily than larger ones [56] [11]. Reducing agents like Dithiothreitol (DTT) or β-mercaptoethanol are typically added to break disulfide bonds, ensuring complete denaturation and dissociation of protein subunits [53] [55].
Native-PAGE: Separation by Charge, Size, and Shape
Native-PAGE is performed in the absence of denaturing agents. Proteins remain in their native conformation, retaining their secondary, tertiary, and quaternary structures, as well as their biological activity [53] [54]. Separation in the gel depends on the protein's intrinsic net charge at the running buffer's pH, its size, and its three-dimensional shape [11]. A protein with a higher negative charge density will migrate faster towards the anode, while the gel matrix sieves proteins based on their hydrodynamic volume and shape [11]. This technique is ideal for studying functional protein complexes, enzyme activity, and protein-protein interactions.
The following diagram illustrates the fundamental procedural differences between the two methods:
Comparative Analysis: SDS-PAGE vs. Native-PAGE
The choice between SDS-PAGE and Native-PAGE dictates the type of information that can be obtained from an experiment. The table below provides a direct comparison of their characteristics.
Table 1: Key Differences Between SDS-PAGE and Native-PAGE
| Criteria | SDS-PAGE | Native-PAGE |
|---|---|---|
| Separation Basis | Molecular weight [53] [11] | Size, overall charge, and shape [53] [11] |
| Protein State | Denatured and linearized [53] [56] | Native, folded conformation [53] [54] |
| Detergent (SDS) | Present (0.1% - 1%) [53] [11] | Absent [53] |
| Reducing Agent | Usually present (DTT, BME) [53] [55] | Absent [53] |
| Sample Preparation | Heated (70-100°C) [53] [11] | Not heated [53] |
| Protein Function | Lost [53] [54] | Retained [53] [54] |
| Protein Recovery | Not typically functional [53] | Can be recovered functional [53] [11] |
| Primary Applications | Determine molecular weight, check purity/expression, western blotting [53] [56] | Study oligomeric state, protein-protein interactions, enzymatic activity [53] [54] |
| Typical Run Temperature | Room Temperature [53] | 4°C (to maintain stability) [53] |
Interpreting Results: A Practical Example
The different separation principles can lead to distinct results for the same protein. Consider a protein that exists as a homodimer (two identical subunits) in its native state, held together by non-covalent interactions [57].
- On Native-PAGE, the protein migrates as a single complex. Its migration distance will correspond to the molecular weight of the intact dimer (e.g., 120 kDa for a dimer of two 60 kDa subunits) because the complex remains assembled [57].
- On non-reducing SDS-PAGE, the SDS and heat dissociate the non-covalent bonds but leave disulfide bonds (if present) intact. The protein would run as a band corresponding to the monomer size (60 kDa), indicating the subunits are not linked by disulfides [57].
This discrepancy is informative and allows researchers to deduce the quaternary structure and bonding of a protein.
Protocols for Vertical Gel Electrophoresis
The following protocols are designed for casting and running mini-gels (approx. 8 x 8 cm) in a standard vertical electrophoresis system.
Protocol 1: SDS-PAGE
A. Gel Casting (Handcast Method)
Table 2: Research Reagent Solutions for SDS-PAGE Gel Casting
| Reagent | Function | Resolving Gel (12%, 10 mL) | Stacking Gel (4%, 3 mL) |
|---|---|---|---|
| Acrylamide/Bis Solution (30%/0.8%) | Forms the porous gel matrix [11] | 4.0 mL | 0.4 mL |
| Tris-HCl (1.5 M, pH 8.8) | Buffers the resolving gel [11] | 2.5 mL | - |
| Tris-HCl (1.0 M, pH 6.8) | Buffers the stacking gel [11] | - | 0.38 mL |
| SDS Solution (10% w/v) | Ensures continued protein denaturation in gel [11] | 0.1 mL | 0.03 mL |
| Ammonium Persulfate (10% w/v) | Polymerization initiator [11] | 0.1 mL | 0.03 mL |
| TEMED | Polymerization catalyst [11] | 0.01 mL | 0.003 mL |
| Deionized Water | Solvent | 3.3 mL | 2.16 mL |
Procedure:
- Assemble the gel cassette according to the manufacturer's instructions for your vertical electrophoresis unit.
- Prepare the resolving gel: In a small beaker, mix all components from Table 2 for the resolving gel, adding TEMED last. Swirl gently to mix.
- Pour the resolving gel: Immediately pipette the solution into the gap between the glass plates, leaving space for the stacking gel (approx. 1-2 cm below the top of the shorter plate).
- Overlay with solvent: Carefully layer a small amount of water-saturated isobutanol or deionized water on top of the gel to create a flat, even interface.
- Polymerize: Let the gel sit undisturbed for 20-30 minutes until polymerization is complete (a distinct schlieren line will be visible).
- Prepare and pour the stacking gel: After polymerization, pour off the overlay and rinse the top of the gel with water. Mix the stacking gel components from Table 2, adding TEMED last. Pour the solution onto the resolving gel and immediately insert a clean comb.
- Polymerize: Allow the stacking gel to polymerize for 15-20 minutes.
B. Sample Preparation and Electrophoresis
- Prepare sample buffer: Use a standard 2X Laemmli buffer (e.g., 100 mM Tris-HCl pH 6.8, 4% SDS, 20% glycerol, 0.2% bromophenol blue) with 10% β-mercaptoethanol or 200 mM DTT as a reducing agent [56] [55].
- Mix and denature: Combine your protein sample with an equal volume of sample buffer. Heat the mixture at 70-100°C for 5-10 minutes [11] [55].
- Prepare running buffer: Use 1X Tris-Glycine-SDS running buffer (e.g., 25 mM Tris, 192 mM glycine, 0.1% SDS, pH ~8.3) [11].
- Load and run: Place the polymerized gel cassette into the electrophoresis tank and fill the chambers with running buffer. Carefully load your denatured samples and a protein ladder into the wells. Run the gel at a constant voltage of 100-150 V until the dye front reaches the bottom of the gel (typically 40-60 minutes) [56].
Protocol 2: Native-PAGE
A. Gel Casting
The procedure for casting a native gel is similar to SDS-PAGE, but with critical modifications to the reagents.
Table 3: Research Reagent Solutions for Native-PAGE Gel Casting
| Reagent | Function | Resolving Gel (8%, 10 mL) | Stacking Gel (4%, 3 mL) |
|---|---|---|---|
| Acrylamide/Bis Solution | Porous gel matrix [11] | 2.67 mL | 0.4 mL |
| Tris-HCl (1.5 M, pH 8.8) | Gel buffer | 2.5 mL | - |
| Tris-HCl (1.0 M, pH 6.8) | Gel buffer | - | 0.38 mL |
| Ammonium Persulfate (10% w/v) | Polymerization initiator [11] | 0.1 mL | 0.03 mL |
| TEMED | Polymerization catalyst [11] | 0.01 mL | 0.003 mL |
| Deionized Water | Solvent | 4.73 mL | 2.19 mL |
Procedure: The casting procedure is identical to the SDS-PAGE protocol in Section 4.1.A, but using the Native-PAGE reagents listed in Table 3. Crucially, SDS is omitted from both the gel and all buffers.
B. Sample Preparation and Electrophoresis
- Prepare native sample buffer: Use a non-denaturing buffer (e.g., 50 mM Tris-HCl pH 7.4, 10% glycerol, 0.01% bromophenol blue) [58]. Do not add SDS, reducing agents, or heat the sample.
- Mix sample: Gently mix the protein sample with an equal volume of native sample buffer.
- Prepare running buffer: Use 1X Tris-Glycine running buffer (e.g., 25 mM Tris, 192 mM glycine, pH ~8.3-8.8) without SDS [53].
- Load and run: Load the samples into the gel. To maintain protein stability and function, it is recommended to run the gel at 4°C [53]. Run at a constant voltage of 100-150 V until the dye front migrates to the bottom of the gel.
Advanced Technique: Native SDS-PAGE (NSDS-PAGE)
A hybrid approach, termed Native SDS-PAGE (NSDS-PAGE), has been developed to bridge the gap between high resolution and the retention of native properties [58]. This method uses drastically reduced SDS concentrations (e.g., 0.0375% in the running buffer and none in the sample buffer) and omits heating and reducing agents [58]. Under these mild conditions, many proteins can retain their enzymatic activity and bound metal ions while still achieving high-resolution separation that closely resembles traditional SDS-PAGE [58]. This makes NSDS-PAGE particularly valuable for metalloprotein research and functional proteomics.
SDS-PAGE and Native-PAGE are complementary techniques that serve distinct purposes in the protein research toolkit. SDS-PAGE is the method of choice for determining molecular weight, assessing sample purity, and analyzing subunit composition under denaturing conditions. Native-PAGE is indispensable for probing the functional characteristics of proteins, including their oligomeric state, interactions, and enzymatic activity. The choice of method, along with careful attention to protocol details such as buffer composition and sample preparation, is fundamental to obtaining reliable and interpretable data in vertical gel electrophoresis.
The analysis of high-molecular-weight (HMW) proteins represents a significant technical challenge in proteomics and biomedical research. Standard polyacrylamide gel electrophoresis (PAGE), while excellent for most proteins, encounters substantial limitations when dealing with proteins exceeding 500 kDa. The fundamental issue lies in the polyacrylamide matrix itself—creating gels with sufficiently large pore sizes to accommodate massive proteins results in structures that are mechanically unstable and difficult to handle [59]. This technical barrier impedes the study of many biologically crucial HMW proteins, including titin (3000-4000 kDa), various structural proteins, large enzyme complexes, and therapeutic monoclonal antibodies [60] [59].
Agarose gel electrophoresis emerges as a powerful alternative matrix precisely for these challenging separations. While traditionally associated with nucleic acid electrophoresis, agarose forms a porous matrix with naturally larger pore sizes than polyacrylamide, enabling the migration of very large proteins that would be excluded from standard PAGE gels [59]. The utilization of agarose for HMW protein separation represents a specialized methodological approach that should be part of every protein researcher's toolkit, particularly for those investigating large protein complexes, structural biology, and therapeutic proteins where accurate separation and analysis are critical for valid scientific conclusions.
Table 1: Protein Size Ranges and Recommended Gel Types
| Protein Size Range | Recommended Gel Type | Key Advantages |
|---|---|---|
| 2.5 - 40 kDa | Tricine Polyacrylamide [61] | Superior resolution of low MW proteins |
| 6 - 400 kDa | Bis-Tris or Tris-Glycine Polyacrylamide [61] | Broad range resolution, neutral pH |
| 40 - 500 kDa | Tris-Acetate Polyacrylamide [61] | Improved resolution of high MW proteins |
| >500 kDa | SDS-Agarose (0.5-1%) [59] | Large pore size, mechanical stability |
Fundamental Principles: Agarose vs. Polyacrylamide Matrices
Structural and Separation Characteristics
The selection between agarose and polyacrylamide matrices hinges on their distinct structural properties and resulting separation characteristics. Polyacrylamide gels are chemical polymers formed through the copolymerization of acrylamide and bis-acrylamide, creating a mesh-like network with uniform, small pores. The pore size is precisely controlled by varying the concentration of acrylamide, typically ranging from 5% to 20% [2]. While this allows excellent resolution for most proteins, the practical upper limit for pore size is reached around 4-6% acrylamide, which remains too restrictive for proteins larger than 500 kDa and is mechanically fragile [59].
In contrast, agarose is a polysaccharide derived from seaweed that forms a highly porous hydrogel through hydrogen bonding. The pores in a standard 1% agarose gel are significantly larger than even the most dilute polyacrylamide gels, creating a molecular sieve capable of separating macromolecules in the megadalton range [59]. This large pore structure is mechanically robust, making the gels easier to handle and cast. The separation mechanism in both systems, when using SDS, relies on the denaturation of proteins to a uniform charge-to-mass ratio, ensuring migration is primarily based on molecular size rather than intrinsic charge [12] [2].
Practical and Performance Considerations
From a practical standpoint, agarose gels offer several operational benefits. They can be prepared quickly by dissolving agarose powder in buffer and cooling, without the need for toxic polymerization catalysts like TEMED and ammonium persulfate, which are required for polyacrylamide gels [62]. Agarose gels also typically have faster run times due to their larger pore structure, which presents less resistance to large protein migration. Furthermore, electroblotting efficiency for HMW proteins from agarose gels approaches 100%, significantly outperforming polyacrylamide for transfer to membranes for subsequent western blot analysis [59].
However, agarose gels have a key limitation: they provide lower resolution for average and low molecular weight proteins compared to polyacrylamide. The large pore structure does not effectively separate proteins below 200 kDa, resulting in poor band sharpness [59]. Therefore, the choice of matrix is highly dependent on the target protein size, with agarose being the specialized tool for the extreme upper range of the protein size spectrum.
Methodological Approach: Vertical Agarose Gel Electrophoresis (VAGE) for High-Molecular-Weight Proteins
Protocol: SDS-Agarose Gel Electrophoresis and Electroblotting
The following detailed protocol for Vertical Agarose Gel Electrophoresis (VAGE) is adapted from established methodologies for separating proteins with subunit sizes ranging from approximately 220 kDa up to 4000 kDa [59]. This system has been successfully used to resolve titin isoforms and other massive proteins that are impossible to analyze using standard polyacrylamide systems.
Gel Preparation and Casting
Solution Preparation: Prepare 1x Tris-Glycine-SDS running buffer. For 1L of 1x buffer, dilute 100mL of 10x stock (151.4g Tris, 720.7g Glycine, 50g SDS in 5L water) with 900mL deionized water [60].
Agarose Dissolution: Measure 1.0g of high-grade agarose and add to 100mL of 1x running buffer in a heat-resistant flask. The concentration can be adjusted between 0.7% and 2% depending on the target protein size, with lower percentages providing larger pores for enormous proteins [62] [59].
Melting Procedure: Microwave the mixture using intermittent heating (30-45 second bursts) with swirling between intervals until the agarose is completely dissolved and the solution is clear. Take care to avoid violent boiling which can alter the final concentration through evaporation [62].
Cooling and Pouring: Allow the agarose solution to cool to approximately 50°C (comfortable to hold against the flask). Pour the liquid agarose into a vertical gel casting system equipped with the appropriate comb. Unlike polyacrylamide, no polymerization time is required [59].
Solidification: Allow the gel to solidify completely at room temperature for 20-30 minutes or at 4°C for 10-15 minutes. The gel will appear opaque when fully set [62].
Sample Preparation and Loading
Protein Denaturation: Mix protein samples with 2x SDS-PAGE sample buffer (standard Laemmli buffer containing SDS and reducing agents such as DTT or β-mercaptoethanol). For complete denaturation of HMW proteins, heat samples at 95°C for 5 minutes [60] [2].
Loading Configuration: Load at least 20μg of total protein per lane for optimal detection. Include an appropriate high-molecular-weight marker in one lane. For HMW proteins, precision in loading is critical—prepare 10% more sample volume than needed to account for pipetting error [60] [62].
Electrophoresis Conditions: Assemble the gel in a vertical electrophoresis tank. Fill the upper and lower chambers with running buffer. Run the gel at constant voltage (150V) for approximately 1.5 hours or until the dye front has migrated sufficiently. Maintain cooling at 4°C for best results [60].
Protein Detection and Transfer
Visualization: Following electrophoresis, stain the gel with Coomassie Blue or transfer for western blotting. Note that protein bands in agarose may be slightly more diffuse than in polyacrylamide [12].
Electroblotting: For western blotting, use standard wet transfer systems. Transfer at 500mA for 1 hour at 4°C for optimal results. The efficiency of electroblotting HMW proteins from agarose gels approaches 100%, significantly superior to polyacrylamide [60] [59].
Membrane Activation: When using PVDF membranes, activate with 99.5% methanol for 15 seconds prior to transfer. For nitrocellulose, this step is unnecessary [60].
Table 2: Key Reagents and Materials for Agarose Gel Electrophoresis of HMW Proteins
| Reagent/Material | Specification/Function | Example Product/Formula |
|---|---|---|
| Agarose | High-grade, electrophoresis purity | Standard molecular biology grade |
| Running Buffer | Tris-Glycine-SDS, maintains pH and conductivity | 25mM Tris, 192mM Glycine, 0.1% SDS [60] |
| Sample Buffer | Laemmli buffer with reducing agents, denatures proteins | 62.5mM Tris-HCl, pH 6.8, 2% SDS, 10% glycerol, 50mM DTT [2] |
| Protein Markers | High-molecular-weight standards | Myosin (220 kDa), Thyroglobulin (660 kDa) |
| Transfer Buffer | For electroblotting to membrane | Tris-Glycine buffer with 20% methanol [60] |
| Membrane | For protein transfer and detection | PVDF or Nitrocellulose [60] |
Advanced Applications and Comparative Analysis
Capillary Agarose Gel Electrophoresis for Therapeutic Proteins
Recent advancements have extended agarose-based separation into capillary formats for analytical applications. SDS capillary agarose gel electrophoresis (SDS-CAGE) represents a significant innovation for the analysis of therapeutic proteins, particularly overcoming the challenge of baseline disturbances that plague traditional capillary electrophoresis methods [63]. This technique uses a transiently cross-linked agarose matrix stabilized with tetrahydroxyborate to enable rapid, high-resolution separation of large proteins with excellent reproducibility (RSD <0.3% for migration time and <5% for peak area) [63].
The SDS-CAGE method has been successfully applied to analyze secretory immunoglobulin A (sIgA), a complex glycoprotein with a molecular weight exceeding 400 kDa, demonstrating the capability of agarose-based systems for characterizing highly glycosylated therapeutic proteins [64]. The analysis time for such large proteins can be as short as 10 minutes, offering a rapid and robust platform for quality control in biopharmaceutical development [63] [64]. This method effectively eliminates the baseline "humps" or "waves" that frequently complicate the analysis of complex protein samples in traditional CE-SDS, enabling more accurate quantification and characterization of therapeutic proteins [63].
Comparative Performance Analysis
The performance advantages of agarose gels for HMW proteins become evident when directly comparing key parameters with polyacrylamide systems. The successful separation of titin (3000-4000 kDa) using vertical agarose gel electrophoresis, achieving migration over 10 cm in an approximately 13 cm resolving gel, represents a capability far beyond what is possible with polyacrylamide matrices [59]. This system has revealed previously undetectable titin size variants in muscle tissues, demonstrating its value in discovering structural and functional diversity in HMW proteins [59].
From a practical applications perspective, VAGE has demonstrated particular utility in several key areas:
Structural Biology: Enables analysis of massive structural proteins like titin and nebulin in muscle tissues, revealing isoform diversity and post-translational modifications [59].
Therapeutic Protein Analysis: Supports characterization of large biopharmaceuticals including monoclonal antibodies, fusion proteins, and antibody-drug conjugates where accurate size determination is critical for quality control [63] [64].
Protein Complex Studies: Facilitates investigation of large multi-protein complexes that remain partially associated even under denaturing conditions.
Diagnostic Applications: Allows detection of high-molecular-weight biomarkers in clinical samples that were previously inaccessible to gel-based analysis.
Table 3: Troubleshooting Common Issues in HMW Protein Electrophoresis
| Problem | Potential Causes | Solutions |
|---|---|---|
| Poor Resolution | Gel concentration inappropriate | Use lower % agarose (0.7-1%) for larger proteins |
| Smeared Bands | Overheating during run | Use cooling system (4°C); reduce voltage [60] |
| Weak Transfer | Incomplete electroblotting | Optimize transfer time; ensure membrane activation [60] |
| High Background | Inadequate blocking | Extend blocking time; optimize blocking buffer [60] |
Agarose gel electrophoresis represents an essential specialized technique in the protein researcher's arsenal, specifically designed for the challenging task of separating high-molecular-weight proteins exceeding 500 kDa. The method capitalizes on the naturally large pore structure of agarose matrices to resolve protein species that are completely excluded from standard polyacrylamide gels. The technique has been validated for proteins up to 4000 kDa, with applications spanning from basic research on structural proteins to quality control of therapeutic biologics.
The implementation of vertical agarose gel electrophoresis, combined with optimized electroblotting protocols, provides a robust workflow for analyzing HMW proteins with transfer efficiencies approaching 100%. Furthermore, the recent development of capillary-based agarose electrophoresis extends these capabilities to automated, high-throughput analytical systems for biopharmaceutical applications. While agarose does not replace polyacrylamide for routine protein separations, it fills a critical methodological gap for researchers working with the extreme upper range of the protein size spectrum. Mastery of this technique expands the experimental possibilities for investigating large protein complexes, structural biology, and therapeutic proteins that play crucial roles in health and disease.
Systematic Optimization of Solubilization Buffers for Complex Samples
The solubilization of complex protein samples is a critical, yet often challenging, first step in preparing for vertical gel electrophoresis. Inefficient solubilization can lead to protein loss, aggregation, and poor resolution, ultimately compromising the reliability of downstream analyses such as western blotting. This application note provides a structured framework for the systematic optimization of solubilization buffers, specifically tailored for researchers preparing complex biological samples for separation via vertical polyacrylamide gel electrophoresis (PAGE) [11]. The protocols and data presented herein are designed to guide scientists in selecting and refining buffer conditions to maximize protein yield, stability, and data quality.
The Scientist's Toolkit: Essential Research Reagents
The following table details key reagents and their functions in the process of solubilizing complex samples for electrophoresis.
Table 1: Key Reagents for Sample Solubilization and Preparation
| Reagent Category | Specific Examples | Primary Function | Key Considerations |
|---|---|---|---|
| Detergents | SDS, Rapigest, Triton X-100, IGEPAL CA-630 [65] [66] [67] | Denatures proteins and disrupts lipid membranes; SDS confers uniform negative charge [11]. | SDS is essential for denaturing SDS-PAGE; milder detergents (Triton) are used for native purification [66] [11]. |
| Chaotropic Agents | Urea, Thiourea, Guanidine HCl (GdnHCl) [65] [67] | Disrupts hydrogen bonding, unfolding proteins and increasing solubility [67]. | Often used at high concentrations (6-8 M); optimal concentration and pH are protein-dependent [67]. |
| Reducing Agents | Dithiothreitol (DTT), β-mercaptoethanol [67] | Cleaves disulfide bonds, fully denaturing proteins [11]. | Critical for analyzing complex multi-subunit proteins; prevents improper folding [67]. |
| Buffers & Stabilizers | Tris-HCl, Ammonium Bicarbonate, Sugars (glucose, sorbitol), Amino Acids (arginine, glycine), Polyols (glycerol) [65] [67] | Maintain pH, reduce aggregation, and enhance refolding stability during sample preparation [67]. | "Optimum Solubility Screening" identifies ideal buffer and additive combinations for specific proteins [68]. |
| Precipitation Agents | Methanol, Trichloroacetic Acid (TCA) [65] | Concentrates and purifies proteins from dilute or complex starting materials like saliva [65]. | Pre-processing step to remove interfering substances; choice of agent impacts subsequent solubilization [65]. |
Comparative Analysis of Solubilization Method Efficacy
A recent study systematically evaluated different sample preparation methods for the salivary proteome, providing quantitative data highly relevant for electrophoresis sample preparation [65]. The following table summarizes the key findings on proteome coverage and digestion efficiency, which are critical indicators of successful solubilization.
Table 2: Quantitative Comparison of Sample Preparation Methods for a Complex Sample (Saliva) [65]
| Method | Pre-processing / Precipitation | Solubilization Buffer | Key Performance Metric (MPS-Relevant Proteins Identified) | Digestion Efficiency (% Full Cleavage) |
|---|---|---|---|---|
| in-solution digestion (inSol) | Trichloroacetic Acid (TCA60) | 0.1% Rapigest in 50 mM Ammonium Bicarbonate | 74 proteins | >80% |
| in-solution digestion (inSol) | Methanol (MeOH) | 0.1% Rapigest in 50 mM Ammonium Bicarbonate | Data provided in source | >80% |
| in-solution digestion (inSol) | Trichloroacetic Acid (TCA60) | 8M Urea / 2M Thiourea (UT) | Data provided in source | Data provided in source |
| Solid-Phase SP3 | Methanol (MeOH) | 8M Urea / 2M Thiourea (UT) | 40 proteins | Data provided in source |
| Solid-Phase SP3 | Direct to Raw Saliva | Paramagnetic Beads in appropriate buffer | Data provided in source | High reproducibility reported |
The data demonstrates that the combination of pre-processing and solubilization buffer significantly impacts outcomes. The traditional in-solution method with TCA precipitation and Rapigest buffer provided the most comprehensive proteome coverage for this complex sample [65]. Both methods showed high digestion efficiency with Rapigest buffer, indicating effective protein denaturation and accessibility for enzymatic digestion [65].
Experimental Protocols for Buffer Optimization
Protocol 1: OS Screening for Buffer and Additive Optimization
The Optimum Solubility (OS) screening method is an efficient approach to identify buffer conditions that promote protein homogeneity, a prerequisite for high-quality electrophoresis [68].
- Buffer Screening: Prepare a 24-condition screen of buffers covering a wide pH range (e.g., pH 3 to 10) using a vapor-diffusion setup with minimal protein.
- Visual Assessment: After 24 hours, examine each drop under a light microscope. Clear drops indicate conditions where the protein remains soluble.
- Dynamic Light Scattering (DLS): Subject the clear drops from step 2 to DLS analysis to assess the monodispersity and size distribution of the protein particles.
- Additive Screening (If Required): If the initial buffer screen does not yield sufficiently monodisperse samples, a second screen exploring various chemical additives (e.g., salts, sugars, detergents, and reducing agents) should be performed to further improve solubility [68].
This method has been shown to successfully enable crystallization in 64% of initially aggregated proteins, underscoring its effectiveness in achieving homogeneous samples [68].
Protocol 2: Solubilization of Inclusion Bodies
Proteins overexpressed in E. coli often form inclusion bodies (IBs), which are dense, insoluble aggregates requiring robust solubilization [66]. This protocol is adapted from successful IB solubilization studies [67].
IB Isolation and Washing:
- Resuspend the cell pellet in Lysis Buffer (e.g., 50 mM Tris-HCl, 1% Triton X-100, 100 mM NaCl, 10 mM DTT, pH 8.0).
- Lyse cells via sonication on ice.
- Add benzonase (10 U/mL) and MgCl₂ (2 mM) to reduce viscosity by digesting nucleic acids.
- Centrifuge at 11,000 ×g for 20 min at 4°C. Discard the supernatant.
- Wash the pellet (the crude IB fraction) repeatedly with Wash Buffer with and without detergent to remove cell debris and contaminants [67].
Solubilization Screening:
- Test different denaturing agents, such as Urea (2-8 M) and Guanidine HCl (2-6 M), on identical aliquots of washed IBs.
- Evaluate combinations of denaturing agents (e.g., 6 M Urea and 6 M GdnHCl at different ratios).
- Investigate the effect of pH (e.g., pH 12 vs. neutral pH) and the inclusion of additives like DTT or n-propanol in the best solubilizing agent [67].
- Centrifuge solubilized samples at 7,500 ×g for 10 min. The protein concentration in the supernatant indicates the success of solubilization, which can be quantified via SDS-PAGE and Bradford assay [67].
Refolding (If Required for Functional Assays):
- For active protein recovery, use a rapid dilution method to refold the solubilized protein.
- Systematically test refolding buffer additives such as sugars (e.g., 1.15 M glucose), polyols (e.g., 0.16 M sorbitol), and amino acids (e.g., 9.16 mM imidazole) to suppress aggregation and promote correct folding [67].
Workflow Diagram for Systematic Optimization
The following diagram outlines the logical decision-making process for optimizing a solubilization buffer, from initial assessment to final electrophoresis.
Systematic Solubilization Buffer Optimization Workflow
Successful separation of proteins by vertical gel electrophoresis is fundamentally dependent on the initial solubilization step. A methodical approach to optimizing solubilization buffers, as outlined in this application note, is not a one-size-fits-all process but rather a strategic investigation. By leveraging comparative data, implementing structured screening protocols for buffers and additives, and understanding the role of key reagents, researchers can significantly improve the clarity, reproducibility, and biological relevance of their electrophoretic analyses. This systematic optimization ensures that the protein sample entering the gel truly represents the complex biological system under study.
In the fields of molecular biology, genetics, and biochemistry, the ability to separate and analyze biological macromolecules is a fundamental requirement for accurate research, diagnostics, and quality control [2]. At the core of this capability lies electrophoresis, a powerful and versatile technique that has become indispensable in the modern laboratory workflow [2]. Vertical gel electrophoresis, specifically using polyacrylamide gels, provides the foundation for numerous analytical techniques central to proteomics and protein characterization. Its ability to separate proteins with high resolution based on molecular weight makes it an essential first step in western blotting and many proteomic workflows [69].
The principle of electrophoresis involves the migration of charged molecules in a liquid or semisolid medium under the influence of an electric field [2]. By leveraging differences in molecular properties such as size, charge, and shape, this method provides a high-resolution means to purify and characterize proteins [2]. The effectiveness of electrophoresis is rooted in a fundamental physical principle: charged particles will migrate toward an electrode of the opposite polarity when subjected to an electric field [2]. For proteins, which possess varying charges determined by their amino acid composition and the pH of the buffer, techniques like SDS-PAGE (sodium dodecyl sulfate-polyacrylamide gel electrophoresis) overcome this variability by imparting a uniform negative charge-to-mass ratio on all proteins, ensuring separation occurs almost exclusively by molecular weight [2].
This application note explores the central role of vertical gel electrophoresis in western blotting and proteomics, providing detailed methodologies and contextualizing these techniques within the broader framework of protein research and drug development.
Core Principles of Vertical Gel Electrophoresis for Protein Separation
Theoretical Foundations of SDS-PAGE
Sodium dodecyl sulfate-polyacrylamide gel electrophoresis (SDS-PAGE) is the gold standard for separating proteins based on their molecular weight [2]. The technique overcomes the variable charge issue of native proteins by treating protein samples with a denaturing agent, sodium dodecyl sulfate (SDS). This anionic detergent binds to the hydrophobic regions of proteins, causing them to unfold into linear polypeptide chains [2]. Critically, SDS imparts a uniform negative charge-to-mass ratio on all proteins, effectively eliminating the influence of a protein's intrinsic charge on its migration rate [2]. Consequently, protein separation in SDS-PAGE is based almost exclusively on size [2].
The separation matrix, a polyacrylamide gel, acts as a molecular sieve [2]. Unlike agarose, polyacrylamide is a chemical polymer with a highly uniform pore size, which provides superior resolution for proteins [2]. The gel is typically cast in a vertical orientation and consists of two parts: a lower resolving gel and an upper stacking gel [2]. The stacking gel concentrates the proteins into a narrow band before they enter the resolving gel, ensuring sharp, well-defined bands [2].
Gel Composition and Molecular Weight Resolution
The percentage of polyacrylamide in the gel determines how easily proteins of various sizes can move through the gel [70]. Higher percentage gels have a tighter gel matrix better for resolving smaller proteins [70]. The appropriate gel percentage should be selected based on the molecular weight of the target protein(s) as shown in Table 1.
Table 1: Gel Percentage Selection Guide Based on Protein Molecular Weight
| Protein Size (kDa) | Recommended Gel Percentage |
|---|---|
| >100 | 8% |
| 30-100 | 10% |
| 10-30 | 12% |
| <10 | 15% |
If unsure of the protein size or looking at proteins of a variety of molecular weights, a gradient gel may provide the best resolution [71].
Protein Gel Casting: Protocol for Vertical Electrophoresis
Resolving Gel Preparation
- Determine the volume needed and gently mix the ingredients for the chosen percentage of the resolving gel. Blend the solution gently to avoid introducing too much oxygen into the solution [71].
- Pour the gel solution slowly into your gel casting form [71].
- Layer the top of the gel with distilled water to prevent oxygen from entering the gel [71].
- Incubate at 37°C for 30-60 minutes for the gel solution to fully polymerize until it becomes solid [71].
- Remove the water from the polymerized resolving gel (absorb excess with paper towel) [71].
Stacking Gel Preparation
- Determine the volume needed, gently mix the ingredients, and absorb water on the solid resolving gel with a filter [71].
- Slowly pour the stacking gel solution on top of the running gel [71].
- Carefully insert the sample comb to avoid bubbles. There should be no bubbles between the comb teeth [71].
- Incubate at 37°C for 30-60 minutes. When the gel solution is fully polymerized and solid, gently take out the comb [71].
Sample Preparation and Electrophoresis Run
- Mix the extracted protein sample with loading buffer (e.g., 4X Dual Color Protein Loading Buffer at a 3:1 ratio) [71].
- Denature the sample/loading buffer mixture in a 100°C water bath for 5 minutes [71].
- Place the gel in the electrophoresis apparatus and fill both buffer chambers with SDS-PAGE electrophoresis buffer [71].
- Carefully remove the comb from the gel and rinse the wells with the electrophoresis buffer [71].
- Pipette your samples into the wells quickly to prevent possible sample diffusion [71].
- Pipette appropriate controls and molecular weight standards in separate well(s) [71].
- Run electrophoresis at 100-130V until the tracking dye reaches the gel bottom (typically 1.5 to 3 hours) [71].
Application 1: Western Blotting for Specific Protein Detection
Western Blotting Workflow and Principles
Western blotting, also called immunoblotting, is a widely used method for detecting specific proteins in a sample [71]. Developed in 1979 by W. Neal Burnette, this technique remains a standard in molecular biology [71]. The process involves separating proteins by gel electrophoresis, transferring them to a membrane, and using antibodies for detection [71]. Western blotting is commonly used to confirm protein expression and post-translational changes, playing a key role in research and diagnostics, including HIV detection and studies of cancer and neurodegenerative diseases [71].
The complete western blotting workflow extends beyond the initial gel electrophoresis to include protein transfer, blocking, and antibody-based detection as outlined in Figure 2.
Detailed Western Blot Protocol Following Gel Electrophoresis
Step 1: Protein Transfer to Membrane
- Membrane Preparation: Cut the blotting membrane (nitrocellulose or PVDF) according to the size of your gel. Soak PVDF membrane in methanol for 1 minute, then immerse in transfer buffer for 5 minutes [71].
- Transfer Cassette Assembly: Assemble the transfer "sandwich" in the following order: Foam Pad → Filter Paper → Gel → Membrane → Filter Paper → Foam Pad [71]. Ensure the gel is closest to the cathode and the membrane is closest to the anode [70].
- Transfer Run: Fill the transfer tank with transfer buffer and firmly insert the transfer cassette. Run at appropriate constant current for 1-2 hours depending on protein size [71].
Step 2: Membrane Blocking
- Blocking Buffer: Incubate the membrane in an appropriate blocking buffer for 1 hour at room temperature [70].
- Buffer Selection: Use protein-free blocking buffer for fluorescent Western blots, specialized chemiluminescent blocking buffer for enhanced signal strength, or traditional options like dry milk or serum albumin [70].
Step 3: Antibody Incubations
- Primary Antibody: Incubate the blocked membrane with primary antibody diluted in blocking buffer or washing buffer. Conditions depend on the antigen-antibody pair [70].
- Washing: Wash away excess unbound primary antibody in a series of washes with blot washing buffer [70].
- Secondary Antibody: Incubate with an appropriate labeled secondary antibody directed against the primary antibody species [70].
Step 4: Detection and Analysis
- Detection Method: For chemiluminescent detection, incubate the blot with a chemiluminescent substrate and detect emitted light using a digital imager [70]. For fluorescent detection, image the blot using an imager with appropriate excitation and emission filters [70].
- Analysis: Analyze digital blot images using analysis software. For quantitative information, compare the signal for the protein of interest to a housekeeping protein or total protein (total protein normalization) [70].
Research Reagent Solutions for Western Blotting
Table 2: Essential Reagents for Western Blotting
| Reagent Category | Specific Examples | Function and Application |
|---|---|---|
| Gel Preparation | SDS-PAGE Gel Preparation Kit [71], Acrylamide/Bis-acrylamide | Forms the polyacrylamide matrix for protein separation based on molecular weight |
| Sample Preparation | Dual Color Protein Loading Buffer [71], Reducing Agents (DTT, β-mercaptoethanol) | Denatures proteins and provides density for loading; reduces disulfide bonds |
| Electrophoresis Buffer | SDS-PAGE Electrophoresis Buffer (Tris-glycine-SDS; pH 8.3) [71] | Maintains pH and conductivity during electrophoresis |
| Transfer Buffer | Western Blot Transfer Buffer (Tris-glycine-methanol; pH 8.3) [71] | Facilitates protein transfer from gel to membrane |
| Blocking Buffers | Protein-Free Blocking Buffer, Chemi Blot Blocking Buffer [70] | Blocks non-specific binding sites on the membrane to reduce background |
| Detection Substrates | Radiance ECL, Radiance Plus [70] | Chemiluminescent substrates for HRP-based detection of target proteins |
| Membranes | Nitrocellulose, PVDF [70] | Solid supports for protein immobilization after transfer |
| Antibodies | Primary antibodies specific to target, Species-specific HRP or fluorescent-conjugated secondary antibodies [70] | Enable specific detection of target protein through antigen-antibody binding |
Application 2: Proteomics Techniques for Comprehensive Protein Analysis
Two-Dimensional Gel Electrophoresis for High-Resolution Separation
Two-dimensional polyacrylamide gel electrophoresis (2D gel electrophoresis) is one of the earliest high-resolution proteomics techniques used for visualizing and separating complex protein mixtures [72]. This method separates proteins based on two independent properties: isoelectric point (pI) in the first dimension and molecular weight (MW) in the second dimension [72].
The first dimension involves isoelectric focusing (IEF), where proteins migrate through a pH gradient until they reach the pH corresponding to their pI (where they hold no net electrical charge) [72]. The focused proteins are then separated in the second dimension via SDS-PAGE, where separation is based purely on MW [72]. This technique is capable of resolving thousands of protein spots on a single gel, allowing for visual quantification of relative protein abundance by staining intensity [72]. Individual spots can be excised for subsequent mass spectrometry (MS) identification [72].
Despite the rise of automated liquid chromatography methods, 2D gel electrophoresis remains a valuable tool for comparative proteomics studies, particularly for visualizing global changes in protein expression across different conditions or cell states [72].
Mass Spectrometry-Based Proteomics
Mass spectrometry (MS) is the core analytical platform underpinning most modern proteomics techniques [72]. MS measures the mass-to-charge ratio of ionized molecules, providing precise molecular weight information that can be used to identify proteins in a sample [72]. For proteins, direct MS analysis is often challenging due to their size and complexity. Therefore, a common strategy in proteomics is to digest proteins into smaller peptides using an enzyme like trypsin [72].
Shotgun proteomics, also referred to as "discovery proteomics," is the dominant methodology for large-scale identification and quantification of proteins in a sample [72]. It bypasses the need for 2D gel separation prior to MS analysis. In shotgun proteomics, the entire protein mixture is enzymatically digested, and the resulting peptides are separated using high-performance liquid chromatography (LC) before being introduced into the mass spectrometer [72]. This coupling of LC and MS (LC-MS) is crucial for handling the complexity of the peptide mixtures derived from a whole proteome [72].
While shotgun proteomics excels at discovery, targeted proteomics focuses on the precise quantification of a predefined set of proteins [72]. This methodology is critical for validating findings from discovery studies, clinical biomarker quantification, and routine monitoring [72]. The core of targeted proteomics is the selection of specific peptides that uniquely represent the target proteins [72].
Advanced Integration: AI-Powered Gel Analysis
Recent advances have introduced artificial intelligence (AI) to revolutionize gel electrophoresis image analysis. Traditional software methods for analyzing gel images have remained essentially unchanged for decades [73]. Most approaches involve either a tedious manual process or semi-automated equivalent of digitally carving out lanes and bands from an image before signal quantification [73].
AI-based systems can now automatically identify gel bands in seconds for a wide range of experimental conditions, surpassing the capabilities of current software in both ease-of-use and versatility [73]. These systems use a dataset of manually-labelled gels to train various U-Nets to accurately identify bands through segmentation, classifying pixels as 'band' or 'background' [73]. When applied to gel electrophoresis data from other laboratories, these systems generate results that quantitatively match those of the original authors [73]. Open-source applications like GelGenie allow users to extract bands from gel images on their own devices, with no expert knowledge or experience required [73].
Vertical gel electrophoresis remains a cornerstone technique in protein research, providing the critical first separation step for both western blotting and advanced proteomics applications [69]. The versatility, cost-effectiveness, and reliability of these methods continue to make them indispensable in modern laboratories [69]. From educational settings to advanced proteomic workflows, the ability to separate proteins by molecular weight forms the foundation for numerous downstream analyses [69].
The future of gel-based protein analysis is increasingly focused on automation, integration with sophisticated detection methods like mass spectrometry, and the application of artificial intelligence for data analysis [69] [73]. These advancements are making protein analysis more accessible, quantitative, and comprehensive, enabling researchers to move from basic protein separation to profound biological discoveries with implications for basic research, diagnostic development, and therapeutic innovation.
As the field continues to evolve, the integration of classical techniques like SDS-PAGE with cutting-edge technologies ensures that vertical gel electrophoresis will remain relevant and essential for protein researchers seeking to understand complex biological systems and disease mechanisms.
Conclusion
Mastering the technique of casting a protein gel for vertical electrophoresis is a critical skill that underpins reliable protein analysis in biomedical research and drug development. A solid grasp of the foundational principles, combined with a meticulous methodological approach, enables the generation of high-quality, reproducible data. Proactive troubleshooting and systematic optimization are key to overcoming common experimental hurdles, while advanced validation and comparative techniques ensure the integrity and biological relevance of the results. As proteomic technologies continue to evolve, this foundational method remains essential for driving discoveries in disease mechanisms, biomarker identification, and therapeutic development.
References
- 1. Vertical Gel Electrophoresis: Everything You Need to Know [https://www.igenels.com/vertical-gel-electrophoresis-everything-you-need-to-know/]
- 2. Mastering Electrophoresis: Techniques, Equipment, and ... [https://www.labx.com/resources/mastering-electrophoresis-techniques-equipment-and-applications-in-dna-rna-and-protei/5535]
- 3. Vertical Gel Electrophoresis Systems Market : Trends And ... [https://www.linkedin.com/pulse/vertical-gel-electrophoresis-systems-market-trends-jt2pc/]
- 4. Electrophoresis Market Size & Industry Demand 2025-2035 [https://www.futuremarketinsights.com/reports/electrophoresis-market]
- 5. Gel Electrophoresis - an overview | ScienceDirect Topics [https://www.sciencedirect.com/topics/neuroscience/gel-electrophoresis]
- 6. Vertical Electrophoresis System LVES-A12 [https://www.labtron.com/vertical-electrophoresis-system/lves-a12]
- 7. Horizontal or Vertical Electrophoresis: What You Need to Know [https://blog.btlabsystems.com/blog/horizontal-or-vertical-electrophoresis]
- 8. What is the difference between Vertical and Horizontal Gel ... [https://denagene.com/en/articles/Polyacrylamide-Gel-vs-Agarose-Gel-An-Exploration-of-Their-Differences]
- 9. The difference between horizontal and vertical ... [https://www.igenels.com/the-difference-between-horizontal-and-vertical-electrophoresis-system/]
- 10. Steps in Nucleic Acid Gel Electrophoresis [https://www.thermofisher.com/us/en/home/life-science/cloning/cloning-learning-center/invitrogen-school-of-molecular-biology/na-electrophoresis-education/na-electrophoresis-workflow.html]
- 11. Overview of Protein Electrophoresis [https://www.thermofisher.com/us/en/home/life-science/protein-biology/protein-biology-learning-center/protein-biology-resource-library/pierce-protein-methods/overview-electrophoresis.html]
- 12. DNA Electrophoresis vs Protein Electrophoresis [https://blog.edvotek.com/2025/07/24/dna-electrophoresis-vs-protein-electrophoresis/]
- 13. Gel Electrophoresis Steps [https://azurebiosystems.com/blog/gel-electrophoresis-steps/]
- 14. Comparison of Variability Associated with Sample ... [https://pmc.ncbi.nlm.nih.gov/articles/PMC2291783/]
- 15. An Easy SDS-PAGE Gel Recipe & 10-Step Protocol [https://bitesizebio.com/59429/sds-page-gel-recipe/]
- 16. Comprehensive Guide to Polyacrylamide Gel Preparation ... [https://www.alfa-chemistry.com/resources/comprehensive-guide-to-polyacrylamide-gel-preparation-and-application.html]
- 17. Titanium Dioxide Photocatalytic Polymerization of ... [https://www.nature.com/articles/srep20981]
- 18. Western blotting guide: Part 2, Protein separation by SDS- ... [https://www.jacksonimmuno.com/secondary-antibody-resource/technical-tips/western-blotting-guide-part-2/]
- 19. Deciphering food proteins: The applications of SDS-PAGE ... [https://www.sciencedirect.com/science/article/abs/pii/S2212429225003025]
- 20. SDS-PAGE: The science behind all those bubbles [https://www.antibodiesinc.com/pages/sds-page-demystified?srsltid=AfmBOooIr3aXSIShDtlioAZhEw9WnTa99yKxzZRNfx5qDZaHfjhu18j9]
- 21. Effect of the operational parameters on the electromigration ... [https://www.sciencedirect.com/science/article/pii/S0039914025000876]
- 22. Buffer Preparation Market Size, Trends & Forecast, 2025- ... [https://www.coherentmarketinsights.com/industry-reports/buffer-preparation-market]
- 23. Why Is SDS-PAGE Run Vertically? Here are 3 Great Answers [https://bitesizebio.com/10699/why-is-sds-page-run-vertically/]
- 24. Biological Buffers Market Size and Growth 2025 to 2034 [https://www.precedenceresearch.com/biological-buffers-market]
- 25. Biological Buffers Market Size: Growth, Trends, and ... [https://www.linkedin.com/pulse/biological-buffers-market-size-growth-trends-forecast-wkawf]
- 26. Gel Casters for Small Format Vertical Electrophoresis Units [https://hoeferinc.com/products/gel-casters-for-small-format-vertical-electrophoresis-units?srsltid=AfmBOorX4mB999wteR0M39fjhgvdjEaMHGFS185hahcFdla4Lj9Qx_wk]
- 27. Electrophoresis Safety [https://ehs.stanford.edu/reference/electrophoresis-safety]
- 28. (SDS-PAGE) | PPTX Vertical Gel Electrophoresis [https://www.slideshare.net/slideshow/vertical-gel-electrophoresis-sdspage/76090024]
- 29. Nucleic Acid Gel Electrophoresis Troubleshooting [https://www.thermofisher.com/us/en/home/life-science/cloning/cloning-learning-center/invitrogen-school-of-molecular-biology/na-electrophoresis-education/na-electrophoresis-troubleshooting.html]
- 30. Troubleshooting Common Electrophoresis Problems and ... [https://www.labx.com/resources/troubleshooting-common-electrophoresis-problems-and-artifacts/5539]
- 31. SDS-PAGE [https://en.wikipedia.org/wiki/SDS-PAGE]
- 32. Sample preparation for western blot [https://www.abcam.com/en-us/technical-resources/guides/western-blot-guide/sample-preparation-for-western-blot]
- 33. Toward a Universal Sample Preparation Method for ... [https://pmc.ncbi.nlm.nih.gov/articles/PMC7542658/]
- 34. Preparing High-Quality Samples for Electrophoresis: Best ... [https://www.labx.com/resources/preparing-high-quality-samples-for-electrophoresis-best-practices/5550]
- 35. Fluorescent Western Blotting | Thermo Fisher Scientific - US [https://www.thermofisher.com/us/en/home/life-science/protein-biology/protein-biology-learning-center/protein-biology-resource-library/pierce-protein-methods/fluorescent-western-blotting.html]
- 36. SDS-PAGE Optimization for Western Blot [https://www.bosterbio.com/protocol-and-troubleshooting/western-blotting-optimization/sds-page?srsltid=AfmBOorJSxD7IY7j3oaXjSla-a8DeqMOk891MX4SFPF3LO9Vf1bYNGKX]
- 37. Western Blot SDS-PAGE [https://www.novusbio.com/support/support-by-application/western-blot-sds-page?srsltid=AfmBOooQeNAiobVbX4B_xtKc4grSTWzXNZ9Hst0TOOGnENKkCPwF_jC2]
- 38. How to choose an acrylamide gel concentration for western ... [https://hellobio.com/how-to-choose-an-acrylamide-gel-concentration-for-western-blot/]
- 39. Tips for Optimal SDS-PAGE Separation [https://www.rockland.com/resources/tips-for-optimal-sds-page-separation/?srsltid=AfmBOorxjHp-MxqXtoK_TVpksdiCCtqZ_a64ekpVsQx_0rlHGA8js8GV]
- 40. Troubleshooting Sodium Dodecyl Sulfate- Polyacrylamide ... [https://www.hycultbiotech.com/sds-page/troubleshooting/]
- 41. News - Protein Electrophoresis Common Issues [https://www.gelepchina.com/news/protein-electrophoresis-common-issues/]
- 42. Troubleshooting Gel Casting/ Polymerization Issues in ... [https://www.goldbio.com/blogs/articles/troubleshooting-gel-casting-polymerization-issues-in-sds-page?srsltid=AfmBOor2MHVainJpAjw7qFciApX7AjN8nIpec_pSd-7MMPXeBH2O9IAD]
- 43. Protein Gel 1D Electrophoresis Support—Troubleshooting [https://www.thermofisher.com/us/en/home/technical-resources/technical-reference-library/protein-electrophoresis-western-blotting-support-center/protein-gel-1d-electrophoresis-support1/protein-gel-1d-electrophoresis-support-troubleshooting.html]
- 44. Troubleshooting SDS-PAGE Sample Preparation Issues [https://www.goldbio.com/blogs/articles/troubleshooting-sds-page-sample-preparation-issues?srsltid=AfmBOoqFaGw_6kl7FlTnxwtR3HN3GmNn6Iqg5-y-uY0zRqtzW3V4-caq]
- 45. - SDS : Protein Analysis Made Easy PAGE [https://www.numberanalytics.com/blog/sds-page-protein-analysis-made-easy]
- 46. Protein Gel 2D Electrophoresis Support—Troubleshooting [https://www.thermofisher.com/us/en/home/technical-resources/technical-reference-library/protein-electrophoresis-western-blotting-support-center/protein-gel-2d-electrophoresis-support/protein-gel-2d-electrophoresis-support-troubleshooting.html]
- 47. Troubleshooting SDS-PAGE Gel Running Issues [https://www.goldbio.com/blogs/articles/troubleshooting-sds-page-gel-running-issues?srsltid=AfmBOoqisRMhz3jft8Wi6izcU8_xeI7ssKV-uyXqizo0SCxcsEWQRUWG]
- 48. Mastering Gel Electrophoresis: 10 Tips and Tricks for ... [https://americanlaboratorytrading.com/mastering-gel-electrophoresis-10-tips-and-tricks-for-successful-results/?srsltid=AfmBOopT_tW7FFooTxgYhgnw2emZOdcuswNGnucOzrRKdwTJtpFYykbl]
- 49. Protein Standards & Ladders [https://www.thermofisher.com/us/en/home/life-science/protein-biology/protein-gel-electrophoresis/protein-standards-ladders.html]
- 50. A Guide to Modern Quantitative Fluorescent Western ... [https://pmc.ncbi.nlm.nih.gov/articles/PMC4354265/]
- 51. 2024 Scientific Publication Requirements for Western Blots ... [https://azurebiosystems.com/blog/publication-requirements-for-western-blots-and-gels/]
- 52. Western Blotting: Products, Protocols, & Applications [https://www.thermofisher.com/us/en/home/life-science/protein-biology/protein-biology-learning-center/protein-biology-resource-library/pierce-protein-methods/overview-western-blotting.html]
- 53. Differences between SDS PAGE and Native PAGE [https://www.geeksforgeeks.org/biology/differences-between-sds-page-and-native-page/]
- 54. How Is Native PAGE Different from SDS-PAGE? [https://synapse.patsnap.com/article/how-is-native-page-different-from-sds-page]
- 55. Overview of SDS-PAGE [https://www.creative-proteomics.com/resource/overview-of-sds-page.htm]
- 56. SDS-PAGE guide: Sample preparation to analysis [https://www.abcam.com/en-us/knowledge-center/western-blot/sds-page-guide]
- 57. Interpret SDS-PAGE vs Native-PAGE Results [https://www.letstalkacademy.com/sds-page-vs-native-page-protein-dimer/]
- 58. Native SDS-PAGE: High Resolution Electrophoretic ... [https://pmc.ncbi.nlm.nih.gov/articles/PMC4517606/]
- 59. Vertical agarose gel electrophoresis and electroblotting of ... [https://pubmed.ncbi.nlm.nih.gov/12783444/]
- 60. Western blot protocol for high molecular weight proteins [https://www.abcam.com/en-us/technical-resources/protocols/western-blot-for-high-molecular-weights]
- 61. Precast Protein Gels | Thermo Fisher Scientific - US [https://www.thermofisher.com/us/en/home/life-science/protein-biology/protein-gel-electrophoresis/protein-gels.html]
- 62. Protocols Agarose Gel Electrophoresis [https://www.addgene.org/protocols/gel-electrophoresis/]
- 63. Rapid baseline hump-free analysis of therapeutic proteins ... [https://www.sciencedirect.com/science/article/pii/S0003267025005410]
- 64. Capillary gel electrophoresis of very high molecular weight ... [https://www.sciencedirect.com/science/article/pii/S0021967322008809]
- 65. Salivary Proteome Insights: Evaluation of Saliva Preparation Methods in Mucopolysaccharidoses Research [https://www.mdpi.com/2227-9059/13/3/662]
- 66. Strategic optimization of conditions for the solubilization of GST-tagged amphipathic helix-containing ciliary proteins overexpressed as inclusion bodies in E. coli - PMC [https://pmc.ncbi.nlm.nih.gov/articles/PMC9746132/]
- 67. Effect of buffer additives on solubilization and refolding of reteplase inclusion bodies - PMC [https://pmc.ncbi.nlm.nih.gov/articles/PMC6082031/]
- 68. Optimum solubility (OS) screening: an efficient method to optimize buffer conditions for homogeneity and crystallization of proteins - PubMed [https://pubmed.ncbi.nlm.nih.gov/15333951/]
- 69. Why Gel Electrophoresis Still Matters in 2025? [https://eureka.patsnap.com/blog/what-is-gel-electrophoresis-used-for/]
- 70. 6 Steps to Western Blotting [https://azurebiosystems.com/6-steps-to-western-blotting/]
- 71. Western Blot Protocol: Step-by-Step Guide [https://www.bosterbio.com/protocol-and-troubleshooting/western-blot-protocol?srsltid=AfmBOorJwJqup9YLOXib1F4Wfw6IQVT0zuXO3jqZ1bxxaVPglCggAeMY]
- 72. Advanced Proteomics Techniques [https://www.technologynetworks.com/proteomics/articles/exploring-proteomics-techniques-from-mass-spectrometry-to-shotgun-405802]
- 73. GelGenie: an AI-powered framework for gel ... [https://www.nature.com/articles/s41467-025-59189-0]